Lasermet ICS-6-DLSM User manual

ICS-6-DLSM Instruction Manual
01692-53-000 Issue 3 30 January 2020
LASERMET
ICS-6-DLSM
INSTRUCTION MANUAL
SINGLE / DUAL ROOM SWITCH UNIT
TYPE ICS-6-DLSM
Issue 3

ICS-6-DLSM Instruction Manual
01692-53-000 Page 2 of 20 Issue 3 30 January 2020
LASERMET ICS-6-DLSM
Instruction Manual
Contents
1 Safety Warnings .................................................................................................................. 3
2 Concept ............................................................................................................................... 4
3 Installation .......................................................................................................................... 5
4 Wiring ................................................................................................................................. 7
4.1 Switching Unit Power Source ...................................................................................... 8
4.2 Control ......................................................................................................................... 9
4.3 Safety Circuits .............................................................................................................. 9
4.4 Override ..................................................................................................................... 10
4.5 Signs........................................................................................................................... 12
4.6 Interlock Operators ................................................................................................... 13
4.7 Uncommitted Contacts ............................................................................................. 14
4.8 Connections to ICS .................................................................................................... 14
5 Testing .............................................................................................................................. 17
5.1 Two-Room Mode ....................................................................................................... 17
5.2 One-Room Mode ....................................................................................................... 18
6 Indications ........................................................................................................................ 19
7 Warranty ........................................................................................................................... 19
8 Contact Details .................................................................................................................. 20

ICS-6-DLSM Instruction Manual
01692-53-000 Page 3 of 20 Issue 3 30 January 2020
1 Safety Warnings
This device is intended to be used as part of a safety system which may be used to protect personnel
and equipment from possible injury, damage, or loss.
As such it must be installed and wired according to these instructions and tested by suitably qualified
persons. No attempt may be made to tamper with the parts, open them, or use them outside of the
parameters contained herein.
The units are only designed to be fixed to surfaces using their inbuilt fixing holes. They must not
come into contact with each other or any other moving part when in use. The parts should never be
subject to impact or mechanical strain.
Safety switches should never be defeated or bypassed. It is imperative that all steps are taken to
ensure that any spare actuators are made unavailable, such that they cannot be used to defeat the
switch or reduce the protection offered by the system in any way.

ICS-6-DLSM Instruction Manual
01692-53-000 Page 4 of 20 Issue 3 30 January 2020
2 Concept
This unit is intended to simplify the implementation and operation of interlock systems where the
room comprises a divider such that it may be split into two sub-rooms each with its own ICS, or
becomes one larger room when the divider is open, controlled by one of the ICS’s. A typical layout is
shown on the next page.
This version of the unit is compatible with Lasermet’s ICS-6 Interlock Controllers and cannot be used
with ICS-5.
In this manual it is assumed that when the divider is closed the room is divided into two areas
labelled herein as ‘A’ and ‘B’, each of which has its own interlock system which operates
independently of the other. In this manual the system is said to be in ‘two-room mode’ when the
divider is closed. On the front panel of the switch unit, area A is referred to as ‘Area 1’, and area B as
‘Area 2’, to avoid confusion with the two safety input channels which are also labelled ‘A’ and ‘B’.
When the divider is open the ‘A’ area ICS takes control of the whole room and the ‘B’ area ICS is
disabled. This is said to be ‘one-room mode’.
The switching unit is versatile and can be wired such that the signs, overrides and controlled devices
such as lasers and shutters in the B area become controlled by the A ICS when in one-room mode. It
also allows the A area override device to override the B area interlocks and the B area override
device to override the A area interlocks in one-room mode.
The unit provides a duplicate of the B area interlock indications so the status of the B area doors can
be seen on the switching unit even if the B ICS is turned off.
The switching unit is normally set up to operate automatically according to the state of the room
divider, but it can be operated by switches or other means.

ICS-6-DLSM Instruction Manual
01692-53-000 Page 5 of 20 Issue 3 30 January 2020
Lasermet provides a full range of laser interlock equipment including control systems, interlock
switches, illuminated warning signs, laser shutters, door locks, external power supplies etc. which
can be connected to provide a complete laser interlock system. Full support, design and installation
is available from Lasermet, please contact us for any queries. Contact details are given at the end of
this manual.
3 Installation
The unit is contained within a wall-mountable box. The size and fixing centres are given in the
diagram on the next page.
The box should be fitted to the wall in such a position that the front panel indications can be seen
within the ‘B’ area when the room divider is closed, and from both areas when the divider is open.
The box should be mounted with the long sides horizontal normally cable entries will be at the top
or bottom and this makes the longer sides available for this purpose.
A large number of low voltage cables will need to be taken to the unit. The unit can accept cable
entries on all four sides and consideration should be given to cable routing and entry when
positioning the unit. The unit is powered from low voltage supplies from the two ICSs and no mains
supply is needed.

ICS-6-DLSM Instruction Manual
01692-53-000 Page 6 of 20 Issue 3 30 January 2020

ICS-6-DLSM Instruction Manual
01692-53-000 Page 7 of 20 Issue 3 30 January 2020
4 Wiring
This section gives an overview of the general wiring principles as a guide to cable routing. More
detailed information for each function is given in succeeding sections.
When wiring such a system the general principle is to wire all the B area input equipment (door
contacts, override switches, keypads etc.) to the switching unit instead of the B ICS.
The B ICS interlock operators may be wired directly to their controlled devices (shutters, lasers,
maglocks) if they are only to work in two-room mode. Any outputs which have to work in both
modes must be cabled through the switching unit so that they can be controlled by the A ICS in one-
room mode. Note that the switching unit has three contacts which are closed in each mode and the
system should be designed with this limitation in mind. The A ICS must have sufficient spare
interlock operators to do this and a 9-way interlock board is a likely requirement for the A ICS in this
instance.
The signs in both areas are controlled by terminals inside the switching unit, not by the ICS’s. If the
signs are 24VDC powered, then they can be run off the switching unit 24V out terminals so that they
all work in both modes. If the loading is too great for the signs to be powered by one of the ICS PSU’s
then a separate power supply may be used. Mains powered signs may also be used, switched
through the terminals in the switching unit.
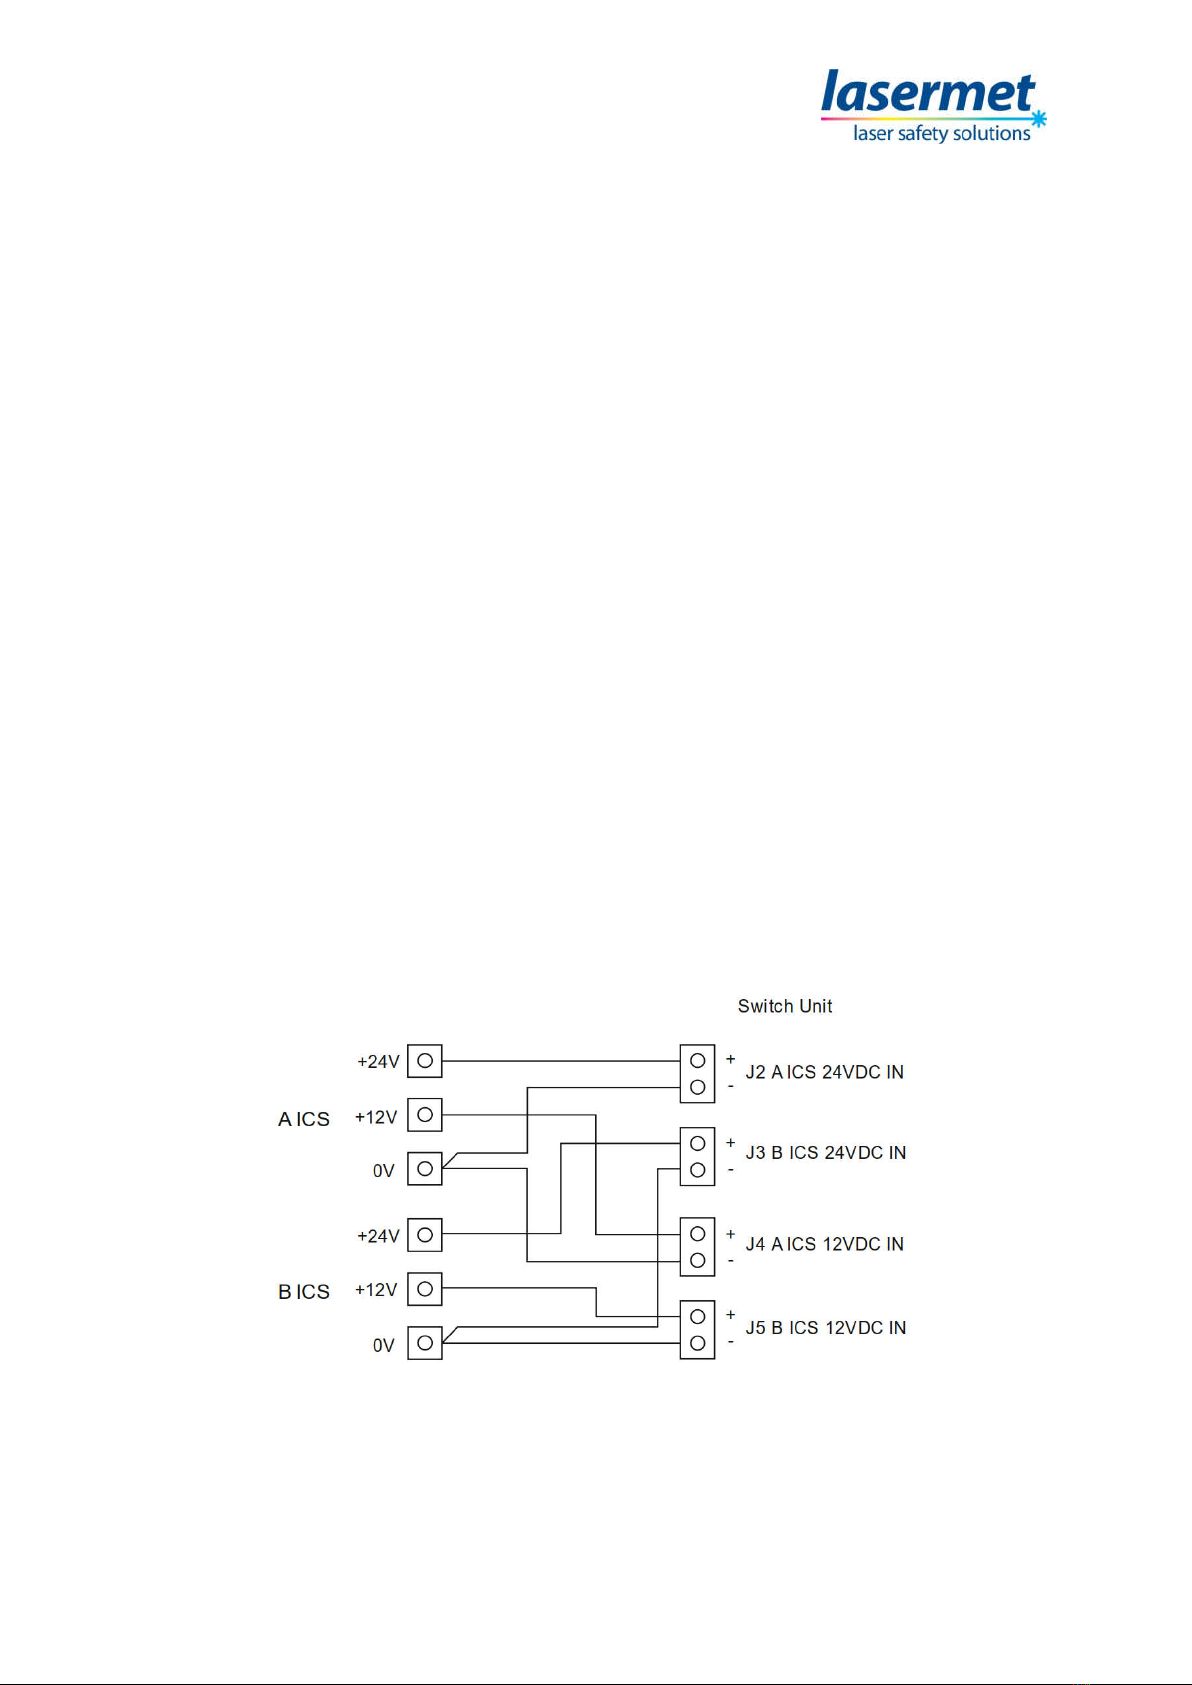
The switching unit will then have cabling to the A and B ICS’s as shown below. Note that there are 3
cables to the A ICS and 8 cables to the B ICS. An additional 2-core cable is required to run from the B
ICS to the switching unit for every B area interlock operator contact that has to pass through the
switching unit such that it will operate in one-room mode.
It may be more efficient to use two 16-core cables or one 24-core cable for the signal connections
between the B ICS and the switching unit as this will save four or five cables.
The following list suggests stranded cable with 0.2mm2 strands, the number of strands per core is
recommended.
A ICS
24V and 12V Power 3-core 16 or 24 strand
Sign Control 3-core 16 or 24 strand
ICS/Output Monitor 4-core 7 strand
B ICS
Safety Circuits 4X 4-core 7 strand
Estop Circuit 4-core 7 strand
24V and 12V Power 3-core 16 or 24 strand
Sign Control 3-core 16 or 24 strand
ICS/Output Monitor 4-core 7 strand
Interlock Operators If required to operate in one-room mode.

ICS-6-DLSM Instruction Manual
01692-53-000 Page 8 of 20 Issue 3 30 January 2020
Switching Unit Mode Selector
The mode selector switch may be a single keyswitch with four contacts or an ISMECH 2/2 door
switch fitted. The switch needs to have two contacts which close in one-room mode only, and two
electrically separate contacts which close in two-room mode only.
From selector switch 8-core 7 strand
When the selector switch is in the one-room position the relays in the switching unit are powered
and they change the B area circuits over from the B ICS to the A ICS (one-room mode). When the
switch is set in the two-room position closed each ICS is responsible for its own area.
4.1 Switching Unit Power Source
The switching unit takes power from either or both ICS’s. A power-commoning arrangement in the
switching unit can be used to provide 24V and 12V power to signs, keypads and shutters provided at
least one ICS is turned on.
The ground / 0V connections of the ICS’s are joined together.
Connect the power supplies from the two ICS’s to the Switch Unit as shown below. Make sure to use
cable of sufficient cross section to carry the expected total load of equipment that may be powered
by the Switch Unit. It is suggested that a minimum of 16/0.2mm cores are used. This may need to be
increased if there is a lot of equipment such as maglocks or low voltage signs to be powered or if the
cable run is long.
For the following circuits multicore cable using 7/0.2mm conductors is usually sufficient.

ICS-6-DLSM Instruction Manual
01692-53-000 Page 9 of 20 Issue 3 30 January 2020
4.2 Control
The switching unit is controlled by four contacts, two of which must only be closed in one-room
mode (divider or interconnecting door open) and the other two must only close in two-room mode
(divider/interconnecting door closed).
The two contacts which close in one-room mode are wired to J31 pins 1 and 2, and J31 pins 3 and 4.
The two contacts which close in two-room mode are wired to J34 pins 1 and 2, and J34 pins 3 and 4.
Switches shown in two-room mode, i.e. when divider is closed
4.3 Safety Circuits
The A area door contacts and emergency stop buttons are wired as usual to the A ICS. Refer to the
ICS-6 manual.
The B area door contacts and emergency stop buttons are not wired to the B ICS. Instead they are
connected to ‘B Area’ terminals in the Switch Unit, terminals J11, 12, 13, 15, 16, 28. They are
connected in exactly the same as they would be if they were inside the ICS. Each switch must have
two contacts which close when the door is closed, or the emergency stop button is not pressed. One
contact is wired across the outer two terminals, and the other contact across the middle two
terminals. Refer to the ICS-6 manual for more information and diagrams.
Any unused terminal blocks in J11, 12, 13, 15, 16 must have a jumper fitted between the outer two
terminals, and another jumper fitted between the middle two terminals in the same way as they
would in an ICS-6.

ICS-6-DLSM Instruction Manual
01692-53-000 Page 10 of 20 Issue 3 30 January 2020
4.4 Override
Doors in the B area may be overridden by connecting external controls to the Switch Unit. The
override facility inside the B area ICS is not used at all.
The switching unit is equipped with an override buzzer and light to indicate when the B area is
overridden. The buzzer may be disabled by removing link LK1 ‘Buzzer Ctrl’ on the main PCB inside
the Switch Unit.
In general, doors in the A area are overridden by connecting the A area override device to the A ICS
in the usual way according to the ICS manual. More information is given below.
There are a number of ways of arranging for the B area interlocks to be overridden, as follows:
ICS-KP12 Keypad
An ICS-KP12 keypad may be provided at one or more entry points into the B area. If this is done the
keypad should be wired to J28 B Area Keypad inside the Switch Unit. Each keypad terminal should be
wired to the terminal with the same name in the Switch Unit. Link LK2 must be fitted on the main
PCB inside the Switch Unit. If there is more than one keypad they should all be wired in parallel to
the same terminals. Keypads must not be wired to the ICS.
If there is a keypad in the A area it is connected as normal to the Keypad terminal block in the A area
ICS as shown in the ICS manual. If it is necessary for it to allow entry through doors in the B area in
one-room mode the four connections from the A area keypad should be taken to both the A ICS and
the A area keypad terminal block J36 in the Switch Unit, as shown on the next page.

ICS-6-DLSM Instruction Manual
01692-53-000 Page 11 of 20 Issue 3 30 January 2020
O-PCB Failsafe Timer
The B area doors may be overridden by a momentary contact such as a pushbutton or access control
system in conjunction with a Lasermet O-PCB failsafe timer, which gives an override for an
adjustable limited time duration.
The O-PCB must be fitted in the sockets on the main PCB inside the Switch Unit and secured with an
M3 screw in the post provided.
The external momentary contact used to trigger the timer is connected to the ‘B’ terminals of J24
‘O/RIDE IN AREA’ inside the Switch Unit. This contact must be normally open and close momentarily
to activate the override timer.
Link LK2 on the main PCB of the Switch Unit must be removed.
If there is a similar override arrangement in the A area the A area override activation
contact/pushbutton needs to be connected to the A ICS, and an O-PCB needs to be fitted inside the
A ICS according to the ICS manual.
If the A override needs to override doors in the B area in one-room mode, the override
device/pushbutton needs to have a second contact which is connected to the ‘A’ terminals of J24
‘O/RIDE IN AREA’ in the Switch Unit. It is not possible to have a single contact connected to both the
ICS and the Switch Unit.

ICS-6-DLSM Instruction Manual
01692-53-000 Page 12 of 20 Issue 3 30 January 2020
Direct Override Control
The B area doors may be directly overridden by an external contact with no timeout function, such
that the override exists all the time the external contact is closed.
To do this connect the external contact to the ‘B’ terminals of J24 ‘O/RIDE IN AREA’. Link LK2 on the
main PCB of the Switch Unit must be fitted. An O-PCB must not be fitted to the Switch Unit or B area
ICS.
If there is a similar override arrangement in the A area the A area override activation contact needs
to be connected to the A ICS according to the ICS manual. An O-PCB should not be fitted in the A ICS.
If the A override needs to override doors in the B area in one-room mode, the override device needs
to have a second contact which is connected to the ‘A’ terminals of J24 ‘O/RIDE IN AREA’ in the
Switch Unit. It is not possible to have a single contact connected to both the ICS and the Switch Unit.
4.5 Signs
Two three-pin terminal blocks are provided in the Switch Unit, one for controlling the signs in A area
and one for those in B. Each block provides an isolated changeover contact, in the same way as
those normally used in the ICS. So instead of wiring the signs in both areas to the sign control
terminals inside the ICS’s, these terminals are used instead.
The signs in A area are connected to J30 ‘A SIGNS’ near the middle of the main PCB in the Switch
Unit. The signs in B area are connected to J33 ‘B SIGNS’ near the top edge of the PCB.
Signs that operate at 24VDC such as Lasermet’s Miniature and Ultra ranges may be powered from
the Switch Unit provided the total load (including any magnetic door locks) does not exceed the
power supply of an ICS. This is typically of the order of 1.5A depending on other equipment that may
be connected.
If the loading exceeds the power supply capability of an ICS, a separate 24VDC PSU may be used and
suitable supplies are available from Lasermet.

ICS-6-DLSM Instruction Manual
01692-53-000 Page 13 of 20 Issue 3 30 January 2020
If the signs in B area are powered from the 24V terminals of J7 ‘B ICS PWR OUT’ they will only
operate when the B ICS is switched on. If they are powered from J6 ‘+24V OUT’ they will operate
when either ICS is turned on, which means that they will operate in one-room mode even if the B ICS
is switched off. In either case J9 ‘0V’ should be used for the negative connection.
Refer to the ICS manual for examples of sign wiring, remembering to use the terminals in the Switch
Unit instead of those in the ICS’s. Note that signs larger than Lasermet’s miniature types will require
larger current-carrying cables.
4.6 Interlock Operators
Each ICS has interlock operator contacts which are used to control the laser. Depending on the
installation these contacts may operate laser interlocks or beam shutters. They may also be used to
control magnetic door locks or other equipment. These devices should be connected to the relevant
ICS following the instructions in the ICS manual such that each ICS can control the devices in its area.
If it is necessary for devices in B area to be operational when in one-room mode, the A ICS must have
sufficient interlock operator contacts to control all the devices in both areas. This will often mean
that it should be equipped with a 9-way interlock board which gives nine interlock operator contacts
instead of the usual three.
The Switch Unit has three pairs of uncommitted relay contacts as described in section 4.7 which
switch according to the state of the unit. These contacts are rated at 8A and may be used to connect
unused A ICS interlock operators in parallel with B interlock operators so that devices connected to
the B ICS may also be operated in one-room mode, as shown below.

ICS-6-DLSM Instruction Manual
01692-53-000 Page 14 of 20 Issue 3 30 January 2020
4.7 Uncommitted Contacts
The Switch Unit has three contacts which close when it is one-room mode, and three more which
close when it is in two-room mode, provided it is receiving power from at least one of the ICS’s.
These contacts are electrically isolated and can switch up to 8A resistive load at 240Vac/50VDC.
The contacts may be used to switch various functions according to the state of the room, and one
use is described in Interlock Operators section 4.6 above.
The contacts may also be used to switch magnetic door locks from one system to the other, or to
operate signs or other equipment according to the state of the divider between the rooms.
Cables on these terminals should be sufficiently rated to carry the expected load current and to
avoid excessive voltage drop.
4.8 Connections to ICS
B Area ICS
The connections from the Switch Unit to the B area ICS are grouped together on the main PCB inside
the Switch Unit.
Each of the I/LOCK and EMERG STOP terminals are wired to the corresponding terminals of J1-J5 in
the B ICS. Follow the connections below carefully. Each terminal numbered 1 – 4 must be connected
to the corresponding numbered terminal on the corresponding terminal block according to the
diagrams below. Multicore cable with 7/0.2mm or equivalent cores is suitable.

ICS-6-DLSM Instruction Manual
01692-53-000 Page 15 of 20 Issue 3 30 January 2020
For the switching unit and standard ICS-6 the following wiring convention is recommended for the
plugs at both ends of the cables between the units.
See the next page if the ICS-6 is fitted with a 9-way expansion board.

ICS-6-DLSM Instruction Manual
01692-53-000 Page 16 of 20 Issue 3 30 January 2020
For the switching unit and 9-way ICS-6 J1-J4 the following wiring convention is recommended for the
plugs at both ends of the cables between the units.
For J5 in the ICS-6 only the following wiring is recommended:
Connect J25 and J27 in the Switch Unit to the corresponding terminals of J6 and J14 respectively in
the B ICS.
Connect J19 ‘Signs B ICS’ in the Switch Unit to the corresponding terminals of J8 SIGN terminal block
in the B ICS using cable of sufficient rating for the signs to be controlled.

ICS-6-DLSM Instruction Manual
01692-53-000 Page 17 of 20 Issue 3 30 January 2020
A Area ICS
Connect J26, J29, J36 in the Switch Unit to the corresponding terminals of J14, J6, J17 respectively in
the A area ICS.
Connect J32 ‘Signs A ICS’ in the Switch Unit to the corresponding terminals of J8 in the A area ICS
using cable of sufficient rating for the signs to be controlled.
5 Testing
The following gives a general guide to testing the system, however due to the large number of ways
a system could be implemented it serves as a guide to the general principles and additional specific
testing may be required.
Ensure that no hazard will be produced when the ICS’s are armed, e.g. by turning off electrical power
to any lasers and removing any interlock plugs etc.
It will be necessary to verify the correct operation of the outputs of the ICS’s. If this is an interlock
connector a continuity test can be performed across the pins. When continuity is present the laser, if
connected, would be enabled.
If the ICS is controlling a beam shutter, the shutter operation can be verified provided the laser is
disabled by other means e.g. by ensuring its power is turned off.
If the ICS is controlling power supplies a suitable multimeter may be used to verify that the power is
present when the system is armed and absent when it is disarmed.
5.1 Two-Room Mode
Set the room divider closed. Test each interlock system separately and confirm correct operation.
Verify that with the doors closed the ICS can be armed and that it becomes disarmed when each
door is opened.
Check that the ‘2-Room Mode’ light is illuminated on the Switch Unit, and that two yellow lights
show when the corresponding B area door is opened.
If the doors are fitted with maglocks check that they are locked when the system is armed and
unlocked when it is disarmed.
Activate the door release break glass switch and check that the door is unlocked and, when opened,
the system is disarmed. Reset the break glass switch.

ICS-6-DLSM Instruction Manual
01692-53-000 Page 18 of 20 Issue 3 30 January 2020
Verify that any override devices operate correctly from both sides of the door and that the door can
be opened without disarming the system while the override is in force. Check that any time function
(e.g. O-PCB or ICS-KP12 keypad) operates and times out after the desired time delay, and that if the
door is left open beyond the time delay the system is disarmed. Check that overrides in the B area
are indicated by a red light on the Switch Unit, and not on the B ICS.
Check that any illuminated signs indicate correctly when the system is armed and disarmed.
Confirm that the opening of doors in one area does not cause the other area to be disarmed.
Confirm that the activation of any override in one area does not defeat any interlocks in the other
area.
Confirm that the output of the ICS only operates when the relevant ICS is armed and that the output
of one ICS is not activated by the arming of the other.
5.2 One-Room Mode
Set the room divider open.
Set all doors closed and confirm that the B area ICS cannot be armed.
Check that the Switch Unit indicates ‘One-Room Mode’.
Perform the tests described in ‘Two-Room Mode’ above in one-room mode using the A area ICS and
check that all equipment in both halves of the room operate correctly as a single interlocked room,
and that all overrides and signs operate as required.
Confirm that any overrides allow access through the required doors and that the override is correctly
indicated on the A area ICS and Switch Unit.
Check that when the system is armed the correct outputs operate and the correct devices are
enabled, and that any outputs that should not work when the system is armed are disabled.

ICS-6-DLSM Instruction Manual
01692-53-000 Page 19 of 20 Issue 3 30 January 2020
6 Indications
Front panel indicator lights:
Area 1 ICS Power, green.
Area 2 ICS Power, green.
Four pairs of interlock input status monitor lights, yellow, as ICS-6.
One pair of emergency stop input status monitor lights, yellow as ICS-6.
Single Room Mode indicator, green.
Two Room Mode Indicator, green.
Area 2 Overridden, red.
Audible Indicator:
A buzzer sounds when area 2 is overridden. The buzzer may be disabled by an internal link see
Override section earlier in this manual.
7 Warranty
Lasermet provide a 12-month warranty for defects in materials and manufacture, from the date of
installation or delivery. Installations completed by Lasermet are covered against defects in
workmanship for 12 months.
Damage or defects caused by other factors are not covered. For example, industrial contamination,
incorrect cleaning, storm damage. Consequential loss is not covered under warranty. Compensation
for indirect or direct loss or damage is expressly excluded. Rectification of the defects or a
replacement does not initiate a new warranty period.
For all deliveries, payments and other legal transactions, English law takes precedence for any
litigation.

ICS-6-DLSM Instruction Manual
01692-53-000 Page 20 of 20 Issue 3 30 January 2020
8 Contact Details
Lasermet provide a full range of laser interlock equipment including interlock switches, illuminated
warning signs, laser shutters, entry keypads with built-in fail-safe override timer, door locks, external
power supplies etc. which can be interconnected to provide a complete system. We also supply
equipment and consultancy covering all aspects of laser safety. Full support, design, and installation
is available from Lasermet, please contact us for any queries.
For sales and technical support:
Lasermet Ltd.
Lasermet House,
137 Hankinson Road,
Bournemouth
BH9 1HR
United Kingdom.
Tel: +44 (0) 1202 770740
Fax: +44 (0) 1202 770730
Website: www.lasermet.com
Lasermet Inc.
10N Martingale Road, Suite 400,
Schaumburg, Illinois 60173
United States.
Tel: 847 466 1475
Website: www.lasermet.com
Table of contents
Other Lasermet Switch manuals
Popular Switch manuals by other brands

TP-Link
TP-Link T2500G-10MPS installation guide

GE Zenith Controls
GE Zenith Controls ZTX Operation and maintenance manual

Lantronix
Lantronix Xpress-Pro SW 52000 user guide

Extreme Networks
Extreme Networks ExtremeSwitching X435 Series Hardware installation guide

Rose electronics
Rose electronics ServeView 2X Installation and operation manual

Weidmuller
Weidmuller IE-SW-IP67-5M12 Hardware installation guide