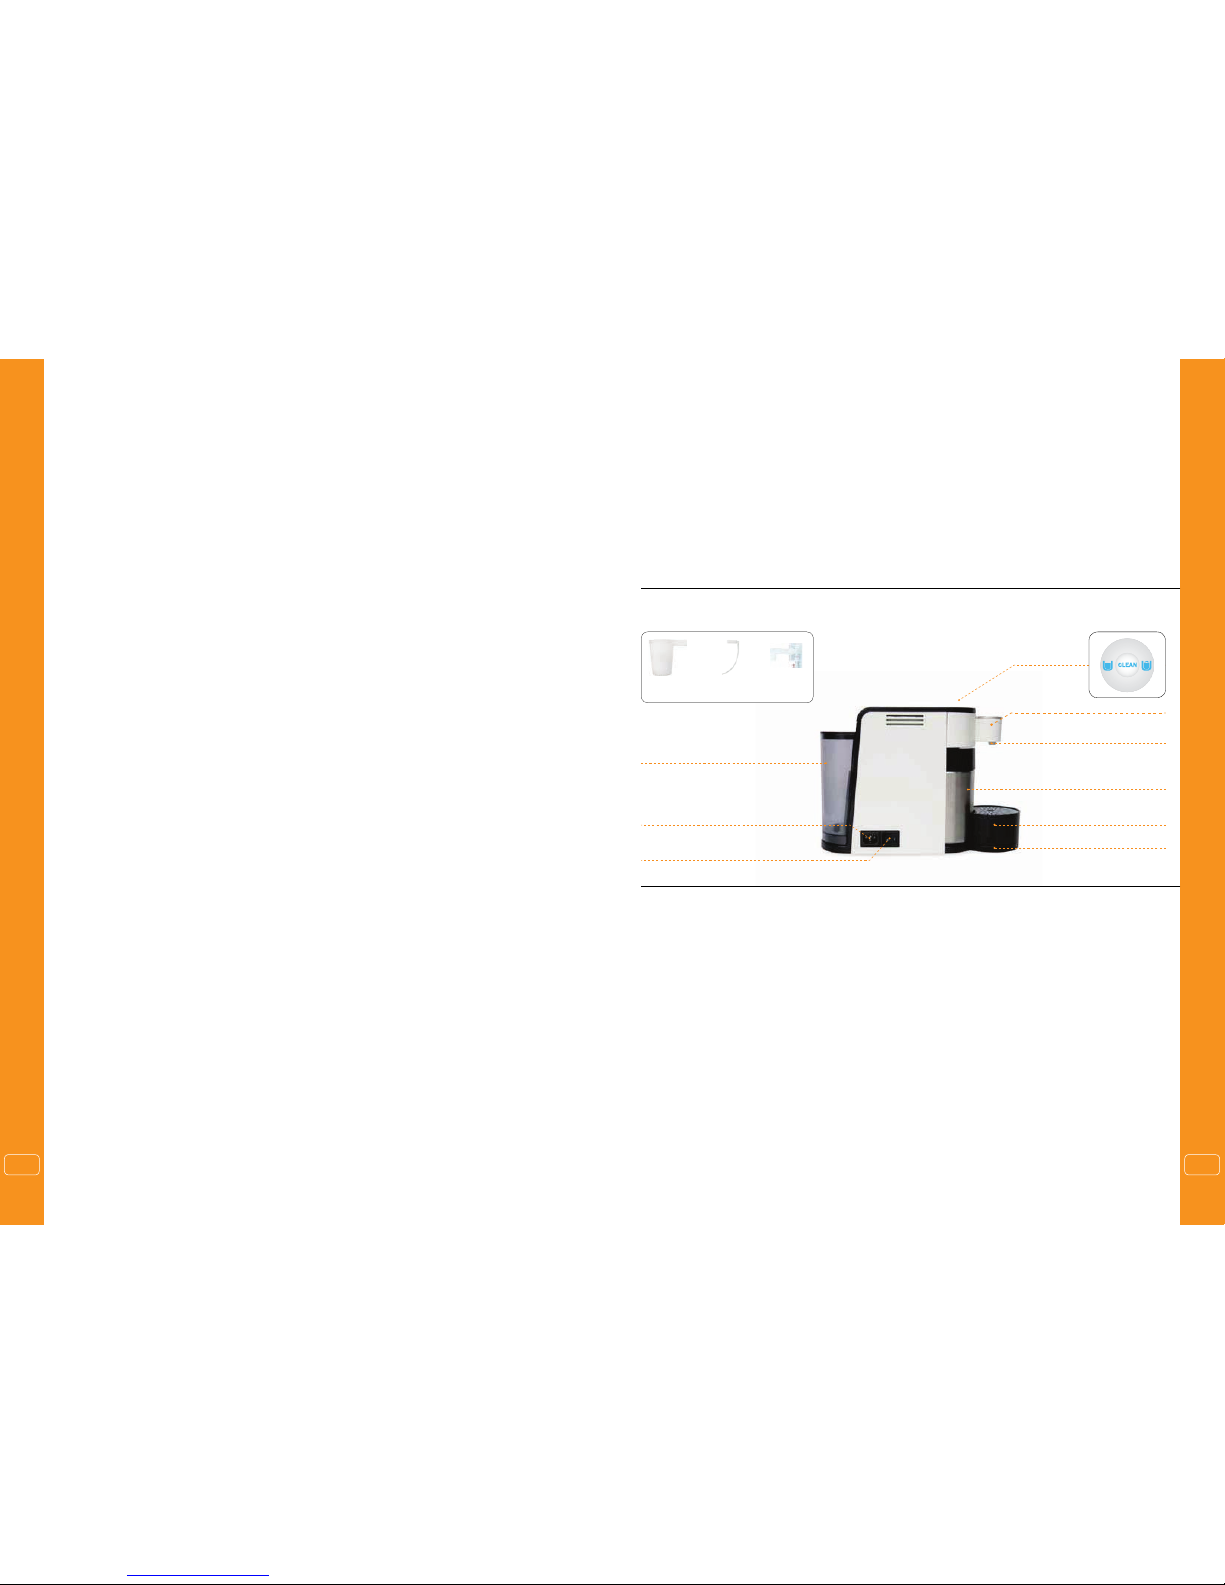
Apparaat beschrijving
Watertank
(max. 600 ml)
Kabelaansluiting
Aan/uit knop
Verwijderbare afdekplaat
Schuim kop
Melk tank
(max. 600 ml)
Druipbak
Druiprooster
Reinigings-
beker
Accessoires
Verleng-
slang
Schuim
unit
Geachte klant,
Met de aankoop van deze LattePremio Melkschuimer heeft u gekozen voor een kwaliteitsproduct dat qua
techniek en functionaliteit voldoet aan de modernste ontwikkelingsstandaard.
Lees de hier vermelde informatie goed door zodat u snel vertrouwd raakt met uw melkschuimer en de functies
ervan onbeperkt kunt gebruiken
Het apparaat zal u vele jaren ter beschikking staan, wanneer u het op de juiste manier behandelt.
Wij wensen u veel plezier bij het gebruik van uw LattePremio milkfrother
A B
Belangrijke veiligheidsvoorschriften
Om bij het gebruik van elektrische apparaten het ri-
sico op brand, elektrische schokken en / of letsel te
voorkomen, moeten de volgende basis veiligheids-
maatregelen altijd worden gevolgd:
• Lees alle instructies aandachtig door
• Raak geen hete oppervlakken aan. Gebruik knoppen
en schakelaars.
• Ter voorkoming van elektrische schokken; dompel
het snoer, de stekker of enig ander deel van de melk-
schuimer niet onder in water of andere vloeistoffen.
• Streng toezicht is geboden bij gebruik door of nabij
kinderen
• Trek de stekker uit het stopcontact als het apparaat
niet in gebruik is en voordat u het schoonmaakt. Laat
het apparaat afkoelen alvorens onderdelen te beves-
tigen / verwijderen en voor het reinigen van het ap-
paraat.
• G ebruik het apparaat niet met een beschadigd snoer
of stekker, indien het apparaat niet goed werkt, of be-
schadigd is op enige wijze. Breng het apparaat naar
het dichtstbijzijnde bevoegde servicepunt voor onder-
zoek of reparatie.
• Het gebruik van accessoires die niet worden aanbevo-
len door de fabrikant van het apparaat, kan resulteren
in brand, elektrische schokken of letsel aan personen.
• G ebruik het apparaat niet buitenshuis
• Laat het netsnoer niet over de rand van een tafel of
aanrecht hangen, of in aanraking komen met hete op-
pervlakken
• Plaats het apparaat niet op of bij een hete gas-of elek-
trische brander of in een verwarmde oven
• Bevestig altijd eerst het netsnoer aan het apparaat al-
vorens de stekker in het stopcontact te steken. Om
los te koppelen; schakel het apparaat uit en trek ver-
volgens de stekker uit het stopcontact.
• G ebruik het apparaat niet voor andere doeleinden dan
het beoogde gebruik.
• Zorg ervoor dat de netspanning correspondeert met
het voltage vermeld op de onderzijde van de melk-
schuimer.
• G ebruik de melkschuimer niet bij een defect stopcon-
tact.
• Elk onderzoek, reparatie of aanpassing van het ap-
paraat dient te worden gemaakt door een erkende
reparateur.
• Als het netsnoer beschadigd is, moet het worden ver-
vangen door de fabrikant, een service agent of een
soortgelijke, gekwaliceerde persoon, om gevaar te
vermijden.
• Bewaar deze handleiding voor toekomstig gebruik.
Foremost BV is niet verantwoordelijk voor schade
aan het apparaat, veroorzaak door:
• Kalkopbouw/aanslag in de pomp
• Gebruik van ongeschikte anti-calcium middelen
• Gebruik van ongeschikte schoonmaak middelen
• Gebruik anders dan voorgeschreven in de handleiding
• Het gebruik van melk met een vervallen houdbaar-
heidsdatum of andere dranken dan melk.
De garantie is niet van toepassing indien:
• Het model en/of serienummer op het product is veran-
derd, verwijderd of onleesbaar is.
• Reparaties, wijzigingen of aanpassingen zijn gemaakt
door andere personen dan een erkende reparateur
• Het product wordt gebruikt voor commerciële doelein-
den, of anders dan voorgeschreven
• Het defect is veroorzaakt door misbruik, verkeerd ge-
bruik of door lokale omstandigheden, installatie/ge-
bruik niet in overeenstemming met de aanbevelingen
voor de werking van het product.
• De schade wordt veroorzaakt door ongelukken als de
bliksem, spanningverval, overstroming, brand, natuur-
rampen of ongevallen.
• De schade wordt veroorzaakt door dieren.
• Het product niet meer goed functioneert als gevolg
van normale slijtage van onderdelen / componenten
• Het product niet goed werkt omdat het niet oor-
spronkelijk is ontwikkeld / ontworpen / vervaardigd,
goedgekeurd en/of geautoriseerd is voor het land/ge-
bied waar het wordt gebruikt
• Het product is aangekocht in het buitenland
• Normale schoonmaak van het apparaat en/of on-
derdelen niet geschiedt volgens de aanwijzingen, in
termen van frequentie en methode.
• Gebruik van ongeschikte melk en niet op de juiste
temperatuur voor deze apparaten.
• Geen schuimprestaties als gevolg van het onjuist ge-
bruik van het appraat
NL NL
1716