LawnMaster LGBQH9200 Installation manual

SAFETY AND OPERATING MANUAL
PLEASE READ THIS MANUAL CAREFULLY BEFORE OPERATING THE UNIT
PROUDLY
NZ OWNED
A STEELFORT PRODUCT
INVERTER
GENERATOR
LGBQH9200(E)

2A STEELFORT PRODUCT
OPERATOR SAFETY 3
GETTING STARTED 4
Unpacking
Assembly
FEATURES & CONTROLS 7
Control Panel
OPERATION 9
Operation Checklist
Operation Conditions
Engine Oil
Engine Fuel
Operation Place
Grounding
Battery Connection
STARTING THE GENERATOR 12
Electric Start
Wireless Remote Start
Manual Start
CONNECTING TO THE ELECTRICAL DEVICES 14
Loading Capacity
Wattage Reference Chart
STOPPING THE ENGINE 15
MAINTENANCE 15
Maintenance Schedule
Generator & Engine Maintenance
Air Filter
Spark Plug
Spark Killer
STORAGE & TRANSPORT 19
TROUBLESHOOTING 20
SPECIFCATIONS & WIRING DIAGRAMS 22
WARRANTY 24
TABLE OF CONTENTS

3
A STEELFORT PRODUCT
OPERATOR SAFETY
SAFETY RULES
This manual contains important safety information
and instructions to operate the LawnMaster Inverter
Generator.
PLEASE READ THIS MANUAL CAREFULLY BEFORE
USING THE UNIT.
Failure to adhere to the safety instructions could
result in property damage and/or serious personal
injury.
This manual should be considered a permanent part
of the generator and should remain with the unit at all
times. All information in this publication is based on
the latest product information available at the time
of printing.
Product Information and specications can be
altered and/or improved without notice.
Content from this publication may not be reproduced
without written consent.
DANGER
Indicates a hazardous situation which, if not strictly
complied with, will result in substantial property
damage and or serious injury.
WARNING
Indicates a hazardous situation which, if not strictly
complied with, may result in property damage
CAUTION
Indicates a hazardous situation which, if not strictly
complied with, could result in property damage or
personal injury.
The warnings and precautions discussed in this
manual does not cover all possible conditions and or
scenarios that may occur.
It must be understood by the operator that common
sense and caution must be taken into consideration
when operating this product, as these are factors
which cannot be built into this manual.
WARNING
This generator is intended for domestic consumer
use only. Damage and faults created from
commercial use may void warranty. These generators
are designed for full time operation. No personal
modications should be made to any part of the unit.
DANGER
TOXIC FUMES
• The exhaust of the engine contains carbon
monoxide, an odorless, colorless poison gas.
Using the engine in conned/indoor spaces can
be extremely dangerous and life threatening.
• DO NOT use the generator inside and or in
enclosed spaces EVEN IF doors and windows
are open. Only use the engine in well
ventilated areas and consider wind and airow
when positioning the engine.
KICKBACK
• Rapid retraction of the starter cord will pull
hand and arm towards the engine faster than
you can let go. Unintentional startup can result
in serious injury.
FIRE
• When operating the unit, the engine may create
sparks that could trigger res.
• When operating around dry vegetation such as
agricultural crops, forest, bush, grass, or other
similar environments please be careful.
• This engine may not be equipped with a spark
arresting muer. In some countries and
regions, a spark arrester is required by law.
Please contact your local council and or re
agency for laws and regulations relating to re
prevention requirements.
• Petrol is highly ammable and explosive. A re
and or explosion from petrol can cause severe
burns or result in serious personal injury includ-
ing death.
• Keep ammable items away while handling
petrol. Fill fuel tank outdoors and in a well
ventilated area with the engine stopped.
• Always wipe spilled fuel and wait until the fuel
has dried before starting the engine.
• DO NOT operate the engine with known leaks
in the fuel system. Use proper fuel storage and
handling procedures.
• DO NOT store fuel or other ammable materials
near the generator.

4A STEELFORT PRODUCT
• Empty the fuel tank before storing or
transporting the generator. Keep re
extinguisher handy at all times.
BATTERY
• Lithium battery is maintenance free, if you have
any question, please contact a local LawnMas-
ter authorised dealer.
HOT SURFACE
• Running the generator will produce heat and
severe burns may occur upon contact. DO NOT
touch the engine while under operation or just
after stopping the unit.
• Avoid contact with hot exhaust gases and or
hot surfaces.
• Maintain at least 1m of clearance on all sides to
ensure adequate cooling. Combustible material
can catch re upon contact. Maintain at least
3m of clearance from combustible materials.
MOVING PARTS
• Moving parts can cause severe injury. Keep
hands and feet away from the unit.
• DO NOT operate engine with covers, shrouds, or
guards removed.
• DO NOT wear loose-tted clothing, dangling
drawstrings or items that could become caught
or entangled.
• Tie up long hair and remove jewelry. The
moving parts may catch operator’s hand, feet,
hair and or loose clothing resulting in serious
injury.
GENERAL WARNINGS
• Before use, check for loose or damaged parts,
signs of oil or fuel leaks, and any other
condition that may impact operation.
• Repair or replace all damaged and or defective
parts immediately.
• Locate all operating controls and safety labels.
• Make sure all the safety instructions are in
correct working condition.
• Operate only on level surfaces.
• DO NOT expose the generator to excessive
moisture, dust, and or dirt.
• Keep all safety guards in place and in proper
working order at all times.
• DO NOT allow any material to block the cooling
slots.
• DO NOT allow children or untrained people to
operate the unit.
• DO NOT leave the generator unattended when
it is in operation. Always turn off the generator
prior to leaving the area.
ELECTRIC SHOCK
• The generator produces powerful voltage and
the electricity and can be dangerous and cause
serious life threatening injuries if an electric
shock is received.
• Please ensure that the unit is properly
connected to an appropriate ground to help
prevent electric shocks.
• Failure to properly ground the unit can result
in electrocution, especially if the generator is
equipped with a wheel kit. Consult an electri-
cian for local grounding requirements.
• Installation should be performed by a certied
electrician. Improper Installation could result in
serious injury.
• To reduce the risk of electric shocks. DO NOT
use electrical cords that are worn, frayed, bare
or otherwise damaged.
• DO NOT touch bare wires or receptacles.
• DO NOT operate the unit in wet weather.
• Keep the generator dry and DO NOT handle
generator or electrical cords while standing in
water, while barefoot, or while hands or feet
are wet.
• Keep children or pets away.
• DO NOT plug the unit into a building electrical
system without the proper use and installation
of a transfer switch installed by a qualied
electrician.
• When using the generator for backup power,
notify your utility company.
• Use approved transfers to isolate generator
from electric utility.
• Failure to isolate the unit from the power utility
could result in serious injury to the staff and
utility workers due to back-feed of electrical
energy.
GETTING STARTED
1. UNPACKING
Remove the generator from the packaging
1. Place box on a solid and at surface
2. Carefully cut each corner of the packaging box
from top to bottom. Lay each side open and at
on the ground.
3. Remove all accessories except the generator
from the packaging box.

5
A STEELFORT PRODUCT
2. ASSEMBLY
ASSEMBLE WHEELS
After xing the wheel axle assembly on the frame,
install the wheels and spacers on the wheel axle
assembly in turn, and x it with bolts.
1. Bolt M8X14
2. Washer
3. Wheel
4.Wheel Axle Assembly
INSTALL SUPPORT FEET
Align the mounting holes of the support feet with the
mounting holes of the rack, and fasten the support
feet to the rack with bolts.
1. Support Feet Assembly
2.Bolt M6X16
ASSEMBLE REAR ARMREST
After aligning the rear armrest mounting holes with
the generator mounting holes, fasten them with
bolts.
1. Rear Armrest
2. Bolt M8X14
INSTALL HANDLE
Align the handle and the nylon washer of the brake
pin with the mounting hole of the push handle, and
then install the washer and retaining ring after the
pin is passed through. The installation steps of the
handle rack are the same as above. After installation,
hang the two ends of the brake spring on the
handle rack and the handle respectively. The handle
connecting bar is installed on the inner side of the
handle and xed with bolts.

6A STEELFORT PRODUCT
1. Pin 8X45
2. Bolt M8X14
3. Nylon washers
4. Washer
5. Retaining Ring
6. Spring
7. Handle Assembly (Left)
8. Handle Assembly (Right)
9. Armrest Rack (Right)
10. Handle Connecting Bar
11. Bolt M6X12
HANDLE OPERATION
The handle can be unfolded by directly lifting it up,
and the handle has a self-locking function. After the
handle is fully lifted, the position of the handle will be
locked and will not fall freely.
Before lowering the handle, lift it up slightly then
turn the handle inward and press down to lower the
handle.
MOVING THE GENERATOR
WARNING
Failure to follow these instructions could result in
personal injury or damage to the generator.
CAUTION
• ALWAYS turn the generator off and ensure the
fuel valve is closed.
• ALWAYS make sure engine and muer are
cooled down before the generator can be
handled safely (typically 15-30 minutes.)
• Do not drop or strike unit or place under heavy
objects.
Lift unit up by the frame with 2 people and move to
the desired location.

7
A STEELFORT PRODUCT
FEATURES & CONTROLS
1. Lever Indicator
2. Fuel Cap
3. Rack
4. Control Panel
5. Push Handle
6. Support Feet Assembly
7. Recoil Starter
8. Battery Maintenance Cover
9. Engine Inlet Shutter
10. Wheel
11. Air Filter Maintenace Cover
12. Muer Blind Window
13. Muer
14. Oil Drain Cover
15. Oil Maintenace Cover
16. Rear Armrest
1. Start/Stop Switch (Outer)
2. Fuel Switch (Inner)
3. Energy-Saving Switch
4. Learning Button
5. Breaker
6. 12V DC
7. USB
8. Ground Terminal
9. RCD
10. Charge Port
11. Output Receptacle
12. Engine Switch
13. Power Indicator
14. Overload Indicator
15. Running Indicator
16. Low Oil Light
17. Reset Buton
CONTROL PANEL

8A STEELFORT PRODUCT
FUEL SWITCH (INNER)
START STOP SWITCH (OUTER)
Fuel Switch: Fuel ON/OFF
Start/Stop Switch: STOP/RUN
OVERLOAD INDICATOR (RED)
The overload indicator light is on, indicating that the
generator has detected the output of the connected
electrical equipment has exceeded the load capacity
of the generator. At this time, stop the generator to
protect the generator and the electrical equipment
connected. The running indicator (green) goes out,
the overload indicator (red) ashes for 3 seconds/
time, but the generator will not stop running.
When the generating set has no output and the
overload indicator is on, please take the following
steps:
1. Lower the total load of the connected electric
devices to the rated output range of the
generator.
2. Check the air lter to ensure it is not clocked
and the generator is in an open area to allow
enough air ow to the generator.
3. Press the reset button.
RUNNING INDICATOR (GREEN)
The running indicator lights up when generating set
starts and has normal output.
OIL ALARM LAMP (YELLOW)
When the oil level drops below the lower limit, the oil
protection system will stop the engine automatically
and oil alarming lamp will blink when recoil starter is
pulled. The engine will not run until the oil has been
lled to the proper level.
Note: If the generator fails to start when the engine
is turned off, please turn the start-stop knob to the
“RUN” position, and then pull the starter handle. If
the oil alarm indicator lights up, it means that the oil
capacity is insucient, please add oil and restart.
RESET BUTTON
The reset button is used to restore output if an
overload occurs. To restore output, reduce the load(s)
and press the reset button.
ENERGY-SAVING SWITCH
When the electrical equipment needs a large starting
current, please put the energy-saving switch in the
“OFF” position.
While when the electrical equipment needs a small
starting current, please put the energy-saving switch
in the “ON” position.
Note: Please set the energy-saving switch to “OFF”
position when connect to an air compressor, pumps,
circular saws etc., Due to large starting current
required.

9
A STEELFORT PRODUCT
GROUNDING TERMINAL
The grounding terminal is designed to prevent
electric shock by connecting it to the grounding wire.
The generating set must be properly grounded before
operation.
OVERLOAD PROTECTOR
When generator is overloaded or overheated for a
long time, the over-current protector will protect the
output. If it is protected, please lower the load or run
without load for a few minutes, and then press the
button of the over-current protector to restore the
output.
Note: Similar to the circuit breaker, ip the switch
upward to restore the output. The over-current
protector/circuit breaker will be affected by factors
such as operating current and ambient temperature,
so there will be differences in the protection time.
IV. OPERATION
1. OPERATING CHECKLIST
OPERATING LOCATION
Only use this generator OUTSIDE and in well
ventilated areas.
Only operate the generator on a at, level surface and
in a clean, dry operating environments. Only use the
generator for applications within its operating scope.
If you have any question regarding applicable scope,
please speak to your nearest Service Agent.
In some locations and regions, the generator may
require additional provisions and or regulations for
operation, please consult with your nearest Service
Agent.
DANGER
TOXIC FUMES
The exhaust of the generator contains carbon
monoxide, using the engine indoors may cause
serious personal injury including death. DO NOT use
the generator inside any buildings or within enclosed
spaces EVEN IF doors and windows are open. Place
the generator in a well-ventilated and clean area.
Note the wind direction and airow when placing the
generator.
HIGH ALTITUDE
This generator may require a high altitude carburetor
kit to ensure correct operation at high altitudes.
Consult with your local authorised LawnMaster dealer
for high altitude kit information if you intend to
operate the generator at altitudes above 5, 000 feet
(1,500 meters).
10 A STEELFORT PRODUCT
CAUTION
• Even with carburetor modication, generator
horsepower will decrease by 3.5% for every
1,000 feet (300 meters) increase in altitude. The
effect of altitude on horsepower will be greater
than this if no carburetor modication is made.
• Operating the engine at altitudes below 5, 000
feet (1,500 meters) with a modied carburetor
may cause the generator to overheat and result
in serious engine damage. Please restore
factory specications of the carburetor with
your service dealer when using the engine in
low altitude areas.
2. OPERATING CONDITION
Check for loose or damaged parts, signs of oil or fuel
leaks, and any other condition that may affect proper
operation. Repair and or replace with genuine spare
parts immediately.
WARNING
• Failure to correct problem(s) before operation
may result in property damage and or serious
personal injury.
• Remove excessive dirt or debris, especially
around the muer and recoil starter.
• DO NOT move or tip the generator during
operation.
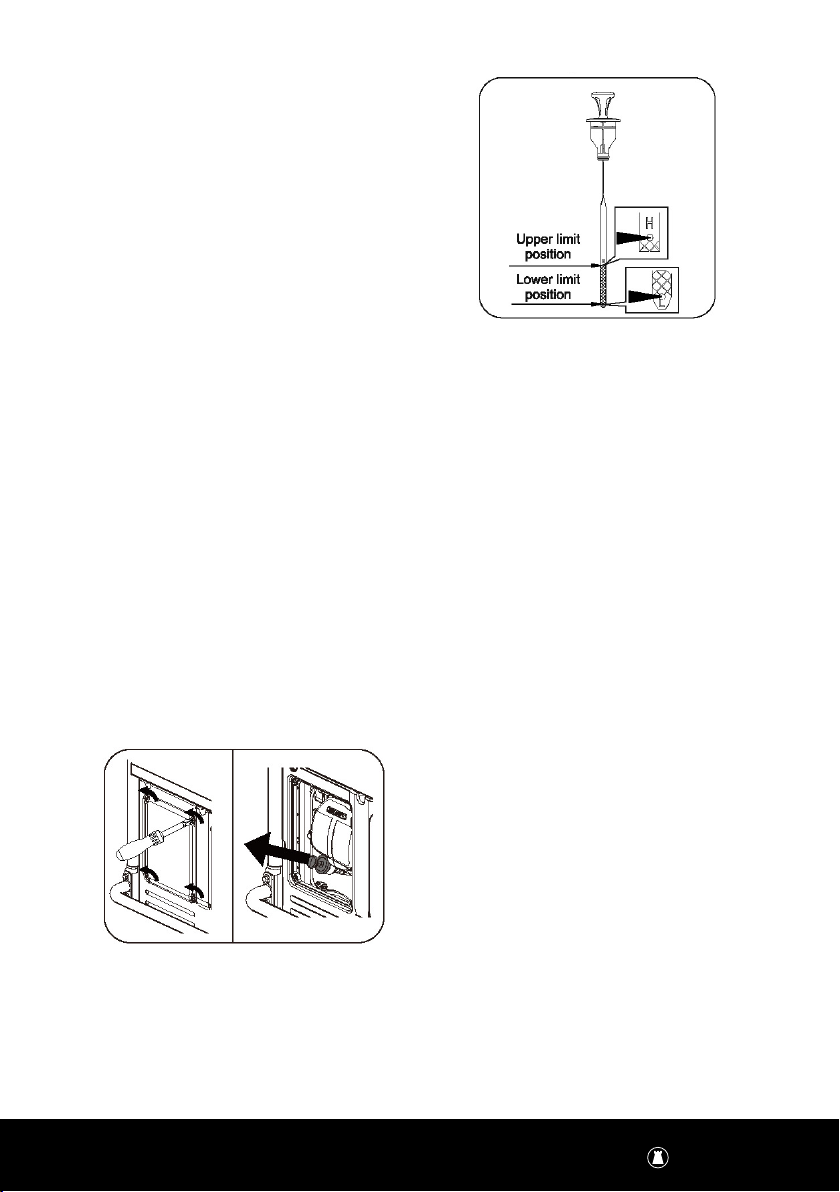
3. ENGINE OIL
• Place the engine on a level surface with engine
stopped. Check the engine oil level.
• Remove the oil maintenance cover.
• Place the dipstick in the ller neck and stay at
the neck of the ller neck.
• Remove the dipstick again and check oil level.
Level should be between the upper and lower
limit.
• Fill to the upper limit of the dipstick with the
recommended oil if the oil level is too low.
Reinstall and fully tighten the dipstick.
Refer to add oil instruction in MAINTENANCE section
for more information.
Oil level: 1.1 L
Recommended grade of engine oil: SAE10W-30
WARNING
• Oil is a major factor affecting performance and
service life.
• We recommend using LawnMaster 4-Stroke
10W30 Oil (PP01020005). You can nd more
information about this in the MAINTENANCE
section of this manual.
• OIL MUST BE PLACED IN ENGINE BEFORE
STARTING. This engine is not lled with oil at
the factory. Any attempt to crank or start the
engine before it has been properly lled with
the recommended type and amount of oil may
result in engine damage and void your warranty.
CAUTION
Operate generator only on level surfaces. The engine
is equipped with a low oil sensors (if applicable) that
will automatically stop the engine when the oil level
falls below safe threshold. To avoid the inconvenient
unexpected shutdowns, ll to the upper limit and
check oil levels regularly.
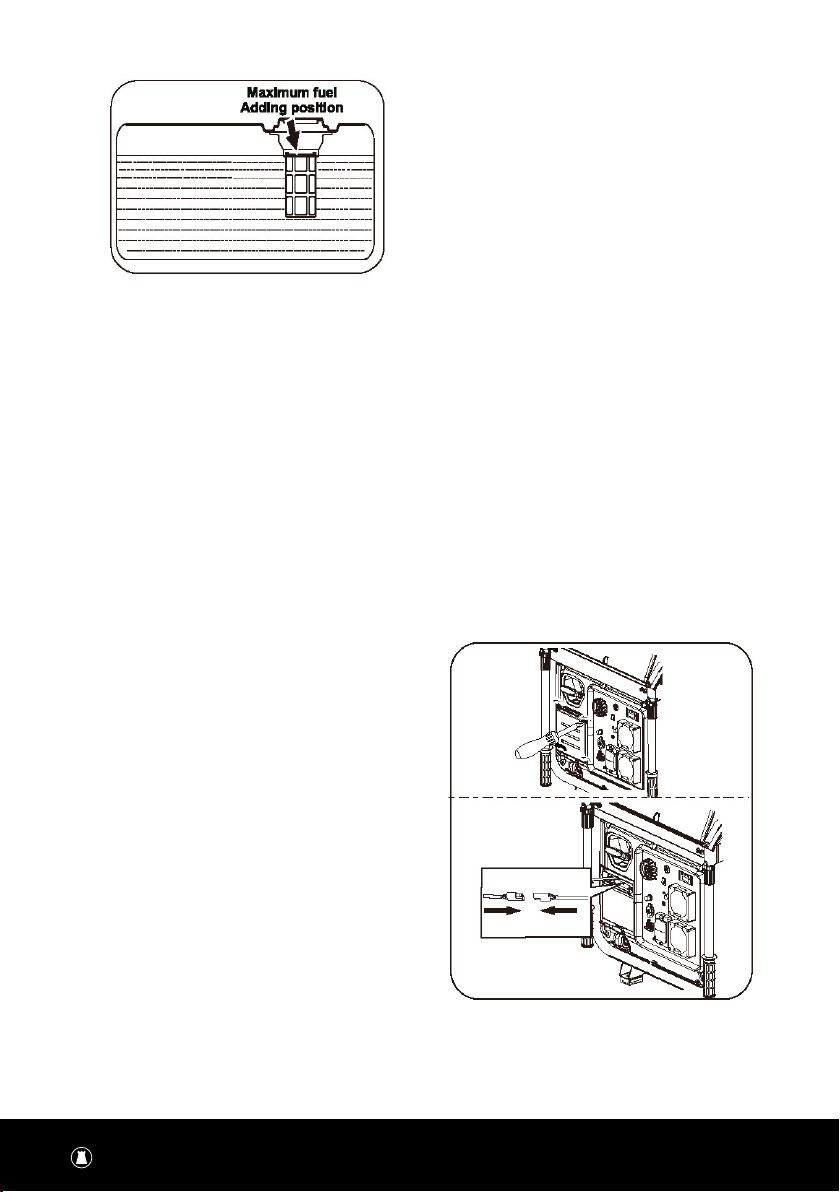
4. ENGINE FUEL
• With the engine stopped, check the fuel level
gauge. Rell the fuel tank if necessary.
• Use clean, fresh, regular unleaded petrol.
• DO NOT mix oil with petrol.
• Always wipe up any spilled fuel.
• Be sure not to ll above the upper limit mark
• Always allow room for fuel expansion.
• Place the dipstick in the ller neck and stay at
the neck of the ller neck.
11
A STEELFORT PRODUCT
• DO NOT use engine and or carburetor cleaning
products in the fuel tank as this could result in
permanent damage.
• It is important to prevent gum deposits from
forming in essential fuel system components,
such as the carburetor, fuel lter, fuel hose or
tank during longterm storage. Also, experience
indicates that alcohol-blended fuels (gasohol,
ethanol or methanol) can attract moisture,
which could lead to separation and formation
of acids during longterm storage.
• Acidic fuels can damage the fuel system while
in storage. Be sure to review the instructions
in the “Storage” section.
• Petrol/Alcohol Blends: up to 10% alcohol, 90%
unleaded petrol by volume is approved as a
fuel. Other forms of petrol/alcohol blends are
not approved.
• Damage and faults caused by old, stale or
contaminated fuel may void warranty.
DANGER
• Do not ll the fuel tank above the upper limit.
Over lling will result in engine damage and
may void warranty.
• Petrol is highly ammable and extremely
explosive. Keep ammable items away while
handling petrol as this could result in a re.
• Fill fuel tank outdoors and well-ventilated
areas with the generator stopped.
• Always wipe off spilled fuel and wait until the
fuel has dried before starting the generator.
CAUTION
• To minimise gum deposits in your fuel system
and to insure easy starting, do not use petrol
that is left over from the previous seasons.
• Pressure can build up in the fuel tank. Allow
the generator to cool for at least two minutes
before removing fuel cap. Loosen the fuel cap
slowly to relieve any pressure in the tank.
4. GROUNDING
The generating set must be properly connected to
an appropriate ground. It helps prevent electrical
shock if a ground fault condition exists in the
generating set or in connected electrical devices,
especially when the unit is equipped with a wheel
kit. Proper grounding also helps dissipate static
electricity, which often builds up in ungrounded
devices.
DANGER
ELECTRICAL SHOCK
Failure to properly ground the generator could result
in electric shocks.
A ground terminal has been provided on the
generating set. For remote grounding, connect of a
length of heavy gauge (4mm²) copper wire between
the generating set ground terminal and a copper rod
driven into the ground.
5. BATTERY CONNCETION
Remove the xing bolts and the battery
maintenance cover, loosen the battery rubber
belt, connect the battery terminals to the motor
terminals, and then install the battery maintenance
cover.
Disconnect all electrical devices from the generator
and switch off the AC circuit breaker before start
the engine. The generator may be hard to start with
electrical devices. The power draw of the connected
electrical equipment cannot exceed the maximum
12 A STEELFORT PRODUCT
capacity of the generator, please refer to the
specication table for details.
STARTING THE GENERATOR
WARNING
When the generator is idle for a long time or improper
use or other factors, the battery is undercharging
so that the generator cannot be electrically started,
follow the manual start steps to control the choke
and start the generator manually. The generator will
automatically charge the battery during operation.
1. Perform Operating checklist and remove all
loads.
2. Turn the fuel switch to “FUEL” position.
3. Turn the start/stop switch to “RUN” position
4. Select according to the actual conguration of
the user.
ELECTRIC STARTING
1. Press the engine switch button to enter standby
mode.
1.
2. Press the engine switch button to start the
engine.
WARNING
If it fails to start, the generator will restart by itself.
lf it fails to start after repeated 6 times, please allow
the generator to cool for 1 minute and start again.
Sometimes the generator can take a few attempts
to start in cold weather. If machine does not start
in the rst 10 seconds, wait for 30 seconds before
attempting again. If the motor turns a little then
stops when you press the Start key, it may indicate a
low battery. Charge the battery before operation or
start by recoil start.
CAUTION
During the operatoin of the unit, the battery supplies
power for the solenoid valve of the carburetor.
For this, when the unist is turned off, make sure
that the starting switch is in “STOP” position and
otherwise the storage battery voltage is reduced due
to the operating solenoid valve of the carburetor,
impqacting on starting for next time.
If engine is equipped with an engine oil alarm, it is
possible to prevent engine start when the engine oil
in the crancase is lower than the minimum level.
During running-in, routinely inspect the engine
oil. See maintenance section for recommended
maintenance period.
WIRELESS REMOTE START
1. Press the engine switch button to enter standby
mode. If generator was turned off using the
remote key fob within the last 24 hours, it will
already be in standby mode.
2. Press and hold the “ON” key for 1 second and
release it to start the generator.

13
A STEELFORT PRODUCT
WARNING
Remote transmitter and genrator learning
The generator and the remote controller have been
successfully matched at the factory, and users do not
need to perform matching when use.
MATCHING WIRELESS REMOTE CONTROL
(IF APPLICABLE)
1. Turn the Start/Stop switch to “RUN” position
2. Press and hold the learning button until a blue
light comes on and then release, the blue light
stays on.
3. Press and hold the “OFF” button of the remote
control until the learning lamp ashes 1 time
and then release it.
4. Press and hold the “ON” button of the remote
control until the learning lamp ashes for 1 time
and then release.
5. Press and hold the learning button until it goes
out and then release it.
MANUAL START
When starting engine, grasp the recoil starter handle
and pull slowly until resistance is felt. Then pull
rapidly to advoid kickback.
WARNING
Check starter cord conditions before operating. Have
it replaced immediately by your local service dealer if
cord is frayed.
KICKBACK
Rapid retraction of the starter cord will pull hand and
arm towards the engine faster than you can let go.
Unintentional startup can result in entanglement,
traumatic amputation or laceration. Broken bones,
fractures, bruises or sprains could result.
When the battery power of the generator is too low
to start, please operate the choke handle as the
following gure to start the generator.
CAUTION
Choke plate should be setting in different width due
to temperature and other factors.
1. Remove the oil maintenance cover.
2. Move the carburetor choke lever to the right to
close the choke.
3. When starting the engine, grasp the recoil
starter handle and pull slowly until resistance is
felt. Then pull rapidly to avoid kickback.
4. After the generator has started, move the
carburetor choke lever to the left to open the
choke.
After completing the above operations, the generator
can be connected to electrical equipment.
CAUTION
Do not restart the generator without removing the
fault. It is strictly forbidden to start the generator
after using other batteries without authorization.
WARNING
It is prohibited to start or close the generating
set when the output terminal of generating set is
connected to an electric device and the electric
device is in “ON” state.
14 A STEELFORT PRODUCT
CONNECT TO ELECTRICAL
DEVICES
Inspect power cord for damage before using. A
hazard is electrical shocks from crushing, cutting or
heat damage.
1. Conrm that the generator is grounded. If
the electric device requires grounding, the
generator must be grounded.
2. Ensure that all electrical devices are turned off.
3. After the generator is started, let it run for a
few minutes to allow it to warm up to a steady
state.
4. Conrm the connection and then turn on the
electric device you expected.
5. Before stopping the generator, please turn off
the electrical device or disconnect the output.
6. If the generator provides power to more than
one electrical devices, start each electrical
device according to the size of the load, from
small to large.
DANGER
If connected devices overheat, turn them off and
disconnect them from generating set.
ELECTRICAL SHOCK
• To reduce the risk of electrical shock, DO NOT
use electrical cords that are worn, frayed, bare
or otherwise damaged.
• DO NOT touch bare wires or receptacles.
• DO NOT handle generator or electrical cords
while standing in water, while barefoot, or while
hands or feet are wet.
•
LOADING CAPACITY
You must make sure your generator can supply
enough rated (running) and surge (starting) watts for
the electrical devices you plan to power at the same
time. Follow these simple steps to calculate the
running and starting watts that are necessary for
your purposes.
WARNING
• DO NOT overload the generator.
• Exceeding the generator’s capacity can
damage the generator and/or electrical devices
connected to it. Faults and damaged caused by
overloading may void warranty.
1. Select the electrical devices you will power at
the same time.
2. The amount of power you need to run all the
devices is the total rated (running) watts of
these items.
3. Identify how many surge (starting) watts you
will need. Surge wattage is the short burst of
power needed to start electric power tools and
or appliances. Because not all motors start at
the same time, total surge watts can
be estimated by adding only the electrical
device(s) with the highest additional surge
watts to the total rated watts from step 2.
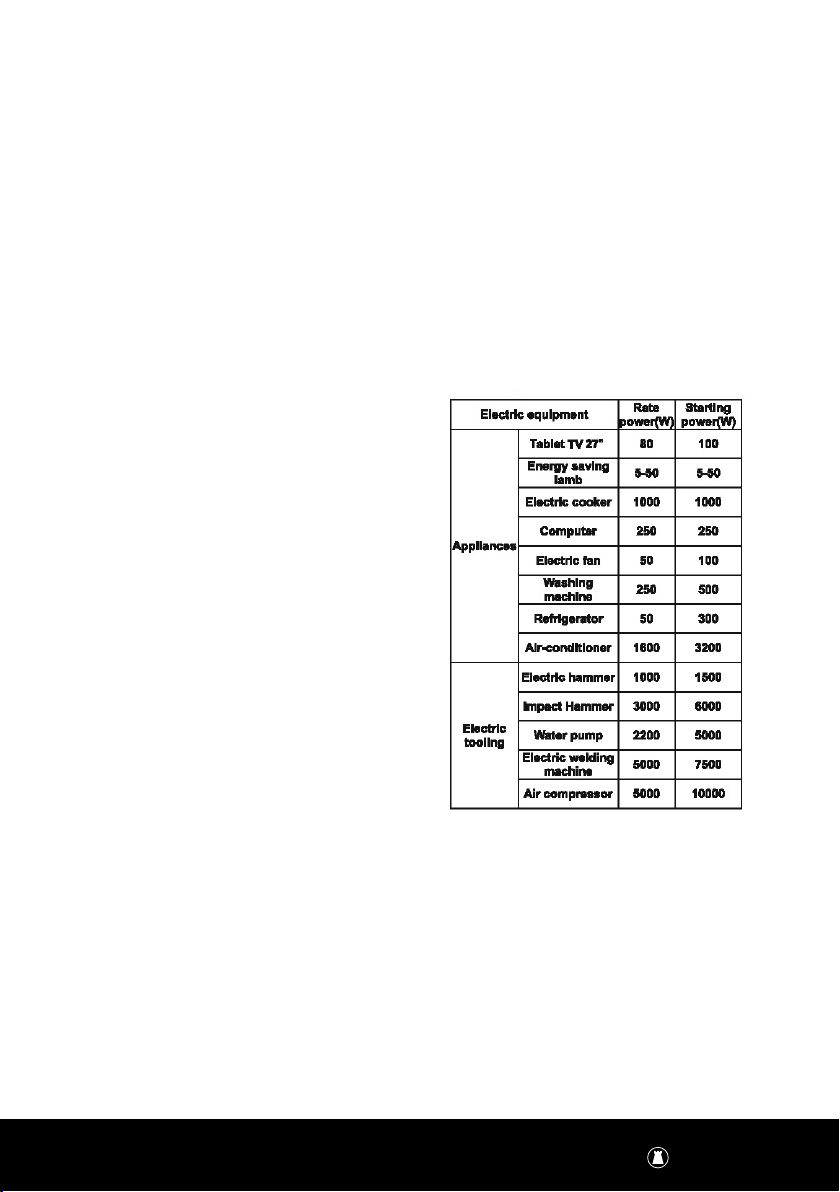
WATTAGE REFERENCE CHART
WARNING
It is necessary to equip with circuit protector or
switch to isolate the generating set from the electric
utility when the generating set is mainly used for
backup. Failure to isolate the generating set from the
power utility may result in injury or death to electric
utility workers and damage to the generating set due
to back feed of electrical energy.

15
A STEELFORT PRODUCT
STOPPING THE ENGINE
Turn off the electrical devices and then unplug all the
electrical device plugs from the panel.
WARNING
NEVER stop the engine with electrical devices
connected and with the connected devices turned
“ON”.
1. Press the “OFF” button on the remote.
2. Turn the fuel switch to “OFF” position.
WARNING
Generator Long-Term Storage:
If the generator needs to be stored for a long period
of time, please turn the fuel switch to the “OFF”
Position. After the fuel in the carburetor fuel cap is
burnt out and the generator automatically stops, turn
the start-stop knob to the “STOP” position.
If the start-stop switch knob is not placed in the
“STOP” position, the battery will be depleted of
power, making it impossible to start the generator
normally.
MAINTENANCE
It is the operator’s responsibility to complete all
scheduled maintenance and or servicing in a timely
manner. Always correct any issues before operating
the generator. Follow all inspection and
maintenance recommendations that are listed in the
manual.
WARNING
Improper maintenance and or failure to correct
problems prior to operating the unit may cause the
unit to malfunction and result in property damage and
or serious personal injury. Improper maintenance and
servicing may void warranty.
DANGER
Accidental starts can cause serious personal injury.
Remove and ground the spark plug wire before
performing any service.
CAUTION
The lter element may contain PAHs, PAHs that
is harmful for your health. Please wear gloves for
protection during air lter maintenance.
16 A STEELFORT PRODUCT
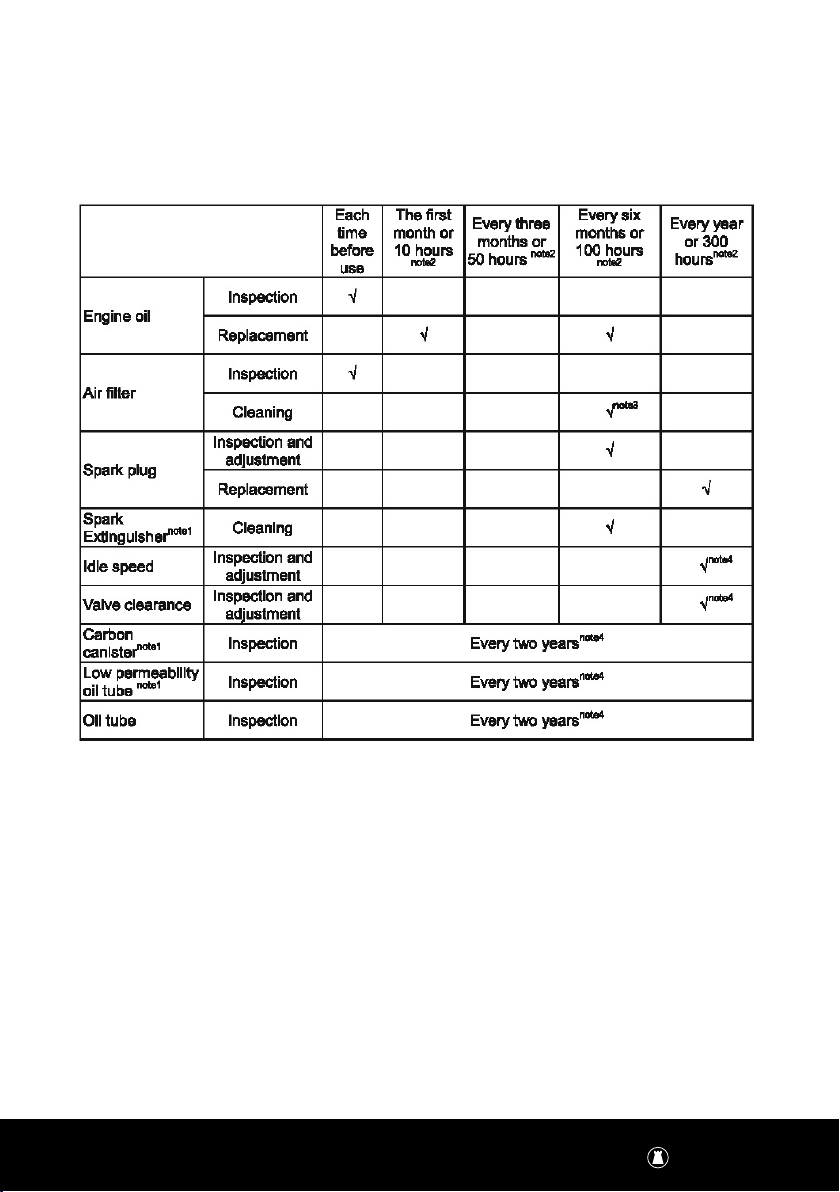
1. MAINTENANCE SCHEDULE
Before servicing the generator, stop the gen-
erator, disconnect all electric devices and battery (if
equipped) and allow the generator to cool down.
Follow the service intervals indicated in the chart
below. Service your generator more frequently when
operating in adverse conditions. Contact your local
LawnMaster Service Dealer if the generator requires
maintenance.
Note 1: Applicable types (if available).
Note 2: Before each season and after (whichever comes rst).
Note 3: Service more frequently under severe, dusty, dirty conditions.
Note 4: To be performed by knowledgeable and or experienced owners. However, we recommend using an
authorised service agent to conduct all maintenance and servicing need for the purpose of voiding issues with
warranty.
17
A STEELFORT PRODUCT
2. GENERATOR MAINTENANCE
• Make certain that the generator is kept clean
and stored properly.
• Use a damp cloth to clean exterior surfaces of
the generator.
• Use an compressed air (25 PSI) to clear dirt and
debris from the generator.
• Inspect all air vents and cooling slots to ensure
that they are clean and unobstructed.
WARNING
• DO NOT use water to clean the generator. Water
can enter the generator through the cooling
slots and damage the generator windings.
• DO NOT modify the generator in any way.
• DO NOT tamper with governed speed.
Generator supplies correct rated frequency and
voltage when running at factory set.
• Tampering with the factory reset governor will
void your warranty
3. ENGINE MAINTENANCE
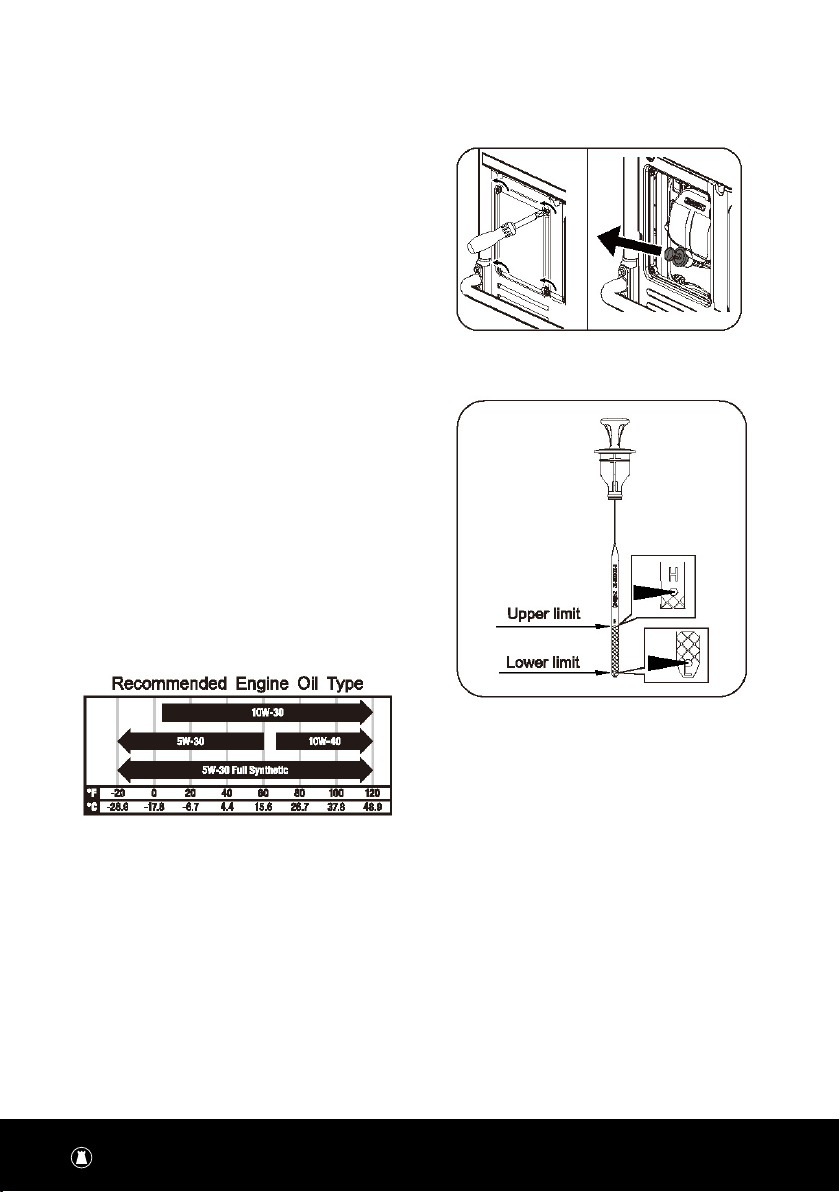
3.1 ENGINE OIL
LawnMaster 10W30 Oil (PP01020005) is
recommended. Other viscosities shown in the chart
may be used when the average temperature in your
area is within the indicated range. OIL MUST BE
PLACED IN ENGINE BEFORE STARTING.
Ambient temperature
Oil capacity (rated):
See Parameters.
3.2 ADDING OIL
WARNING
The engine is not lled with oil at the factory. Any
operation before it has been properly lled with the
recommended type and amount of oil may result in
engine damage and void your warranty.
1. Place the engine on a level surface.
2. Remove the oil maintenance cover and oil
dipstick and wipe oil dipstick clean.
3. Add recommended oil to the upper limit.
CAUTION
Oil level check
Insert the dipstick into ller port and stay at the ller
neck. Do not screw the dipstick into the port, then
remove the dipstick and check the oil level.
4. Insert the dipstick into its seal position and x
the oil maintenance cover.
5. Properly dispose of any used oil at an approved
waste management facility.
3.3 CHANGING OIL
CAUTION
Change the oil when in hot engine state. The oil can
reach up to 140 °C under that condition. Careful
operation should be taken to prevent burns.

18 A STEELFORT PRODUCT
1. Place the machine on a level surface which is
300mm higher than the ground.
2. Remove the oil drain cover.
3. Place the oil container box under the oil drain
hole of the generator and remove the drain bolt
to drain out all the used oil.
4. Fully tighten the drain plug, x the oil drain
cover.
5. Remove the oil maintenance cover.
1.
2.
3.
4.
5.
6. Fully insert the dipstick into the oil lling hole
and reinstall the oil maintenance cover.
7. Properly dispose of any used oil at an approved
waste management facility.
WARNING
The engine is not lled with oil at the factory. Any
operation before it has been properly lled with the
recommended type and amount of oil may result in
engine damage and void your warranty.
4. AIR FILTER
1. Unscrew the air lter maintenance cover.
2. Take out the air lter element.
3. Check whether the paper lter element is
damaged, if damaged, please replace it in time.
4. Gently tap the lter element to remove the dust
or debris attached to the lter element.
5. Put the lter element back into the assembly
and screw it tightly with the air lter
maintenance cover.
WARNING
The air lter is a key part that affects the emission
performance, and any form of modication is
strictly prohibited. It is prohibited to use the engine
without installing or correctly installing the air
lter, otherwise the engine will be seriously worn or
damaged, and the product warranty will be void.
It is strictly forbidden to use organic solvent to clean
the paper lter element, and to use compressed air
to blow and clean it.
5. SPARK PLUG
WARNING
Before repairing the spark plug make sure that the
engine has cooled down completely.

19
A STEELFORT PRODUCT
1. Remove the oil maintenance cover after
unscrewing the xing bolt.
2. Clean any dirt from the spark plug cap and
spark plug base.
3. Remove the spark plug cap.
4. Using socket wrench to loose and remove the
spark plug.
5. Observe whether the spark plug and spark
plug gasket are damaged, if necessary, replace
them.
6. Check spark plug gap. If necessary, carefully
bend one end of the electrode to adjust the
clearance.
SPARK PLUG GAP: 0.6MM - 0.8MM
7. Carefully thread the plug into the engine by
hand.
8. After the spark plug is seated, use spark plug
wrench to tighten the plug.
SPARK PLUG TIGHTEN TORQUE: 20-25 N.M
9. Attach the spark cap to the plug and connect
the spark plug wire to the plug.
WARNING
Only use the recommended spark plug or equivalent.
DO NOT use spark plugs that have improper heat
range.
10. Install Oil maintenance cover.
SPARK KILLER
(IF APPLICABLE)
1. Allow the generating set to cool completely
before servicing the spark arrester.
2. Remove the muer blind window rst.
3. Remove the spark arrester screen.
4. Carefully remove the carbon deposits from the
spark arrester screen with a wire brush.
5. Replace the spark arrester if it is damaged.
6. Reinstall the spark arrester in the muer and
reinstall the muer blind window.
SPEED
The speed has been pre-set at the factory and should
rarely require readjustment. Consult your local
authorized LawnMaster dealer for such needs.
WARNING
Unapproved adjustment will damage your engine
and/or your electrical devices and void your war-
ranty.
ADJUSTMENT
There has no other service and/or adjustment need
for your generator. Unapproved adjustments or
tampering can damage your generator and your elec-
trical devices and will void your warranty. Contact
your local dealer for such needs.
WARNING
Tampering with the factory set governor will damage
your generator and void your warranty.
STORAGE & TRANSPORTATION
STORAGE
The generating set should be started at least once
every 2 weeks and allowed to run for at least 20
minutes. Follow the instructions below for longer term
storage if the generating set will be out of service for 2
months or more.
WARNING
FIRE OR EXPLOSION
Gasoline is highly ammable and extremely explosive.
Empty the fuel tank and shut off fuel valve before
storing or transporting this generating set.

20 A STEELFORT PRODUCT
1. Allow the generating set to cool completely
before storage.
2. Clean the generating set according to
instructions in Maintenance section.
3. Drain all fuel completely from the fuel tank,
fuel hose and carburetor to prevent gum from
forming.
4. Turn the combination switch in “OFF” position
to cut off the fuel.
5. Remove the oil drain plug to drain out the oil
6. Remove the spark plug and pour about 15 ml of
fresh oil into the cylinder. Pull the recoil starter
slightly to distribute the oil and lubricate the
cylinder. And then attach the spark plug.
7. Store the unit in a clean, dry area out of direct
sunlight.
8. Disconnect the battery.
TRANSPORTATION
When generator is being transported or put into short
term storage, the generator should be in the normal
operating position and xed vertically to prevent fuel
leakage. The combination switch should be in the
“stop” position and knob of the fuel cap should be
turned to the “OFF” position.
WARNING
When transporting do not overll the tank. Do not
operate the generating set while it is on vehicle.
Take the generating set off the vehicle and use it
in a well-ventilated place. Avoid a place exposed to
direct sunlight when putting the generating set on
a vehicle. If the generating set is left in an enclosed
vehicle for many hours, high temperature inside the
vehicle could cause fuel to vaporize resulting in a
possible explosion. Do not drive on a rough road for
an extended period with the generating set on board.
If you must transport the generating set on a rough
road, drain the fuel beforehand.
TROUBLE SHOOTING
This manual suits for next models
1
Table of contents
Other LawnMaster Portable Generator manuals


Popular Portable Generator manuals by other brands

Impax
Impax IM800I instruction manual

Tesla
Tesla TI47407 MPU-24 user manual

Westinghouse
Westinghouse iGen2550c quick start guide

Champion Power Equipment
Champion Power Equipment para link 500468-WL-EU Operator's manual

Pyle
Pyle SereneLife SLSPGN10 user manual

NewMar
NewMar PFM-500 Installation & operation manual

DUROMAX
DUROMAX DUALFUEL XP11500EH user manual

DK-Technologies A/S
DK-Technologies A/S PT 5230 user manual

Mosa
Mosa GE S-6000 YDM Use and maintenance manual

STEELE PRODUCTS
STEELE PRODUCTS SP-GG350 owner's manual

Siemens
Siemens SINAMICS S120 Equipment manual

Miller
Miller Big Blue 500X Eco Pro owner's manual


