LawnMaster CLGS1832A01_V1 User manual

CLGS1832A01_V1
Includes Battery And Standard Charger
Battery Part # 1800L-BA
18V Li-On Standard Charger Part # 18LC02-ETL
Comprend une batterie et un chargeur standard
Numéro de pièce de la batterie: 1800L-BA
Numéro de pièce du chargeur lithium-ion standard
18 V: 18LC02-ETL
Operators Manual / Guide d'Utilisation
Read all safety rules and instructions carefully before operating this tool.
Distributed By Cleva North America 601 Regent Park Court Greenville, SC 29607 (866)-384-8432
Lisez attentivement toutes les consignes de sécurité ainsi que les instructions avant de faire fonctionner cet outil.
Distribué par Cleva North America 601 Regent Park Court Greenville, SC 29607 (866)-384-8432
18V-LI 1.5AH GARDEN UTILITY SAW
EN p. 2
SCIE POUR JARDINAGE À BATTERIE LITHIUM-ION 18 V 1,5 Ah
EN p. 27

2
CONTENTS 2
PRODUCT SPECIFICATIONS 2-3
SAFETY WARNINGS 4-8
SYMBOLS 9
KNOW YOUR CORDLESS GARDEN UTILITY SAW 10
UNPACKING 11
ASSEMBLY 12-15
INTENDED USE 16
SERRATED GRIPPING JAW 17
GENERAL OPERATION 18
CUTTING 19-20
AFTER USE 21
TROUBLESHOOTING 22
WARRANTY 23
EXPLODED DIAGRAM 24
PARTS LIST 25
NOTES 26
CONTENTS
18V-LI 1.5AH GARDEN UTILITY SAW
No Load Speed n01500 min-1
Max. Cutting Capacity With Serrated Gripping Jaw Installed
PRODUCT SPECIFICATIONS
General
,Q:RRG0D['LDPHWHUPP
,Q3ODVWLF0D['LDPHWHUPP
,Q6RIW0HWDO
0D['LDPHWHUPPVROLGPPKROORZ
Weight (with battery pack) Approx. 3.3 lbs (1.5kg)
0D[LPLXP$OORZDEOH%ODGH/HQJWKPP

3
PRODUCT SPECIFICATIONS
Voltage Battery 18Vd.c., 1.5Ah Lithiium-Ion
Type Battery Pack Li-Ion
Battery Pack Model No. 1800L-BA
Battery Pack
Charger
Model No 18LC02-ETL
Rated Input Voltage 120VAC 60Hz
Rated Output Voltage 20.8 V
Rated Output Current 300mA
Charging Time approx. 3-5h
SAFETY WARNINGS
Power Tool Safety Warnings
Work Area Safety
.HHSZRUNDUHDFOHDQDQGZHOOOLW&OXWWHUHGRUGDUNDUHDVLQYLWHDFFLGHQWV
'RQRWRSHUDWHSRZHUWRROVLQH[SORVLYHDWPRVSKHUHVVXFKDVLQWKHSUHVHQFHRIIODPPDEOHOLTXLGV
gases or dust. Power tools create sparks which may ignite the dust or fumes.
.HHSFKLOGUHQDQGE\VWDQGHUVDZD\ZKLOHRSHUDWLQJDSRZHUWRRO'LVWUDFWLRQVFDQFDXVH\RXWR
lose control.
Electrical Safety
3RZHUWRROSOXJVPXVWPDWFKWKHRXWOHW1HYHUPRGLI\WKHSOXJLQDQ\ZD\'RQRWXVHDQ\DGDSWHU
plugs with earthed (grounded) power tools. Unmodified plugs and matching outlets will reduce risk
of electric shock.
$YRLGERG\FRQWDFWZLWKHDUWKHGRUJURXQGHGVXUIDFHVVXFKDVSLSHVUDGLDWRUVUDQJHVDQG
refrigerators. There is an increased risk of electric shock if your body is earthed or grounded.
'RQRWH[SRVHSRZHUWRROVWRUDLQRUZHWFRQGLWLRQV:DWHUHQWHULQJDSRZHUWRROZLOOLQFUHDVHWKH
risk of electric shock.
'RQRWDEXVHWKHFRUG1HYHUXVHWKHFRUGIRUFDUU\LQJSXOOLQJRUXQSOXJJLQJWKHSRZHUWRRO
Keep cord away from heat, oil, sharp edges or moving parts. Damaged or entangled cords increase
the risk of electric shock.
:KHQRSHUDWLQJDSRZHUWRRORXWGRRUVXVHDQH[WHQVLRQFRUGVXLWDEOHIRURXWGRRUXVH
Use of a cord suitable for outdoor use reduces the risk of electric shock.
,IRSHUDWLQJDSRZHUWRROLQDGDPSORFDWLRQLVXQDYRLGDEOHXVHDUHVLGXDOFXUUHQWGHYLFH5&'
protected supply. Use of an RCD reduces the risk of electric shock.
Personal Safety
6WD\DOHUWZDWFKZKDW\RXDUHGRLQJDQGXVHFRPPRQVHQVHZKHQRSHUDWLQJDSRZHUWRRO'RQRW
use a power tool while you are tired or under the influence of drugs, alcohol or medication.
A moment of inattention while operating power tools may result in serious personal injury.
Use personal protective equipment. Always wear eye protection. Protective equipment such as
4
7KLVSURGXFWLVQRWLQWHQGHGIRUXVHE\SHUVRQVLQFOXGLQJFKLOGUHQZLWKUHGXFHGSK\VLFDOVHQVRU\
or mental capabilities, or lack of experience and knowledge, unless they have been given supervision
or instruction concerning use of the product by a person responsible for their safety.
&KLOGUHQVKRXOGEHVXSHUYLVHGWRHQVXUHWKDWWKH\GRQRWSOD\ZLWKWKHSURGXFW
WARNING !
Read all safety warnings and all instructions.
Failure to follow the warnings and instructions may result in electric shock, fire and/or serious injury.
Save all warnings and instructions for future reference.
The term “power tool” in the warnings refers to your mains-operated (corded) power tool or battery-
operated (cordless) power tool.

SAFETY WARNINGS
5
dust mask, non-skid safety shoes, hard hat, or hearing protection used for appropriate conditions
will reduce personal injuries.
Prevent unintentional starting. Ensure the switch is in the off-position before connecting to power
source and/or battery pack, picking up or carrying the tool. Carrying power tools with your finger
on the switch or energising power tools that have the switch on invites accidents.
Remove any adjusting key or wrench before turning the power tool on. A wrench or a key left
attached to a rotating part of the power tool may result in personal injury.
Do not overreach. Keep proper footing and balance at all times. This enables better control of
the power tool in unexpected situations.
Dress properly. Do not wear loose clothing or jewellery. Keep your hair, clothing and gloves
away from moving parts. Loose clothes, jewellery or long hair can be caught in moving parts.
If devices are provided for the connection of dust extraction and collection facilities, ensure these
are connected and properly used. Use of dust collection can reduce dust-related hazards.
Power Tool Use And Care
'RQRWIRUFHWKHSRZHUWRRO8VHWKHFRUUHFWSRZHUWRROIRU\RXUDSSOLFDWLRQ
The correct power tool
will do the job better and safer at the rate for which it was designed.
'RQRWXVHWKHSRZHUWRROLIWKHVZLWFKGRHVQRWWXUQLWRQDQGRII$Q\SRZHUWRROWKDWFDQQRWEH
controlled with the switch is dangerous and must be repaired.
'LVFRQQHFWWKHSOXJIURPWKHSRZHUVRXUFHDQGRUWKHEDWWHU\SDFNIURPWKHSRZHUWRROEHIRUH
making any adjustments, changing accessories, or storing power tools. Such preventive safety
measures reduce the risk of starting the power tool accidentally.
6WRUHLGOHSRZHUWRROVRXWRIWKHUHDFKRIFKLOGUHQDQGGRQRWDOORZSHUVRQVXQIDPLOLDUZLWKWKH
power tool or these instructions to operate the power tool. Power tools are dangerous in the hands
of untrained users.
0DLQWDLQSRZHUWRROV&KHFNIRUPLVDOLJQPHQWRUELQGLQJRIPRYLQJSDUWVEUHDNDJHRISDUWVDQG
any other condition that may affect the power tool’s operation. If damaged, have the power tool
repaired before use. Many accidents are caused by poorly maintained power tools.
.HHSFXWWLQJWRROVVKDUSDQGFOHDQ3URSHUO\PDLQWDLQHGFXWWLQJWRROVZLWKVKDUSFXWWLQJHGJHVDUH
less likely to bind and are easier to control.
8VHWKHSRZHUWRRODFFHVVRULHVDQGWRROELWVHWFLQDFFRUGDQFHZLWKWKHVHLQVWUXFWLRQVWDNLQJLQWR
account the working conditions and the work to be performed. Use of the power tool for operations
different from those intended could result in a hazardous situation.
BATTERY TOOL USE AND CARE
5HFKDUJHRQO\ZLWKWKHFKDUJHUVSHFLILHGE\WKHPDQXIDFWXUHU$FKDUJHUWKDWLVVXLWDEOHIRURQH
type of battery pack may create a risk of fire when used with another battery pack.
Use power tools only with specifically designated battery packs. Use of any other battery packs
may create a risk of injury and fire.
When battery pack is not in use, keep it away from other metal objects, like paper clips, coins,
keys, nails, screws or other small metal objects, that can make a connection from one terminal
to another. Shorting the battery terminals together may cause burns or a fire.

SAFETY WARNINGS
6
8QGHUDEXVLYHFRQGLWLRQVOLTXLGPD\EHHMHFWHGIURPWKHEDWWHU\DYRLGFRQWDFW,IFRQWDFW
accidentally occurs, flush with water. If liquid contacts eyes, additionally seek medical help.
Liquid ejected from the battery may cause irritation or burns.
Service
Have your power tools serviced by a qualified repair person using only identical replacement
parts. This will ensure that safety of the power tool is maintained.
Saw Safety Warnings
Hold power tool by insulated gripping surfaces, when performing an operation where the cutting
accessory may contact hidden wiring. Cutting accessory contacting a “live” wire may make
exposed metal parts of the power tool “live” and could give the operator an electric shock.
Keep hands away from the sawing range. Do not reach under the workpiece. Contact with the
saw blade can lead to injuries.
Apply the product to the workpiece only when switched on. Otherwise there is danger of kickback
when the cutting accessory jams in the workpiece.
Use only undamaged saw blades that are in perfect condition. Bent or dull saw blades can break,
negatively influence the cut, or lead to kickback.
Clamp material well. Do not support the workpiece with your hand or foot. Do not touch objects
or the floor with the saw running. Danger of kickback.
Always wait until the product has come to a complete stop before placing it down. The tool insert
can jam and lead to loss of control over the product.
Before any work on the product (e. g. maintenance, changing the tool, etc.) as well as during its
transport and storage, lock the On/Off switch in the off position. There is danger of injury when
the On/Off switch is unintentionally actuated.
Always wear a dust mask to protect yourself against hazards resulting from fine dust.
Charger Safety Warnings
This charger is not intended for use by persons (including children) with reduced physical, sensory
or mental capabilities, or lack of experience and knowledge, unless they have been given supervision
or instruction concerning use of the product by a person responsible for their safety.
Children should be supervised to ensure that they do not play with the charger.
Before using the charger, read all the instructions and cautionary markings on the charger and
battery pack.
Do not attempt to charge battery packs other than supplied. The charger and battery pack supplied
with it are specifically designed to work together.
Charge the battery pack indoors only as the charger is designed for indoor use only.
Do not charge non-rechargeable batteries.
Protect the charger against moisture and wet conditions. There is a danger of electric shock.
Ensure proper ventilation when charging.
Do not place any object on top of the charger as it could cause overheating.
Do not place the charger near any heat source.

7
SAFETY WARNINGS
Do not use the charger if it has been subjected to a heavy knock, dropped or otherwise damaged
in any way. Have the charger checked and repaired by an authorised service centre.
Do not disassemble the charger. Incorrect re-assembly may result in the risk of fire, electric
shock or electrocution.
Disconnect the charger from the power supply before attempting to clean it to reduce the risk
of an electric shock. Removing the battery pack alone does not reduce the risk.
Battery Pack Safety Warnings
Do not attempt to charge the battery pack with any other charger than the one supplied.
The charger and battery pack supplied with it are specifically designed to work together.
Charge and store the battery pack in an ambient temperature of 18 - 24°C (65 - 75°F) to ensure
the longest battery life and best performance. Do not charge or store the battery pack in
temperatures below 0°C (32 °F) and above 40°C (104 °F).
Small leakage of liquid from the battery pack may occur under extreme usage or temperature
conditions. However, if the outer seal is broken and this leakage comes into contact with your
skin wash the affected area quickly with water. If the leakage gets in your eyes flush your eyes
with clean water for a minimum of 10 minutes and seek immediate medical attention.
Never attempt to open the battery pack for any reason. If the plastic housing of the battery pack
breaks open or cracks, immediately discontinue its use and do not recharge it.
Do not store or carry a spare battery pack in a pocket or toolbox or any other place where it may
come into contact with metal objects. The battery pack may be short-circuited causing damage
to the battery pack, burns or a fire.
Do not pierce the battery with nails, strike the battery with a hammer, step on the battery or
otherwise subject it to strong impacts or shocks.
Protect the battery pack against heat. Do not place the battery in direct sunlight or use or store
the battery inside cars in hot weather. Doing so may cause the battery to generate heat,
explode or ignite.
Never try to charge a battery pack that is cracked or damaged in any other way. There is a
danger of electric shock or electrocution.
Only charge the battery pack with the charger supplied.
Vibration And Noise Reduction
To reduce the impact of noise and vibration emission, limit the time of operation, use low-vibration and
low-noise operating modes as well as wear personal protective equipment.
Take the following points into account to minimize the vibration and noise exposure risks:
Only use the product as intended by its design and these instructions.
Ensure that the product is in good condition and well maintained.
6
e correct cutting attachments for the product and ensure they in good condition.
Keep tight grip on the handles/grip surface.
0DLQWDLQWKLVSURGXFWLQDFFRUGDQFHZLWKWKHVHLQVWUXFWLRQVDQGNHHSLWZHOOOXEULFDWHGZKHUHDSSURSULDWH
Plan your work schedule to spread any high vibration tool use across a longer period of time.

8
SAFETY WARNINGS
Emergency
Familiarise yourself with the use of this product by means of this instruction manual. Memorise the
safety directions and follow them to the letter. This will help to prevent risks and hazards.
Always be alert when using this product, so that you can recognise and handle risks early.
Fast intervention can prevent serious injury and damage to property.
Switch off and disconnect from the power supply if there is any malfunction. Have the product
checked by a qualified specialist and repaired, if necessary, before you put it into operation again.
Residual risks
Even if you are operating this product in accordance with all the safety requirements, potential risks
of injury and damage remain. The following dangers can arise in connection with the structure and
design of this product:
Health defects resulting from vibration emission if the product is being used over long periods of
time or not adequately managed and properly maintained.
Injuries and damage to property due to broken accessories or the sudden impact of hidden objects
during use.
Danger of injury and property damage caused by flying objects.
Contact with the blade
Kickback

9
SYMBOLS
On the product, the rating label and within these instructions you will find among others the following
symbols and abbreviations. Familiarise yourself with them to reduce hazards like personal injurues
and damage to property.
V~ VVolts,(alternating voltage) Volts,(direct current voltage)
W Watt Hz Hertz
mA
mm
cm
3
IPX0 yyWxx
Kg
A
mAhMilliampere
Ampere
Millimetre
Milliampere-hour
/min or
min-1
Per Minutes
Killogram
Cubic centimetre
Protection against
penetration of dust, but no
protection against water
0DQXIDFWXULQJGDWHFRGH
year of manufacturing (20yy) and week
of manufacturing (Wxx)
Lock / to tighten or secure
Caution / Warning.
Read the instruction manual
Unlock / to loosen
Polarity
With fuse (xx °C)
Safety transformer
Note / Remark
This product is of protection class II.
That means it is equipped with enhanced or double insulation.
For dry indoor use only.
Do not dispose of battery packs in rivers or immerse in water.
'RQRWGLVSRVHRIEDWWHU\SDFNVLQ¿UH7KH\ZLOOH[SORGHDQGFDXVHLQMXU\
Do note expose battery packs to heat in excess of 50ºC.
50
10
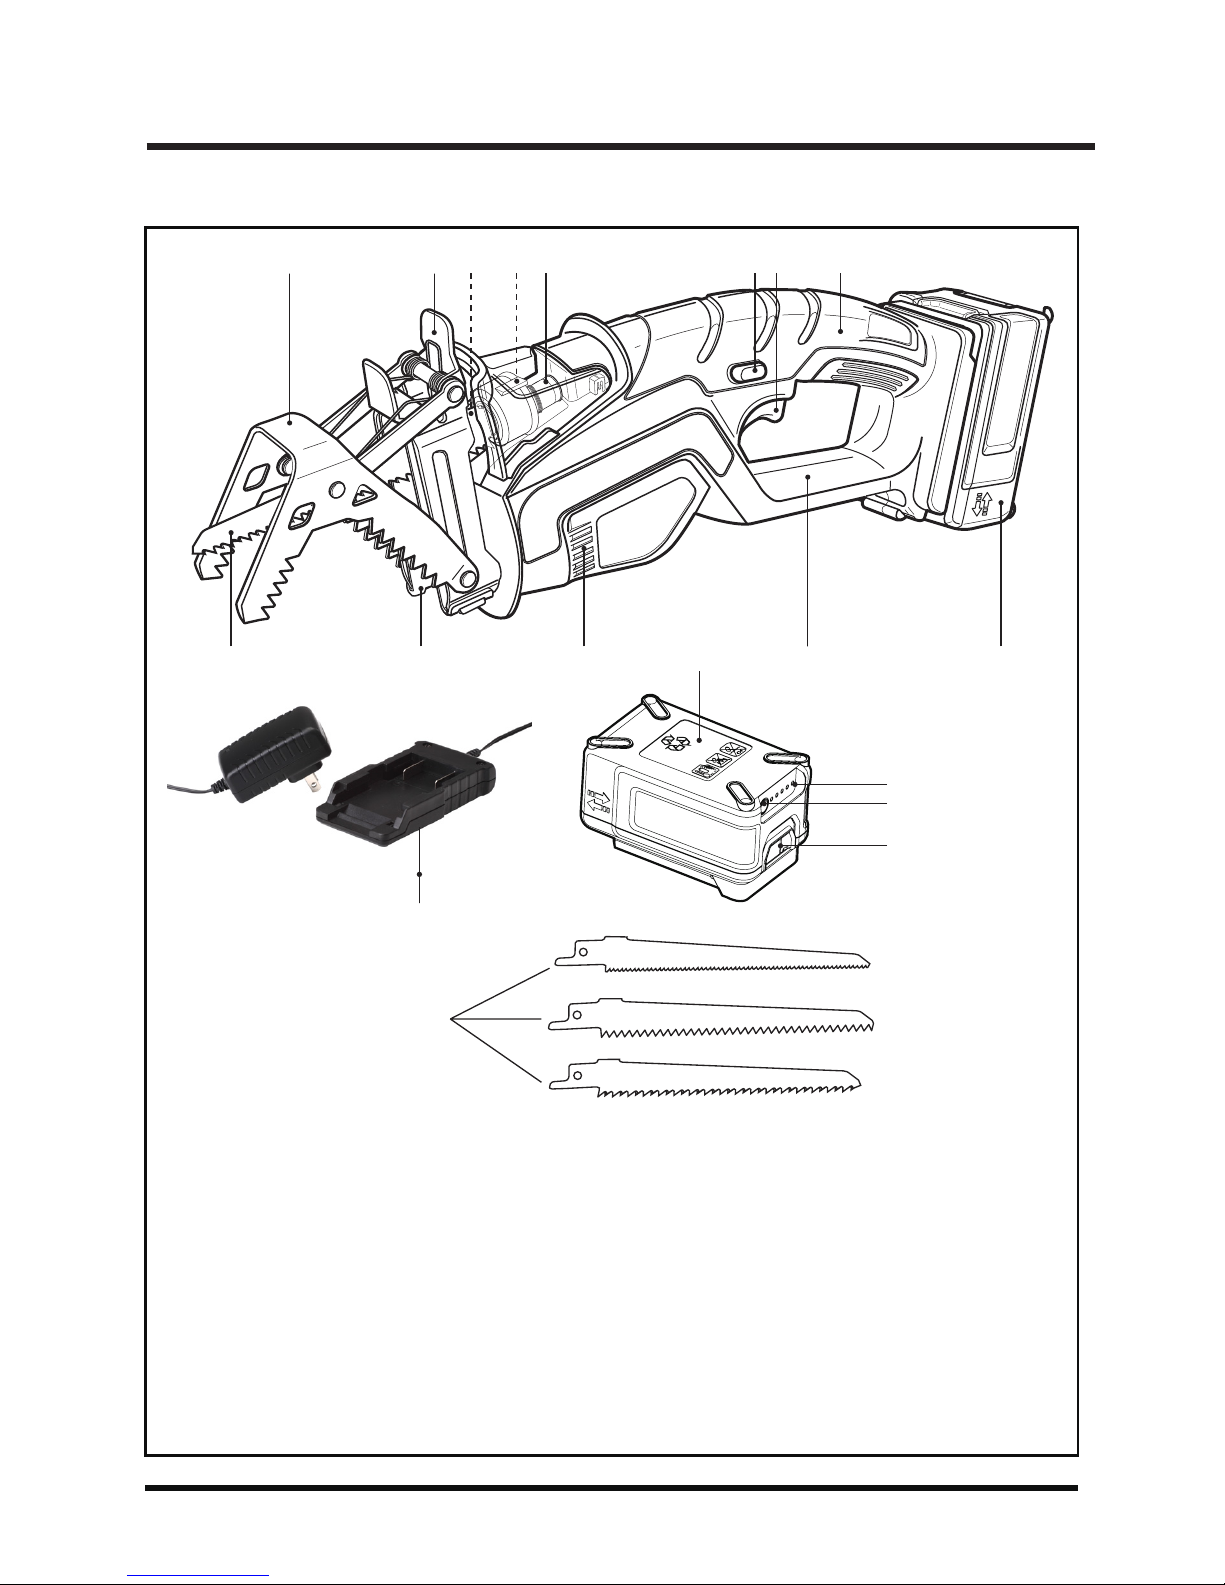
KNOW YOUR PRODUCT
KNOW YOUR CORDLESS GARDEN UTILITY SAW
12
345 67 8
9
10111213 9
14
16
15
17
13
1 - Metal Blade
1 - Plastic Blade
3 - Wood Blades
1. Serrated Gripping Jaw
2. Serrated Gripping Jaw Release
3. Blade Reciever
4. Blade Lock Release
5. Clear Protective Cover
6. Lock-off Button
7. On/off Switch
8. Main Handle
9. 18v Li-on Battery
10. Lower Hand Safety Guard
11. Air Vents
12. Serrated Gripping Jaw Support Rail
13. Saw Blades (X5)
14. Indicator Lights (Battery Capacity)
15. Button For Battery Capacity
16. Battery Release Button
17. Battery Charger And Plug
( X 3 )
( X 1 )
( X 1 )
11
Ɣ8QSDFNDOOSDUWVDQGOD\WKHPRQDIODWVWDEOHVXUIDFH
Ɣ5HPRYHDOOSDFNLQJPDWHULDOVDQGVKLSSLQJGHYLFHVLIDSSOLFDEOH
Ɣ0DNHVXUHWKHGHOLYHU\FRQWHQWVDUHFRPSOHWHDQGIUHHRIDQ\GDPDJH,I\RXILQGWKDWSDUWVDUH
missing or show damage do not use the product but contact your dealer. Using an incomplete
or damaged product represents a hazard to people and property.
Ɣ(QVXUHWKDW\RXKDYHDOOWKHDFFHVVRULHVDQGWRROVQHHGHGIRUDVVHPEO\DQGRSHUDWLRQ
This also includes suitable personal protective equipment.
WARNING !
Always use saw blades according to the intended use!
For example, never use a saw blade intended for working on wood for working on metal or
vice versa!
Observe the technical requirements of this product (see section “Technical specifications”)
when purchasing and using saw blades!
The supplied saw blades are only for cutting wood. Do not attempt to use them for cutting
other materials.
Some saw blades are very sharp and become hot during use! Handle them carefully!
Wear safety gloves when handling saw blades in order to avoid injuries like burns and cuts!
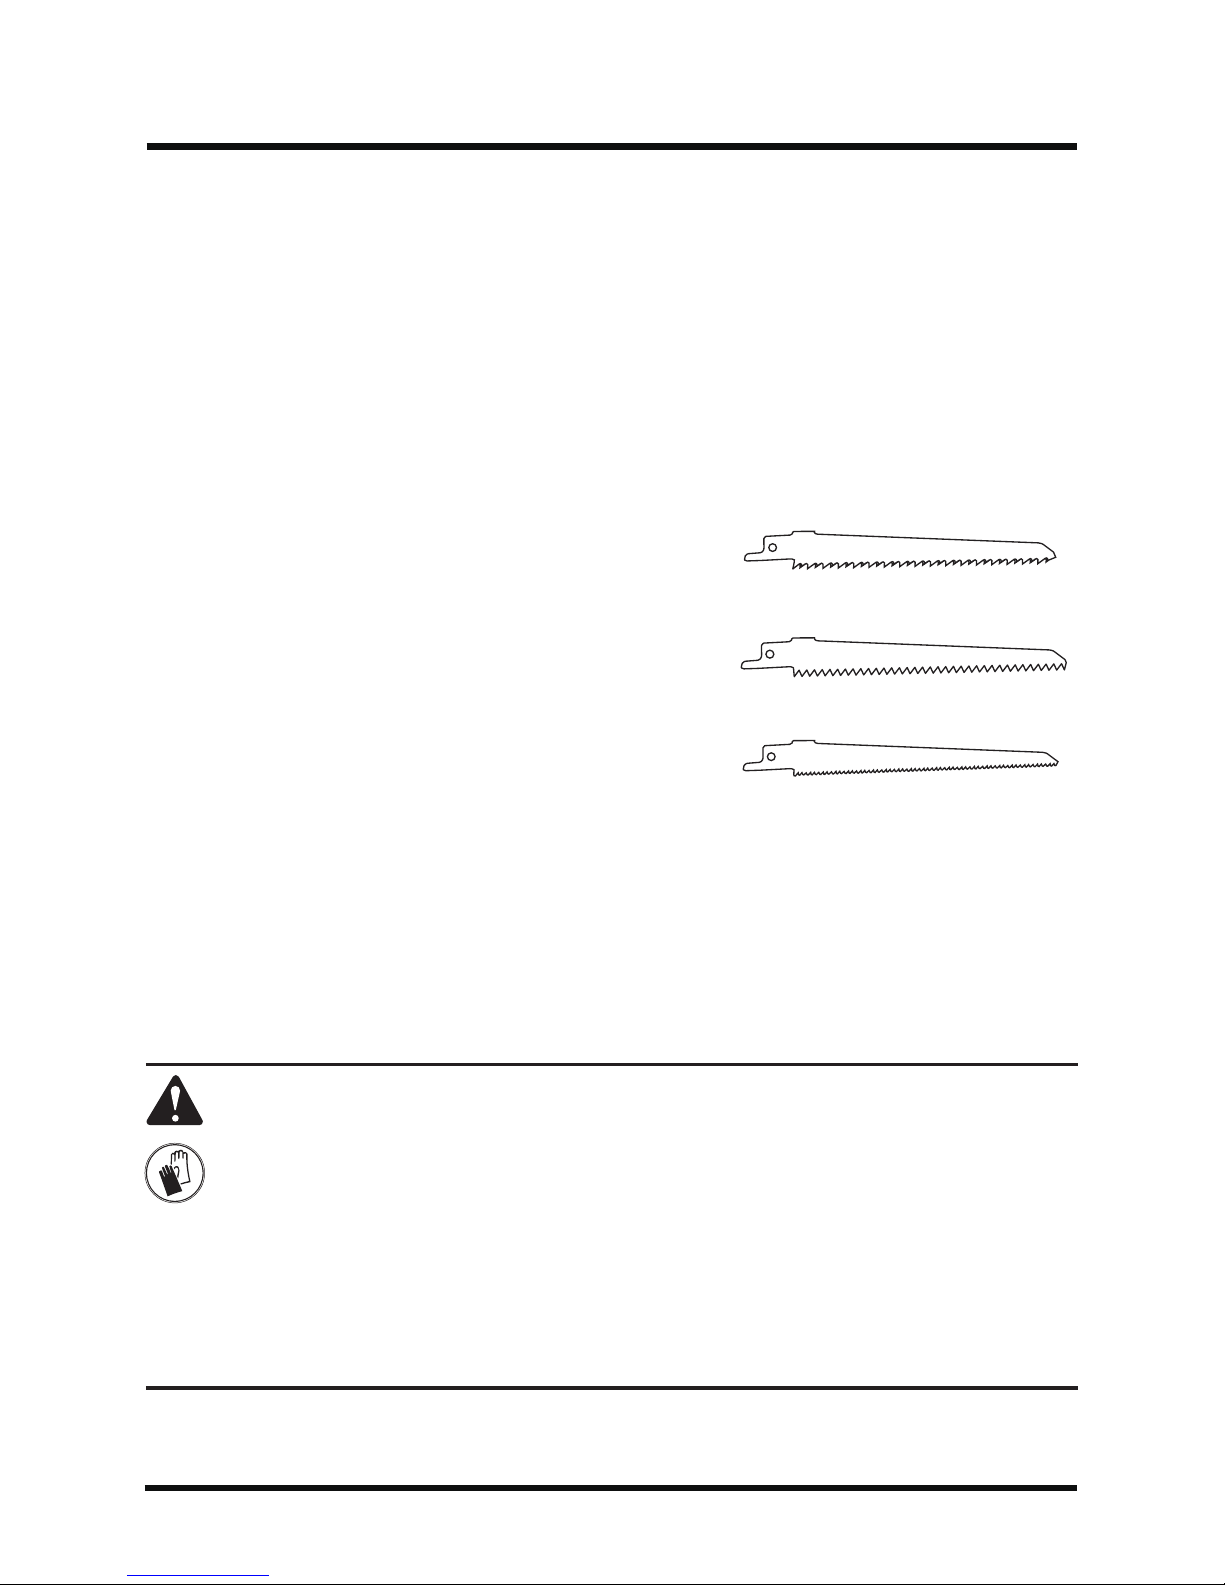
YOU WILL NEED
UNPACKING
(items not supplied)
Suitable personal protective equipment
Saw blade (for plastic)
Saw blade (for metal)
(items supplied)
Saw blade (for wood) x3
SAW BLADES
Standard single tang reciprocating saw blades can be used as replacements.
Choose the appropriate blade for the workpiece and material being cut!
NOTE:7KLVSURGXFWLVQRWLQWHQGHGIRUDEODGHRYHULQOHQJWK
12
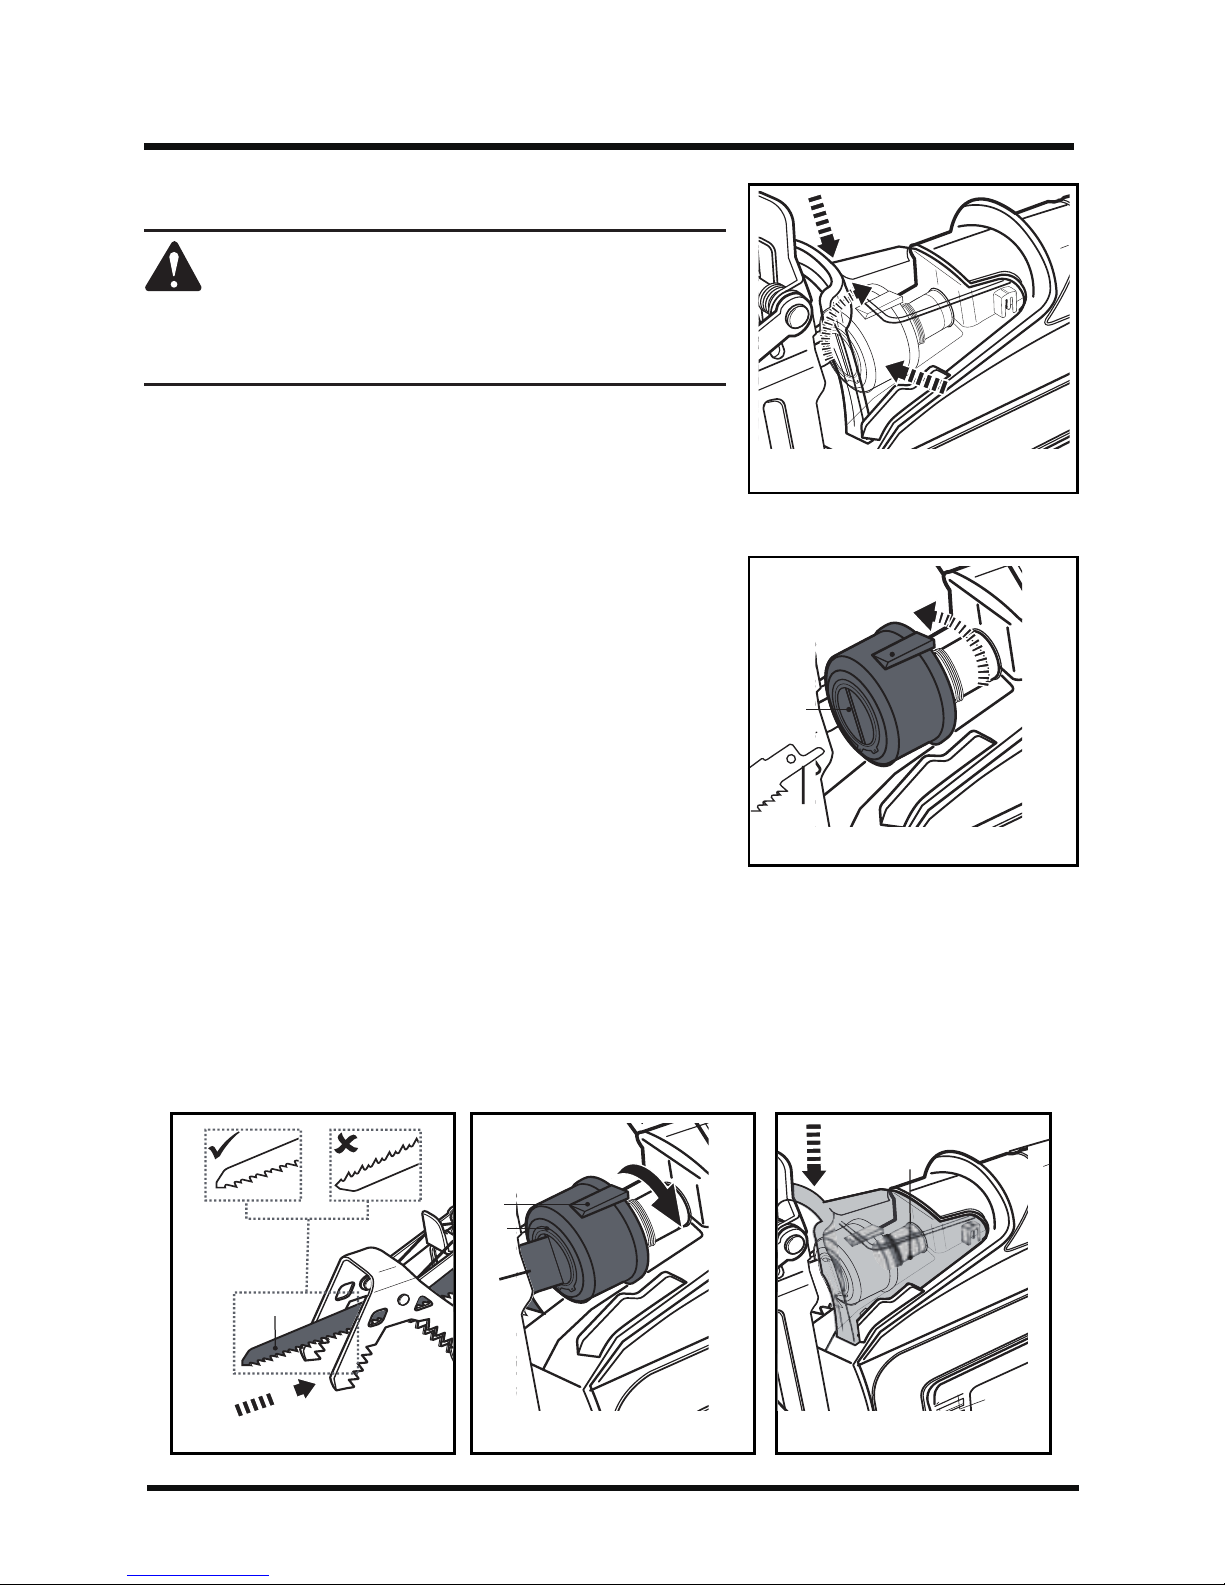
Ɣ/LJKWO\VTXHH]HERWKVLGHVRIWKHFOHDUSURWHFWLRQFRYHU
(5) and open it (Figs. 1&5).
Ɣ7XUQWRJJOHWKHEODGHORFNUHOHDVHWRWKHULJKWDQG
hold it in position (Fig. 2).
Ɣ)XOO\LQVHUWDFRUUHFWVDZEODGHDOOWKHZD\LQWR
the blade reciever (3) and release the blade lock release
(4) (Figs. 2, 3, 4).
NOTE: Always wear protective gloves when touching blades.
Ɣ(QVXUHWKHVDZEODGHLVIXOO\ORFNHGLQWRSODFHE\
pinching the blade (13) between two gloved fingers and
lightly pulling on it (13) to test if it is properly seated in
place. It should not be possible to the pull blade out if
correctly seated and locked into place.
Ɣ&ORVHWKHFOHDUSURWHFWLRQFRYHUDQGHQVXUHLWVQDSV
into place by lightly pushing it down (Fig. 5).
Removing/Replacing Blades
NOTE:
Always wear protective gloves when touching blades.
Ɣ2SHQWKHFOHDUSURWHFWLRQFRYHU)LJV
Ɣ7XUQWRJJOHWKHEODGHORFNUHOHDVHWRWKHULJKWDQGKROGLWLQSRVLWLRQ)LJ
Ɣ5HPRYHWKHVDZEODGHDQGLQVHUWDQHZRQHDVUHTXLUHG)LJ
Ɣ&ORVHWKHFOHDUSURWHFWLRQFRYHU)LJ
ASSEMBLY
WARNING !
5
5
4
Fig. 1
3
13
4
Fig. 2
Inserting Blades
13
Fig. 3
3
13
4
Fig. 4
5
Fig. 5
Always remove the battery pack from the product Before
performing ANY maintenance on the utility saw.
Failure to heed this warning may result in serious harm
13
ASSEMBLY
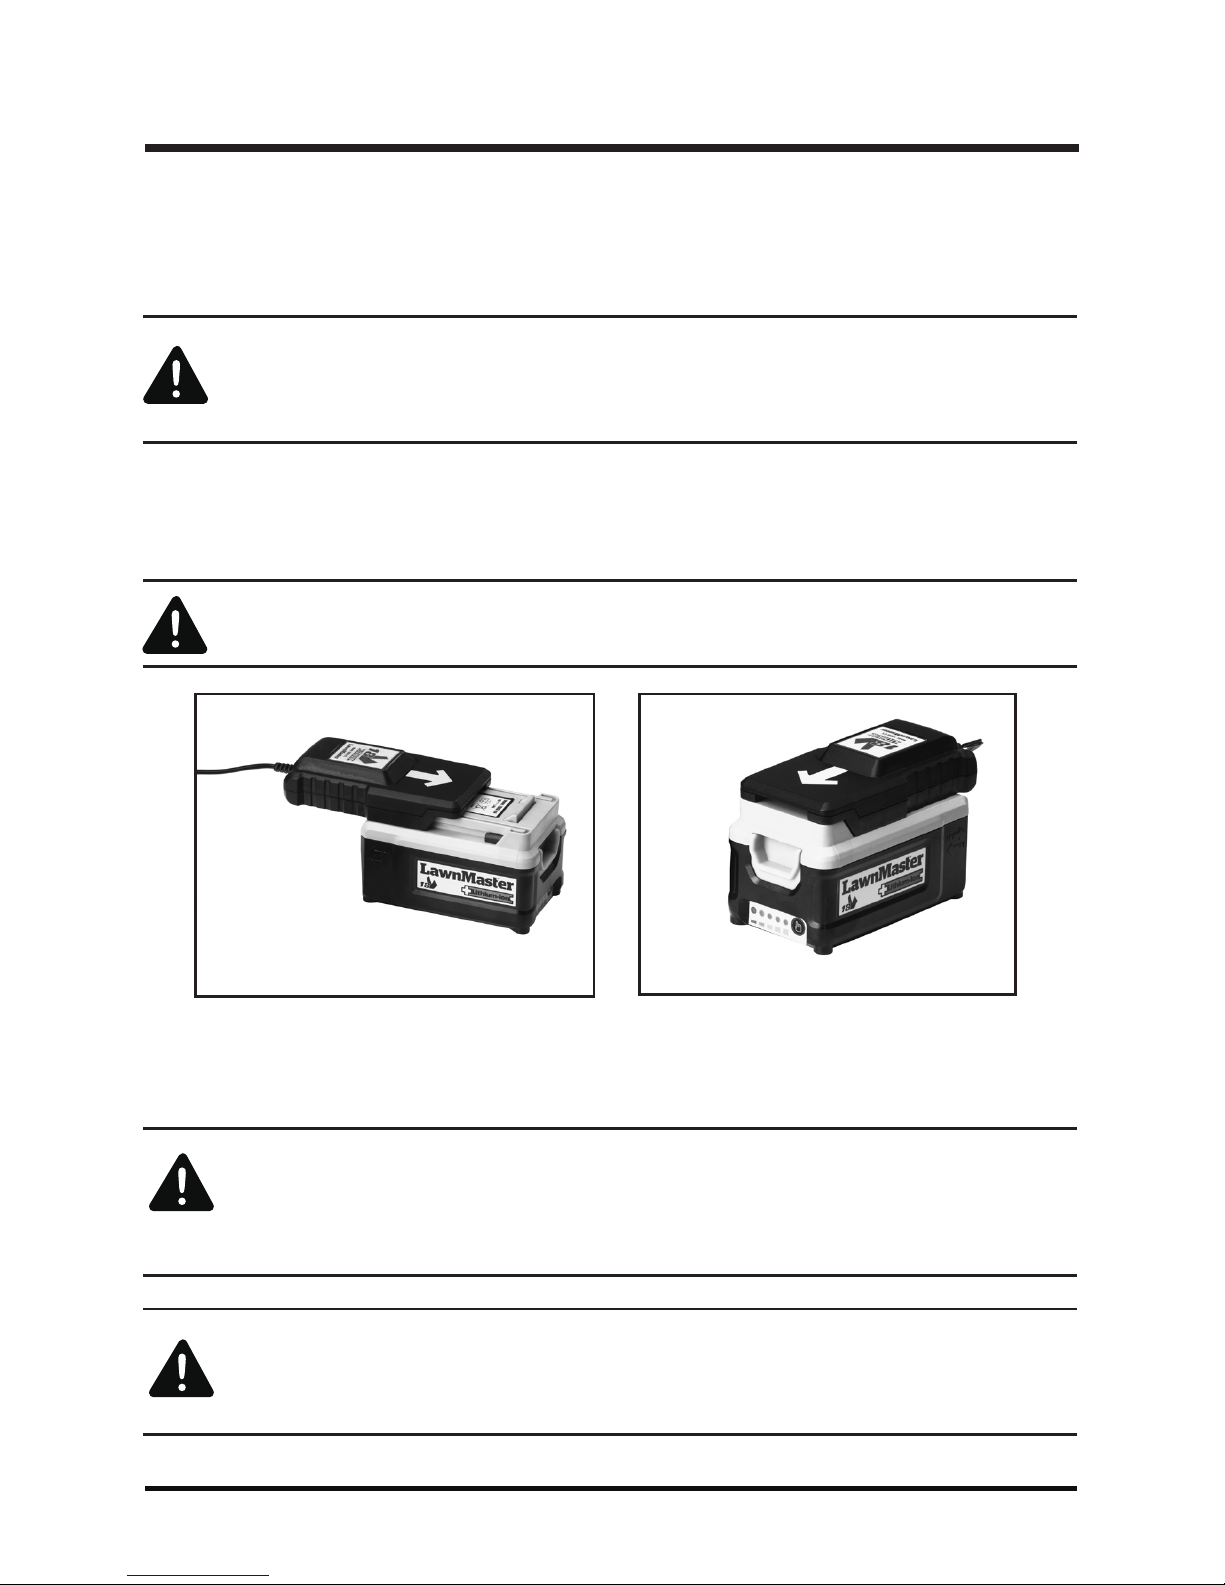
Charging the Battery (See figs 6A - 6B)
The battery pack for this product has been shipped in a low charge condition.
Charge it fully before first use.
WARNING! Always remove the battery pack from the product
for charging! Charge in a safe location away from moisture,
heat or any hazard to the charger or other danger!
NOTE: It is normal for the battery pack and charger to become
warm (but not hot) during charging process. If the battery does
not charge properly, check to make sure the electrical outlet
is "live".
WARNING! Always charge the battery before storage!
To reduce risk of fire, never leave the battery connected with
the charger for more than 24 hours!
WARNING! Check the voltage and current! The voltage and
current must comply with the information on the rating label!
Ɣ Align the battery pack to the slots on the charger and slide it in until it locks in
place (Fig. 6A , 6B).
ƔConnect the charger to the power supply.
Ɣ Allow sufficient charging time (see technical data), and then disconnect the
charger from the power supply.
ƔPress the release button on the battery pack and remove it from the charger.
Fig. 6A Fig. 6B

14
ASSEMBLY
CHARGER INDICATORS
The lights on the charger indicate the charger status.
Symbol Spelling indicators Status
red,
blinking
technical
defect
red,
continuous charging
green,
continuous
fully
charged
ATTACH / RELEASE (Figs. 7 , 8)
Ɣ7RDWWDFKDOLJQWKHEDWWHU\SDFNWRWKHVORWVRIWKHEDWWHU\GRFNLQJSRUWRIWKHSURGXFWDQG
slide it in until it locks in place (Fig. 7).
Ɣ7RUHOHDVHSUHVVWKHUHOHDVHEXWWRQRQWKHEDWWHU\SDFNDQGUHPRYHLWIURPWKHSURGXFW
(Fig. 8).
16
9
1.
9
8.giF7.giF
ASSEMBLY
15
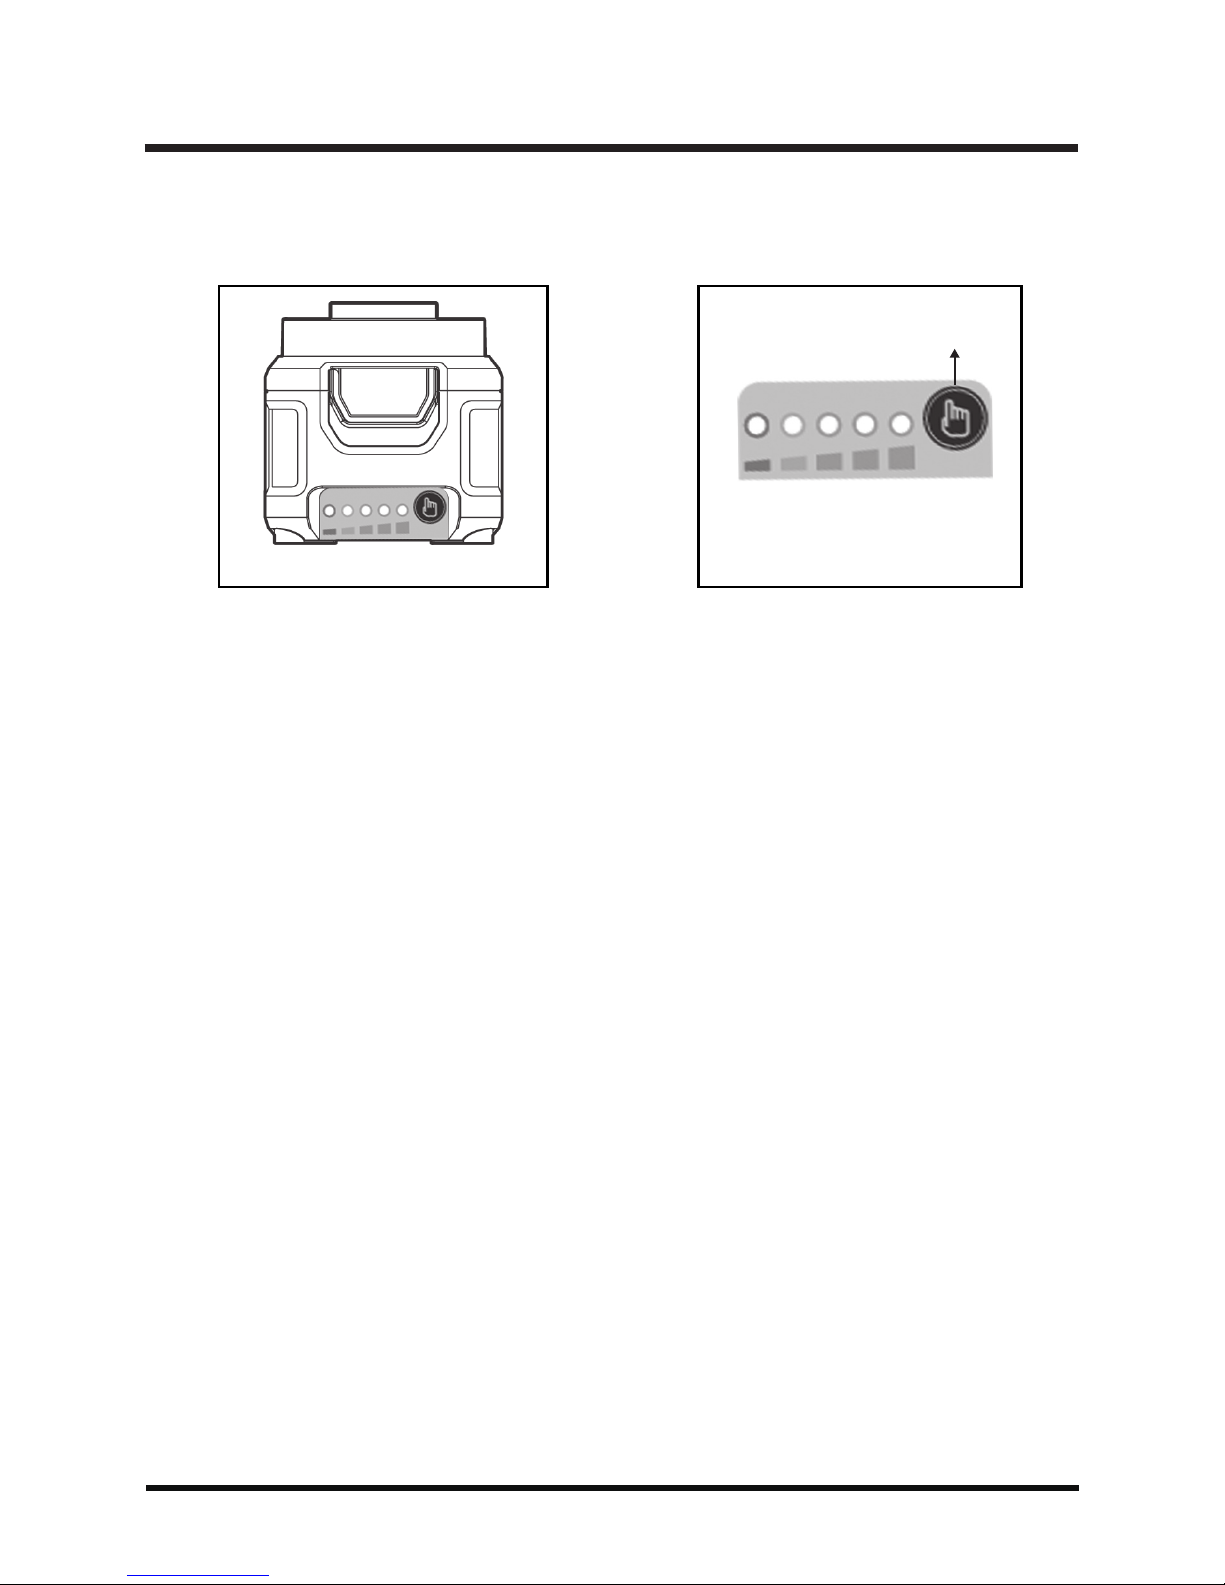
Battery LED Indicators (See figs. 9-10)
Check the battery pack capacity pressing the button(15).
STARTING AND STOPPING
Ɣ0DNHVXUHWKHRQRIIVZLWFKLVLQLWVRIISRVLWLRQ
Ɣ$WWDFKWKHEDWWHU\SDFNWRWKHSURGXFW(QVXUHLWVQDSVLQSODFH
Ɣ<RXUSURGXFWLVQRZUHDG\WREHXVHG
Fig. 9 Fig. 10
Indicator Lights
Low Capacity High Capacity
15

INTENDED USE
16
Ɣ
This cordless garden saw CLGS1832A01 is designated with a rated
voltage of 18 V It is designed only to be used with the battery pack
model no. 1800L-BA. CLGS1832A01 designates the respective charger with
a charging voltage of 20.8 V
Ɣ
This product is intended for cutting wood and branches in domestic gardens.
With appropriate saw blades the product can also be used for cutting plastic
and soft metal.
.
.
NOTE: The supplied saw blades are only for cutting wood, plastic and metal.
Do not attempt to use them for cutting other materials.
The product must not be used for plunge cutting and should not be used as a
stationary product mounted on a work bench. The product must not be used on
materials that are harmful to health.
For safety reasons it is essential to read the entire instruction manual before ¿UVW
operation and to observe all the instructions therein.
This product is intended for private domestic use only, not for any commercial
trade use. It must not be used for any purposes other than those described.

17
Ɣ7RUHPRYHSUHVVWKHVHUUDWHGJULSSLQJMDZUHOHDVHOHYHUDQGUHPRYHWKH
serrated gripping jaw by it lifting (1) from the serrated gripping jaw support rail
(12) (fig. 13).
ƔWRDWWDFKDOLJQWKHWZRVWHHOWDEVRQWKHERWWRPRIWKHVHUUDWHGJULSSLQJMDZ
(1) with the two holes at the base of the serrated gripping jaw support rail (12)
align and slide it onto the support rail while pressing the serrated gripping jaw
release lever (2).(fig. 14)
Ɣ5HOHDVHWKHVHUUDWHGJULSSLQJMDZUHOHDVHOHYHUDQGHQVXUHWKHVHUUDWHG
gripping jaw release lever (2) is locked in place (fig. 14).
ƔSXOORQWKHUHOHDVHOHYHUWRWHVWLIWKHVHUUDWHGJULSSLQJMDZVLWVSURSHUO\
in place. it should not be possible to pull it off.
SERRATED GRIPPING JAW
The Serrated Gripping Jaw (1) helps to guide and support the material while cutting
small branches,
OLPEVRUSROHVGLDPHWHUOHVVWKDQPP)LJV
21.giF11.giF
12
2
1
12
2
1
41.giF31.giF

18
Ɣ
Check the product, its battery pack and charger as well as accessories for
damage before each use. Do not use the product if it is damaged or shows
wear.
Ɣ
Double check that accessories or the saw blade are properly fixed.
Ɣ
Always hold the product firmly with one hand by the handle. Keep the handle
dry and clean to ensure safe support.
Ɣ
While sawing, do not touch the serrated gripping jaw, the blade or the air vents.
Ɣ
Ensure that the air vents are always unobstructed and clear. Clean them if
necessary with a soft brush. Blocked air vents may lead to overheating and
damage the product.
Ɣ
Switch the product off immediately if you are disturbed while working by other
people entering the working area. Always let the product come to complete
stop before putting it down.
Ɣ
After sawing, the blade may be hot, let it cool down before touching it.
Ɣ
Do not overwork yourself. Take regular breaks to ensure you can concentrate
on the work and have full control over the product.
Ɣ
Press the lock-off button (6) to either side and hold it in position.
Ɣ
Press the on/off switch (7) to switch the
product on (Fig. 15).
Ɣ
Release the on/off switch (7) to switch the
product off. (Fig. 15).
Speed Control (Fig. 15).
Adjust the speed directly when operating
with the built-in speed control.
The on/off switch (7) of this product is
combined with a speed control.
The speed is controlled by how far the
on/off switch (7) is depressed.
GENERAL OPERATION
SWITCHING ON/OFF (Fig. 15)
NOTE: The lock-off button can either be pressed from left to right or
right to left. With the lock-off button in the middle position the on/off
switch is locked in its off position.
6
7
1.
2.
Fig. 15

CUTTING
19
Ɣ Hold the product with one hand only (Fig. 16).
Do not attempt to hold the product with two hands (Figs. 17, 18).
Ɣ Do not hold the workpiece by hand but use suitable clamps to secure it if
required (Fig. 19).
Ɣ Ensure the workpiece is free of obstacles like nails or screws before operation.
Remove them if required.
Ɣ Switch the product on and wait until it runs at full speed before placing it on
the workpiece.
Ɣ Only apply as much pressure as necessary to guide the blade through the
workpiece. Higher pressure will not increase but lower the performance of
the product.
Ɣ Switch the product off, let it come to a complete stop and remove the battery
pack if the saw blade (13) is stuck in the workpiece.
Only then free the jammed blade.
WARNING! During operation fine dust will be generated!
Some dusts are highly inflammable and explosive! Do not smoke during
operation, keep heat sources and open flames out of the working area!
Always wear a dust mask to protect yourself against hazards resulting
from fine dust!
NOTE: Always use the product together with the serrated gripping jaw (1)
when
cutting smaller round workpieces.
For squared shaped or workpieces with bigger diameter (larger than 60mm)
remove the serrated gripping jaw.
Fig. 16YES
NO
NONO
Fig. 17
Fig. 18 Fig. 19

CUTTING
20
Cutting With SERRATED GRIPPING JAW
Ɣ3ODFHWKHVHUUDWHGJULSSLQJMDZRQWRWKHZRUNSLHFH
Ɣ(QVXUHWKHEODGHLVQRWWRXFKLQJWKHZRUNSLHFHDQGVZLWFKWKHSURGXFWRQDVGHVFULEHG
Ɣ:DLWXQWLOWKHVDZEODGHUXQVDWIXOOVSHHG
Ɣ6ORZO\ORZHUWKHVDZEODGHLQWRWKHZRUNSLHFHDSSO\LQJOLJKWSUHVVXUHGRZQZDUG)LJ
Cutting Without SERRATED GRIPPING JAW
Ɣ5HPRYHWKHSERRATED GRIPPING JAW from the product.(Fig. 13).
Ɣ(QVXUHWKHEODGHLVQRWWRXFKLQJWKHZRUNSLHFHDQGVZLWFKWKHSURGXFWRQDVGHVFULEHG
Ɣ:DLWXQWLOWKHVDZEODGHUXQVDWIXOOVSHHG
Ɣ0RYHWKHSURGXFWLQDVZLQJLQJPRWLRQVRWKHVDZEODGHFXWVWKURXJKWKHZRUNSLHFHZLWKDQHYHQ
feed (Fig. 21).
Fig. 20
Fig. 21
Table of contents
Other LawnMaster Saw manuals


