lb polar RL Series User manual

Table of Contents Page
1. Safety Precautions 1
2. General Desciption 2
3. Power Setting and Wiring 2
4. Box Content 2
5. Optional Accessories 2
6. Installation 3
6.1
6.2 Ceiling Mounting with Threaded Rod 4
6.3 Mounting on
WH 180 Bracket (Optional)
.
8. Specifications 7
1. Safety Precautions
•Before starting to install the RL 180 NT EVAC loudspeaker please read these instructions carefully.
•Keep this instructions for future reference
•The RL 180 NT EVAC speakers are intended to be used in voice alarm systems with a 100 V line speaker distribution.
•Installation work should only be done by a certified installer.
•Only use accessories and mounting accessories specified by the manufacturer.
This symbol indicates a possible presence of
dangerous voltages that may constitute a risk of electric shock.
This symbol indicates the presence of
important safety instructions in this manual.
Manufacturer
LB Lautsprecher und Beschallungstechnik GmbH · Steinerstr. 15 k · 81369 München · Tel. +49 89 1893 109-0 Fax -29 · www.lb-lautsprecher.de · info@lb-lautsprecher.de
RL 180 NT EVAC
Inst Manual
Certified to the European Standard EN 54-24: 2008
Loudspeaker for voice alarm systems
2. General Description
he
The speakers may be suspended from the ceiling or mounted on wall/ceiling with the WH 180 bracket (to be ordered separately).
Due to i broad forward dispersion angle and highly reduced backward radiation it is well suited for even coverage of a listening area with sufficent
intelligibility
The RL 180 NT EVAC
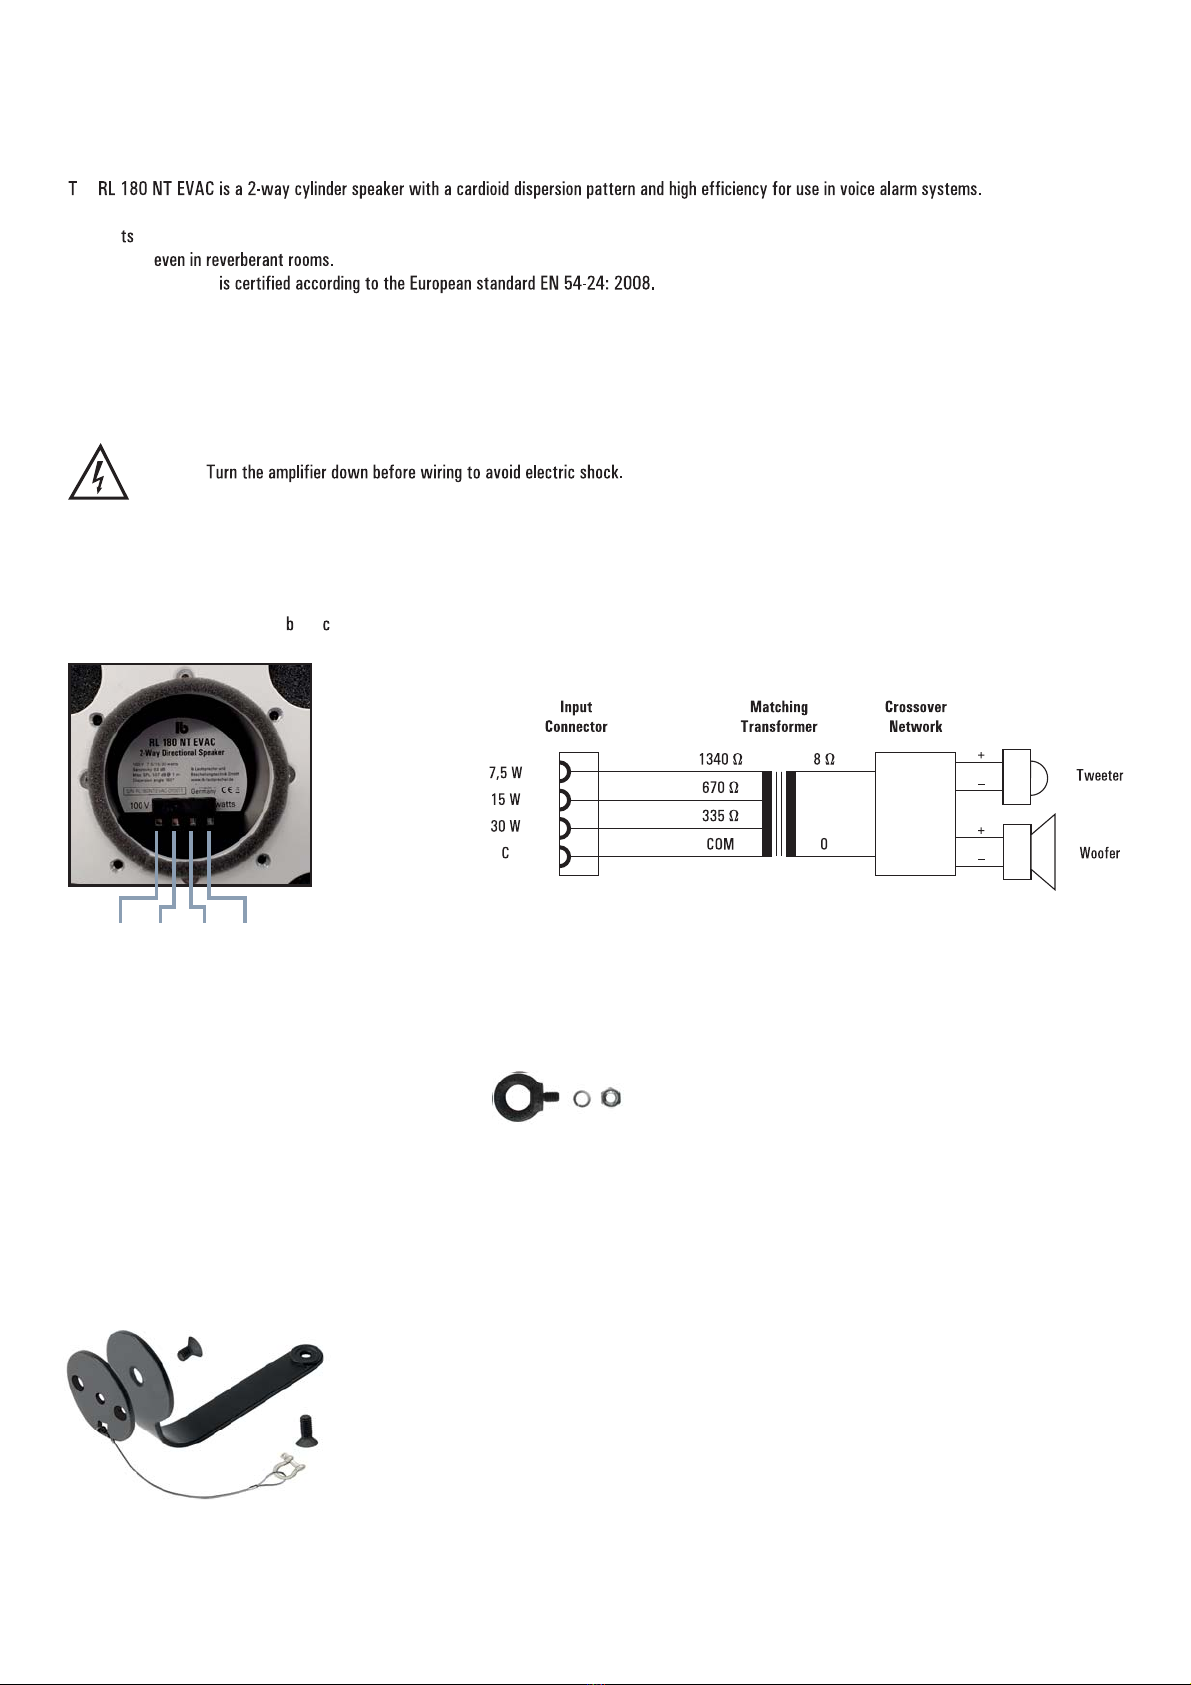
3. Power Setting and Wiring
The RL 180 NT EVAC comprises a 4-pole plug to select the speaker power.
Use COM and one of the 3 taps to connect the speaker to the speaker line.
COM 30 W 15 W 7.5 W
4. Box Content
•Speaker
•M8 eye bolt, lock washer and nut
•Installation manual
5. Optional Accessories
For on wall and on ceiling mounting with adjustable speaker direction the WH 180 Mount is available.
RL 180 NT EVAC Wiring Diagram
WH 180 Bracket with safety rope
Connector on the Rear (without ack over)
Manufacturer
LB Lautsprecher und Beschallungstechnik GmbH · Steinerstr. 15 k · 81369 München · Tel. +49 89 1893 109-0 Fax -29 · www.lb-lautsprecher.de · info@lb-lautsprecher.de
Page -2-

Eye Bolt M8
fastened with lock washer and nut
Main Suspension
Stainless steel rope with min. 1, mm
diameter + approved compression sleeves
or hangers
Safety Suspension
Stainless steel rope with min. 1,
mm diameter + approved
compression sleeves
The safety rope should not be longer
then the main rope + 200 mm
Cable Gland
for speaker line feed
Cable diameter from
5 to 10 mm
M 5 Screws + Lock Washers
for
wiring
Safety Eye
6. Installation
6.1 RL 180 NT-EVAC suspended from the ceiling with a steel rope
The procedure to install the speakers suspended from the ceiling goes as follows:
1. Create the main suspension point and a second poin for the safety rope
2. Prepare the 2 steel ropes and the speaker cable with appropriate lenght
3. Remove the back cover from the speaker and fix the eye bolt to it using the lock washer and nut. Seal the joint with thread-locking fluid water-tight.
4. Pass the cable through the gland and connect the speaker feed to the 4-pole plug. Use C (COM) and one of the 3 different taps (7,5, 15 or 30 watts).
Then tighten the cable gland leaving enough free cable to connect the plug to the speaker terminal and fix the back cover to the speaker again.
•
ake sure all screws of the back cover are firmly fastened and the gland fits tightly around the cable jacket. A leaky gland affects•
the enclosure protection.
•Seal the eye bolt joint with thread-locking fluid water-tight.
5. Fix the main suspension rope to the speaker eye bolt and the ceiling anchor with approved compression sleeves or hangers.
6. Fix the safety rope to the safety eye of the speaker and the ceiling anchor with approved compression sleeves or hangers.
The safety rope should be a little longer then the main rope to avoid a tilt of the speaker, but not more then the main rope + 200 mm
7. both ropes + cable may be bundled with a textile hose
Back Cover
Remove the back cover for wiring.
Manufacturer
LB Lautsprecher und Beschallungstechnik GmbH · Steinerstr. 15 k · 81369 München · Tel. +49 89 1893 109-0 Fax -29 · www.lb-lautsprecher.de · info@lb-lautsprecher.de
Page -3-
Safety Suspension
Stainless steel rope with min. 1, mm
diameter + approved compression
sleeves
The safety rope should not be longer
then the main suspension + 200 mm
Cable Gland
for speaker line feed.
Cable diameter from
5 to 10 mm
M 5 screws + Lock Washers
for
wiring
Safety Eye
6. Installation
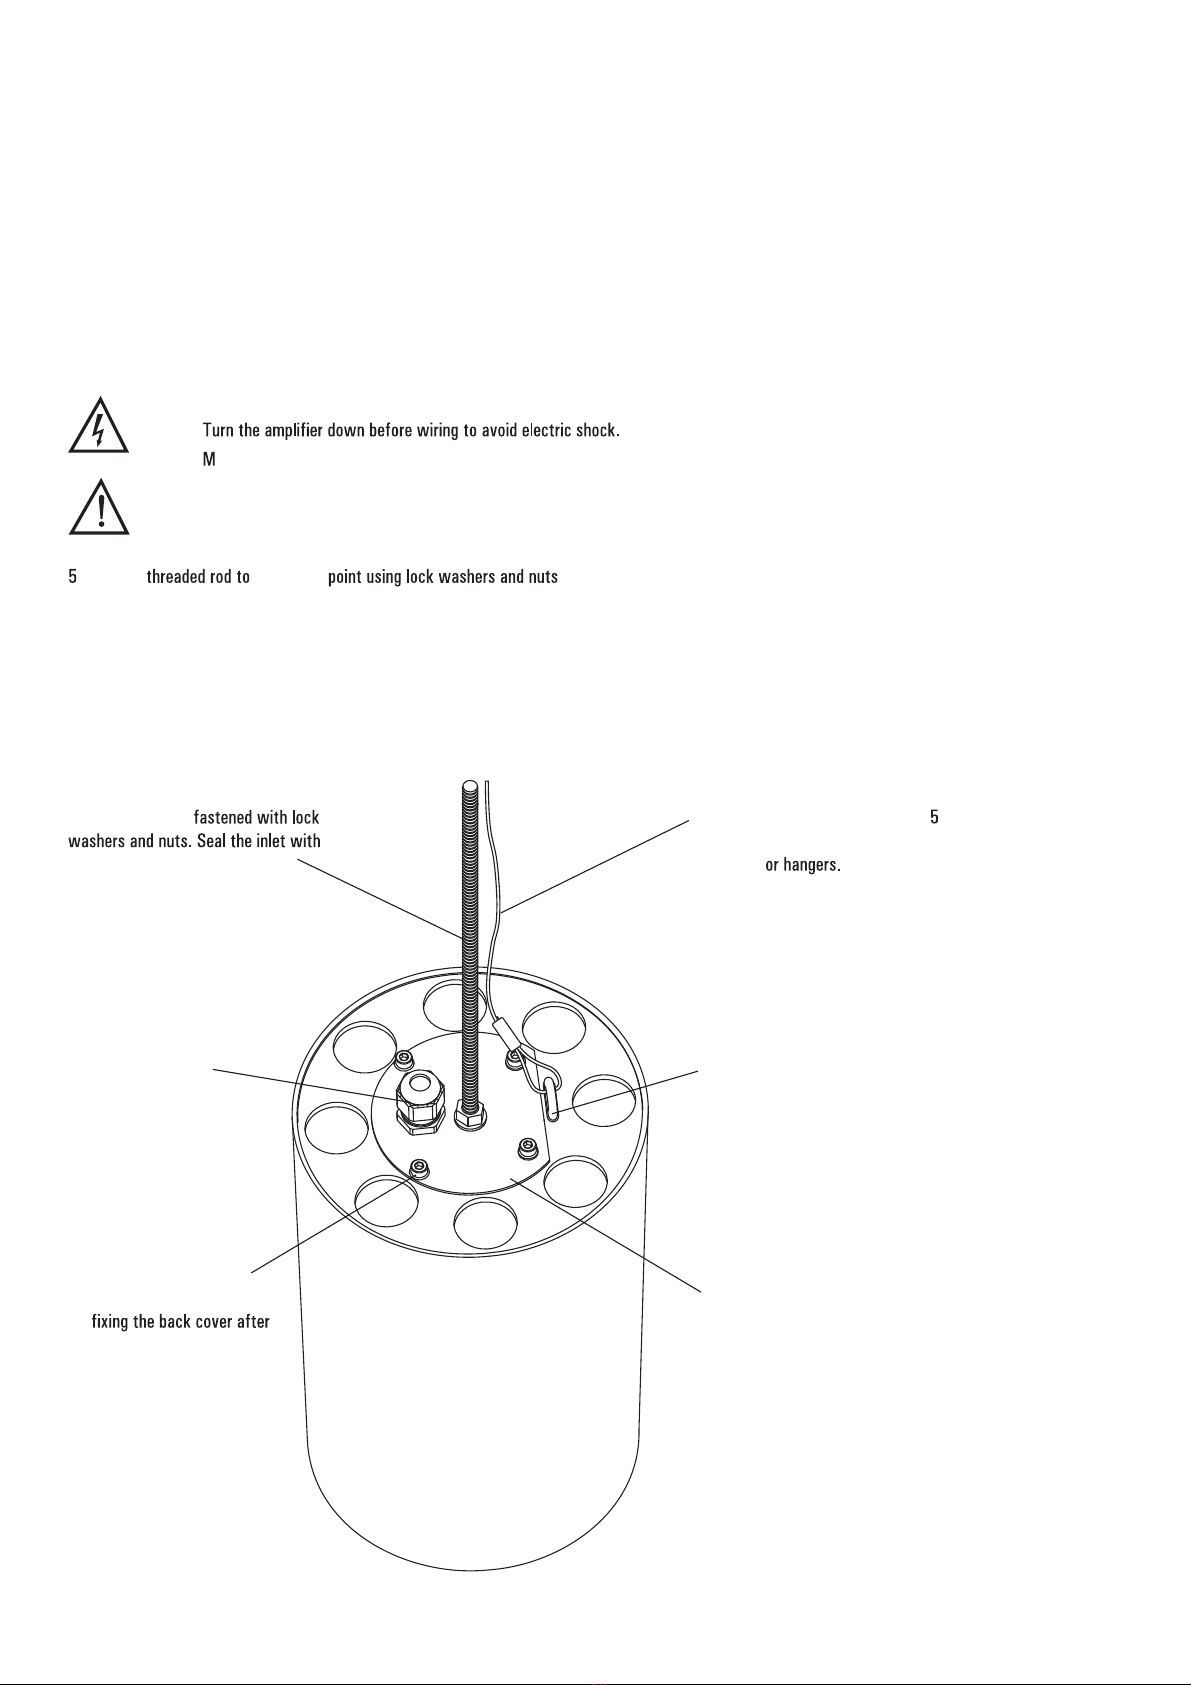
6.2 RL 180 NT-EVAC suspended from the ceiling with a threaded rod
The procedure to install the speakers suspended from the ceiling with a threaded rod goes as follows:
1. Create the main suspension point and a second point for the safety
2. Prepare rod, safety rope and speaker cable with appropriate lenght
3. Remove the back cover from the speaker and fix the M8 threaded rod to it using lock washers and nuts. Use thread-locking fluid to seal the joint
water-tight.
4. Pass the cable through the gland and connect the speaker feed to the 4-pole plug. Use C (COM) and one of the 3 different taps (7,5, 15 or 30 watts).
Then tighten the cable gland leaving enough free cable to connect the plug to the speaker terminal and fix the back cover to the speaker.
•
ake sure the screws of the back cover are firmly fastened and the gland fits tightly around the cable jacket.•
A leaky gland affects the enclosure protection.
Use thread-locking fluid to seal the rod joint water-tight.
•
. Fix the the ceiling
6 Fix the safety rope to the safety eye of the speaker and the ceiling anchor with approved compression sleeves or hangers.
The safety rope should not be tensioned to avoid a tilt of the speaker, but it should not be longer then the main suspension + 200 mm
7. Rod, rope and cable may be bundled with a textile hose
Back Cover
Remove the back cover for wiring.
Main Suspension
Threaded rod M8,
thread-locking fluid water-tight
Manufacturer
LB Lautsprecher und Beschallungstechnik GmbH · Steinerstr. 15 k · 81369 München · Tel. +49 89 1893 109-0 Fax -29 · www.lb-lautsprecher.de · info@lb-lautsprecher.de
Page -4-

Mounting the RL 180 NT-EVAC on a ceiling using the WH 180 bracket
Cable Gland
for speaker line feed
Cable diameter from
5 to 10 mm
M 5 screws + Lock Washers
for
wiring
6. Installation
6.3 RL 180 NT-EVAC with WH 180 Mount on wall or on ceiling
The procedure to install the speakers with WH 180 mounts goes as follows:
1.
the weight of the speaker and mount.
2. Remove the back cover from the speaker and fix the eye bolt to it using the lock washer and nut. Seal the joint with thread-locking fluid water-tight.
The eye bolt is not used as a mounting point but to close the rear cover water-tight.
3. Fix the L-bracket to the speaker and the mounting plate with little force so you can adjust the speaker direction using the M10 screws and the toothed
lock washers.
4. Take the back cover, pass the cable through the gland with appropriate lenght and connect the speaker feed to the 4-pole plug. Use C (COM) and one
of the 3 different taps (7,5, 15 or 30 watts). Then tighten the cable gland leaving enough free cable to connect the plug to the speaker terminal and
fix the back cover to the speaker.
•
ake sure the screws of the back cover are firmly fastened and the gland fits tightly around the cable jacket.•
A leaky gland affects the enclosure protection.
Seal the eye bolt joint with thread-locking fluid water-tight.
•
. Adjust the speaker direction und the
6 Fix the safety rope to the safety eye of the speaker using the shackle. Make sure the shackle is firmly closed.
Back Cover
Remove the back cover for wiring.
Shackle and Safety Eye
Fix the safety rope to the safety
eye
Safety Rope
Mounting Plate
Mount the late to the wall or ceiling
with appropiate dowels
L-Bracket
Fix the L- racket to the mounting
plate and speaker using the M 10
screws and the toothed lock washers
RL 180 NT-EVAC with WH 180 Mount on Wall
Manufacturer
LB Lautsprecher und Beschallungstechnik GmbH · Steinerstr. 15 k · 81369 München · Tel. +49 89 1893 109-0 Fax -29 · www.lb-lautsprecher.de · info@lb-lautsprecher.de
Page -5-

7. Drawings
RL 180 NT EVAC
d=180
d=180
PG
Safety ye
280
ed Insert M10
M10×12 Screw
90
M10×20 Screw
161
90
WH 180 Bracket
late
142
oothed asher
L- ket
d=8,5
0
Front
Front Rear
Back over
Manufacturer
LB Lautsprecher und Beschallungstechnik GmbH · Steinerstr. 15 k · 81369 München · Tel. +49 89 1893 109-0 Fax -29 · www.lb-lautsprecher.de · info@lb-lautsprecher.de
Page -6-

8. Specifications
Model RL 180 NT EVAC
Environment Type Type A
Speaker omponents 6,5" Low-Mid driver, 1" dome tweeter with Polar wave guide
Frequency ange
Sensitivity (1 W / 4 m)
Maimum SPL (30 W / 4 m)
Coverage (vertikal and horizontal)
1 kHz: 130°
2 kHz: 100°
4 kHz: 80°
8 kHz: 110°
Rated Noise Power 30 Wrms (30 W tap)
Rated Noise Voltage 100 Vrms
Rated Impedance 30 W tap: 335
15 W tap: 6 0
7,5 W tap: 1340 Ω
Connector 4-pole Plug, ated ross ection 2,5 mm²
Cable Gland Maximum diameter 10 mm
Temperatur Range
Dimensions Diameter 180 mm, Depth 280 mm
Weight 4,3 kg
Enclosure Material Emclosure: luminium, ower coated
Front grille: perforated steel mesh, powder-coated
Standard Colors White or Black
Certificates CE,
Accesories WH 180 Wall bracket,
Notes
- The design and specifications are subject to change without notice for improvement.
- The Specifications data was measured according to EN 54-24.
- Reference axis: Axis is on the center of grill surface and perpendicular to the grill surface.
Manufacturer
LB Lautsprecher und Beschallungstechnik GmbH · Steinerstr. 15 k · 81369 München · Tel. +49 89 1893 109-0 Fax -29 · www.lb-lautsprecher.de · info@lb-lautsprecher.de
Page -7-
This manual suits for next models
1
Table of contents
Other lb Speakers manuals

Popular Speakers manuals by other brands


Marshall Amplification
Marshall Amplification Kilburn II user manual

Hercules
Hercules WAE Outdoor 04Plus FM user manual

Altec Lansing
Altec Lansing IMT7012 quick start guide

GAI-Tronics
GAI-Tronics 13310-311 Instruction and service manual

Blaupunkt
Blaupunkt GTt 1200 Operating and installation instructions

Sony
Sony SRS-XB100 Help guide


