manuals.online logo
Brands
  1. Home
  2. •
  3. Brands
  4. •
  5. Lechner
  6. •
  7. Hob
  8. •
  9. Lechner Pure FullFit CU Series User manual

Lechner Pure FullFit CU Series User manual

Pure FullFit customized (CU)
Montageanleitung
Installation Instructions
Notice de montage
DE Ein Kochfeld nach Maß
Das Induktionskochfeld CU ist in zwei Breiten erhältlich und jeweils in der
Tiefe konfektionierbar (B x T):
Pure FullFit CU90: 900 x 601 – 890 mm
Pure FullFit CU120: 1200 x 601 – 890 mm
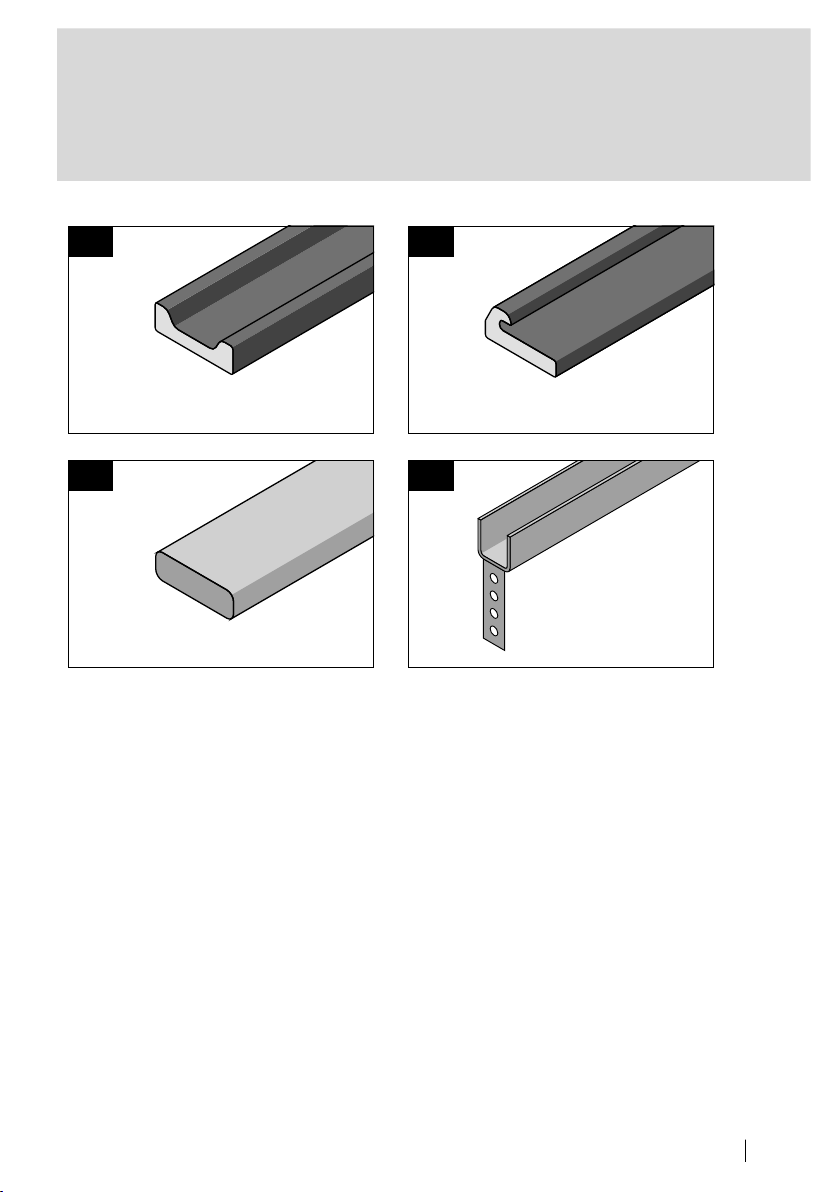
Material-Kombinationen
Das Induktionskochfeld Pure FullFit CU lässt sich mit folgenden Materialien
RVTIPUPLYLU!5H[\YZ[LPU8\HYaZ[LPU2LYHTPR4PULYHS^LYRZ[Vќ3HTPUH[
Für alle Materialien ist eine hohe Produktsicherheit gewährleistet. Für den
optimalen Einbau werden alle Kochfelder mit einem Unterstützungsmonta-
NLWYVÄSMY2JOLU\U[LYZJOYpURLH\ZNLSPLMLY[+PLZLZVYNLUMYLPULN\[L
Aussteifung der Unterschränke. Die Arbeitsplatten aus steinartigen Materia-
lien werden mit Plattenstoß und einer speziell gefertigten Unterbauplatte für
das Kochfeld realisiert.
EN A made-to-measure hob
The CU induction hob is available in two widths, each of which can be
tailored in depth (W x D):
Pure FullFit CU90: 900 x 601 – 890 mm
Pure FullFit CU120: 1200 x 601 – 890 mm
Material combinations
The Pure FullFit CU induction hob can be combined with the following
TH[LYPHSZ!5H[\YHSZ[VULX\HY[aZ[VULHUKJLYHTPJTPULYHSÄSSLKTH[LYPHS
laminate
A high product reliability is guaranteed for all materials. For optimum
PUZ[HSSH[PVUHSSOVIZJVTL^P[OHZ\WWVY[PUNPUZ[HSSH[PVUWYVÄSLMVYRP[JOLU
IHZL\UP[Z;OLZLWYV]PKLNVVKIYHJPUNMVY[OLIHZL\UP[Z;OL^VYR[VWZ
in stone-type materials are designed with butt joint and a specially made
support panel for the hob.
Pure FullFit CU90 und CU120
Pure FullFit CU90 and CU120
Pure FullFit CU90 et CU120
2INDUKTIONSKOCHFELD PURE FULLFIT CUSTOMIZED
FR Un plan de cuisson sur mesure
Le plan de cuisson à induction CU est disponible en deux largeurs et peut
être fabriqué en deux profondeurs respectives (l x P) :
Pure FullFit CU90 : 900 x de 601 à 890 mm
Pure FullFit CU120 : 1200 x de 601 à 890 mm
Combinaisons de matériaux
Il est possible de combiner le plan de cuisson à induction Pure FullFit CU
avec les matériaux suivants: la pierre naturelle, le quartz et la céramique, la
TH[PuYLTPUtYHSLL[SLZ[YH[PÄt
Une sécurité élevée du produit est garantie pour tous les matériaux. Pour
MHJPSP[LYSLTVU[HNL[V\ZSLZWSHUZKLJ\PZZVUZVU[MV\YUPZH]LJ\UWYVÄSt
de montage d‘appui pour les éléments bas de cuisine. Il garantit un bon
renfort des éléments bas. Les plans de travail en matériaux de type pierre
sont réalisés avec un joint de panneaux et un panneau de base spéciale-
ment conçu pour le plan de cuisson.
3
H _+VWWLSWYVÄS3pUNLTPUTT
I _:LP[LUWYVÄS3pUNLTPU TT
c) 2 Blatt Ausgleichsmasse mit je 6 Streifen
K _,KLSZ[HOS(\ZZ[LPM\UNZWYVÄS
ILP $3pUNLTT
ILP$3pUNLTT
H KV\ISLWYVÄSLZSLUN[OTPUTT
I ZPKLWYVÄSLZSLUN[OTPU TT
c) 2 sheets of levelling compound, 6 strips each
K Z[HPUSLZZZ[LLSIYHJPUNWYVÄSL
for 900 = length 868 mm
for 1200 = length 1168 mm
H WYVÄStZKV\ISLZSVUN\L\YTPUTT
I WYVÄStZSH[tYH\_SVUN\L\YTPU TT
c) 2 feuilles de masse de compensation comprenant
respectivement 6 bandelettes
K WYVÄStKLYLUMVY[LUHJPLYPUV_`KHISL
pour 900 = 868 mm de long
pour 1200 = 1168 mm de long
Montagezubehör
Installation accessories
Accessoires de montage
DE
EN
F
R
4INDUKTIONSKOCHFELD PURE FULLFIT CUSTOMIZED
1x
2x
2 x 6
ab
c d
4x
5
1) Unterschränke ausrichten, sodass die Oberkanten
aller Elemente das gleiche Niveau haben.
1) Align base units so that the top edges of all elements
are at the same level.
1) Aligner les éléments bas si bien que les chants supérieurs
de tous les éléments soient au même niveau.
DE
EN
F
R
Unterschränke ausrichten
Aligning base units
Aligner les éléments bas
01
6INDUKTIONSKOCHFELD PURE FULLFIT CUSTOMIZED
1
7
 (\ZZ[LPM\UNZWYVÄSIUKPNTP[KLY6ILYRHU[LPU
das Element einschrauben.
 :JYL^IYHJPUNWYVÄSLVU[V[OLLSLTLU[ZV[OH[
P[PZÅ\ZO^P[O[OL[VWLKNL
 =PZZLYSLWYVÄStKLYLUMVY[nÅL\YH]LJ
le chant supérieur dans l‘élément.
DE
EN
F
R
(\ZZ[LPM\UNZWYVÄSLPUZJOYH\ILU
:JYL^PUNVUIYHJPUNWYVÄSL
=PZZLYSLWYVÄStKLYLUMVY[
02
8INDUKTIONSKOCHFELD PURE FULLFIT CUSTOMIZED
2
9
3 a-b) Vorgefräste Trägerplatten mit einem langen Stichsägeblatt von
unten heraustrennen.
JK (\ZZJOUP[[LTP[LPULT(S\TPUP\TRSLILIHUK]VSSÅpJOPNILRSLILU
3 a-b) Using a long jigsaw blade, cut out the pre-milled support panels
and remove them from below.
3 c-d) Apply adhesive aluminium tape to the entire surface of the cut-out
edges.
3 a-b) Séparer par le bas les panneaux de support préfraisés au moyen
d‘une longue lame de scie sauteuse.
3 c-d) Poser une bande autocollante en aluminium sur toute la surface
des découpes.
DE
EN
FR
Ausschnitte werkseits – Wrasenblech
Factory-produced cut-outs – vapour strip
Découpes réalisées en usine - tôle anti-buées
03
10 INDUKTIONSKOCHFELD PURE FULLFIT CUSTOMIZED
3a
3c
3b
3d
11
Einpassen der Arbeitsplatten
-P[[PUN^VYR[VWZ
Ajuster les plans de travail
4 a-b) Arbeitsplatten auf den ausgerichteten Unterschränken zusammen-
SLNLU/OLUKPќLYLUaLUK\YJO<U[LYSLNLUH\ZNSLPJOLU
HI 7VZP[PVU^VYR[VWZVU[OLHSPNULKIHZL\UP[Z
,]LUV\[OLPNO[KPќLYLUJLZ^P[OZOPTZ
4 a-b) Assembler les plans de travail sur les éléments bas alignés.
*VTWLUZLYSLZKPќtYLUJLZLUOH\[L\YH\TV`LUKLJHSLZ
DE
EN
F
R
04
12 INDUKTIONSKOCHFELD PURE FULLFIT CUSTOMIZED
4a 4b
13
Optional: Fixieren des Plattenstoßes
6W[PVUHS!)\[[QVPU[Ä_PUN
,UVW[PVU!Ä_LYSLQVPU[KLZWHUULH\_
A) Bei allen steinartigen Platten oder solchen, die in mehreren
Teilstücken geliefert werden, fahren Sie mit Schritt 5
„Fixieren des Plattenstoßes” fort.
B) Bei Platten, welche in einem Stück geliefert wurden,
fahren Sie bei Schritt 6É+VWWLSWYVÄSLH\MIYPUNLU¹MVY[
( -VYHSSZ[VUL[`WL^VYR[VWZVY^VYR[VWZZ\WWSPLKPUZL]LYHSZLJ[PVUZ
continue at step 5É)\[[QVPU[Ä_PUN¸
) -VY^VYR[VWZZ\WWSPLKPUVULWPLJLJVU[PU\L
at step 6É-P[[PUNKV\ISLWYVÄSLZ¸
A) Pour tous les panneaux de type pierre ou ceux livrés en plusieurs
segments, passer à l‘étape 5 « Fixer le joint de panneaux ».
B) Pour les panneaux livrés en une pièce, passer à
l‘étape 6(WWSPX\LYSLZWYVÄStZKV\ISLZ®
DE
EN
FR
14 INDUKTIONSKOCHFELD PURE FULLFIT CUSTOMIZED
5
A
6
B
15
HI 7SH[[LUZ[LYLPUPNLU
JK 7SH[[LUZ[LTP[5H[\Y
stein-Silikon abdichten.
L (YILP[ZWSH[[LU
zusammenfügen.
M (YILP[ZWSH[[LUH\ZYPJO[LU
und positionieren.
HI *SLHU^VYR[VWQVPU[Z
JK :LHS^VYR[VWQVPU[Z^P[O
natural-stone silicone.
L 1VPU^VYR[VWZ
M (SPNUHUKWVZP[PVU
^VYR[VWZ
HI 5L[[V`LYSLZQVPU[ZKL
panneaux.
JK i[HUJOLYSLZQVPU[ZKL
panneaux avec du silicone
pour pierre naturelle.
L (ZZLTISLYSLZWSHUZ
de travail.
M (SPNULYL[WVZP[PVUULY
les plans de travail.
05 Fixieren des Plattenstoßes
)\[[QVPU[Ä_PUN
Fixer le joint des panneaux
DE
EN
FR
DE Spiritus
EN Spirit
FR Alcool
DE Naturstein-Silikon
EN Natural-stone silicone
FR Silicone pour pierres
naturelles
5a
5c
5e
16 INDUKTIONSKOCHFELD PURE FULLFIT CUSTOMIZED
DE Je nach Ausführung liegen
3 oder 4 Teilstücke bei.
CU90: Breite = 900 mm
CU120: Breite = 1200 mm
EN +LWLUKPUNVUJVUÄN\YH[PVU
[OLYL^PSSILVYZLJ[PVUZ
*< !^PK[O$ TT
*<!^PK[O$TT
FR ,UMVUJ[PVUK\TVKuSLV\
ZLNTLU[ZKLWHUULH\_ZVU[QVPU[Z
*< !SHYNL\Y$ TT
*<!SHYNL\Y$TT
5b
5d
5f
PURE FULLFIT CU90
PURE FULLFIT CU120
17
+VWWLSWYVÄSLH\MIYPUNLU
-P[[PUNKV\ISLWYVÄSLZ
7VZLYSLZWYVÄStZKV\ISLZ
06
H +VWWLSWYVÄSH\MWHZZLUKL3pUNLRYaLU\UKHUKLU,UKLUPT
Winkel auf Gehrung schneiden.
I _+VWWLSWYVÄSIUKPNmit hinterer und vorderer Kante
der Platte anbringen. Bei einer Ausführung als Inselplatte
bitte Schritt 7c beachten.
H :OVY[LUKV\ISLWYVÄSL[V[OLHWWYVWYPH[LSLUN[OHUK
TP[YL[OLLUKZH[
I -P[KV\ISLWYVÄSLZÅ\ZOwith rear and front edge of worktop.
>OLUPUZ[HSSPUNPUHUPZSHUK^VYR[VWWSLHZLWH`H[[LU[PVU
to step 7c.
H *V\WLYSLWYVÄStKV\ISLnSHSVUN\L\YUtJLZZHPYLL[JV\WLY
SLZL_[YtTP[tZLUVUNSL[n
I 7VZLYWYVÄStZKV\ISLZnÅL\Yavec les chants arrière et avant
du panneau. Tenir compte de l‘étape 7c pour les modèles sous
forme de panneau d‘îlot de cuisson.
DE
EN
FR
18 INDUKTIONSKOCHFELD PURE FULLFIT CUSTOMIZED
2x
45°
2x
6a
6b
19
:LP[LUWYVÄSLH\MIYPUNLU
-P[[PUNZPKLWYVÄSLZ
7VZLYSLZWYVÄStZSH[tYH\_
07
H :LP[LUWYVÄSH\MWHZZLUKL3pUNLRYaLU\UKHUKLU,UKLUPT
>PURLSH\M.LOY\UNZJOULPKLU
I _:LP[LUWYVÄSHUlinker und rechter Kante
des Ausschnitts anbringen.
7 c) Bei einer Ausführung als Inselplatte das zusätzlich beigelegte
:LP[LUWYVÄSH\MKLY/PU[LYRHU[LHUZ[H[[KLT+VWWLSWYVÄSHUIYPUNLU
H :OVY[LUZPKLWYVÄSL[V[OLHWWYVWYPH[LSLUN[OHUK
TP[YL[OLLUKZH[
I -P[ZPKLWYVÄSLZH[left and right edge of cut-out.
7 c) >OLUPUZ[HSSPUNPUHUPZSHUK^VYR[VWÄ[[OLHKKP[PVUHSS`Z\WWSPLK
ZPKLWYVÄSL[V[OLYLHYLKNLPUZ[LHKVM[OLKV\ISLWYVÄSL
H *V\WLYSLWYVÄStSH[tYHSnSHSVUN\L\YUtJLZZHPYLL[JV\WLY
SLZL_[YtTP[tZLUVUNSL[n
I 7VZLYWYVÄStZSH[tYH\_JVU[YLles chants gauche et droit
de la découpe.
7 c) En cas d‘un modèle sous forme d‘îlot de cuisson,
PSMH\[WVZLYSLWYVÄStSH[tYHStNHSLTLU[MV\YUPZ\YSLJOHU[
HYYPuYLH\SPL\K\WYVÄStKV\ISL
EN
F
R
20 INDUKTIONSKOCHFELD PURE FULLFIT CUSTOMIZED

This manual suits for next models

2

Other Lechner Hob manuals

Lechner Pure FullFit CU90 User manual

Lechner

Lechner Pure FullFit CU90 User manual

Popular Hob manuals by other brands

Whirlpool GMA 6421 manual

Whirlpool

Whirlpool GMA 6421 manual

Asko HIG1995AB Instructions for use

Asko

Asko HIG1995AB Instructions for use

AEG HG795450XB user manual

AEG

AEG HG795450XB user manual

KKT KOLBE IND290 Instruction and installation manual

KKT KOLBE

KKT KOLBE IND290 Instruction and installation manual

Klarstein 10034603 manual

Klarstein

Klarstein 10034603 manual

arcelik OM 754 EDWI manual

arcelik

arcelik OM 754 EDWI manual

Turbo Incanto TIA732 instruction manual

Turbo Incanto

Turbo Incanto TIA732 instruction manual

Electrolux KGG95375K user manual

Electrolux

Electrolux KGG95375K user manual

Baumatic Pythagora P61SS user manual

Baumatic

Baumatic Pythagora P61SS user manual

Samsung C21RJAN series Installation and operating instructions

Samsung

Samsung C21RJAN series Installation and operating instructions

Tesla HV6410MX user manual

Tesla

Tesla HV6410MX user manual

Smeg CIR60XS instruction manual

Smeg

Smeg CIR60XS instruction manual

SCHÖCK STIB64BKE Instructions for use

SCHÖCK

SCHÖCK STIB64BKE Instructions for use

montpellier GH91X Installation and operating instructions

montpellier

montpellier GH91X Installation and operating instructions

Electrolux EGW6343 user manual

Electrolux

Electrolux EGW6343 user manual

Zanussi ZITN643K user manual

Zanussi

Zanussi ZITN643K user manual

AEG HK683320FG user manual

AEG

AEG HK683320FG user manual

Jocel JP3GI008930 instruction manual

Jocel

Jocel JP3GI008930 instruction manual

manuals.online logo
manuals.online logoBrands
  • About & Mission
  • Contact us
  • Privacy Policy
  • Terms and Conditions

Copyright 2025 Manuals.Online. All Rights Reserved.