Do not operate Polar 2 Neon
while it is tightly coiled
WARNING: These products may represent a possible shock or re hazard if improperly
installed or attached in any way. Products should be installed in accordance with these
instructions, current electrical codes, and/or the current National Electric Code (NEC).
Use this rope light only with P2-NF-CONKIT-NP and 24V DC power supply. Any other
power cord or feed may damage the xture.
WARNINGS: READ ALL INSTRUCTIONS BEFORE YOU START:
CAUTION - To reduce risk of re, electric shock, or injury to persons, pay close
attention to this manual and stay within its guidelines when using this product.
Before use, note that this product requires a 24V DC Driver.
Ensure that the voltage of your power supply is compatible!
1. Do not cover this product as the covering may cause rope to overheat, melt, or ignite.
2. Do not operate Polar 2 Neon while it is tightly coiled.
3. Do not submerge exible light in liquids, or use the product in the vicinity of standing water or other liquids.
4. Do not route the cord or Polar 2 Neon through walls, ceilings, doors, windows, or any similar part of the building structure.
5. Secure this exible light using only the mounting clips provided or factory recommended mounting track (sold separately).
6. Do not secure this product or its cord with staples, nails, or like means that may damage the insulation.
7. Do not use if there is any damage to the PVC housing or power cord insulation. Inspect periodically.
8. Do not install on gates or doors, where subject to continuous exing.
9. Do not install in tanks or enclosures of any kinds.
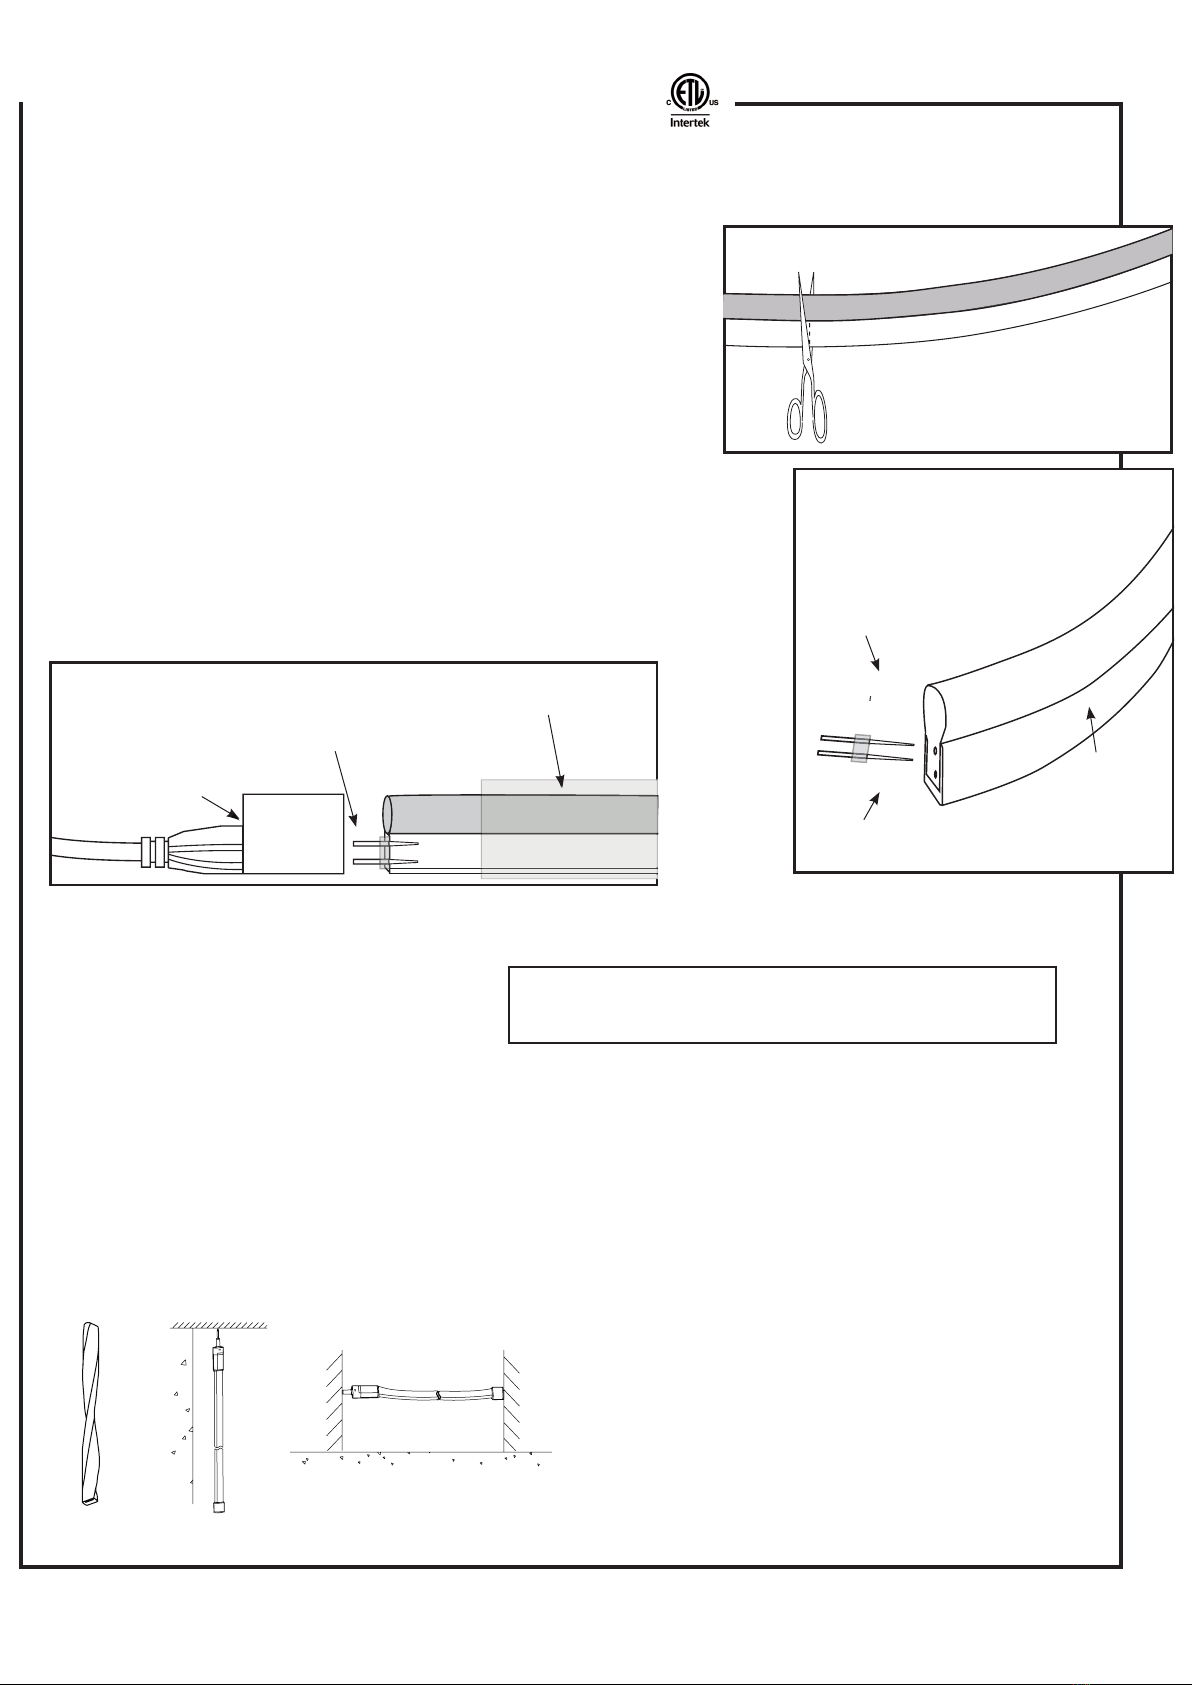
10. Follow instructions carefully when splicing Polar 2 Neon sections or attaching power cords. Ensure that all connections,
including the end cap on the last segment, are properly installed with dielectric grease and shrink tube to preclude the
entrance of water (outdoor applications).
11. Risk of re. Do not replace attachment plug. Discard product if attachment plug is damaged.
12. 24V Polar 2 Neon can only be cut at 12” intervals as indicated by the cutting marks printed on the side of the PVC housing.
Failure to cut at a cut mark, will result in a loss of light. Before making any cuts or attaching any power cords or jumpers,
be sure power source is disconnected!
13. This product is designed for use by a qualied installer.
14. This product is for decorative use only. Not to be used by children as a toy. Keep out of reach of small children.
15. Do not exceed 65’maximum run distance in any single run.
16. Size your 24V DC driver appropriately for your run distance of Polar 2 Neon using 2.8W/ft as a guide. Be sure not to load your
driver to 100% as this will reduce it’s eciency. An 80% load is recommended.
CAUTION - To reduce the risk of re, electric shock, or injury to persons:
WARNING: When using outdoor portable lighting products, basic safety precautions should always
be followed to reduce the risk of re, electric shock, and personal injury, including the following:
1. Use dielectric grease and shrink tube at all power connections, including end cap when using outdoors.
2. Use ground fault circuit interrupter (GFCI) protection on the circuit(s) or outlet(s) when using outdoors.
3. Use only wet location 24V DC drivers, per driver’s instructions; or house driver inside a weatherproof enclosure.
CONNECTING POWER (See Figures 1, 2, 3, and 4)
NOTE: Do not exceed 65’ maximum run distance in any single run.
1. Reels include one pre-attached power cord with no plug. See Figure 1.
2. Connect power cord to 24V DC power only. Determine the required length
for the lighting application. Use the driver chart on the reverse to size the
driver correctly. Cut the Neon following step 3 and Figure 2 on the reverse,
then skip to step 9.
24V Polar 2 Neon consumes 2.8 watts/ft. Do not exceed the maximum run distance of 65 feet.
POLAR 2 NEON, BULK REELS
Instructions for P2-NF-SERIES
24V DC
Figure 1