manuals.online logo
Brands
  1. Home
  2. •
  3. Brands
  4. •
  5. LEGRAND
  6. •
  7. Carbon Monoxide Alarm
  8. •
  9. LEGRAND Tynetec FireAngel User manual

LEGRAND Tynetec FireAngel User manual

Tynetec, a business unit of Legrand Electric Ltd
Cowley Road, Blyth Riverside Business Park, Blyth, Northumberland, NE24 5TF.
Tel: +44 (0) 1670 352371 www.tynetec.co.uk
Trusted Technology
Caring for People
Carbon Monoxide Alarm
869MHz
Caring for People
_________________________________________________________________________
________________________________________________________________
Doc No. FM0824 V1.02 Page 1
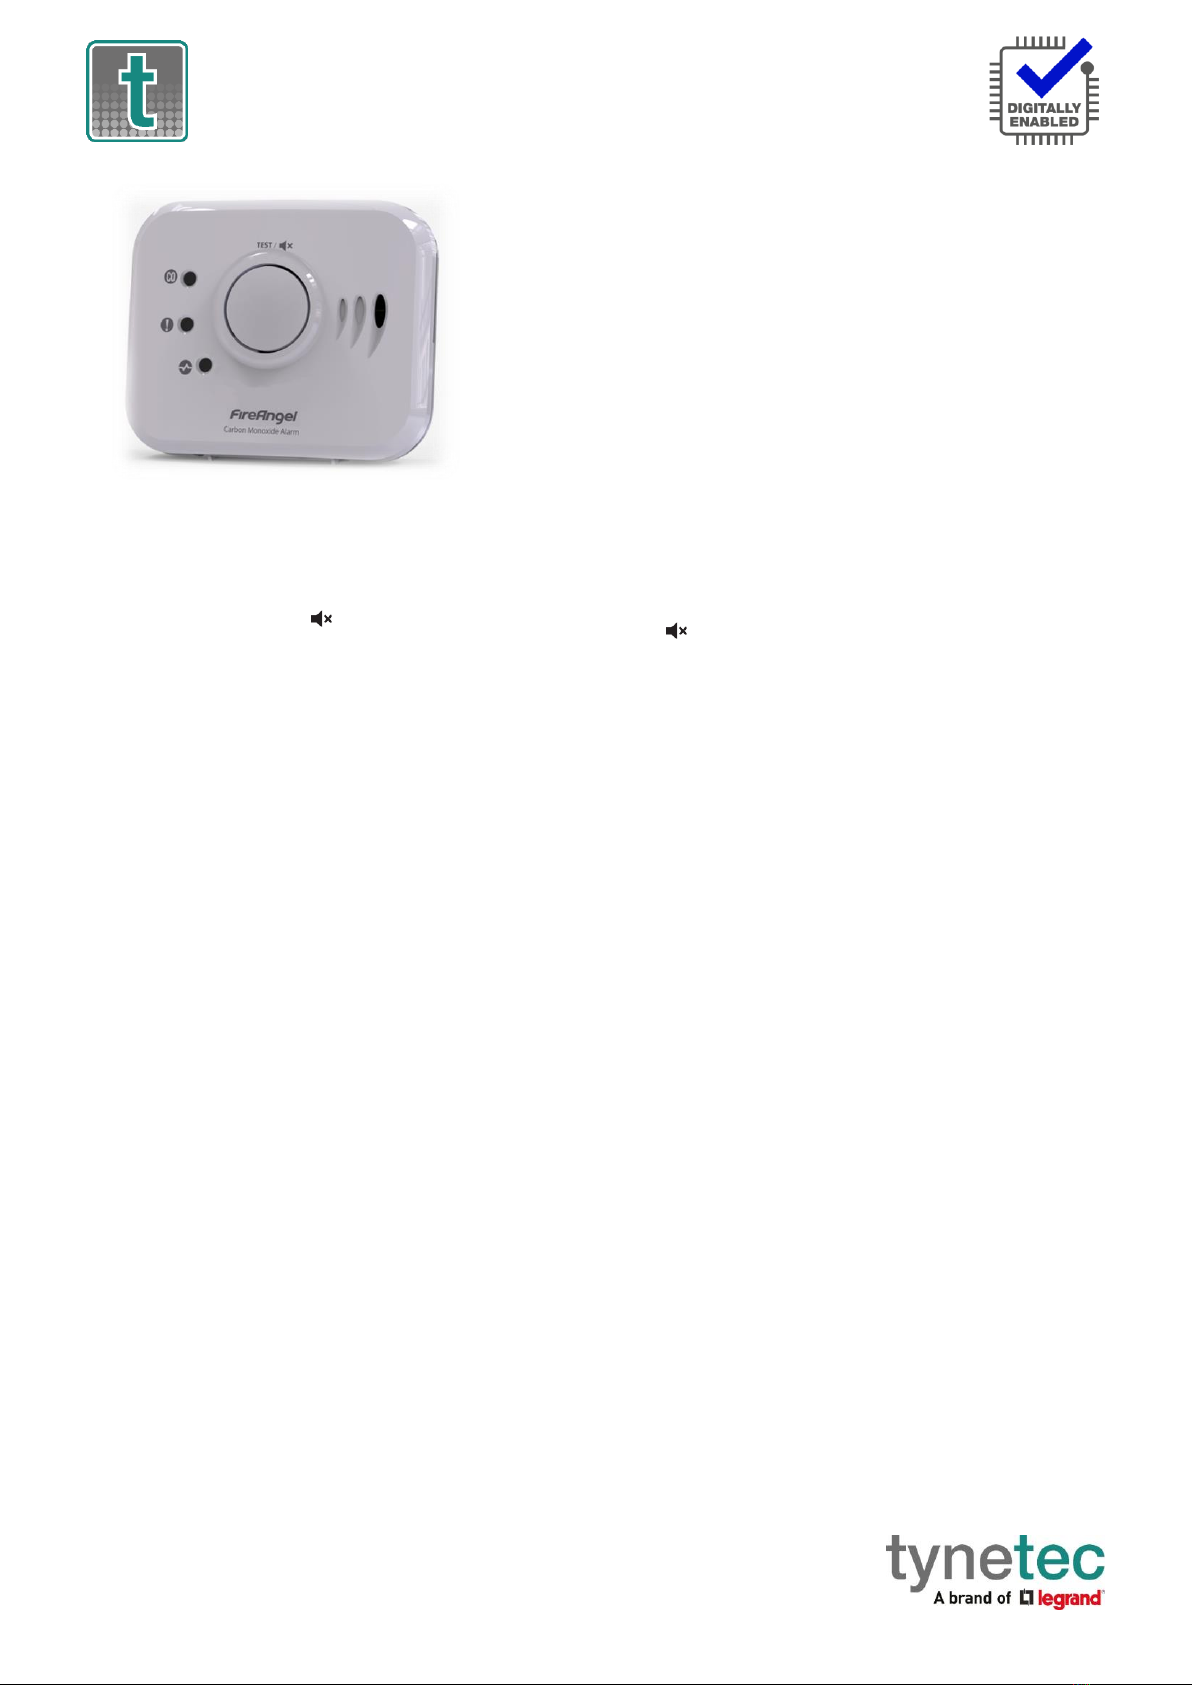
•Compatible with Reach IP and Advent XT2
•Complies with BS EN 50291-1 & 2:2010 + A1:2012
•Advanced electrochemical sensor technology
•10 year sealed for life Lithium battery (typical)
•Alarm sound level: 85dB(A) @ 3m
•Large central Test/Silence ( ) button
•Operating Temperature: +4oC to +38oC
•Telecare Transceiver: 869.2125MHz Class 1.5
•Digital Heartbeat
•Weight: 193 grams
•Dimensions: 114mm x 94.5mm x 40mm
•Product Code: ZXT812
How Carbon Monoxide can affect you
Refer to the Manufacturer’s instruction booklet for full details on
the symptoms associated with increasing degrees of exposure to
Carbon Monoxide.
DANGER: Never ignore any alarm, further exposure can be fatal.
Get medical help immediately for anyone suffering the effects of
Carbon Monoxide poisoning (e.g. headaches or nausea).
Do not use the appliance again until it has been checked by a Gas
Safe qualified engineer.
Positioning
Carbon Monoxide (CO) alarms
should beinstalled in every room
containing a fuel-burning appliance and every sleeping room.
When fitting in the same room as a fuel burning appliance the
alarm should be at a horizontal distance between 1 and 3m from
the potential source, if the room has a sloped ceiling it should be at
the high side of the room. If the alarm is wall mounted it should be
at least 150mm below the ceiling and at a height greater than any
door or window. If the alarm is ceiling mounted it should be at least
300mm away from any wall or light fitting. If fitted in sleeping
rooms the alarm should be located close to the breathing zone of
the occupants.
Refer to the Manufacturer’s instruction booklet for more
information on positioning.
Normal Operation
The green power light will flash once every 60 seconds to indicate
normal operation.
Alarm Condition
If Carbon Monoxide is detected the unit will repeatedly sound 4
loud beeps and the red CO light will flash once every 5 seconds.
Keep calm, turn off all fuel-burning appliances and open the doors
and windows to ventilate the property. Evacuate the property
leaving the doors and windows open.
Contact your Gas supplier on their emergency number.
Do not re-enter the building until the alarm has stopped.
Low Battery Condition
If the unit chirps every 60 seconds and the yellow warning light
flashes at the same time, this indicates the battery is running low.
The low battery condition will be reported to the Alarm Receiving
Centre (ARC) or the local Manager.
The CO alarm should be replaced within 30 days.
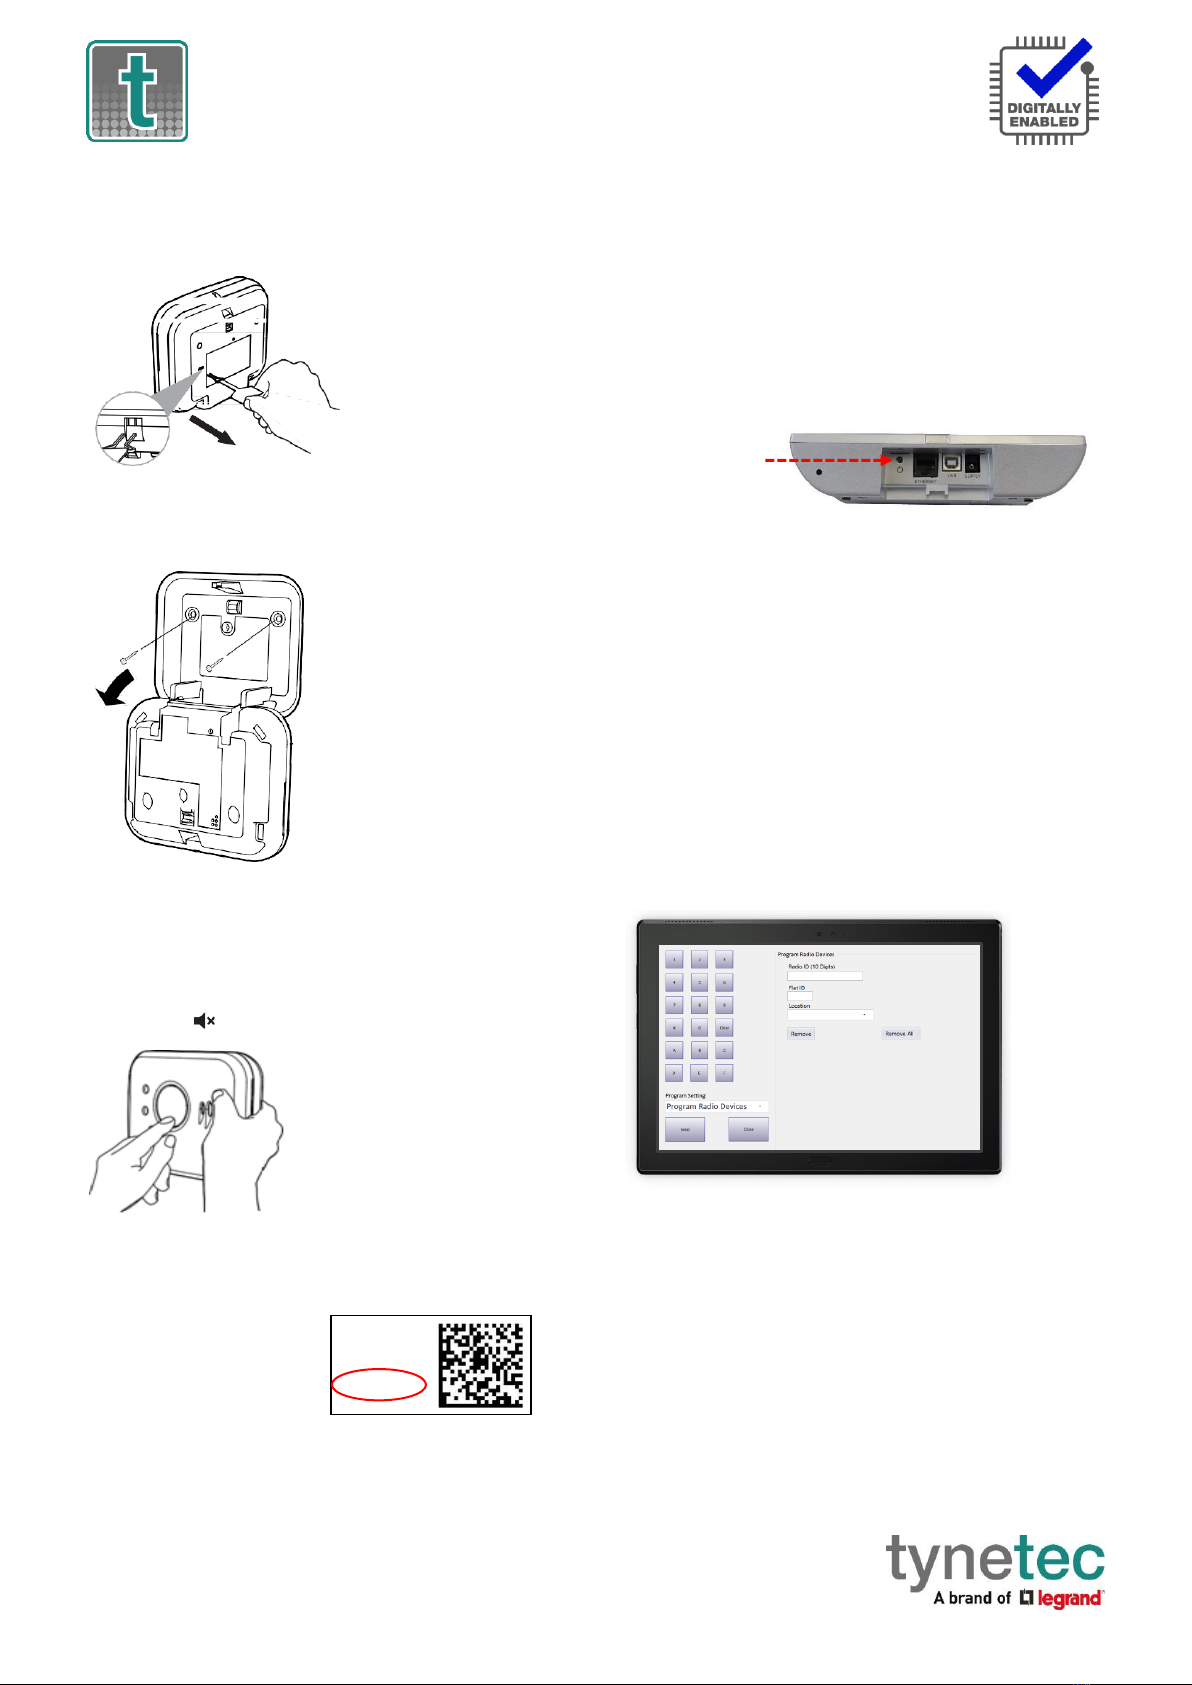
Sleep Easy Feature
Low battery warnings often start at night or when it may be
inconvenient to replace the alarm. You can silence the audible
low battery chirp for a period of eight hours by pressing the
Test/ button. After this period the audible chirp will start
again. This process can be repeated up to 10 times. The alarm
will still detect CO during this time, however it must be replaced
within 30 days.
Fault Condition
If the unit chirps every 60 seconds and the yellow warning light
flashes 20-25 seconds after, this indicates a fault with the CO
alarm and it should be replaced immediately.
Out of Range Notification (Reach IP)
The Reach IP can monitor all radio peripheral devices to
determine whether they have been damaged or removed from
an installation. Should the Reach IP be unable to detect a device’s
heartbeat it will automatically generate a “radio out of range”
notification. Firstly, investigate if there’s a genuine reason for the
alert, if not, arrange for the peripheral device to be replaced
immediately. The “Radio out of range timer” can be set from 30
hours to 99999 hours in Pulse CMP. “Radio supervision” can be
disabled by unchecking the tick box associated with each
peripheral device in Pulse CMP.
Maintenance
Test the CO alarm once every week.
Clean once every 3 months using a vacuum cleaner fitted with
the soft brush attachment. Do not use solvents or cleaners on
the CO alarm, the unit can be wiped with a damp cloth.
Disposal
Waste electrical products should not be disposed of with normal
household waste. The CO alarm is ideally suited for disposal
within the waste electronic and electrical equipment (WEEE)
recycling scheme. Please recycle where facilities exist.
Check with your local authority or contact your supplier for
recycling/disposal advice.
Warning
The CO alarm contains a powerful Lithium battery.
If tampered with the battery may be damaged and create a fire
hazard. No attempt should be made to open the case or remove
the battery. Do not incinerate.
Tynetec, a business unit of Legrand Electric Ltd
Cowley Road, Blyth Riverside Business Park, Blyth, Northumberland, NE24 5TF.
Tel: +44 (0) 1670 352371 www.tynetec.co.uk
Trusted Technology
Caring for People
Carbon Monoxide Alarm
869MHz
Caring for People
_________________________________________________________________________
________________________________________________________________
Doc No. FM0824 V1.02 Page 2
The unit will sound an audible
alarm consisting of 2 cycles of
4 loud beeps, then stop
automatically. The red light
on the alarm will flash rapidly
during the audible signal.
The Radio ID is a 10-digit code
printed on the radio module
label on the back of the
CO alarm…
When activated the
green power light will
flash once every 60
seconds.
Retain the disabling clip
for future use.
To mount on a wall or
ceiling; push-out the
screw hole blanking
plugs in the rear with a
screwdriver and mark
the position for the drill
holes. Please ensure
that you use the screws
and wall plugs provided
as they were chosen
specifically for use with
this product.
ZXT812
S:081923628
Iss-1
17930833F6
19W8
How to activate the CO Alarm
To activate the alarm, remove the metal disabling clip by pulling
it out of the back of the alarm.
How to install the CO Alarm
Make sure you have read and understood the instructions on
positioning the alarm before starting.
Alternatively, the unit can be fixed with the self-adhesive pads
provided. Ensure the surface is smooth, clean and dry. Press hard
to make sure the self-adhesive pads are properly adhered. It can
also be positioned free-standing on a shelf.
How to test the CO Alarm
Press the Test/ button in the centre and release.
Telecare Radio ID
The CO alarm includes a plug-in radio transceiver module to
communicate with the Reach IP or Advent XT2.
Registering the CO Alarm onto a Reach IP
Login to Pulse CMP (www.tynetecpulse.com) and enter the
Reach IP Serial No. in the ALARM UNIT view.
Press the Accessories button and enter the Radio ID code,
Location and Equipment type. Press Save then Synchronize.
IMPORTANT: when the CO alarm is installed a test call must be
made to check operation and start the digital heartbeat.
Alternatively, with the Reach IP in normal operating mode undo
the fixing screw and remove the stand or connector cover to
access the ⚫Power button.
Press the ⚫Power button to enter Control Mode, then press and
hold the button until the unit announces “add radio device”
then release.
Press the ⚫button to confirm then activate the CO alarm by
pressing the Test button.
The Reach IP unit will sound a high beep if it’s a new device and
announce “range test mode”.
Press ⚫to confirm, or press to step to the next function, or
press to exit the mode.
Registering the CO Alarm onto an Advent XT2
Radio device programming can only be performed from the
Advent XT2 Manager’s Panel designated as the Controller.
Login using the Manager or Engineer password and touch the
Programming button.
Select the Program Radio Devices option from the Program
Setting drop-down list.
Enter the Radio ID: this is the 10-digit code taken from the radio
module label on the back of the CO alarm.
Enter the Flat ID: this is the flat number the CO alarm is being
installed in. Enter 4-digits e.g. 0014.
Enter the Location: select where the CO alarm is located from the
drop-down list e.g. Living Room.
Press the Send button to update the XT2 system.
Press the test button on the CO alarm to check operation.
⚫Power Button

Popular Carbon Monoxide Alarm manuals by other brands

First Alert FCD2DDNP user manual

First Alert

First Alert FCD2DDNP user manual

First Alert CO710 user manual

First Alert

First Alert CO710 user manual

Kidde KN-COB-B-LS user guide

Kidde

Kidde KN-COB-B-LS user guide

Firehawk CO5B Guide

Firehawk

Firehawk CO5B Guide

BRK electronic CO400B brochure

BRK electronic

BRK electronic CO400B brochure

Maretron CO-CO1224T installation instructions

Maretron

Maretron CO-CO1224T installation instructions

Tomura RD-03 Installation & operation manual

Tomura

Tomura RD-03 Installation & operation manual

x-sense Pro XC01 user manual

x-sense

x-sense Pro XC01 user manual

American Sensor CO910 Instructional manual

American Sensor

American Sensor CO910 Instructional manual

First Alert SCO7 user manual

First Alert

First Alert SCO7 user manual

Kidde KN-COB-BCA user guide

Kidde

Kidde KN-COB-BCA user guide

First Alert CO3000BNEN user manual

First Alert

First Alert CO3000BNEN user manual

First Alert FCD2DD user manual

First Alert

First Alert FCD2DD user manual

First Alert SC7010B user manual

First Alert

First Alert SC7010B user manual

x-sense XCO1 user manual

x-sense

x-sense XCO1 user manual

Kidde KN-COB-B user guide

Kidde

Kidde KN-COB-B user guide

manuals.online logo
manuals.online logoBrands
  • About & Mission
  • Contact us
  • Privacy Policy
  • Terms and Conditions

Copyright 2025 Manuals.Online. All Rights Reserved.