Lenovo Legion Go 8APU1 User manual

User Guide
Legion Go

Read this first
Before using this documentation and the product it supports, ensure that you read and understand the
following:
• Generic Safety and Compliance Notices
• Safety and Warranty Guide
• Setup Guide
First Edition (September 2023)
© Copyright Lenovo 2023.
LIMITE AN RESTRICTE RIGHTS NOTICE: If data or software is delivered pursuant to a General Services
Administration “GSA” contract, use, reproduction, or disclosure is subject to restrictions set forth in Contract No. GS-
35F-05925.

Contents
bout this guide . . . . . . . . . . . . . iii
Chapter 1. Meet your Legion Go . . . . 1
What is Legion Go . . . . . . . . . . . . . . . 1
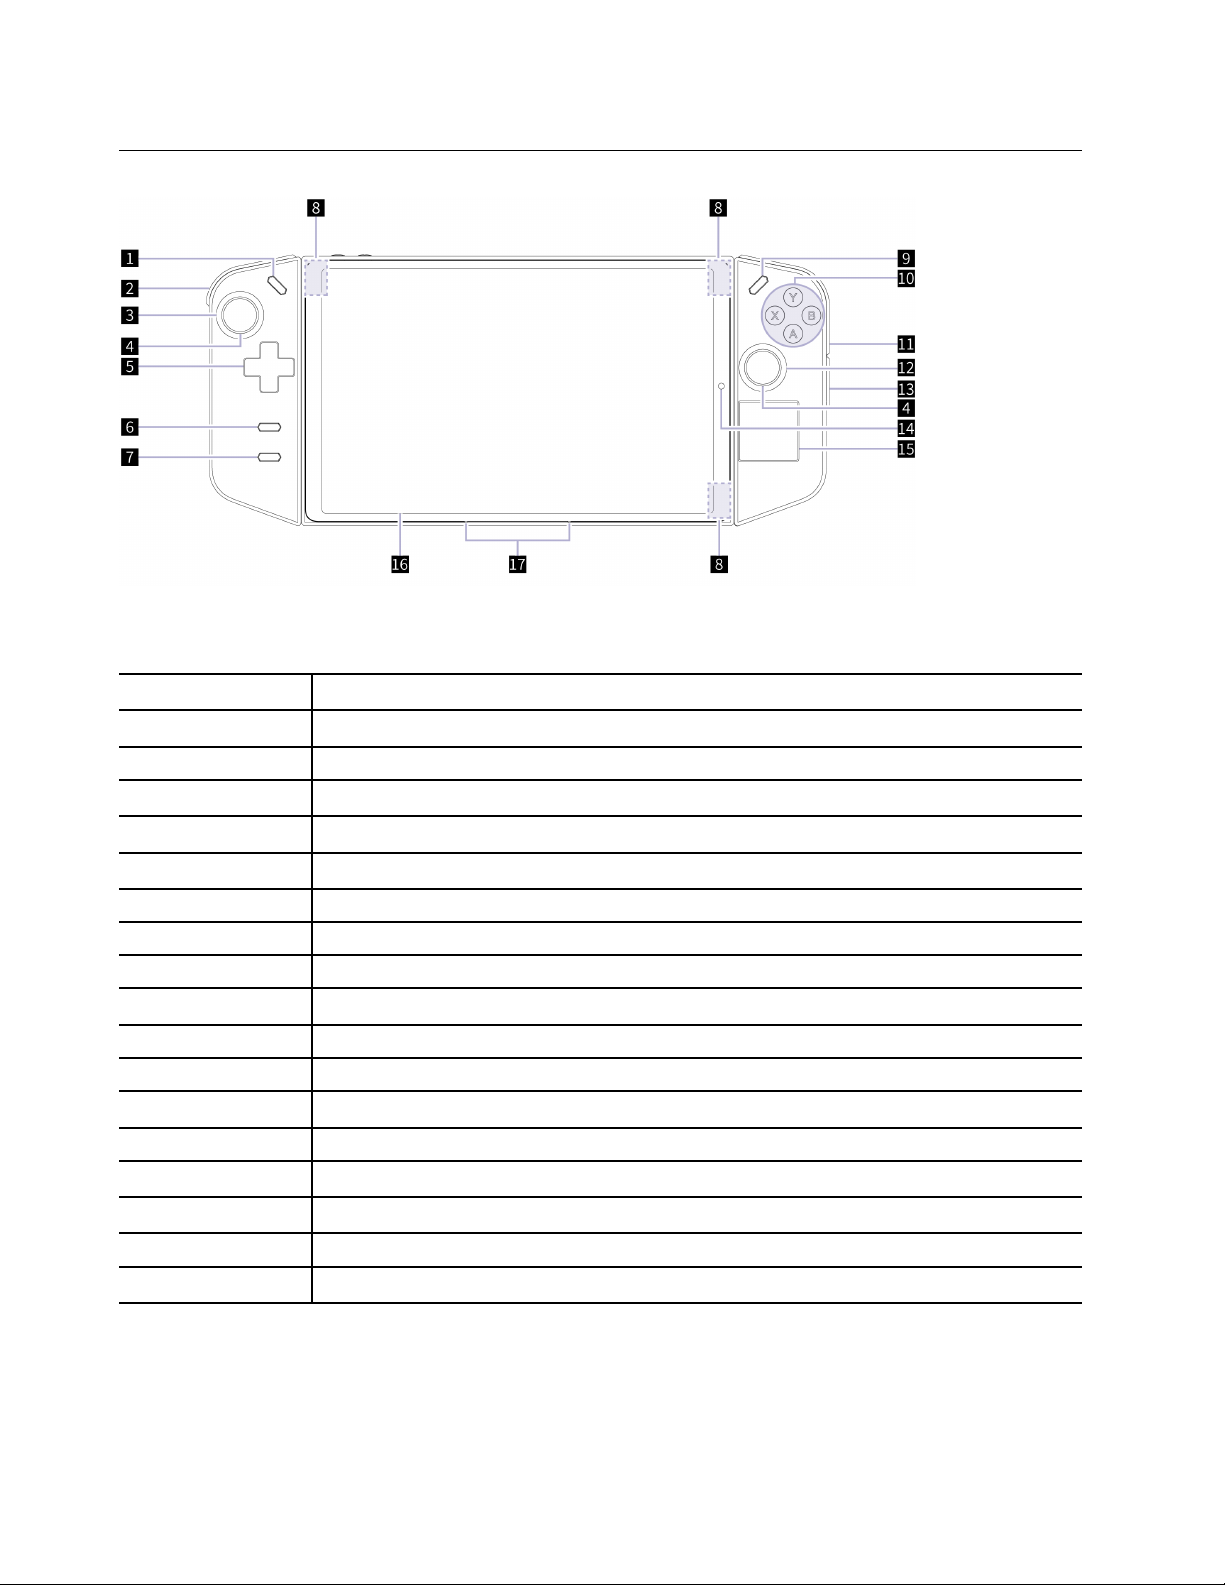
Front view . . . . . . . . . . . . . . . . . . 2
Controls seen from the front view . . . . . . . 2
Controller state light . . . . . . . . . . . . 3
Antennas . . . . . . . . . . . . . . . . 4
Ambient light sensor . . . . . . . . . . . . 4
Touchpad . . . . . . . . . . . . . . . . 4
Screen . . . . . . . . . . . . . . . . . 4
Microphones . . . . . . . . . . . . . . . 4
Back view . . . . . . . . . . . . . . . . . . 5
Controls seen from the back view . . . . . . . 5
Air vents (intake) . . . . . . . . . . . . . . 5
Mouse wheel . . . . . . . . . . . . . . . 5
Kickstand . . . . . . . . . . . . . . . . 6
Top view . . . . . . . . . . . . . . . . . . 7
Controls seen from the top view . . . . . . . 7
Volume buttons . . . . . . . . . . . . . . 7
Speakers . . . . . . . . . . . . . . . . 7
Multi-purpose USB Type-C connector . . . . . 7
microS card slot . . . . . . . . . . . . . 8
Air vents (outlet) . . . . . . . . . . . . . . 8
Combo audio jack . . . . . . . . . . . . . 8
Power button . . . . . . . . . . . . . . . 8
Power light . . . . . . . . . . . . . . . . 8
Bottom view . . . . . . . . . . . . . . . . . 9
Multi-purpose USB Type-C connector . . . . . 9
FPS mode switch . . . . . . . . . . . . . 9
Mouse sensor. . . . . . . . . . . . . . . 9
Specifications for the tablet . . . . . . . . . . 10
Statement on USB transfer rate . . . . . . . 11
Avoid constant body contact with specific hot
sections . . . . . . . . . . . . . . . . 11
Operating environment . . . . . . . . . . 12
Specifications for the controllers . . . . . . . . 12
Chapter 2. Start your Legion Go to
play video games . . . . . . . . . . . 13
Controller connection type . . . . . . . . . . 13
Play video games on the tablet of Legion Go . . . 13
Gamepad mode . . . . . . . . . . . . . 13
FPS mode . . . . . . . . . . . . . . . 15
Play video games on external devices . . . . . . 16
Connect the controllers to a Windows-based
PC . . . . . . . . . . . . . . . . . . 16
Connect the controllers to an Android
device. . . . . . . . . . . . . . . . . 16
Connect the controllers to an iOS device . . . 16
Chapter 3. Get the best gaming
experience on your Legion Go. . . . . 17
The Legion Space app . . . . . . . . . . . . 17
Thermal mode . . . . . . . . . . . . . 17
Full Speed Fan . . . . . . . . . . . . . 18
Adjustable refresh rate . . . . . . . . . . 18
Controller vibration . . . . . . . . . . . . . 18
Button combinations . . . . . . . . . . . . . 18
Preset shortcuts . . . . . . . . . . . . . 18
Macro key . . . . . . . . . . . . . . . 19
Touch gestures . . . . . . . . . . . . . . . 19
One-finger touch gestures . . . . . . . . . 20
Two-finger touch gestures . . . . . . . . . 21
Three- and four-finger touch gestures . . . . 21
Rechargeable battery pack . . . . . . . . . . 22
Rapid charge mode . . . . . . . . . . . 22
Recover full battery capacity . . . . . . . . 23
Power settings . . . . . . . . . . . . . . . 23
OS power mode . . . . . . . . . . . . . 23
The default power plan . . . . . . . . . . 23
Chapter 4. Firmware setup utility . . . 25
Use Windows advanced startup to open the
firmware setup utility . . . . . . . . . . . . . 25
Open the firmware setup utility from the Novo
Button Menu . . . . . . . . . . . . . . . . 25
Set passwords in UEFI/BIOS setup utility . . . . . 25
Password types . . . . . . . . . . . . . 25
Set administrator password . . . . . . . . 26
Change or remove administrator password . . 26
Set user password . . . . . . . . . . . . 27
Enable power-on password . . . . . . . . 27
Set password for the secondary storage
device. . . . . . . . . . . . . . . . . 27
Change or remove hard disk password . . . . 28
Chapter 5. Help and support . . . . . 29
Frequently asked questions . . . . . . . . . . 29
Why does my screen brightness change
constantly?. . . . . . . . . . . . . . . 29
Why does my controller turn off
automatically? . . . . . . . . . . . . . 29
How can I connect the controllers to the tablet
after connecting them to an external
device? . . . . . . . . . . . . . . . . 29
© Copyright Lenovo 2023 i

What should I do if the controller
malfunctions?. . . . . . . . . . . . . . 29
Can I just detach one controller from the tablet
to play video games? . . . . . . . . . . . 29
Can I charge the console when it is in the
bag? . . . . . . . . . . . . . . . . . 30
Self-help resources . . . . . . . . . . . . . 30
What is a CRU . . . . . . . . . . . . . . . 30
CRUs for your product model . . . . . . . . . 31
Call Lenovo . . . . . . . . . . . . . . . . 31
Before you contact Lenovo . . . . . . . . 31
Lenovo Customer Support Center . . . . . . 32
Purchase additional services. . . . . . . . . . 32
ppendix . Notices and
trademarks . . . . . . . . . . . . . . . 33
ii User Guide

bout this guide
• This guide applies to the Lenovo product model(s) listed below. Illustrations in this guide may look slightly
different from your product model.
Table 1. Product model name and machine type
Model name Machine type (MT)
Legion Go 8APU1 83E1
• For further compliance information, refer to the Generic Safety and Compliance Notices at https://
pcsupport.lenovo.com/docs/generic_notices.
• This guide may contain information about accessories, features, and software that are not available on all
models.
• This guide contains instructions that are based on the Windows® operating system. These instructions are
not applicable if you install and use other operating systems.
• Microsoft® makes periodic feature changes to the Windows operating system through Windows Update.
As a result, the operating system instructions in this guide may become outdated. Refer to Microsoft
resources for the latest information.
• The content of the guide is subject to change without notice. To obtain the latest version, go to https://
pcsupport.lenovo.com.
• When you open https://pcsupport.lenovo.com or https://support.lenovo.com, change the country or region
from the top bar.
© Copyright Lenovo 2023 iii

iv User Guide

Chapter 1. Meet your Legion Go
What is Legion Go
Legion Go is a console developed by Lenovo, which can be used for entertainment, work, or study. In this
guide, Legion Go (hereinafter referred to as the “console”) refers to the combination of the tablet and two
controllers.
1
2
3
Figure 1. Simple Diagram of egion Go
Table 2. Components of egion Go
No. Description
1Left controller (Legion Go Controller L)
2 Tablet
3Right controller (Legion Go Controller R)
© Copyright Lenovo 2023 1

Front view
Figure 2. Front view of egion Go
Table 3. Components seen from the front view
No. Description
1 Legion L
2 LB
3Left joystick/LS
4Controller state light
5-pad
6 Menu
7View
8 Antennas
9 Legion R
10 ABXY
11 RB/M1
12 Right joystick/RS
13 M2
14 Ambient light sensor
15 Touchpad
16 Screen
17 Microphones
Controls seen from the front view
The Legion L, LB, left joystick/LS, -pad, View, Menu, Legion R, RB/M1, ABXY, right joystick/RS, and M2
controls are visible at the front of the console and perform different functions in different games. You can find
their function descriptions in the controls guide of a specific Legion Go game.
2User Guide

The left joystick and the right joystick are used to interact with games, apps, and the console interface. You
can use a joystick to move an object on the screen in any direction. When you press down on a joystick, it
can also function as a clickable button and it is then named LS/RS.
The -pad is a directional pad that allows you to indicate four directions—up, down, left, and right.
The button labelled 11 in the figure is named RB in Gamepad mode and called M1 in FPS (First-Person
Shooting Game) mode.
Controller state light
The controller state light indicates the controller’s current power state and connection state.
Light status during wired connection
When the controller is connected to the tablet using a wired connection, the controller state light turns amber
to indicate the power state.
Table 4. Controller state light status and power state during wired connection
Light status Battery charge level
Blinking fast 10%–12%
Blinking fast for 5 seconds 13%–30%
Blinking slow for 5 seconds 31%–89%
Solid on for 5 seconds 90%–100%
Light status during wireless connection
When the controller is connecting to the tablet using a wireless connection or is connecting to an external
device, the controller state light turns amber to indicate the power state.
Table 5. Controller state light status and power state during wireless connection
Light status Battery charge level
Blinking fast 10%–12%
Blinking fast for 5 seconds 13%–30%
Blinking slow for 5 seconds 31%–89%
Solid on for 5 seconds 90%–100%
After indicating the power state, the light color changes to indicate what device the controller is pairing with
or connected to.
Table 6. Controller state light color and the paired device during wireless connection
Light color The controller is pairing with or is connected to
Green The tablet or a Windows-based PC
Blue An Android device
Pink An iOS device
The status of the controller state light indicates the connection state.
Chapter 1.Meet your Legion Go 3

Table 7. Controller state light status and connection state during wireless connection
Light status Connection state
Solid on The controller is connected to a device.
Blinking fast The controller is pairing with a device.
Blinking slow The controller is connecting to a recently paired device automatically.
ntennas
The antennas transmit and receive radio waves to allow data to be transferred between your tablet and a Wi-
Fi network device or a Bluetooth device.
Note: The antennas are hidden inside the tablet.
mbient light sensor
The ambient light sensor detects and measures the intensity of light in the user’s environment. The data
collected by this sensor can be used to enable adaptive brightness for the screen backlight.
Touchpad
The touchpad is the console's built-in pointing device, which provides the basic functionality of an external
mouse. Slide your finger on the touchpad to move the pointer on the screen and tap or double-tap to select
or execute a screen item.
Screen
The screen of the built-in display is the area where text, graphics, and videos are displayed.
Touch-enabled screens allow you to intuitively interact with your tablet by touching buttons, icons, and menu
commands displayed on the screen. Touch-enabled screens also support multi-finger gestures.
Microphones
The microphones are the tablet's built-in sound input devices. They capture your voice and ambient sound
and convert them into digital form. Microphones are essential components when you use your tablet for
video conferencing or voice recording.
4User Guide

Back view
1
4
1
5
1
8
1
9
6
7
1
2
3
Figure 3. Back view of egion Go
Table 8. Components seen from the back view
No. Description
1 Y1
2 Y2
3 Release button for the left controller
4Air vents (intake)
5Mouse wheel
6 M3
7Y3
8 Release button for the right controller
9 Kickstand
Controls seen from the back view
The Y1, Y2, Y3, and M3 controls are visible at the back of the console and perform different functions in
different games. You can find their function descriptions in the controls guide of a specific Legion Go game.
Release buttons
The release button at the back of each controller is used to detach the controller from the tablet.
For instructions on detaching the controllers, see “ etach the controllers from the tablet” on page 14.
ir vents (intake)
The air vents allow air to be sucked into the tablet to cool the internal components.
Important: When the tablet is operating, do not place it flat on a bed, sofa, carpet, or other flexible surfaces.
Otherwise, the air vents will be blocked, and the tablet may overheat, reducing performance or causing the
tablet to be unresponsive or even shut down.
Mouse wheel
The mouse wheel is used to scroll through web pages or to zoom in and out when browsing maps.
Chapter 1.Meet your Legion Go 5

Kickstand
The kickstand can rotate up to 120 degrees to prop the console up, which provides a hands-free solution.
6User Guide

Top view
Figure 4. Top view of egion Go
Table 9. Components seen from the top view
No. Description
1 LT
2 Volume buttons
3Speakers
4Multi-purpose USB Type-C connector
5microS card slot
6Air vents (outlet)
7Combo audio jack
8 Power button
9 RT
10 Power light
Controls seen from the top view
The controls that can be seen from the top view, including the LT and RT, perform different functions in
different games. You can find their function descriptions in the controls guide of a specific Legion Go game.
Volume buttons
The volume buttons are the tablet’s built-in volume controls. Press to turn the volume down and press
to turn it up.
Speakers
The speakers are the tablet's built-in sound output devices.
Multi-purpose USB Type-C connector
This USB Type-C® connector is the console's power input connector. Use the included power adapter and
this connector to supply power to the console.
When this connector is not used by the included power adapter, it can also be used to connect:
• Storage or peripheral devices that follow the USB specification for data transfer and device
interconnection
Chapter 1.Meet your Legion Go 7

• isplay devices
Note: When you connect the tablet to display devices, you need to use appropriate cables and adapters
(if needed) according to the connection capabilities of the display device.
• Thunderbolt™-enabled docks or devices
microSD card slot
The microS card slot is used to insert a microS , microS HC, microS XC, or microS UC memory card to
transfer data between the memory card and your console.
ir vents (outlet)
The air vents allow hot air to be discharged out of the tablet.
Important: When the tablet is operating, do not place it on a bed, sofa, carpet, or other flexible surfaces.
Otherwise, the air vents will be blocked and the tablet may overheat, reducing performance or causing the
tablet to be unresponsive or even shut down.
Combo audio jack
The combo audio jack is used to connect single-plug headsets, headphones, or external speakers.
Power button
Press the power button to turn on your console.
Note: By default, on a Windows product, pressing the power button when the product is turned on will put it
into sleep mode.
Power light
The power light indicates the tablet's current power state when it is not connected to the ac power adapter:
powered off, in sleep mode, or in hibernation mode.
Table 10. Power light status and description
Light status Power state Battery charge level
White (Blinking slowly) In sleep mode 91%–100%
Amber (Blinking slowly) In sleep mode 1%–90%
Off Powered off or in hibernation mode /
The color of the power light can indicate the tablet's active thermal mode when it is powered on.
Table 11. Power light color and the tablet's active thermal mode
Light color Thermal mode
White Balance mode
Blue Quiet mode
Red Performance mode
Purple Custom mode
8User Guide

Bottom view
1 32
Figure 5. Bottom view of egion Go
Table 12. Components seen from the bottom view
No. Description
1Multi-purpose USB Type-C connector
2FPS mode switch
3 Mouse sensor
Multi-purpose USB Type-C connector
This USB Type-C® connector is the console's power input connector. Use the included power adapter and
this connector to supply power to the console.
When this connector is not used by the included power adapter, it can also be used to connect:
• Storage or peripheral devices that follow the USB specification for data transfer and device
interconnection
• isplay devices
Note: When you connect the tablet to display devices, you need to use appropriate cables and adapters
(if needed) according to the connection capabilities of the display device.
• Thunderbolt™-enabled docks or devices
FPS mode switch
The switch is used to turn FPS mode on or off. When it is toggled to the “FPS” position, FPS mode is
enabled, which enhances your experience in playing First-Person Shooting games.
Mouse sensor
The mouse sensor translates your hand movements into the cursor movements on your screen.
Chapter 1.Meet your Legion Go 9

Specifications for the tablet
Dimensions
Length 209.48 mm
Width 130.4 mm
Thickness 19.9 mm
Display
Type LC
Screen size (diagonal) 8.8 inches
Resolution 2560 × 1600
Supported refresh rates • 60 Hz
• 144 Hz
Brightness 500 nits
Connectors and slots
Combo audio jack • iameter: 3.5 mm
• Supported plug:
– 3-pole, TRS
– 4-pole, TRRS (CTIA and OMTP)
microS card reader • Quantity: 1
• Interface: UHS-II
USB Type-C • Quantity: 2
• Maximum power output: 5 V, 1 A
• Supported signaling protocols:
– USB 2.0 480 Mbps
– SuperSpeed+ USB 10 Gbps
– isplayPort 1.4
– Thunderbolt 3 40 Gbps
– USB4 40 Gbps
ac power adapter
Input 100 V ac–240 V ac, 50 Hz–60 Hz
Output voltage 20 V
Maximum output current 3.25 A
Maximum output power 65 W
10 User Guide

Rechargeable battery pack
Capacity 49.2 Wh
Cell type Lithium-polymer
Number of cells 2
Note: The battery capacity is the typical or average capacity as measured in a specific test environment.
Capacities measured in other environments may differ but are no lower than the rated capacity (see product
label).
Memory
Type LP R5X
Installation Onboard
Mass storage device
Type Solid-state drive (SS )
Slot type M.2 (2242)
Number of slots 1
Interface PCIe Gen4
Networking
Wi-Fi®Wi-Fi 6E or Wi-Fi 6
Bluetooth®Bluetooth 5.3
Note: Support of Bluetooth 5.3 may require a future operating system update.
Statement on USB transfer rate
epending on many factors such as the processing capability of the host and peripheral devices, file
attributes, and other factors related to system configuration and operating environments, the actual transfer
rate using the various USB connectors on this device will vary and will be slower than the data rate listed
below for each corresponding device.
Table 13. USB device and the corresponding data rate
USB device Data rate (Gbit/s)
USB 3.2 Gen 1 5
USB 3.2 Gen 2 10
USB4 40
void constant body contact with specific hot sections
C UTION:
When the console is operating, it should be placed on a hard and flat surface with its back area not in
contact with user’s bare skin. Under normal operating conditions, the temperature of the back surface
will remain within an acceptable range as defined in IEC 62368-1, but such temperatures can still be
high enough to cause discomfort or harm to the user if directly touched for over 10 seconds at a time.
s such, it is recommended that users avoid prolonged direct contact with the back of the tablet.
Chapter 1.Meet your Legion Go 11

Operating environment
Maximum altitude (without pressurization)
3048 m (10 000 ft)
Temperature
• At altitudes up to 2438 m (8000 ft)
– Operating: 5°C to 35°C (41°F to 95°F)
– Storage: 5°C to 43°C (41°F to 109°F)
• At altitudes above 2438 m (8000 ft)
– Maximum temperature when operating under the unpressurized condition: 31.3°C (88°F)
Note: When you charge the battery, its temperature should be no lower than 10°C (50°F).
Relative humidity
• Operating: 8% to 95% at wet-bulb temperature 23°C (73°F)
• Storage: 5% to 95% at wet-bulb temperature 27°C (81°F)
Specifications for the controllers
Dimensions
Width 44.5 mm
epth 130.4 mm
Thickness 40.22 mm
Main control chip
Type MCU+ Bluetooth
Output power 8 dB
Maximum code rate 2 Mb/s
Sensitivity -93 dB
Transmission range 10 m, 360 degrees
Rechargeable battery pack
Cell type Lithium-polymer
Capacity 1000 mAh
Charge rate 1 C
Note: The battery capacity is the typical or average capacity as measured in a specific test environment.
Capacities measured in other environments may differ but are no lower than the rated capacity (see product
label).
12 User Guide

Chapter 2. Start your Legion Go to play video games
Controller connection type
The controller can be connected to the tablet using a wired or wireless connection. It can also be connected
to an external device using a wireless connection.
When the controller is attached to the tablet, it connects to the tablet via Pogo pins, which is called a wired
connection. If you detach it from the tablet, it connects to the tablet via Bluetooth, which is called a wireless
connection.
After detaching the controller from the tablet, you can also connect the controller to an external device using
a wireless connection.
Play video games on the tablet of Legion Go
Legion Go is a fully-featured console, which can satisfy different usage requirements. You can use the whole
console to play games on a train, in a coffee shop, or even outdoors. You can also enjoy a lighter gaming
experience after detaching the controllers and placing the tablet on a flat surface.
Gamepad mode
In Gamepad mode, you can play video games by either holding the whole console with both hands, or
holding only the controllers. In this mode, the mode switch on the right controller is in the “OFF” position.
Play video games using a wired connection
After pressing the power button, the tablet and the two controllers turn on at the same time. The two
controllers are connected to the tablet automatically and the solid green light of the controller state light
indicates a successful connection.
You can hold the whole console to play video games almost anywhere.
Figure 6. Play video games using a wired connection
Toggle between X-input mode and D-input mode
When the controllers are connected to the tablet, they are in X-input mode by default. Press and hold Legion
L + RB for one second to toggle between X-input mode and -input mode.
© Copyright Lenovo 2023 13

Table 14. Controller state light status and mode switch
Mode switch Light status
From X-input mode to -input mode Blinks once
From -input mode to X-input mode Blinks twice
Play video games using a wireless connection
If you prefer not to hold the console with both hands, you can detach the controllers from the tablet, rotate
the kickstand out to an appropriate position, and put the tablet on a flat surface.
Figure 7. Play video games using a wireless connection
To connect the controllers to the tablet, turn the tablet on first by pressing the power button.
To turn on the left/right controller, press and hold the Legion L/R button for 7 seconds. After the controllers
are turned on, they are connected to the tablet automatically via Bluetooth. The solid green light of the
controller state light indicates a successful connection.
Toggle between X-input mode, D-input mode, and Dual D-input mode
When the controllers are connected to the tablet, they are in X-input mode by default. Press and hold Legion
L + RB for one second to toggle between X-input mode, -input mode, and ual -input mode.
Table 15. Controller state light status and mode switch
Mode switch Light status
From X-input mode to -input mode Blinks once
From -input mode to ual -input mode Blinks twice
From ual -input mode to X-input mode Blinks three times
Detach the controllers from the tablet
It is easier to detach the controllers when you are facing the console’s screen.
Step 1. Press and hold the release button of the left controller.
14 User Guide
Other manuals for Legion Go 8APU1
1
This manual suits for next models
1
Table of contents
Other Lenovo Game Console manuals
Popular Game Console manuals by other brands

Nintendo
Nintendo Wii U Operation manual

Microsoft
Microsoft Xbox 360 Elite user guide

AtGames
AtGames Legends Core instruction manual

Excalibur
Excalibur Brew Master 463 operating manual

3A Game Electronic Technology
3A Game Electronic Technology PANDORA BOX DX SPECIAL manual

Nintendo
Nintendo LABO Getting started