Let 'Em Play Wild Thing Adapter User manual

Wild Thing Adapter
USER MANUAL
2018-08-31

DOC ID: L04001A
PAGE 1
Safety and Warnings
This manual describes how to use a Wild Thing Adapter connected to a Fisher Price®
Power Wheels® Wild Thing™ ride on toy. Any use of the Wild Thing Adapter other than
this is outside of the intended application and use described herein, and is performed at
your own risk.
Intended Application and Use
The Wild Thing Adapter is intended to be fitted to a Fisher-Price® Power Wheels® Wild
Thing™ battery operated ride-on toy to facilitate connection of alternative control surfaces
that a child with a disability may find easier to operate than the Wild Thing’s standard
controls.
Assumptions
This manual assumes the Wild Thing Adapter has been installed on a fully assembled
Fisher-Price® Power Wheels® Wild Thing™. If that is not the case, please consult the Wild
Thing Adapter Installation Manual and/or the Fisher-Price® Power Wheels® Wild Thing™
User Manual to mount the Wild Thing Adapter to an assembled Wild Thing™.

DOC ID: L04001A
PAGE 2
Contents
Safety and Warnings................................................................................................................. 1
Intended Application and Use.................................................................................................. 1
Assumptions.............................................................................................................................. 1
Emergency Stop Switch ............................................................................................................3
Configuration ............................................................................................................................4
Control with Proportional Joystick AND Switches..............................................................4
Control with Switches ONLY................................................................................................5
Control with Proportional joystick ONLY ...........................................................................6
Powering on the Wild Thing Adapter......................................................................................7
Operating an adapted Wild Thing™ ........................................................................................8
Switch Inputs.........................................................................................................................8
Proportional Joystick Input ..................................................................................................8
Emergency Stop State ...............................................................................................................9
LED Indications....................................................................................................................... 10
Normal Operation............................................................................................................... 10
Startup ................................................................................................................................. 10
Emergency Stop................................................................................................................... 10
No LEDs............................................................................................................................... 10
Adjusting Maximum Speed ..................................................................................................... 11
Wild Thing Adapter Speed Factor....................................................................................... 11
Adjusting SmartDrive Speed Setting...................................................................................12
Where to buy Proportional Joysticks and/or Switches ......................................................... 14

DOC ID: L04001A
PAGE 3
Emergency Stop Switch
A red, Oval Click Switch is included with every Wild Thing Adapter.
Plug this switch into the E-Stop port.
The Emergency Stop Switch is used to deactivate the input devices and prevents the Wild
Thing from driving. Useful when positioning the child in their Wild Thing, or to pause
the action while learning. See the Emergency Stop State section for more information.
Emergency
Stop
Dipswitches

DOC ID: L04001A
PAGE 4
Configuration
The Wild Thing Adapter accepts input from Mechanical Switches and/or a Proportional
Joystick. Depending on what you connect, you may need to configure the Wild Thing
Adapter’s dipswitches to use the devices in the manner you desire.
CONTROL WITH PROPORTIONAL JOYSTICK AND SWITCHES
Connect a proportional joystick, compatible with the Trace SET Standard, to the 9-pin
port. Connect a mechanical switch to the each of the four direction ports.
Set Dipswitches 5-8 to the OFF position, as shown.
Dipswitches 1-4 have other uses, do not change their position at this time.
Use a paperclip to activate the Restart button.
Dipswitches
Restart

DOC ID: L04001A
PAGE 5
CONTROL WITH SWITCHES ONLY
Connect a mechanical switch to each of the four direction ports.
Set Dipswitches 5-8 to the ON position, as shown.
Dipswitches 1-4 have other uses, do not change their position at this time.
Use a paperclip to activate the Restart button.
Dipswitches
Restart

DOC ID: L04001A
PAGE 6
CONTROL WITH PROPORTIONAL JOYSTICK ONLY
Connect a proportional joystick, compatible with the Trace SET Standard, to the 9-pin port.
Set Dipswitch 5 ON, 6 OFF, 7 ON, 8 OFF, as shown.
Dipswitches 1-4 have other uses, do not change their position at this time.
Use a paperclip to activate the Restart button.
Dipswitches
Restart

DOC ID: L04001A
PAGE 7
Powering on the Wild Thing Adapter
Once the Wild Thing Adapter is configured for the input(s) being used, it is ready for
power up and use. Each time you connect the Wild Thing’s battery, complete the
following steps to activate the Wild Thing Adapter.
Step 1
Check the connections on the Wild Thing Adapter. Ensure they are all securely
plugged in.
Step 2
Confirm the Wild Thing Adapter’s Power Switch is in the ON position.
Step 3
Plug the battery connector into the 12 volt battery.
Step 4
Slide the Wild Thing Adapter’s Power Switch to the OFF position.
Step 5
Slide the Wild Thing Adapter’s Power Switch to the ON position.
Step 6
Drive On! Your adapted Fisher-Price® Power Wheels® Wild Thing™ is ready to use.

DOC ID: L04001A
PAGE 8
Operating an adapted Wild Thing™
SWITCH INPUTS
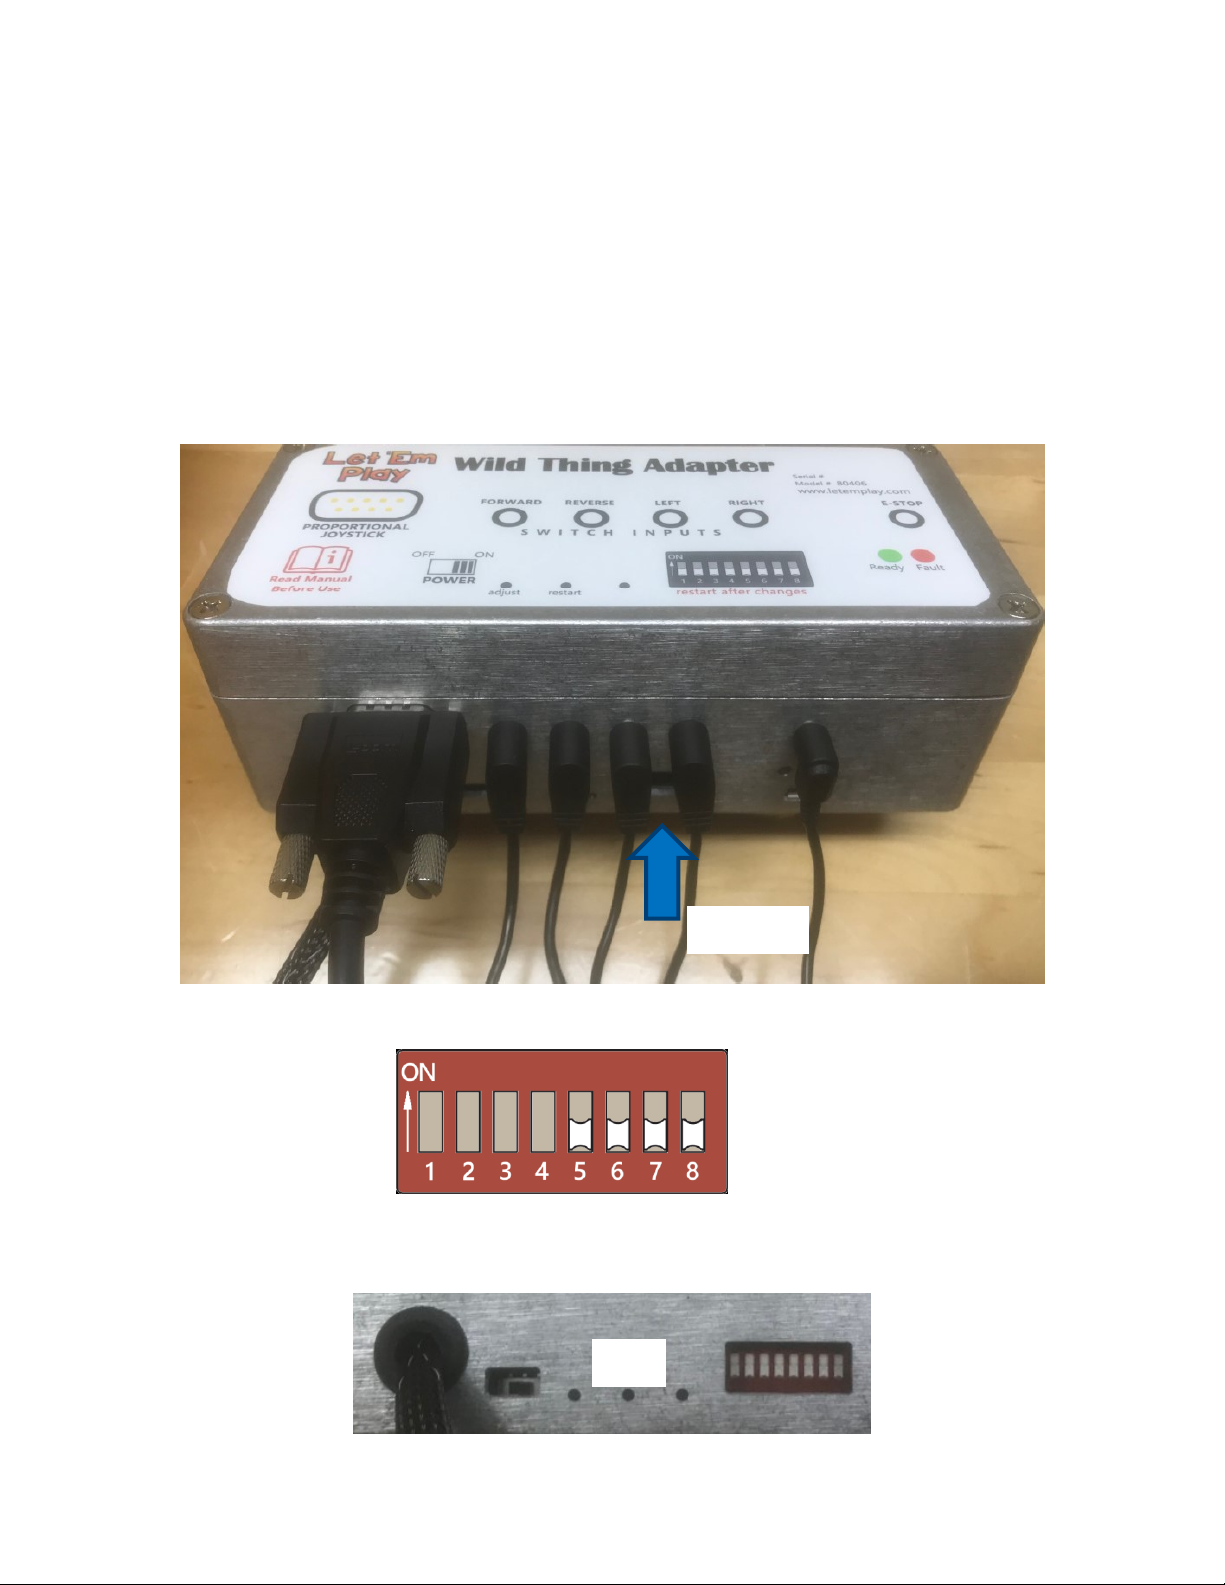
The Wild Thing Adapter has four 3.5mm Mono Jack ports, one port for each direction.
When the switch connected to each port is activated, the Wild Thing™ moves in one
direction. Forward; Reverse; Left (spin); Right (spin).
Two switches can be activated at the same time, combining their directions. For example,
activating the Forward switch and the Left switch at the same time will make the Wild
Thing™move in a sweeping left turn.
Note that it isn’t necessary to connect a switch to all four of the directional ports.
Introduce cause-and-effect with just one switch connected to the Left (or Right) Port for
fun, and independent(!), spins!
PROPORTIONAL JOYSTICK INPUT
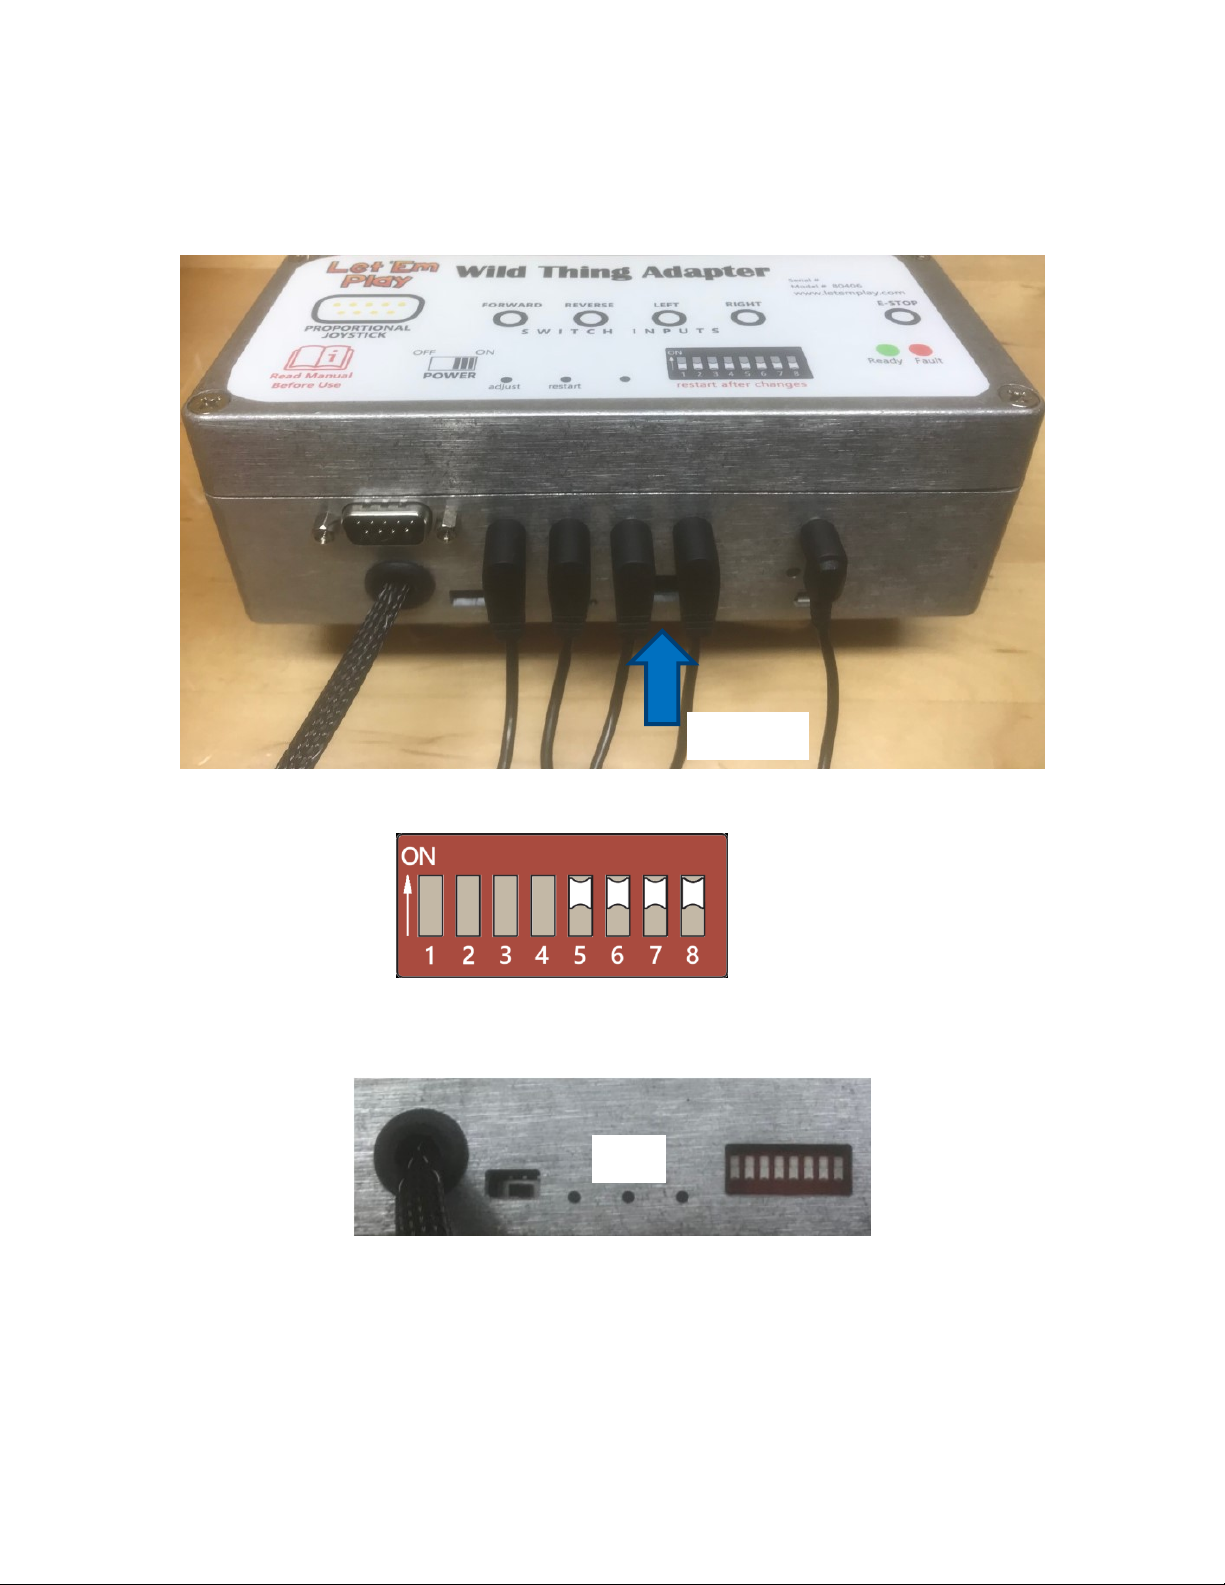
The Wild Thing Adapter has one 9-pin D-subminiature port that accepts a proportional
joystick compatible with the Trace SET Standard. Proportional Joysticks compatible with
this standard are available from multiple sources online and are also widely used in the
powered mobility device industry.
Proportional joysticks send the direction and position they are moved from their center
position as a varying signal to the control system they are connected to. This performance
makes it is possible to achieve very slow and very fine controlled movements through
small variations in joystick position.
PLEASE NOTE
The inputs of the Wild Thing Adapter are intended for momentary controls signals.
Depressing a switch, or deflecting the joystick starts movement. Releasing the switch or
joystick stops movement. If this behavior is not what you experience, it could indicate a
malfunction in your input device(s) –inspect them for damage, especially the cables and
connections.
Do not continue to use your adapted Wild Thing™ if it exhibits unusual behavior, contact
the input device manufacturer and/or Let’em Play customer service for assistance.

DOC ID: L04001A
PAGE 9
Emergency Stop State
The Emergency Stop switch enables caregivers to prevent the Wild Thing Adapter from
sending movement commands to the Fisher-Price® SmartDrive Control Board. This
feature is useful when adjusting the child’s position in the Wild Thing™, or at any time a
pause is needed.
Activating the mechanical switch connected to the E-Stop Port will suspend drive control
signals output by the Wild Thing Adapter, stopping motion of the Wild Thing™.
When the Emergency Stop State is triggered, the LEDs will alternately flash green and red.
While in the Emergency Stop State, input device signals are ignored.
To exit Emergency Stop State and resume normal operation, perform the following steps:
Step 1:
Ensure all input devices are in their inactive (or neutral) state.
Step 2:
Press and release the Emergency Stop Switch.
Step 3:
Confirm the Green READY LED is steady-on illuminated (not flashing).
Step 4:
Your adapted Wild Thing™ is ready to use again, drive on!
Solid Green READY LED indicates normal operating state
PLEASE NOTE
If the Wild Thing Adapter will not exit the Emergency Stop State, this may indicate a
malfunctioning input device –inspect them for damage, especially their cables.

DOC ID: L04001A
PAGE 10
LED Indications
NORMAL OPERATION
A solid green LED indicates the Wild Thing Adapter is in normal operating mode.
STARTUP
A flashing green LED indicates the Wild Thing Adapter is starting up.
If the Adapter stays in Startup for an extended period, it usually means it is configured for
a joystick input and isn’t seeing this connection. Check the joystick and/or configuration.
EMERGENCY STOP
Flashing green and red LEDs indicate the unit is emergency stopped. See the Emergency
Stop State section for more information.
NO LEDS
If there are No LEDs illuminated on the Wild Thing Adapter, the Fisher Price® SmartDrive
control board has likely entered its power saving mode and has turned off.
To wake it up, slide the Wild Thing Adapter’s power switch Off, then On.

DOC ID: L04001A
PAGE 11
Adjusting Maximum Speed
A standard Wild Thing™has a maximum speed of 5 MPH. And is adjustable to three
other speeds of 4 MPH, 3 MPH, 2 MPH. (8 km/h; 6.4 km/h; 4.8 km/h; 3.2 km/h)
Using the Wild Thing Adapter’s speed factors of 100%, 75%, 50%, 25%, it is possible to
reduce the Wild Thing’s maximum speed to approximately 0.5 MPH (0.8 km/h).
Maximum speed is determined by the combination of the Fisher Price® SmartDrive Speed
Setting and the Wild Thing Adapter Speed Factor.
5 MPH
SmartDrive
Speed Setting
4 MPH
SmartDrive
Speed Setting
3 MPH
SmartDrive
Speed Setting
2 MPH
SmartDrive
Speed Setting
Speed Factor
Top Speed
100%
5 MPH
75%
3.75 MPH
50%
2.5 MPH
25%
1.25 MPH
Speed Factor
Top Speed
100%
4 MPH
75%
3 MPH
50%
2 MPH
25%
1 MPH
Speed Factor
Top Speed
100%
3 MPH
75%
2.25 MPH
50%
1.5 MPH
25%
0.75 MPH
Speed Factor
Top Speed
100%
2 MPH
75%
1.5 MPH
50%
1 MPH
25%
0.5 MPH
WILD THING ADAPTER SPEED FACTOR
100%
75%
1 OFF, 2 OFF
1 OFF, 2 ON
50%
25%
1 ON, 2 OFF
1 ON, 2 ON
After adjusting the dipswitches, use a paperclip to activate the Restart button.

DOC ID: L04001A
PAGE 12
ADJUSTING SMARTDRIVE SPEED SETTING
After the Wild Thing Adapter is installed, it is still possible to change the Fisher Price®
SmartDrive Speed Setting using the following steps.
Step 1:
Remove the Wild Thing’s seat, so you can see the SmartDrive LED at the front of
the seat area.
Step 2:
Ensure the Wild Thing Adapter’s Power Switch is in the ON position.
Step 3:
Press and Hold the Adjust button.
Step 4:
Wait 10 seconds.
Step 4:
Slide the Wild Thing Adapter’s Power Switch to the OFF position.
Step 5:
Slide the Wild Thing Adapter’s Power Switch to the ON position.
Step 6:
Count the number of flashes emitted by the SmartDrive LED.
5 flashes = 5 MPH; 4 flashes = 4 MPH; 3 flashes = 3 MPH; 2 flashes = 2 MPH
There is a pause between each set of flashes.
Adjust

DOC ID: L04001A
PAGE 13
Step 7:
If the number of flashes does NOT match the desired speed, slide the Wild Thing
Adapter’s Power Switch to the OFF position.
Step 8:
Slide the Wild Thing Adapter’s Power Switch to the ON position.
Step 9:
Count the number of flashes emitted by the SmartDrive LED.
5 flashes = 5 MPH; 4 flashes = 4 MPH; 3 flashes = 3 MPH; 2 flashes = 2 MPH
Step 10:
Repeat Steps 7 - 9 until the number of flashes match your desired Speed Setting.
Step 11:
Release the Adjust button.
Adjust

DOC ID: L04001A
PAGE 14
Where to buy Proportional Joysticks and/or Switches
Proportional Joysticks and Mechanical Ability Switches are available from a variety of
companies. More information can be found at their websites.
AbleNet: www.ablenetinc.com
Adaptive Switch Laboratories: http://www.asl-inc.com/products/products.php
Broadened Horizons: www.broadenedhorizons.com
EnableMart: www.enablemart.com
Enabling Devices: www.enablingdevices.com
RJ Cooper & Associates: store.rjcooper.com
SAJE Technology: www.saje-tech.com/switches.html
Stealth Products: https://www.stealthproducts.com/
Switch-It: http://www.sunrisemedical.com/power-wheelchairs/electronics/compact-joysticks
Most of these companies sell directly through their website, a few require contacting a
representative for purchase.
Table of contents