LEXIBOOK SW100MI User manual

Machine à coudre
Sewing Machine
MODE D’EMPLOI
INSTRUCTION MANUAL
MANUAL DE INSTRUCCIONES
MANUAL DE INSTRUÇÕES
MANUALE DI INSTRUZIONI
BEDIENUNGSANLEITUNG
GEBRUIKSAANWIJZING

FRANÇAIS
FRANÇAIS
Fonctionnement de la machine à coudre
Cadran de tension
Levier de levage
Porte-cannette Volant à main
Interrupteur
marche/arrêt
Bouton de
vitesse
Prise de la pédale
Adaptateur
AC / DC
Pied presseur
Bobine inférieure
Couvercle de la
bobine
Aiguille
Anneau de xation
du l
Lampe
Interrupteur de lampe
Coupe-l
Levier du pied
presseur
Support de
bobineur
Prise de la
pédale
Adaptateur
AC / DC
Outil d’enlage
des aiguilles
Aiguilles de
rechange
Bobines sans l
Pédale
Bobines avec l
Interrupteur de
lampe
Lampe
Bobine
Vis de xation
de l’aiguille
Couvercle de
sécurité
VEUILLEZ VOUS ASSURER DE RESPECTER LES PRÉCAUTIONS D’UTILISATION SUIVANTES.
LA SURVEILLANCE ET L’ASSISTANCE D’UN ADULTE SONT REQUISES.
ATTENTION : GARDER HORS DE LA PORTÉE DES JEUNES ENFANTS. DÉCONSEILLÉ AUX ENFANTS DE MOINS DE 8 ANS.
INSTALLATION DES PILES ET DE L’ADAPTATEUR CA/CC (non inclus) :
1. Le compartiment à piles se trouve sous la machine. Assurez-vous que la
machine est éteinte. Retirez le couvercle du compartiment à piles à l’aide d’un
tournevis et insérez 4 piles de type AA / LR6 1,5V (non incluses) selon les instruc-
tions indiquées à l’intérieur du compartiment. Refermez le couvercle. La machine
sera en mode de veille.
2. Si vous choisissez d’utiliser un adaptateur CA/CC, il doit répondre aux
spécications suivantes : Sortie CC 6.0V 800mA, avec une taille extérieure de la
che de 5,5 mm et un trou intérieur de 2,1 mm et la polarité comme indiqué :
La machine à coudre fonctionne avec 4 piles de type AA/LR6 de 1.5V (non fournies) ou un
adaptateur secteur (non fourni) de 6.0V 800 mA à centre positif .
Entrée : 100V - 240V ~ 50 / 60Hz
REMARQUE ! Les piles doivent être installées par un adulte. Respectez le sens correct des polarités + et -. Ne
mélangez pas des piles usées avec des piles neuves ou des piles de types diérents. N’essayez pas de recharg-
er des piles qui ne sont pas rechargeables. Retirez les piles si le produit ne sera pas utilisé durant une longue
période. Ne mettez pas les bornes des piles en court-circuit. Veuillez conserver ces informations pour toute
référence ultérieure.
Lorsque l’appareil est éteint, insérez la che de l’adaptateur CA/CC dans la prise située à
l’arrière de l’appareil.
Remarque : les piles doivent être retirées si un adaptateur CA/CC est utilisé.
ENFILAGE DE LA MACHINE :
La navette de l de surface de la machine a déjà été enlée. Si vous voulez changer la cannette, enlevez le couvercle
de protection en retirant la vis et le boulon avec un tournevis (non inclus). Retirez le porte-bobine sur le dessus de la
machine et placez la cannette de l sur le porte-bobine. Tirez une longueur de l et suivez les étapes numérotées pour
enler correctement la machine. Replacez le couvercle de protection en serrant la vis et le boulon avec un tournevis.
Ne pas recharger les piles non rechargeables. Retirer les accumulateurs de l’appareil avant de les recharg-
er. Ne charger les accumulateurs que sous la surveillance d’un adulte. Ne pas mélanger diérents types
de piles ou accumulateurs, ou des piles et accumulateurs neufs et usagés. Les piles et accumulateurs
doivent être mis en place en respectant la polarité. Les piles et accumulateurs usagés doivent être en-
levés de l’appareil. Les bornes d’une pile ou d’un accumulateur ne doivent pas être mises en court-circuit.
Ne pas jeter les piles au feu. Retirer les piles en cas de non utilisation prolongée. Cet appareil doit être
alimenté avec les piles spéciées seulement. Les batteries ne doivent jamais être exposées à une source
de chaleur excessive, par exemple la lumière du soleil ou un feu. N’utiliser que des piles de type identique
ou équivalent à celles recommandées.
CHARGEMENT DE LA BOBINE :
1. Ouvrez la plaque de protection de la bobine en appuyant sur la èche et en
la faisant glisser pour l’éloigner de la machine.
2. Placez la bobine avec le l de votre choix dans le porte-bobine, en laissant
environ 25,5 cm de l sortir du porte-bobine.
3. Tournez le volant vers vous. L’aiguille descend et prend le l de la bobine.
Tournez le volant jusqu’à ce que l’aiguille soit complètement descendue
puis remonte à son point le plus élevé. Arrêtez lorsque l’aiguille commence
à redescendre.
4. Relevez le levier du pied presseur et amenez le l de la bobine vers l’avant.
5. Tirez-le doucement vers le haut et vous verrez qu’il a attrapé le l de la
bobine. Tirez les deux ls vers l’arrière de la machine (loin de vous), et
placez-les sous le pied presseur.
6. Remettez la plaque de couverture de la bobine en place en la faisant glisser.
Remarque : Il est essentiel que l’enlage du haut et du bas soit eectué
correctement. Vériez soigneusement et faites un point d’essai avant de
commencer à coudre. Un enlage incorrect endommagera le point de piqûre.
REQUIS
4 X 1.5V AA OR LR6
1. Lorsque vous utilisez des sources d’alimentation externes ou que vous chargez des piles, veuillez mettre la
machine sur « Arrêt ».
2. La surveillance d’un adulte est requise lors de l’utilisation de cette machine.
3. Après utilisation, éteignez la machine et retirez les piles ou débranchez l’alimentation externe.
4. Pour éviter tout danger potentiel, n’utilisez pas simultanément des piles de marques diérentes.
5. Ne mettez la machine en marche que si le tissu est en place et que le pied presseur est abaissé.
6. Cette machine a été calibrée avec précision ; les non-professionnels ne doivent pas démonter la machine.
ATTENTION: Les éléments d’emballage tels que lms plastiques, rubans adhésifs, étiquettes et rubans de xation
métalliques ne font pas partie de ce jouet et doivent être enlevés par raison de sécurité avant toute utilisation par un
enfant.
ATTENTION : D’importantes interférences électromagnétiques ou des décharges
électrostatiques peuvent provoquer un dysfonctionnement ou une perte de
données. Si l’appareil ne fonctionne pas correctement, enlevez puis remettez les
piles, ou débranchez l’adaptateur secteur de la prise de courant puis rebranchez-le.
Attention : Débranchez l’adaptateur en cas de non-utilisation prolongée an d’éviter tout échauement. Lorsque le
jouet est alimenté parun adaptateur, ne jouez pas à l’extérieur. Vériez régulièrement l’état de l’adaptateur et des ls de
branchement. En cas de détérioration, n’utilisez pas l’adaptateur jusqu’à réparation. Le jouet ne doit être utilisé qu’avec
un transformateur pour jouets. L’adaptateur n’est pas un jouet. La machine doit être déconnectée de l’alimentation pour
être nettoyée si des liquides sont utilisés pour le nettoyage. Ce jouet n’est pas destiné aux enfants de moins de 3 ans.
Une mauvaise utilisation de l’adaptateur peut provoquer une électrocution. Le jouet ne doit pas être connecté à plus que
le nombre recommandé de transformateurs ou d’alimentations.
Conseil aux parents : Le transformateur et l’adaptateur ne sont pas destinés à être utilisés comme des jouets. Ils doivent
être utilisés sous la surveillance des parents. Le jouet ne doit être branché que sur un équipement portant le symbole
suivant ou .

FRANÇAIS
FRANÇAIS
BOBINAGE DU FIL SUR LA BOBINE :
Pour changer ou remplacer le l d’une bobine, une bobine de coton est
nécessaire. Suivez les étapes suivantes :
1. Placez une bobine du l souhaité sur la broche à l.
2. La tige du bobineur est encastrée dans le volant. Appuyez sur l’extrémité
et tournez-la vers la gauche pour la libérer.
3. Placez une bobine vide sur la tige du bobineur et enroulez l’extrémité du
l sur la bobine sur 4 à 5 tours.
4. Mettez l’appareil sous tension pour commencer à enrouler le l, en
utilisant votre doigt pour le répartir uniformément sur la bobine à
mesure qu’il s’enroule. La bobine est pleine lorsque le l atteint le haut
des petits trous.
5. Lorsque vous avez terminé, mettez la machine sur « Arrêt », coupez le
l et retirez la bobine.
6. Enfoncez la tige du bobineur dans le volant et tournez-la vers la droite
pour la verrouiller en place.
REMPLACEMENT DE L’AIGUILLE :
Le remplacement de l’aiguille doit être eectué par un adulte.
Suivez ces étapes si l’aiguille a été tordue ou cassée et doit être changée :
(Les aiguilles de machines à coudre domestiques 90/14 peuvent être utilisées
avec cette machine).
1. Éteignez la machine et retirez les piles (ou débranchez la source
d’alimentation externe).
2. Retirez le couvercle de sécurité en enlevant la vis et le boulon à l’aide
d’un tournevis.
3. Desserrez la vis de xation de l’aiguille et retirez l’ancienne aiguille.
4. Insérez la nouvelle aiguille dans la barre à aiguille avec le côté plat
tourné vers la vis de serrage de l’aiguille. Enfoncez doucement la
nouvelle aiguille aussi loin que possible.
5. Serrez la vis de serrage de l’aiguille tout en maintenant l’aiguille en place.
6. Replacez le couvercle de sécurité en xant la vis et le boulon avec un
tournevis.
UTILISATION DE LA PÉDALE :
La pédale permet de mettre en marche et d’éteindre la machine à l’aide de votre pied, ce qui vous permet d’utiliser les
deux mains pour contrôler le tissu Insérez la che à l’extrémité du cordon de la pédale dans la prise de la pédale, située
sous le volant. La machine doit être en position « Arrêt ».
Remarque : Assurez-vous d’appuyer sur l’interrupteur Marche/Arrêt en position « Arrêt » lorsque vous avez terminé de
coudre pour éviter de démarrer accidentellement la machine.
CONTRÔLE DE LA LAMPE :
Appuyez sur l’interrupteur de la lampe pour allumer la lampe si vous avez besoin de plus de lumière.
FONCTION COUPE-FIL :
Le coupe-l situé au-dessus de la lampe vous permet de couper les ls de manière pratique sans ciseaux.
Tirez fermement le l vers le bas sur le coupe-l.
PROBLÈMES COURANTS ET SOLUTIONS
PROBLÈME
DESCRIPTION
MISE HORS
TENSION
(RÉPONSE LENTE)
SAUT DU FIL
DÉFAILLANCE
DU FIL
RUPTURE DU FIL
MAUVAIS FIL
INFÉRIEUR OU
FIL DE SURFACE
SAUT DE
L’AIGUILLE
CAUSE POSSIBLE
Mauvais positionnement des piles.
Trou d’aiguille incliné, installation
incorrecte de l’aiguille. Changez l’aiguille
Bobine de l inférieur coincée
Desserrage du pied presseur ou de
l’aiguille
Faites glisser le tissu pendant l’opération
de couture.
Pas de tissu en place lors de la mise en
marche.
Changez l’aiguille et serrez la vis du pied
presseur
Changez à nouveau l’aiguille et le l pour coudre.
Mouvement entravé du l de surface Vériez si la bobine de l de surface et la
broche tournent librement
Vériez si l’extrémité du l dans la bobine de
l inférieur a été dégagée
Insérez les piles dans le bon sens.
Puissance de sortie insusante de la
source d’alimentation externe, faible
tension de sortie ou source d’alimentation
endommagée.
Fil de surface trop serré ou trop lâche Tournez le bouton de réglage du letage de
surface pour uniformiser le letage inférieur et
le letage de surface
Changez pour une source d’alimentation
appropriée.
Mélange de piles neuves et usées.
Pied presseur lâche Serrez la vis du pied presseur
Fil inférieur épuisé Changer la bobine du l inférieur
Changez toutes les piles.
Piles usées.
Aiguille tordue ou déformée. Changez l’aiguille
Bavure dans le trou de l’aiguille Changez l’aiguille
Aiguille penchée ou installation
inadéquate
Aiguille tordue ou déformée Changez l’aiguille
Enlage incorrect Enlez à nouveau dans le bon ordre
Installez à nouveau l’aiguille
Séquence de l incorrecte Enlez à nouveau dans le bon ordre
Remplacez les piles par des piles neuves.
SOLUTIONS
RÉGLAGE DU POINT DE COUTURE :
1. Un point normal est illustré sur le schéma A. Le l de surface et le l
inférieur auront une élasticité uniforme. Si vous ne pouvez pas distinguer
les points sur un tissu entre le l de surface et le l inférieur, le point est
normal.
2. Un l de surface lâche est illustré sur le schéma B. Le l inférieur sera
droit et des « nœuds » peuvent sortir. Dans ce cas, vous devez visser
l’écrou de serrage du l dans le sens des aiguilles d’une montre et
augmenter la pression du l de surface, jusqu’à ce que les points du l
de surface et du l inférieur soient égaux.
3. Un l inférieur lâche est illustré sur le schéma C. Le l de surface sera
droit et quelques « nœuds » peuvent sortir. Dans ce cas, vous devez
visser l’écrou de serrage du l dans le sens inverse des aiguilles d’une
montre et diminuer la pression du l de surface, jusqu’à ce que les
points du l de surface et du l inférieur soient égaux.
Remarque : Lorsque vous réglez le serrage du l de surface, vériez si le l de
surface est sorti du clip à l. Si c’est le cas, vous devez resserrer le l de surface
au milieu des deux clips de serrage du l.
Remarque : Le sens de l’aiguille doit être correct, et la vis contre l’aiguille doit être correctement serrée pour
empêcher l’aiguille de tomber.
Fil de surface
Fil inférieur
Vis de xation
de l’aiguille
Support de
l’aguille Serrer
Déserrer
Tissu
Remarque : Si le tissu est dicile à retirer, vous pouvez tourner le volant dans les deux sens et tirer doucement sur le
tissu pour le libérer.
Remarque : Utilisez uniquement des tissus légers ou de poids normal. Les tissus épais ou lourds ne sont pas
recommandés et peuvent entraîner la cassure de l’aiguille.
PLACEMENT DU TISSU ET OPÉRATION DE COUTURE :
1. Tournez le volant dans le sens de la èche pour soulever l’aiguille à sa position la plus haute.
2. Relevez le levier du pied presseur et placez le tissu sous le pied presseur.
3. Abaissez le levier du pied presseur
4. Tournez le volant sur 2 ou 3 tours dans le sens de la èche.
5. Mettez la machine en marche et commencez à coudre.
6. Modiez la vitesse de couture avec le bouton de vitesse.
7. Mettez la machine en position « Arrêt » lorsque vous avez terminé de coudre. Tournez le volant dans le sens des
èches jusqu’à ce que l’aiguille soit dans sa position la plus haute. Relevez le levier de pied presseur et retirez le
tissu en le tirant doucement vers l’arrière et en l’éloignant de la machine.
INSTRUCTIONS RELATIVES À LA SÉCURITÉ
LIRE LES INSTRUCTIONS SUIVANTES AVANT TOUTE UTILISATION DE L’APPAREIL.
Lisez et suivez attentivement ces instructions an d’utiliser au mieux toutes les fonctions qu’ore cet appareil.
Merci de noter qu’il s’agit de précautions générales qui peuvent ne pas s’appliquer à votre unité.
1. Lisez ces instructions avant toute utilisation ou connexion de l’appareil.
2. Conservez ces instructions en bon état. Tenez bien compte des mises en garde. Suivez les instructions.

ENGLISH
FRANÇAIS
Suivez-nous
@LexibookCom
ENTRETIEN ET GARANTIE
NOTE : Veuillez garder ce mode d’emploi, il contient d’importantes informations.
Ce produit est couvert par notre garantie de deux ans. Pour toute mise en oeuvre de la garantie ou de service
après-vente, vous devez vous adresser à votre revendeur muni de votre preuve d’achat. Notre garantie couvre les vices
de matériel ou de montage imputables au constructeur à l’exclusion de toute détérioration provenant du non-respect
de la notice d’utilisation ou de toute
intervention intempestive sur l’article (telle que démontage, exposition à la chaleur ou à l’humidité …).
Il est recommandé de conserver l’emballage pour toute référence ultérieure.
• Ne pas tenter de coudre des tissus épais ou de forcer le volant.
• Changer les piles lorsque vous constatez que votre machine ne fonctionne pas aussi rapidement que d’habitude.
• Pour nettoyer la machine, utiliser uniquement un chion doux légèrement imbibé d’eau, à l’exclusion de tout
produit détergent.
• Ne pas exposer la machine à la lumière directe du soleil ni à toute autre source de chaleur.
• Ne pas la mouiller.
• Ne pas la démonter, ni le laisser tomber.
ATTENTION : Ce produit contient des aiguilles et des ciseaux à pointes tranchantes et devrait être utilisé sous la
surveillance d’un adulte.
Avertissement. Doit être utilisé sous la supervision directe d’un adulte.
Ne touchez pas la partie coupante de la lame du couteau ou de la pointe de l’aiguille, car cela peut provoquer des
blessures.
ATTENTION : Ne convient pas aux enfants de moins de 3 ans. Risque de suocation en raison des petites pièces.
Dans un souci constant d’amélioration, nous pouvons être amenés à modier les couleurs et les détails du produit
présenté sur l’emballage.
Référence : SW100MI
Conçu et développé en Europe – Fabriqué en Chine
© LEXIBOOK®
Lexibook S.A.
6 avenue des Andes
Bâtiment 11
91940 Les Ulis
France
www.lexibook.com
Informations sur la protection de l’environnement
Tout appareil électrique usé est une matière recyclable et ne devrait pas faire partie des ordures ménagères !
Nous vous demandons de bien vouloir nous soutenir en contribuant activement au ménagement des
ressources et à la protection de l’environnement en déposant cet appareil dans des sites de collectes (si
existants).
3. Conservez ce mode d’emploi pour consultation ultérieure.
4. N’utilisez pas cet appareil près de l’eau ou à proximité d’objets remplis d’eau tels que des vases. A conserver à
l’abri de l’humidité.
5. Ne placez jamais d’objets enammés, tels que des bougies allumées, sur l’appareil.
6. Les jeunes enfants ne doivent pas utiliser l’appareil sans la surveillance d’un adulte.
7. L’aération ne doit pas être bloquée en obturant les sorties d’aération.
8. Utilisez uniquement les attaches/accessoires recommandés par le fabricant.
9. Utilisez les pièces de remplacement recommandées par le fabricant.
10. Installez en respectant les consignes du fabricant.
11. Placez l’appareil dans un lieu aéré, sur une surface plate, dure et stable. Ne pas exposer à une température
supérieure à 40°C. L’appareil doit être positionné de sorte à laisser un espace de 10 cm à l’avant et à l’arrière et de
5 cm sur les côtés.
12. Respectez l’environnement : éliminez les piles par l’entremise des points de collecte prévus à cet eet.
13. Assurez-vous toujours que le produit est débranché de toute source d’alimentation avant de le déplacer ou de le
nettoyer. Pour nettoyer l’appareil, utilisez uniquement un chion sec.
14. Débranchez l’appareil lors d’orages ou lorsque vous ne l’utilisez pas pendant une longue période.
15. Aucune pièce de ce produit ne peut être réparée par l’utilisateur. Seul un personnel de service qualié peut s’en
charger. Portez l’appareil à l’atelier de réparation électronique de votre choix pour manutention ou réparation.
16. Ne laissez JAMAIS personne, et en particulier les enfants, mettre des objets dans les trous, dans les fentes ou dans
toute autre ouverture de l’appareil – cela pourrait causer une électrocution.
17. Ne placez pas cet appareil à proximité de TV, haut-parleurs ou tout autre objet à fort champ magnétique.
18. Ne laissez pas l’appareil sans surveillance lorsqu’il est en marche.
19. Gardez une distance minimale autour de l’appareil pour une aération susante .
20. Il convient de ne pas obstruer les ouvertures d’aération par des objets tels que journaux, nappes, rideaux, etc.
21. L’appareil est destiné à être utilisé sous un climat tempéré et/ou tropical .
22. Les piles doivent être jetées de façon conforme. Déposez-les dans des bacs de collecte prévus an de protéger
l’environnement.
Sewing Machine Operation
Tension Dial
Take-up Lever
Spool Pin SpindleHand
Wheel
On/O Switch
Speed Button
Foot Pedal
Socket
AC/DC Adapter
Socket
Presser Foot
Bottom Bobbin
Bobbin Cover
Plate
Needle
Thread Fixing
Ring
SwitchLamp
Lamp
Thread Cutter
Presser Foot
Lifter
Bobbin Winder
Post
Foot Pedal
Socket
AC/DC Adapter
Socket
Needle
Threading Tool
Spare Needles
Bobbins
without
Thread
Foot Pedal
Bobbins with
Thread
Lamp
SwitchLamp
Bobbin
PLEASE MAKE SURE TO COMPLY WITH THE FOLLOWING OPERATIONAL PRECAUTIONS.
ADULT SUPERVISION AND ASSISTANCE REQUIRED.
CAUTION: KEEP OUT OF REACH OF YOUNG CHILDREN. NOT RECOMMENDED FOR CHILDREN UNDER 8 YEARS.
1. When using external power sources or loading batteries, please switch the machine to “O”.
2. Adult supervision required when using this machine.
3. After using, switch the machine to “O”, and remove batteries or unplug external power supply.
4. To avoid any potential dangers, do not use batteries of dierent brands at the same time.
5. Only switch the machine to “On” if there is fabric in place and the presser foot has been lowered.
6. This machine has been precisely calibrated; non-professionals should not disassemble the machine.
WARNING: All packaging materials, such as tape, plastic sheets, wire ties and tags are not part of this toy and should be
discarded for your child’s safety.
Needle
Clamp
Screw
Safety
Cover

ENGLISH
ENGLISH
INSTALLATION OF BATTERIES & AC/DC ADAPTER (not included):
1. The battery compartment is on the bottom of the machine. Make sure the
machine is switched “O”.Using a screwdriver, remove the battery cover and
insert 4 x AA / LR6 1,5V batteries (not included) according to the directions marked
inside the compartment. Close the cover. The machine will be in standby mode.
2. If you choose to use an AC/DC adapter, it must meet the following specications:
Output of DC 6.0V 800mA, with a plug outer size of 5.5 mm and inner hole of
2.1 mm and polarity as shown:
The sewing machine works with 4 x 1.5V LR6/AA size batteries (not included) or a
6.0V 800mA adaptor with positive centre (not included).
Input : 100V - 240V ~ 50 / 60Hz
NOTE! Batteries should be installed by an adult. Remember to position + and - correctly. Do not mix old and
new batteries or dierent types of batteries. Do not attempt to recharge batteries which are not rechargeable.
Remove batteries if the product is not in use for some. Do not short-circuit the battery contacts.
Please keep this information for future reference.
With the machine switched o, insert the plug of the AC/DC adapter into the socket on
the back of the machine.
Note: Batteries must be removed if any AC/DC Adapter is used.
THREADING THE MACHINE:
The surface thread shuttle of the machine has already been threaded. If you want to change the spool, remove
protective cover by removing the screw and bolt with a screwdriver (not included). Pull out the spool pin on the top of
the machine and put the thread spool onto the spool pin. Pull out a length of thread and follow the numbered steps to
correctly thread the machine. Replace the protective cover by tightening the screw and bolt with a screwdriver.
LOADING THE BOBBIN:
1. Open the bobbin cover plate by pressing the arrow and sliding it away
from the machine.
2. Place the bobbin with thread of your choice in the bobbin holder,
leaving about 25.5 cm of thread extended out from the bobbin holder.
3. Turn hand wheel toward you. The needle will go down, picking up the
bobbin thread. Turn hand wheel until needle has descended completely
and then comes up again to its highest raised point. Stop when needle
starts to go down again.
4. Raise the presser foot lifter and bring the spool thread around to
the front.
5. Pull it gently up and you will see it has caught the bobbin thread. Pull the
two threads toward the back of the machine (away from you), and lay
them under the presser foot.
6. Slide the bobbin cover plate back into place.
CLOTH PLACEMENT & SEWING OPERATION:
1. Turn the hand wheel in the direction of the arrow to life the needle to its highest position.
2. Raise the presser foot lifter and put the cloth beneath the presser foot.
3. Lower the presser foot lifter.
4. Turn the hand wheel 2-3 rotations in the direction of the arrow.
5. Switch the machine “On” and start sewing.
6. Change the sewing speed with the speed button.
7. Switch the machine to the “O” position when nished sewing. Turn the hand wheel in the direction of the arrows
on wheel until the needle is in its’ highest position. Raise the presser foot lifter and remove the cloth, pulling it
gently backwards and away from the machine.
Note: It is essential that threading bot top and bottom be done properly.
Check carefully and do one practice stitch before beginning to sew. Improper threading will damage the lockstitch.
Note: If the cloth is dicult to take out, you can turn the hand wheel back and froth and gently pull the cloth to
release it.
REQUIRES
4 X 1.5V AA OR LR6
WINDING THREAD ONTO THE BOBBIN:
To change or replace the thread on a bobbin a reel of cotton is needed.
Follow these steps.
1. Place a spool of the desired thread onto the thread spindle.
2. The bobbin winder post is recessed in the hand wheel. Press in on the
end and twist to the left to release it.
3. Place an empty bobbin onto the bobbin winder post, and wrap the end of
the thread onto the bobbin for 4-5 turns.
4. Switch the power to “On” to start winding the thread, using your nger to
evenly spread it across the bobbin as it wraps. The bobbin is full when the
thread reaches the tops of the small holes.
5. When nished, swtich the machine to “O”, cut the thread and remove the
bobbin.
6. Press the bobbin winder post back into the hand wheel and twist to the
right to lock in place.
NEEDLE REPLACEMENT:
Needle replacement should be done by an adult.
Follow these steps if the needle has been bent or broken and needs to
be changed:
(90/14 household sewing machine needles can be used with this machine).
1. Switch the machine “O” and remove the batteries (or unplug the
external power source).
2. Remove the safety cover by removing the screw and bolt with a
screwdriver.
3. Loosen the needle clamp screw and pull out the old needle.
4. Insert the new needle into the needle bar with the at side facing the
needle clamp screw. Gently push the new needle in as far as it will go.
5. Tighten the needle clamp screw while holding the needle in place.
6. Replace the safety cover by securing the screw and bolt with a
screwdriver.
STITCH ADJUSTMENT:
1. A normal stitch is shown in Figure A. The surface thread and the bottom
thread will have uniform elasticity. If you can’t tell the stitches on a cloth
from a surface thread to a bottom thread, the stitch is normal.
2. A loose surface thread is shown in Figure B
The bottom thread will be straight and some “knots” may come out.
In this case, you need to screw the thread clamping nut clockwise and
increase the pressure of the surface thread, until the stitches of the
surface thread and bottom thread are even.
3. A loose bottom thread is shown in Figure C.
The surface thread will be straight and some “knots” may come out.
In this case, you need to screw the thread-clamping nut counter-clockwise
and decrease the pressure of the surface thread, until the stitches of the
surface thread and bottom thread are even.
Note: Use only lightweight or normal weight fabric. Thick of heavyweight
fabric is not recommended and may result in a broken needle.
Note: When adjusting the tightness of the surface thread, watch if the surface
thread has come out from the thread clip. If so, you need to clamp the surface
thread back to the middle of the two thread clamping clips.
Surface Thread
Bottom Thread
Needle Clap
Screw
Needle bar Tighten
Loosen
Cloth
Non-rechargeable batteries are not to be recharged. Rechargeable batteries are to be removed from the
product before being charged. Rechargeable batteries are only to be charged under adult supervision.
Dierent types of batteries or new and used batteries are not to be mixed. Only batteries of the same or
equivalent type as recommended are to be used. Batteries are to be inserted with the correct polarity.
Exhausted batteries are to be removed from the product. The supply terminals are not to be short circuit-
ed. Do not throw batteries into a re. Remove the batteries if you are not going to use the unit for a long
period of time. Battery shall not be exposed to excessive heat such as sunshine, re or the like.
WARNING: Malfunction or loss of memory may be caused by strong frequency
interference or electrostatic discharge. Should any abnormal function occur, remove
the batteries and insert them again, or unplug the AC adapter from the mains socket
and plug it back in.
Warning: Disconnect the adapter if the game is not used for a long period of time to prevent overheating. When the toy is
powered by an adapter, do not play outside. Check the state of the adapter and the connection cords regularly.
If their condition is deteriorating, do not use the adapter until it has been repaired. The toy shall only be used with a trans-
former for toys. The adapter is not a toy. The machine should be disconnected from the power supply to be cleaned if liq-
uids are used for cleaning. The toy is not intended for children under 3 years old. Misuse of transformer can cause electrical
shock. The toy is not to be connected to more than the recommended number of transformers or power supplies.
Parental advisory: transformer and adaptor for toys are not intended to be used as a toy. The usage must be under
parental advice.
The toy is only to be connected with equipment bearing the following symbol or .

ENGLISH
ENGLISH
Follow us
@LexibookCom
Lexibook UK
PO Box 59
SOUTH MOLTON
EX36 9AU
UK
MAINTENANCE AND WARRANTY
NOTE: Please keep this instruction manual, it contains important information.
This product is covered by our 2-year warranty.
For any claim under the warranty or after sale service, please contact your distributor and present a valid proof of pur-
chase. Our warranty covers any manufacturing material and workmanship defect, with the exception of any deterioration
arising from the non-observance of the instruction manual or from any careless action implemented on this item (such as
dismantling, exposition to heat and humidity, etc.).
It is recommended to keep the packaging for any further reference.
• Do not attempt to sew thick materials or force the hand wheel.
• Change the batteries when you notice that the machine is working at a slower speed than usual.
• To clean the machine, use only a dry cloth; do not use any detergent product.
Environmental Protection
• Unwanted electrical appliances can be recycled and should not be discarded along with regular household waste!
Please actively support the conservation of resources and help protect the environment by returning this appliance
to a collection centre (if available).
• Do not expose the machine to direct sunlight or to any other source of heat.
• Do not dismantle or drop.
WARNING: This product contains functional sharp edge on scissors and functional sharp point on needle and should be
used under the
direct supervision of an adult.
WARNING: To be used under the direct supervision of an adult. Do not touch sharp needle end or scissor blade as it may
cause injury.
WARNING. Not suitable for children under 3 years. Choking Hazard – Small parts.
In a bid to keep improving our services, we could implement modication on the colours and the details of the product
shown on the packaging.
Reference: SW100MI
Designed and developed in Europe - Made in China.
© LEXIBOOK®
United Kingdom & Ireland
www.lexibook.com
LAMP CONTROL:
Press the lamp switch to turn the lamp on if you need more light.
THREAD CUTTING FUNCTION:
The thread cutter above the lamp allows you to conveniently cut threads without scissors. Tightly pull the thread down
across the cutter.
COMMON PROBLEMS AND SOLUTIONS
PROBLEM
DESCRIPTION
POWER OFF (SLOW
RESPONSE
THREAD SKIPPING
THREAD FAILURE
THREAD
BREAKAGE
BAD BOTTOM
THREAD OR
SURFACE THREAD
NEEDLE BUMPING
POSSIBLE CAUSE
Incorrect battery direction
Leaning needle hole, inadequate
installation of the needle Change the needle
Bobbin of bottom thread jamming
Loosening of the presser foot or the
needle Change the needle and tighten the presser foot
screw
Hindered movement of the surface thread Check if the bobbin of surface thread and the
spindle are spinning freely
Check if the end of the thread in the bottom
thread bobbin has been cleared
Place the batteries in the correct direction
Insucient output power of the external
power source, low output voltage or
damaged power source
Surface thread too tight or too loose Turn the adjusting know of the surface thread to
make the bottom thread and the surface thread
even
Change to a suitable power source
Mixed new and old batteries
Presser foot loose Tighten the presser foot screw
Bottom thread exhausted Change the bobbin of the bottom thread
Change to all new batteries
Exhausted batteries
Bent or deformed needle Change the needle
Burr in the needle hole
Drag the cloth during the sewing operation Change the needle and thread again to sew
Change the needle
Leaning needle or inadequate installation
No cloth in place when switching to “On” Change the needle and thread again to sew
Bent or deformed needle Change the needle
Incorrect threading Thread again in the correct sequence
Install the needle again
Incorrect thread sequence Thread again in the correct sequence
Change to new batteries
SOLUTIONS
USING THE FOOT PEDAL:
The foot pedal switches the machine on and o using your foot, allowing you to use both hands to control the fabric.
Insert the plug at the end of the foot pedal’s cord into the foot pedal socket, found below the hand wheel. The machine
needs to be in the “O” position.
Note: Be sure to press the On/O switch to the “O” position when nished sewing to avoid accidentally starting
the machine.
Note: The direction of the needle must be correct, and the screw against
the needle must be properly tightened to keep the needle from falling out.
SAFETY INSTRUCTIONS
PLEASE READ BEFORE OPERATING THIS EQUIPMENT.
Before using the unit, be sure to read all operating instructions carefully. Please note that these are general precautions
and may not pertain to your unit.
1. Read this Instruction Manual before you attempt to connect or operate the appliance.
2. Keep these instructions in good condition. Heed all warnings. Follow all instructions.
3. Save this Instruction Manual for future reference.
4. The apparatus shall not be exposed to dripping or splashing and no objects lled with liquids, such as vases, shall
be placed on the product. Dry location use only.
5. No naked ame source, such as candles, should be placed on the product.
6. Children should be supervised to ensure that they do not play with the appliance.
7. Ventilation should not be impeded by covering the ventilation openings.
8. Only use accessories, which are specied by the manufacturer.
9. Use replacement parts, which are specied by the manufacturer.
10. Install the unit in accordance with the manufacturer’s instructions.
11. Place the unit where there is good ventilation. Place the system on a at, hard and stable surface. Do not expose
to temperatures above 40°C. Allow at least 10 cm clearance from the rear and the top of the unit and 5 cm from
each side.
12. Dispose of used batteries in an environmental-responsible manner.
13. Always ensure that the product is unplugged from the electrical outlet before moving or cleaning. Clean it with dry
cloth only.
14. Turn o the product during lightning, storms or when it will not be used for long periods of time.
15. This product has no user-serviceable parts. Do not attempt to repair this product yourself. Only qualied service
personnel should perform servicing. Take the product to the electronics repair shop of your choice for inspection
and repair.
16. NEVER let anyone, especially children, push anything into holes, slots or any other openings in the unit’s casing as
this could result in a fatal electric shock.
17. Do not place the unit near TVs, speakers and other objects that generate strong magnetic elds.
18. Do not leave the unit unattended when it is in use.
19. Keep minimum distances around the apparatus for sucient ventilation.
20. The ventilation should not be impeded by covering the ventilation openings with items, such as newspapers,
tablecloths, curtains, etc.
21. The use of apparatus in tropical and/or moderate climates.
22. Batteries should be disposed properly. Take them to the collection container in order to protect the environment.
Environmental Protection
Unwanted electrical appliances can be recycled and should not be discarded along with regular household
waste! Please actively support the conservation of resources and help protect the environment by returning
this appliance to a collection centre (if available).

DEUTSCH
DEUTSCH
Betrieb der Nähmaschine
Fadenhebel
Fadenhebel
Spulenstift Handrad
Ein-/Ausschalter
Geschwindig
-keitstaste
Anschluss für
Pedal
Anschluss für
Netzteil
Nähfuß
Untere Spule
Spulenabdeckplatte
Nadel
Fadenxierring
Lampe
Lampenschalter
Fadenschneider
Nähfußhebel
Spulenwickler
Anschluss für
Pedal
Anschluss für
Pedal
Einfädelhilfe
Ersatznadeln
Spulen ohne
Garn
Pedal
Spulen mit
Garn
Lampenschalter
Lampe
Garnrollenspindel
BITTE UNBEDINGT DIE FOLGENDEN SICHERHEITSHINWEISE BEACHTEN.
AUFSICHT UND HILE EINES ERWACHSENEN ERFORDERLICH.
ACHTUNG: AUSSER REICHWEITE VON KLEINEN KINDERN HALTEN. NICHT EMPFOHLEN FÜR KINDER UNTER 8 JAHREN.
1. Bei Verwendung eines Netzteils und beim Einlegen der Batterien die Nähmaschine ausschalten (OFF).
2. Bei Benutzung dieser Maschine ist Aufsicht durch Erwachsene erforderlich. Die Nähmaschine nicht in Reichweite
von Kindern aufbewahren.
3. Nach Gebrauch die Maschine ausschalten und Batterien herausnehmen oder Netzteil ausstecken.
4. Um eventuelle Gefahren zu vermeiden, immer Batterien desselben Herstellers verwenden.
5. Die Maschine nur einschalten, wenn Sto eingelegt ist und Nähfuß abgesenkt wurde.
6. Diese Maschine wurde sorgfältig eingestellt. Nicht versuchen, sie auseinander zu nehmen.
WARNUNG: Das gesamte Verpackungsmaterial wie Klebeband, Plastikfolie, Drähte und Etiketten ist nicht Teil dieses
Produktes und sollten entsorgt werden.
Nadelklem
-mschraube
Schutzab
-deckung
BATTERIEN UND NETZTEIL (nicht enthalten):
1. Das Batteriefach bendet sich auf der Unterseite der Maschine. Darauf achten,
dass die Maschine ausgeschaltet ist. Mit einem Schraubendreher, Das Batter-
iefach önen und 4 x AA / LR6 1,5V Batterien (nicht enthalten) entsprechend der
Markierungen im Batteriefach einlegen. Dann das Batteriefach wieder schließen.
Die Maschine bendet sich jetzt im Standby-Modus.
2. Wenn ein Netzeil verwendet wird, muss es die folgenden technischen Daten
haben: Ausgang Gleichstrom 6.0V 800mA, Außenmaß des Steckers 5,5 mm mit
Innenloch 2,1 mm und Polarität wie abgebildet.
BITTE BEACHTEN! Batterien sollten von einem Erwachsenen eingesetzt werden. Die Plus- und Minuspole richtig
ausrichten. Keine alten und neunen Batterien oder verschiedene ARten von Batterien zusammen verwenden.
Nicht auadbare Batterien nicht auaden. Batterien aus dem Produkt entfernen, wenn dieses längere Zeit
nicht verwendet wird. Die Batteriekntakte nicht kurzschließen. Diese Information für eventuelle Rückfragen
bitte aufbewahren.
Bei ausgeschalteter Maschine den Stecker des Netzteils in den Anschluss auf der Rückseite der Maschine stecken.
Hinweis: Die Batterien müssen entfernt werden, wenn ein AC/DC-Adapter verwendet wird.
EINFÄDELN:
Der Faden ist bereits eingefädelt. Wenn die Spule ausgewechselt werden soll, muss zunächst die Schutzabdeckung
entfernt werden. Dazu Schraube und Mutter mit einem Schraubenzieher (nicht mitgeliefert) entfernen. Den Garnrollen-
stift oben auf der Maschine herausziehen und die Garnrolle daraufstecken. Etwas Faden von der Rolle ziehen und den
nummerierten Schritten folgen, um ihn korrekt einzufädeln. Danach wieder die Schutzabdeckung anbringen. Dazu
Schraube und Mutter mit einem Schraubenzieher (nicht mitgeliefert) anschrauben.
SPULE EINSETZEN:
1. Die Spulenabdeckplatte önen. Dazu auf den Pfeil drücken und die Platte
von der Maschine weg schieben.
2. Die Spule mit dem gewünschten Garn in den Spulenhalter einlegen.
Etwa 25 cm des Fadens müssen aus dem Spulenhalter herausstehen.
3. Drehe das Handrad in Richtung auf dich zu. Die Nadel geht hinunter und
nimmt den Faden aus der Spule auf. Drehe das Handrad weiter, bis die-
Nadel ganz nach oben gegangen ist, nachdem sie ganz unten war. Hör auf
zudrehen, wenn die Nadel wieder beginnt, hinunterzugehen.
4. Stelle den Nähfußhebel hoch und bringe den Garnrollenfaden nach vorn.
Zieh ihn vorsichtig hoch und du wirst sehen, dass er den Spulenfaden
eingefangen hat. Zieh die beiden Fäden von dir weg und lege sie unter
den Nähfuß.
5. Die Spulenabdeckplatte wieder schließen.
ERFIRDERT
4 X 1.5V AA OR LR6
Nicht wieder auadbare Batterien können nicht aufgeladen werden. Auadbare Batterien müssen vor
der Auadung aus dem Spielzeug genommen werden. Batterien dürfen nur unter Aufsicht eines Er-
wachsenen aufgeladen werden. Unterschiedliche Batterietypen bzw. alte und neue Batterien dürfen
nicht gemischt werden. Es dürfen nur solche Batterien verwendet werden, die gleichwertig zum emp-
fohlenen Batterietyp sind. Die Batterien müssen korrekt entsprechend der Polaritätsmarkierungen einge-
legt werden. Leere Batterien müssen aus dem Spielzeug genommen werden. Die Anschlüsse dürfen nicht
kurz geschlossen werden.
Batterien niemals ins Feuer werfen. Entfernen Sie die Batterien, wenn Sie das Spielzeug für längere Zeit
nicht benutzen. Wenn der Sound schwächer wird oder das Spielzeug anfängt, nicht mehr direkt zu re-
agieren, deutet dieses ebenfalls darauf hin, dass es Zeit wird, neue Batterien einzusetzen. Die Batterien
dürfen keinen übermäßigen Hitzequellen ausgesetzt werden,zum Beispiel Sonnenschein oder Feuer.
WARNUNG: Funktionsstörungen oder Speicherverlust können möglicherweise durch
starke Frequenzstörungen oder elektrostatische Entladung verursacht werden. Sollte
es zu unnormalen Funktionen kommen, entfernen Sie die Batterien und legen Sie
die Batterien wieder ein ; oder trennen Sie die Verbindung des AC/DC-Adapters mit
der Netzsteckdose und stellen Sie die Verbindung wieder her.
Warnung: Ziehen Sie den Stecker des Netzadapters, wenn das Spiel für längere Zeit nicht benutzt wird, um ein Überhitzen
zu verhindern. Wenn das Spiel über einen Adapter betrieben wird, spielen Sie nicht im Freien. Prüfen Sie den Zustand des
Adapters und der Verbindungskabel regelmäßig. Wenn Adapter oder Kabel nicht in einwandfreiem Zustand sind, benutzen
Sie den Adapter nicht, bis er repariert worden ist. Das Spielzeug darf nur mit einem Transformator für Spielzeuge benutzt
werden. Der Adapter ist kein Spielzeug. Das Spielzeug sollte zum Reinigen vom Netzstrom getrennt werden, falls
Flüssigkeiten zum Reinigen verwendet werden. Das Spielzeug ist nicht für Kinder unter 3 Jahren geeignet. Die unsach-
gemäße Benutzung des Transformators kann einen Stromschlag verursachen.
WARNUNG: Das Spielzeug darf nicht an mehr als die empfohlene Anzahl von Transformatoren oder Netzteilen angeschlos-
sen werden.
Hinweis für Eltern: Transformatoren und Netzgeräte für Spielzeuge sind nicht dazu geeignet, als Spielzeuge benutzt zu
werden. Die Benutzung muss unter ständiger Überwachung der Eltern erfolgen. Das Spielzeug darf nur mit Geräten
verbunden werden, die mit dem folgenden Symbol versehen sind oder .
Die Nähmaschine benötigt 4 x 1,5 V LR6/AA Batterien (nicht mitgeliefert) oder
einem 6.0V 800mA Adapter (nicht mitgeliefert) mit positiver Mitte .
Input : 100V - 240V ~ 50 / 60Hz

DEUTSCH
DEUTSCH
GARN AUFSPULEN:
Um Garn auf eine Spule aufzuspulen, wird eine Garnrolle benötigt.
Führe folgende Schritte aus:
1. Die gewünschte Garnrolle auf die Spindel stecken.
2. Der Spulenwickler bendet sich im Handrad. Auf das Ende drücken und
nach links drehen, damit er herauskommt.
3. Eine leere Spule auf den Spulenwickler stecken und das Fadenende 4 bis 5
Wicklungen um die Spule wickeln.
4. Die Maschine einschalten (ON), um den Faden aufzuspulen, dabei mit
dem Finger den Faden hin und her bewegen, damit er gleichmäßig auf der
Spule verteilt wird. Die Spule ist voll, wenn das Garn die Oberkante der
kleinen Löcher erreicht hat.
5. Danach die Maschine ausschalten (OFF), den Faden abschneiden und die
Spule abnehmen.
6. Den Spulenwickler wieder in das Handrad drücken und nach rechts
drehen, um ihn zu arretieren.
NADEL AUSWECHSELN:
Der Nadelwechsel sollte von einem Erwachsenen durchgeführt werden.
Die folgenden Schritte ausführen, wenn die Nadel ausgewechselt werden
muss, weil sie verbogen oder abgebrochen ist:
(Für diese Maschinen können 90/14 Nadeln für Haushaltsnähmaschinen
verwendet werden).
1. Maschine ausschalten und Batterien herausnehmen oder Netzteil
ausstecken.
2. Die Schutzabdeckung entfernen. Dazu Schraube und Mutter mit einem
Schraubenzieher abschrauben.
3. Die Nadelklemmschraube lösen und die alte Nadel herausnehmen.
4. Die neue Nadel einsetzen. Dabei muss die ache Seite zur Schraube
der Nadelklemme zeigen. Die neue Nadel so weit wie möglich
hineinschieben.
5. Die Nadel festhalten und die Nadelklemmschraube wieder anziehen.
6. Danach wieder die Schutzabdeckung anbringen. Dazu Schraube und
Mutter mit einem Schraubenzieher anschrauben.
BENUTZUNG DES PEDALS:
Mithilfe des Pedals kannst du die Maschine ein- und ausschalten, während du mit den beiden Händen den Sto hältst.
Den Stecker des Pedals in den Anschluss an der Maschine stecken, der sich unter dem Handrad bendet. Dabei muss
die Maschine ausgeschaltet sein (OFF).
Bitte beachten: Darauf achten, dass nach dem Nähen der Ein-/Ausschalter auf Aus (OFF) gestellt wird, damit die
Maschine nicht versehentlich durch das Pedal eingeschaltet wird.
STITCH ADJUSTMENT:
1. Abbildung A zeigt den normalen Stich. Hier haben Ober- und Unterfaden
die gleiche Spannung. Wenn man beim Betrachten der Naht Ober- und
Unterfaden nicht unterscheiden kann, ist dies der normale Stich.
2. Abbildung B zeigt den Stich mit losem Unterfaden.
Der Oberfaden ist gerade und einige Knoten können hervortreten.
In diesem Fall muss der Fadenspanner nach links gedreht und so die
Spannung des Oberfadens verringert werden, bis die Stiche von Oberund
Unterfaden gleichmäßig sind.
3. Abbildung C zeigt den Stich mit losem Oberfaden.
Der Unterfaden ist gerade und einige Knoten können hervortreten. In
diesem Fall muss der Fadenspanner nach rechts gedreht und so die
Spannung des Oberfadens erhöht werden, bis die Stiche von Ober- und
Unterfaden gleichmäßig sind.
Bitte beachten: Beim Einstellen der Spannung des Oberfadens überprüfen, ob der. Oberfaden sich von dem Fadenclip
gelöst hat. Wenn das der Fall ist, muss der Oberfaden wieder in die Mitte zwischen den beiden Fadenclip gelegt werden.
Bitte beachten: Die Nadel muss richtig herum eingesetzt werden. Die Nadelklemmschraube
muss gut angezogen werden, damit sich die Nadel nicht löst und herausfällt.
Oberfaden
Unterfaden
Nadelklemmschraube
Nadelhalter Anziehen
Lösen
Sto
BELECHTUNG:
Auf die Lampentaste drücken, um die Beleuchtung einzuschalten, wenn man mehr Licht benötigt.
FADENSCHNEIDER:
Der Fadenschneider über der Lampe ermöglicht ein einfaches Abschneiden des Fadens ohne Schere. Dazu den Faden
fest über den Fadenschneider ziehen.
PROBLEMLÖSUNGEN
PROBLEM
KEINE LEISTUNG
(MASCHINE IST
LANGSAM)
FADEN SPRINGT
NAHTFEHLER
FADEN REISST
SCHLECHTE
OBERODER
UNTERNAHT
NADEL SPRINGT
MÖGLICHE URSACHE
Batterien verkehrt herum eingelegt
Nadel ist nicht richtig eingesetzt, Nadelöhr
ist schief Die Nadel austauschen
Unterfadenspule hängt fest Dafür
sorgen
Nähfuß oder Nadel sind lose
Während des Nähens wurde am Sto
gezogen
Beim Einschalten war kein Sto eingelegt
Die Nadel austauschen und die Schraube des
Nähfußes anziehen
Die Nadel austauschen und den Faden erneut
einfädeln
Die Nadel austauschen und den Faden erneut
einfädeln
Bewegung des Oberfadens wird behindert Dafür sorgen, dass die Garnrolle für den
Oberfaden frei ist
Dafür sorgen, dass das Fadenende der
Unterfadenspule frei ist
Batterien richtig herum einlegen
Netzteil ist zu schwach oder beschädigt
Die Fadenspannung ist zu niedrig oder zu
hoch Den Fadenspanner so einstellen, dass ide
Spannung von Ober- und Unterfaden gleich ist
Ein geeignetes Netzteil verwenden
Neue und alte Batterien wurden zusammen
verwendet
Nähfuß ist lose Die Schraube des Nähfußes anziehen
Unterfadenspule ist leer Spule für den Unterfaden austauschen
Nur neue Batterien verwenden
Leere Batterien
Verbogene Nadel Die Nadel austauschen
Grat im Nadelöhr Die Nadel austauschen
Nadel ist nicht richtig eingesetzt, Nadelöhr
ist schief
Verbogene Nadel Die Nadel austauschen
Faden falsch eingefädelt Faden korrekt einfädeln
Die Nadel erneut einsetzen
Faden falsch eingefädelt Faden korrekt einfädeln
Die Batterien ersetzen
LÖSUNG
STOFF AUFLEGEN UND NÄHEN:
1. Das Handrad in Pfeilrichtung drehen, um die Nadel auf die höchste Stellung zu bringen.
2. Den Nähfußhebel hochstellen und den Sto darunterlegen.
3. Den Nähfußhebel nach unten stellen.
4. Das Handrad 2 bis 3 Umdrehungen in Pfeilrichtung drehen.
5. Die Maschine einschalten (ON) und mit dem Nähen beginnen.
6. Mit der Geschwindigkeitstaste kann die Nähgeschwindigkeit eingestellt werden
7. Nach dem Nähen die Maschine ausschalten (OFF). Das Handrad in Pfeilrichtung drehen, um die Nadel auf die
höchste Stellung zu bringen. Den Nähfußhebel hochstellen und den Sto vorsichtig nach hinten und weg von der
Maschine ziehen.
Bitte beachten: Falls sich der Sto schwierig herausnehmen lässt, das Handrad etwas vor und zurück drehen und sanft
am Sto ziehen, um ihn zu lösen.
Bitte beachten: Nur leichten oder normalen Sto benutzen. Dicker oder schwerer Sto wird nicht empfohlen und kann
dazu führen, dass die Nadel abbricht.
Bitte beachten: Es ist wichtig, dass sowohl Ober- wie Unterfaden richtig eingefädelt werden.
Überprüfe dies sorgfältig und mache einen Probestich, bevor du mit dem Nähen anfängst. Durch unrichtiges Einfädeln
kann die Maschine beschädigt werden.
SICHERHEITSHINWEISE
BITTE VOR DER INBETRIEBNAHME DIESES GERÄTES LESEN.
Bevor Sie dieses Gerät benutzen, lesen Sie bitte alle Bedienungsanleitungen sorgfältig durch. Dies sind allgemeine
Vorsichtsmaßnahmen und betreen eventuell nicht Ihr Gerät.
1. Vor dem Anschließen oder Bedienen des Geräts sollte die Bedienungsanleitung gelesen werden.
2. Heben Sie die vorliegende Anleitung gut auf. Beachten Sie alle Warnungen. Befolgen Sie alle Anweisungen.
3. Heben Sie diese Bedienungsanleitung zum Nachschlagen auf.
4. Das Gerät darf keinen tropfenden oder spritzenden Flüssigkeiten ausgesetzt werden. Es dürfen keine mit
Flüssigkeiten gefüllten Gegenstände, wie z. B. Vasen, auf das Gerät gestellt werden. Nur für den Gebrauch an
trockenen Orten.

ESPAÑOL
DEUTSCH
Folgen Sie uns auf
@LexibookCom
Modo de uso de la máquina de coser
Tensor
Palanca
tirahílos Portahílos Eje y rueda
manual
Interruptor de
encendido/apagado
Botón de
velocidad
Toma del pedal
Toma del
adaptador CA/CC
Prensatelas
Bobina inferior
Placa de la cubierta
de la bobina
Aguja
Anillo de jación
del hilo
Lámpara
Interruptor de la
lámpara
Cortahílos
Elevador del
prensatelas
Poste de
enrollado de la
bobina
Toma del pedal
Toma del adaptador
CA/CC
Enhebrador de
agujas
Agujas de
repuesto
Bobinas sin hilo
Pedal
Bobinas con hilo
Interruptor de
la lámpara
Lámpara
Bobina
Tornillo de la
abrazadera de
la aguja
Cubierta de
seguridad
ASEGÚRESE DE CUMPLIR CON LAS SIGUIENTES PRECAUCIONES DE FUNCIONAMIENTO.
REQUIERE SUPERVISIÓN Y ASITENCIA ADULTA.
PRECAUCIÓN: MANTENGA FUERA DEL ALCANCE DE LOS NIÑOS PEQUEÑOS. NO RECOMENDADO PARA NIÑOS
MENORES DE 8 AÑOS.
1. Cuando utilice fuentes de alimentación externas o al instalar las pilas, apague la máquina.
2. El uso de esta máquina requiere supervisión adulta.
3. Después de usarla, apague la máquina y retire las pilas o desenchufe la fuente de alimentación externa.
4. Para evitar peligros potenciales, no utilice pilas de diferentes marcas conjuntamente.
5. Sólo se puede encender la máquina si hay tela en su lugar y se ha bajado el prensatelas.
6. Esta máquina ha sido calibrada con precisión y las personas no profesionales no deben desmontarla.
¡ADVERTENCIA! Los elementos utilizados para el embalaje, tales como recubrimientos de plástico, cintas adhesivas,
etiquetas y ataduras metálicas, no forman parte de este juguete y deberán retirarse del mismo por razones de
seguridad antes de que se permita al niño utilizar el juguete.
FLEGE UND WARTUNG
Anmerkung: Bitte bewahren Sie diese Bedienungsanleitung auf, da sie wichtige Hinweise enthält. Dieses Produkt hat
2 Jahre Garantie. Für jede Inanspruchnahme der Garantie oder des Kundendienstes, kontaktieren Sie bitte Ihren
Einzelhändler unter Vorlage der Einkaufsquittung. Unsere Garantie deckt Materialschäden oder Installationsfehler, die
auf denHersteller zurückzuführen sind. Nicht eingeschlossen sind Schäden, die durch Missachtung der Bedienungsan-
leitung oder auf unsachgemäße Behandlung (wie z. B. unbefugtes Önen, Aussetzen von Hitze oder Feuchtigkeit, usw.)
zurückzuführen sind.
Hinweise zum Umweltschutz Alt-Elektrogeräte sind Wertstoe, sie gehören daher nicht in den Hausmüll! Wir möchten
Sie daher bitten, uns mit Ihrem aktiven Beitrag bei der Ressourcenschonung und beim Umweltschutz zu unterstützen
und dieses Gerät bei den (falls vorhanden) eingerichteten Rücknahmestellen abzugeben. Folgen Sie uns auf
@LexibookCom
Es wird empfohlen, die Verpackung für spätere Verwendung aufzubewahren.
• Versuche nicht, dickes Material zu nähen oder das Handrad mit Gewalt zu drehen.
• Tausche die Batterien aus, wenn Du bemerkst, dass sich die Geschwindigkeit der Maschine merklich verringert.
• Reinige die Maschine nur mit einem trockenen Tuch; verwende keine Reinigungsmittel.
• Setzen Sie das Spielzeug nicht direkter Sonnenbestrahlung oder anderen Hitzequellen aus.
• Bringen Sie es auf keinen Fall mit Nässe in Berührung.
• Nehmen Sie es nicht auseinander und lassen Sie es nicht fallen.
WARNUNG: Die Scheren dieses Produkts enthalten scharfe Kanten und scharfe Spitzen an den Nadeln. Beides darfnur
unter Aufsicht eines Erwachsenen verwendet werden.
WARNUNG: Unter der direkten Aufsicht eines Erwachsenen zu benutzen.
Nicht die scharfe Nadelspitze und Scherenklinge berühren, da dies zu Verletzungen führen kann.
ACHTUNG. Nicht für Kinder unter 3 Jahren geeignet. Erstickungsgefahr – Kleinteile.
Im Bemühen unseren Service weiterhin zu verbessern, können wir an den Farben und der Ausführung des Produktes,
wie es auf der Verpackung abgebildet ist, Änderungen vornehmen.
Referenznummer: SW100MI
Design und Entwicklung in Europa - Hergestellt in China
© LEXIBOOK®
Deutschland & Österreich
Für den Kundendienst wenden Sie sich bitte an unsere Teams: [email protected]
www.lexibook.com
5. Es sollten keine oenen Flammen, wie z.B. brennende Kerzen, auf das Gerät gestellt werden.
6. Damit Kinder nicht mit dem Gerät spielen, sollten sie beaufsichtigt werden.
7. Die Belüftung darf durch Zudecken der Lüftungsschlitze nicht behindert werden.
8. Benutzen Sie nur Zubehör, das vom Hersteller angegeben wird.
9. Verwenden Sie Ersatzteile, die vom Hersteller angegeben werden.
10. Das Gerät muss in nach Herstelleranweisungen aufgestellt werden.
11. Stellen Sie das Gerät an einem gut belüfteten Ort auf. Stellen Sie das System auf eine ache, harte und stabile
Fläche. Nicht Temperaturen über 40°C aussetzen. Hinten am Gerät sowie über dem Gerät mindestens 10 cm
Sicherheitsabstand und auf jeder Seite 5 cm frei halten.
12. Verbrauchte Batterien müssen umweltbewusst entsorgt werden.
13. Vor dem Versetzen oder Reinigen immer darauf achten, dass das Gerät von der Steckdose getrennt wird. Nur mit
einem trockenen Tuch reinigen.
14. Bei Blitz, Sturm oder längeren Betriebspausen das Gerät ausschalten.
15. Das Gerät enthält keine durch den Nutzer reparierbaren Teile. Keine eigenen Reparaturversuche unternehmen.
Reparaturen sollten nur von geschultem Fachpersonal ausgeführt werden. Lassen Sie das Gerät bei einem Elek-
tronikfachgeschäft Ihrer Wahl überprüfen und reparieren.
16. Achten Sie darauf, dass keine Gegenstände in die Önungen, Schlitze und andere oene Stellen am Gerätege-
häuse eingeführt werden, besonders gilt dies für Kinder. Tödliche Stromschläge sind hierbei nicht ausgeschlossen.
17. Das Gerät nicht in die Nähe von Fernsehgeräten, Lautsprechern und andere Objekte aufstellen, die starke Mag-
netfelder erzeugen.
18. Das Gerät bei Gebrauch nicht unbeaufsichtigt lassen.
19. Halten Sie um das Gerät herum einen Mindestabstand ein, um eine ausreichende Luftzirkulation zu gewährleis-
ten.
20. Die Luftzirkulation darf nicht durch Bedecken der Lüftungsönungen durch solche Gegenstände wie Zeitschriften,
Tischdecken, Vorhängen usw. behindert werden.
21. Das Gerät ist für den Gebrauch in einem moderaten und/oder tropischen Klima vorgesehen.
22. Batterien müssen auf sichere Weise entsorgt werden. Entsorgen Sie Batterien in den hierfür vorgesehenen Sam-
melbehältern, um die Umwelt zu schützen.
Hinweise zum Umweltschutz:
Alt-Elektrogeräte sind Wertstoe, sie gehören daher nicht in den Hausmüll! Wir möchten Sie daher bitten, uns
mit Ihrem aktiven Beitrag bei der Ressourcenschonung und beim Umweltschutz zu unterstützen und dieses
Gerät bei den (falls vo rhanden) eingerichteten Rücknahmestellen abzuge.

ESPAÑOL
ESPAÑOL
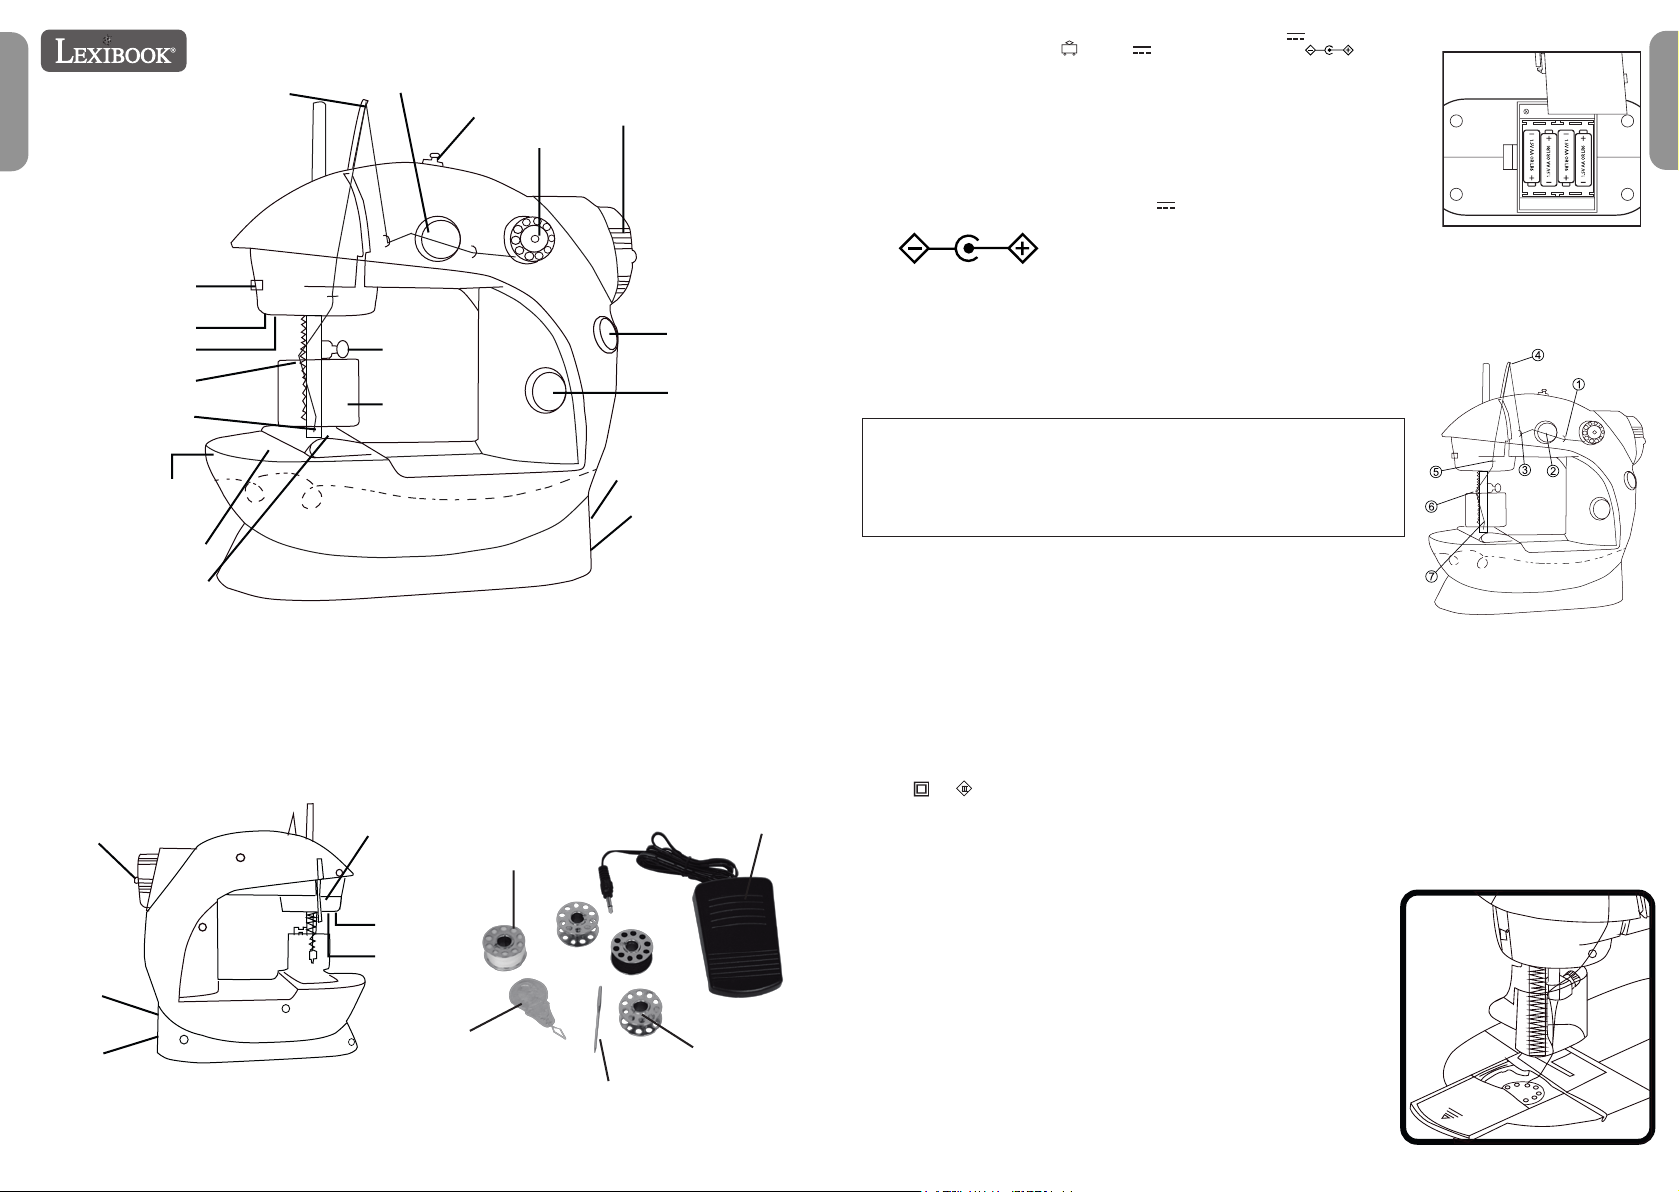
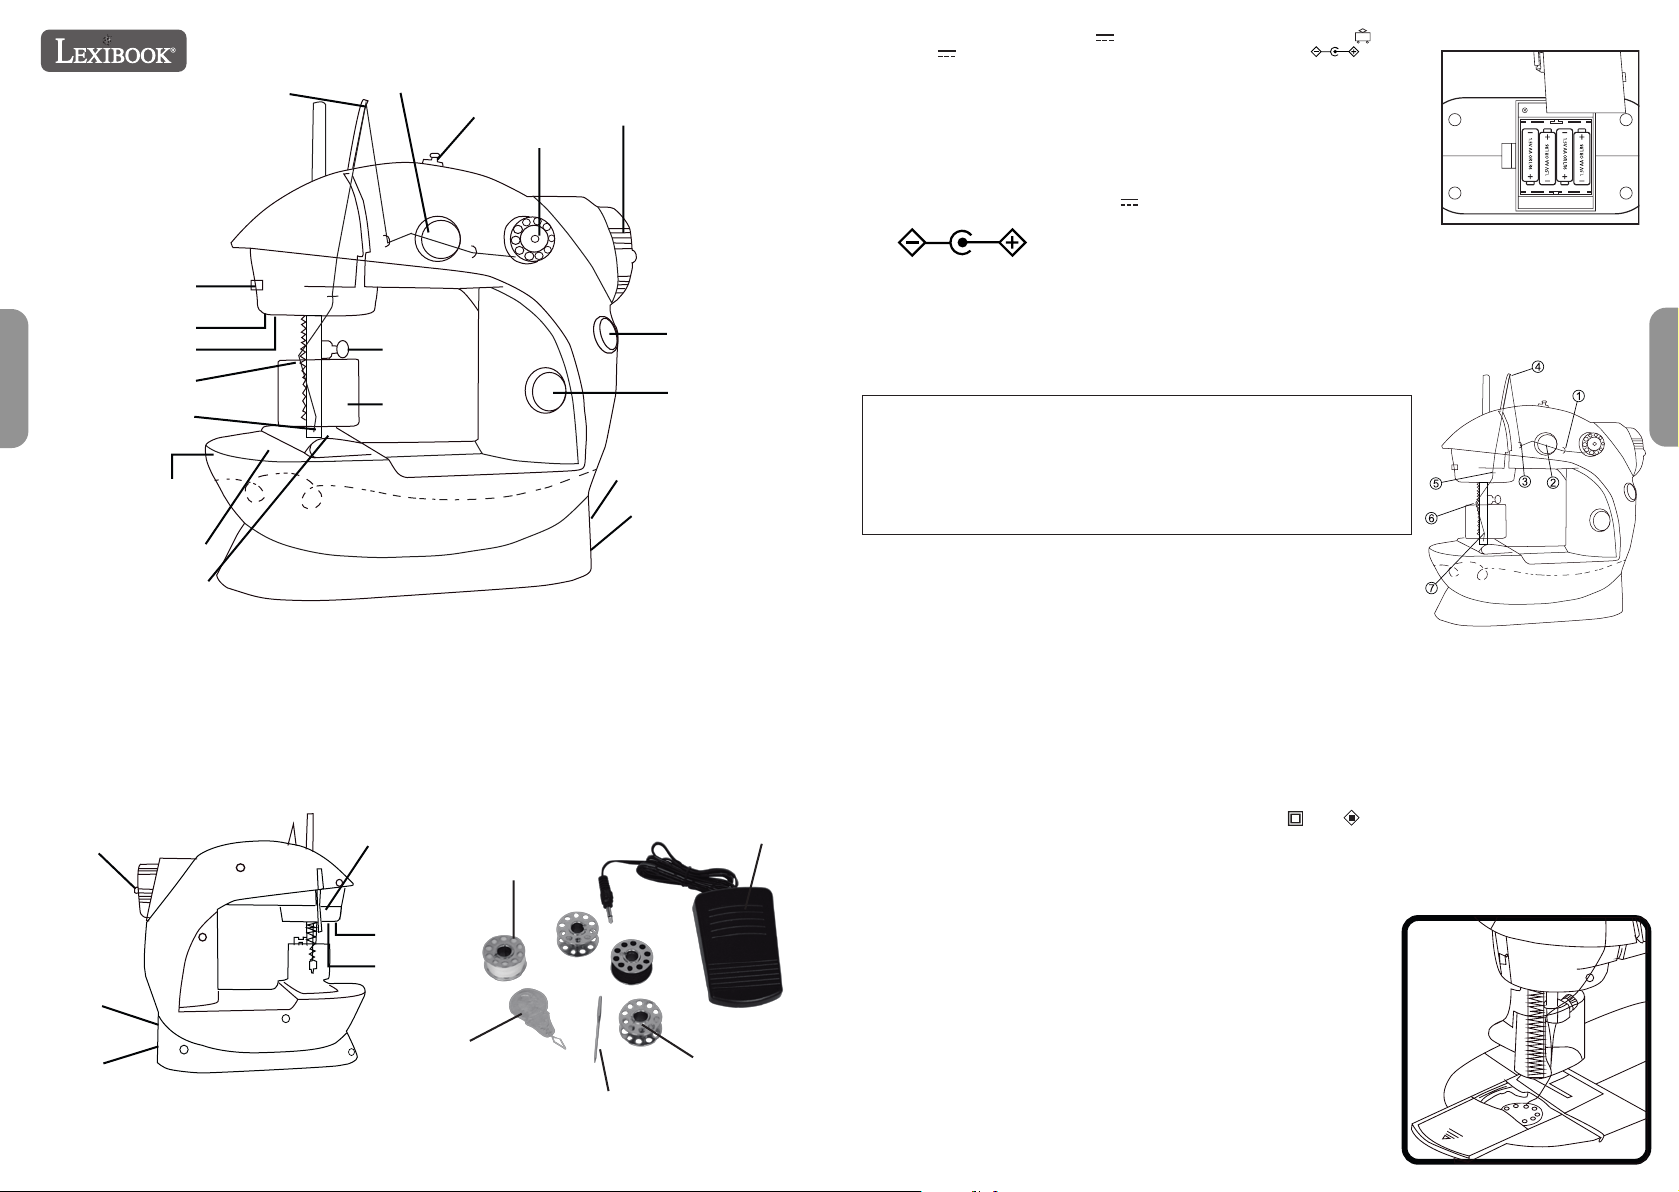
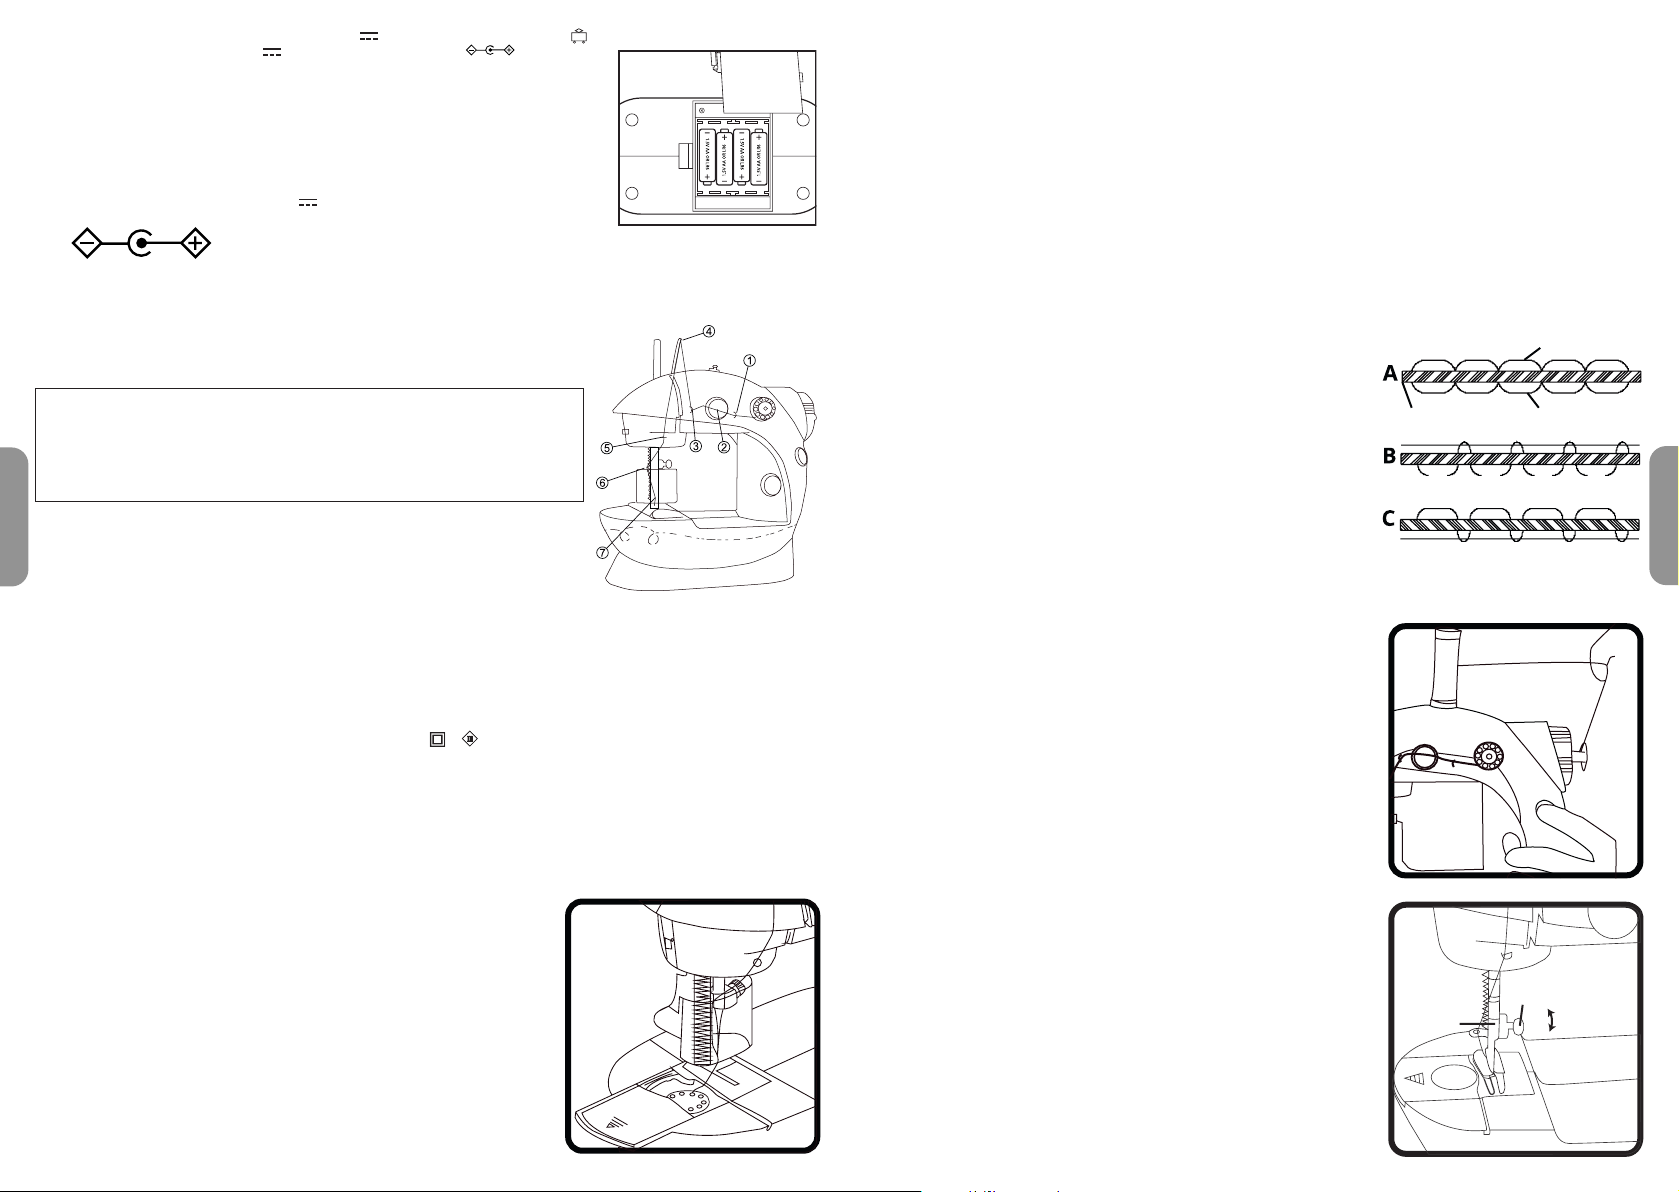
INSTALACIÓN DE LAS PILAS Y DEL ADAPTADOR CA/CC (no incluido):
1. El compartimento de las pilas está ubicado en la parte inferior de la máquina.
Compruebe que la máquina está apagada. Con un destornillador, retire la tapa de
las pilas e introduzca 4 pilas AA / LR6 1,5V (no incluidas) siguiendo la dirección
indicada en el interior del compartimiento. Cierre la tapa. La máquina estará en
modo de standby.
2. Si decide utilizar un adaptador de CA/CC, debe cumplir las siguientes
especicaciones: Salida de CC 6.0V 800mA, con un tamaño exterior de la clavija
de 5,5 mm, el oricio interior de 2,1 mm y la polaridad como se muestra:
¡NOTA! Las pilas deben ser instaladas por un adulto. Recuerde colocar los símbolos + y – en posición correcta.
No mezcle pilas viejas y nuevas o diferentes tipos de pilas. No intente recargar las pilas que no son recargables.
Retire las pilas si no va a usar la máquina por un algún tiempo. No cortocircuite los contactos de las pilas.
Conserve esta información para futuras consultas.
Con la máquina apagada, inserte el enchufe del adaptador CA/CC en la toma de
corriente de la parte trasera del aparato.
Nota: Las baterías deben quitarse si se utiliza cualquier adaptador de CA / CC.
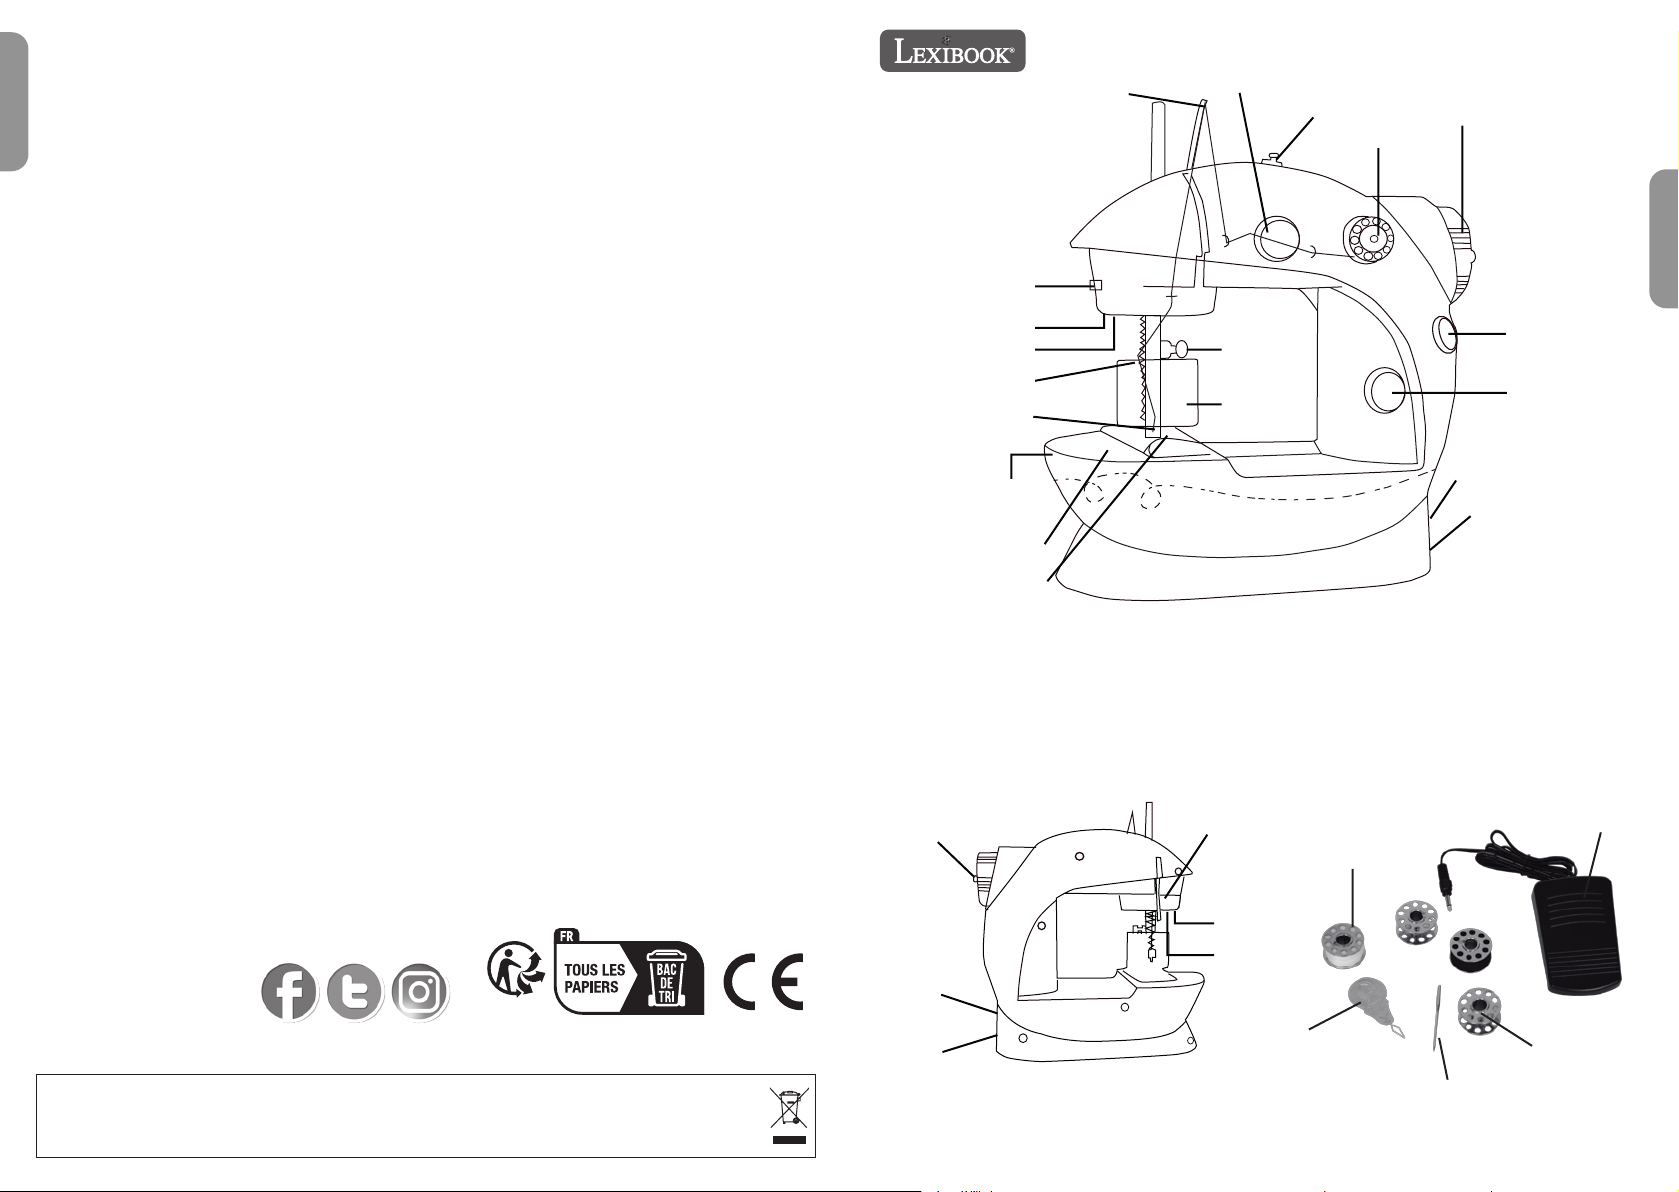
ENHEBRAR LA MÁQUINA:
La lanzadera de hilo supercial de la máquina ya ha sido enhebrada. Si desea cambiar el carrete, retire la cubierta
protectora quitando el tornillo y el perno con un destornillador (no incluido). Extraiga el portahílos de la parte superior
de la máquina y coloque el carrete de hilo en él. Saque un trozo de hilo y siga los pasos numerados para enhebrar
correctamente la máquina. Vuelva a colocar la cubierta protectora apretando el tornillo y el perno con un
destornillador.
CÓMO CARGAR LA BOBINA:
1. Abra la placa de la cubierta de la bobina presionando la echa y
deslizándola hacia afuera de la máquina.
2. Coloque la bobina con el hilo que desee en el portabobinas, dejando unos
25,5 cm de hilo extendido fuera del portabobinas.
3. Gire la rueda manual hacia usted. La aguja bajará y recogerá el hilo de la
bobina. Gire la rueda manual hasta que la aguja haya descendido
4. completamente y luego suba de nuevo hasta la altura máxima.
Deténgase cuando la aguja empiece a bajar de nuevo.
5. Levante el elevador del prensatelas y lleve el hilo hacia la parte frontal.
6. Tire suavemente hacia arriba y verá que ha cogido el hilo de la bobina.
Tire de los dos hilos hacia la parte posterior de la máquina (en dirección
opuesta a usted) y colóquelos debajo del prensatelas.
7. Vuelva a colocar la placa de la cubierta de la bobina en su sitio.
COLOCACIÓN DE LA TELA Y COSIDO:
1. Gire la rueda manual en la dirección de la echa para elevar la aguja a su posición más alta.
2. Levante el elevador del prensatelas y coloque la tela debajo del prensatelas.
3. Baje el elevador del prensatelas.
4. Gire la rueda manual 2-3 vueltas en la dirección de la echa.
5. Encienda la máquina y empiece a coser.
6. Cambie la velocidad de la máquina mediante el botón de velocidad.
7. Apague la máquina cuando haya terminado de coser. Gire la rueda manual en el sentido de las echas hasta que
la aguja esté en su punto más alto. Levante el elevador del prensatelas y retire la tela, tirando suavemente hacia
atrás y alejándola de la máquina.
Nota: Es esencial que el enhebrado, tanto de la parte superior como de la
inferior, se haga correctamente.
Compruebe que todo está correcto y haga una puntada de práctica antes de
empezar a coser. Un enhebrado incorrecto dañará el pespunte.
Nota: Si la tela resulta difícil de sacar, puede girar la rueda manual hacia adelante y hacia atrás y tirar suavemente de
ella para liberarla.
Nota: Use solo telas de peso ligero o normal. No se recomienda el uso de telas gruesas o de alto gramaje, ya que
pueden provocar la rotura de la aguja.
REQUIERE
4 X 1.5V AA OR LR6
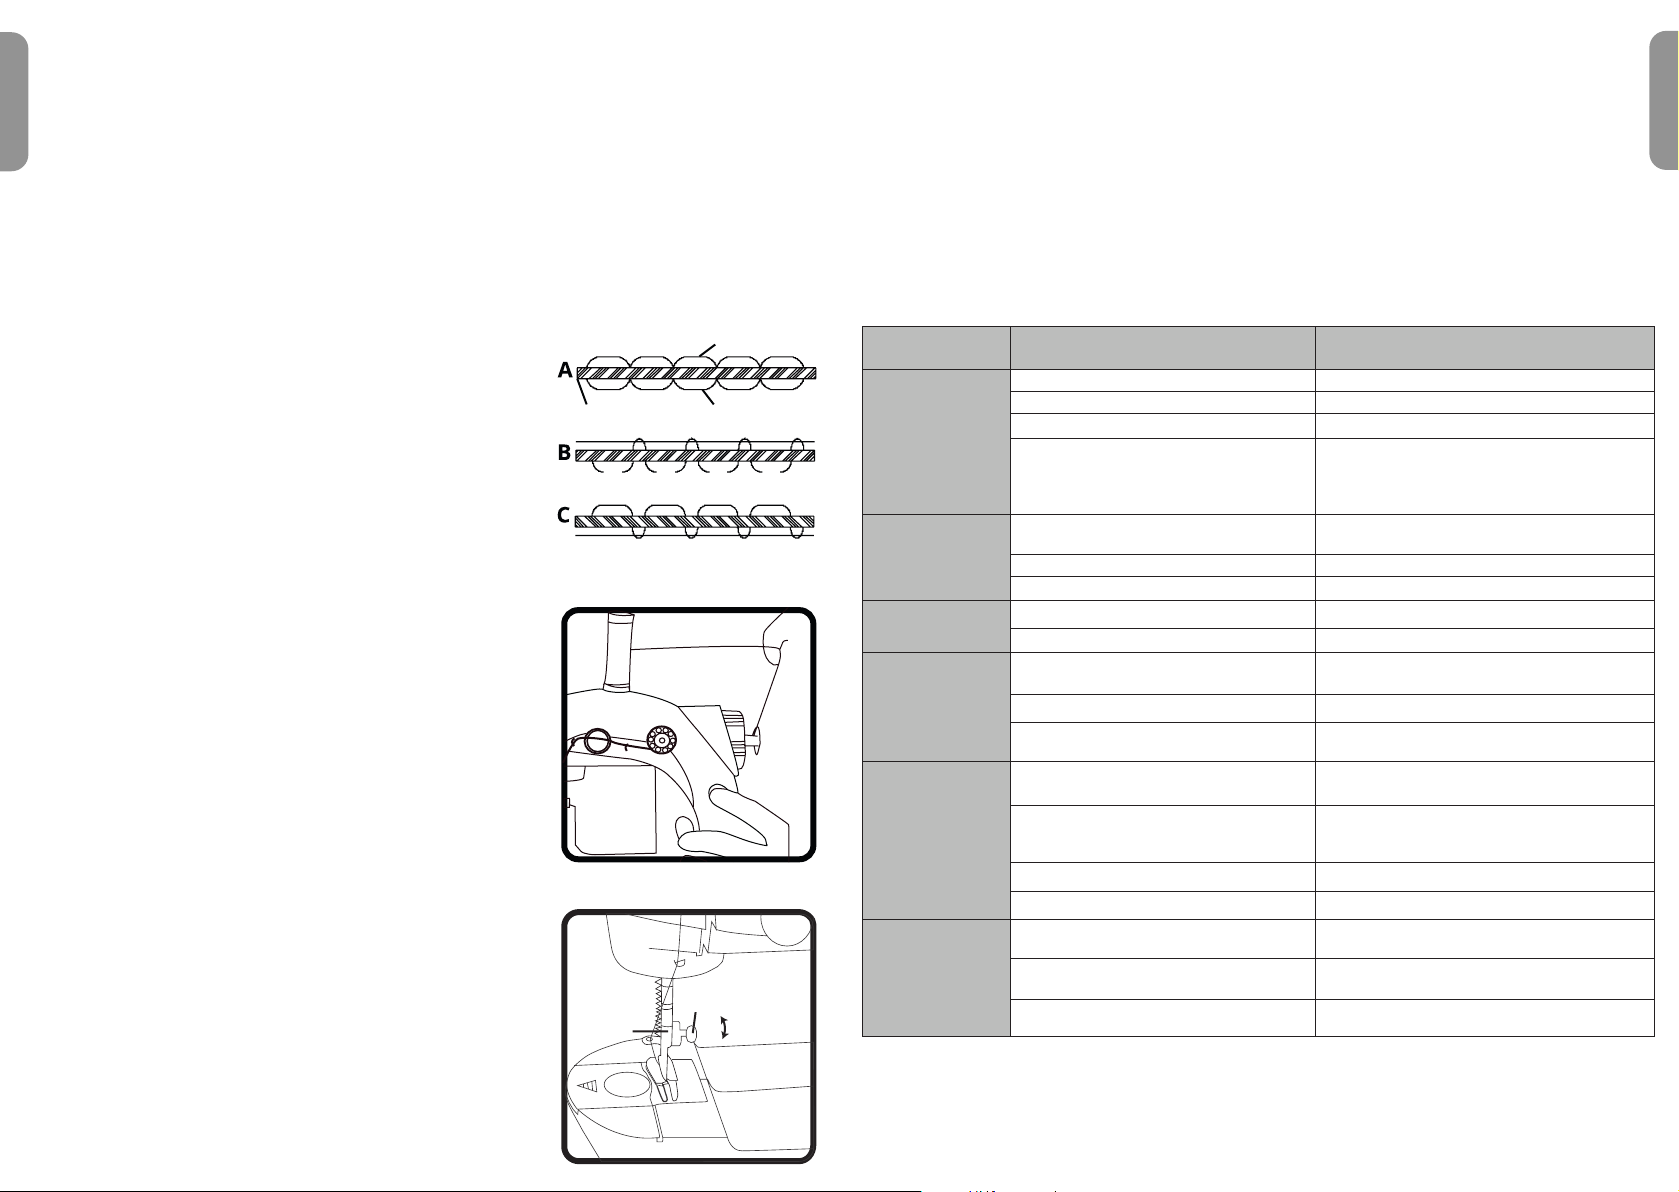
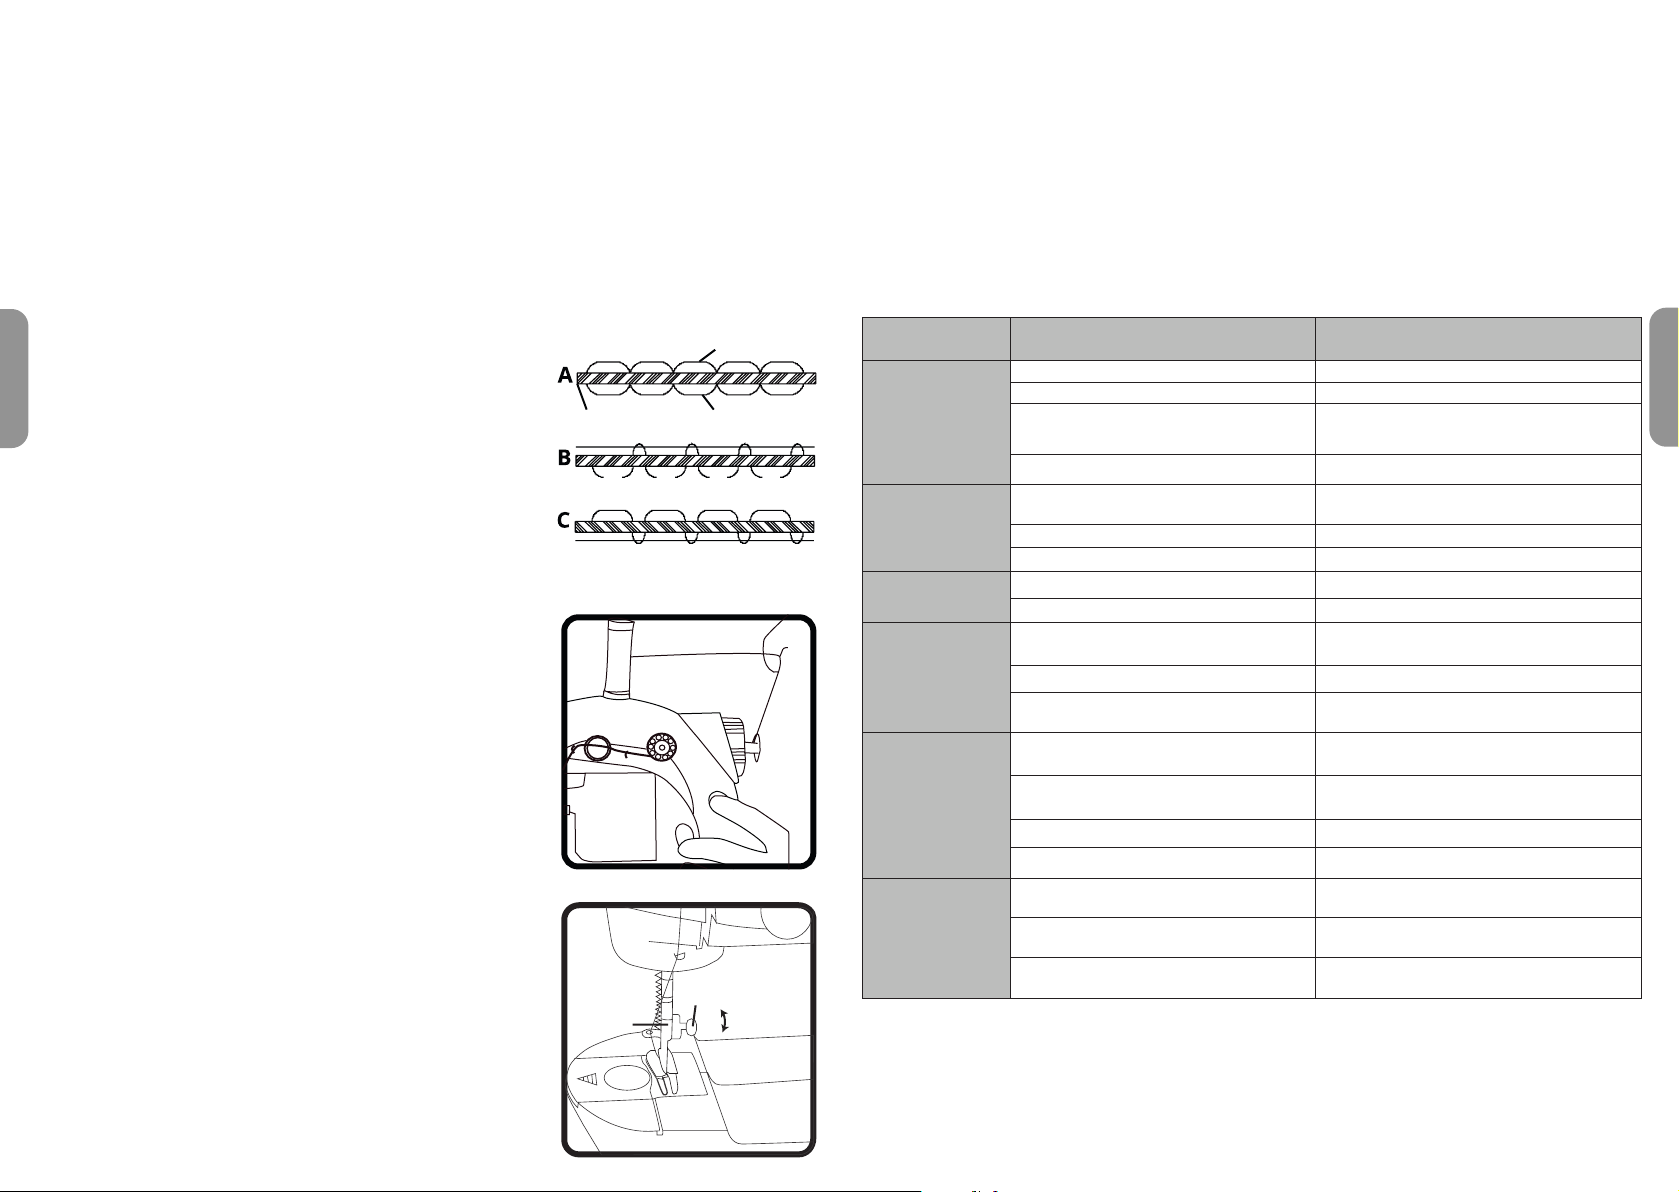
CÓMO ENROLLAR EL HILO EN LA BOBINA:
Para cambiar o sustituir el hilo de una bobina se necesita un carrete de
algodón.
Siga estos paso:
1. Coloque un carrete del hilo deseado en el portahílos.
2. El poste de enrollado de la bobina está empotrado en la rueda manual.
Presione el extremo y gire hacia la izquierda para liberarlo.
3. Coloque una bobina vacía en el poste de enrollado de la bobina y enrolle
el extremo del hilo en la bobina dándole 4 o 5 vueltas.
4. Encienda la máquina para empezar a enrollar el hilo, utilizando el dedo
para repartirlo uniformemente por la bobina mientras se enrolla. La
bobina está llena cuando el hilo llega a la parte superior de los oricios
pequeños.
5. Cuando termine, apague la máquina, corte el hilo y retire la bobina.
6. Presione el poste de enrollado de la bobina en la rueda manual y gire
hacia la derecha para bloquearlo.
SUSTITUCIÓN DE LA AGUJA:
El reemplazo de la aguja debe ser realizado por un adulto.
Siga estos pasos si la aguja se ha doblado o roto y necesita cambiarla:
(Las agujas de la máquina de coser doméstica 90/14 pueden utilizarse con esta
máquina).
1. Apague la máquina y retire las pilas (o desenchufe la fuente de
alimentación externa).
2. Retire la cubierta de seguridad quitando el tornillo y el perno con
undestornillador.
3. Aoje el tornillo de sujeción de la aguja y saque la aguja vieja.
4. Coloque la nueva aguja en la barra de la aguja con el lado plano hacia
adentro mirando hacia la abrazadera. Presione con cuidado la aguja
nueva hasta el tope.
5. Apriete el tornillo de sujeción de la aguja mientras la mantiene en su sitio.
6. Vuelva a colocar la cubierta de seguridad jando el tornillo y el perno con
un destornillador.
AJUSTE DE LA PUNTADA:
1. Una puntada normal se muestra en la gura A. El hilo de la supercie y
el hilo del fondo tendrán una elasticidad uniforme. Si no puede distinguir
las puntadas en una tela de un hilo de supercie a un hilo de fondo, la
puntada es normal.
2. En la gura B se muestra un hilo supercial suelto. El hilo inferior será
recto y pueden salir algunos “nudos”. En este caso, hay que enroscar la
tuerca de sujeción del hilo en sentido horario y aumentar la presión del
hilo supercial, hasta que las puntadas del hilo supercial y del inferior
sean uniformes.
3. En la gura C se muestra un hilo inferior suelto. El hilo de la supercie
será recto y pueden salir algunos “nudos”. En este caso, hay que
enroscar la tuerca de sujeción del hilo en sentido antihorario y
disminuir la presión del hilo supercial, hasta que las puntadas del
hilo supercial y del inferior sean uniformes.
Nota: Al ajustar la tensión del hilo supercial, observe si el hilo supercial se
ha salido del clip del hilo. Si es así, hay que volver a sujetar el hilo supercial en
el centro de los dos clips de sujeción.
Hilo supercial
Hilo inferior
Tornillo de la
abrazadera de la aguja
Barra de
la aguja Apretar
Aojar
Tela
No intente nunca recargar pilas no recargables. Para cargar las pilas recargables, antes retírelas del
juguete. Las pilas recargables deben recargarse siempre bajo la supervisión de un adulto. No mezcle
pilas de distinto tipo, o pilas nuevas con pilas usadas. Utilice únicamente pilas del tipo recomendado o
equivalentes. Colocar siempre las pilas en la posición correcta, de acuerdo con la polaridad indicada en
el compartimento. Retire del juguete las pilas gastadas. No permita que entren en contacto eléctrico los
terminales de la alimentación. Si prevé que el juguete no va a utilizarse durante un periodo largo de ti-
empo, retire las pilas. Cuando el sonido se hace débil o el juego no responde adecuadamente es señal de
que debe sustituir las pilas. Deberá evitarse exponer las baterías a temperaturas excesivamente elevadas
tales como las generadas por la la acción de los rayos del sol o de las llamas.
ADVERTENCIA: Interferencias fuertes de señales de radio o descargas electrostáticas
pueden provocar un mal funcionamiento de la unidad o que se pierda el contenido de
la memoria. En caso de que se produzca un funcionamiento anormal, retire y vuelva a
colocar las pilas, o desenchufe el adaptador CA/CC de la toma de red y vuelva a enchufarlo
de nuevo.
ADVERTENCIA: Desconecte el adaptador si no va a utilizar la máquina por un largo periodo de tiempo para evitar sobrecalentamien-
tos. Cuando le jueguete esté alimentada mediante el adaptador, no la use a la intemperie. Compruebe periódicamente el estado
del adaptador y de los cables de conexión. Si observa algún deterioro en el adaptador, no lo use hasta que haya sido reparado. El
juguete solo debe utilizarse con un transformador para juguetes. El adaptador no es un juguete. Si va a limpiar el teclado con algún
tipo de líquido, desenchúfela antes de la toma de corriente. Este juguete no es apto para niños menores de 3 años. Un uso incorrec-
to del transformador puede causar descargas eléctricas.
ADVERTENCIA: El juguete no debe conectarse a más de la cantidad recomendada de transformadores o fuentes de alimentación.
Advertencia a los padres: los transformadores y adaptadores para juguetes no están destinados a ser utilizados como juguetes. Su
uso debe realizarse bajo supervisión parental.
El juguete solo debe conectarse a equipos que lleven este símbolo o.
Su máquina de coser funciona con 4 pilas de 1,5V de tipo LR6/AA (no incluidas) o
un adaptador (no incluido) de 6.0V 800mA con centro positivo .
Entrada : 100V - 240V ~ 50 / 60Hz

ESPAÑOL
ESPAÑOL
Síganos en
@LexibookCom
CONTROL DE LA LÁMPARA:
Si necesita más luz, pulse el interruptor de la lámpara para encenderla.
FUNCIÓN DEL CORTAHÍLOS:
El cortahílos está situado encima de la lámpara y permite cortar cómodamente los hilos sin necesidad de tijeras.
Tire del hilo tensado hacia abajo a través del cortahílos.
PROBLEMAS COMUNES Y SOLUCIONES
PROBLEMA
DESCRIPCIÓN
APAGADO
(RESPUESTA LENTA)
SALTO DEL HILO
FALLO DEL HILO
ROTURA DEL HILO
HILO DE FONDO
O HILO DE
SUPERFICIE
DEFECTUOSOS
SALTO DE LA
AGUJA
CAUSA PROBABLE
Dirección incorrecta de las pilas.
Agujero de la aguja inclinado, instalación
inadecuada de la aguja. Cambie la aguja.
La bobina del hilo inferior está atascada.
Aojamiento del prensatelas o de la
aguja.
Arrastre de la tela durante el cosido.
No hay tela en su lugar al encender la
máquina.
Cambie la aguja y apriete el tornillo del
prensatelas.
Cambie la aguja y vuelva a enhebrar para coser.
Movimiento obstaculizado del hilo
supercial. Verique si la bobina del hilo supercial y el
eje giran sin problemas.
Compruebe si la punta del hilo en la bobina
inferior está despejada.
Coloque las pilas en la dirección correcta.
Potencia de salida insuciente de la
fuente de alimentación externa, baja
tensión de salida o fuente de alimentación
dañada.
Hilo supercial demasiado apretado o
demasiado ojo. Gire la perilla de ajuste del hilo supercial para
que el hilo inferior y el hilo supercial queden
parejos.
Cambie a una fuente de alimentación
apropiada.
Mezcla de pilas nuevas y usadas.
Prensatelas ojo. Apriete el tornillo del prensatelas.
El hilo inferior se ha terminado. Cambie la bobina del hilo inferior.
Sustituya las pilas por otras nuevas.
Pilas usadas.
Aguja doblada o deformada. Cambie la aguja.
Rebabas en el agujero de la aguja. Cambie la aguja.
Aguja inclinada o instalación inadecuada.
Aguja doblada o deformada. Cambie la aguja.
Enhebrado incorrecto. Vuelva a enhebrar en la secuencia correcta.
Vuelva a instalar la aguja.
Séquence de l incorrecte Vuelva a enhebrar en la secuencia correcta.
Sustituya las pilas por otras nuevas.
SOLUCIONES
USO DEL PEDAL:
El pedal enciende y apaga la máquina con el pie, lo que le permite utilizar ambas manos para controlar el tejido.
Inserte el enchufe del extremo del cable del pedal en la toma del pedal, que se encuentra debajo de la rueda manual.
La máquina debe estar apagada.
Nota: Asegúrese de pulsar el interruptor de encendido/apagado para llevarlo a la posición de apagado cuando termine
de coser y así evitar que la máquina se ponga en marcha accidentalmente.
Nota: La dirección de la aguja debe ser correcta y el tornillo contra la aguja debe estar bien apretado para evitar que
la aguja se caiga.
INSTRUCCIONES DE SEGURIDAD
LEA ESTA SECCIÓN ANTES DE UTILIZAR ESTE EQUIPO.
Antes de utilizar el equipo, asegúrese de leer con cuidado todas las instrucciones de funcionamiento. Tenga en cuenta
que estas son precauciones generales y puede que no tengan aplicación a su equipo.
1. Lea este Manual de instrucciones antes de intentar conectar o utilizar el aparato.
2. Mantenga estas instrucciones en perfectas condiciones. Preste atención a todas las advertencias. Respete todas
las instrucciones.
3. Guarde este Manual de instrucciones para referencia en el futuro.
4. No deberá exponerse el aparato a goteos o salpicaduras, y no deberán colocarse sobre el producto objetos que
contengan líquidos, como pueden ser jarrones de ores. Utilice únicamente en lugares secos.
5. No coloque fuentes de llamas vivas, como pueden ser velas, sobre el producto.
6. Los niños deberán estar supervisados para asegurarse de que no juegan con el aparato.
7. No deberá impedirse la ventilación cubriendo las ranuras de ventilación.
8. Utilice únicamente accesorios especicados por el fabricante.
9. Emplee piezas de repuesto especicadas por el fabricante.
10. Instale la unidad en conformidad con las instrucciones proporcionadas por el fabricante.
11. Coloque la unidad donde exista una ventilación adecuada. Coloque el sistema sobre una supercie plana, dura y
estable. No exponga el aparato a temperaturas superiores a 40 °C. Deje una separación mínima de 10 cm respecto
a las partes trasera y superior de la unidad y de 5 cm respecto a los laterales.
12. Deseche las baterías (pilas) gastadas de un modo responsable con el medio ambiente.
13. Asegúrese siempre de desenchufar el producto de la toma de corriente antes de su traslado o limpieza. Límpielo
únicamente con un paño seco.
14. Apague el producto durante las tormentas eléctricas o cuando no piense utilizarlo durante un período de tiempo
prolongado.
15. En el interior del producto no hay piezas reparables por parte del usuario. No intente reparar este producto por
su cuenta. Únicamente podrá ser reparado por personal de servicio técnico cualicado. Lleve el producto al taller
de servicio técnico de electrónica de su elección para su inspección y reparación.
16. NO PERMITA NUNCA que nadie, especialmente los niños, metan nada en los oricios, las ranuras o cualquier otra
abertura de la carcasa de la unidad, ya que esto podría tener como resultado una descarga eléctrica mortal.
17. No coloque la unidad cerca de aparatos de TV, altavoces u otros objetos que generen fuertes campos magnéticos.
18. No deje la unidad desatendida cuando se encuentre en funcionamiento.
19. Guardar una distancia mínima alrededor del aparato, para que tenga una ventilación adecuada;
20. La ventilación no debe quedar impedida debido a la obstrucción de las aberturas de ventilación por objetos como
periódicos, manteles, cortinas, etc.;
21. El aparato ha sido diseñado para su uso en un clima templado o tropical;
22. Las pilas deben desecharse de manera conforme. Deposítelas en contenedores selectivos previstos a este efecto,
para proteger el medio ambiente.
MANTENIMIENTO Y GARANTÍA
NOTA: Conserve este manual de instrucciones ya que contiene informaciones de importancia.
Este producto está cubierto por nuestra garantía de 2 años.
Para cualquier reclamación bajo la garantía o petición de servicio post venta deberá dirigirse a su revendedor y presentar
su comprobante de compra. Nuestra garantía cubre los defectos de material o montaje que sean imputables al fabrican-
te, con la excepción de todo aquel deterioro que sea consecuencia de la no observación de las indicaciones indicadas en
el manual de instrucciones o de toda intervención improcedente sobre este aparato (como por ejemplo el desmontaje,
exposición al calor o a la humedad…).
Se recomienda conservar el embalaje para poder utilizarlo como referencia futura.
• No intentes coser materiales gruesos, ni fuerces el volante manual.
• Cambia las pilas tan pronto como adviertas que la máquina trabaja a menos velocidad que la habitual.
• Para limpiar la máquina utiliza únicamente un trapo seco; no utilices ningún tipo de detergente.
• No exponga el juguete a la acción directa de los rayos del sol ni a ninguna otra fuente de calor.
• No mojar el juguete. No desmonte o deje caer el juguete.
ADVERTENCIA: Este producto contiene bordes alados en las tijeras y extremos puntiagudos en las agujas y deber ser
usado bajo la supervisión directa de una persona adulta.
Advertencia. Usar bajo la supervisión directa de un adulto.
No toque el extremo puntiagudo de la aguja o las hojas aladas de las tijeras, ya que podría causar lesiones.
ADVERTENCIA. No apto para niños menores de 3 años. Peligro de atragantamiento – Piezas pequeñas.
En nuestro continuo afán de optimización de servicios, podremos implementar modicaciones en los colores y detalles
del producto mostrado en el embalaje.
Referencia: SW100MI
Diseñado y desarrollado en Europa – Fabricado en China.
© LEXIBOOK®
España
Para servicio postventa, entre en contacto con nuestros equipos: [email protected].
www.lexibook.com
Advertencia para la protección del medio ambiente
¡Los aparatos eléctricos desechados son reciclables y no deben ser eliminados en la basura doméstica! Por
ello pedimos que nos ayude a contribuir activamente en el ahorro de recursos y en la protección del medio
ambiente entregando este aparato en los centros de colección (si existen).

PORTUGUÊS
PORTUGUÊS
Funcionamento da máquina de costura
Disco de
tensão
Alavanca de
levantar
Cavilha do
carrinho Roda do eixo
Interruptor de
ligar/desligar
Botão da
velocidade
Tomada do
pedal
Entrada do
adaptador AC/DC
Pé de pressão
Bobina inferior
Placa da
cobertura da
bobina
Agulha
Anel de xação
da linha
Luz do interruptor
Lâmpada
Cortador da linha
Elevador do pé
de pressão
Barra do
rebobinador da
bobina
Tomada do
pedal
Entrada do
adaptador AC/DC
Colocador da
linha na agulha
Agulhas extra
Bobinas sem
linha
Pedal
Bobinas com
linha
Lâmpada
Luz do
interruptor
Bobina
CERTIFIQUE-SE DE QUE SEGUE AS PRECAUÇÕES DE FUNCIONAMENTO SEGUINTES.
É NECESSÁRIA A SUPERVISÃO E ASSISTÊNCIA POR PARTE DE UM ADULTO.
1. Quando usar fontes de alimentação externas ou colocar pilhas, desligue a máquina.
2. É necessária a supervisão por parte de um adulto quando usar a máquina.
3. Após a utilização, desligue a máquina e retire as pilhas, ou desligue da alimentação externa.
4. Para evitar potenciais perigos, não use pilhas de diferentes marcas em simultâneo.
5. Ligue a máquina apenas se houver tecido no lugar e o pé de pressão estiver baixado.
6. Esta máquina foi calibrada com precisão. Pessoas não prossionais não deverão desmontar a máquina.
ATENÇÃO: As peças da embalagem, como os revestimentos de plástico, elásticos, etiquetas e os de xação de metal
não fazem parte do brinquedo e devem ser deitados fora.
CUIDADO: MANTENHA FORA DO ALCANCE DE CRIANÇAS. NÃO RECOMENDADO PARA CRIANÇAS MENORES DE 8 ANOS.
Parafuso de
xação da
agulha
Cobertura de
segurança
INSTALAÇÃO DAS PILHAS E ADAPTADOR AC/DC (NÃO INCLUÍDO):
1. O compartimento das pilhas situa-se no fundo da máquina. Certique-se de que
a máquina está desligada. Com uma chave de fendas, retire a tampa do comparti-
mento das pilhas e insira 4 pilhas AA / LR6 1,5V (NÃO INCLUÍDO) de acordo com as
direções assinaladas dentro do compartimento.
Feche a tampa. A máquina entra no modo inativo.
2. Se escolher usar um adaptador AC/DC, tem de ir ao encontro das seguintes
especicações: Saída DC 6.0V 800mA, com uma cha de 5,5 mm e um orifício
interior de 2,1 mm e polaridade conforme apresentado:
NOTA! As pilhas devem ser instaladas por um adulto. Coloque os terminais + e - corretamente. Não misture pil-
has novas com pilhas usadas ou tipos diferentes de pilhas. Não tente recarregar pilhas não recarregáveis. Retire
as pilhas se o produto não for usado durante um longo período de tempo. Não coloque os contacto da pilhas em
curto-circuito. Guarde esta informação para futuras referências.
Com a máquina desligada, insira a cha do adaptador AC/DC na entrada na parte traseira
da máquina.
Observação: as baterias devem ser removidas se qualquer adaptador CA / CC for usado.
COLOCAR LINHA NA MÁQUINA:
A lançadeira da linha na superfície da máquina já tem linha. Se desejar mudar de carrinho, retire a cobertura de
proteção retirando o parafuso e o trinco com uma chave de fendas (não incluída). Retire a cavilha do carrinho no topo
da máquina e coloque o carrinho de linha na cavilha do carrinho. Puxe um bocado de linha e siga os passos numerados
para colocar a linha corretamente na máquina. Volte a colocar a cobertura de proteção apertando o parafuso e o trinco
com uma chave de fendas.
CARREGAR A BOBINA:
1. Abra a placa da cobertura da bobina pressionando a seta e fazendo-a de-
slizar para longe da máquina.
2. Coloque a bobina com a linha à sua escolha no suporte da bobina,
deixando cerca de 25,5 cm de linha esticada para fora do suporte da
bobina.
3. Rode a roda na sua direção. A agulha desce, e encontra a linha da bobina.
Rode a roda até que a agulha desça por completo e volte a subir até ao seu
ponto mais elevado. Pare quando a agulha começar a descer de novo.
4. Levante o elevador do pé de pressão e leve a linha do carrinho até à frente.
5. Puxe gentilmente para cima e verá que foi apanhada pela linha da bobina.
Puxe as duas linhas para a parte traseira da máquina (para longe de si),
e coloque-as por baixo do pé de pressão.
6. Faça deslizar a placa da cobertura da bobina de volta para o respetivo lugar.
REQUER
4 X 1.5V AA OR LR6
Nota: É essencial que a colocação da linha, tanto em cima como em baixo, seja feita corretamente.
Verique cuidadosamente e faça uma costura para praticar antes de começar a costurar realmente. Uma passagem
incorreta da linha danica o pesponto.
As pilhas recarregáveis deverão ser retiradas do brinquedo antes de serem recarregadas e só deverão
ser recarregadas sob a supervisão de um adulto. Não misture diferentes tipos de pilhas ou pilhas novas
com pilhas usadas. Só deverá utilizar pilhas do mesmo tipo ou de um tipo equivalente às recomendadas.
As pilhas deverão ser colocadas com a polaridade correcta. Deverá retirar as pilhas gastas do brinquedo.
Não coloque os terminais em curto-circuito. Não atire as pilhas para o fogo. Retire as pilhas caso não
utilize a unidade durante um longo período de tempo. Quando o som car fraco ou o jogo não responder,
pense em substituir as pilhas. As pilhas não deverão ser expostas a calor em excesso, como luz directa do
sol, fogo ou algo parecido. As pilhas não recarregáveis não devem ser recarregadas.
AVISO: Uma descarga electrostática ou frequências fortes podem dar origem a um
mau funcionamento ou perda de memória. Caso ocorra algum funcionamento
anormal, retire e volte a colocar as pilhas, ou desligue o adaptador AC/DC da
tomada e volte a ligá-la.
Aviso: Desligue o adaptador, se brinquedo não for utilizado por um longo período de
tempo, para evitar o seu sobreaquecimento. Quando brinquedo for alimentado por um adaptador, não o utilize no exterior.
Verique o estado do adaptador e dos os de ligação regularmente. Se o seu estado se deteriorar, não use o adaptador até
que seja reparado. O brinquedo só deve ser usado com um transformador para brinquedos. O adaptador não é um brinque-
do.
O brinquedo deverá ser desligada da alimentação para ser limpa, se usar líquidos para proceder à limpeza. O brinquedo
não foi criado para crianças com menos de 3 anos de idade. Uma má utilização do transformador pode causar um choque
eléctrico.
AVISO: O brinquedo não deve ser conectado a mais do que o número recomendado de transformadores ou fontes de alimen-
tação.
Aviso parental: O transformador e adaptador para os brinquedos não foram criados para serem usados como
brinquedos. A sua utilização deverá ser feita sob supervisão de um adulto. O brinquedo só pode ser ligado a equipamento
com o seguinte símbolo ou .
A sua máquina de costura funciona com 4 pilhas de 1,5V LR6/AA (não incluídas), ou
um adaptador (não incluído) de 6.0V 800mA com um centro positivo .
Entrada : 100V - 240V ~ 50 / 60Hz

PORTUGUÊS
PORTUGUÊS
ENROLAR A LINHA NA BOBINA:
Para alterar ou substituir a linha numa bobina, precisa de um rolo de algodão.
Siga estes passos.
1. Coloque um rolo com a linha desejada no eixo da linha.
2. A barra do rebobinador da bobina está encastrada na roda. Pressione a
extremidade e torça para a esquerda para libertar.
3. Coloque uma bobina vazia na barra do rebobinador da bobina, e enrole a
extremidade da linha na bobina cerca de 4 a 5 voltas.
4. Ligue a energia para começar a enrolar a linha, usando o dedo para
espalhar uniformemente a linha pela bobina. A bobina está cheia quando
a linha chegar ao topo dos pequenos orifícios.
5. Quando terminar, desligue a máquina, corte a linha e retire a bobina.
6. Volte a pressionar a barra do rebobinador da bobina na roda e torça para
a direita para xar no respetivo lugar.
SUBSTITUIÇÃO DA LINHA:
A substituição da agulha deve ser feita por um adulto.
Siga estes passos se a agulha car dobrada ou partida e tiver de ser substituída:
(pode usar agulhas de costura de 90/14 para uso doméstico com esta máquina).
1. Desligue a máquina e retire as pilhas (ou desligue da fonte de alimentação
externa).
2. Retire a cobertura de segurança retirando o parafuso e o trinco com uma
chave de fendas.
3. Desaperte o parafuso de xação da agulha e puxe a agulha antiga para
fora.
4. Insira a nova agulha na barra da agulha com o lado plano virado para o
parafuso de xação da agulha. Pressione gentilmente a nova agulha até
ao m.
5. Aperte o parafuso de xação da agulha enquanto segura a agulha no
respetivo lugar.
6. Volte a colocar a cobertura de segurança apertando o parafuso e o trinco
com uma chave de fendas.
USAR O PEDAL:
O pedal liga e desliga a máquina usando o seu pé, permitindo-lhe usar ambas as mãos para controlar o tecido. Insira
a cha na extremidade do o do pedal na tomada do pedal, encontrada por baixo da roda. A máquina tem de estar
desligada.
Nota: Certique-se de que prime o interruptor de ligar/desligar para a posição de desligado quando terminar de
costurar, para evitar um arranque acidental da máquina.
AJUSTE DA COSTURA:
1. apresentada uma costura normal na Imagem A. A linha da superfície e a
linha inferior terão uma elasticidade uniforme. Se não souber distinguir a
costura num tecido entre a linha da superfície e a linha inferior, signica
que a costura está normal.
2. É apresentada uma costura solta na Imagem B. A linha inferior cará
direita e poderão aparecer alguns “nós”. Neste caso, tem de enroscar a
porca de xação da linha no sentido dos ponteiros do relógio e aumentar
a pressão da linha da superfície, até que a costura da linha da superfície
e da linha inferior esteja uniforme.
3. É apresentada uma linha inferior solta na Imagem C. A linha da
superfície cará direita e poderão aparecer alguns “nós”. Neste caso, tem
de enroscar a porca de xação da linha no sentido inverso ao dos
ponteiros do relógio e diminuir a pressão da linha da superfície, até
que a costura da linha da superfície e da linha inferior esteja uniforme.
Nota: Use apenas tecido leve ou normal. Tecido espesso ou pesado não é
recomendado e pode partir a agulha.
Nota: Quando ajustar o aperto da linha da superfície, verique se a linha da
superfície saiu do clipe da linha. Se for o caso, tem de voltar a xar a linha da
superfície no meio dos dois clipes de xação da linha.
Nota: A direção da agulha tem de ser a correta, e o parafuso contra a
agulha tem de ser devidamente apertado para evitar que a agulha caia.
Linha da superfície
Linha inferior
Needle Clap
Screw
Needle bar Tighten
Loosen
Tecido
CONTROLO DA LUZ:
Prima o interruptor da luz para a ligar, caso precise de mais iluminação.
FUNÇÃO DE CORTE DA LINHA:
O cortador da linha acima da lâmpada permite-lhe cortar convenientemente as linhas sem tesoura. Puxe bem a linha
para baixo ao longo do cortador.
PROBLEMAS COMUNS E SOLUÇÕES
PROBLEMA
DESCRIÇÃO
DESLIGAR
(RESPOSTA LENTA)
A LINHA SALTA
FALHA NA LINHA
LINHA PARTIDA
MÁ LINHA
INFERIOR OU
DA SUPERFÍCIE
A AGULHA SALTA
POSSÍVEIS CAUSAS
Direção incorreta das pilhas
Orifício da agulha inclinado, instalação
inadequada da agulha Substitua a agulha
Bobina da linha inferior obstruída
Pé de pressão ou agulha soltos Substitua a agulha e aperte o parafuso do pé
de pressão
Movimento dicultado da linha da
superfície Verique se a bobina da linha da superfície e
o eixo rodam livremente
Verique se a extremidade da linha na bobina
da linha inferior foi afastada
Coloque as pilhas na direção correta
Energia insuciente proveniente da fonte
de alimentação externa, baixa voltagem de
saída ou fonte de alimentação danicada
Linha da superfície demasiado apertada
ou demasiado solta Rode o manípulo de ajuste da linha da
superfície para que a linha inferior e a linha
da superfície estejam uniformes
Passe para uma fonte de alimentação
adequada
Misturou pilhas novas com pilhas usadas
Pé de pressão solto Aperte o parafuso do pé de pressão
Linha inferior gasta Substitua a bobina da linha inferior
Use pilhas novas
Baterias esgotadas
Agulha dobrada ou deformada Substitua a agulha
Rebarbas no orifício da agulha
Tecido arrastado durante a costura Substitua a agulha e passe de novo a linha
para costurar
Substitua a agulha
Agulha inclinada ou instalação inadequada
Sem tecido no lugar quando liga a
máquina Substitua a agulha e passe de novo a linha
para costurar
Agulha dobrada ou deformada Substitua a agulha
Costura incorreta Costure de novo na sequência correta
Volte a instalar a agulha
Sequência incorreta da linha Costure de novo na sequência correta
Use pilhas novas
SOLUÇÕES
COLOCAÇÃO DO TECIDO E COSTURA:
1. Rode a roda na direção da seta para levantar a agulha até ao máximo.
2. Levante o elevador do pé de pressão e coloque o tecido por baixo do pé de pressão.
3. Baixe o elevador do pé de pressão.
4. Rode a roda 2 a 3 voltas na direção da seta.
5. Ligue a máquina e comece a costurar.
6. Altere a velocidade de costura com o botão da velocidade.
7. Desligue a máquina quando terminar de costurar. Rode a roda na direção das setas até que a agulha se encontre
na sua posição mais elevada. Levante o elevador do pé de pressão e retire o tecido, puxando gentilmente para
trás e para longe da máquina.
Nota: Se for difícil retirar o tecido, pode rodar a roda para a frente e para trás e puxar gentilmente o tecido para o
libertar.
INSTRUÇÕES DE SEGURANÇA
POR FAVOR, LEIA ANTES DE UTILIZAR ESTE EQUIPAMENTO.
Antes de usar a unidade, certique-se de que lê com atenção todas as instruções de funcionamento. Tenha em conta
que estas são precauções gerais e podem não abranger a sua unidade.
1. Leia este manual de instruções antes de tentar ligar ou utilizar o aparelho.
2. Guarde estas instruções em bom estado. Leve todos os avisos a sério. Siga todas as instruções.
3. Guarde este manual de instruções para futuras referências.

ITALIANO
PORTUGUÊS
Siga-nos em
@LexibookCom
Utilizzo della macchina da cucire
Manopola della tensione
Leva tira-lo Perno della
spoletta Volantino con perno
di avvolgimento
Interruttore di
accensione/spegnimento
Pulsante della
velocità
Presa per pedale
Presa per adattatore
di corrente
Piedino
premistoa
Rocchetto
inferiore
Piastra di copertura
del rocchetto
Ago
Clip di ssaggio
del lo
Interruttore della
lampada
Lampada
Taglia-lo
Leva del piedino
premistoa
Perno di
avvolgimento del
rocchetto
Presa per pedale
Presa per
adattatore di
corrente
Inla-ago
Aghi di ricambio
Rocchetti
senza lo
Pedale
Rocchetti
con lo
Lampada
Interruttore
della lampada
Rocchetto
RISPETTARE LE AVVERTENZE RIPORTATE DI SEGUITO.
È NECESSARIA LA SUPERVISIONE DI UN ADULTO.
1. Spegnere la macchina da cucire prima di inserire le batterie o collegarla all’adattatore di corrente.
2. Durante l’uso della macchina da cucire è necessaria la supervisione di un adulto.
3. Dopo l’uso, spegnere la macchina da cucire e rimuovere le batterie o scollegarla dall’adattatore di corrente.
4. Per motivi di sicurezza, non usare contemporaneamente batterie di marche diverse.
5. Accendere la macchina da cucire esclusivamente dopo aver posizionato il tessuto e abbassato il piedino
premistoa.
6. La macchina da cucire è stata calibrata in fabbrica. Non disassemblarla.
ATTENZIONE: I componenti dell’imballo, quali pellicole in plastica, nastro adesivo, nastri di ssaggio metallici non
fanno parte del giocattolo e devono essere eliminati.
ATTENZIONE: TENERE FUORI DALLA PORTATA DEI BAMBINI. NON CONSIGLIATO PER BAMBINI SOTTO 8 ANNI.
Vite del
morsetto
dell’ago
Schermo di
sicurezza
4. O aparelho não deverá ser exposto a pingos ou salpicos e não deve colocar objetos cheios de líquidos, como
vasos, em cima do produto. Use apenas em locais secos.
5. Não coloque fontes de chamas sem proteção, como velas acesas, em cima do produto.
6. As crianças devem ser supervisionadas para se assegurar de que não brincam com o aparelho.
7. As entradas de ventilação não devem ser cobertas.
8. Utilize apenas acessórios especicados pelo fabricante.
9. Utilize peças sobresselentes especicadas pelo fabricante.
10. Instale a unidade de acordo com as instruções do fabricante.
11. Coloque a unidade onde exista uma boa ventilação. Coloque o sistema numa superfície plana, dura e estável. Não
exponha a temperaturas acima dos 40 ºC. Deixe, pelo menos, 10 cm de espaço entre a parte traseira ou superior
da unidade e 5 cm de cada lado.
12. Elimine as pilhas gastas de um modo amigo do ambiente.
13. Certique-se sempre de que o produto está desligado da alimentação antes de o mover ou limpar. Limpe-o ape-
nas com um pano seco.
14. Desligue o produto durante trovoadas, tempestades ou quando não for usado durante um longo período de
tempo.
15. Este produto não contém peças que possam ser reparadas pelo utilizador. Não tente reparar você mesmo o pro-
duto. Apenas pessoal qualicado deverá efetuar reparações. Leve o produto a uma loja de reparação de produtos
eletrónicos para que se proceda à inspeção e reparação.
16. NUNCA deixe ninguém, especialmente crianças, inserir algo nos orifícios, ranhuras ou outras aberturas na estrutu-
ra da unidade, pois isso pode dar origem a um choque elétrico fatal.
17. Não coloque a unidade perto de televisões, altifalantes e outros objetos que gerem campos magnéticos fortes.
18. Não deixe a unidade sem supervisão enquanto estiver a ser usada.
19. Mantenha uma distância mínima em redor do aparelho, para uma ventilação suciente.
20. Convém que a ventilação não seja perturbada pela obstrução das aberturas de ventilação por objetos como
jornais, toalhas, cortinas, etc.
21. O aparelho destina-se a ser utilizado num clima temperado e/ou tropical.
22. As pilhas devem ser eliminadas de modo adequado. Coloque-as em contentores de recolha previstos para este
efeito, de modo a proteger o ambiente.
MANUTENÇÃO E GARANTIA
NOTA: Por favor guarde este manual, pois contém informações importantes. Este produto está coberto pela nossa
garantia de 2 anos.
Para a utilização da garantia ou do serviço pós-venda, deverá dirigir-se ao seu revendedor, levando consigo o talão
da compra. A nossa garantia cobre defeitos de material ou de montagem da responsabilidade do fabricante, excluindo
qualquer deterioração proveniente do não cumprimento do modo de utilização ou de qualquer intervenção inoportuna
sobre a unidade (como a desmontagem, exposição ao calor ou à humidade…).
Recomendamos que guarde a embalagem para futuras referências.
• Não tente coser materiais grossos nem force a roda manual.
• Mude as pilhas quando achar que a máquina está a funcionar a uma velocidade mais lenta que o habitual.
• Para limpar a máquina, utilize apenas um pano seco. Não utilize detergentes.
• Não exponha o jogo à luz directa do sol nem a qualquer outra fonte de calor.
• Não molhe a unidade.
• Não desmonte nem deixe cair a unidade.
AVISO: Este produto contém extremidades pontiagudas nas tesouras e nas agulhas e deverá ser usado sob a
supervisão directa de um adulto.
Aviso. A ser usado sob a supervisão directa de um adulto.
Não toque na extremidade aada da agulha ou na lâmina da tesoura, pois pode sofrer lesões.
ATENÇÃO. Não é adequado para crianças de idade inferior a 3 anos. Perigo de engasgamento – peças pequenas.
Num esforço constante para melhorar o produto, poderemos modicar as cores e pormenores do produto
apresentados na embalagem.
Referência: SW100MI
Criado e desenvolvido na Europa – Fabricado na China
© LEXIBOOK®
Para qualquer serviço pós-venda, por favor, contacte as nossas equipas:
www.lexibook.com
Indicações para a protecção do meio ambiente
Aparelhos eléctricos antigos são materiais que não pertencem ao lixo doméstico! Por isso pedimos para que
nos apoie, contribuindo activamente na poupança de recursos e na protecção do ambiente ao entregar este
aparelho nos pontos de recolha, caso existam.

ITALIANO
ITALIANO
INSTALLAZIONE DELLE BATTERIE O COLLEGAMENTO DELL’ADATTATORE
DI CORRENTE (non incluso)
1. l vano batterie è situato sulla parte inferiore della macchina da cucire. Assicurarsi
che la macchina da cucire sia spenta. Con un cacciavite, rimuovere il coperchio del
vano batterie e inserire 4 batterie AA / LR6 1,5V (non incluso) rispettando l’orien-
tamento indicato all’interno del vano. Riposizionare il coperchio. La macchina da
cucire entrerà in standby.
2. Se si utilizza un adattatore di corrente, è necessario che abbia le seguenti
speciche: uscita CC 6.0V 800mA, con spina da 5,5 mm e foro interno da
2,1 mm e la seguente polarità
NOTA: le batterie devono essere installate da un adulto. Rispettare la corretta
polarità dei poli + e –. Non usare contemporaneamente batterie di tipo diverso o
batterie nuove e batterie usate. Non tentare di ricaricare le batterie non ricaricabili.
Rimuovere le batterie dal prodotto in previsione di un lungo periodo di inutilizzo.
Non cortocircuitare i terminali delle batterie. Conservare queste informazioni per
riferimento futuro.
Quando la macchina da cucire è spenta, collegare il connettore dell’adattatore di
corrente alla presa situata sulla parte posteriore.
Nota: le batterie devono essere rimosse se si utilizza un adattatore CA/CC.
INFILATURA DELLA MACCHINA
La spoletta del lo superiore è già inlata. Se desideri sostituire la spoletta,
rimuovi la copertura protettiva usando un cacciavite (non incluso) per allentare la vite e il bullone. Estrai il perno della
spoletta sulla parte superiore della macchina e posiziona la spoletta sul perno. Estrai un po’ di lo e segui i numeri
nell’illustrazione per inlare correttamente la macchina. Riposiziona la copertura protettiva avvitando la vite e il bullone
con un cacciavite.
INSERIMENTO DEL ROCCHETTO
1. Apri la piastra di copertura del rocchetto facendola scorrere nella
direzione indicata dalla freccia.
2. Posiziona il rocchetto con lo nel porta-rocchetto, lasciando fuoriuscire
circa 25,5 mm di lo dal porta-rocchetto.
3. Ruota il volantino verso di te. L’ago si abbasserà e aggancerà il lo del
rocchetto. Ruota il volantino nché l’ago non si abbassa completamente
e poi si solleva no al punto più alto. Smetti di ruotare il volantino quando
l’ago inizia a riabbassarsi.
4. Solleva il piedino premistoa e porta il lo della spoletta verso la parte
anteriore.
5. Tiralo delicatamente verso l’alto: noterai che ha agganciato il lo del
rocchetto. Tira i due li verso la parte posteriore della macchina (lontano
da te) e posizionali sotto il piedino premistoa.
6. Riposiziona la piastra di copertura del rocchetto.
POSIZIONAMENTO DEL TESSUTO E CUCITURA
1. Ruota il volantino nella direzione indicata dalla freccia per sollevare completamente l’ago.
2. Solleva il piedino premistoa e posiziona il tessuto sotto il piedino.
3. Abbassa il piedino premistoa.
4. Ruota il volantino di 2 o 3 giri nella direzione indicata dalla freccia.
5. Accendi la macchina e inizia a cucire.
6. Puoi variare la velocità della cucitura con l’apposito pulsante.
7. Spegni la macchina quando hai terminato la cucitura. Ruota il volantino nella direzione indicata dalla freccia nché
l’ago non si solleva completamente. Solleva il piedino premistoa e rimuovi il tessuto tirandolo delicatamente
all’indietro, lontano dalla macchina.
Nota: è essenziale che entrambi i li (superiore e inferiore) siano posizionati correttamente.
Fai un punto di prova prima di iniziare la cucitura. Un’inlatura scorretta della macchina la danneggerà.
Nota: se il tessuto è dicile da rimuovere, puoi ruotare il volantino avanti e indietro prima di provare nuovamente
a tirarlo.
REQUIRES
4 X 1.5V AA OR LR6
AVVOLGIMENTO DEL ROCCHETTO
Per sostituire il lo di un rocchetto è necessaria una spoletta con lo.
Procedi come descritto di seguito.
1. Inla la spoletta sul perno della spoletta.
2. Il perno di avvolgimento è situato all’interno del volantino. Premi
l’estremità e ruotalo verso sinistra per estrarlo.
3. Inla un rocchetto vuoto sul perno di avvolgimento e avvolgi l’estremità
del lo intorno al rocchetto per 4 o 5 giri.
4. Accendi la macchina per iniziare ad avvolgere il lo. Puoi usare un dito
per distribuirlo in modo uniforme intorno al rocchetto durante
l’avvolgimento. Il rocchetto è pieno quando il lo raggiunge i piccoli fori.
5. Al termine dell’avvolgimento, spegni la macchina, taglia il lo e rimuovi il
rocchetto.
6. Spingi il perno di avvolgimento per farlo rientrare nel volantino e ruotalo
verso destra per bloccarlo.
SOSTITUZIONE DELL’AGO
La sostituzione dell’ago deve essere eseguita da un adulto.
Se l’ago si è rotto o si è piegato, procedi come descritto di seguito per
sostituirlo.
Questa macchina da cucire utilizza aghi 90/14.
1. Spegni la macchina e rimuovi le batterie (o scollega l’adattatore di cor-
rente),
2. Rimuovi la copertura protettiva svitando la vite e il bullone con un caccia-
vite.
3. Allenta la vite del morsetto dell’ago ed estrai l’ago da sostituire.
4. Inserisci l’ago nuovo nella barra dell’ago, con il lato piatto rivolto verso la
5. vite del morsetto dell’ago. Spingi delicatamente il nuovo ago no in fondo.
6. Serra la vite del morsetto mentre tieni l’ago in posizione.
7. Riposiziona la copertura protettiva avvitando la vite e il bullone con un
cacciavite.
REGOLAZIONE DEI PUNTI
1. In Figura A è illustrato un punto corretto. Il lo superiore e il lo inferiore
sono tesi in modo uniforme. Se non riesci a distinguere qual è il lo
superiore e quello inferiore dei punti che hai cucito, il punto è corretto.
2. In Figura B è illustrato un punto con il lo superiore allentato. Il lo
inferiore è dritto ma con alcuni “nodi”. In questo caso dovrai ruotare la
manopola della tensione in senso orario e aumentare la tensione del lo
superiore per uniformarla a quella del lo inferiore.
3. In Figura C è illustrato un punto con il lo inferiore allentato. Il lo
superiore è dritto ma con alcuni “nodi”. In questo caso dovrai ruotare la
manopola della tensione in senso antiorario e diminuire la tensione del
lo superiore per uniformarla a quella del lo inferiore.
Nota: usa esclusivamente tessuti leggeri o di peso normale. Tessuti spessi o pesanti possono causare la rottura
dell’ago.
Nota: durante la regolazione della tensione del lo superiore, assicurati che il
lo superiore non sia fuoriuscito dalla clip di ssaggio del lo. In caso contrario
dovrai ssare il lo superiore al centro delle due clip di ssaggio del lo.
Filo superiore
Filo inferiore
Vite del morsetto
dell’ago
Barra
dell’ago Serrare
Allentare
Tessuto
Le batterie ricaricabili devono essere tolte dal giocattolo prima di essere ricaricate; le batterie ricaricabili
devono essere caricate unicamente con la supervisione di un adulto; non mischiare dierenti tipi di bat-
terie o batterie nuove e usate; utilizzare unicamente batterie del tipo raccomandato o equivalenti; inserire
le batterie rispettando le polarità; rimuovere le batterie esaurite dal giocattolo; non cortocircuitare i ter-
minali di alimentazione. Non buttare le batterie nel fuoco. Rimuovere le batterie se non si usa il gioco per
molto tempo. Sostituire le batterie quando il suono diventa debole o il gioco non funziona. Non esporre
le batterie a un calore eccessivo, ad esempio la luce del sole o un fuoco. Le batterie non ricaricabili non
devono essere ricaricate.
AVVERTENZA: Una forte interferenza di frequenza o scariche elettrostatiche possono
causare malfunzionamenti o perdite di memoria. Se si dovessero vericare funzionamenti
anormali, resettare l’unità o togliere e reinserire le batterie, oppure staccare l’adattatore
CA/CC dalla presa di corrente e reinserirlo.
Attenzione: Rimuovere l’adattatore se il prodotto non viene usato per un lungo periodo di tempo, in modo da evitare il surriscalda-
mento. Se il prodotto è alimentato dall’adattatore, non giocare all’aperto. Controllare con regolarità lo stato
dell’adattatore e del cavo di alimentazione. In caso di deterioramento delle condizioni, non usare l’adattatore senza averlo prima
fatto riparare. Utilizzare il giocattolo solo con un trasformatore per giocattoli. L’adattatore non è un giocattolo. Se si utilizzano dei
liquidi per pulire il prodotto, scollegarla prima dalla sorgente di alimentazione. Questo giocattolo non è adatto ai bambini di età
inferiore a 3 anni. L’utilizzo scorretto del trasformatore può causare scosse elettriche.
AVVERTENZA : Il giocattolo non deve essere collegato a un numero di trasformatori o alimentatori superiore a quello raccomandato.
Raccomandazione per i genitori: il trasformatore e l’adattatore non sono giocattoli. Utilizzare sempre sotto la supervisione di un
adulto.
Il giocattolo deve essere collegato esclusivamente a un apparecchio che rechi il seguente simbolo o.
La macchina da cucire della funziona con 4 batterie LR6/AA da 1,5 (non incluse) o
un adattatore (non incluse) 6.0V 800mA con centro positivo .
Ingresso : 100V - 240V ~ 50 / 60Hz

ITALIANO
ITALIANO
Seguici
@LexibookCom
UTILIZZO DELLA LAMPADA
Premi l’interruttore della lampada per accenderla se hai bisogno di più luce.
UTILIZZO DEL TAGLIA-FILO
Il taglia-lo situato sopra la lampada permette di tagliare il lo comodamente senza l’uso di forbici. Tira delicatamente il
lo sul taglia-lo.
ISTRUZIONI DI SICUREZZA
LEGGERE PRIMA DI UTILIZZARE L’APPARECCHIO.
Prima di utilizzare l’unità, leggere attentamente tutte le istruzioni operative. Notare che si tratta di precauzioni
generiche che possono non essere relative alla vostra unità.
1. Leggere questo manuale di istruzioni prima di collegare l’apparecchio alla presa di corrente e usarlo.
2. Mantenere queste istruzioni in buone condizioni. Rispettare tutte le avvertenze. Seguire tutte le istruzioni.
3. Conservare il manuale di istruzioni per riferimento futuro.
4. Non esporre l’apparecchio a schizzi o sgocciolii e non collocare sull’apparecchio contenitori di liquido, ad esempio
vasi. Usare esclusivamente in ambienti asciutti.
MANUTENZIONE E GARANZIA
NOTA: conservare il presente libretto d‘istruzioni in quanto contiene informazioni importanti.
Questo prodotto è coperto dalla nostra garanzia di 24 mesi.
Per servirsi della garanzia o del servizio di assistenza post vendita, rivolgersi al negoziante muniti di prova d‘acquisto. La
nostra garanzia copre i vizi di materiale o di montaggio imputabili al costruttore a esclusione di qualsiasi deterioramen-
to causato dal mancato rispetto delle istruzioni d‘uso o di qualsiasi intervento inadeguato sul prodotto (smontaggio,
esposizione al calore o all’umidità…).
Si consiglia di conservare l‘imballo per eventuali riferimenti futuri.
• Non cercare di cucire materiali spessi o di forzare la manopola.
• Sostituire le batterie quando si nota che la macchina da cucire lavora più lentamente del solito.
• Per pulire la macchina, servirsi di un panno asciutto; non utilizzare detergenti.
• Non esporre il giocattolo alla luce diretta del sole né ad altre sorgenti di calore. Non bagnare.
• Non smontare il giocattolo e non lasciarlo cadere.
AVVERTENZA: questo prodotto contiene bordi funzionali alati a livello delle forbici e una punta acuminata funzionale
a livello dell‘ago e va utilizzato con l‘attenta supervisione di un adulto.
Avvertenza. Usare sotto la diretta supervisione di un adulto.
Non toccare l’estremità appuntita dell’ago o la lama della forbice perché possono ferire.
ATTENZIONE. Articolo non adatto a bambini di età inferiore ai 3 anni. Rischio di sofocamento – Presenza di piccolo parti.
Allo scopo di migliorare i servizi, potremmo implementare modiche a colori e dettagli del prodotto illustrato sulla
confezione.
Riferimento: SW100MI
Progettato e sviluppato in Europa – Fabbricato in Cina
© LEXIBOOK®
Per i servizi di assistenza post-vendita, contattare i nostri team:
www.lexibook.com
RISOLUZIONE DEI PROBLEMI
PROBLEMA
DESCRIZIONE
LA MACCHINA
NON SI ACCENDE
O RISPONDE
LENTAMENTE
IL FILO SALTA
IL FILO NON
FUORIESCE
IL FILO SI ROMPE
IL FILO SUPERIORE
O INFERIORE NON
È TESO
CORRETTAMENTE
L’AGO SOBBALZA
POSSIBILE CAUSA
Le batterie non sono orientate
correttamente.
L’ago è stato installato in modo scorretto. Sostituire l’ago.
Il rocchetto del lo inferiore si è inceppata.
Il piedino premistoa o l’ago sono
allentati. Sostituire l’ago e serrare la vite del piedino
premistoa.
Il movimento del lo superiore è
ostacolato. Assicurarsi che il rocchetto del lo superiore e
il perno ruoti liberamente.
Assicurarsi che l’estremità del lo del
rocchetto inferiore sia libera.
Installare le batterie orientandole
correttamente.
La fonte di alimentazione è danneggiata
o non fornisce abbastanza potenza o
tensione.
Il lo superiore è troppo teso o troppo
allentato. Ruotare la manopola di tensione per uniformare
la tensione del lo inferiore e del lo superiore.
Utilizzare una fonte di alimentazione adatta.
Sono state utilizzate batterie vecchie
insieme a batterie nuove.
Il piedino premistoa è allentato. Serrare la vite del piedino premistoa.
Il lo inferiore è esaurito. Sostituire il rocchetto del lo inferiore.
Sostituire le batterie.
Batterie scariche.
L’ago è piegato o deformato. Sostituire l’ago.
La cruna dell’ago è smussata.
Il tessuto viene tirato eccessivamente
durante la cucitura. Sostituire l’ago e inlare nuovamente la
macchina.
Sostituire l’ago.
L’ago è stato installato in modo scorretto.
Il tessuto non è stato posizionato prima di
accendere la macchina. Sostituire l’ago e inlare nuovamente la
macchina.
L’ago è piegato o deformato. Sostituire l’ago.
La macchina non è stata inlata
correttamente. Inlare correttamente la macchina.
Installare correttamente l’ago.
La macchina non è stata inlata
correttamente. Inlare correttamente la macchina.
Sostituire le batterie.
SOLUZIONE
UTILIZZO DEL PEDALE
Il pedale permette di accendere e spegnere la macchina con il piede, per poter guidare il tessuto con entrambe le mani.
Inserisci il connettore all’estremità del cavo del pedale nella presa per pedale situata sotto il volantino. La macchina
deve essere spenta.
Nota: assicurati di portare l’interruttore di accensione/spegnimento in posizione di spegnimento al termine della
cucitura per evitare l’accensione accidentale della macchina.
Nota: è importante che l’ago sia orientato correttamente, e che la vite del
morsetto sia serrata saldamente per evitare la caduta dell’ago. 5. Non collocare sull’apparecchio fonti di amme libere, ad esempio candele accese.
6. I bambini devono essere sorvegliati per evitare che giochino con il prodotto.
7. Non impedire la ventilazione coprendo le aperture di ventilazione.
8. Utilizzare esclusivamente accessori raccomandati dal costruttore.
9. Utilizzare esclusivamente parti di ricambio raccomandate dal costruttore.
10. Installare il prodotto seguendo le istruzioni del costruttore.
11. Posizionare il prodotto in un ambiente ben ventilato. Posizionare il prodotto su una supercie piana, dura e
stabile. Non esporre a temperature superiori a 40°C. Lasciare uno spazio libero di almeno 10 cm dalla parte poste-
riore e superiore del prodotto e almeno 5 cm da ogni lato.
12. Smaltire le batterie usate nel rispetto dell’ambiente.
13. Assicurarsi che il prodotto sia scollegato dalla presa di corrente prima di spostarlo o pulirlo. Pulirlo esclusivamente
con un panno asciutto.
14. Spegnere l’apparecchio durante i temporali e in previsione di un lungo periodo di inutilizzo.
15. Questo prodotto non contiene parti riparabili dall’utente. Non tentare di riparare il prodotto da soli. Adare
qualsiasi riparazione a un tecnico qualicato. Portare il prodotto presso un centro di assistenza anché venga
ispezionato e riparato.
16. IMPEDIRE ad altre persone, in particolare bambini, di inlare oggetti nei fori, nelle fessure o in qualsiasi altra aper-
tura sull’involucro del prodotto per evitare il rischio di scossa elettrica.
17. Non posizionare il prodotto in prossimità di TV, altoparlanti e altri oggetti che generano forti campi elettroma
netici.
18. Non lasciare il prodotto incustodito quando è in funzione.
19. Mantenere una distanza minima intorno all’apparecchio per garantire un’adeguata ventilazione.
20. Per garantire una corretta ventilazione, non ostruire le aperture di ventilazione con oggetti come giornali, tovaglie,
tende, ecc.
21. L’apparecchio deve essere usato in climi temperati e/o tropicali.
22. Smaltire le batterie in modo conforme. Portarle presso gli appositi punti di raccolta per salvaguardare l’ambiente.
Avvertenze per la tutela dell’ambiente
Gli apparecchi elettrici vecchi sono materiali pregiati, non rientrano nei normali riuti domestici! Preghiamo
quindi i gentili clienti di contribuire alla salvaguardia dell’ambiente e delle risorse e di consegnare il presente
apparecchio ai centri di raccolta competenti, qualora siano presenti sul territorio.

NEDERLANDS
NEDERLANDS
Werking van de naaimachine
Spanningsschijf
Opnamehendel Klospen Handwiel
Aan/Uit-schakelaar
Snelheidsknop
Voetpedaalaansluiting
AC/DC
-adapteraansluiting
Persvoet
Onderste spoel
Spoelafdekplaat
Naald
Garenvastzetring
Lampschakelaar
Lamp
Draadafsnijder
Persvoethendel
Spoelwinder
Voetpedaa-
laansluiting
AC/DC-adapteraansluiting
Naaldinrijger
Reservenaalden
Spoelen zonder
garen
Voetpedaal
Spoelen met
garen
Lamp
Lampschakelaar
Spoel
LEEF DE VOLGENDE VEILIGHEIDSVOORSCHRIFTEN NA.
TOEZICHT EN HULP¨DOOR EEN VOLWASSENE IS VEREIST.
LET OP: BUITEN BEREIK VAN JONGE KINDEREN HOUDEN. NIET AANBEVOLEN VOOR KINDEREN ONDER 8 JAAR.
1. Stel de schakelaar van de machine in op ‘O’ (Uit) voordat de stekker in het stopcontact wordt gestoken of de
batterijen worden geïnstalleerd.
2. Toezicht door een volwassene is vereist tijdens het gebruiken van deze machine.
3. Na gebruik, stel de schakelaar in op ‘O’ (Uit) en verwijder de batterijen of haal de stekker uit het stopcontact.
4. Om mogelijk gevaar te vermijden, gebruik geen batterijen van verschillende merken tegelijkertijd.
5. Stel de schakelaar alleen op ‘On’ (Aan) in wanneer er stof is aangebracht en de persvoet omlaag is gebracht.
6. Deze machine is nauwkeurig geijkt. Niet-professionele gebruikers mogen deze machine niet uit elkaar halen.
OPGELET: Al het verpakkingsmateriaal zoals plakband, plastic vellen, draadklemmen en labels die niet deel uitmaken
van dit apparaat dienen weggegooid te worden.
Naaldklemschroef
Beschermkap
INSTALLATIE VAN DE BATTERIJEN EN AC/DC-ADAPTER (niet inbegrepen):
1. Open het deksel van het batterijvak aan de onderkant van de machine. Zorg dat
de machine is uitgeschakeld. Met behulp van een schroevendraaier, verwijder het
batterijdeksel en installeer 4 AA / LR6 1,5V (niet inbegrepen) batterijen volgens de
richting zoals aangegeven binnenin het vak. Sluit het deksel. De machine staat in
stand-by.
2. Als je een AC/DC-adapter wilt gebruiken, dan moet deze aan de volgende
specicaties voldoen: Uitvoer van DC 6.0V 800mA met een stekker met een
buitenafmeting van 5,5 mm en een binnengat van 2,1 mm en een polariteit zoals
weergegeven:
MEDEDELING! De batterijen moeten door een volwassene worden geïnstalleerd. Plaats de batterijen volgens de
juiste + en - positie. Meng geen oude en nieuwe batterijen of batterijen van een
verschillend type. Laad geen wegwerpbatterijen op. Verwijder de batterijen als u
denkt het product langere tijd niet te gebruiken. Sluit de batterijklemmen niet kort.
Bewaar deze informatie voor toekomstige raadpleging.
Met de machine uitgeschakeld, steek de stekker van de AC/DC-adapter in de
aansluiting aan de achterkant van de machine.
Opmerking: Batterijen moeten worden verwijderd als een AC/DC-adapter wordt
gebruikt.
DE MACHINE VAN GAREN VOORZIEN:
De onderste spoel is reeds van garen voorzien. Als je de klos wilt vervangen, verwijder de beschermkap door het verwi-
jderen van de schroef en bout met behulp van een schroevendraaier (niet inbegrepen). Trek de klospen aan de boven-
kant van de machine omhoog en plaats de garenklos op de klospen. Trek een stuk garen uit en volg de genummerde
stappen om de machine op een juiste manier van garen te voorzien. Breng
de beschermkap opnieuw aan door het vastdraaien van de schroef en bout
met behulp van een schroevendraaier.
DE SPOEL OPWINDEN
1. Open de spoelafdekplaat door op de pijl te duwen en de plaat vervolgens
van de machine weg te schuiven.
2. Plaats de gewenste spoel met garen in de spoelhouder. Laat ongeveer
25,5 cm garen uit de spoelhouder steken.
3. Draai het handwiel naar je toe. De naald gaat omlaag en neemt het spoel-
garen op. Draai het handwiel totdat de naald volledig is gezakt
VEREIST
4 X 1.5V AA OR LR6
Niet-heroplaadbare batterijen kunnen niet worden heropgeladen; oplaadbare batterijen moeten uit het
speelgoed worden verwijderd alvorens deze op te laden; heroplaadbare batterijen mogen alleen onder
toezicht van een volwassene worden opgeladen; verschillende types batterijen of nieuwe en oude batter-
ijen mogen niet onderling gebruikt worden; gebruik alleen batterijen van hetzelfde of equivalente type
zoals aangeraden door de fabrikant; batterijen moeten volgens de juiste polariteit worden ingestoken;
lege batterijen moeten uit het speelgoed worden verwijderd; de toevoerterminals mogen geen kortslu-
iting ondervinden. Gelieve de verpakking te bewaren als referentie voor later daar het belangrijke infor-
matie bevat. Gooi batterijen nooit in open vuur. Indien je het spel voor langere tijd niet zal gebruiken,
neem de batterijen uit het spel. Wanneer het geluid verzwakt of het spel niet reageert, vervang dan de
batterijen. Stel de batterijen nooit bloot aan een warmtebron, zoals zonlicht of vuur.
WAARSCHUWING: Een storing of geheugenverlies kan veroorzaakt worden door een sterke frequentie-interferentie of een
elektrostatische ontlading. Indien er zich een abnormale functie voordoet, stel het toestel opnieuw in of verwijder en verbind
opnieuw de batterijen, of haal de AC/DC-adapter uit het stopcontact en steek deze er daarna opnieuw in.
Waarschuwing: Koppel de adapter los als het spel gedurende een lange periode niet gebruikt zal worden, om oververhitting
te vermijden. Speel niet buiten als de speelgoed door een adapter van stroom wordt voorzien. Controleer regelmatig de
toestand van de adapter en de aansluitkabels. Als de toestand verslechtert, gebruik de adapter niet langer totdat deze is
gerepareerd. Gebruik dit speelgoed alleen met een transformator die speciek voor speelgoed is ontworpen. De adapter is
geen speelgoed. Haal de stekker uit het stopcontact als de speelgoed met vloeistoen wordt schoongemaakt. Het speelgoed
is niet geschikt voor kinderen jonger dan 3 jaar oud. De transformator verkeerd gebruiken kan een elektrische schok veroor-
zaken. Het speelgoed mag niet worden aangesloten op meer dan het aanbevolen aantal transformatoren of voedingen.
Mededeling voor ouders: De transformator en adapter voor het speelgoed zijn niet bestemd om als speelgoed te worden
gebruikt. Het gebruik ervan dient onder het toezicht van een ouder te gebeuren.
Het speelgoed mag alleen op uitrusting worden aangesloten die het volgend symbool draagt of .
Mededeling: Het is essentieel om het garen zowel boven- als onderaan op
een juiste manier aan te brengen.
Controleer grondig en voer eerst een test uit voordat je begint te naaien. Een
verkeerde aanbrenging van het garen zal de naaimachine beschadigen.
Uw naaimachine werkt op 4 x 1,5V LR6/AA batterijen (niet meegeleverd) of een
adapter (niet meegeleverd) van 6.0V 800mA met positief centrale pool .
Invoer: 100V - 240V ~ 50 / 60Hz

NEDERLANDS
NEDERLANDS
DE SPOEL VAN GAREN VOORZIEN:
Om het garen op een spoel te wijzigen of te vervangen is een klos garen nodig.
Volg deze stappen.
1. Plaats een klos van het gewenste garen op de klospen.
2. De spoelwinder bevindt zich binnenin het tandwiel Duw op het uiteinde en
draai de spoelwinder naar links om deze vrij te geven.
3. Plaats een lege spoel op de spoelwinder en wikkel het uiteinde van het
garen 4-5 omwentelingen op de klos.
4. Stel de schakelaar in op ‘On’ (Aan) om het opwinden van het garen te start-
en. Gebruik je vinger om de draad tijdens het opwinden gelijkmatig op de
spoel aan te brengen. De spoel is vol wanneer het garen de bovenkant van
de kleine gaten bereikt.
5. Wanneer voltooid, stel de schakelaar in op ‘O’ (Uit), knip het garen door
en verwijder de spoel.
6. Duw de spoelwinder opnieuw in het handwiel en draai deze naar rechts
om het op zijn plaats vast te zetten.
DE NAALD VERVANGEN
Naaldvervanging moet worden gedaan door een volwassene.
Volg deze stappen wanneer de naald gebogen of gebroken is en vervangen
moet worden.
(90/14 huishoudelijke naaimachinenaalden kunnen met deze machine worden
gebruikt).
1. Stel de schakelaar in op ‘O’ (Uit) en verwijder de batterijen (of ontkoppel
de machine van de externe voedingsbron).
2. Verwijder de beschermkap door het losdraaien van de schroef en moer
met behulp van een schroevendraaier.
3. Draai de naaldklemschroef los en trek de oude naald uit.
4. Plaats de nieuwe naald in de naaldstang met de vlakke kant richting de
naaldklemschroef. Duw de nieuwe naald voorzichtig tot het einde in.
5. Draai de naaldklemschroef vast terwijl je de naald op zijn plaats vast-
houdt.
6. Breng de beschermkap opnieuw aan door het vastdraaien van de schroef
en moer met behulp van een schroevendraaier.screwdriver.
DE VOETPEDAAL GEBRUIKEN
De voetpedaal schakelt de machine in en uit met behulp van je voet zodat je je beide handen kunt gebruiken voor het
hanteren van de stof. Steek de stekker aan het uiteinde van de voetpedaalkabel in de voetpedaalaansluiting onder het
handwiel. De machine moet uitgeschakeld zijn.
Mededeling: Duw de aan/uit-schakelaar naar de positie ‘O’ (Uit) na het naaien om het ongewenst starten van de
machine te vermijden.
DE STEEK AANPASSEN:
1. Een normale steek wordt in Figuur A weergegeven. De oppervlaktedraad
en de onderste draad hebben een uniforme elasticiteit. Als je in de steken
geen verschil kunt zien tussen de oppervlaktedraad en de onderste
draad, dan is de steek normaal.
2. Een losse oppervlaktedraad wordt in Figuur B weergegeven. De onderste
draad is recht en enkele “knopen” kunnen zichtbaar zijn. In dit geval
moet je de draadspanmoer met de klok mee draaien en de druk op de
oppervlaktedraad verhogen totdat de steken van de oppervlaktedraad en
de onderste draad gelijk zijn.
3. Een losse onderste draad wordt in Figuur C weergegeven. De oppervlak-
tedraad is recht en enkele “knopen” kunnen zichtbaar zijn. In dit geval
moet je de draadspanmoer tegen de klok in draaien en de druk op de
oppervlaktedraad verlagen totdat de steken van de oppervlaktedraad en
de onderste draad gelijk zijn.
Mededeling: Gebruik alleen stof van een licht of normaal gewicht. Het naaien van dikke of zware stof wordt niet aan-
bevolen, deze kan de naald doen breken.
Mededeling: Tijdens het aanpassen van de spanning van de oppervlaktedraad, kijk of de oppervlaktedraad uit de
draadklem is gekomen. Als dit het geval is, klem de oppervlaktedraad opnieuw vast in het midden van de twee draadk-
lemmen.
Mededeling: De richting van de naald moet juist zijn en de schroef tegen de naald moet stevig zijn vastgedraaid om het
uitvallen van de naald te vermijden.
Oppervlaktedraad
Onderste draad
Naaldklemschroef
Naaldstang vastdraaien
losdraaien
Stof
DE LAMP GEBRUIKEN:
Druk op de lampschakelaar om de lamp in te schakelen wanneer je meer licht nodig hebt.
DRAAD AFSNIJFUNCTIE:
De draadafsnijder boven de lamp zorgt voor een probleemloos doorsnijden van de draden zonder gebruik van een
schaar. Trek de draad stevig over de draadafsnijder omlaag.
MOGELIJKE PROBLEMEN EN OPLOSSINGEN
PROBLEEM
BESCHRIJVING
MACHINE WERKT
NIET
(TRAGE REACTIE)
DRAAD WORDT
OVERGESLAGEN
STORING OP
DRAAD
BREUK VAN
DRAAD
SLECHTE
ONDERSTE DRAAD
OF OPPERVLAKTE-
DRAAD
NAALD SPRINGT
OP
MOGELIJKE OORZAAK
Batterijen bevinden zich in de verkeerde
richting
Naald schuin in gat, verkeerde installatie
van de naald Vervang de naald
Spoel van onderste draad zit vast
De persvoet of de naald zit los Vervang de naald en draai de schroef van de
persvoet vast
Beweging van de oppervlaktedraad wordt
belemmerd Controleer of de spoel van de oppervlakte-
draad en de as ongehinderd ronddraaien
Controleer of het uiteinden van de draad in de
spoel van de onderste draad vrij is
Installeer de batterijen in de juiste richting
Onvoldoende uitgangsvermogen van de ex-
terne voedingsbron, lage uitgangsspanning
of beschadigd voedingsbron
Oppervlaktedraad te vast of te los Draai aan de regelknop van de oppervlakte-
draad om ervoor te zorgen dat de onderste
draad en de oppervlaktedraad gelijk zijn
Vervang door een gepaste voedingsbron
Nieuwe en oude batterijen zijn gemengd
Persvoet zit los Draai de schroef van de persvoet vast
Onderste draad is opgebruikt Vervang de spoel van de onderste draad
Vervang door nieuwe batterijen
Lege batterijen
Naald is gebogen of vervormd Vervang de naald
Braam in het naaldgat
Trek aan de stof tijdens het naaien Vervang de naald en breng de draai opnieuw
aan
Vervang de naald
Schuine naald of verkeerde installatie
Geen stof aangebracht wanneer de
machine wordt ingeschakeld Vervang de naald en breng de draai opnieuw
aan
Naald is gebogen of vervormd Vervang de naald
Verkeerd aangebrachte draad Breng de draad in de juiste volgorde aan
Installeer de naald opnieuw
Verkeerde draadvolgorde Breng de draad in de juiste volgorde aan
Vervang door nieuwe batterijen
OPLOSSINGEN
DE STOF PLAATSEN EN STARTEN MET NAAIEN:
1. Draai het handwiel in de richting van de pijl om de naald naar zijn hoogste positie te brengen.
2. Breng de persvoethendel omhoog en plaats de stof onder de persvoet.
3. Laat de persvoethendel zakken.
4. Draai het handwiel 2-3 omwentelingen in de richting van de pijl.
5. Stel de machine in op ‘On’ (Aan) en start met naaien.
6. Wijzig de naaisnelheid met de snelheidsknop.
Mededeling: Als de stof moeilijk verwijderd kan worden, draai het handwiel voor- en achteruit en trek voorzichtig aan
de stof om deze vrij te geven.
VEILIGHEIDSINSTRUCTIES
GELIEVE TE LEZEN ALVORENS DIT APPARAAT TE GEBRUIKEN.
Alvorens dit apparaat te gebruiken, dient u alle gebruiksinstructies grondig te lezen. Gelieve op te merken dat dit
algemene voorzorgen zijn en misschien geen betrekking hebben op uw apparaat.
1. Lees deze gebruiksaanwijzing voordat u poogt het apparaat aan te sluiten en in gebruik te nemen.
2. Behoud deze instructies in een goede staat van dienst. Houd rekening met alle waarschuwingen. Volg alle
instructies op.
3. Bewaar deze gebruiksaanwijzing voor latere raadpleging.
4. Stel het apparaat niet bloot aan gedruppel of gespetter en plaats geen voorwerpen gevuld met vloeistoen, zoals
vazen, op het product. Alleen op een droge locatie gebruiken.

NEDERLANDS
Volg ons op
@LexibookCom
Onderhoud en garantie
OPMERKING: gelieve deze handleiding te bewaren aangezien het belangrijke informatie bevat. Het product is gedekt
door onze 2 jaar garantie.
Voor alle herstellingen tijdens de garantie of naverkoopsdienst, moet je je richten tot de verkoper met een aankoopbe-
wijs. Onze garantie geldt voor al het materiaal en de montage van de fabrikant, exclusief alle schade veroorzaakt door
het niet repsecteren van onze gebruiksaanwijzing ( zoals uit elkaar halen, blootstellen aan hitte of vochtigheid….).
Het is aanbevolen de verpakking te bewaren voor het geval u ze later nog zou nodig hebben.
• Robeer niet om dikke materialen te naaien of het handwiel te forceren.
• Vervang de batterijen wanneer je ziet dat de naaimachine trager begint te werken dan normaal.
• Om de naaimachine te reinigen, gebruik een droge doek; gebruik geen reinigingsmiddelen.
• Stel het spel niet bloot aan direct zonlicht of eender welke hittebron.
• Maak het spel niet nat. Haal het niet uit elkaar en laat het niet vallen.
WAARSCHUWING: Dit product bevat functionele, scherpe kanten aan de schaar en een functionele, scherpe punt aan
de naald en moet steeds onder direct toezicht van een volwassene gebruikt worden.
Waarschuwing. Te gebruiken onder het toezicht van een volwassene.
Raak het scherpe uiteinde van de naald of het schaarblad niet aan want dit kan letsel veroorzaken.
WAARSCHUWING. Niet geschikt voor kinderen jonger dan 3 jaar. Verstikkingsgevaar - Kleine onderdelen.
Daar wij er voortdurend naar streven om te verbeteren, kan het gebeuren dat de kleuren en gegevens van het product
anders zijn dan deze afgebeeld op de verpakking.
Referentie : SW100MI
Ontworpen en ontwikkeld in Europa - Gemaakt in China.
© LEXIBOOK®
Voor service na verkoop, neem contact op met onze teams: www.lexibook.com
5. Plaats geen open vuur, zoals van kaarsen, op het product.
6. Houd toezicht op kinderen zodat ze niet met het apparaat spelen.
7. De ventilatie mag niet worden belemmerd door de ventilatieopeningen af te dekken.
8. Gebruik alleen accessoires die door de fabrikant worden aanbevolen.
9. Gebruik alleen reserveonderdelen die door de fabrikant zijn aanbevolen.
10. Installeer het product volgens de aanwijzingen van de fabrikant.
11. Plaats het product op een goed geventileerde plek. Plaats het systeem op een vlak, hard en stabiel oppervlak.
Stel het product niet bloot aan temperaturen boven 40°C. Houd minstens 10 cm afstand aan de achterkant en
bovenkant en 5 cm aan iedere zijkant vrij.
12. Verwijder verbruikte batterijen op een milieuvriendelijke manier.
13. Zorg er altijd voor dat de stekker van het product is uitgetrokken alvorens het te bewegen of te reinigen. Maak
het alleen met een droge doek schoon.
14. Schakel het product uit tijdens onweer, storm of als u het gedurende een langere tijd niet gebruikt.
15. Dit product bevat geen onderdelen die door de gebruiker kunnen worden onderhouden. Probeer niet zelf het
product te repareren. Dit dient u uitsluitend door gekwaliceerde deskundigen uit te laten voeren. Breng het
product voor reparaties en inspecties naar een elektronicawinkel van uw keuze.
16. Laat NOOIT iemand, vooral geen kinderen, iets in de gaten, sleuven of andere openingen van de behuizing van
het product steken. Dit kan een fatale elektrische schok tot gevolg hebben.
17. Plaats het product niet naast de televisie, luidsprekers of andere voorwerpen die een sterk magnetisch veld
genereren.
18. Laat het product nooit onbeheerd achter wanneer het in gebruik is.
19. Houd een minimale afstand rond het apparaat voor voldoende ventilatie.
20. De ventilatie dient niet belemmerd te worden door het afdekken van de ventilatieopeningen door voorwerpen
zoals een krant, een tafellaken, gordijnen, etc.
21. Het apparaat is ontworpen om te worden gebruikt in een gematigd en/of tropisch klimaat.
22. Gooi de batterijen op een juiste manier weg. Gooi gebruikte batterijen in de inzamelbakken die voor dit doeleinde
voorzien zijn.
Richtlijnen voor milieubescherming
Gebruikte elektronische apparaten horen niet thuis in het huisafval ! Wij vragen u daarom een bijdrage aan
de bescherming van ons milieu te leveren en dit apparaat op de voorziene verzamelplaatsen af te geven.
IM Code: SW100MI_IM2052
Table of contents
Languages: