Lexus 2015 ES 300h User manual

1
Towing and
Road Service Guide
For The
Lexus ES300h
Quality and Education Services
AAA Automotive
1000 AAA Drive
Heathrow, FL 32746
September 7, 2012

2
Index
General Vehicle Information
Major Component Locations and General Information 3
Sounds and Vibrations Specific to the Hybrid 3
General Towing Information
Equipment Availability 4
Special Precautions 4
Shifting out of Park and into Neutral 4
Car Carrier Loading and Transporting 5
Car Carrier Tie-down Points 6
Wheel-Lift Towing Procedure 6
Emergency Road Service Information
Jacking and Tire Service 7
Stowing the Deflated Road Wheel 9
Tire Pressure Reset Procedure 9
Out of Fuel 10
Electric Fuel Door Override Procedure 10
Jump-Start Procedures 11
Recharging/Reconnecting the Battery 12
Starting with a Dead Key Fob Battery 12
Emergency Start Function 13
Shift Interlock Override Procedure 13

3
General Information
The hybrid system combines the use of a gasoline engine and an electric motor (traction motor) according to
driving conditions, improving fuel efficiency and reducing exhaust emissions.
Take care when handling the hybrid system, as it contains a high voltage system (about 650V at maximum) as
well as parts that become extremely hot when the hybrid system is operating. Obey the caution labels attached
to the vehicle.
Sounds and vibrations specific to a hybrid vehicle:
There may be no engine sounds or vibration even though the vehicle is able to move. Always change the shift
position to P when parked.
The following sounds or vibrations may occur when the hybrid system is operating and are not a malfunction:
Sounds may be heard from the hybrid battery (traction battery) behind the rear seats when the hybrid
system starts or stops.
Motor sounds may be heard from the engine compartment.
Sounds from the hybrid system may be heard when the cargo area lid is open.
Sounds may be heard from the transaxle when the hybrid system starts or stops, or while the vehicle is
idling.
Engine sounds may be heard when accelerating sharply.
Sounds may be heard due to regenerative braking when the brake pedal is depressed and accelerator
is loosened.
Other sounds, such as motors and mechanical noises, may be heard from the brake system when the
brake pedal is depressed.
Vibration may be felt when the gasoline engine starts or stops.
Cooling fan sounds may be heard from the air intake vent on the side of rear left seatback. When
driving in Eco mode, the fan noise may be louder than when driving normally.
1. Air Conditioning Compressor
2. Power Control Unit
3. High Voltage Cables (Orange)
4. Hybrid Battery
5. Service Plug
6. Electric Motor (Traction motor)
7. Caution Label

4
GENERAL TOWING INFORMATION
EQUIPMENT AVAILABILITY:
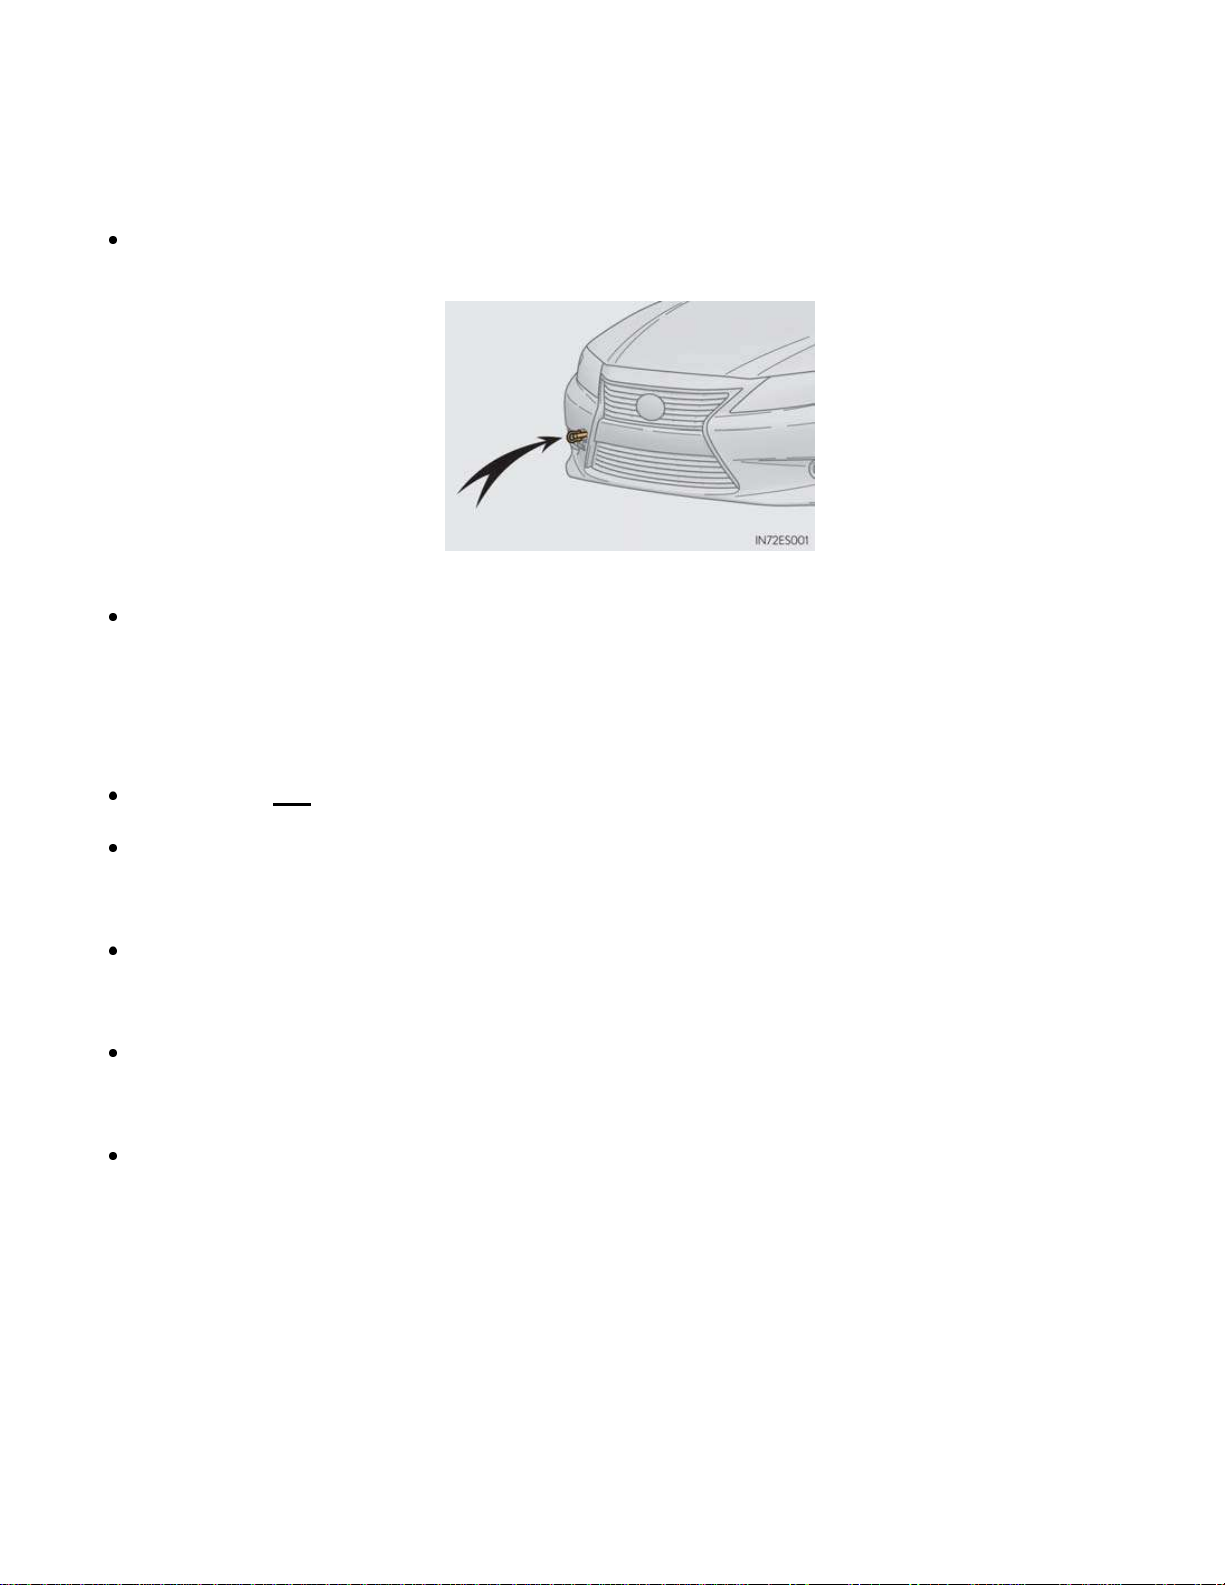
To eliminate the need to remove the eyebolt from the vehicle’s tool kit during loading or recovery, a
screw-in eyebolt is available from any authorized Lexus dealer’s parts department.
Towing Eyebolt Part number 5196148202
The towing and tie-down equipment discussed in this guide is available through AW Direct, a preferred
AAA supplier. Contact your local AAA club representative for special offers available to AAA
contractors.
SPECIAL PRECAUTIONS:
The ES300h has a locking steering column with Push-Button start
If the vehicle needs to be towed, do so with front wheels raised. If the wheels connected to the electric
motor (traction motor) are on the ground when towing, the motor may continue to generate electricity.
This may cause electricity leakage leading to a fire.
Wheel-lift and car carrier equipment are authorized methods of transporting this vehicle. A car carrier is
the preferred method of transporting. THERE IS NO APPROVED PROCEDURE FOR THE USE OF
SLING-TYPE EQUIPMENT ON THIS VEHICLE.
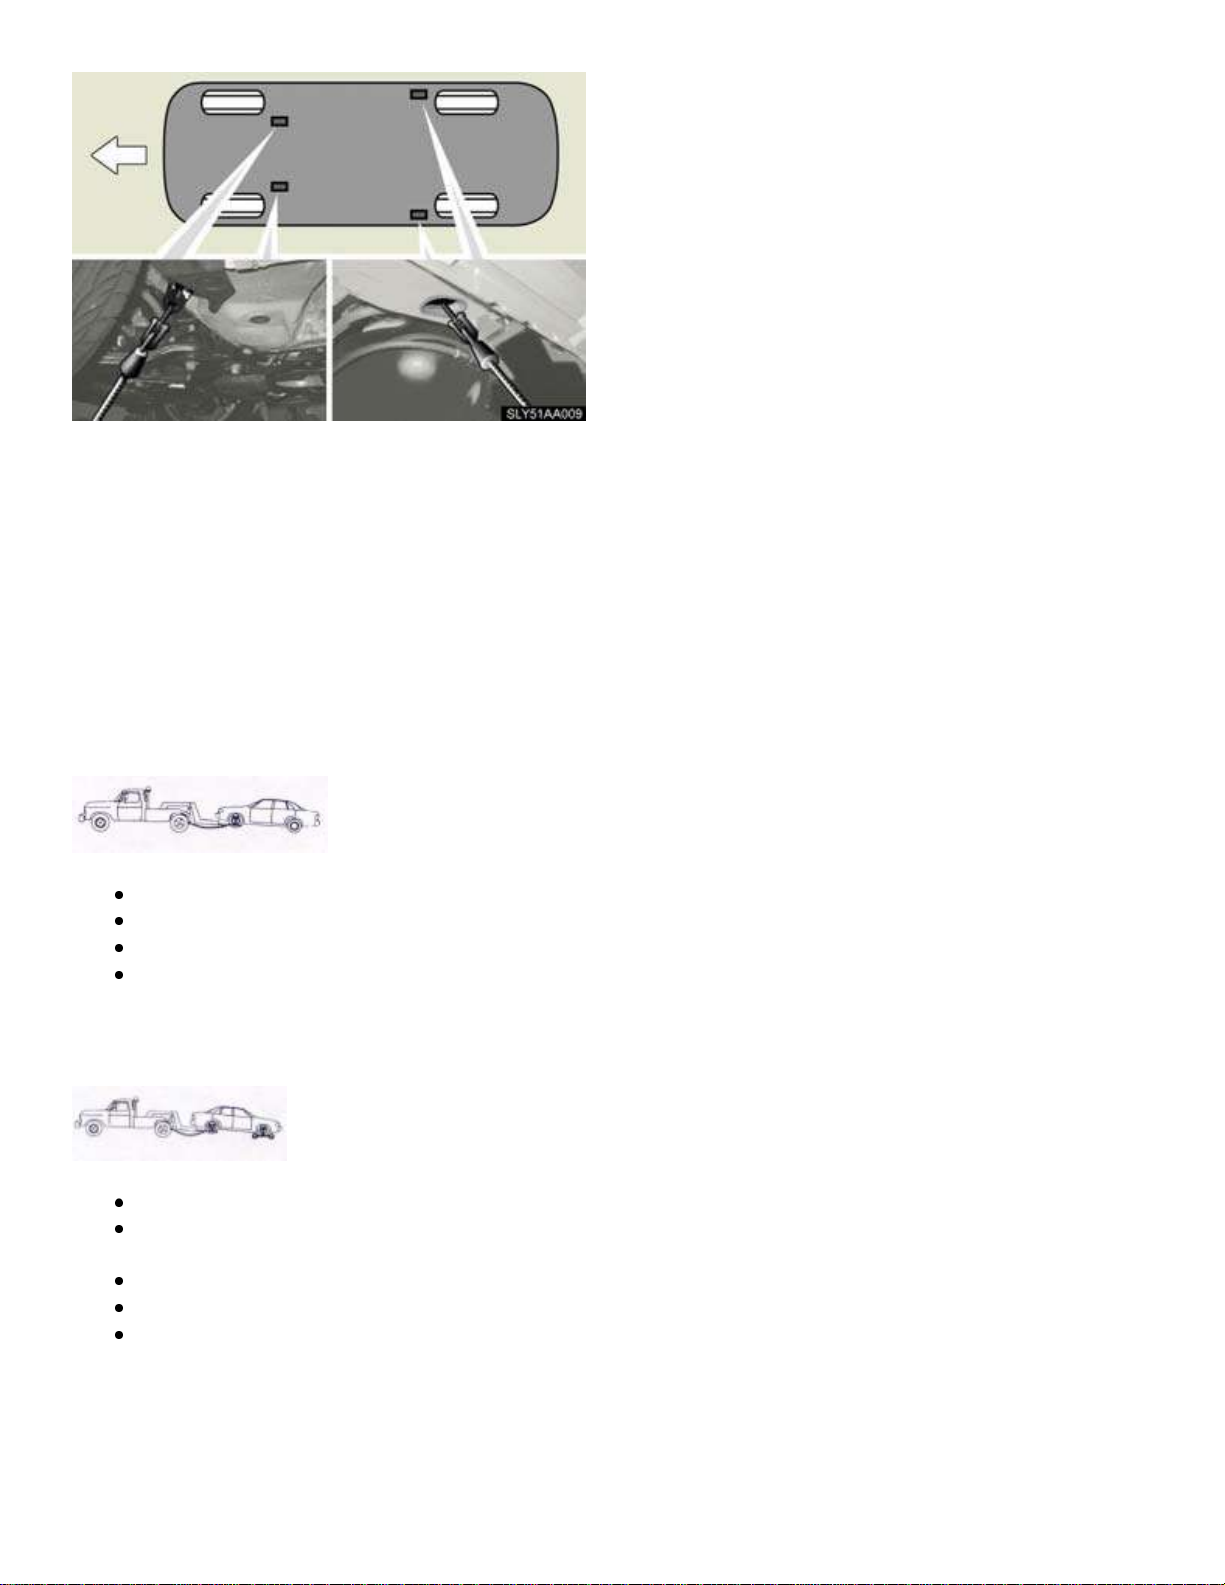
When loading or pulling the ES300h, DO NOT USE HOOKS OF ANY TYPE ON THE LOWER
CONTROL ARMS. Follow only the approved loading procedures specified in the following pages and
listed in the AAA/CAA Towing & Service Manual.
In an emergency situation where the vehicle will not roll or must be moved for towing access, wheel-
jacking equipment, such as GoJaks are recommended.
Shifting out of Park and into Neutral:
The vehicle may be shifted out of Park into Neutral by pressing the POWER button to attain either Ignition-on
or READY-on modes. To select Neutral, press the brake pedal while moving the shifter from Park
If the 12-Volt auxiliary battery is discharged, the vehicle will not start. However, shifting out of Park is possible
using the manual override procedure listed on page 13 of this guide.

5
CAR CARRIER LOADING AND TRANSPORTING:
The use of car carrier equipment is the preferred method of transporting a Lexus ES300h vehicle.
Note: The curb weight for the ES300h is 3,660 lbs/2,196 kg
The ES300h has a moderate amount of ground clearance at front and rear. Loading onto a conventional car
carrier may require additional ramping in some circumstances. However, clearance at the trailing end of the
vehicle should always be monitored as it is loaded.
The towing eyebolt can be used for front loading of the ES300h. The eyebolt is located in a tool tray located in
the rear cargo area; however exact placement depends on the type of spare tire the vehicle is equipped with
(See Figure 1 and 2).
Figure 1 Figure 2
Compact Spare Eyebolt in location (2) Full Size Spare Eyebolt in location (1)
If the towing eyebolt is missing or otherwise inaccessible, the tie-down slots on the undercarriage can be used
to load the vehicle.
NOTE: Use a plastic trim tool or a plastic card, such as an old credit card to avoid damaging the painted
surface when removing the plug from the bumper to gain access to the eyebolt receiver. The eyebolt on this
model has RIGHT-HAND THREADS. Screw the eyebolt clockwise into the front pull point and ensure that it is
tight. Attach the winch line to the eyebolt with the open side of the hook facing upward (See Figure 3, 4 and 5).
Figure 3 Figure 4 Figure 5
Before loading, ensure that the transmission is in “Neutral”. When loading, remember that the eyebolts are
designed for a straight ahead pull within a 20 degree window, so stop the vehicle as the winch wire rope
begins to pull downward. To prevent too much downward pull you will need to keep the leading edge of the
ES300h about 2 feet or more from the winch drum.
Once loaded, set the parking brake and secure the vehicle onto the carrier.

6
Figure 6 (Tie-down points)
After securing, return the bed to the transporting position, then slacken the winch wire rope slightly to prevent
downward pull on the towing eyebolt as bumps are encountered during transport. Make sure that the ignition
is in the OFF position and the smart key is located in the cab of the tow vehicle.
WHEEL-LIFT TOWING PROCEDURE:
If a wheel-lift is used, the procedures shown below must be followed. Refer to the AAA/CAA Tow and
Service Manual for detailed information regarding towing this vehicle. Follow all general towing
precautions.
Front Tow:
To tow ES300h with a wheel-lift from the front of the vehicle, observe the following:
Secure the front wheels firmly to the wheel-lift
Use a steering wheel securing device
Attach safety chains and tow lights to the vehicle
Ensure that the ignition is turned OFF to prevent unnecessary battery drain and smart key is removed
from the vehicle and placed in the cab of the tow vehicle
Rear Tow:
To tow ES300h with a wheel-lift and dolly, observe the following:
Secure the rear wheels firmly to the wheel-lift and the front set of wheels firmly to the dolly
After loading the ES300h onto the dolly and wheel-lift, place the transmission in Park and set the
parking brake
Use a steering wheel securing device
Attach safety chains and tow lights to the vehicle
Ensure that the ignition is turned OFF to prevent unnecessary battery drain and smart key is removed
from the vehicle and placed in the cab of the tow vehicle
NOTE: Lexus states that the four tie-
down slots in the frame can be used to
secure the vehicle. Slots are provided in
the frame to take either “T” or “mini-J”
type hooks (Figure 6).
Do not overly tighten the tie-downs or
the vehicle may be damaged. AAA
recommends the use of wheel strap tie-
downs around each wheel.

7
EMERGENCY ROAD SERVICE PROCEDURES
JACKING and TIRE SERVICE:
The jack supplied with the ES300h is located in the tray beneath the rear cargo liner. The location of the jack
and tire changing tools is affected by the type of spare tire the vehicle is equipped with. Below are images of
the two different layouts with the jack being in position 3 (See Figure 7 and 8).
Figure 7 Compact Spare Figure 8 Full Size Spare
The approved lifting locations for the factory jack are on the pinch weld or rocker sills, located inboard of the
wheels.
Observe all standard jacking precautions. Ensure that the vehicle is on firm, level ground and chock the wheel
diagonal from the one you will be raising. Prior to jacking the vehicle, loosen the lug nuts. As the jack comes
in contact with the vehicle body, ensure that it is contacting the correct location on the vehicle. Figure 9 shows
the location for the factory jack while Figure 10 show the jacking and lifting locations for a trolley jack and
hoist. Continue lifting to raise the vehicle high enough to change the tire.
CAUTION: Locating the proper lifting points along the sides of the vehicle can be difficult due the
shape of the lower body panels. To avoid damage, ensure that the jack you are using is properly
placed in its correct location before lifting the vehicle.
Figure 9 Figure 10

8
Clean all debris or rust from the tire mounting surfaces. Use a rag and or wire brush (Figure 11).
Figure 11 Figure 12
Install the spare tire and tighten lug nuts. On an aluminum spare wheel, the nut washer should contact the
wheel surface. On a steel spare wheel, the tapered portion of the lug nut should contact the wheel surface.
Firmly tighten each wheel nut two or three times in the order shown in the illustration below (Figure 12).
Lug Nut Tightening Specification: Tightening torque: 76 ft•lbs/103 N•m/ 10.5 kgf•m
When using the compact spare tire:
As the compact spare tire is not equipped with a tire pressure warning valve and transmitter, low inflation
pressure of the spare tire will not be indicated by the tire pressure warning system. Also, if you replace the
compact spare tire after the tire pressure warning light comes on, the light remains on.
NOTE: If the compact spare is used when the road surface is snowy or icy, it needs to be installed on
the rear only. If the vehicle has a front flat, install the compact spare on the rear and move a good
road wheel from the rear axle to the front axle for safety reasons.
CAUTION: Before mounting the spare tire on the vehicle, ensure that the rim and axle mounting
surfaces are clean and free from dirt and corrosion. If the spare rim is badly corroded, mounting the
spare on the vehicle is not recommended. Instead, transport the vehicle to a repair facility to have
the problem corrected.

9
STOWING THE DEFLATED ROAD WHEEL:
The deflated road wheel can be stored in the rear cargo area in the same location as the spare wheel. Use
caution not to damage the wheel nor pinch your hand between the wheel and the trunk surface when stowing
the deflated tire. The center wheel ornament will need to be removed from the road wheel in order to secure
the wheel in the rear cargo area.
After completing the tire change
The tire pressure warning system must be reset.
How to initialize the tire pressure warning system:
1. Park the vehicle in a safe place and turn the “POWER” switch off. Initialization cannot be performed
while the vehicle is moving.
2. Adjust the tire inflation pressure to the specified cold tire inflation pressure level. Make sure to
adjust the tire pressure to the specified cold tire inflation pressure level. The tire pressure warning
system will operate based on this pressure level.
3. Turn the “POWER” switch to ON mode.
4. Press and hold the tire pressure warning reset switch until the tire pressure warning light flashes
slowly three times (Figure 13).
Figure 13
5. Wait for a few minutes with the “POWER” switch in ON mode and then turn the “POWER” switch
off.

10
OUT OF FUEL SERVICE:
The fuel filler is located on the left-hand (driver’s) side of the vehicle’s rear quarter panel and is covered by a
locking door. A button on the lower left side of the dash opens the fuel filler door (Figure 14 and 15).
Figure 14 Figure 15
Electric fuel door opener:
The ES300h is equipped with an electric fuel door opener. In the event of 12-volt power loss or other electrical
problem with the release mechanism, the fuel door can only be opened using the manual release located
behind a trim panel on the left side of the rear cargo area (Figure 16).
Figure 16
Running out of fuel:
When the vehicle has run out of fuel and the hybrid system cannot be started, refuel the vehicle with at least
enough gasoline to make the low fuel level warning light go off. If there is only a small amount of fuel, the
hybrid system may not be able to start. (The minimum amount of fuel to add to make the low fuel level warning
light go off is 3.0 gal, when the vehicle is on a level surface. This value may vary when the vehicle is on a
slope.)
NOTE: If the ES300h runs out of fuel (warning light is on) and the engine quits running, add fuel to the
vehicle and try to start the engine (as long as the READY light is ON) if the READY light is not
illuminating. The vehicle MUST go to the Lexus dealer for service. If the READY light does not
illuminate, multiple attempts to start the vehicle may have been performed prior to adding fuel, and the
vehicle will not start, even if fuel is added.

11
BATTERY & JUMP-STARTING:
The Lexus ES300h battery is located in the passenger side of the rear cargo area, under a removable trim
panel on the right side (Figure 17). If the battery has been discharged you will need to access the trunk area
using the metal key found in the key fob (Figure 18).
Figure 17 Figure 18
The following jump-starting procedures should be followed when rendering assistance to a Lexus ES300h:
Never use jump-starting equipment that can exceed normal 12-volt charging system voltage
Ensure that all electrical accessories and the ignition are OFF and all the key fobs are at least 10 feet
away from the vehicle before connecting jumper cables or a jumper box to the discharged vehicle
Figure 19
Connect cables to the designated locations and in the order shown in Figure 19 above. Disconnect
cables in reverse order:
Connect a positive jumper cable clamp to the positive (+) terminal on the discharged battery
Connect the clamp on the other end of the positive cable to the positive (+) battery terminal on the
second vehicle
Connect a negative cable clamp to the negative (-) battery terminal on the second vehicle

12
Connect the clamp at the other end of the negative cable to a solid, stationary, unpainted metallic
point away from the discharged battery such as the trunk latch striker, as shown (Figure 19).
If using a portable jump pack:
oConnect the positive cable of the jump pack to the positive terminal of the discharged battery
oConnect the negative cable of the jump pack to a solid, stationary, unpainted metallic point
away from the discharged battery such as the trunk latch striker, as shown (Figure 19).
oIf the jump pack has an ON/OFF switch, turn the jump pack on
Start the engine of the second vehicle. Increase the engine speed slightly and maintain that level for
approximately 5 minutes to recharge the 12-volt battery in the Lexus ES300h
Maintain the engine speed of the second vehicle and start the hybrid system by turning the “POWER”
switch to ON mode
Make sure the “READY” indicator comes on. If the indicator does not come on, follow the start
override procedures listed below
Once the hybrid system has started, remove the jumper cables in the exact reverse order from which
they were connected
After recharging/reconnecting the 12-volt battery:
Unlocking the doors using the smart key system may not be possible immediately after reconnecting the 12-
volt battery. If this happens, use the wireless remote control or the mechanical key to lock/unlock the doors.
Start the hybrid system with the “POWER” switch in ACCESSORY mode. The hybrid system may not start with
the “POWER” switch turned OFF. However, the hybrid system will operate normally from the second attempt.
The “POWER” switch mode is recorded by the vehicle. If the battery is reconnected, the vehicle will return the
“POWER” switch mode to the status it was in before the battery was disconnected. Make sure to turn off the
power before disconnecting the battery. Take extra care when connecting the battery if the “POWER” switch
mode prior to discharge is unknown.
Caution: When recharging the 12-volt battery NEVER recharge the 12-volt battery while the hybrid system is
operating. Also, be sure all accessories are turned off.
Starting with a dead key fob battery:
This vehicle displays a symbol on the instrument panel to indicate that it recognizes the correct key being in
the vehicle. The symbol looks like this:
If this symbol isn’t displayed when you attempt to start the vehicle, you may be dealing with a dead key fob
battery or another problem where the following procedures may allow the vehicle to be started.
Discharge Key Fob Battery Override
Figure 20
Depress and hold the brake pedal
Hold the Lexus emblem side of the key fob next to
the Power Button allowing system to recognize the
key fob (Figure 20)
Depress and hold the start button

13
Emergency Start Function:
When the hybrid system does not start, the following steps can be used as an interim measure to start the
hybrid system if the “POWER” switch is functioning normally:
1. Set the parking brake.
2. Turn the “POWER” switch to ACCESSORY mode.
3. Press and hold the “POWER” switch for about 15 seconds while depressing the brake
pedal firmly.
Even if the hybrid system can be started using the above steps, the system may be malfunctioning.
SHIFTER LOCK OVERRIDE:
If there is a problem with the shifter or if the ignition key is not available, the transmission can be shifted out of
the Park position as follows:
Set the parking brake
Depress the brake pedal
Using a flat screwdriver type tool, gently pry up on the edge of the cover plug above the shifter “PARK”
(P) indicator (Figure 21)
Depress the button below the cover and move the shifter out of the “PARK” (P) position (Figure 22)
Figure 21 Figure 22
Other manuals for 2015 ES 300h
5
Table of contents
Other Lexus Automobile manuals

Lexus
Lexus LFA Manual

Lexus
Lexus 2013 IS250 User manual

Lexus
Lexus 2008 GS460 User manual

Lexus
Lexus 2014 LX570 User manual

Lexus
Lexus GS 450h 2006 User manual

Lexus
Lexus IS220d 2012 User manual

Lexus
Lexus 2015 RX350 User manual

Lexus
Lexus CT 200H 2014 User manual

Lexus
Lexus 2008 ES350 User manual

Lexus
Lexus 2004 330 Configuration guide

Lexus
Lexus 2012 LS 600h L User manual

Lexus
Lexus 2011 IS 250 User manual

Lexus
Lexus ES350 User manual

Lexus
Lexus RX 350 User manual

Lexus
Lexus HomeLink GS 300 2005 User manual

Lexus
Lexus LFA User manual

Lexus
Lexus RX450h User manual

Lexus
Lexus 2012 RX450h User manual

Lexus
Lexus LS 460L Instructions and recipes

Lexus
Lexus 2014 RX 450h User manual