LG Room air conditioner User manual

Air
(Window
E 'S
Conditioner
UAL
P/No,: 3828A20133S

FOR YOURRECORDS
Write the model and serial numbers here:
Model #
You can find them on a label on the side of each unit.
_aler's Name
DatePurcha_
RE,4D THIS MANUAL
inside you will find many helpful hints on how to use and
maintain your air conditioner properly. Just a little preventive
care on your part can save you a great deal of time and
money over the life of your air _nditioner.
You'll find many answers to common problems in the chart
of troubleshooting tips. If you review our chart of
Troubleshooting Tips first, you may not need t:ocall for
sewice at all.
•Contact the authorized service technician br repair
or maintenance of this unit.
• Contact the installer for installation of this unit.
• The air conditioner is not intended for use by young
children or infirm persons without supervision.
• Young children should be supervised to ensure that
they do not play with the air conditioner.
|

fety Pre utions
TOprevent injury to the user or other p_pie and property damage, the following instructions must be
followed.
m Incorrect operation due to ignoring of instruction will cause harm or damage, the seriousness is classified
by the folbwing indications,
II The items to be followed are classified by the following symboas,
• Otherwise, it will cause electric
shock or fire due to heat
generation or electrical shock,
•It will cause electrical shock or
fire due to heat generation.
•It will cause electrical shock or
fire due to heat generation.
• It may cause e_ectdcal shock.
. It:willcause elec_fi_l shock or fire.
. Ifthe supply cordisdamage, it
must_ replacedbya s_cial cord
or assembly availablefrom the
manufactureror itsserviceagent,
•Thiscould damage your health.

•Itmaycauseaninjury.
C,UT,O.l
•Water may enter the unit and
degrade the insu]atiom It may
cause an electric shock,
,An oxygen shortage may occur.
• Since the fan rotates at high
speed during operation, it may
cause an i_ury,
*This could injure the pet or plant. • Do not use this air c_nditioner to
preserve precision devices, food,
pets, p_ants,and art objects,
Itmay cause deterioration of
qua]ity, etc,
• it may cause an electric shock. . It may cause a fire or deformation ,_tmay cause imperfect
of the cabinet, combustion.

About the Controls on the air nditioner
The controls will look like the following.
Pr_aution: The Remote Control unit wilt not function properly if strong light strikes the sensor
window of the air conditioner or it there are obstacles beb_veenthe Remote Control
unit and the air conditioner.
POWER BU_ON
Operation starts, when this button is press_ and stops when you press the button again.
OPERATION MODE SELECTION BUTTON
Select Cooling, Heating, Fan or Dehumidification(Dry) mode witlh this button.
ONtOFF TIMER BU_ON
........Set the time of starting and stopping operation
The timer is.set by 1 hour.
FAN SPEED SELECTOR
Select the fan speed
°Cooling Model: High[F3] _ Low[F1] -) M_[F2] -') High[F3] ....
- Heating Model: High[F2] e Low[F1] -e High[F2] ....
ROOM TEMPERATURE SETTING BUTTON
Control the r_m tempera_re within a range of 16_ to 30_.
The unit takes an average of 30 minutes to adjust the room temperature by 1_ (1.8_)_
Temperature increases only by 2_ and no longer increase thereafter,
AUTOSW NG
The vertical louver swings horizontaily by the automatic system and stops when you press the
button again.
SIGNAL RECEIVER
. STORAGE
The remote control may be stored mounted on a wall,

Auto Restart
In case the power comes on again after a power failure, Auto Restarting Operation is the
function to operate procedures automatically to the previous operating conditions.
How to Insert the Batteries
Remove the battery cover by pulling
it according to the arrow direction.
insert new batteries making sure
that the (+) and (-) of battery are
installed _rrectJy.
Reattach the cover by pushing it
back into position.
VentControl
• Use2 _(!.5vott) batted,es. Donotuse
bakeries.
,Rerno_ thebattef_ from theremote
controlifthesystemis notg_g to_us_
fora bng #me.
The vent control is located above the
control knobs.
When set at CLOSE, only the air inside
the room will be circulated and
conditioned. When set at OPEN, some
inside air is exhausted outside.
Air Direction
CLOSE _ VENT _L, OPEN
To open b_e vent; puff the lever toward you.
To close it, push it in.
The direction of air can be controlled horizontally or vertically by using the, horizontal
louver or vertical louver.
•Horizontal Air-Direction
The horizontal air direction is adiusted
by pressing the AUTO SWING ( _ )
button. If you want to stop the air flow
from moving, press the button again at
the desired position of the louver.
•Vertical Air-Direction
Fingertip pressure on the bank of
horizontal louvers adjusts the air
direction up or down

and maintenan
Grilleand Case
Turn the air conditioner off and remove the plug
from the wal! outlet before cleaning.
OutdoorCoils
To clean, use water and a mild detergent. Do not
use bleach or abrasives.
The ®ils on the outdoor side of the air conditioner should be
checked regularly. If they are clogged with dirt or sat they may be
professionally steam cleaned, a service available through a dealer.
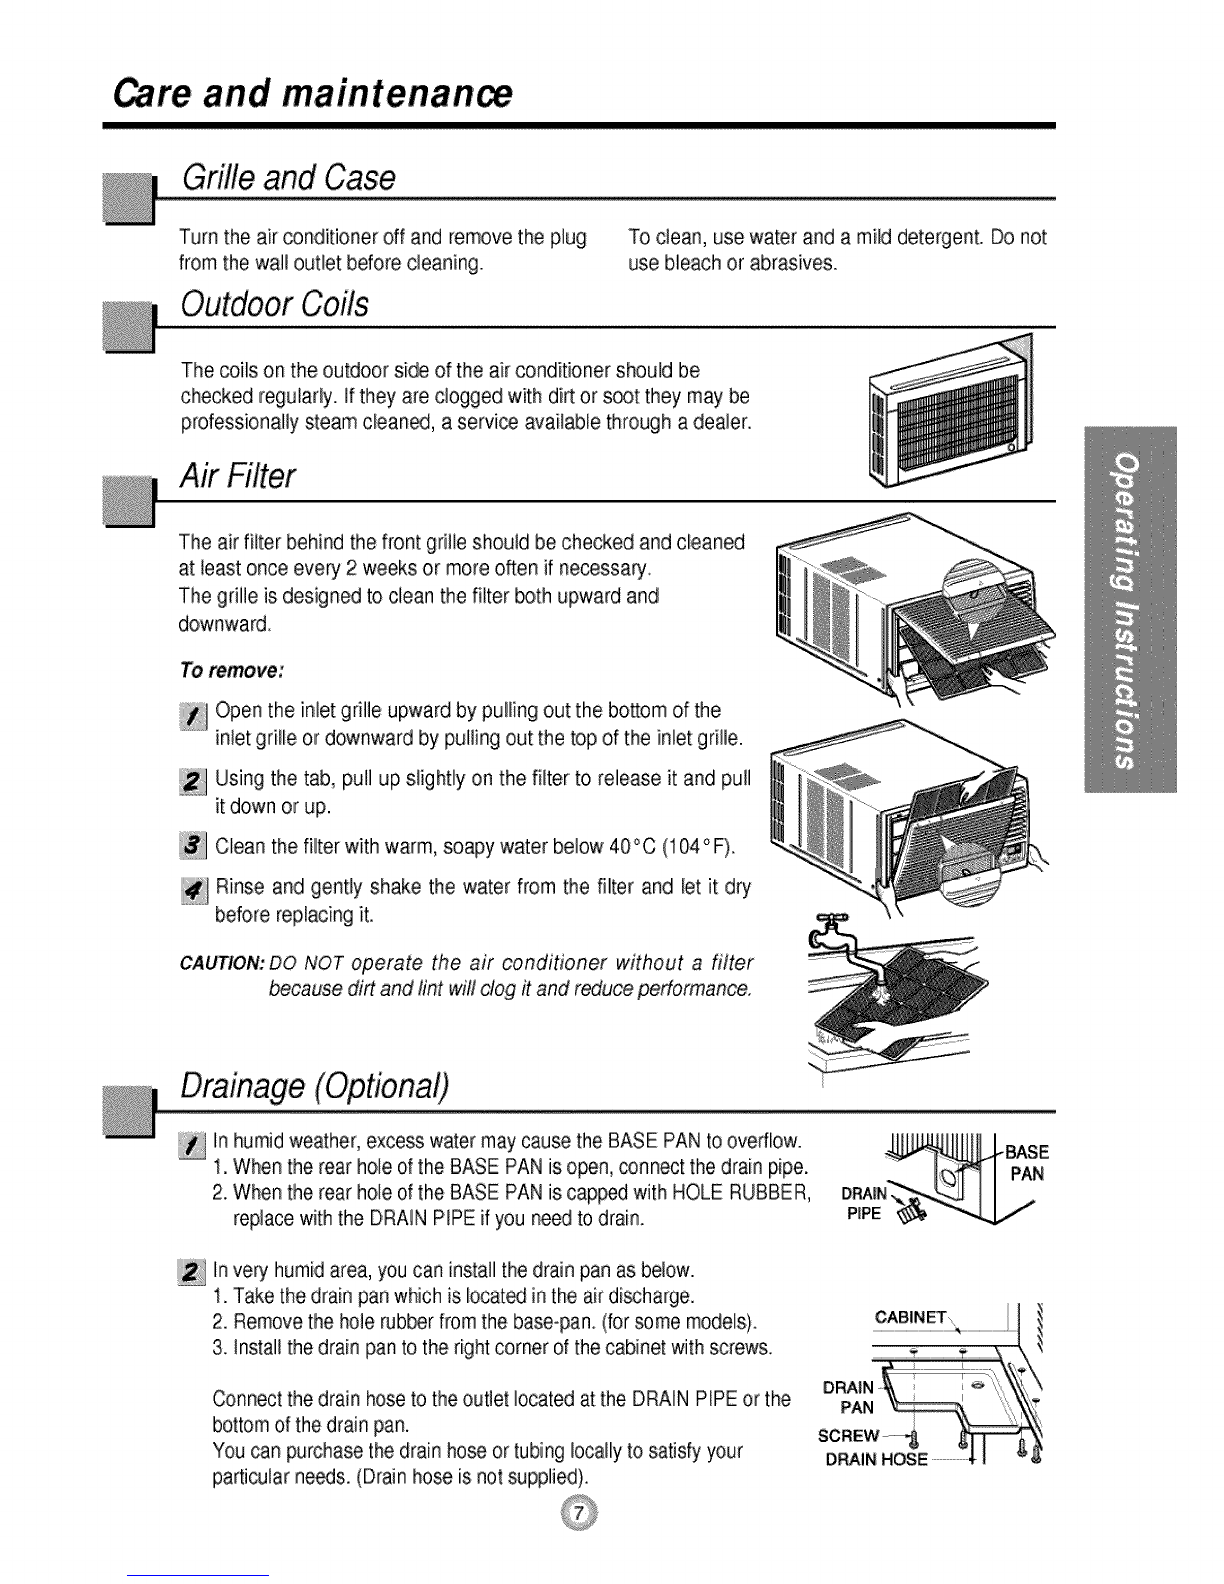
Air Filter
The air filter behind the front grille should be checked and cleaned
at least once every 2 weeks or more o_en if necessary.
The grille is designed to clean the filter _th upward and
downward.
To remove;
:!_ Open the inlet grille upward by pulling out the bosom of the
........inlet grille or downward by pulling out the top of the inlet grille.
Using the tab, pull up slightly on the filter to release it and pull
it down or up.
_:] Clean the filter with warm, soapy water below 40°C (104°F).
_ Rinse and gently shake the water from the filter and let it dry
before replacing it.
CAUTION: DO NOT operate the air conditioner without a filter
because dirt and lint will clog it and reduce pedormance.
Drainage (Optional)
In humid weather, excess water may cause the BASE PAN to overflow.
1. When the rear hole of the BASE PAN is o_n, connect the drain pipe.
2. When the rear hole of the BASE PAN is capped with HOLE RUBBER,
replace with the DRAIN PIPE if you need to drain. P_P'E
In very humid area, you can install the drain pan as below.
1. Take the drain pan which is located in the air di_harge.
2. Remove the hole rubber from the base-pan. (for _me models).
3. Install the drain pan to the right corner of the cabinet with screws.
Connect the drain hose to the outlet located at the DRAIN PIPE or the
bottom of the drain pan.
You can purchase the drain hose or tubing locally to satisfy your
particular needs. (Drain hose iSnot supplied).
-BASE
PAN

_atums and In_allation Hardware
Learning parts name prior to installation will held you understanding the installation procedure.
1. CABINET
2. FRONT GRILLE
3. AIR FILTER
4, AIR UNTAKE(_NLETGRILLE)
5. AIR DISCHARGE
6. VERTICAL AIR DEFLECTOR
(HORIZONTAL LOUVER)
7. HORIZONTAL A_RDEFLECTOR
(VERTICAL LOUVER)
8. CONTROL PANEL
9. POWER CORD
'10. COVER CONTROL
11. COMPRESSOR
12. BASE PAN
l& BRACE
14 CONDENSER
15. EVAPORATOR
'16. REMOTE CONTROL
InstallationHardware
Screw
T
Drain Pan
(For some models)

Installation Instructions
Read completely, then follow stepoby step.
• The appliance shall be installed in accordance with national wiring regulation.
• If a power plug isn't to be used, provide a circuit breaker be_een power _urce and the unit, as following
picture.
Select the BestLocation
Power sou roe
Breaker
Use a cJrcuit breaker
or time _lay.
Note: Use 20A circu_ breaker for 22K,
24K Btu/h Models
@
@
To prevent vibration and noise, make sure
the unit is installed securely and firmly.
Instaii the unit where the sunlight does not
shine directly on the unit.
FOAM ......
COOLED
There should be no obstacle, such as a
fence or wall, within 50cm from the back of
the cabinet because it will prevent heat
radiation of the condenser.
Restriction of outside air will greatly reduce
the cooling efficiency of the,air conditioner.
Instaii the unit a little obliquely outward not to
leak the condensed water into the room
(about 10 ~ 15mm or 1/4 bubble with leveO.
CAUTION: All side louvers of the cabinet must
remain exposed to the outside of
the structure.
FENCE
AWNING
HEAT
RADIATION
!O-15mm
Over 50cm
1/4 Bubble
Remove the Air Conditioner From the Case
[_] Remove the 2 shipping _rews from the
back of the case.
Remove the 2 screws on each side of the
case. Keep these for later use.
_ Slide the air conditioner from the case,by
gripping the base pan handle and pulling
forward while bracing the case
Shipping screws

Install the Air Conditioner in the Case
_ Slide the air conditioner into the case.
Reinstall the 2 screws removed earlier on
each side of the case.
[_ Attach the front grille to the case by
inserting the tabs on the grille into the slots
on the front of the case. Push the grille in
until it snaps into place,
Screw
Power Cord
CAUTION: Thepower cordmustbe connectedto
an independentcircuit.
Thegreen wiremustbe grounded,
Stuff the foam between the top of the unit
and the wall to prevent air and insects from
geeing into the room.
The Foam
Before installing the front grille, pull out the
vent control lever located above the unit
control knobs, as shown.
,ir
r"
When you detach the
front grille from the
case, push the grille
to your rightside and
pull it toward you.
Lift the inlet grilll and secure the front gdlle
with a screw. Lower the inletgdlle into
piace.
Use the Reversible Inlet Grille
_lf want to pull out the filter upward, the inlet grille slightly.
you open
Turn inside out the front grille.
Disassemble the inlet grille from the front grille with separating the
hinged pa_ by inse_ing a .... type screw-driver tip.
Rotate the inlet grille 180 degrees and insert the hooks into the
lower holes of front grille,
Then, insert the filter
[_ If you want to pull out the filter downward, use the reversible inlet
grille without change.(The grille is already assembled for that way.)

fore you 11 for
Troubleshooting Tips
Save time and money! Review the chart below first and
you may not need to call for service.
Normal Operation
• You may hear a pinging noise caused by water being picked up and thrown against the condenser
on rainy days or when the humidity is high. This design feature helps remove moisture and improve
efficiency.
•You may hear the thermostat click when the compressor cycles on and off.
• Water will collect in the base pan during high humidity or on rainy days. The water may overflow
and ddp from the outdoor side of the unit.
• The fan may run even when the compressor does not.
Air conditioner
does not start
Air conditioner
does not coolas it
should
Air conditioner
• Make sure the air conditioner plug is pushed
completely into the outiet.
• Check the house fuse/circuit breaker box and
replace the fuse or reset the breaker.
• Ifpower failure occurs, turn the mode control t:oOFF.
When power is restored, wait:3 minutes to restart the
air conditioner to prevent tripping of the compressor
overload.
• Make sure there are no curtains, blinds, or furniture
blocking the front of the air conditioner.
•Turn the knob to a higher seRing. The highest
setting provides maximum cooling.
• Clean the filter at least every 2 weeks.
See the operating instructions section.
• When the air _nditioner is first turned on you need
to allow time for the room to cool down
Check for open furnace floor registers and cold air
returns,
Set the air conditioneCs vent to the closed position.
See Air Conditioner Freezing Up below.
• Set the mode contro! at HIGH fan or HIGH ccel with
the high,temperature.

Other manuals for Room air conditioner
5
Table of contents
Other LG Air Conditioner manuals
Popular Air Conditioner manuals by other brands

Fujitsu
Fujitsu ASYG 09 LLCA installation manual

York
York HVHC 07-12DS Installation & owner's manual

Carrier
Carrier Fan Coil 42B Installation, operation and maintenance manual

intensity
intensity IDUFCI60KC-3 installation manual

Frigidaire
Frigidaire FAC064K7A2 Factory parts catalog

Sanyo
Sanyo KS2432 instruction manual

CLIMAVENETA
CLIMAVENETA a-CHD U-2T 606+2209 OPERATING AND INSTALLATION Manual

Midea
Midea EWK06CW5 user manual

Pioneer
Pioneer FAB Series installation manual

SPT
SPT WA-1511S user manual

Mitsubishi Electric
Mitsubishi Electric Mr.Slim MSZ-A24NA operating instructions

Mitsubishi Electric
Mitsubishi Electric PUHZ-RP50VHA4 Service manual