LG LAB-M7500 User manual

Please read this instruction booklet carefully and completely
before connecting, operating or adjusting this product.
Car CD/Cassette Combo Receiver
OWNER’S MANUAL
MODEL : LAB-M7500
LAB-M7500_ENG

Table of Contents
2
INTRODUCTION
Table of Contents . . . . . . . . . . . . . . . . . . . . . . . . . . . . . . . . . . 2
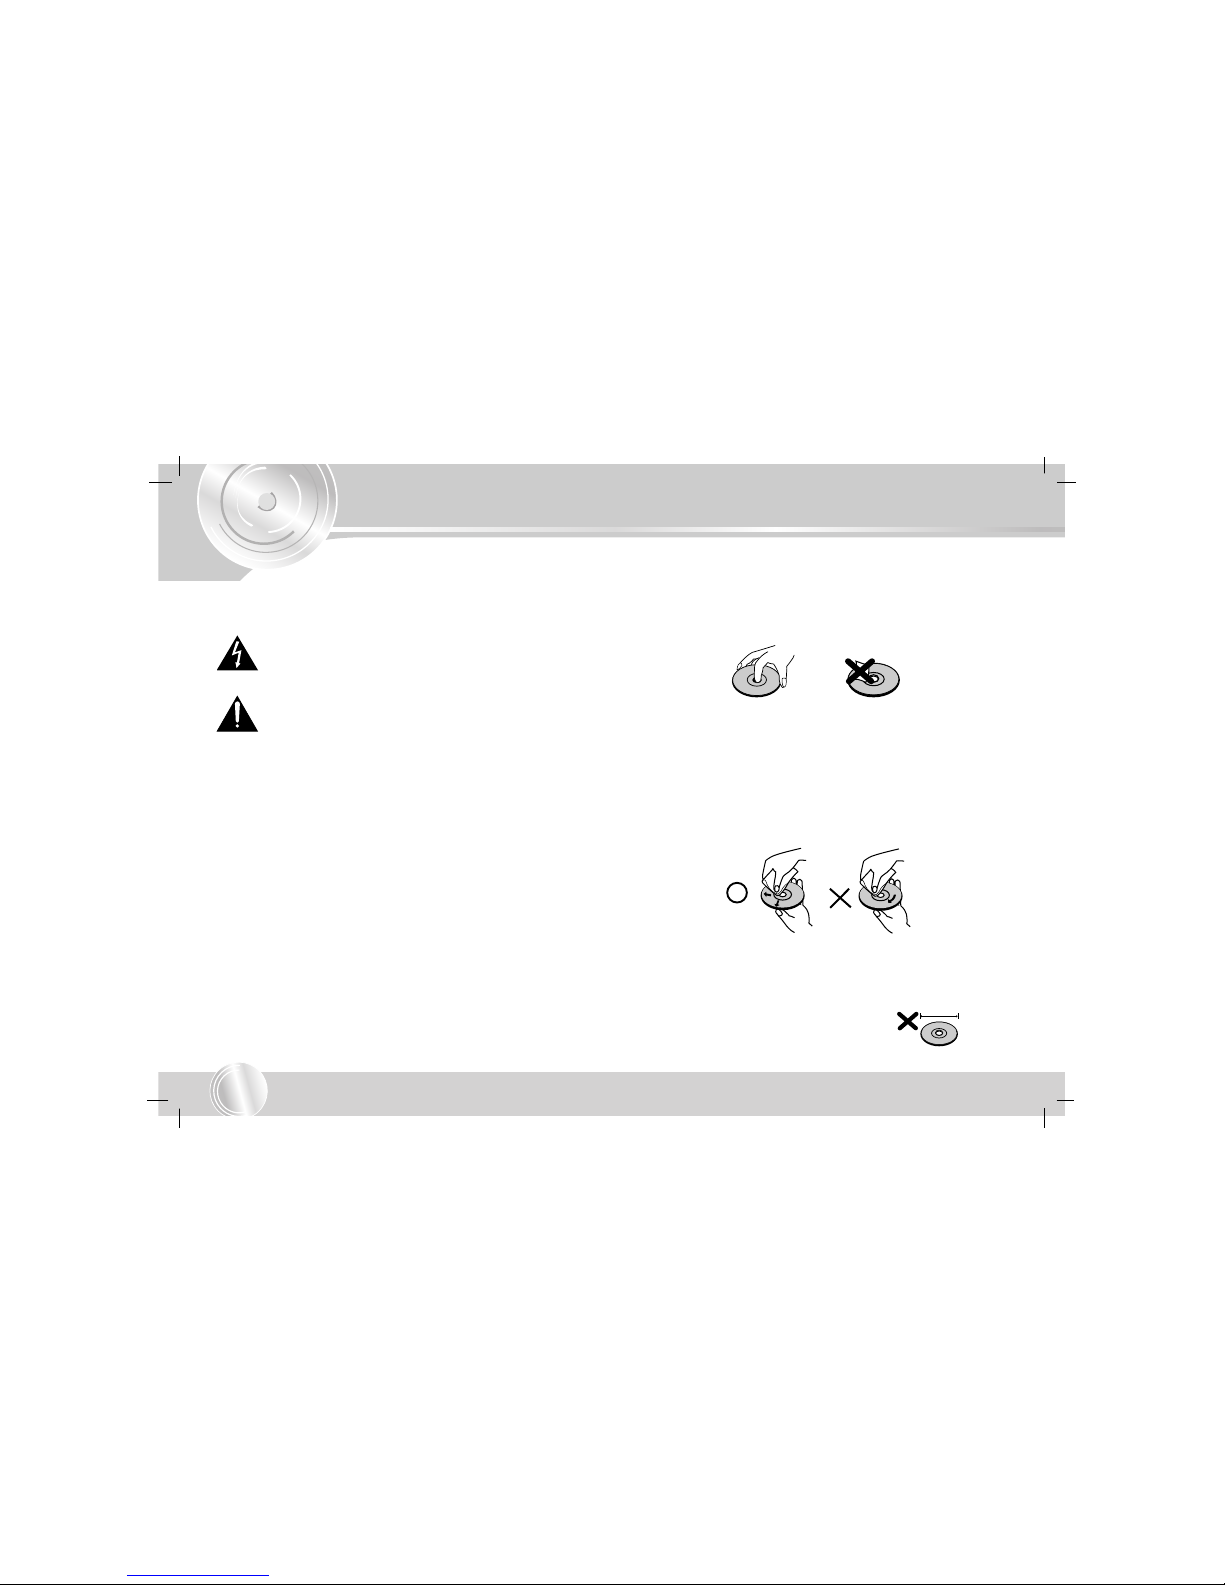
Safety Precautions . . . . . . . . . . . . . . . . . . . . . . . . . . . . . . . . . 3
Before Use. . . . . . . . . . . . . . . . . . . . . . . . . . . . . . . . . . . . . . 4-6
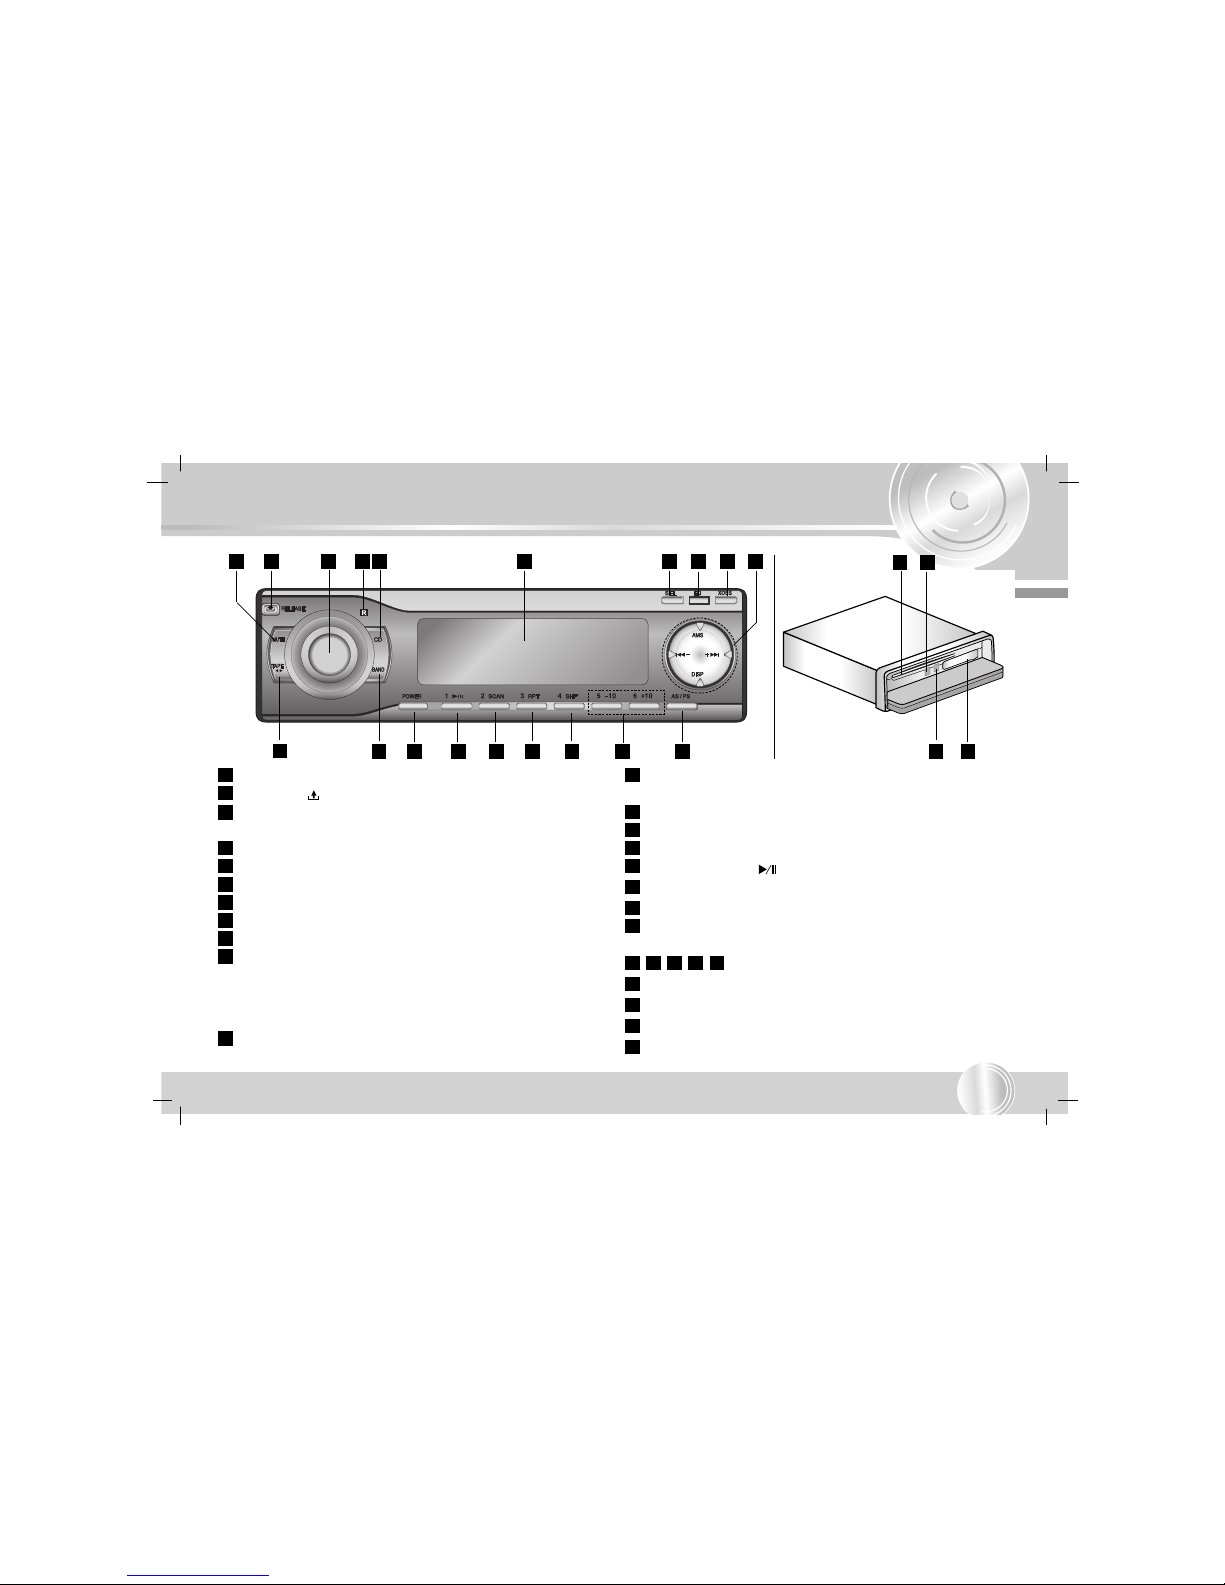
Front Panel . . . . . . . . . . . . . . . . . . . . . . . . . . . . . . . . . . . . . . . 7
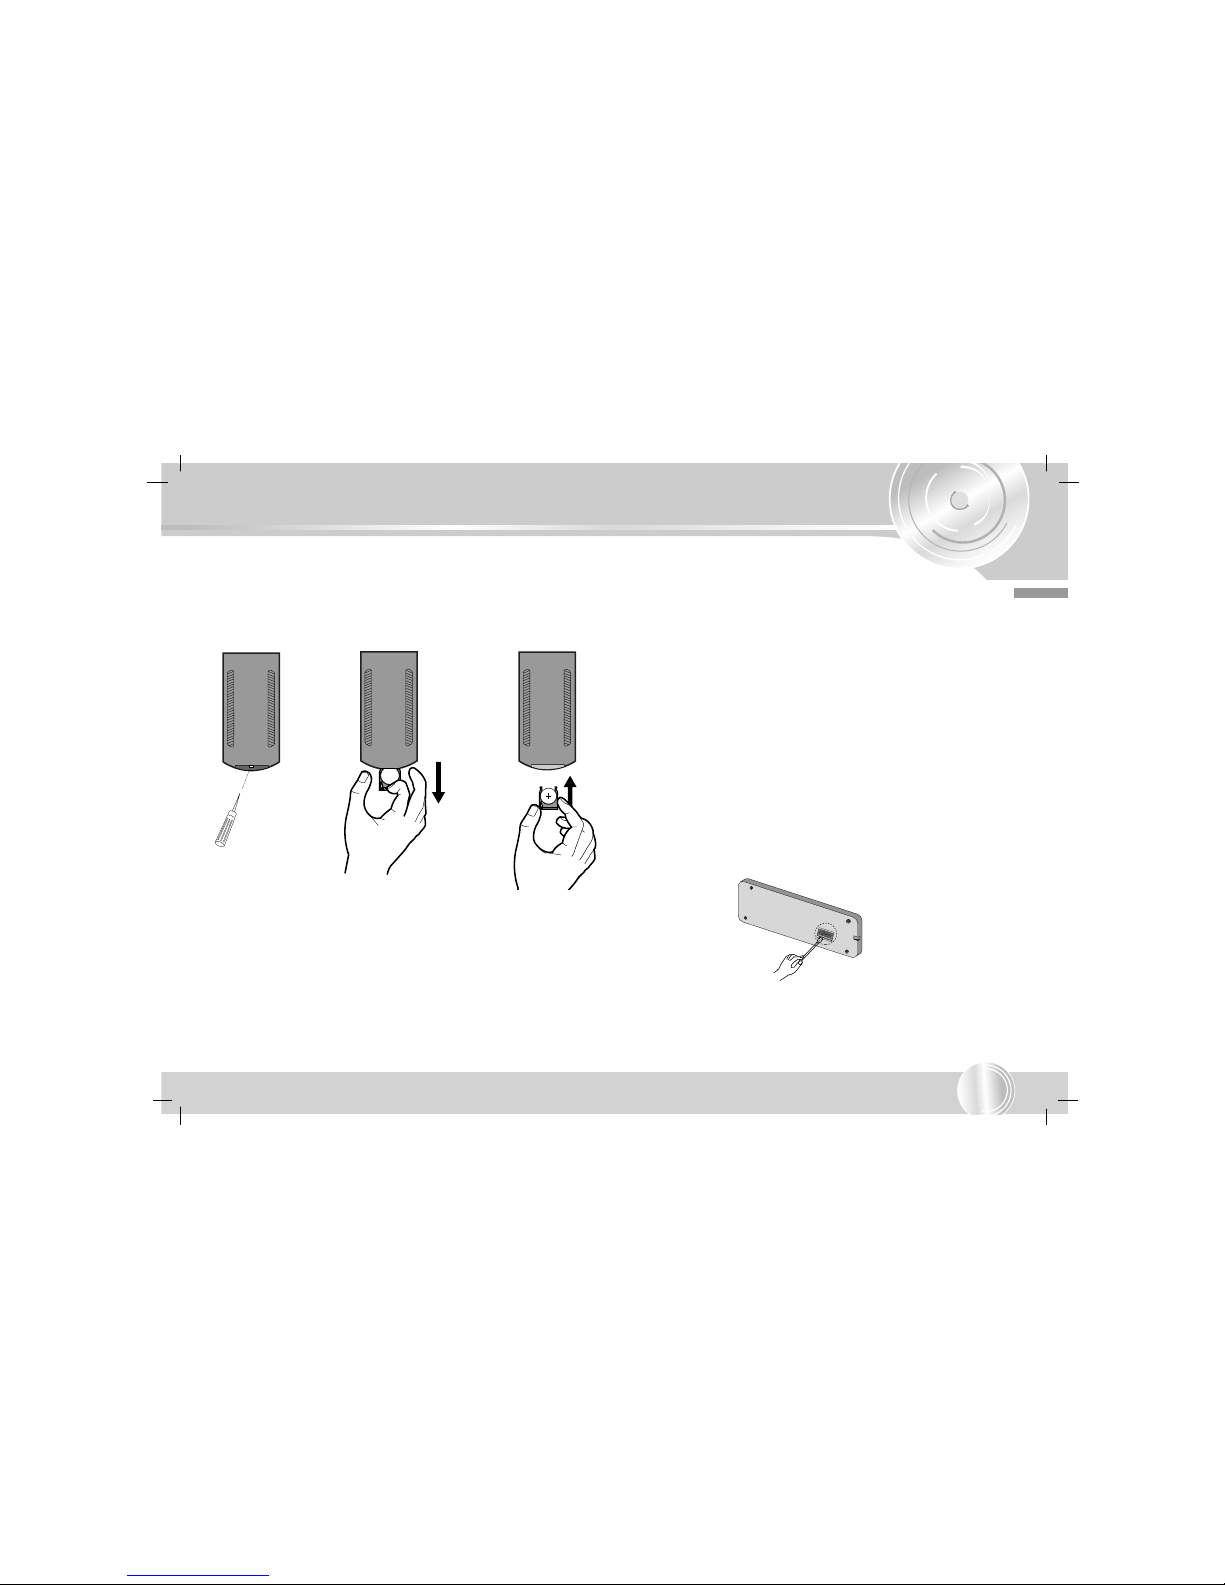
Remote Control. . . . . . . . . . . . . . . . . . . . . . . . . . . . . . . . . . . . 8
PREPARATION
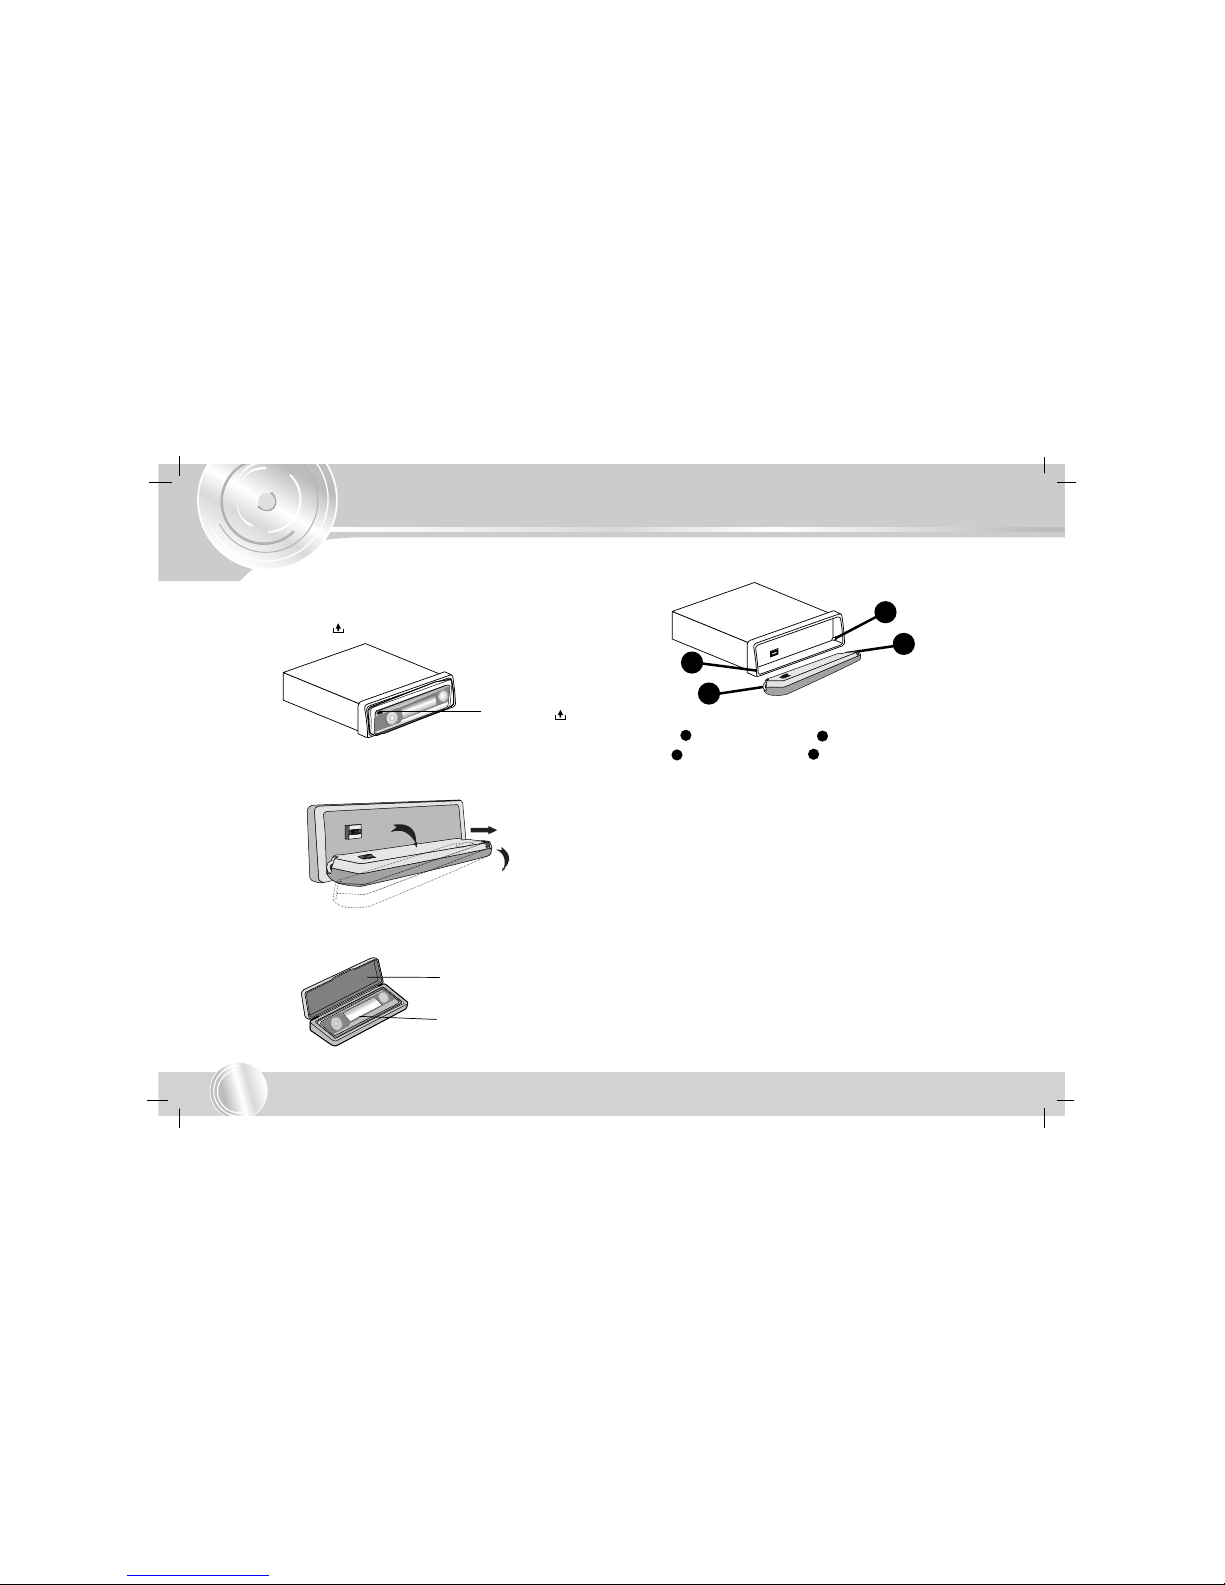
Installation . . . . . . . . . . . . . . . . . . . . . . . . . . . . . . . . . . . . . . . 9
Connections . . . . . . . . . . . . . . . . . . . . . . . . . . . . . . . . . . . 10-11
OPERATION
Basic Operation . . . . . . . . . . . . . . . . . . . . . . . . . . . . . . . . 12-13
Turning the unit on. . . . . . . . . . . . . . . . . . . . . . . . . . . . . . 12
Turning the unit off . . . . . . . . . . . . . . . . . . . . . . . . . . . . . . 12
Selecting a source . . . . . . . . . . . . . . . . . . . . . . . . . . . . . . 12
Adjusting the volume . . . . . . . . . . . . . . . . . . . . . . . . . . . . 12
Setting the clock . . . . . . . . . . . . . . . . . . . . . . . . . . . . . . . 12
Checking the clock. . . . . . . . . . . . . . . . . . . . . . . . . . . . . . 12
SOUND Adjustment . . . . . . . . . . . . . . . . . . . . . . . . . . . . . 13
Radio Operation . . . . . . . . . . . . . . . . . . . . . . . . . . . . . . . . . . 14
Listening to radio stations . . . . . . . . . . . . . . . . . . . . . . . . 14
Auto Search Memory . . . . . . . . . . . . . . . . . . . . . . . . . . . . 14
Storing and recalling broadcast frequencies . . . . . . . . . . . 14
Operation with Audio CD, MP3 Disc and CD changer . . . . . 15-16
Playing an Audio CD and MP3 Disc . . . . . . . . . . . . . . . . . 15
Playing a CD changer (OPTIONAL) . . . . . . . . . . . . . . . . . 15
TAPE Operation . . . . . . . . . . . . . . . . . . . . . . . . . . . . . . . . . .17
Basic Playback . . . . . . . . . . . . . . . . . . . . . . . . . . . . . . . .17
Auto Music Search (AMS) . . . . . . . . . . . . . . . . . . . . . . . .17
TAPE INTRO SCAN (SCAN) . . . . . . . . . . . . . . . . . . . . . .17
REFERENCE
Troubleshooting . . . . . . . . . . . . . . . . . . . . . . . . . . . . . . . . . . 18
Specifications . . . . . . . . . . . . . . . . . . . . . . . . . . . . . . . . . . . . 19
Disposal of your old appliance
1. When this crossed-out wheeled bin symbol is attached
to a product it means the product is covered by the
European Directive 2002/96/EC.
2. All electrical and electronic products should be disposed
of separately from the municipal waste stream via desig-
nated collection facilities appointed by the government or
the local authorities.
3. The correct disposal of your old appliance will help
prevent potential negative consequences for the
environment and human health.
4. For more detailed information about disposal of your old
appliance, please contact your city office, waste
disposal service or the shop where you purchased the
product.

3
Safety Precautions
INTRODUCTION
Warning: To reduce the risk of electric shock, do not remove the
cover or back of this product. There are no user-serviceable
parts inside. Refer servicing to qualified service personnel.
Warning: To reduce the risk of fire or electric shock, do not
expose this product to dripping or splashing water, rain, or
moisture.
Warning: Due to high temperature outside of the unit, please
use the unit only installed in a car.
Caution: Protect this product from moisture.
Caution: If the battery is disconnected or discharged, the preset
memory will be erased and must be reprogrammed.
CAUTION:
This unit employs a Laser System.
To ensure proper use of this product, please read this owner’s manual
carefully and retain for future reference should the unit require mainte-
nance, contact an authorized service location (see service procedure).
Use of controls, adjustments, or the performance of procedures other than
those specified herein may result in hazardous radiation exposure.
To prevent direct exposure to laser beam, do not try to open the enclosure.
Visible laser radiation when open. DO NOT STARE INTO BEAM.
CAUTION
RISK OF ELECTRIC SHOCK DO NOT OPEN

Before Use
4
To ensure proper use of this product, please read this owner’s
manual carefully and retain for future reference.
Symbols Used in this Manual
The lightning flash symbol alerts you to the presence of
dangerous voltage within the product enclosure that may
constitute a risk of electric shock.
Indicates hazards likely to cause harm to the unit itself or
other material damage.
NOTE
Indicates special notes and operating features.
TIP
Indicates tips and hints for making the task easier.
Notes on Discs
Handling Discs
Do not touch the playback side of the disc. Hold the disc by the
edges so that fingerprints do not get on the surface. Never stick
paper or tape on the disc.
Storing Discs
After playing, store the disc in its case. Do not expose the disc to
direct sunlight or sources of heat and never leave it in a parked
car exposed to direct sunlight.
Cleaning Discs
Fingerprints and dust on the disc can cause poor picture quality
and sound distortion. Before playing, clean the disc with a clean
cloth. Wipe the disc from the center out.
Do not use strong solvents such as alcohol, benzine, thinner, com-
mercially available cleaners, or anti-static spray intended for older
vinyl records.
This unit cannot be operated with 8cm disc
(use 12cm discs only).
8 cm

5
Before Use
INTRODUCTION
Use and care of the remote control
Installing the battery
Pull out the tray outward on the back of the remote control with a
pencil or ball point pen and insert the battery with the plus (+)
minus (-) poles pointing in the proper direction.
NOTES
•Use only one CR2025 (3V) lithium battery.
•Remove the battery if the remote control is not used for a long period
of time.
•
Do not recharge, disassemble, heat or dispose of the battery in fire.
•Do not handle the battery with metallic tools.
•Do not store the battery with metallic materials.
•In the event of battery leakage, wipe the remote control
completely clean and install a new battery.
Using the remote control
Point the remote control in the direction of the front panel to
operate.
NOTES
•The remote control may not function properly in direct sunlight.
•Do not store the remote control in high temperatures or sunlight.
•
Do not let the
remote control fall onto the floor, where it may become
jammed under the brake or accelerator pedal
.
Handling the Unit
• This unit is designed to be operated on a 12 volt DC negative
ground electrical system only.
• When replacing the fuse, be sure to use fuseone with an
identically rated amperage. Use of a fuse with a higher
amperage may cause serious damage to the unit.
• Periodically wipe the contacts on the back of the front panel with
a cotton swap moistened with alcohol.

Before Use
6
Protecting your unit from theft
The front panel can be detached from the head unit and stored in
the protective case provided to discourage theft.
1. Press RELEASE to open the front panel
.
2. Push the front panel to the right.
3. Pull the front panel.
4. Put the front panel into the protective case provided for safe
keeping.
Attaching the front panel
1. Place on the front panel to on the main unit.
2. Join on the front panel to on the main unit by pushing it to
the left.
3. Close the front panel
NOTES
•When detaching or attaching the front panel, do not press the
display or control buttons.
•The control buttons may not work if the front panel is not
attached properly. If this occurs, gently press the front panel.
•Do not leave the front panel in any area exposed to high tem-
peratures or direct sunlight.
•Do not drop the front panel or otherwise subject it to severe
impacts.
•Do not allow volatile agents such as benzine, thinner, or insecti-
cides to come into contact with the surface of the front panel.
•Do not try to disassemble the front panel.
D
C
B
A
Protective case
Front panel
RELEASE ( )
A
C
D
B

7
Front Panel
INTRODUCTION
3 7
12
82
13
MUTE button
RELEASE ( ) button
• VOLUME KNOB
• CONTROL UP/DOWN dial
REMOTE SENCER
CD/CDC(OPTIONAL) button
DISPLAY WINDOW
SELECTION (SEL) button
EQUALIZER (EQ) button
XDSS button
• AUTO MUSIC SEARCH (AMS) button
• CD SKIP/SEARCH(..//>>) button
• TAPE REWIND/FAST FORWARD (..//>>) button
• TUNE (-/+) button
• DISPLAY (DISP) button
AUTO STORE/PRESET SCAN (AS/PS) button
• MP3 TRACK +10 (+D) button
• MP3 TRACK -10 (-D) button
SHUFFLE (SHF) button
REPEAT (RPT) button
INTRO SCAN (SCAN) button
CD PLAY/PAUSE ( ) button
POWER button
BAND button
• TAPE button
• TAPE direction (bB) button
,,,, Preset Station buttons (1-6)
CD disc slot
CD EJECT (Z) button
TAPE slot
TAPE EJECT (Z) button
23
22
21
20
1615141312
19
18
17
16
15
14
13
12
11
10
9
8
7
6
5
4
3
2
1
19 18 17 16 15 14
5 9 10
11
1 6
22
23
2120
4

Remote Control
8
• POWER/MUTE ( )
- Switches the unit ON
and OFF.
- Press to mute the
sound from the
speaker.
FUNCTION (FUNC.) button
Selects a function.
• 0-9 number buttons
- Preset Station buttons (1-6)
• PLAY/PAUSE (BB/X)
- Starts playback.
- Pauses playback temporarily.
- Reverse playback (TAPE).
• SCAN
- Plays the first 10 seconds of all tracks.
• REPEAT (RPT)
- Plays
tracks repeatedly.
• SHF
- Plays tracks in random order.
• SKIP/SEARCH (..mm/ MM>>)
- Backward or forward
search playback.
- Go to next track.
Returns to the beginning of the
current track or goes to the
previous track.
- Select the desired frequency
• DISC SELECTOR (D-/D+) button
(Optional)
• MP3 Track -10/+10 (D-/D+)
• BAND
- Selects three FM and MW (AM) bands.
• bbBB
- It select direction of the cassette.
• SEL
- Enters the audio settings.
• NUMBER (#)
- To play a file directly, press NUMBER
(#) button and then press the track
number with 0-9 number buttons.
VOLUME ( / )
Adjusts the volume level.
• CLOCK (CLK)
- Clock display.
• DISPLAY (DISP.)
- Changes the display.
7
6
5
4
3
2
1
1
3
4
6
7
2
5

9
5
4
3
1
2
6
Bend the claws
according to
the thickness
of the
dashboard
A
A
Installation
PREPARATION
Bend the claws
according to
the thickness
of the
dashboard
Basic Installation
Before installing, make sure that the ignition-switch is set to OFF and remove
the car battery terminal to avoid short-circuiting.
1. Remove the existing receiver unit.
2. Make the necessary connections.
3. Install the mounting sleeve.
4. Install the unit in to the mounting sleeve.
Removing existing receiver unit
If there already is a mounting sleeve for the receiver unit in the
dashboard, it must be removed.
When removing the unit from the mounting sleeve
If you need to remove the unit from the mounting sleeve, proceed as follows.
1. Remove the rear support from the unit.
2. Remove the front panel and trim ring from the unit.
3. Insert the lever into the hole on one side of the unit. Perform the same
operation on the other side and pull the unit out from the mounting sleeve.
ISO-DIN Installation
1. Slide the unit into ISO-DIN frame.
2. Install screws removed from old unit.
3. Slide the unit and frame into the dash opening.
4. Mount the dash panel or adapter plate.
5. Mount the trim ring onto the unit.
6. Install the faceplate by sliding the right edge into position and then
pushing the left edge closed.
A

Connections
10
+
+
+
+
+
++
IGNITION
SWITCH
DIMMER SWITCH (OPTIONAL)
POWER
ANTENNA
POWER AMPLIFIER
(optional)
6REMOTE ON (BLUE/WHITE STRIPE)
CONTROL
RELAY
1
GND (BLACK)
5
PWR ANT (BLUE)
3
TO IGNITION (RED)
2
DIMMER (ORANGE) :
OPTIONAL
15A
4
FILTER BOX
E
A
B
C
BATTERY
CD CHANGER
(optional)
D
OPTIONAL
TO BATTERY (YELLOW)
1
2
3
4
5
6
7
8
1
2
3
4
5
6
7
8
VIOLET (FL +)
VIOLET/ BLACK STRIPE (FL -)
GRAY (FR +)
GRAY/ BLACK STRIPE (FR -)
GREEN (RL +)
GREEN/ BLACK STRIPE (RL -)
BROWN (RR +)
BROWN/BLACK STRIPE (RR -)
Connecting to the Car
Before connecting, make sure that the ignition switch is set to OFF, and remove the battery terminal to avoid short circuits.
not supplied

11
Connections
Connecting to the Car
From antenna
To the wiring of vehicle Colors of leads
1BLACK : This lead is for the Ground connection.
2ORANGE : This lead is for the phone line connection.
3PINK : This lead is for the Dimmer line connection.
4 RED : This lead is for connection to the power supply
terminal when the ignition switch is set to ACC.
5 YELLOW : This lead is for connection to the Battery
(back-up) terminal from which power is
always supplied.
6 BLUE : This lead is for the power antenna connection.
7 BLUE/WHITE STRIPE : This lead is for the remote amplifier
on connection.
Connect the CD changer
• Your car receiver works as the control unit for a CD changer
which you can buy later, if you have not yet done so.
• The suitable cord will be provided together with the CD
changer as shown on the scheme.
Speaker Connections
Connecting to Auxiliary Equipment (OPTIONAL)
-Connect the AUDIO OUTPUT connector of this unit to the
AUDIO INPUT connector of Auxiliary Equipment.
L
FRONT REAR
RL R
D
1
2
3
4
5
6
7
8
+
+
+
+
+
++
Left
Right
To AUDIO IN To AUDIO OUT
PREPARATION

Basic Operation
12
Turning the unit on
Press POWER or any other button on the front panel or
POWER/MUTE ( ) on the remote control to turn the unit on.
Turning the unit off
•Press POWER on the front panel to turn the unit off.
•Press POWER/MUTE ( ) on the remote control for more than
1.2 seconds to turn the unit off.
Selecting a source
You can select a source you want to listen to.
•Press CD/CDC(OPTIONAL), BAND and TAPE to select a
source.
•Press FUNC. to select a source.
•Press FUNC. repeatedly to switch between the following
sources:
Tuner → CD → CD Changer (optional) → TAPE → Tuner...
NOTE
•When you turn the unit off, the current volume level is automatically
memorized. Whenever you turn the unit back on, it will operate at the
memorized volume level.
Adjusting the volume
Use VOLUME to adjust the sound level.
Rotate the VOLUME KNOB on the front panel to increase or
decrease the volume.
Press VOLUME ( / ) on the remote control to increase or
decrease the volume.
Setting the clock
1.Press DISP or CLK and press DISP for more than 1 second.
(Clock indicator will be displayed for 5 seconds. Adust the clock
within 5 seconds.)
2.Press >>on the front panel to adjust the hour.
3.Press ..on the front panel to adjust the minute.
4.Press DISP or CLK.
Checking the clock
You can see the clock pressing DISP or CLK.

13
Basic Operation
OPERATION
SOUND Adjustment
Using the EQ (Equalizer)
The equalizer lets you adjust the equalization to match the
acoustic characteristics of the car’s interior as desired.
There are 7 stored equalizer curves which you can easily recall at
any time.
Here is a list of the equalizer curves:
• EQ POP : Reproduces pop music acoustics.
• EQ CLASSIC : Reproduces orchestral music acoustics.
• EQ ROCK : Reproduces rock music acoustics.
• EQ JAZZ : Reproduces jazz music acoustics.
• EQ VOCAL: Reproduces vocal music acoustics.
• EQ USER 1 : Selects an initial user mode.
• EQ USER 2: Selects an initial user mode.
1. Press EQ on the front panel to select the equalizer.
2. Press EQ repeatedly to choose between the following
Equalizer settings.
POP → CLASSIC → ROCK → JAZZ → VOCAL → USER EQ1
→ USER EQ2 → FLAT (No display) → POP....
MUTE
1. Press MUTE [POWER/MUTE ( )] to cut the sound.
2. To cancel it press MUTE [POWER/MUTE ( )] again.
XDSS (Extreme Dynamic Sound System)
Press XDSS button to reinforce treble, bass and surround effect.
SELECTION (SEL) Button
1. WAY
1. Select the USER EQ1 or USER EQ2 using the EQ button
2. Press the SELECTION (SEL) button repeatedly to select the mode you want to
adjust from volume, bass, middle treble, balance and fader. The mode indicator
lights up in the following order.
3. Turn the CONTROL UP/DOWN left or right (or press VOLUME ( / ) on
the remote control) to adjust the sound quality.
2. WAY
1. Press the SELECTION (SEL) button repeatedly to select the mode you want to
adjust from volume, balance and fader. The mode indicator lights up in the fol-
lowing order.
2. Turn the CONTROL UP/DOWN left or right (or press VOLUME ( / ) on
the remote control) to adjust the sound quality.
NOTE
The unit can adjust the bass, middle and treble in the USER EQ1
or USER EQ2.
Turn right Turn left
VOL Increase the volume level. Decrease the volume level.
BAS Increase the bass level. Decrease the bass level.
MID Increase the Middle level. Decrease the Middle level.
TRB Increase the Treble level. Decrease the Treble level.
BAL Decrease the level of the left speaker(s). Decrease the level of the right speaker(s).
FAD Decrease the level of the front speaker(s). Decrease the level of the rear speaker(s).
VOL BAS MID TRB BAL FAD
VOL BAL FAD

Radio Operation
14
Listening to radio stations
1. Press the POWER/MUTE ( ) [POWER on the front panel] but-
ton to turn the unit on.
- When you select a source the unit is turned on.
2. Press the FUNC. or BAND button to select the tuner.
3. Press the BAND button to select a band.
- Press the BAND button until the desired band is displayed,
FM1,FM2, FM3, MW(AM).
4. To perform seek tuning, pressing the TUNE(-/+) or ..mm/
MM>>for more 1 second.
- The tuner will scan the frequencies until a broadcast with
strong enough reception is found.
- You can cancel seek tuning by pressing the TUNE(-/+) or
..mm/ MM>>with quick presses.
5. To perform manual tuning, press the TUNE(-/+) button with
quick presses.
- The frequencies move up or down step by step.
NOTE
•When the selected frequency is being broadcast in stereo, the “ ”
indicator will light.
Auto Search Memory
This function lets you automatically store the six strongest
broadcast frequencies.
1. • Press the BAND button to select the tuner.
• Press the FUNC. button to select the tuner.
2. Press the AS/PS button on the front panel for about 1 second.
- Scanning starts from the currently displayed frequency to
higher frequencies and stops when 6 stations have been
preset or the receivable frequencies have been scanned once.
NOTES
•The presetting is not performed if there is no station to be tuned in.
•When automatic presetting is performed, the previous
preset stations are automatically erased.
•To stop the automatic presetting, press the BAND or the AS/PS button.
Storing and recalling broadcast frequencies
You can easily store up to six broadcast frequencies for later recall
with the touch of a button.
1. Select the desired frequency
2. Press one of the preset station buttons (1 - 6) for more than 1
seconds. The number of the pressed preset station button is
displayed.
3. Repeat steps 1 and 2 to preset other stations.
NOTES
• As F1, F2, F3 have the same frequency range, up to 18 station can be
preset for FM.
• When a station is preset on the preset station button on which another
station of the same band has already been preset, the previously preset
station is automatically erased.
To scan the preset stations
Press the AS/PS button on the front panel.
To stop the scanning, press the AS/PS button.
To tune in the preset stations
Press BAND to select the desired band and press the desired
number buttons (1-6) on the remote control.
The number of the preset station button is displayed and the
preset station is received.

15
Operation with Audio CD, MP3 Disc and CD changer
OPERATION
Playing an Audio CD and
MP3
Disc
The unit can play MP3 formatted recordings on CD-ROM, CD-R or
CD-RW discs.
Before playing MP3 recordings, read the notes on MP3
Recordings on page 19.
To directly play a file, press NUMBER (#) button and then press
the track number with 0-9 number buttons.
Playing a CD changer (OPTIONAL)
Playback Setup
Connect the CD Changer connector of this unit to the connector
on this CD Changer on page 10.
Audio system: Turn on the audio system and select the input
source connected to the unit.
1. Press POWER or POWER/MUTE ( ) to turn the unit on.
2. • Select the CD changer function press CD/CDC(OPTIONAL).
• Select the CD changer function pressing FUNC. repeatedly.
3. Insert a disc you want to play into the magazine.
Playback starts automatically.
Moving to another Disc
Press (-D/+D) briefly during playback to go to the next disc or
step back to the previous disc.
Pause
1. Press PLAY/PAUSE (BB/X)during playback.
2. To return to playback, press PLAY/PAUSE (BB/X) again.
Moving to another Track
Press the ../ >>on the front panel or ..mm/ MM>>
on the remote control briefly during playback to go to the next
track or to return to the beginning of the current track.
Press the ..on the front panel or ..mmon the remote
control twice briefly to step back to the previous track.
(If playing times is less then 3 seconds this function is not operated.)
Search
Press and hold the ../ >>on the front panel or ..mm/
MM>>on the remote control for about 1 second during play-
back and then release at the point you want.
NOTE
If a disc is not inserted in the CD disc slot, press the CD EJECT
(CD) button.
CDCCD
CDCMP3CD
CDCMP3CD
CDC
CDC
CDC
MP3CD

16
Repeat
1. a. Press RPT during playback.
The “RPT” appears in the display window.
(It is played repeatedly the whole music within disc)
b. Press and hold RPT during playback.
The “DRT” appears in the display window.
(It is played repeatedly the whole music within disc of CD changer)
2. Press RPT again.
The “RPT” disappears in the display window.
(The repeat mode is cancelled.)
Random
1. a. Press SHF during playback.
The “SHF” appears in the display window.
(It is played redomly the whole music within disc)
b. Press and hold SHF during playback.
The “DSF” appears in the display window
(It is played redomly the whole music within disc of CD changer)
2. Press SHF again.
The “SHF” disappears in the display window.
(The random playback is cancelled.)
NOTE
•During random playback, if you press button, you won't go back to
the previous track.
MP3 TRACK -10/+10
Durning playback, press the -10 (-D)
button to go back to the previous 10th track, and press +10 (+D)
button to go forward to the next 10th track.
Intro scan
1. a. Press SCAN.
The “SCAN” appears in the display window.
(It is played first 10 seconds of the whole music within disc)
b. Press and hold SCAN.
The “DSN” appears in the display window.
(It is played first 10 seconds of the whole music within disc of
CD changer)
2. Press SCAN again.
The “SCAN” disappears in the display window.
(The intro scan is cancelled.)
ID 3 TAG
When playing a disc containing information, you can see the
information (ID3 TAG, Title, Artist and Album) in the display win-
dow. If there is no information, “NO ID3 TAG” will be shown in the
display window.
Press the DISP button twice during MP3 file playback.
MP3
CDC
CDCMP3CD
CDC
CDCMP3CD
CDC
CDCMP3CD
Operation with Audio CD, MP3 Disc and CD changer

17
OPERATION
TAPE Operation
Basic Playback
1. Open the front panel by pressing RELEASE ( ) button.
2. Insert a cassette tape with the exposed tape side to the
right.
If radio broadcast is being received, the cassette tape plays
automatically.
For your reference
To play the TAPE during other function (CD or RADIO) operation,
press TAPE button. (The TAPE is played automatically.)
3. Adjust the volume by turning CONTROL UP/DOWN dial.
Auto Reverse function
The tape direction is reversed automatically when the tape end
has been reached.
To select Tape Direction
The tape direction can be reversed by pressing TAPE (bB) button.
To play rewind and fast forward
Press the
TAPE REWIND/FAST FORWARD (]m/M]) button
dur-
ing playing a tape.
To ejecting Tape
Open the front panel by pressing RELEASE ( )
button and then press the TAPE EJECT (TAPE) button.
(If you eject the tape during tape playback, the previously function
(CD or RADIO) is played.)
Auto Music Search (AMS)
This unit is equipped with a function that allows you to sip forward
or backward to locate the beginning of a particular selection on the
tape.
1. Press the AMS button during playing.
“AMS-P” indicator will be shown in the display window.
2. Press the ]]mm/MM]]button during playing.
The cassette deck will search for and play the next (or before)
track.
- To cancel, press the AMS button again.
TAPE INTRO SCAN (SCAN)
This tape intro scan helps to find a program by playing about the
first 10 seconds each selection.
Press the SCAN button during play to start scan operation.
(“SCAN” indicator will be shown in the display window.)
- To cancel, press the SCAN button again.

18
Troubleshooting
Symptom
Power doesn’t turn on.
The unit doesn’t
operate.
Playback is not
possible.
No sound is heard.
The volume level will
not rise.
There’s no sound.
There’s audio skipping.
Correction
Confirm once more that all connections are correct.
Rectify the problem that caused the fuse to blow, and
then replace it. Be very sure to install the correct fuse
with the same rate.
Turn the unit off and then on.
Clean disc.
Check what type the disc is.
Connect the cables correctly.
Adjust the volume.
Secure this unit firmly.
Cause
Leads and connectors are not properly
connected.
The fuse is blown.
Noise and other factors are causing the built-in
microprocessor to operate incorrectly.
The disc is dirty.
The loaded disc is of a type this unit cannot play.
Cables are not connected correctly.
The volume level is low.
This unit is not firmly secured.

19
OPERATION
MP3 Disc compatibility with this unit is limited as
follows:
1. Sampling Frequency / 22.05 - 48kHz (MP3),
2. Bit rate / within 16 - 320kbps (include VBR) (MP3),
3. CD-R/CD-RW physical format should be “ISO 9660”
4. If you record MP3 files using software which cannot create a
FILE SYSTEM, for example “Direct-CD” etc., it is impossible to
playback MP3 files. We recommend that you use “Easy-CD
Creator” which creates an ISO9660 file system.
5. Folder or File names should have a maximum 22 letters or less.
ID3 TAG: Title, Artist or Album names should have a maximum
30 letters or less.
The file have an “.mp3” extension e.g. “********.MP3”.
Customers should also note that permission is required in
order to download MP3 files and music from the Internet. Our
company has no right to grant such permission. Permission
should always be sought from the copyright owner.
General
Output Power . . . . . . . . . . . . . . . . . . . . . . . .50W x 4CH(Max.)
Power Source . . . . . . . . . . . . . . . . . . . . . . . . . . . . . . . .DC 12V
Speaker impedance . . . . . . . . . . . . . . . . . . . . . . . . . . . . . . .4 Ω
Ground System . . . . . . . . . . . . . . . . . . . . . . . . . . .Negative type
Dimensions (W x H x D)188 x 58 x 178 mm (Without Front Panel)
Net Weight (approx.) . . . . . . . . . . . . . . . . . . . . . . . . . . . .1.85 kg
FM tuner
Frequency Range . . . . . . . 87.5-107.9MHz or 87.5-108 MHz or
65-74 MHz, 87.5-108 MHz
S/N Ratio . . . . . . . . . . . . . . . . . . . . . . . . . . . . . . . . . . . . .55 dB
Distortion . . . . . . . . . . . . . . . . . . . . . . . . . . . . . . . . . . . . . .1.0%
Usable sensitivity . . . . . . . . . . . . . . . . . . . . . . . . . . . . .12 dBµV
MW(AM) tuner
Frequency Range . . . . . . . . . . . .520-1720kHz or 522-1620 kHz
S/N Ratio . . . . . . . . . . . . . . . . . . . . . . . . . . . . . . . . . . . . .45 dB
Distortion . . . . . . . . . . . . . . . . . . . . . . . . . . . . . . . . . . . . . .1.0%
Usable sensitivity . . . . . . . . . . . . . . . . . . . . . . . . . . . . .32 dBµV
CD
Frequency Response . . . . . . . . . . . . . . . . . . . . . .40 - 20000 Hz
S/N Ratio . . . . . . . . . . . . . . . . . . . . . . . . . . . . . . . . . . . . .70 dB
Distortion . . . . . . . . . . . . . . . . . . . . . . . . . . . . . . . . . . . . .0.15%
TAPE
Tape Drive System . . . . . . . . . . . . . . . . . . . . .Full Auto Reverse
Tape Speed . . . . . . . . . . . . . . . . . . . . . . . . . . . . . .4,75 cm/sec.
Wow/Flutter . . . . . . . . . . . . . . . . . . . . . . . . . . . . .0.3 % (WRMS)
S/N Ratio . . . . . . . . . . . . . . . . . . . . . . . . . . . . . . . . . . . . .45 dB
Frequency/Response . . . . . . . . . . . . . . . . . . . . .125 ~ 10000 Hz
Distortion . . . . . . . . . . . . . . . . . . . . . . . . . . . . . . . . . . . . . . .2 %
Design and specifications are subject to change without notice.
Specifications

P/NO : 3834RR0033G
Table of contents
Other LG Car Receiver manuals