LG DLEX4200 Series User manual

1
1
ELECTRIC & GAS DRYER
SERVICE MANUAL
CAUTION
READ THIS MANUAL CAREFULLY TO DIAGNOSE
PROBLEMS PROPERLY AND TO PROVIDE
QUALITY SERVICE SAFELY ON THESE DRYERS.
U.S.A. Website: http://us.lgservice.com
Canadian Website: http://lg.ca
MODEL : DLEX4200*, DLGX4201*
DLEX4000*, DLGX4001*
DLE3600*, DLG3601*
Any reproduction, duplication, distribution (including by way of email, facsimile or other electronic means),
you have obtained the prior written consent of the LG Electronics entity from which you received this Service
Manual. The material covered by this prohibition includes, without limitation, any text, graphics or logos in this
Service Manual.
Copyright © 2020 LG Electronics Inc. All rights reserved. Only training and service purposes.
CONFIDENTIAL

2 3
2 3
To avoid injury to persons, disconnect power before servicing this product. If electrical power is required
for diagnosis or test purposes, disconnect the power immediately after performing the necessary checks.
H
WARNING !
WHAT TO DO IF YOU SMELL GAS:
IMPORTANT SAFETY NOTICE
The information in this service guide is intended for use by individuals possessing skill and experience in
electrical, electronic, and mechanical appliance repair. Any attempt to repair a major appliance may result
in injury to persons, and property damage. The manufacturer or seller cannot be responsible for the
interpretation of this information, nor can it assume any liability in connection with its use.
RECONNECT ALL GROUNDING DEVICES
If grounding wires, screws, straps, clips, nuts, or washers used to complete a path to ground are
removed for service, they must be returned to their original position and properly fastened.
IMPORTANT
lGkGOlzkPGzGl
HVG#sureohpv#duh#suhvhqw#hyhu|zkhuh1#HVG#pd|#gdpdjh#ru#zhdnhq#wkh#hohfwurqlf
frqwuro#dvvhpeo|1#Wkh#qhz#frqwuro#dvvhpeo|#pd|#dsshdu#wr#zrun#zhoo#diwhu#uhsdlu#lv
ilqlvkhg/#exw#idloxuh#pd|#rffxu#dw#d#odwhu#gdwh#gxh#wr#HVG#vwuhvv1
Use an anti-static wrist strap. Connect wrist strap to green ground connection point or unpainted
metal in the appliance.
- OR -
Wrxfk#|rxu#ilqjhu#uhshdwhgo|#wr#d#juhhq#jurxqg#frqqhfwlrq#srlqw#ru#xqsdlqwhg#phwdo#
lq#wkh#dssoldqfh1
Before removing the part from its package, touch the anti-static bag to a green ground connection
point or unpainted metal in the appliance.
Avoid touching electronic parts or terminal contacts; handle electronic control assembly by edges only.
When repackaging the failed electronic control assembly in an anti-static bag, observe the instructions above.
Do not try to light a match, or cigarette, or turn on
any gas or electrical appliance.
Do not touch any electrical switches. Do not use
any phone in your building.
Clear the room, building, or area of all occupants.
Immediately call your gas supplier from a
neighbor’s phone. Follow the gas supplier’s
instructions carefully.
If you cannot reach your gas supplier, call the fire
department.
2

2 3
2 3
To avoid injury to persons, disconnect power before servicing this product. If electrical power is required
for diagnosis or test purposes, disconnect the power immediately after performing the necessary checks.
H
WARNING !
WHAT TO DO IF YOU SMELL GAS:
IMPORTANT SAFETY NOTICE
The information in this service guide is intended for use by individuals possessing skill and experience in
electrical, electronic, and mechanical appliance repair. Any attempt to repair a major appliance may result
in injury to persons, and property damage. The manufacturer or seller cannot be responsible for the
interpretation of this information, nor can it assume any liability in connection with its use.
RECONNECT ALL GROUNDING DEVICES
If grounding wires, screws, straps, clips, nuts, or washers used to complete a path to ground are
removed for service, they must be returned to their original position and properly fastened.
IMPORTANT
lGkGOlzkPGzGl
HVG#sureohpv#duh#suhvhqw#hyhu|zkhuh1#HVG#pd|#gdpdjh#ru#zhdnhq#wkh#hohfwurqlf
frqwuro#dvvhpeo|1#Wkh#qhz#frqwuro#dvvhpeo|#pd|#dsshdu#wr#zrun#zhoo#diwhu#uhsdlu#lv
ilqlvkhg/#exw#idloxuh#pd|#rffxu#dw#d#odwhu#gdwh#gxh#wr#HVG#vwuhvv1
Use an anti-static wrist strap. Connect wrist strap to green ground connection point or unpainted
metal in the appliance.
- OR -
Wrxfk#|rxu#ilqjhu#uhshdwhgo|#wr#d#juhhq#jurxqg#frqqhfwlrq#srlqw#ru#xqsdlqwhg#phwdo#
lq#wkh#dssoldqfh1
Before removing the part from its package, touch the anti-static bag to a green ground connection
point or unpainted metal in the appliance.
Avoid touching electronic parts or terminal contacts; handle electronic control assembly by edges only.
When repackaging the failed electronic control assembly in an anti-static bag, observe the instructions above.
Do not try to light a match, or cigarette, or turn on
any gas or electrical appliance.
Do not touch any electrical switches. Do not use
any phone in your building.
Clear the room, building, or area of all occupants.
Immediately call your gas supplier from a
neighbor’s phone. Follow the gas supplier’s
instructions carefully.
If you cannot reach your gas supplier, call the fire
department.
2
1. SPECIFICATIONS ............................................................................................................... 4
2. FEATURES AND BENEFITS ...............................................................................................6
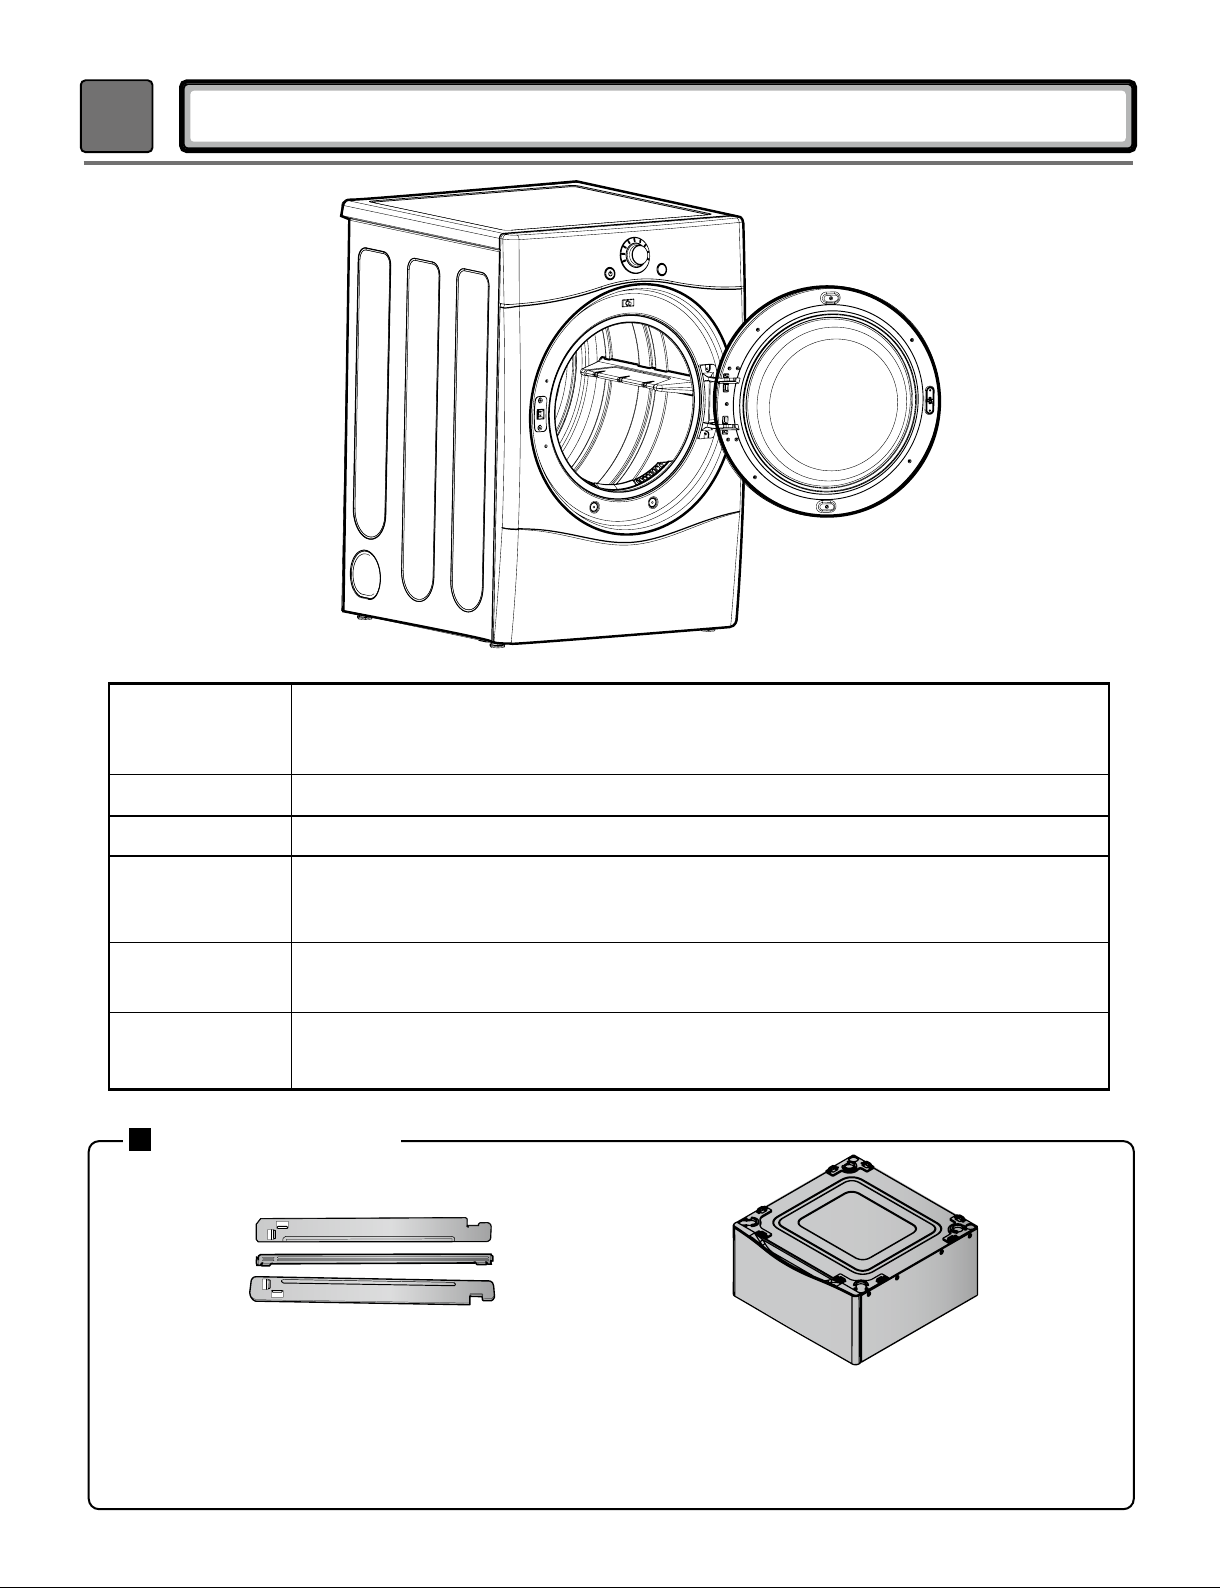
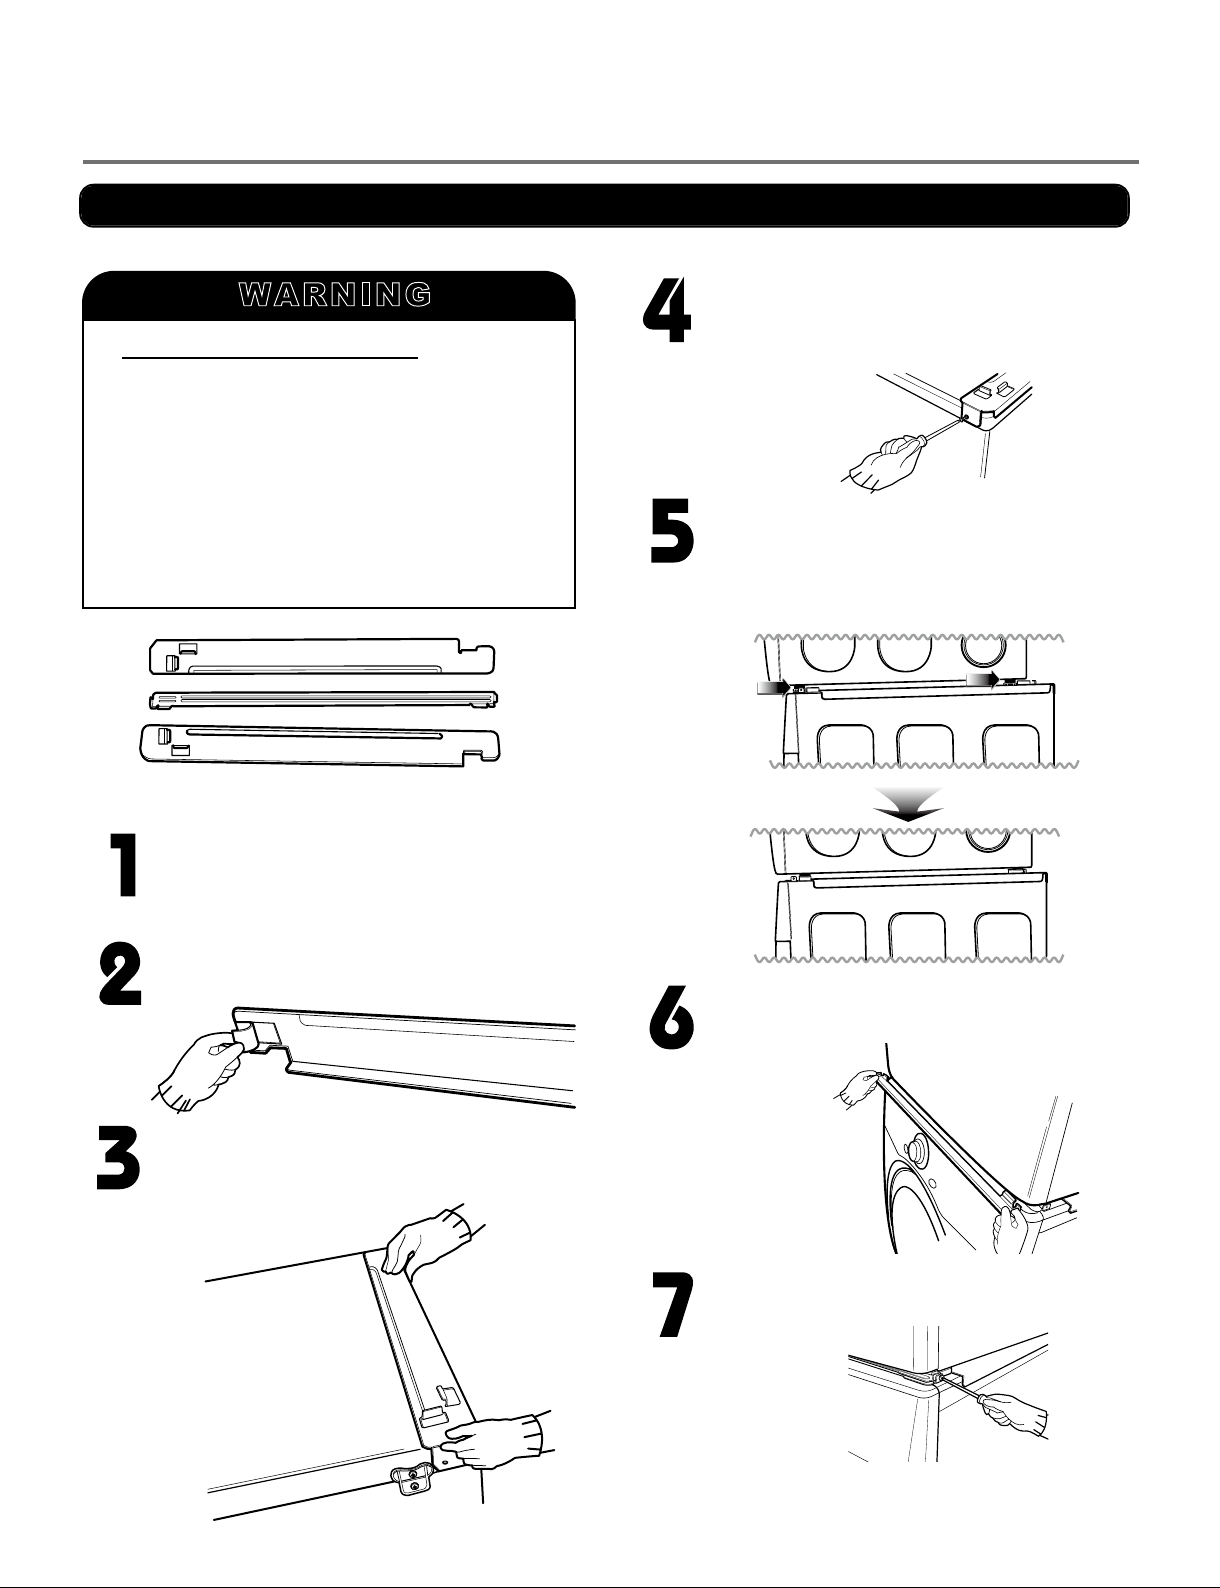
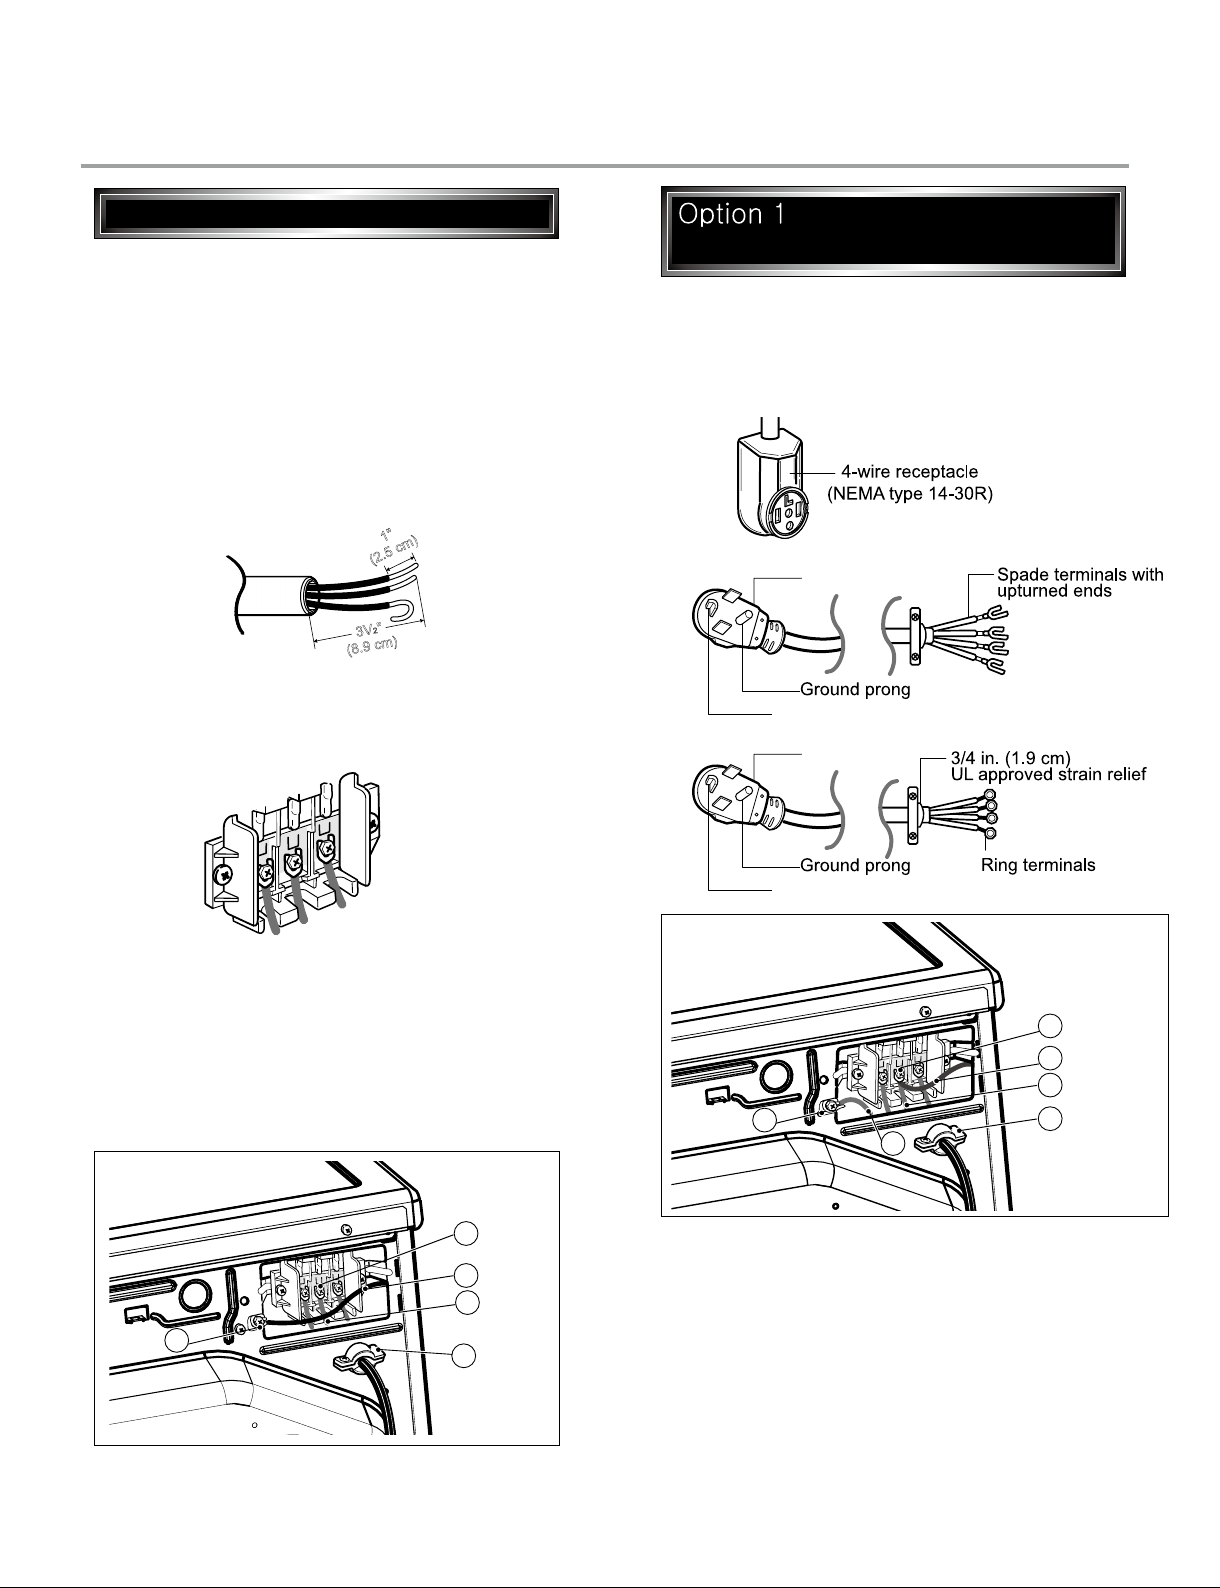
3. INSTALLATION INSTRUCTIONS ........................................................................................6
4. DRYER CYCLE PROCESS ................................................................................................ 14
5. COMPONENT TESTING INFORMATION .........................................................................17
6. MOTOR DIAGRAM AND SCHEMATIC ............................................................................. 20
7. WIRING DIAGRAM ............................................................................................................ 21
8. STEAM FUNCTION ............................................................................................................ 23
8-1. STEAM CYCLE GUIDE ............................................................................................ 23
8-2. TROUBLESHOOTING FOR STEAM DRYER.............................................................................................. 24
8-3. DISPLAY FAULT/ERROR CODES FOR STEAM DRYER .........................................
..................................................................
25
26
34
34
35
38
41
42
43
44
45
46
47
37
48
50
61
61
62
63
64
65
9. FLOW SENSOR FUNCTION .............................................................................................
9-1. FLOW SENSOR .......................................................................................................
9-2. INSTALLATION TEST (EXHAUST CHECK) ............................................................
10. DIAGNOSTIC TEST ........................................................................................................
10-1. TEST 1 120V AC ELECTRICAL SUPPLY ............................................................
10-2. TEST 2 THERMISTOR TEST - MEASURE WITH POWER OFF ........................
10-3. TEST 3 MOTOR TEST .........................................................................................
10-4. TEST 4 MOISTURE SENSOR ..............................................................................
10-5. TEST 5 DOOR SWITCH TEST .............................................................................
10-6. TEST 6 HEATER SWITCH TEST - ELECTRIC TYPE ..........................................
10-7. TEST 7 GAS VALVE TEST - GAS TYPE ..............................................................
10-8. TEST 8 MOTOR ASSEMBLY, DC, PUMP ............................................................
11. CHANGE GAS SETTING (NATURAL GAS, PROPANE GAS) ......................................
12. DISASSEMBLY INSTRUCTIONS ...................................................................................
13. EXPLODED VIEW ...........................................................................................................
13-1. CONTROL PANEL AND PLATE ASSEMBLY ........................................................
13-2. PANEL DRAWER ASSEMBLY AND GUIDE ASSEMBLY .......................................
13-2-2. CABINET AND DOOR ASSEMBLY: GAS TYPE .................................................
13-3-1. DRUM AND MOTOR ASSEMBLY: ELECTRIC TYPE
13-3-2. DRUM AND MOTOR ASSEMBL: GAS TYPE ........................................
........................................
CONTENTS
Copyright © 2014 - 2017 LG Electronics Inc. All
rights reserved. Only training and service purposes.
8-4. TROUBLESHOOTING WITH SYMPTOM

4 5
4
1SPECIFICATIONS
See page S
7e
e page 8
Stacking kit (1 each)
Purchased Separately
ACCESSORIES
Model DLEX4200* DLGX4201*
DLEX4000* DLGX4001*
DLE3600* DLG3601*
Name Electric and Gas Dryer
Please refer to the rating label regarding detailed information
27” (W) X 30” (D) X 38 / ” (H), 51” (D with door open)
68.6 cm (W) X 76.1 cm (D) X 98.3 cm (H), 129.7 cm (D with door open)
1116
Size
Weight
Dryer capacity - Normal Cycle IEC 7.4 cu.ft. (22.5 lb/10.2 kg)
- Steam Cycle IEC 7.4 cu.ft. (8 lb/3.6 kg)
Gas : 124.7 lb (56.6 kg) - 137.5 lb (62.4 kg)
Electric : 122.0 lb (55.3 kg) - 134.1 lb (60.8 kg)
Power supply
Pedestal (1 each)
Purchased Separately

4 5
4
1SPECIFICATIONS
See page S7ee page 8
Stacking kit (1 each)
Purchased Separately
ACCESSORIES
Model DLEX4200* DLGX4201*
DLEX4000* DLGX4001*
DLE3600* DLG3601*
Name Electric and Gas Dryer
Please refer to the rating label regarding detailed information
27” (W) X 30” (D) X 38 / ” (H), 51” (D with door open)
68.6 cm (W) X 76.1 cm (D) X 98.3 cm (H), 129.7 cm (D with door open)
1116
Size
Weight
Dryer capacity - Normal Cycle IEC 7.4 cu.ft. (22.5 lb/10.2 kg)
- Steam Cycle IEC 7.4 cu.ft. (8 lb/3.6 kg)
Gas : 124.7 lb (56.6 kg) - 137.5 lb (62.4 kg)
Electric : 122.0 lb (55.3 kg) - 134.1 lb (60.8 kg)
Power supply
Pedestal (1 each)
Purchased Separately
5
DLEX4200*/DLGX4201* DLEX4000*/DLGX4001* DLE3600*/DLG3601*
Black Steel/Blue White Black Steel/Blue White STS Silver/Blue White
Chrome
12
2 (On/Off)
14 10
11
3
15
5
Shiny Rose Gold Silver White
ITEM

6 7
2FEATURES AND BENEFITS
3INSTALLATION INSTRUCTIONS
Dryer Rack Installation Instructions
Open the door
DLEX4200*, DLGX4201*
DLEX4000*, DLGX4001*
DLE3600*, DLG3601*
.
Hold the dryer rack
with both hands.
Put the dryer rack into
the drum
Check and be sure that the
front of the rack is properly
seated behind the lint filter.
Peel the protective paper from the tape on
the side bracket.
Secure the side bracket to the washer with
a screw on the back of the bracket. Repeat
Steps 2, 3, and 4 for the other side.
Place the dryer on top of the washer by
placing the legs as shown. Be careful not to
pinch fingers between the washer and dryer.
Slide the dryer back against the stop on the
side rail.
Fit the side bracket firmly to the side of the
top plate by attaching the double-faced tape
to the top plate as picture shown.
Insert the front rail of the stacking kit. Push
the front rail back against the stops on the
side brackets.
•Do not use a stacking kit with a gas dryer in
potentially unstable conditions like a mobile
home.
Stacking Kit Installation Instructions
Place the washer firmly on a stable, even
and solid floor as product installation
instructions describe in the owner’s
manual.
Do not attempt this alone!
At least two people are required to lift and
position the dryer on top of a washing
machine!
Failure to heed this warning can result in
serious physical injury and damage to the
appliance.
To reduce the risk of Injury to persons adhere to all
industry recommended safety procedures including
the use of long sleeved gloves and safety glasses.
WARNING
Stacking kit
Attach the front bracket to the side rails with
a screw on each side.
To ensure safe and secure installation, please observe the instructions below.

8 9
Pedestal Installation Instructions
•Drawer divider (1) •Wrench (1)
•Screws (18) † •T-clips (4) ††
•Phillips screwdriver
•Wrench (supplied)
† Dryer installation only uses 8 screws
†† For dryer only
To ensure safe and secure installation, please
thoroughly follow the instructions below.
•Incorrect installation can cause serious accidents.
•The appliances are heavy. Two or more people are
required when installing the pedestal. There is a
risk of serious back injury or other injuries.
•Do not allow children to play in or on the drawer.
There is a risk of suffocation or injury.
•Do not step on the handle. There is a risk of serious injury.
•If appliances are already installed, disconnect them
from all power, water, or gas lines and from draining or
venting connections. Failure to do so can result in
electrical shock, fire, explosion, or death.
•To reduce the risk of Injury to persons adhere to all industry
recommended safety procedures including the use of long
sleeved gloves and safety glasses.
WARNING
Retract fully
Retainer
T-clip
Make sure the leveling feet of the dryer are
fully retracted.
NOTE: The appliance and pedestal assembly
must be placed on a solid, sturdy, level floor
for proper operation.
Insert the T-clip of the 4 retainers into the dryer
base as shown. Press up on the back of the
clip and pull outward to lock into place.
Place the dryer on the
pedestal. Make sure
the front and back feet
are in the correct
positions. The dryer
feet will fit into the
innermost positions as
shown.
Make sure the screws on the pedestal align with the
holes in the retainers, then install 4 screws on each
side to securely attach the appliance to the pedestal.
NOTE: If the screws are not installed properly, noise
and vibration may result.
Move the appliance to the desired location.
Securely tighten all locknuts by hand.
NOTE: Noise and vibration may result if locknuts are not
tightened.
Be sure to connect the appliances to all water, power,
or gas lines and draining or venting connections before
operation.
If there is excessive vibration during the first operation
after installation, slightly adjust the leveling feet.
Loosen the locknuts on all 4 leveling feet of the
pedestal until you can turn them with the wrench.
Turn clockwise to raise or counterclockwise to lower
until the pedestal is level and all 4 feet are solidly
against the floor.
For dryer
For washer/combo
Raise Lower
Locknut
Use the instructions under option 2 or 3 if your
home has a 3-wire receptacle (NEMA type 10-30R).
Use option 2 if local codes and ordinances permit
the connection of a chassis ground to the neutral
connector. If this is not permitted, use option 3.
Review the following options to determine the appropriate electrical connection for your home
3-1. Connecting Electric Dryers
If this type is available at your home. you will be
connecting to a fused disconnect or circuit breaker
box
Important :Grounding through the neutral conductor
is prohibited for (1) new branch-circuit installations,
(2) mobile homes, and (3) recreational vehicles, and
(4) areas where local codes prohibit grounding through
the neutral conductor.
Prepare minimum 5 ft(1.52 m) of length in order for
dryer to be replaced.
First, peel 5 inch (12.7 cm) of covering material from
end. Make a 5 inch of ground wire bared. After cutting
1
1
/2inch (3.8 cm) from 3 other wires. peel insulation
back 1inch (2.5 cm). Make ends of 3 wires a hook
shape.
Then, put the hooked shape end of the wire under the
screw of the terminal block(hooked end facing rightward)
and pinch the hook together and screw tightly.
Use the instructions under option 1 if your home
home has a 4-wire receptacle (NEMA type 14-30R).
If this type is available at your home. you will be
connecting to a fused disconnect or circuit breaker
box
1. Connect neutral wire(white) of power cord to center
terminal block screw.
2. Connect red and black wire to the left and right
terminal block screws.
3. Connect ground wire(green) of power cord to external
ground screw and move neutral ground wire of
appliance and connect it to center screw.
4. Make sure that the strain relief screw is tightened.
and be sure that all terminal block nuts are on tight and
power cord is in right position.
1"
(2.5 cm)
5"
(12.7 cm)
3-wire direct
4-wire receptacle
(NEMA type14-30R)
3-wire receptacle
(NEMA type10-30R)
4-wire direct
5"
(12.7 cm)
4-wire connection : Direct wire
1"
(2.5 cm)
5"
(12.7 cm)
F
a
b
E
D
C

10 11
Important : Grounding through the neutral conductor
is prohibited for (1) new branch-circuit installations,
(2) mobile homes, and (3) recreational vehicles, and
(4) areas where local codes prohibit grounding through
the neutral conductor.
Prepare minimum 5 ft(1.52 m) of length in order for
dryer to be replaced.
First, peel 3 1/2inch (8.9 cm) of covering material
from end and bare 1 inch from the ends.
1. Connect neutral wire(white) of power cord to
center terminal block screw.
2. Connect red and black wire to the left and right
terminal block screws.
3. Make sure that the strain relief screw is tightened
and be sure that all terminal block nuts are on
tight and power cord is in right position.
Then, put the hooked shape end of the wire under
the screw of the terminal block(hooked end facing
rightward) and pinch the hook together and screw
tightly.
1"
(2.5cm)
3V2"
(8.9 cm)
3-wire connection : Direct wire
1. Connect the neutral wire (white) of the power
cord to the center terminal block screw.
2. Connect the red and black wires to the left and
right terminal block screws.
3. Connect the ground wire (green) of the power
cord to the external ground screw. Remove the
neutral ground wire of appliance and connect it to
center screw.
4. Make sure that the strain relief screw is tightened
and that all terminal block nuts are tight and the
power cord is in the right position.
F
a
b
E
D
C
: 4-wire connection with
a power supply cord.
E
a
D
B
C
lf your local codes or ordinances do not allow the
use of a 3 wire connection, or you are installing
your dryer in a mobile home, you must use a
4-wire connection.
4-prong plug
4-prong plug
Neutral prong
Neutral prong
11
1. Remove the appliance ground wire (D) (green)
fromthe external ground connector screw and
reconnect it, together with the center, white,
neutral wire (E) to the center, silver colored,
terminal block screw.
2. Connect the other two power cord wires (red and
black) to the left and right terminal block screws
and tighten securely.
3. Tighten the strain relief screws securely.
4. Connect an independent ground wire (F) from the
external ground connector screw to a proper
ground. (The ground wire must be long enough to
allow the appliance to be moved, if necessary, for
service or cleaning.)
C
B
A
lf your local codes or ordinances permit the
connection of a frame-grounding conductor to the
neutral wire, use these instructions. If your local
codes or ordinances do not allow the connection of
a frame-grounding conductor to the neutral wire,
use the instructions under Option 3: Optional
3-wire connection.
1. Connect the neutral (white or center) wire (B) to
the center, silver colored screw (A) and tighten
securely.
2. Connect the other two power cord wires (red and
black) to the left and right terminal block screws
and tighten securely.
3. Tighten the strain relief screws (C) securely.
vGY: 3-Wire connection with
a power supply cord
•If your local codes or ordinances do not allow the
connection of a frame-grounding conductor to the
neutral wire, use the instructions under this
section.
E
A
D
F
vGZ: Optional 3-wire
connection.
11

12 13
12 13
3-2. Connecting The Gas Supply
1. Make certain your dryer is equipped for use with the
type of gas in your laundry room. Dryer is equipped
at the factory for Natural Gas with a 3/8” NPT gas
connection.
2. Remove the shipping cap from the gas connection
at the rear of the dryer. Make sure you do not
damage the pipe thread when removing the cap.
3. Connect to gas supply pipe using a new flexible
stainless steel connector.
4. Tighten all connections securely. Turn on gas and
check all pipe connections (internal and external) for
gas leaks with a non-corrosive leak detection fluid.
5. For LP (Liquefied Petroleum) gas connection, refer
to section on Gas Requirements.
For further assistance, refer to section on Gas Requirements.
12

12 13
12 13
3-2. Connecting The Gas Supply
1. Make certain your dryer is equipped for use with the
type of gas in your laundry room. Dryer is equipped
at the factory for Natural Gas with a 3/8” NPT gas
connection.
2. Remove the shipping cap from the gas connection
at the rear of the dryer. Make sure you do not
damage the pipe thread when removing the cap.
3. Connect to gas supply pipe using a new flexible
stainless steel connector.
4. Tighten all connections securely. Turn on gas and
check all pipe connections (internal and external) for
gas leaks with a non-corrosive leak detection fluid.
5. For LP (Liquefied Petroleum) gas connection, refer
to section on Gas Requirements.
For further assistance, refer to section on Gas Requirements.
12
13
3-3. Connect Inlet Hose
21.8150~800
800

14 15
14
Cycle
Default
Conditions of operation and termination
Temp-
erature
Dry
Level
Display
time
Sensor
Dry *
STEAM FRESH
TM
BEDDING
HEAVY DUTY
PERM.PRESS
NORMAL
DELICATES
SPORTSWEAR
SMALL LOAD
STEAM
SAINTARY
TM
MID HIGH
-
HIGH
MID HIGH
HIGH
HIGH
LOW
10 min
Saturation
Saturation
Saturation
Saturation
Saturation
Saturation
Saturation
66±4˚C 45±5˚C
45±5˚C
45±5˚C
45±5˚C
38±5˚C
45±5˚C
45±5˚C
68±4˚C
68±4˚C
60±4˚C
52±3˚C
66±4˚C
5 min
5 min
5 min
5 min
5 min
5 min
5 min
31 min
MEDIUM
Saturation45±5˚C
52±3˚C
5 min
32 min
54 min
Elec. : 67
Gas : 63
28 min
55 min
30 min
Drying Cooling
Wrinkle care
Time
Electro-
sensor
Temp-
Control
Default
time
Temp-
Control**
3 Hr
Load
Motor
Heater
Temperature Control for each cycl e
Off Time: 6 mi n
On Time: 10 sec
*Sensor dry : Dry Level is set by users.
**Manual dry : Temperature control is set by users.
Default settings can be adjusted
NOTE The Energy Saver option is turned on by default in the Cotton/Normal cycle.
Turn off the Energy Saver option for a faster Normal cycle which begins with heated drying.
To turn the Energy Saver default off, press and hold the Wrinkle Care button for three seconds.
ON or OFF appears in the display.
by users.
MEDIUM
Saturation45±5˚C
60±4˚C
5 min
55 min
Manual
Dry **
SPEED DRY
AIR DRY
HIGH
NO
HEAT
Saturation
Saturation
(47±5˚C)
(68±5˚C)
(66±5˚C)
5 min
5 min
25 min
30 min
3 Hr
68±4˚C
NORMAL
ADJUSTABLE
ADJUSTABLE
NORMAL
ADJUSTABLE
NORMAL
ADJUSTABLE
NORMAL
ADJUSTABLE
NORMAL
ADJUSTABLE
OFF
ANTIBACTERIAL HIGH
Saturation45±5˚C
66±4˚C
5 min
70 min
VERY
TOWELSMID HIGH
Saturation45±5˚C
66±4˚C
5 min
55 min
NORMAL
ADJUSTABLE
NORMAL
ADJUSTABLE
OFF
OFF
OFF
OFF
DLEX4200*, DLGX4201*
4DRYER CYCLE PROCESS
15
Cycle
Default
Conditions of operation and termination
Temp-
erature
Dry
Level
Display
time
Sensor
Dry *
STEAM FRESH
TM
BEDDING
HEAVY DUTY
PERM.PRESS
NORMAL
DELICATES
STEAM
SAINTARY
TM
MID HIGH
MID HIGH
HIGH
HIGH
LOW
10 min
Saturation
Saturation
Saturation
Saturation
Saturation
66±4˚C 45±5˚C
45±5˚C
45±5˚C
45±5˚C
38±5˚C
68±4˚C
68±4˚C
60±4˚C
52±3˚C
5 min
5 min
5 min
5 min
5 min
31 min
MEDIUM
Saturation45±5˚C
52±3˚C
5 min
32 min
54 min
Elec. : 67
Gas : 63
28 min
Drying Cooling
Wrinkle care
Time
Electro-
sensor
Temp-
Control
Default
time
Temp-
Control**
3 Hr
Load
Motor
Heater
Temperature Control for each cycl e
Off Time: 6 mi n
On Time: 10 sec
*Sensor dry : Dry Level is set by users.
**Manual dry : Temperature control is set by users.
Default settings can be adjusted
NOTE The Energy Saver option is turned on by default in the Cotton/Normal cycle.
Turn off the Energy Saver option for a faster Normal cycle which begins with heated drying.
To turn the Energy Saver default off, press and hold the Wrinkle Care button for three seconds.
ON or OFF appears in the display.
by users.
MEDIUM
Saturation45±5˚C
60±4˚C
5 min
55 min
Manual
Dry **
SPEED DRY
AIR DRY
HIGH
NO
HEAT
Saturation
Saturation
(47±5˚C)
(68±5˚C)
(66±5˚C)
5 min
5 min
25 min
30 min
3 Hr
NORMAL
ADJUSTABLE
ADJUSTABLE
NORMAL
ADJUSTABLE
NORMAL
ADJUSTABLE
NORMAL
ADJUSTABLE
NORMAL
ADJUSTABLE
OFF
OFF
OFF
OFF
DLEX4000*, DLGX4001*
ANTIBACTERIAL HIGH
Saturation45±5˚C
66±4˚C
5 min
70 min
VERY
TOWELSMID HIGH
Saturation45±5˚C
66±4˚C
5 min
55 min
NORMAL
ADJUSTABLE

16 17
16
Cycle
Default
Conditions of operation and termination
Temp-
erature
Dry
Level
Display
time
Sensor
Dry *
BEDDING
HEAVY DUTY
PERM.PRESS
NORMAL
DELICATES
SMALL LOAD HIGH
MID HIGH
HIGH
LOW
Saturation
Saturation
Saturation
Saturation
45±5˚C
45±5˚C
38±5˚C
45±5˚C
68±4˚C
60±4˚C
52±3˚C
5 min
5 min
5 min
5 min
MEDIUM
Saturation 45±5˚C
52±3˚C
5 min
32 min
54 min
Elec. : 67
Gas : 63
28 min
30 min
Drying Cooling
Wrinkle care
Time
Electro-
sensor
Temp-
Control
Default
time
Temp-
Control**
3 Hr
Load
Motor
Heater
Temperature Control for each cycl e
Off Time: 6 mi n
On Time: 10 sec
*Sensor dry : Dry Level is set by users.
**Manual dry : Temperature control is set by users.
Default settings can be adjusted
NOTE The Energy Saver option is turned on by default in the Cotton/Normal cycle.
Turn off the Energy Saver option for a faster Normal cycle which begins with heated drying.
To turn the Energy Saver default off, press and hold the Wrinkle Care button for three seconds.
ON or OFF appears in the display.
by users.
MEDIUM
Saturation45±5˚C
60±4˚C
5 min
55 min
Manual
Dry **
SPEED DRY
AIR DRY
HIGH
NO
HEAT
Saturation
Saturation
(47±5˚C)
(68±5˚C)
(66±5˚C)
5 min
5 min
25 min
30 min
3 Hr
68±4˚C
NORMAL
ADJUSTABLE
NORMAL
ADJUSTABLE
NORMAL
ADJUSTABLE
NORMAL
ADJUSTABLE
NORMAL
ADJUSTABLE
NORMAL
ADJUSTABLE
OFF
OFF
DLE3600*, DLG3601*
TOWELSMID HIGH
Saturation 45±5˚C
66±4˚C
5 min
55 min
NORMAL
ADJUSTABLE
17
COMPONENT TESTING INFORMATION
5
Auto reset -31°F (-35°C)
Same shape as outlet thermostat.
4. LED Lamp Schematic:If the lamp is turned on
by connecting is normal.
It is not
measured by
multimeter
because V is
3.2V
(except for
DLE3600*,
DLG3601*)
th
Measure resistance of the
following terminal
1) Door open
Terminal: COM - NC (1-3)
Terminal: COM - NO (1-2)
2) Door closed
Terminal: COM - NC (1-3)
Terminal: COM - NO (1-2)

18 19
18 19
15

18 19
18 19
15
19
Ω
Ω
Electric type
(except for
DLE3600*,
DLG3601*)
15. Inlet. valveMeasure resistance of the
Following terminal
Left picture
-.plate

20 21
20 21
MOTOR DIAGRAM AND SCHEMATIC
6
Contact On / Off by Centrifugal Switch
STOP MODE
(When Motor does not operate)
RUN MODE
(Motor operates)
When checking components, turn the power off and discharge voltage.
NOTE
Centrifugal switch Centrifugal switch
(Pull Drive forward)
17
This manual suits for next models
6
Table of contents
Other LG Dryer manuals
Popular Dryer manuals by other brands

White Knight
White Knight 0312 85A 15000 - 85AW Service manual

Hydor
Hydor HHD2500RW Installation and maintenance instructions

Siemens
Siemens WT47W460GR Installation and operating instructions

Maytag
Maytag HybridCare YWED99HEDC installation instructions

Crosley
Crosley 134892200 owner's guide

Candy
Candy RapidO H11A2TCEX-S manual

Fisher & Paykel
Fisher & Paykel Smartload DGGX1US installation instructions

Samsung
Samsung DV203AGW user manual

Whirlpool
Whirlpool WGD9500TC1 parts list

ZEBRILLO
ZEBRILLO 1220 installation manual

Saivod
Saivod Timer Dry Instructions for installation

Bosch
Bosch 300 Series Use and care manual / installation instructions