LG DVT654 Installation guide

R
LH-E750SG NA1CLLA_ENG
©Copyright 2006, LG Electronics U.S.A., Inc.
Installation and Operating Guide | Warranty
Model Number I DVT654 I 5 Disc DVD HOME THEATER SYSTEM
(Speakesr: LHS-75SGS, LHS-75SGC, LHS-75SGW)
For service/
support Call:
Toll Free Number
1-800-243-0000

2
This lightning flash with arrowhead symbol within
an equilateral triangle is intended to alert the user
to the presence of uninsulated dangerous voltage
within the product’s enclosure that may be of
sufficient magnitude to constitute a risk of electric
shock to persons.
The exclamation mark within an equilateral
triangle is intended to alert the user to the
presence of important operating and maintenance
(servicing) instructions in the instructions
accompanying the product.
WARNING: Do not install this equipment in a confined space
such as a book case or similar unit.
CAUTION:
This DVD/CD receiver employs a Laser System.
To ensure proper use of this product, please read this
owner’s manual carefully and retain it for future reference.
Should the unit require maintenance, contact an authorized
service location (see service procedure).
Performing controls, adjustments, or carrying out procedures
other than those specified herein may result in hazardous
radiation exposure.
To prevent direct exposure to laser beam, do not try to open
the enclosure. Visible laser radiation when open. DO NOT
STARE INTO BEAM.
CAUTION: The apparatus should not be exposed to water
(dripping or splashing) and no objects filled with liquids, such
as vases, should be placed on the apparatus.
REGULATORY INFORMATION:
FCC Part 15
This product has been tested and found to comply with the
limits for a Class B digital device, pursuant to Part 15 of the
FCC Rules. These limits are designed to provide
reasonable protection against harmful interference when the
product is operated in a residential installation. This product
generates, uses and can radiate radio frequency energy
and, if not installed and used in accordance with the
instruction manual, may cause harmful interference to radio
communications. However, there is no guarantee that
interference will not occur in a particular installation. If this
product does cause harmful interference to radio or
television reception, which can be determined by turning the
product off and on, the user is encouraged to try to correct
the interference by one or more of the following measures:
•Reorient or relocate the receiving antenna.
•Increase the separation between the product and
receiver.
•Connect the product into an outlet on a circuit different
from that to which the receiver is connected.
•Consult the dealer or an experienced radio/TV
technician for help.
FCC WARNING: This equipment may generate or use radio
frequency energy. Changes or modifications to this
equipment may cause harmful interference unless the
modifications are expressly approved in the instruction
manual. The user could lose the authority to operate this
equipment if an unauthorized change or modification is
made.
ON COPYRIGHTS:
It is forbidden by law to copy, broadcast, show, broadcast
via cable, play in public, or rent copyrighted material without
permission.
This product features the copy protection function developed
by Macrovision. Copy protection signals are recorded on
some discs. When recording and playing the pictures of
these discs on a VCR, picture noise will appear.
This product incorporates copyright protection technology
that is protected by method claims of certain U.S. patents
and other intellectual property rights owned by Macrovision
Corporation and other rights owners. Use of this copyright
protection technology must be authorized by Macrovision
Corporation, and is intended for home and other limited
viewing uses only unless otherwise authorized by
Macrovision Corporation. Reverse engineering or
disassembly is prohibited.
SERIAL NUMBER: The serial number is located on the back
of this unit. This number is unique to this unit and not
available to others. You should record requested information
here and retain this guide as a permanent record of your
purchase.
Model No. _______DVT654_____________________
Serial No. ___________________________________
WARNING: TO PREVENT FIRE OR ELECTRIC SHOCK
HAZARD, DO NOT EXPOSE THIS PRODUCT TO RAIN
OR MOISTURE.
CAUTION
RISK OF ELECTRIC SHOCK
DO NOT OPEN
CAUTION: TO REDUCE THE RISK
OF ELECTRIC SHOCK
DO NOT REMOVE COVER (OR BACK)
NO USER-SERVICEABLE PARTS INSIDE
REFER SERVICING TO QUALIFIED SERVICE
PERSONNEL.

3
Introduction
1. Read these instructions. - All these safety and
operating instructions should be read before the
product is operated.
2. Keep these instructions. - The safety, operating
and use instructions should be retained for future
reference.
3. Heed all warnings. - All warnings on the product
and in the operating instructions should be adhered
to.
4. Follow all instructions. - All operating and use
instructions should be followed.
5. Do not use this apparatus near water. – For
example: near a bath tub, wash bowl, kitchen sink,
laundry tub, in a wet basement; or near a swimming
pool; and like.
6. Clean only with dry cloth. – Unplug this product
from the wall outlet before cleaning. Do not use
liquid cleaners.
7.
Do not block any ventilation openings. Install in
accordance with the manufacturer’s instructions. -
Slots and openings in the cabinet are provided for
ventilation and to ensure reliable operation of the
product and to protect it from over- heating.
The openings should never be blocked by placing
the product on a bed, sofa, rug or other similar
surface. This product should not be placed in a
built-in installation such as a bookcase or rack
unless proper ventilation is provided or the
manufacturer’s instructions have been adhered to.
8. Do not install near any heat sources such as
radiators, heat registers, stoves, or other
apparatus (including amplifiers) that produce
heat.
9.
Do not defeat the safety purpose of the polarized
or grounding-type plug. A polarized plug has two
blades with one wider than the other. A
grounding
type plug has two blades and a third
grounding prong. The wide blade or the third
prong are provided for your safety.
If the provided plug does not fit into your outlet,
consult an electrician for replacement of the
obsolete outlet.
10. Protect the power cord from being walked on or
pinched particularly at plugs, convenience
receptacles, and the point where they exit from
the apparatus.
11. Only use attachments/accessories specified by
the manufacturer.
12. Use only with the cart, stand, tripod, bracket, or
table specified by the manufacturer, or sold with
apparatus. When a cart is used, use caution
when moving the cart/apparatus combination to
avoid injury from tip-over.
13. Unplug this apparatus during lightning storms
or when unused for long periods of time.
14.
Refer all servicing to qualified service personnel.
Servicing is required when the apparatus has
been damaged in any way, such as power-
supply cord or plug is damaged, liquid has
been spilled or objects have fallen into the
apparatus, the apparatus has been exposed to
rain or moisture, does not operate normally, or
has been dropped.
CAUTION: PLEASE READ AND OBSERVE ALL WARNINGS AND INSTRUCTIONS IN THIS OWNER’S
MANUAL AND THOSE MARKED ON THE UNIT. RETAIN THIS MANUAL FOR FUTURE
REFERENCE.
This set has been designed and manufactured to assure personal safety. Improper use can result in electric shock
or fire hazard. The safeguards incorporated in this unit will protect you if you observe the following procedures for
installation, use, and servicing.
This unit does not contain any parts that can be repaired by the user.
DO NOT REMOVE THE CABINET COVER, OR YOU MAY BE EXPOSED TO DANGEROUS VOLTAGE. REFER
SERVICING TO QUALIFIED SERVICE PERSONNEL ONLY.
IMPORTANT SAFETY INSTRUCTIONS

4
Contents
Introduction . . . . . . . . . . . . . . . . . . . . .3-11
IMPORTANT SAFETY INSTRUCTIONS . . . . . .3
Symbol used in this Manual . . . . . . . . . . . . . . . .5
About the Symbol Display . . . . . . . . . . . . . .5
Notes on Discs . . . . . . . . . . . . . . . . . . . . . . . . . .5
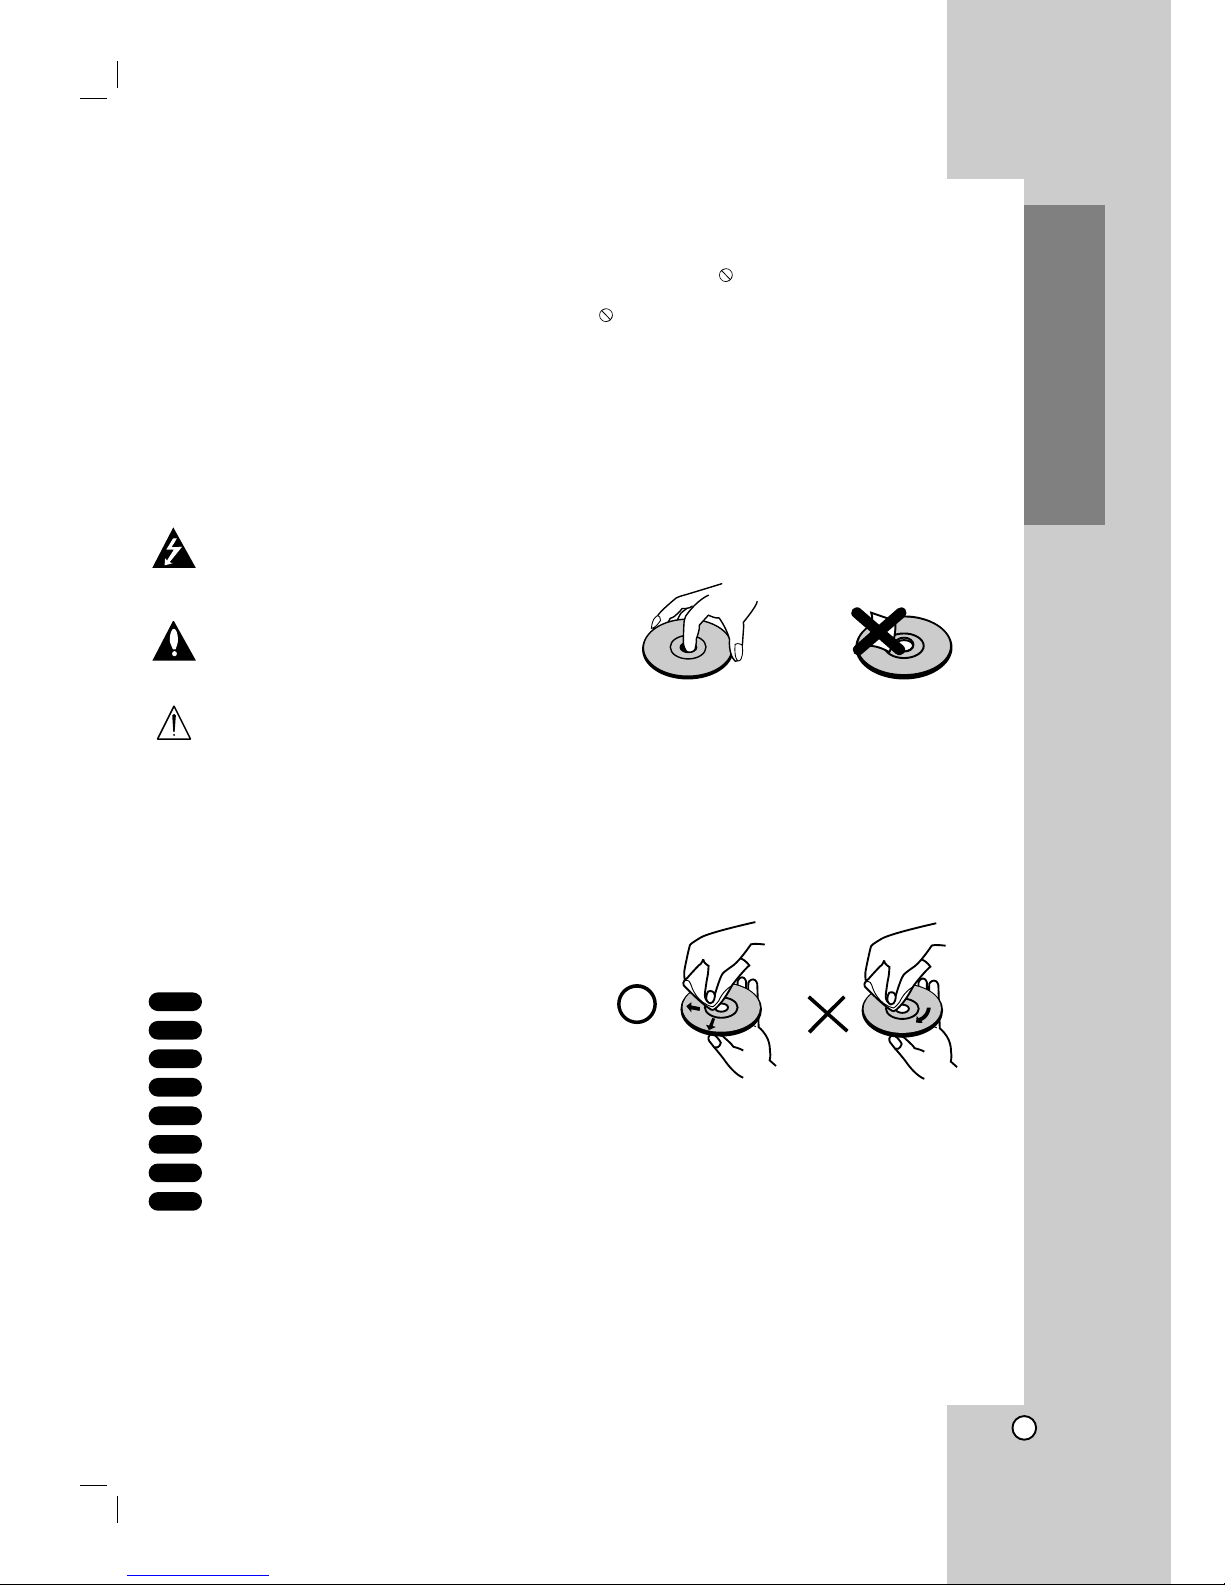
HANDLING DISCS . . . . . . . . . . . . . . . . . . . . . . . . .5
STORING DISCS . . . . . . . . . . . . . . . . . . . . . . . . . .5
CLEANING DISCS . . . . . . . . . . . . . . . . . . . . . . . . .5
Types of Playable Discs . . . . . . . . . . . . . . . . . . .6
REGIONAL CODE . . . . . . . . . . . . . . . . . . . . . . . . .6
REMOTE CONTROL OPERATION RANGE . . . . .6
REMOTE CONTROL BATTERY INSTALLATION .6
Disc-related terms . . . . . . . . . . . . . . . . . . . . . . . .7
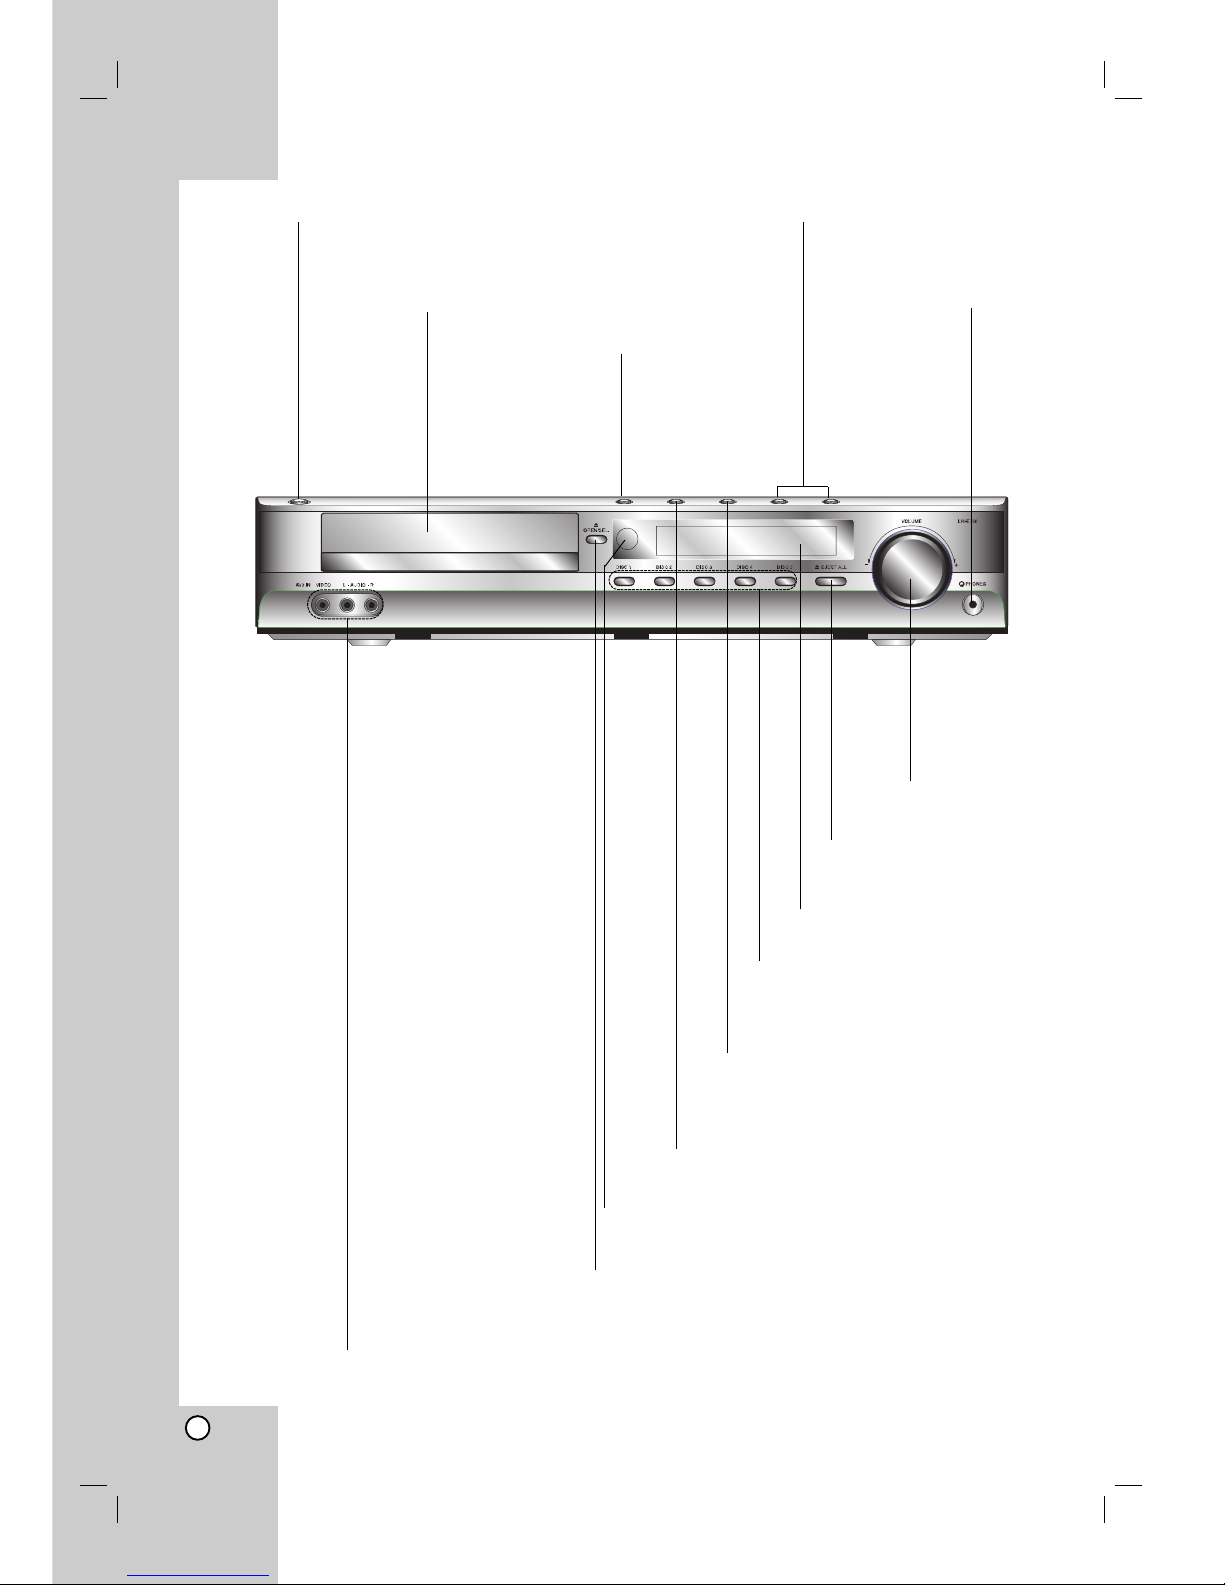
Front Panel . . . . . . . . . . . . . . . . . . . . . . . . . . . . .8
Display Window . . . . . . . . . . . . . . . . . . . . . . . . . .9
Remote Control . . . . . . . . . . . . . . . . . . . . . . . . .10
Rear Panel . . . . . . . . . . . . . . . . . . . . . . . . . . . . .11
Installation and Setup . . . . . . . . . . .12-22
TV Connections . . . . . . . . . . . . . . . . . . . . . . . .12
Audio Connection to Optional Equipment . . . .13
Antenna Connections . . . . . . . . . . . . . . . . . . . .14
Speaker System Connection . . . . . . . . . . . . . .15
Speaker Positioning . . . . . . . . . . . . . . . . . . . . .16
Mini Glossary for Audio Stream &
Surround Mode . . . . . . . . . . . . . . . . . . . . . . . . .17
Sound Mode . . . . . . . . . . . . . . . . . . . . . . . . . . .17
On-Screen Display . . . . . . . . . . . . . . . . . . . . . .18
PLAYBACK STATUS/RESTRICTIONS . . . . . . . .18
Initial Settings . . . . . . . . . . . . . . . . . . . . . . .19-22
GENERAL OPERATION . . . . . . . . . . . . . . . . . . .19
LANGUAGE . . . . . . . . . . . . . . . . . . . . . . . . . . . . .19
• Menu Language . . . . . . . . . . . . . . . . . . . . . . .19
• Disc Audio / Subtitle / Menu . . . . . . . . . . . . . .19
DISPLAY . . . . . . . . . . . . . . . . . . . . . . . . . . . . . . . .19
• TV Aspect . . . . . . . . . . . . . . . . . . . . . . . . . . . .19
• Display Mode . . . . . . . . . . . . . . . . . . . . . . . . .19
• Progressive Scan . . . . . . . . . . . . . . . . . . . .19-20
AUDIO . . . . . . . . . . . . . . . . . . . . . . . . . . . . . . . . .20
• 5.1 Speaker Setup . . . . . . . . . . . . . . . . . . . . . .20
• Dynamic Range Control (DRC) . . . . . . . . . . .20
• Vocal . . . . . . . . . . . . . . . . . . . . . . . . . . . . . . . .20
LOCK (Parental Control) . . . . . . . . . . . . . . . . . . .21
• Rating . . . . . . . . . . . . . . . . . . . . . . . . . . . . . . .21
• Password (Security Code) . . . . . . . . . . . . . . . .21
• Country Code . . . . . . . . . . . . . . . . . . . . . . . . .21
OTHERS . . . . . . . . . . . . . . . . . . . . . . . . . . . . . . . .22
• PBC . . . . . . . . . . . . . . . . . . . . . . . . . . . . . . . . .22
• Auto Play . . . . . . . . . . . . . . . . . . . . . . . . . . . . .22
• B.L.E. (Black Level Expansion) . . . . . . . . . . . .22
• DivX(R) VOD . . . . . . . . . . . . . . . . . . . . . . . . . .22
Operation . . . . . . . . . . . . . . . . . . . . . .23-38
Playback Setup . . . . . . . . . . . . . . . . . . . . . . . .23
Playing a DVD or Video CD . . . . . . . . . . . . . .24
General Features . . . . . . . . . . . . . . . . . . . . . . .24
MOVING TO ANOTHER TITLE/GROUP . . . . . . .24
MOVING TO ANOTHER CHAPTER/TRACK . . . .24
SEARCH . . . . . . . . . . . . . . . . . . . . . . . . . . . . . . . .24
CHANGING THE AUDIO CHANNEL . . . . . . . . .24
STILL PICTURE AND FRAME-BY-FRAME
PLAYBACK
. . . . . . . . . . . . . . . . . . . . . . . . . . . . . .25
SLOW SCAN . . . . . . . . . . . . . . . . . . . . . . . . . . . . .25
REPEAT A-B . . . . . . . . . . . . . . . . . . . . . . . . . . . . .25
REPEAT . . . . . . . . . . . . . . . . . . . . . . . . . . . . . . . . .25
3D SURROUND . . . . . . . . . . . . . . . . . . . . . . . . .25
TIME SEARCH . . . . . . . . . . . . . . . . . . . . . . . . . . .25
ZOOM . . . . . . . . . . . . . . . . . . . . . . . . . . . . . . . .26
MARKER SEARCH . . . . . . . . . . . . . . . . . . . . .26
PAUSE . . . . . . . . . . . . . . . . . . . . . . . . . . . . . . . . . .26
Special DVD Features . . . . . . . . . . . . . . . . . . .26
CHECKING THE CONTENTS OF DVD
DISCS: MENUS
. . . . . . . . . . . . . . . . . . . . . . . . . . .26
TITLE MENU . . . . . . . . . . . . . . . . . . . . . . . . . . . .26
DISC MENU . . . . . . . . . . . . . . . . . . . . . . . . . . . .26
CAMERA ANGLE . . . . . . . . . . . . . . . . . . . . . . . .26
CHANGING THE AUDIO LANGUAGE . . . . . . . . .26
SUBTITLES . . . . . . . . . . . . . . . . . . . . . . . . . . . .26
DVD Audio Discs . . . . . . . . . . . . . . . . . . . . . . . .27
MOVING TO ANOTHER GROUP . . . . . . . . . . . . .27
VIEWING ANOTHER PAGE . . . . . . . . . . . . . . . . .27
Playing an Audio CD or MP3/WMA Disc . . . . .28
Audio CD and MP3 / WMA Disc Features . . . .29
PAUSE . . . . . . . . . . . . . . . . . . . . . . . . . . . . . . . . . .29
MOVING TO ANOTHER TRACK . . . . . . . . . . . . .29
REPEAT TRACK/ALL/OFF . . . . . . . . . . . . . . . . . .29
SEARCH . . . . . . . . . . . . . . . . . . . . . . . . . . . . . . .29
REPEAT A-B . . . . . . . . . . . . . . . . . . . . . . . . . . . . .29
3D SURROUND . . . . . . . . . . . . . . . . . . . . . . . . . .29
Programmed Playback . . . . . . . . . . . . . . . . . .30
REPEAT PROGRAMMED TRACKS . . . . . . . . . .30
ERASING A TRACK FROM PROGRAM LIST . . .30
ERASING THE COMPLETE PROGRAM LIST . .30
Playing a DivX Movie Disc . . . . . . . . . . . . . . . .31
Viewing a JPEG Disc . . . . . . . . . . . . . . . . . . . .32
STILL PICTURE . . . . . . . . . . . . . . . . . . . . . . . . . .32
MOVING TO ANOTHER FILE . . . . . . . . . . . . . . .32
ZOOM . . . . . . . . . . . . . . . . . . . . . . . . . . . . . . . . . .32
TO ROTATE PICTURE . . . . . . . . . . . . . . . . . . . . .32
TO LISTEN TO MP3/WMA MUSIC
WATCHING PICTURE . . . . . . . . . . . . . . . . . . . . . .32
Playing a DVD VR format Disc . . . . . . . . . . . . .33
Maintenance and Service . . . . . . . . . . . . . . . . .33
HANDLING THE UNIT . . . . . . . . . . . . . . . . . . . . .33
5.1 Speaker Setup . . . . . . . . . . . . . . . . . . . . . .34
SPEAKER SETUP . . . . . . . . . . . . . . . . . . . . . . . . .34
Additional Features . . . . . . . . . . . . . . . . . . . . . .35
LAST SCENE MEMORY . . . . . . . . . . . . . . . . . . . .35
VIDEO MODE SETTING . . . . . . . . . . . . . . . . . . . .35
XTS (Excellent True Sound) . . . . . . . . . . . . . . .35
XTS pro . . . . . . . . . . . . . . . . . . . . . . . . . . . . . . .35
Sleep Timer Setting . . . . . . . . . . . . . . . . . . . . . .36
Selecting Input Source . . . . . . . . . . . . . . . . . . . .36
Dimmer . . . . . . . . . . . . . . . . . . . . . . . . . . . . . . .36
Mute . . . . . . . . . . . . . . . . . . . . . . . . . . . . . . . . . .36
Using Headphone Jack . . . . . . . . . . . . . . . . . . .36
Presetting the Radio Stations . . . . . . . . . . . . . .37
Listening to the Radio . . . . . . . . . . . . . . . . . . . .37
Controlling Your TV with the Supplied
Remote . . . . . . . . . . . . . . . . . . . . . . . . . . . . . . .38
CONTROLLING OTHER TVs WITH THE
REMOTE . . . . . . . . . . . . . . . . . . . . . . . . . . . . . . . .38
CODE NUMBERS OF CONTROLLABLE TVS . . .38
Reference . . . . . . . . . . . . . . . . . . . . .39-42
Language Codes . . . . . . . . . . . . . . . . . . . . . . . .39
Country Codes . . . . . . . . . . . . . . . . . . . . . . . . . .39
Troubleshooting . . . . . . . . . . . . . . . . . . . . . .40-41
Specifications . . . . . . . . . . . . . . . . . . . . . . . . . . .42

5
Introduction
To ensure proper use of this product, please read this
owner’s manual carefully and retain for future
reference.
This manual provides information on the operation
and maintenance of your DVD/CD receiver. Should
the unit require service, contact an authorized service
location.
Symbol Used in this Manual
The lightning flash symbol alerts you to the
presence of dangerous voltage within the
product enclosure that may constitute a risk of
electric shock.
The exclamation point alerts you to the
presence of important operating and
maintenance / servicing instructions.
Indicates hazards likely to cause harm to the
unit itself or other material damage.
Note:
Indicates special notes and operating features.
Tip:
Indicates tips and hints for making the task easier.
Asection whose title has one of the following symbols
is applicable only to the disc represented by the
symbol.
DVD and finalized DVD±R/RW
DVD Audio discs
Video CDs
Audio CDs
MP3 Discs
WMA Discs
JPEG Discs
DivX Discs
About the Symbol Display
“ ” may appear on your TV display during
operation and indicates that the function explained in
this owner’s manual is not available on that specific
DVD video disc.
Notes on Discs
HANDLING DISCS
Do not touch the playback side of the disc. Hold the
disc by the edges so that fingerprints do not get on
the surface. Never stick paper or tape on the disc.
STORING DISCS
After playing, store the disc in its case. Do not expose
the disc to direct sunlight or sources of heat and never
leave it in a parked car exposed to direct sunlight.
CLEANING DISCS
Fingerprints and dust on the disc can cause poor
picture quality and sound distortion. Before playing,
clean the disc with a clean cloth. Wipe the disc from
the center out.
Do not use strong solvents such as alcohol, benzine,
thinner, commercially available cleaners, or anti-static
spray intended for older vinyl records.
DivX
JPEG
WMA
MP3
CD
VCD
DVD-A
DVD-V
Introduction

6
Types of Playable Discs
DVD
(8 cm / 12 cm disc)
DVD audio discs
(8 cm / 12 cm disc)
Video CD (VCD)
(8 cm / 12 cm disc)
Audio CD
(8 cm / 12 cm disc)
In addition, this unit plays DivX file, DVD -R, DVD +R,
DVD -RW, DVD +RW, SVCD, and CD-R / CD-RW that
contains audio titles, MP3, WMA, and/or JPEG files.
Notes:
•Depending on the conditions of the recording
equipment or the CD-R/RW (or DVD -R, DVD +R,
DVD -RW, DVD +RW) disc itself, some CD-R/RW
(or DVD -R, DVD +R, DVD -RW, DVD +RW) discs
cannot be played on the unit.
•Do not attach any seal or label to either side (the
labeled side or the recorded side) of a disc.
•Do not use irregularly shaped CDs (e.g., heart-
shaped or octagonal) since they may result in
malfunctions.
Notes on DVDs and Video CDs
Some playback operations of DVDs and Video CDs
may be intentionally programmed by software
manufacturers. This unit plays DVDs and Video CDs
according to disc content designed by the software
manufacturer, therefore some playback features may
not be available or other functions may be added.
Regional code
This DVD/CD receiver is designed and manufactured
for playback of region “1” encoded DVD software. This
unit can play only DVD discs labeled “1” or “ALL”.
Notes on Regional Codes
•Most DVD discs have a globe with one or more
numbers in it clearly visible on the cover. This
number must match your DVD/CD receiver’s
regional code or the disc cannot play.
•If you try to play a DVD with a different region code
from your player, the message “Check Regional
Code” appears on the TV screen.
Manufactured under license from Dolby
Laboratories. “Dolby”, “Pro Logic”, and
the double-D symbol are trademarks of
Dolby Laboratories. Confidential
Unpublished works. Copyright 1992-1997
Dolby Laboratories. All rights reserved.
Manufactured under license from Digital Theater
Systems, Inc. US Pat. No’s. 5,451,942; 5,956,674;
5,974,380; 5,978,762; 6,487,535 and other US and
world-wide patents issued and pending. “DTS” and
“DTS Digital Surround” are registered trademarks of
Digital Theater Systems, Inc. Copyright 1996, 2003
Digital Theater Systems, Inc. All rights reserved.
1
Remote Control Operation Range
Point the Remote Control at the remote sensor and
press the buttons.
Distance: About 23 ft (7 m) from the front of the
remote sensor.
Angle: About 30° in each direction of the front of
the remote sensor.
Remote Control Battery Installation
Detach the battery cover on the
rear of the Remote Control, and
insert two AAA batteries with
and aligned correctly.
Caution
Do not mix old and new batteries. Never mix different
types of batteries (standard, alkaline, etc.).

7
Introduction
Disc-related terms
DVD ±R / DVD ±RW
DVD -R and DVD +R are two different standards for
recordable DVD drives and discs. This format allows
information to be recorded onto the DVD disc only
once. DVD +RW and DVD -RW are two standards for
re-writable media, meaning the DVD content can be
erased and re-recorded. Single-sided discs can hold
4.38 Gigabytes and double-sided discs hold twice as
much. There are no dual layer single sided recordable
discs.
VCD (Video CD)
AVCD holds up to 74 minutes (650 MB disc) or 80
minutes (700 MB disc) of MPEG-1 full-motion video
along with quality stereo sound.
MPEG
MPEG is an international standard for video and audio
compression. MPEG-1 is used in encoding video for
VCD and provides for multichannel surround sound
coding such as PCM, Dolby Digital, DTS and MPEG
audio.
MP3
MP3 is a popular compression format used for digital
audio files that yields very high near-CD quality.
WMA
Windows media audio file. A type of coding / decoding
developed by Microsoft Corp.
JPEG
Joint Pictures Expert Group. JPEG is a compressed
file format that allows you to save images with no limit
on the number of colors.
DivX
DivX is the name of a revolutionary new video codec
which is based on the new MPEG-4 compression
standard for video.You will be able to play DivX
movies using this DVD/CD receiver.
PBC: Playback Control (Video CD only)
Playback control is available for Video CD (VCD)
version 2.0 disc formats. PBC allows you to interact
with the system via menus, search functions, or other
typical computer-like operations. Moreover, still
pictures of high resolution can be played if they are
included in the disc. Video CDs not equipped with
PBC (Version 1.1) operate in the same way as audio
CDs.
Title (DVD video discs only)
Atitle is generally a distinct section of a DVD disc. For
example the main feature could be title 1, a
documentary describing how the film was made could
be title 2, and cast interviews could be title 3. Each
title is assigned a reference number enabling you to
locate it easily.
Chapter (DVD video discs only)
Achapter is a segment of a title such as a scene in a
film or one interview in a series. Each chapter is
assigned a chapter number, enabling you to locate the
chapter you want. Depending on the disc, chapters
may not be recorded.
Group (DVD audio discs only)
The main audio content or accompanying feature
content or additional feature content, or music
album.Each group is assigned a group reference
number enabling you to locate it easily.
Scene (VCD)
On a video CD with PBC (playback control) functions,
moving pictures and still pictures are divided into
sections called “scenes”. Each scene is displayed in
the menu screen and assigned a scene number,
enabling you to locate the scene you want. A scene is
composed of one or several tracks.
Track
Adistinct element of audiovisual information, such as
the picture or sound track for a specific language
(DVD), or a musical piece on a video or audio CD.
Each track is assigned a track number, enabling you
to locate the track you want. DVD discs allow one
track of video (with multiple angles) and several tracks
of audio.

8
Front Panel
VOLUME Control
Turn the knob clock-
wise to increase
sound level, counter-
clockwise to decrease
sound level.
BPLAY/PAUSE/MONO/STEREO
To play back a disc.
Pause playback of a disc temporarily.
Switches STEREO or MONO in the FM mode.
Z OPEN/SEL
Opens or selects the Tray.
LINE IN 2 (VIDEO / AUDIO (Left/Right))
Connect the audio/video output of an external source
(Audio system, TV/ Monitor, VCR, Camcorder, Game System etc.).
Drawer
Insert discshere.
POWER button and indicator
Switches the unit ON and OFF.
Green when the unit is turns on.
Red when the unit is at standby.
x
x STOP
Stops playback.
Display window
Shows the current status of the
unit.
Remote Sensor
Point the unit here.
Disc buttons (DISC 1 - DISC 5)
Press to select the disc directly.
Z EJECT ALL
Press to open all disc trays.
PHONES
To connect
headphones.
FUNCTION
Select the unit’s
function mode.
(DVD/CD, AV 1, AV 2,
FM, or AM)
SS
SKIP/SEARCH
TT
/TUNING -/+
Go to beginning of current chapter/
track or go to NEXT chapter/track.
Tunes FM and AM stations.

9
Introduction
Display Window
MUTE
CHPTRK PROG SLEEP ST TUNED
TITLE
RPT ALL A B
PCM VCD MP3 PHOTO
CD
DVD
DIGITAL
PLII
1
2
4
3
5
SLEEP timer indication
Repeat playback mode indicators.
Indicates clock, total playing time, elapsed time,
remaining time, title number, chapter/track number,
radio frequency, volume, Surround mode or current
deck status (Playback, Pause, etc).
Lights up when a stereo
broadcast is being received.
DVD DVD inserted.
CD CD disc inserted.
VCD Video CD inserted.
MP3 MP3 disc inserted.
PHOTO PHOTO disc inserted.
Programmed
playback active.
DISC INDICATORS
Flashes when a disc is loaded in the
disk tray.
Indicates encoding format of the current disc.
Indicates sound mode is
DOLBY PRO LOGIC or DOLBY PRO LOGIC II.
Indicates the unit is playing back a disc or
indicates the unit is pause playback of a disc
temporarily.
MUTE The speaker sound is
muted.
Lights up when the
unit tunes in a station.
ANGLE active

10
Remote Control EJECT ALL
Opens and closes all disc tray.
DISC SEL.
To select desired a disc.
INPUT
Selects the receiver’s input source
.
0-9 numerical buttons
Selects numbered options in a menu.
AUDIO
Selects an audio language (DVD) or
an audio channel (CD).
SOUND
Selects sound mode.
S-TITLE
Selects a subtitle language.
RETURN (O)
Removes the menu.
DISPLAY
Accesses On-Screen display.
ENTER
Acknowledges menu selection.
TITLE
Displays the disc’s Title menu,
if available.
VOLUME (+/-)
Adjusts speaker sound.
PROG/MEMO.
- Accesses or removes Program menu.
- Stores a radio station’s frequency in
the tuner’s memory.
CLEAR
Removes a track number on the
program menu or a mark on the
MARKER SEARCH menu.
Clears preset stations from the tuner
memory.
REPEAT
Repeat chapter, track, title or all.
REPEAT A-B
Repeats sequence between two
points (A and B)
TV Control Buttons
-POWER: Switches TV ON and
OFF.
-CHANNEL v/V:Selects TV’s
channel.
-VOLUME +/–: Adjusts TV’s
volume.
-INPUT: Selects the TV’s source.
-MUTE: Turns the TV’s sound on
and off.
POWER
Turns DVD Home Theater System ON
and OFF.
DVD
Select the DVD Home Theater System’s
function mode to DVD.
FM/AM
Select FM or AM band as the listening
choice. (FM and AM bands).
AUX
Selects external input source. (AV1 or
AV2)
Disc buttons (1-5)
XTS pro
To enjoy more natural and realistic
sound.
XTS
To enjoy great sound effect.
SETUP
Accesses or removes DVD Setup menu.
b/B/v/V(left/right/up/down)
Selects an option in the menu.
MENU
Accesses the menu on a DVD disc.
SCAN-/+(bb/BB)
Search backward or forward.
SLOW-/+( /
y
)
Reverse/ Forward slow playback.
REVERSE SKIP(..)
Search backward*/go to beginning of
current chapter or track or go to
previous chapter or track.
FORWARD SKIP(>>)
Search forward*/go to next
chapter or track.
ZOOM
Enlarges DVD/VCD video image.
STOP (xx)
Stops playback.
PAUSE/STEP (XX)
Pause playback temporarily.
PLAY (B)
Starts playback.
MUTE
Turns the sound on and off temporarily.
MARKER
Marks any point during playback.
SEARCH
Displays Marker Search menu.
SLEEP
Set the System to turn off automatically
at a specified time.
DIMMER
Press to change brightness of the
display window on the front panel during
in power-on status.
y

11
Introduction
Rear Panel
AV IN (VIDEO IN/AUDIO IN (Left/Right))
Connect the audio/video output of an external
source (Audio system, TV/Monitor, etc.).
AC Power Cord
Plug into the power source.
S-VIDEO OUT (DVD OUT)
Connect to an S-Video Input on TV.
FOR DVD VIEWING ONLY.
FM ANTENNA CONNECTORS
Connect the FM antenna to this terminal.
AM ANTENNA CONNECTORS
Connect the AM antenna to
this terminal.
COMPONENT
VIDEO OUT (Y Pb Pr )
Connect to a TV with Y Pb Pr inputs.
COAXIAL IN Connector
Connect an coaxial output of Digital Device.
SPEAKER CONNECTORS
Connect the six supplied speakers
to these terminals.
OPTICAL IN Connector
Connect an optical output of Digital Device.
MONITOR OUT
Connect to a TV with video inputs.

12
Make one of the following connections, depending on
the capabilities of your existing equipment.
Tips:
Depending on your TV and other equipment you
wish to connect, there are various ways you could
connect the
DVD/CD Receiver
. Use one of the
connections described below.
Please refer to the manuals of your TV, VCR,
Stereo System or other devices as necessary to
make the best connections.
Caution
–
Make sure the DVD/CD Receiver is connected
directly to the TV. Select the correct AV input on your
TV.
–Do not connect your
DVD/CD Receiver
to TV via
your VCR. The DVD image could be distorted by
the copy protection system.
S-Video connection
Connect the S-VIDEO OUT jack on the DVD/CD
Receiver
to the S-VIDEO IN jack on the TV using the
S-Video cable (S).
Video connection
Connect the MONITOR OUT jack from the DVD/CD
Receiver
to the VIDEO IN jack on the TV using the
video cable supplied (V).
Component Video (Color Stream®) connection
Connect the COMPONENT VIDEO OUT jacks from
the DVD/CD Receiver to the corresponding in jacks
on the TV using an Y Pb Pr cable (C).
Progressive Scan (ColorStream®pro) connection
If your television is a high-definition or “digital
ready” television, you may take advantage of the
DVD/CD Receiver
’s progressive scan output for the
highest video resolution possible.
If your TV does not accept the Progressive Scan
format, the picture will appear scrambled if you try
Progressive Scan on the
DVD/CD Receiver
.
Notes:
•Set the Progressive to “On” on the setup menu for
progressive signal, see page 19.
•
Set the progressive to “Off” by removing any disc
from the unit and close the disc tray. see that “no
disc” is displayed on the display window. Then press
STOP and hold it for five seconds before releasing
it.
•Progressive scan does not work with the analog
video connections (yellow VIDEO OUT jack).
TV Connections
Rear of DVD/CD Receiver
SVC
YPb Pr
COMPONENT VIDEO /
PROGRESSIVE SCAN INPUT
L
VIDEO
INPUT
S-VIDEO
INPUT
Rear of TV
Installation and Setup

13
Note:
If the audio format of the digital output does not match the capabilities of your DVD/CD Receiver, the receiver
will produce a strong, distorted sound or no sound at all.
Audio Connection to Optional Equipment
Connect the DVD/CD receiver to your optional equipment for audio output.
1. Connect a VCR to the AV1 connectors.
2. Connect a additional VCR to the AV2 connectors.
3. Connect an optical output of a Digital Device (Cable Box, etc) to the OPTICAL IN connector.
4. Connect an coaxial output of aDigital Device (Cable Box, etc) to the COAXIAL IN connector.
VIDEO
INOUT
AUDIO (L)
AUDIO (R)
VIDEO
OUTIN
AUDIO (L)
AUDIO (R)
VCR Additional VCR
To AUDIO IN (L/R)/
VIDEO IN (AV2)
To AUDIO IN (L/R)/
VIDEO IN (AV1)
To AUDIO OUT (L/R)/
VIDEO OUT
To AUDIO OUT (L/R)/
VIDEO OUT
Digital Device (Cable Box, other DVD Player, etc)
OPTICAL
OUT
Installation and Setup

14
Antenna Connections
Connect the supplied FM/AM antenna for listening to the radio.
Connect the AM Loop antenna to the AM antenna connector.
Connect the FM Wire antenna to the FM antenna connector.
Notes:
To prevent noise pickup, keep the AM Loop antenna away from the DVD/CD receiver and other components.
Be sure to fully extend the FM wire antenna.
After connecting the FM Wire antenna, keep it as horizontal as possible.

15
Installation and Setup
Speaker System Connection
Connect the speakers using the supplied speaker cords.
To obtain the best possible surround sound, adjust the speaker parameters (volume, distance, etc.).
Notes:
Be sure to match the speaker cable to the appropriate terminal on the components: + to + and – to –. If the cables are
reversed, the sound will be distorted and will lack base.
If you use front speakers with low maximum input rating, adjust the volume carefully to avoid excessive output on the
speakers.
About Ferrite Core
Be sure to attach the ferrite core to the speaker
cables (for connecting to this unit).
This ferrite core can reduce noises.
How to attach the ferrite core
1Open the ferrite core.
2Wind the cable once on the ferrite core.
3Close the ferrite core unit it clicks.
Note:
Attach the ferrite core near the unit (Refer to the fig.3
and comment.).
+
-
FRONT REAR SUB REAR FRONT
R R
WOOFER CENTER
L L
SPEAKERS
Keep the length here
as short as possible.

16
Center Speaker
Front Speaker
(Left)
Speaker Positioning Example
Rear Speaker
(Left)
Rear Speaker
(Right)
Front Speaker
(Right)
Subwoofer
Speaker Positioning
In the case of normal position use the 6 speakers (2 front speakers, center speaker, 2 rear speakers and
subwoofer).
If you want to play DTS digital surround or Dolby Digital surround, you should connect a subwoofer.
•Front speakers
According to your listening position set up the speakers for equal distance. And by hearing position set up the
interval between speakers to 45 degree.
•Center speaker
The center speaker and front speakers are ideally the same height. But normally place it above or below the
television.
•Rear speakers
Place left and right behind the listening area. These speakers recreate sound motion and atmosphere required
for surround sound playback. For best results, do not install the rear speakers too far behind the listening
position and install them at or above the level of the listener’s ears. It is also effective to direct the rear
speakers towards a wall or ceiling to further disperse the sound.
In the case of a smaller room size, if the audience is near to the rear wall set the rear speakers opposite each
other, and set the rear speakers above 60 - 90 cm than the listener’s ears.
•Subwoofer
This can be placed in any front position.

17
Installation and Setup
Mini Glossary for Audio Stream &
Surround Mode
Allows you to enjoy 5.1(or 6) discrete channels of high quality
digital audio from DTS program sources such as discs, DVD
and compact discs, etc.bearing the trademark. DTS Digital
Surround delivers up to 6 channels of transparent audio(which
means identical to the original masters) and results in
exceptional clarity throughout a true 360 degree sound field.
The term DTS is a trademark of DTS Technology, LLC.
Manufactured under license from DTS Technology, LLC.
The Dolby Digital surround format lets you enjoy up to 5.1
channels of digital surround sound from a Dolby Digital
program source. If you play DVDs with “ ” mark, you can
enjoy even better sound quality, greater spatial accuracy, and
improved dynamic range.
Use this mode when playing movie or Dolby Digital 2 channel
which carries the “ ” mark. This mode provides the effect
of being in a movie theatre or live concert house-an effect with
an intensity which can only be obtained through DOLBY PRO
LOGIC SURROUND. The effect of the front/back/left/right
movement of the sound image, as well as the sense of fixed
position in the sound image, is much clearer and more dynamic
than before.
(II)
Dolby Pro Logic II creates five full-bandwidth output channels
from two-channel sources. This is done using an advanced,
high-purity matrix surround decoder that extracts the spatial
properties of the original recording without adding any new
sounds or tonal colorations.
MOVIE mode:
The Movie mode is for use with stereo television shows and all
programs encoded in Dolby Surround. The result is enhanced
soundfield directionality that approaches the quality of discrete
5.1-channel sound.
MUSIC mode:
The Music mode is for use with any stereo music recordings.
MATRIX mode:
The Matrix mode is the same as the Music mode except that the
directional enhancement logic is turned off. It may be used to
enhance mono signals by making them seem “larger.” The
Matrix mode may also find use in auto systems, where the
fluctuations from poor FM stereo reception can otherwise cause
disturbing surround signals from a logic decoder. The ultimate
“cure” for poor FM stereo reception may be simply to force the
audio to mono.
3D SURROUND
This unit can produce a 3D Surround effect, using 3D Surround
Sound technology, which simulates multi-channel audio
playback from two conventional stereo speakers instead of the
five or more speakers normally required to listen to multi-
channel audio from a home theatre. This feature works with
DVD discs encoded with Dolby Pro Logic and Dolby Digital
audio tracks.
BYPASS
Software with multichannel surround audio signals is played
according to the way it was recorded.
Sound Mode
You can enjoy surround sound simply by selecting one
of the pre-programmed sound fields according to the
program you want to listen to.
Each time you press SOUND button, the sound mode is
changed in the following order;
PRO LOGIC →PLII MOVIE → PLII MUSIC →
PLII MATRIX →ROCK →POP →LIVE →DANCE →
TECHNO →CLASSIC →SOFT →3D SURROUND →
BYPASS ...
(This function available 2-channel mode only)
Tips:
ROCK: Reproduces the acoustics of rock music.
POP: Reproduces the acoustics of pop music.
LIVE: Reproduces the acoustics of a 300-seat live.
DANCE: Reproduces the acoustics of dance music.
TECHNO: Reproduces the acoustics of techno
music.
CLASSIC: Reproduces the acoustics of orchestral
music.
SOFT: Ideal for soft acoustic sounds.
When DVD is inserted.
You can change the sound mode of DVD (Dolby Digital, DTS,
PRO LOGIC, etc) by pressing the AUDIO button on the remote
during playback.
Although the DVD contents differ from disc to disc, the
following explains the basic operation when this feature is
used.
Each time you press AUDIO button, the sound mode of DVD is
changed as the following order;
→→→
For your reference
•
The DVD/CD receiver memorizes the last mode
settings for each source individually.
•
You can identify the encoding format of program
software by looking at its packaging.
-Dolby Digital discs are labeled with the logo.
-Dolby Surround encoded programs are labeled with
the logo.
-DTS Digital Surround discs are marked with DTS.
Note:
Sound Mode is not applicable when headphone is used.

18
On-Screen Display
You can display the general playback status on the TV
screen. Some items can be changed using the menu.
To use the on-screen display:
1. Press DISPLAY during playback.
2. Press v/Vto select an item.
The selected item is highlighted.
3. Press b/Bto change the setting. You can also
use the number buttons if appropriate (e.g.
inputting the title number). For some functions,
press ENTER to execute the setting.
Notes:
•Some discs may not provide all of the features
shown below.
•If no button is pressed for 10 seconds, the
on-screen display disappears.
PLAYBACK STATUS/RESTRICTIONS
Repeat title
Repeat sequence
Enter a Marker
Marker Search menu
Resume play from this point
Action prohibited or not available
MARKER SEARCH
1 / 9
A - B
Title
Example: On-Screen Display during
playing VCD
Items
Title Number
Chapter Number
Time search
Audio language
and Digital Audio
Output mode
Subtitle language
Angle
Sound
Selection Method
b
/
B
,Numbers
ENTER
b
/
B
,Numbers
ENTER
Numbers, ENTER
b
/
B
or
AUDIO
b
/
B
or
SUBTITLE
b
/
B
b
/
B
1 / 3
1 / 12
0:20:09
ABC
1 ENG
1 / 3
3D SUR
Example: On-Screen Display during
playing DVD Video
Items
Track Number
(or PBC mode)
Time search
Audio Channel
Sound
Selection Method
b
/
B
,Numbers
ENTER
Numbers
ENTER
b
/
B
or
AUDIO
b
/
B
1 / 3
0:20:09
3D SUR
Items
Group Number
Track Number
Time search
Audio language
and Digital Audio
Output mode
Subtitle language
Page (or Angle)
Selection Method
b
/
B
,Numbers
ENTER
b
/
B
,Numbers
ENTER
Display only
b
/
B
or
AUDIO
Display only
b
/
B
0:20:09
OFF
ABC
Example: On-Screen Display during
playing DVD Audio
1 / 3
or
Items
Track Number
Time search
Audio language
and Digital Audio
Output mode
Subtitle language
Sound
Selection Method
b
/
B
,Numbers
ENTER
Numbers, ENTER
b
/
B
or
AUDIO
b
/
B
or
SUBTITLE
b
/
B
1 / 3
0:20:09
MP3
1
ABC
ENG
3D SUR
Example: On-Screen Display during
playing divx movie disc

19
Installation and Setup
Initial Settings
By using the Setup menu, you can make various
adjustments to items such as picture and sound. You
can also set a language for the subtitles and the
Setup menu, among other things. For details on each
Setup menu item, see pages 19 to 22.
To display and exit the Menu:
Press SETUP to display the menu. A second press of
SETUP will take you back to initial screen.
To go to the next level:
Press Bon the remote control.
To go back to the previous level:
Press bon the remote control.
GENERAL OPERATION
1. Press SETUP. The Setup menu appears.
2. Use v/Vto select the desired option then press
Bto move to the second level. The screen shows
the current setting for the selected item, as well as
alternate setting(s).
3. Use v/Vto select the second desired option then
press Bto move to the third level.
4.
Use v/Vto select the desired setting then press
ENTER to confirm your selection. Some items
require additional steps.
5. Press SETUP or PLAY to exit the Setup menu.
LANGUAGE
Menu Language
Select a language for the Setup menu and on-screen
display.
Disc Audio / Subtitle / Menu
Select the language you prefer for the audio track
(disc audio), subtitles, and the disc menu.
Original: Refers to the original language in which the
disc was recorded.
Other:
To select another language, press number
buttons then ENTER to enter the corresponding 4-digit
number according to the language code list in the
reference chapter. If you enter the wrong language code,
press CLEAR.
DISPLAY
TV Aspect
4:3:
Select when a standard 4:3 TV is connected.
16:9 Wide: Select when a 16:9 wide TV is connected.
Display Mode
Display Mode setting works only when the TV Aspect
mode is set to “4:3”.
Letterbox: Displays a wide picture with bands on the
upper and lower portions of the screen.
Panscan:
Automatically displays the wide picture on the
entire screen and cuts off the portions that do not fit.
Progressive Scan
Progressive Scan Video provides higherquality
pictures with less flickering.
If you are using the Component Video jacks for
connection to a TV or monitor that is compatible with
a progressive scan signal, set Progressive Scan to
On.
To Turn ON progressive scan:
Connect component out of the DVD to the input of
your monitor/television, set your television or monitor
to Component Input.
1. Select “Progressive Scan” on the DISPLAY menu
then press B.
2. Select “On” using the v/Vbuttons.
3. Press ENTER to confirm your selection.
The confirm menu will appear.
DVD-ADVD-V
DVD-ADVD-V
DVD-ADVD-V
Menu Language
Original
English
Off
Original
Disc Audio
Disc Subtitle
Disc Menu
Move
Select
LANGUAGE
DISPLAY
TV Aspect
Widescreen
16 : 9
Display Mode
OffProgressive Scan
Move
Select
DISPLAY
TV Aspect
Display Mode
Move
EnterPrev.
OnProgressive Scan
Off

20
Note:
•If your TV does not accept the Progressive
Scan format, the picture will appear scrambled if
you try Progressive Scan on the DVD/CD receiver.
4. When the confirm menu appears on your screen
Cancel is highlighted as default. Use the b/B
buttons to highlight Enter.
5. Pressing ENTER will set the player to Progressive
scan mode.
Caution:
Once the setting for progressive scan output is
entered, an image will only be visible on a progressive
scan compatible TV or monitor. If you set Progressive
Scan to On in error, you must reset the unit. First,
remove the disc in the DVD/CD receiver. Next, press
STOP ( x) and hold it for five seconds before
releasing it. The video output will be restored to the
standard setting, and a picture will once again be
visible on a conventional analog TV or monitor.
AUDIO
Each DVD disc has a variety of audio output options.
Set the receiver’s AUDIO options according to the
type of audio system you use.
5.1 Speaker Setup
Select speaker settings, including volume balance and
distance, or test the speaker settings.
Speaker settings are only active on the Analog Multi-
Channel Output. (See “5.1 Speaker Setup”, page 34.)
Dynamic Range Control (DRC)
With the DVD*1format, you can hear a program’s
soundtrack in the most accurate and realistic
presentation possible, thanks to digital audio
technology. However, you may wish to compress the
dynamic range of the audio output (the difference
between the loudest sounds and the quietest ones).
Then, you may listen to a movie at a lower volume
without losing clarity of sound. Set DRC to On for this
effect.
*1: Dolby Digital only
Vocal
Set Vocal to On only when a multi-channel karaoke
DVD is playing. The karaoke channels on the disc will
mix into normal stereo sound.
DVD-V
DVD-ADVD-V
DVD-ADVD-V
Select5.1 Speaker Setup
OnDRC
OnVocal
Move
Select
AUDIO
This manual suits for next models
3
Table of contents
Other LG Home Theater System manuals