
Do not insert pin or steel wire etc. into inside/out side of case.
blds Hkhrj@ckgj dgha Hkh dksbZ fiu ;k yksgs dk rkj vkfn u ?kqlk,aA
Please be careful during taking the food since high temp. water or soup may overflow to cause burn.
[kkus dks ckgj fudkyrs le; Ñi;k lko/kkuh cjrsa D;ksafd xje ikuh vFkok lwi vkfn rjy inkFkZ mcy
dj ;k Nyd dj vkidks tyk ldrs gSaA
Do not plug in power cord when socket hole is loose or plug is damaged.
tc Iyx [kjkc gks ;k ikoj lkWdsV <hyk gks rks bls Bhd djus ls igys blesa ikoj dksMZ u yxk,aA
Do not place the water container on the oven./vksou ij ikuh dk crZu dHkh u j[ksaA
Do not place anything on the set & do not cover the set with cloth while using.
ekbØksoso vksou ds Åij dqN Hkh u j[ksa vkSj mi;ksx djrs le; bls diM+s ls doj u djsaA
Do not install the oven in the damp space or water sputtering area.
xhys ;k ikuh ds cgko okys {ks= esa vksou dks dHkh u j[ksaA
Do not let children hang onto oven door.
cPpksa dks vksou ds njoktksa ij yVdus ls jksdsaA
Do not heat the unpeeled fruit or bottle with lid.
<Ddu okyh cksry vkSj fcuk fNyk Qy dHkh blds vUnj j[k dj xeZ u djsaA
Do not hold food or accessories as soon as cooking is over.
xeZ gks tkus ;k [kkuk cu tkus ds rqjar ckn vksou ls [kkuk ;k crZu ckgj u fudkysaA
Plug out oven if it is not used for long duration.
vxj vksou dks vf/kd nsj rd bLrseky esa u ykuk gks rks [kkyh le; esa bldh ikoj dksMZ dks lkWdsV ls
fudky dj j[ksaA
Install microwave oven in the well ventilated, flat , level surface.
ekbØksoso vksou dks vPNh rjg goknkj ]likV] lery lrg esa LFkkfir djsaA
There is danger of blast if covered bottle, sealed food, egg, and chestnut etc. are cooked inside oven.
vksou ds Hkhrj <Ddu yxh cksry] vaMk] lhYM [kk| inkFkZ ;k psLVuV j[k dj mls xykus ls foLQksV gks ldrk gSA
Do not use oven while some of foreign material is attached on the door.
tc Hkh vksou ds njokts ij dksbZ pht vM+h ;k j[kh gks] vksou dks pkyw u djsaA
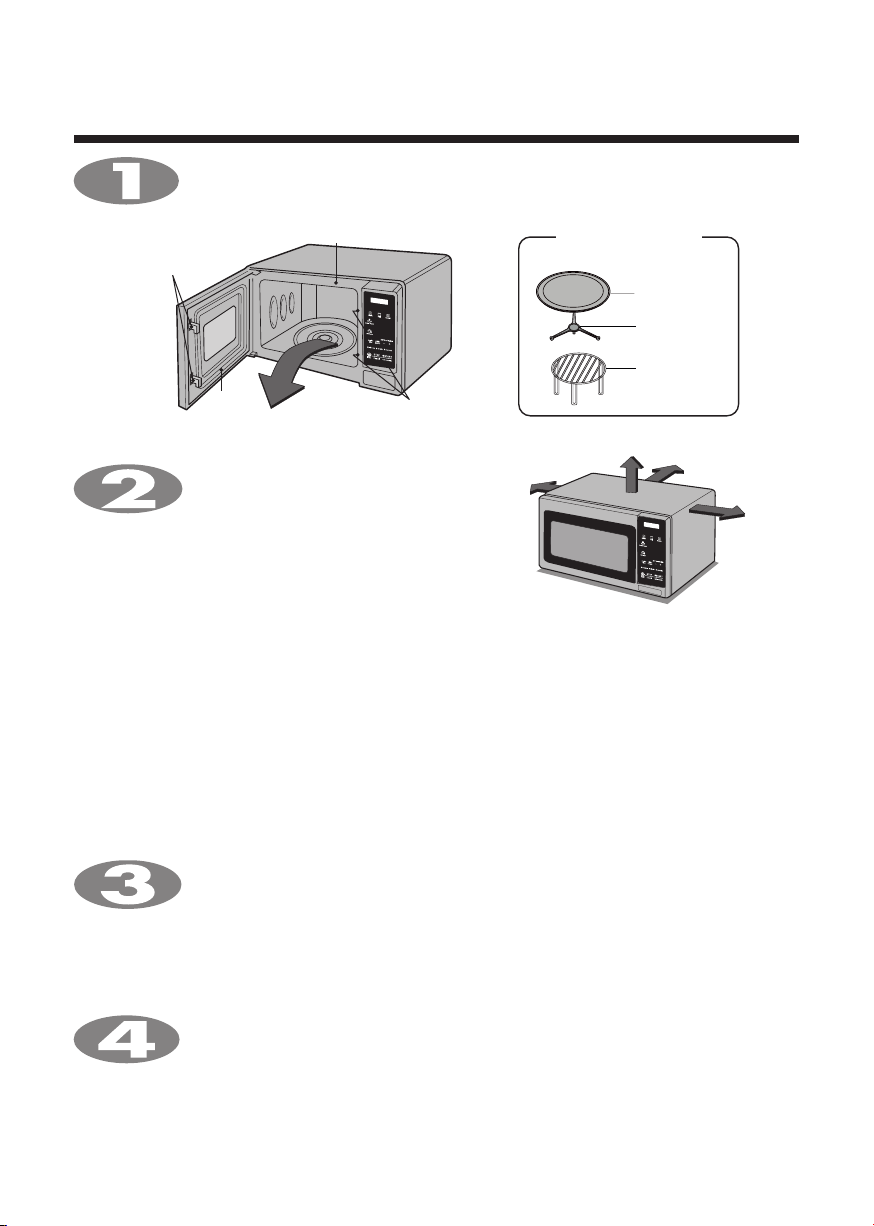
UNPACKING & INSTALLING
[kksyuk vkSj LFkkfir djuk
By following the basic steps on these three pages you will be able to quickly check that your
oven is operating correctly. Please pay particular attention to the guidance on where to install
your oven. When unpacking your oven make sure you remove all accessories and packing.
Check to make sure that your oven has not been damaged during delivery.
fuEufyf[kr rhu i`"Bksa ij fn, x, 'kq#vkrh rjhdksa dk pj.k nj pj.k bLrseky djds tYnh gh vkidks
irk py tk,xk fd vkidk vksou Bhd ls py jgk gSA Ñi;k fo'ks"k /;ku nsa fd vksou dks dgka j[ksaA
bldh iSfdax [kksyrs le; bl ckr dk /;ku j[ksa fd vki blds iSfdax o ,Dlsljht+ dks iwjh rjg ls
fudky pqds gSaA ;g Hkh lqfuf'pr dj ysa fd vkidk vksou fMfyojh ds le; {kfrxzLr ugha gqvk gSA
9
Microwave Oven is heavier from right side. Handle with care.
ekbØksoso vksou nkbZa vksj ls T;knk Hkkjh gSA /;ku ls laHkkysaA
Keep all packaging material (such as plastic bags and Styrofoam) away from children. The
packaging material can cause suocation.
lHkh iSdftax lkexzh¼ tSls& IykfLVd cSx vkSj LVk;jksQkse½ cPpksa ls nwj j[ksaA iSdsftax lkexzh ?kqVu dk dkj.k cu ldrh gSA
After using grill/convection mode, let the microwave oven cool down before switching it o.
fxzy@daosD’ku eksM dk mi;ksx djus ds ckn] ekbØksoso vksou dks can djus ls igys BaMk gksus nsaA


M Service manual")


