LG 3828VA0531D User manual

DLP
PROJECTION TV
OWNER’S MANUAL
Please read this manual carefully before operating your set.
Retain it for future reference.
Record model number and serial number of the set.
See the label attached on the back cover and quote this
information to your dealer when you require service.
Model number :
Serial number :
FOR THE GUARANTEE TERMS & CONDITIONS,
PLEASE REFER TO BACK COVER OF THIS MANUAL
P/NO : 3828VA0531D (MB05DA, 136G/100X TX) a
(3840VA0016C)

2
Contents
Installation 3
Location and function of controls 4
Remote control handset
Battery installation
Front panel / Rear panel
Basic operation 8
On and off / Programme selection
Volume adjustment / Quick view
Mute function / On screen language selection (option)
On screen menus 9
Menu selection
STATION MENU 10
Auto programme tuning
Manual programme tuning
Fine Tuning / Programme edit
Favourite Programme
Calling the programme table
PICTURE MENU 15
PSM(Picture Status Memory)
(Excellent Digital)
CSM (Color Starus Memory)
Manual Colour Temperature Control (User option)
sRGB (RGB[PC], HDMI[PC] mode only)
ACM (Active Color Management)
Manual Picture Control (User option)
SOUND MENU 19
SSM (Sound Status Memory) / BBE
AVL (Auto Volume Leveler) / Balance adjustment
Equalizer (option) / Sound output selection
Stereo/Dual reception / NICAM reception
TIME MENU 23
Clock / On/Off Timer
Auto sleep / Sleep timer
SPECIAL MENU 25
Child Lock / Demo
SCREEN MENU 26
Auto Configuration (RGB [PC] mode only)
Manual Configuration (RGB [PC])
Setting Picture Format / Cinema
NR (Noise Reduction)
Initializing (Reset to original factory value)
PIP/DW MENU 30
Main Picture Source Selection
Picture in picture (PIP) function 31
On and off / Input mode selection for sub picture
Swapping between main and sub pictures
Programme selection for sub picture
Sub picture size / Sub picture position change
Adjusting PIP Transparency (PIP mode only)
Teletext (option) 33
Switch on/off / SIMPLE text
TOP text (option) / FASTEXT
Special teletext functions
Connection of PC 36
PC in socket
Connection of external equipment 37
Aerial socket / Euro scart sockets
Audio/Video input sockets
S-Video / Audio input sockets (option)
DVD input sockets
DTV input sockets / HDMI
Troubleshooting check list 43

3
Installation
Power
This set operates on an AC mains supply, the voltage is as indicat-
ed on the label on the back cover. Never apply DC power to the set.
In the event of thunderstorms or powercuts, please pull out the aer-
ial and mains plugs.
Warning
To prevent fire or shock hazard, do not expose the set to rain or
moisture.
Do not place anything containing liquid on top of the set, this may
cause a fire or could give an electric shock.
Wiring (in U.K. only)
This set is supplied with a BS 1363 approved 13 amp mains plug,
fused at 5 amp. When replacing the fuse always use a 5 amp BS
1362, BSI or ASTA approved type. Never use this plug with the fuse
cover omitted. To obtain a replacement fuse cover contact your
dealer or “LG Electronics U.K. Ltd.”
If the type of plug supplied is not suitable for the mains sockets in
your home, then the plug should be removed and a suitable type fit-
ted. Please refer to the wiring instructions below:
Warning (in U.K. only)
A mains plug removed from the mains lead of this set must be
destroyed. A mains plug with bared wires is hazardous if inserted in
a mains socket.
Do not connect either wire to the earth pin, marked with the letter E
or with the earth symbol or coloured green or green and yellow.
If any other plug is fitted, use a 5 amp fuse, either in the plug, or at
the distribution board.
Important (in U.K. only)
The wires in this mains lead are coloured in accordance with the fol-
lowing codes:
BLUE: NEUTRAL
BROWN: LIVE
As the colours of the wires in the mains lead of this set may not cor-
respond with the coloured marking identifying the terminals in your
plug, proceed as follows:
The wire which is coloured blue must be connected to the terminal
which is marked with the letter N or coloured black. The wire which
is coloured brown must be connected to the terminal which is
marked with the letter L or coloured red.
Service
Never remove the back cover of the set as this can expose you to
very high voltage and other hazards. If the set does not operate
properly, unplug it and call your dealer.
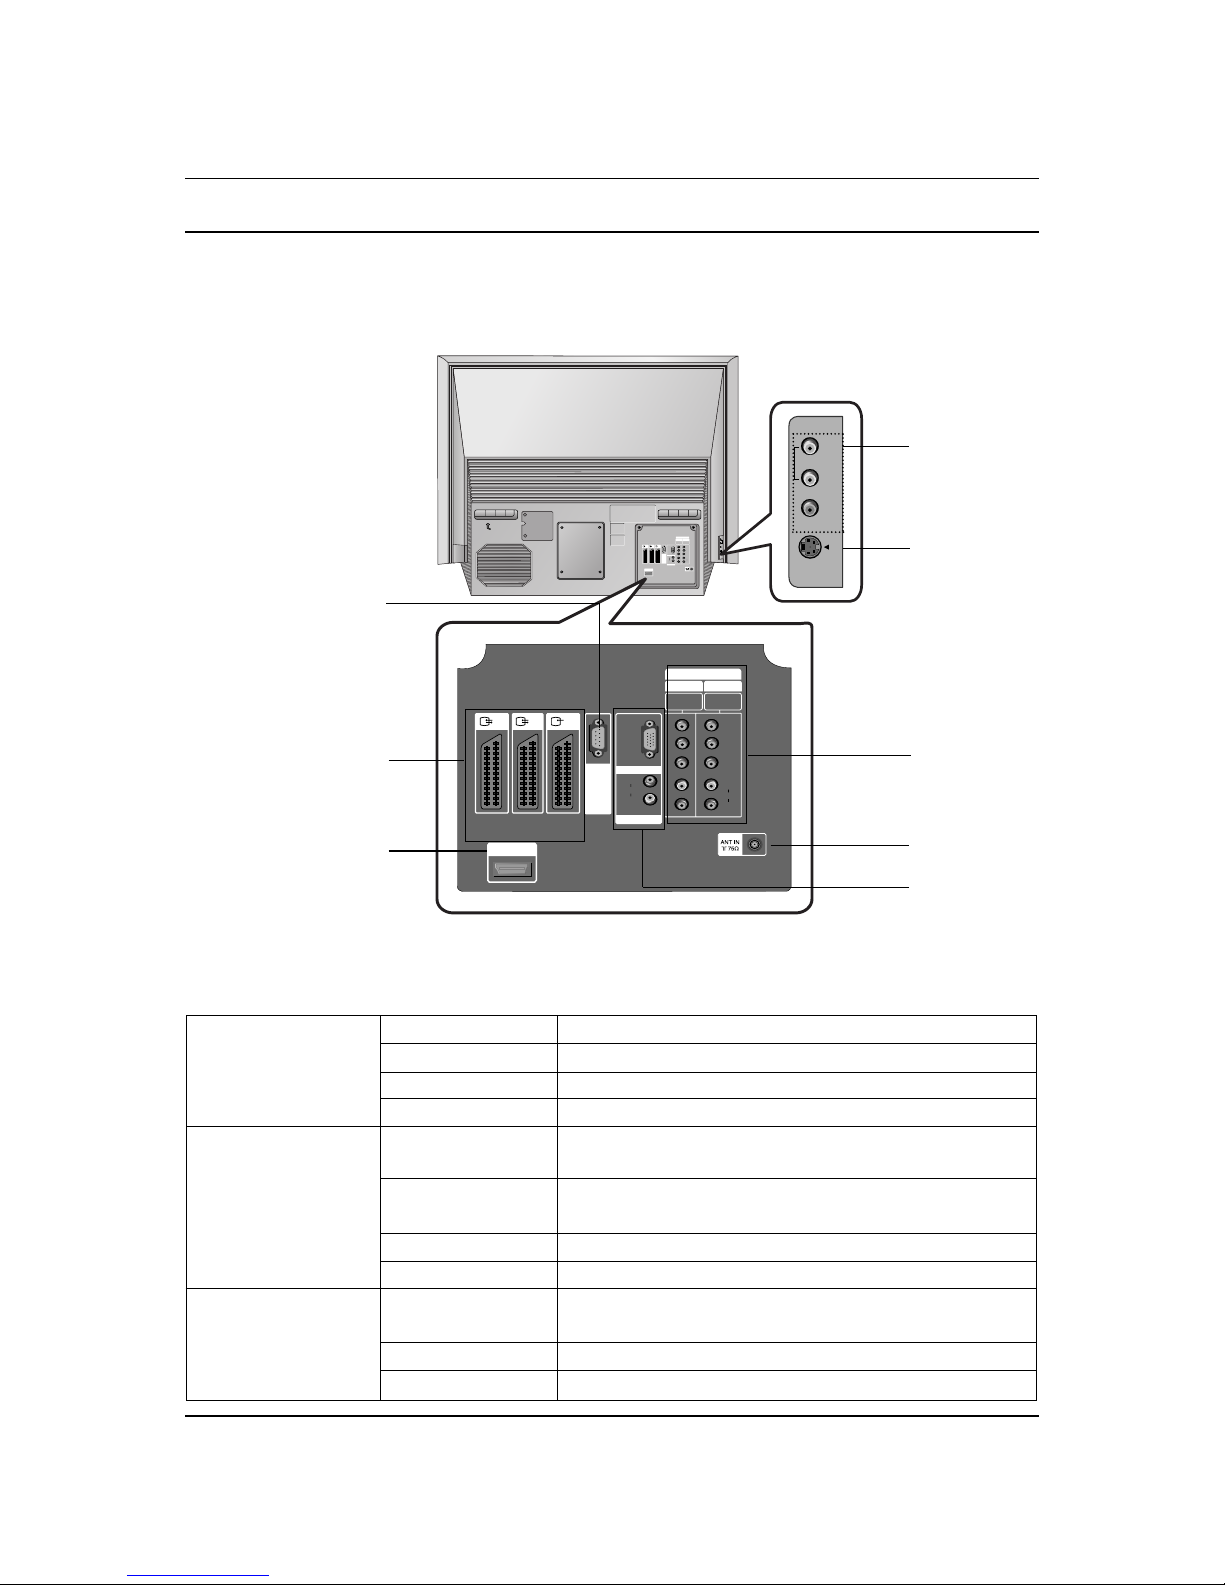
Aerial
Connect the aerial cable to the socket marked +75 Ωon the back
cover. For the best reception an outdoor aerial should be used.
Location
Position your set so that no bright light or sunlight falls directly onto
the screen. Care should be taken not to expose the set to any
unnecessary vibration, moisture, dust or heat. Also ensure that the
set is placed in a position to allow a free flow of air. Do not cover
the ventilation openings on the back cover.
Avoid having a fixed image remaining on the screen for a long peri-
od of time. Typically a frozen still picture from a VCR or DVD, 4:3,
14:9 or 16:9 picture format or if a CH label is present the fixed
image may remain visible on the screen.
Disposal of your old appliance
1. When this crossed-out wheeled bin symbol is attached to a product it means the product is covered
by the European Directive 2002/96/EC.
2. All electrical and electronic products should be disposed of separately from the municipal waste
stream via designated collection facilities appointed by the government or the local authorities.
3. The correct disposal of your old appliance will help prevent potential negative consequences for the
environment and human health.
4. For more detailed information about disposal of your old appliance, please contact your city office,
waste disposal service or the shop where you purchased the product.

Location and function of controls
4
All the functions can be controlled with the remote control handset.
Some functions can also be adjusted with the buttons on the front
panel of the set.
Remote control handset
Before you use the remote control handset, please install the bat-
teries. See the next page.
1. POWER
switches the set on from standby or off to standby.
2. MULTIMEDIA
selects Component 1/2,RGB or HDMI modes.
3. SLEEP
sets the sleep timer.
4. MUTE
switches the sound on or off.
5. PIP BUTTONS
PIP
switches the sub picture on or off.
PR +/-
selects a programme for the sub picture.
SWAP
alternates between main and sub picture.
INPUT
selects the input mode for the sub picture.
SIZE
adjusts the sub picture size.
POSITION
Moves the sub picture to
DD/EE
or
FF/GG
direction.
6. SWAP
returns to the previously viewed programme.
selects a favorite programme.
7. MENU
selects a menu.
8. DD/EE(Programme Up/Down)
selects a programme or a menu item.
switches the set on from standby.
FF/GG(Volume Down/Up)
adjusts the volume.
adjusts menu settings.
OK
accepts your selection or displays the current mode.
9. NUMBER BUTTONS
switches the set on from standby or directly select a number.
10. PSM (Picture Status Memory)
recalls your preferred picture setting.
11. TELETEXT BUTTONS (option)
These buttons are used for teletext.
For further details, see the ‘Teletext’ section.
12. LIST
displays the programme table.
123
456
7
PSM SSM
8
0
POSITION
STILL
MIX
I/II ARC
REVEAL ?
TIME
LIST
STOP REC
P/STILL
REW FF
PLAY
9
POWER
MULTIMEDIA TV/AV
MUTE SLEEP
PIP TEXT
PR - PR +
INPUTSWAP
MENU PR
VOL OK VOL
PR
CANCEL/EXIT
INDEX
MODE /
M
SIZE
(With TELETEXT)
1
2
3
4
5
6
7
10
11
12
18
9
8
14
13
15
16
17
19

Location and function of controls
5
13. TV/AV
selects the remote operating mode.
switches the set on from standby.
14. ARC (Aspect Ratio Control)
changes the picture format.
15. CANCEL/EXIT
Clears all on-screen displays and returns to TV viewing from any
menu.
16. SSM (Sound Status Memory)
recalls your preferred sound setting.
17. STILL
freezes motion of the picture.
18. I/II
selects the language during dual language broadcast.
selects the sound output.
19. VCR BUTTONS
control a video cassette recorder.
Note : In teletext mode, the PR + /
-
,SWAP and INPUT buttons are
used for teletext function.
Battery installation
The remote control handset is powered by two AAA type batteries.
To load the batteries, turn the remote control handset over and
open the battery compartment. Install two batteries as indicated by
the polarity symbols ( and ) marked inside the compartment.
Note : To avoid damage from possible battery leakage, remove the
batteries if you do not plan to use the remote control handset for an
extended period of time.
+
-
123
456
7
PSM SSM
8
0
SLEEP
STILL
SIZE
I/II
STOP REC
P/STILL
REW FF
PLAY
9
POWER
MULTIMEDIA
TV/AV
LIST ARC
MUTE PIP
PR - PR +
INPUTSWAP
MENU PR
VOL OK VOL
PR
CANCEL/EXIT
POSITION
(Without TELETEXT)
1
2
4
12
5
13
14
15
16
17
18
19
6
7
10
9
8
3

Location and function of controls
6
1. REMOTE CONTROL SENSOR
2. TV/AV
selects the remote operating mode.
switches the set on from standby.
3. MENU
selects a menu.
4. OK
accepts your selection or displays the current
mode.
5. FF/GG(Volume Down/Up)
adjusts the volume.
adjusts menu settings.
6. DD/EE(Programme Up/Down)
selects a programme or a menu item.
switches the set on from standby.
7. OPERATION INDICATOR (Refer to p.7)
8. LAMP INDICATOR (Refer to p.7)
9. TEMPERATURE INDICATOR (Refer to p.7)
10. MAIN POWER (ON/OFF)
switches the set on or off.
Note : There might be a faint white trace on the
center of the screen according to the position.
This is normal and is a characteristic of the
screen.
Front panel
ON/OFF
TV/AV MENU OK VOL PR
12 3 4 5 6 7 8 9 10
Lamp indicator, operation indicator, and temperature indicator, located side the front panel controls
reveal the operating status of the DLP(Digital Light Processing) projection TV.

Location and function of controls
S-VIDEO
VIDEO
AUDIO
(R)
(L)/
MONO
AV3
INPUT
HDMI/DVI
U
P
G
R
A
D
E
P
O
R
T
PC/DTV
(XGA/
480p/
576p/
720p/
1080i)
(L)
AUDIO
(R)
RGB INPUT
DVI / RGB INPUT
COMPONENT
P
R
P
B
Y
(L)
AUDIO
(R)
480i/480p/
576i/576p/
720p/1080i
480i/480p/
576i/576p/
720p/1080i
INPUT 1
INPUT 2
AV1 AV2 AV3
AV 4
INPUT
S-VIDEO
VIDEO
(L)/
(R)
MONO
AUDIO
HDMI/DVIINPUT
U
P
G
R
A
D
E
P
O
R
T
PC/DTV
(SXGA/
480p/
576p/
720p/
1080i)
(L)
AUDIO
(R)
RGBINPUT
DVI/ RGBINPUT
COMPONENT
P
R
P
B
Y
(L)
AUDIO
(R)
480i/480p/
576i/576p/
720p/1080i
480i/480p/
576i/576p/
720p/1080i
INPUT1
INPUT2
AV1 AV2 AV3
7
Rear panel
Off Power cord is not connected or power switch is off
Red Power Cord is connected, unit is on standby.
Green On
Orange (flashing) Preparing operation in standby.
Orange Projection lamp is reaching the end of its life and
needs to be replaced with a new lamp.
Red (flashing) There is a problem with the lamp or around it.
Contact an authorized service center.
Red Lamp life over.
Green (flashing) The lamp cover is not closed.
Red The set has shut down due to overheating.
After viewing the phrase “Thermal High Error”
Red (flashing) The set has shut down, check the cooling fan.
Orange Thermal warning.
Operation Indicator
Lamp Indicator
Temperature Indicator
•Status Indicators
AERIAL
SOCKET
UPGRADE PORT
This port is used to
upgrade the software ver-
sion and debug without
changing the hardware.
Be careful not to use this
port. Just contact your
dealer or service centre.
AV1/AV2/AV3 INPUT
SOCKETS
HDMI/DVI
RGB INPUT
DTV/DVD
INPUT
S-VIDEO
INPUT
SOCKET
AV4 INPUT
SOCKET

8
Basic Operation
On and off
1. Before turning the set on, be sure that the main power switch
on the set is pushed on.
When the main switch is pushed on, the LED will be lit up red.
This mode is Stand-by.
2. If the set is in stand-by mode, press the POWER, DD /EE, TV/AV,
MULTIMEDIA or NUMBER button on the remote control hand-
set to turn it on fully. The LED will blink orange for a while and
then lit up green when the power is successfully on.
3. To turn the set off, press the power button on the remote con-
trol handset. The set reverts to the stand-by mode.
Note :
a. The lamp cooling fan will continue to spin for approximately 120
seconds after the power is turned off by the remote control handset.
b. Normally, don’t push off the main power switch. Instead, use the
remote control to turn the power off.
c. When the set is turned on again immediately after turning off, it
takes around 20 to 40 seconds for sufficient cooling.
d. When the power is switched off using the main power switch on
the set, the internal cooling system also stops operating.
Therefore, power-on by main power switch takes around 30 to
50 seconds for sufficient cooling.
e. Forced Power-Off : When the set decides itself that the circum-
stance is not proper for operation, the set will goes to the stand-
by mode automatically. Please retry to turn on the set after a
short period of time.
f. When the set is switched on, there might be a strange sound from
the set.
Programme selection
You can select a programme number with the DD /EEor NUMBER
buttons.
Volume adjustment
Press the FF /GGbutton to adjust the volume.
Quick view
Press the SWAP button to view the last programme you were
watching.
Note : This function works only when Favourite programme is
set to Off. Otherwise each press of this button will select a stored
favourite programme.
Mute function
Press the MUTE button. The sound is switched off and the display
appears.
You can cancel it by pressing the MUTE, FF /GG,SSM, I/II button.
123
456
7
SSM
8
0
I/II
9
POWER
MULTIMEDIA TV/AV
MUTE
SWAP
MENU PR
VOL OK VOL
PR
Mute

9
On Screen Menus
The dialogue between you and your set takes place on screen with an operator menu. The buttons
required for the operating steps are also displayed.
Menu selection
1. Press the MENU button and then DD/EEbutton to display each menu.
2. Press the GGbutton and then the DD/EEbutton to select a menu item.
3. Repeatedly press the MENU button to return to normal TV viewing.
STATION menu PICTURE menu
SOUND menu
TIME menuSCREEN menu SPECIAL menu
Auto programme
Manual programme
Programme edit
Favourite programme
STATION
G
PICTURE
SOUND
TIME
SPECIAL
SCREEN
PIP/DW
PSM
CSM
ACM
Contrast 95
Brightness 50
Colour 50
Sharpness 60
STATION
PICTURE
G
SOUND
TIME
SPECIAL
SCREEN
PIP/DW
SSM
BBE
AVL
Balance 0
Equalizer
STATION
PICTURE
SOUND
G
TIME
SPECIAL
SCREEN
PIP/DW
PIP/DW menu
Clock
Off time
On time
Auto sleep
STATION
PICTURE
SOUND
TIME
G
SPECIAL
SCREEN
PIP/DW
Child lock
Demo
STATION
PICTURE
SOUND
TIME
SPECIAL
G
SCREEN
PIP/DW
Auto config.
Manual config.
ARC
Cinema
NR
Reset
STATION
PICTURE
SOUND
TIME
SPECIAL
SCREEN
G
PIP/DW
Input
DW
PIP
PIP Input
Win. size
Win. position
PIP Transparency
PIP System
STATION
PICTURE
SOUND
TIME
SPECIAL
SCREEN
PIP/DW
G

Up to 100 TV stations can be stored in this set by programme num-
bers (0 to 99). Once you have preset the stations, you will be able
to use the DD/EEor NUMBER buttons to scan the stations you pro-
grammed.
Stations can be tuned using automatic or manual modes.
Auto programme tuning
All stations that can be received are stored by this method. It is rec-
ommended that you use auto programme during installation of this
set.
1. Press the MENU button and then DD/EEbutton to select the
STATION menu.
2. Press the GGbutton and then DD/EEbutton to select Auto pro-
gramme.
3. Press the GGbutton to select System. Select a TV system with
the FF /GGbutton;
BG : PAL B/G, SECAM B/G (Europe/East Europe)
I: PAL I/II (U.K./Ireland)
DK : PAL D/K, SECAM D/K (East Europe)
M : (USA/Korea/Philippines) (option)
4. Press the EEbutton to select Storage from. Select the begin-
ning programme number with the FF /GGbutton or NUMBER but-
tons on the Storage from menu.
5. Press the EEbutton to select Start.
6. Press the GGbutton to begin auto programming.
All receivable stations are stored. The station name is stored for
stations which broadcast VPS (Video Programme Service),
PDC (Programme Delivery Control) or TELETEXT data. If no
station name can be assigned to a station, the channel number
is assigned and stored as C(V/UHF 01-69) or S(Cable 01-47),
followed by a number.
To stop auto programming, press the MENU button.
When auto programming is completed, the Programme ed t
menu appears on the screen. See the ‘Programme Edit’section
to edit the stored programme.
7. Repeatedly Press the MENU button to return to normal TV
viewing.
STATION MENU
10
123
456
78
0
9
MENU PR
VOL OK VOL
PR
Auto programme
Manual programme
Programme edit
Favourite programme
STATION
G
PICTURE
SOUND
TIME
SPECIAL
SCREEN
PIP/DW
Auto programme
Manual programme
Programme edit
Favourite programme
Prev.
System
Storage from
Start
Menu
BG
2
STATION
PICTURE
SOUND
TIME
SPECIAL
SCREEN
PIP/DW
Auto programme GG
Auto programme
Manual programme
Programme edit
Favourite programme
System
Storage from
Start
BG
2
STATION
PICTURE
SOUND
TIME
SPECIAL
SCREEN
PIP/DW
Auto programme
Prev.
-----
M
23 %16
Auto programme
Menu
Stop

STATION MENU
11
Manual programme tuning
Manual programme lets you manually tune and arrange the sta-
tions in whatever order you desire. Also you can assign a station
name with five characters to each programme number.
1. Press the MENU button and then DD/EEbutton to select the
STATION menu.
2. Press the GGbutton and then DD/EEbutton to select Manual
programme.
3. Press the GGbutton to select Storage. Select the beginning
programme number with the FF /GGbutton or NUMBER buttons
on the Storage menu.
4. Press the EEbutton to select System. Select a TV system with
the FF /GGbutton;
BG : PAL B/G, SECAM B/G (Europe/East Europe)
I: PAL I/II (U.K./Ireland)
DK : PAL D/K, SECAM D/K (East Europe)
M : (USA/Korea/Philippines) (option)
5. Press the EEbutton to select Band. Press the FF /GGbutton to
select V/UHF or Cable as required.
6. Press the EEbutton to select Channel. Select the desired
channel number with the FF /GGbutton or NUMBER buttons. If
possible, select the channel number directly with the number
buttons.
7. Press the EEbutton to select Search. Press the FF /GGbutton to
commence searching. If a station is found the search will stop.
8. Press the OK button to store it.
9. To store another station, repeat steps 3 to 8.
10. Repeatedly press the MENU button to return to normal TV
viewing.
123
456
78
0
9
MENU PR
VOL OK VOL
PR
Auto programme
Manual programme
Programme edit
Favourite programme
STATION
G
PICTURE
SOUND
TIME
SPECIAL
SCREEN
PIP/DW
Auto programme
Manual programme
Programme edit
Favourite programme
Prev.
Menu
STATION
PICTURE
SOUND
TIME
SPECIAL
SCREEN
PIP/DW
Manual programme
GG
Storage
System
Band
Channel
Fine
Search
Name
Booster
2
BG
1
V/UHF
Off
C 01

STATION MENU
12
Assigning a station name
1. Repeat the ‘Manual programme tuning’steps 1 to 2.
2. Press the EEbutton to select Name.
3. Press the GGbutton. You can use a blank, +, -, the numeric 0to
9and the alphabet Ato Z.
With the EEbutton you can select in the opposite direction.
4. Select the next position by pressing the GGbutton and then take
your choice of the second character, and so on.
5. Press the OK button.
6. Repeatedly press the MENU button to return to normal TV
viewing.
Booster (option)
In some models, Booster is an optional function. Only a set with
Booster can perform this function.
If the reception is poor at the fringe area of TV signal, select
Booster to On. When the picture condition is good, do not select
Booster to On.
1. Repeat the ‘Manual programme tuning’steps 1 to 2.
2. Press the EE button to select Booster.
3. Press the FF /GG button to select On or Off.
4. Repeatedly press the MENU button to return to normal TV
viewing.
Fine tuning
Normally fine tuning is only necessary if reception is poor.
1. Repeat the ‘Manual programme tuning’steps 1 to 2.
2. Press the EEbutton to select F ne.
3. Press the FF /GGbutton to fine tune for the best picture and
sound.
4. Press the OK button.
The finely tuned programme will be indicated by yellow number
during programme selection.
5. Repeatedly press the MENU button to return to normal TV
viewing.
MENU PR
VOL OK VOL
PR
Auto programme
Manual programme
Programme edit
Favourite programme
STATION
G
PICTURE
SOUND
TIME
SPECIAL
SCREEN
PIP/DW
Auto programme
Manual programme
Programme edit
Favourite programme
Prev.
Menu
STATION
PICTURE
SOUND
TIME
SPECIAL
SCREEN
PIP/DW
Manual programme
GG
Storage
System
Band
Channel
Fine
Search
Name
Booster
2
BG
1
V/UHF
Off
C 01

STATION MENU
13
Programme edit
This function enables you to delete or skip the stored programmes.
Also you can move some stations to other programme numbers or
copy a blank station data into the selected programme number.
1. Press the MENU button and then DD/EEbutton to select the
STATION menu.
2. Press the GGbutton and then DD/EEbutton to select
Programme ed t.
3. Press the GGbutton to display the Programme ed t menu.
Deleting a programme
1. Select a programme to be deleted with the DD/EEor FF /GGbut-
ton.
2. Press the RED button twice.
The selected programme is deleted, all the following pro-
grammes are shifted up one position.
Copying a programme
1. Select a programme to be copied with the DD/EEor FF /GGbut-
ton.
2. Press the GREEN button.
3. Move the programme to the desired programme number with the
DD/EEor FF /GGbutton.
4. Press the GREEN button again to move the programme.
All the following programmes are shifted down one position.
Moving a programme
1. Select a programme to be moved with the DD/EEor FF /GGbut-
ton.
2. Press the YELLOW button.
3. Move the programme to the desired programme number with the
DD/EEor FF /GGbutton.
4. Press the YELLOW button again to release this function.
Skipping a programme number
1. Select a programme number to be skipped with the DD/EEor FF /GG
button.
2. Press the BLUE button. The skipped programme turns to blue.
3. Press the BLUE button again to release the skipped pro-
gramme.
When a programme number is skipped it means that you will be
unable to select it using the DD/EEbutton during normal TV
viewing. If you want to select the skipped programme, directly
enter the programme number with the NUMBER buttons or
select it in the programme edit or table menu.
Repeatedly press the MENU button to return to normal TV viewing.
123
456
78
0
9
MENU PR
VOL OK VOL
PR
Auto programme
Manual programme
Programme edit
Favourite programme
STATION
G
PICTURE
SOUND
TIME
SPECIAL
SCREEN
PIP/DW
CHANNEL
Programme edit
0 - - - - - 5 C 05
1 BLN 2 6 C 07
2 C 01 7 C 55
3 C 04 8 S 27
4 C 05 9 S 29
Delete Copy
Move Skip
Prev.
2 C 01
Menu

STATION MENU
14
LIST
SWAP
MENU PR
VOL OK VOL
PR
Auto programme
Manual programme
Programme edit
Favourite programme
STATION
G
PICTURE
SOUND
TIME
SPECIAL
SCREEN
PIP/DW
Favourite Programme
This function lets you select your favourite programmes directly.
1. Press the MENU button and then use DD/EEbutton to select the
STATION menu.
2. Press the GGbutton and then DD/EEbutton to select Favour te
programme.
3. Press the GGbutton to display the Favour te programme menu.
4. Press the
DD/EEbutton to select On.
5. Press the GGbutton and then DD/EE button to select -- -----.
6. Select a desired programme with the FF /GGbutton or NUMBER
buttons. Any number under 10 is entered with a numeric ‘0’in
front of it, i.e. ‘05’for 5.
7. To store another programme, repeat steps 5 to 6.
You can store up to 8 programmes.
8. Press the OK button.
9. Repeatedly press the MENU button to return to normal TV
viewing.
Repeatedly press the SWAP button to select stored favorite pro-
grammes.
Calling the programme table
You can check the programmes stored in the memory by displaying
the programme table.
Displaying programme table
Press the LIST button to display the Programme table menu.
The programme table appears on the screen.
Note :
a. You may find some blue highlighted programmes shown. They
have been set up in the programme edit mode.
b. Some programmes with the channel number shown in the pro-
gramme table indicate there is no station name assigned.
Selecting a programme in the programme table
Select a programme with the DD/EEor FF /GGbutton.
The set switches to the chosen programme number.
Paging through a programme table
There are 10 (or 20) programme table pages which contain 100 (or
200) programmes.
Pressing the DD/EEor FF /GGbutton repeatedly turns the pages.
Press the LIST button to return to normal TV viewing.
Auto programme
Manual programme
Programme edit
Favourite programme
Prev.
STATION
PICTURE
SOUND
TIME
SPECIAL
SCREEN
PIP/DW
Favourite programme
GG
0 BLN 2
- - - - - - -
- - - - - - -
- - - - - - -
- - - - - - -
- - - - - - -
- - - - - - -
- - - - - - -
Menu
On
Off
0 - - - - - 5 C 05
1 BLN 2 6 C 07
2 C 01 7 C 55
3 C 04 8 S 27
4 C 05 9 S 29
2 C 01

PICTURE MENU
PSM (Picture Status Memory)
1. Press the MENU button and then DD/EEbutton to select the PIC-
TURE menu.
2. Press the GGbutton and then DD/EEbutton to select PSM.
3. Press the GGbutton and then DD/EEbutton to select a picture set-
ting on the PSM pull-down menu.
4. Press the OK or FFbutton.
5. Repeatedly press the MENU button to return to normal TV
viewing.
To recall your preferred setting, press the PSM button until the
desired picture (Dynam c,Standard,M ld or User) appears.
The picture Dynam c, Standard and M ld are programmed for
good picture reproduction at the factory and cannot be changed.
(Excellent Digital)
- You can enjoy the vivid and high-definition picture with Digital
Reality processor technology.
- When selecting picture options (Dynam c, Standard and
M ld) in PICTURE menu, XD is automatically changed to On.
-It’s not available to use this function in RGB[PC], HDMI[PC]
mode.
1. Press the MENU button and then DD/EEbutton to select the PIC-
TURE menu.
2. Press the GGbutton and then DD/EEbutton to select XD.
3. Press the GGbutton and then DD/EEbutton to select On or Off.
4. Press the OK or FFbutton.
5. Repeatedly press the MENU button to return to normal TV
viewing.
15
PSM
MENU PR
VOL OK VOL
PR
PSM
CSM
ACM
Contrast 95
Brightness 50
Colour 50
Sharpness 60
STATION
PICTURE
G
SOUND
TIME
SPECIAL
SCREEN
PIP/DW
PSM
CSM
ACM
Contrast 95
Brightness 50
Colour 50
Sharpness 60
Prev.
Dynamic
Standard
Mild
User
Menu
STATION
PICTURE
SOUND
TIME
SPECIAL
SCREEN
PIP/DW
PSM GG
PSM
CSM
ACM
Contrast 95
Brightness 50
Colour 50
Sharpness 60
Prev.
On
Off
Menu
STATION
PICTURE
SOUND
TIME
SPECIAL
SCREEN
PIP/DW
GG

PICTURE MENU
16
CSM (Color Starus Memory)
- When selecting picture options (Dynam c, Standard and
M ld) in PICTURE menu, CSM is automatically changed to
Normal.
-It’s not available to use this function in sRGB On mode.
1. Press the MENU button and then DD/EEbutton to select the PIC-
TURE menu.
2. Press the GGbutton and then DD/EEbutton to select CSM.
3. Press the GGbutton and then use DD/EEbutton to select the
desired colour temperature.
4. Press the OK or FFbutton.
5. Repeatedly press the MENU button to return to normal TV
viewing.
Manual Colour Temperature Control (User option)
1. Press the MENU button and then DD/EEbutton to select the
PICTURE menu.
2. Press the GGbutton and then DD/EEbutton to select CSM.
3. Press the GGbutton and then DD/EEbutton to select User.
4. Press the GGbutton and then FF /GGbutton to make appropriate
adjustments.
The adjustment range of Red, Green and Blue is -30~+30.
5. Press the OK button.
6. Repeatedly press the MENU button to return to normal TV
viewing.
MENU PR
VOL OK VOL
PR
PSM
CSM
ACM
Contrast 95
Brightness 50
Colour 50
Sharpness 60
Prev.
Cool
Normal
Warm
User
Red
Green
Blue
Menu
STATION
PICTURE
SOUND
TIME
SPECIAL
SCREEN
PIP/DW
CSM GG
0
0
0
PSM
CSM
ACM
Contrast 95
Brightness 50
Colour 50
Sharpness 60
Prev.
Cool
Normal
Warm
User
Red
Green
Blue
Menu
STATION
PICTURE
SOUND
TIME
SPECIAL
SCREEN
PIP/DW
CSM GG
0
0
0
PSM
CSM
ACM
Contrast 95
Brightness 50
Colour 50
Sharpness 60
STATION
PICTURE
G
SOUND
TIME
SPECIAL
SCREEN
PIP/DW

PICTURE MENU
MENU PR
VOL OK VOL
PR
sRGB (RGB[PC], HDMI[PC] mode only)
- When the set was connected to external equipment with sRGB
function, It’s adjusted a colour difference to display the equal
image each other.
1. Press the MENU button and then DD/EEbutton to select the PIC-
TURE menu.
2. Press the GGbutton and then DD/EEbutton to select sRGB.
3. Press the GGbutton and then DD/EEbutton to select On or Off.
4. Press the OK or FFbutton.
5. Repeatedly press the MENU button to return to normal TV
viewing.
ACM (Active Color Management)
- Adjust the ACM to select the desired skin colour option.
- This function works in the following mode:
TV, AV1, AV2, SAV2, AV3, AV4 COMPONENT 1/2 , HDMI DTV
[480p, 570p, 720p,1080i].
-It’s not available to use this function in XD Off mode.
1. Press the MENU button and then use DD/EEbutton to select the
PICTURE menu.
2. Press the
GGbutton and then use DD/EEbutton to select ACM.
3. Press the
GGbutton and then use FF /GGbutton to make appro-
priate adjustments.
The adjustment range of ACM is 0 ~ 3.
4. Press the OK button.
5. Repeatedly press the MENU button to return to normal TV
viewing.
17
PSM
CSM
s-RGB
Contrast 95
Brightness 50
Prev.
On
Off
Menu
STATION
PICTURE
SOUND
TIME
SPECIAL
SCREEN
PIP/DW
s-RGB GG
PSM
CSM
ACM
Contrast 95
Brightness 50
Colour 50
Sharpness 60
Prev.
Fleshtone
Greentone
Bluetone
Menu
STATION
PICTURE
SOUND
TIME
SPECIAL
SCREEN
PIP/DW
ACM GG0
0
0
PSM
CSM
ACM
Contrast 95
Brightness 50
Colour 50
Sharpness 60
STATION
PICTURE
G
SOUND
TIME
SPECIAL
SCREEN
PIP/DW

PICTURE MENU
Manual Picture Control (User option)
You can adjust picture contrast, brightness, colour, sharpness and
tint (NTSC input only) to the levels you prefer.
In the broadcasting system PAL/SECAM, the picture item Tint
doesn’t work.
1. Press the MENU button and then DD/EEbutton to select the PIC-
TURE menu.
2. Press the GGbutton and then DD/EEbutton to select the desired
picture item.
3. Press the GGbutton and then FF /GGbutton to make appropriate
adjustments, then it will be stored for the picture User.
4. Press the OK button.
5. Repeatedly press the MENU button to return to normal TV
viewing.
Note : The adjustment for PICTURE menu (contrast, brightness,
colour, sharpness and tint) affect both the main and sub picture in
PIP or Twin Picture mode.
MENU PR
VOL OK VOL
PR
18
PSM
CSM
ACM
Contrast 95
Brightness 50
Colour 50
Sharpness 60
STATION
PICTURE
G
SOUND
TIME
SPECIAL
SCREEN
PIP/DW
PSM
CSM
ACM
Contrast 95
Brightness 50
Colour 50
Sharpness 60
Prev.
Menu
STATION
PICTURE
SOUND
TIME
SPECIAL
SCREEN
PIP/DW
Contrast 95 GG

SOUND MENU
19
SSM (Sound Status Memory)
This function lets you enjoy the best sound without any special
adjustment because the set automatically selects the appropriate
sound option based on the program content.
When adjusting sound options equalizer manually, SSM is auto-
matically changed to User.
1. Press the MENU button and then DD / EEbutton to select the
SOUND menu.
2. Press the GGbutton and then DD / EEbutton to select SSM.
3. Press the GGbutton and then DD / EEbutton to select a sound set-
ting on the SSM pull-down menu.
4. Press the OK or FFbutton.
5. Repeatedly press the MENU button to return to normal TV
viewing.
To recall your preferred setting, press the SSM button until the
desired sound (SRS TSXT,Flat,Mus c,Mov e,Speech or User)
appears. The sound SRS TSXT,Flat,Mus c,Mov e and Speech
are programmed for good sound reproduction at the factory and
cannot be changed.
Note :
a. If you press the SSM button after making appropriate adjust-
ment on the Equalizer sub menu, the display User automati-
cally appears even though you have already set a factory pre-
set setting; SRS TSXT,Flat,Music,Movie or Speech.
b. Equalizer isn’t suitable to use SRS TSXT.
- is a trademark of SRS Labs, Inc.
- TruSurround XT technology is incorporated under license from
SRS Labs, Inc.
BBE
- BBE High Definition Sound restores clarity and presence for bet-
ter speech intelligibility and musical realism.
-It’s not available to use this function in SRS TSXT mode.
1. Press the MENU button and then DD / EEbutton to select the
SOUND menu.
2. Press the GGbutton and then DD / EEbutton to select BBE.
3. Press the GGbutton and then DD/EEbutton to select On or Off.
4. Press the OK or FFbutton.
5. Repeatedly press the MENU button to return to normal TV
viewing.
SSM
MENU PR
VOL OK VOL
PR
SSM
BBE
AVL
Balance 0
Equalizer
STATION
PICTURE
SOUND
G
TIME
SPECIAL
SCREEN
PIP/DW
SSM
BBE
AVL
Balance 0
Equalizer
Prev.
SRS TSXT
Flat
Music
Movie
Speech
User
Menu
STATION
PICTURE
SOUND
TIME
SPECIAL
SCREEN
PIP/DW
SSM GG
R
TruSurround XT
SSM
BBE
AVL
Balance 0
Equalizer
Prev.
On
Off
Menu
STATION
PICTURE
SOUND
TIME
SPECIAL
SCREEN
PIP/DW
BBE GG

AVL (Auto Volume Leveler)
If you select AVL On, the set automatically keeps on an equal vol-
ume level even if you change programmes.
1. Press the MENU button and then DD / EEbutton to select the
SOUND menu.
2. Press the GGbutton and then DD / EEbutton to select AV L .
3. Press the GGbutton and then DD/EEbutton to select On or Off.
4. Press the OK or FFbutton.
5. Repeatedly press the MENU button to return to normal TV
viewing.
Balance adjustment
You can adjust balance.
1. Press the MENU button and then DD / EEbutton to select the
SOUND menu.
2. Press the GGbutton and then DD / EEbutton to select Balance.
3. Press the GGbutton.
4. Make desired adjustment with the FF / GGbutton on the Balance
pull-down menu.
5. Press the OK button.
6. Repeatedly press the MENU button to return to normal TV
viewing.
SOUND MENU
20
MENU PR
VOL OK VOL
PR
SSM
BBE
AVL
Balance 0
Equalizer
STATION
PICTURE
SOUND
G
TIME
SPECIAL
SCREEN
PIP/DW
SSM
BBE
AVL
Balance 0
Equalizer
Prev.
On
Off
Menu
STATION
PICTURE
SOUND
TIME
SPECIAL
SCREEN
PIP/DW
AVL GG
SSM
BBE
AVL
Balance 0
Equalizer
Prev.
Menu
STATION
PICTURE
SOUND
TIME
SPECIAL
SCREEN
PIP/DW
Balance 0 GGLR
Table of contents
Other LG Projection TV manuals

LG
LG RU-44SZ63D User manual

LG
LG RT-52SZ30RB User manual

LG
LG RT-60SZ31RP User manual

LG
LG RU-44SZ61D - - 44" Rear Projection TV User manual

LG
LG RU-44SZ80L - - 44" Rear Projection TV User manual

LG
LG 71SA1D User manual

LG
LG DU-52SX40D User manual

LG
LG RU-44SZ63D User manual

LG
LG RU-44SZ63D User manual

LG
LG RU-44SZ51D - - 44" Rear Projection TV User manual
Popular Projection TV manuals by other brands

Panasonic
Panasonic PT-47WX42 operating instructions

Panasonic
Panasonic PT52DL10 - 52" DLP REAR PJ HDTV operating instructions

Sony
Sony Hi-Scan KP-51WS520 Specifications

JVC
JVC I'Art Pro AV-48P775 user guide

Sony
Sony KP-53V85 - 53" Color Rear Video Projector Service manual

Samsung
Samsung SP403JHAX Service manual