LG GC-181SA User manual

FRIDGE-FREEZER
User's Guide
GC-181SA
Please read this User's Guide carefully
before operating and keep it handy for
reference at all times.


Introduction
Precaution
Important Safety Instruction
This fridge-freezer must be properly installed and
located in accordance with the Installation
Instruction before it is used.
Never unplug your fridge-freezer by pulling on the
power cord. Always grip plug firmly and pull straight
out from the outlet.
When moving your appliance away from the wall,
be careful not to roll over or damage the power
cord.
After your fridge-freezer is in operation, do not
touch the cold surfaces in the freezer compartment,
particularly when hands are damp or wet. Skin may
adhere to these extremely cold surfaces.
Pull out the power plug prior to cleaning the
fridge-freezer.
Never damage, severely bend, pull out, or twist
the power cord because power cord damage may
cause a fire or electronic shock.
Never place glass products in the freezer because they
may be broken when their inner contents are frozen.
Don't Use an
Extension Cord
If possible, connect the fridge-freezer to its own
individual electrical outlet to prevent it and other
appliances or household lights from causing an overload.
Accessibility of
Supply Plug
Supply Cord
Replacement
The supply plug of the refrigerator-freezer should be
placed in easy accessible position for quick disconnection
in emergency.
If the supply cord is damaged, it must be replaced by the
manufacturer or its service agent or a similarly qualified
person in order to avoid a hazard.
4

5
Introduction
Danger
Important Safety Instruction
Risk of child entrapment.
Before you throw away your old refrigerator or freezer:
Take off the doors.
Leave the shelves in place so that children may not easily
climb inside.
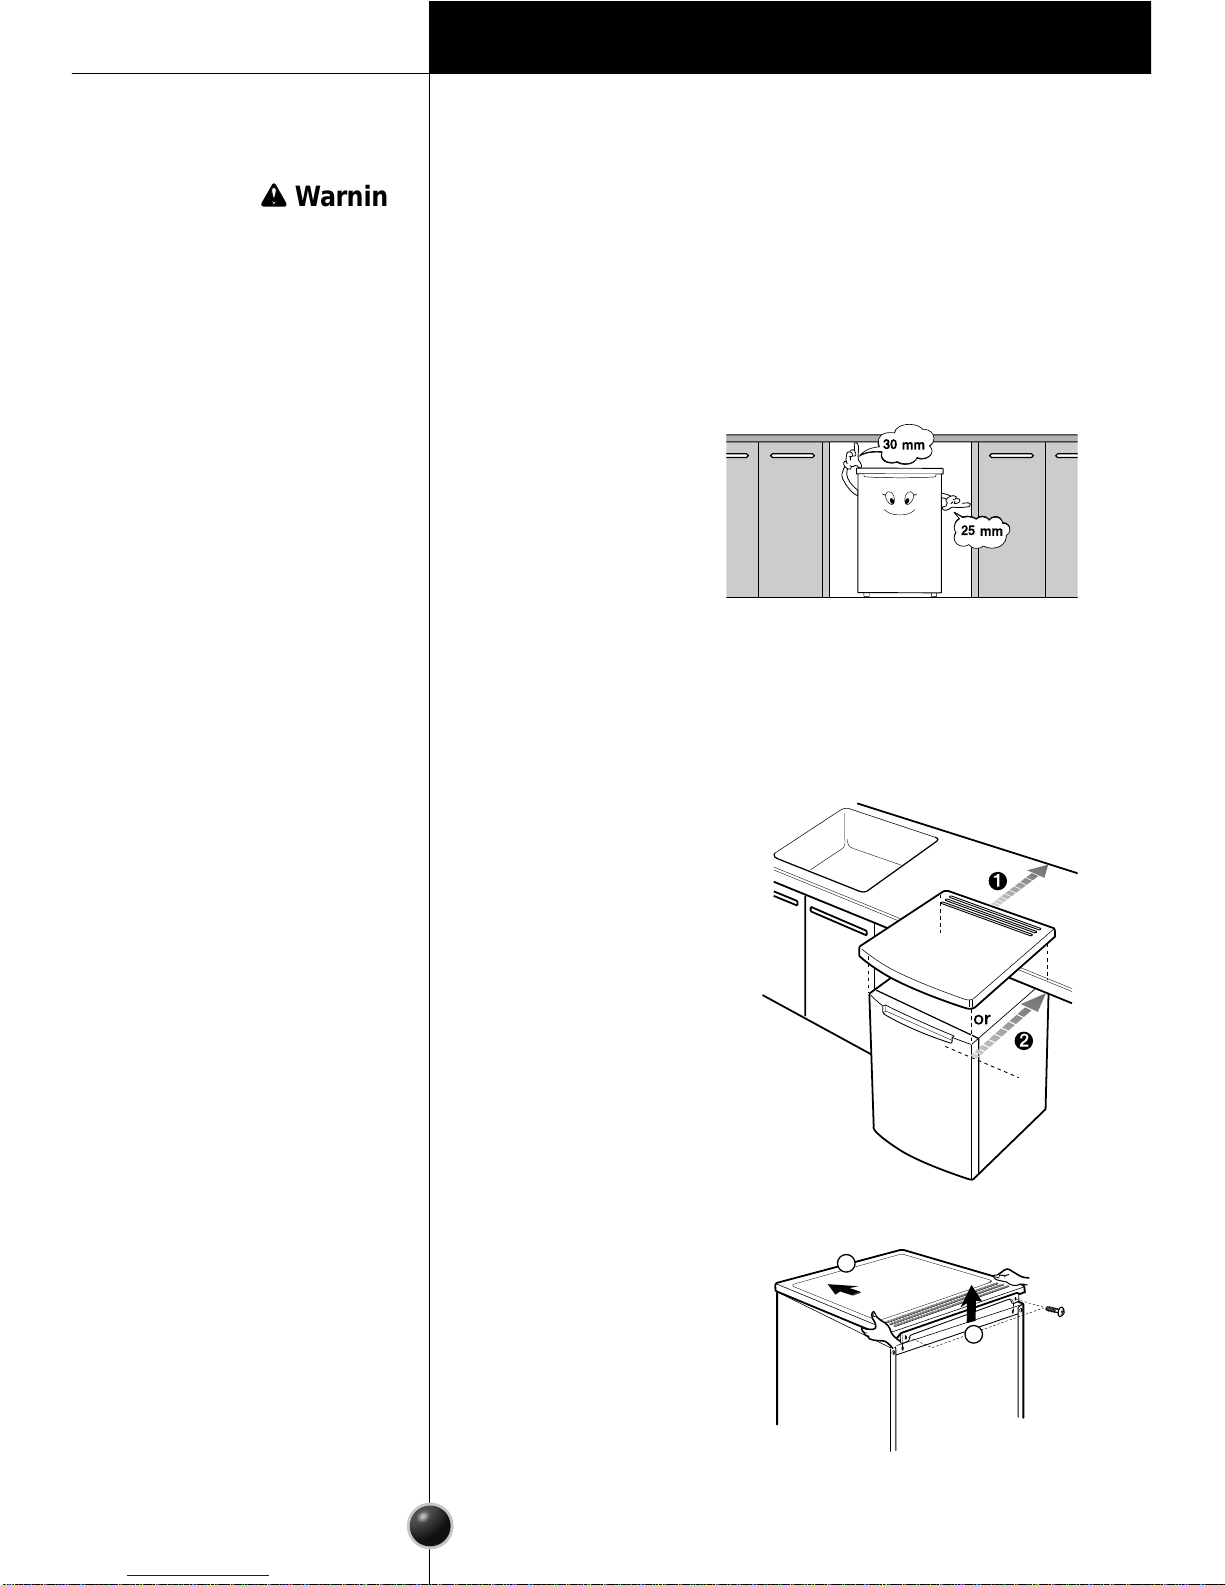
wwWarning wKeep ventilation openings, in the appliance enclosure
or in the built-in structure, clear of obstruction.
wDo not use mechanical devices or other means to
accelerate the defrosting process, other than those
recommended by the manufacturer.
wDo not damage the refrigerant circuit.
wDo not use electrical appliances inside the food
storage compartments of the appliance, unless they
are of the type recommended by the manufacturer.
wThe refrigerant and insulation blowing gas used in
the appliance require special disposal procedures.
At disposal, please consult with service agent or
a similarly qualified person.
Don't store
Don't store or use gasoline or other flammable vapors and
liquids in the vicinity of this or any other appliance.
Grounding
(Earthing)
In the event of an electric short circuit, grounding (earthing)
reduces the risk of electric shock by providing an escape
wire for the electric current. In order to prevent possible
electric shock, this appliance must be grounded. Improper
use of the grounding plug can result in an electric shock.
Consult a qualified electrician or service person if the
grounding instructions are not completely understood, or if
you have doubts on whether the appliance is properly
grounded.

Introduction
Identification of Parts
6
Evaporator
Ice Tray
Drip Tray
Shelves
Vegetable
Drawer
Thermostat
Control Dial
Eva Door
Commodity
Racks
Egg Tray
Bottle Rack
Magnetic
Door Seal
Leveling
Screws

7
Installation
Location
•Avoid placing the refrigerator near any heat sources, direct
sunlight or moisture.
•Sufficient air circulation is essential for the efficient operation
of your refrigerator.
•If your refrigerator is
placed in a recessed area
in the wall, allow at least
30 mm or greater
clearance above the
refrigerator and 25 mm
or more from the wall.
•If the floor is carpeted, the refrigerator should be elevated
25 mm from the floor.
Installation with/without
Top Table
1. When installing with Top
Table (free standing), push
the refrigerator until the air
circulating hole of Top
Table nearly reaches the
wall.
2. When installing without
Top Table, align the door
front edge to the front edge of
kitchen furniture.
How to Remove Top Table
1. Unscrew 2 bolts at the rear
of top table.
2. Hold the rear of top table
and push forwoards with
lifting up top table slightly.
30 mm
25 mm
wwWarning Try not to use the refrigerator for a prolonged time
where the temperature drops below 16°C or rises
above 32°C.
1
2

Installation
Adjusting Leveling Screws
•To avoid vibrations the refrigerator has to be placed on
a leveled surface.
•If necessary, set the leveling screws to compensate the
unevenness of the floor. The front should be slightly
higher than the rear so that the door can close more
easily.
•The Leveling Screws can be adjusted by tilting the
refrigerator slightly.
•Turning the Leveling Screw clockwise, the refrigerator
is raised.
Next •Clean your refrigerator thoroughly and wipe off all dust
accumulated during transit.
•Install accessories such as ice tray, shelf, etc., in their
proper places. They are packed together to prevent
possible damage during transit
•Connect the power supply cord to the AC outlet.
Don’t double up with other appliances on the same
outlet.
•Prior to use, leave your refrigerator on for 2 or 3 hours.
Check the flow of cold air on the evaporator to ensure
proper cooling.
8

9
Operation
Starting
When first turning refrigerator on, allow it to operate for
at least 2 to 3 hours to stabilize at normal temperature
before loading it with fresh food.
If operation is interrupted, allow a 5 minutes delay
before restarting.
Temperature Control
FREEZER CONTROL regulates the temperature in the
freezer and is displayed in OFF, 1, 2,...7.
The freezing capacity of the freezer compartment is
2STAR at a setting of 4 or higher, and food can be
stored up to 1 month.
NOTE The DRIP TRAY in the Freezer should be installed
exactly to contact with the interior wall.
Refrigerator Compartment is cooled by the cold air from
the Freezer Compartment.
Turning the TEMPERATURE
CONTROL clockwise will set to
a colder setting (higher number
setting).
Turning the TEMPERATURE
CONTROL counterclockwise
will set to a warmer setting
(lower number setting).
Setting the TEMPERATURE CONTROL depends on
location of the refrigerator, room temperature,
and how often the refrigerator door.
W
a
r
m
C
o
l
d
OFF
4
2
6
1
5
3
7
Too Warm
Too Cold

Defrosting
•It is necessary to regularly defrost your refrigerator in
order to ensure efficient operation. The frost on the
surface of the evaporator should not exceed 6mm
before defrosting.
•To defrost, turn the control
to ‘OFF’.
•Before you start the defrosting
operation, remove food from the
evaporator, and wrap it with
paper or cloth, then put it in
a cold place or in another refrigerator. Place the DRIP
TRAY in its proper position.
•If you place a bottle containing warm water in the
freezer, defrosting time can be reduced.
•When defrosting is completed, remove the drip tray,
empty water, dry and put it back to its normal position.
Turn the control dial to a desired temperature.
Operation
CAUTION Never use any sharp or metallic instruments to
remove ice, frost or ice tray from the evaporator.
10
OFF
4
2
6
1
5
3
7

11
Suggestions on food storage
Storing Food
•How food is frozen and defrosted is an important
factor in maintaining freshness and flavor.
•Do not store food which goes bad easily at low
temperatures, such as bananas, pineapples and
melons.
•Allow hot food to cool prior to storing. Adding too
much warm food to the refrigerator could spoil other
food, and lead to high electric bills.
•Do not open doors too frequently. Whenever the door
is opened, warm air enters the refrigerator, causing
temperatures to rise.
Freezer Compartment
•Do not store bottles in the freezer compartment –they
may break when frozen.
•Do not refreeze food that has been completely thawed.
This causes loss of taste and nutritional value.
Refrigerator Compartment
•When storing, wrap food in vinyl, or place in a covered
container. This prevents moisture from evaporating,
and helps food to keep its taste and nutrients.
•Always clean food prior to refrigeration. Vegetables
and fruits should be washed and wiped, and packed
food should be wiped clean, to prevent adjacent food
from spoiling.
•Food with odor (fish, cheese, butter etc.) should be
wrapped securely or stored in closed containers.
NOTE In case of placing a big bottle in the COMMODITY
RACK, if excessive force is used to open/close the
door, the bottle may fall down, so be careful.

Going away
General Information
When you plan to be away for an extended period,
remove all food, disconnect the power cord, clean the
interior thoroughly, and leave the door OPEN to prevent
odor formation.
Power Failure Most power failures are corrected in an hour or two and
will not affect your refrigerator temperatures. However,
you should minimize the number of door openings while
the power is OFF. During power failures of longer
duration, place a block of dry ice on top of your frozen
packages.
If you move Remove all items inside the refrigerator or securely fasten
all loose items. To avoid damaging the leveling screw,
turn them all the way into the base.
Care and Maintenance
12
Anti Condensation
Pipe
• The Anti-Condensation pipe is
installed around the front side
of fridge-freezer to prevent
dewing.
• Especially after installation or
when ambient temperature is
high, the fridge-freezer may
feel hot, which is quite normal.
Anti-Condensation
Pipe

13
Care and Maintenance
Cleaning
•It is important that your refrigerator be kept clean to
prevent undesirable odors. Spilled food should be
wiped up immediately, since it may acidify and stain
plastic surfaces.
•Never use metallic scouring pads, brushes, coarse
abrasive cleaners or strong alkaline solutions on any
surface.
•Before you clean, however, remember that damp
objects will stick or adhere to extremely cold surfaces.
Do not touch frozen surfaces with wet or damp hands.
Exterior Use a lukewarm solution of mild soap or detergent to
clean the durable finish of your refrigerator. Wipe with a
clean, damp cloth and then dry.
Interior Regular cleaning of the interior and interior parts is
recommended. Disconnect the power cord, and remove
food and shelves, trays etc. Wash all compartment and
shelves, trays etc. with a baking soda solution. Rinse and
dry.
wwWarning
Lamp Replacing
Unplug the Power Cord from the AC Outlet.
1. Take the DRIP TRAY
and Shelves out to
make access easier.
2. Hold the COVER LAMP,
Take it out softly from
the Thermostat
Enclosure with twisting up and down.
3. Turn the lamp counterclockwise, and replace it.
4. Assemble in reverse order of disassembly.
Replacement bulb must be the same specification as
original.
off
4
2
6
1
5
3
7

Before calling for service, check this list.
It may save you both time and expense.
This list includes common occurrences that are not
the result of defective workmanship or materials in
this appliance.
Problem Possible Causes
Fridge-Freezer
does not operate
• Power plug may be unplugged from the electric
outlet.
Plug it in securely.
• House fuse has blown or circuit breaker has
tripped.
Check and/or replace fuse and reset circuit breaker.
• Power cut.
Check house lights.
Vibration or
Rattling or
Abnormal Noise
• The floor on which the fridge-freezer is installed
may be uneven or the fridge-freezer may be
unstable.
Make it even by rotating the leveling screw.
• Unnecessary objects placed in the back side of the
fridge-freezer.
Frost or Ice
Crystals on frozen
Food
• Door may have been left ajar or package holding
door open.
• Too frequent or too long door openings.
• Frost within package is normal.
Moisture forms on
Cabinet Surface
• This phenomenon is likely to occur in a wet space.
Wipe it with a dry towel.
Trouble Shooting
14

15
Trouble Shooting
Problem Possible Causes
Moisture collects
inside
• Too frequent or too long door openings.
• In humid weather, air carries moisture into fridge
when doors are opened.
Fridge has odor • Foods with strong odors should be tightly
covered or wrapped.
• Check for spoiled food.
• Interior needs cleaning.
Refer to CLEANING section.
Interior light does
not work
• No power at outlet.
• Light lamp needs replacing.
Refer to the Lamp Replacement section.

Precaution
How to Reverse the Door
Your refrigerator is designed with a reversible door, so
you may open from either left or right. It is best to
reposition the door hinge as necessary at the outset since
it is inconvenient to do so later.
To change the door hinge please refer to the diagram
below and proceed as follows.
2. Remove all loose fittings from inside the appliance.
3. Carefully lay the appliance on its back on the original
packing.
4. Use Torque Wrench or Spanner to fix or remover the
bolts.
1. Unscrew the 2xBOLTS , then remove the hinge (L) .
2. Remove the LEG .
3. Gently pull the door downwards to remove it.
4. Before refitting the door, swap the Hinge Cap by pulling
it out from its current location and repositioning it on the
other side of the door. Care should be taken not to damage
the adjacent surfaces when removing the Hinge Cap.
5. Unscrew the Upper Hinge pin (U) and screw it into the
opposite side hole.
To Reverse the Doors
16
4
4
1. First unplug the appliance.

17
To Reverse the Doors
How to Reverse the Door
6. By using 2xBOLTS, secure the Lower Hinge (L) in the
opposite side.
7. Replace the Adjustable Foot in the Hinge (L), setting it at
approximately 20mm.
8. Carefully place the appliance in an upright position.
Use the Adjustable Foot not to vibrate the appliance,
and check that the door opens and closes properly.
How to Reverse the Eva Door
When repositioning the Refrigerator Door hinge, you
should also change the Freezer Door hinge for
convenience. Please refer to the diagram below and
proceed as follows
1. Open the EVA DOOR, and Grasp the Bottom side of
the EVA DOOR Hinge.
2. Take it out forwards by lifting it slightly up .
3. Rotate the EVA DOOR 180 degrees, and insert EVA
DOOR to opposite side top hole first, then in to the
Bottom side hole.
4. Check that EVA DOOR is installed properly.
2
1
NOTE In case of applying Reversible door, When you close
the door with excessive force, there could be the case
that the door doesn’t close because of Reaction
force. Please ascertain if the door closes properly.

18
Door handle(Option)
To Reverse the Doors

HŰTŐSZEKRÉNY-FAGYASZTÓ
Használati útmutató
Kérjük, hogy a készülék használatba vétele
előtt gondosan olvassa el a használati
útmutatót, és őrizze meg azt, mert később
is szüksége lehet rá.
GC-181SA

18
Tartalom
Bevezetés Fontos biztonsági információk
A készülék részegységei, tartozékai
Üzembe helyezés Hol helyezzük el?
Üzembe helyezés Top Table-lel vagy anélkül
A készülék működése Elindítás
Élelmiszertárolási
javaslatok
Élelmiszerek tárolása
Mélyhűtő rekesz
Gondozás és
karbantartás Általános információk
Izzócsere
Tisztítás
Ajtók nyitási irányának megváltoztatása
Eva ajtó nyitási irányának megváltoztatása
Problémaelhárítás
Problémaelhárítás
Ajtók nyitási
irányának
megváltoztatása
Szintbeállító csavarok beállítása
Hömérséklet szabályozása
Leolvasztás
Hűtőszekrény rekesz
3
4
6
7
7
8
9
9
10
11
11
11
12
13
13
14
16
17
18
Ajtófogantyú (opcionális)
18

Bevezetés
Fontos biztonsági információk
Óvintézkedések Használatbavétel előtt a hűtőszekrényt megfelelően üzembe
kell helyezni. A készülék helyének megválasztásakor a jelen
használati utasításban foglalt előírásokat be kell tartani.
Soha ne húzza ki a készülék csatlakozódugóját a kábelnél
fogva. Ha áramtalanítani kívánja a berendezést, markolja meg
a csatlakozódugót, és annál fogva húzza ki a dugaljból.
Ügyeljen arra, hogy a készülék mozgatásakor ne kerüljön a
csatlakozózsinór a készülék alá, illetve más módon se sérüljön
meg.
A hűtőszekrény üzembe helyezése után soha ne érintse meg
a mélyhűtő fagyos felületeit, különösen ha a keze vizes vagy
nedves. A bőr hozzáragadhat a rendkívül hideg felülethez.
A készülék tisztításának megkezdése előtt mindig húzza ki a
hálózati csatlakozódugót.
A csatlakozózsinórt soha ne rongálja, szerelje szét, csomózza
össze vagy hajlítsa meg túlságosan, mert a sérült kábel tüzet
vagy áramütést okozhat.
Üvegből készült tárgyakat soha ne helyezzen a mélyhűtőbe, mert
tartalmuk a lefagyasztás során kitágulhat, és emiatt eltörhet az
üveg.
Ha mód van rá, a hűtőszekrényt közvetlenül a saját
csatlakozódugójával csatlakoztassa a hálózatba: így elkerülhető
a más háztartási készülékek vagy a világítás okozta hálózati
túlterhelés, ami áramszünetet okozhat.
Csatlakozózsinór
cseréje
Ha a csatlakozókábel megsérül, ki kell cserélni. A cserét
kizárólag a gyártó vagy a szervízszolgáltatást biztosító cég,
illetve a fentiekkel azonos képesítéssel rendelkező szakember
végezheti el.
Ne használjon
hosszabbítózsinórt
Csatlakozódugó
hozzáférhetősége
A hűtőszekrény-fagyasztó csatlakozódugóját úgy kell elhelyezni,
hogy baleset esetén könnyen és gyorsan hozzáférhető és
kihúzható legyen.
4
Table of contents
Languages:
Other LG Refrigerator manuals

LG
LG GS68SGS User manual

LG
LG GR-K30PS User manual

LG
LG LSC26905SB User manual

LG
LG GR-M602GSH User manual

LG
LG LSXS26466 User manual

LG
LG LFX28968D User manual

LG
LG LRSC 26945TT, LRSC 26944TT, LRSC 26930TT, LRSC 26922TT, LRSC 26920TT, LRSC 26911TT, LRSC 26910TT, LRSC 26944SW, LRSC 26930SW,... User manual

LG
LG LDC24370 Series User manual

LG
LG GR-S502GSRA User manual

LG
LG LMX25988ST User manual