BRANC H BRANC H OFFIC E ADDRES S PHONE N O. / FAX NO.
Ahmedabad
Asansol
Aurangabad
Bangalore
Bhopal
Bhubaneshwar
Calcutta
Chandigarh
Chennai
Cochin
Coimbatore
Delhi
Dehradun
Gurgaon
Ghaziabad
Guwahati
Hyderabad
Hubli
Indore
Jaipur
Jammu
Jodhpur
Karnal
Lucknow
Ludhiana
Mumbai(N & S)
Nagpur
Patna
Pune
Rajkot
Raipur
Ranchi
Surat
Thane
Varanasi
Vijaywada
Warangal
Kozhikode
LGEIL, 233-234, Platinum Plaza, Nr. Judges Bunglow Cross Road, Bodakdev,
Ahmedabad-54
LGEIL, Block-E, Ist Floor, P C Chattarjee Market, Rambandhu Tala, GT Road (E)
Asansol-713303
LGEIL, 302 CIDCO No. 3, Opp. Hotel Ramgiri, Jalna Road, Aurangabad-431003
LGEIL, No. 914, 2nd Floor, Shri Venkateshwara Complex, Opp. IBP Petrol Bunk,
80ft Road, 6th Block, Koramangala - Banglore - 560095
LG Electronics India Private Limited, 2nd Floor, Alankar Complex, Plot No. 10,
M.P.Nagar, Zone-II, Bhopal-462011
LGEIL, Plot No. 02,1st Flr., Bapuji Nagar, Bhubaneshwar-751009
LGEIL, 1, Ho-Chi-Min-Sarani, 6th Floor, Metro Towers, Calcutta-700071
LGEIL, SCO No. 142-143, 3rd Floor, Sector-34A, Chandigarh-160002
LGEIL, AA11, 2nd Avenue, Fatima Tower,Anna Nagar West, Chennai-600040
LGEIL, 40/1270, Vasudeva Buildings, T.D.Road, Ernakulam Cochin-682011
LGEIL, 250A, Sanganur Main Road, Kannappa Nagar, Coimbatore-641027
LGEIL, A-27, Mohan Co-operative, Industrial Estate, New Delhi
LGEIL, M-22, Commercial Motors Compound, Mohabewala Indl. Area,
Delhi-Saharanpur Road, Dehradun (Uttarakhand)
LGEIL, IInd Flr, ABlock, Centre Point Bldg, Sushant Lok , Ph-I, Gurgaon-122001
LGEIL, J-10, RDC Rajnagar, Ghaziabad - 201001
LGEIL, Shantineer Bhawan, C K Aggarwal Path, Chenikurthi, Guwahati-781003
LGEIL, 1st Floor, Survey No. 54, Pulla Reddy Building, Vikarampuri,
Main Road, Kharkhana, Secunderabad-500009
LGEIL, 1 Floor, Above Bellad & Co., Near Bannigida Busstop, Gokul Road,
Hubli-580030
LGEIL, 3rd flr., 304 Bansi Trade Centre, 581/5 M.G. Road, Indore-452003
LGEIL, B-71, Sahakar Marg, Lal Kothi Scheme, Jaipur-302015
LGEIL, Plot No. 52, Yard No. 6,TransportNagar, Narwal, Jammu-180006
LGEIL, 22(1-A)/21(2-B)/2, RIICO Heavy Industrial Area, Jodhpur-342003
LG Electronics India Pvt Ltd, Super Tyre Building, Near New Anaj Mandi,
Opp. New World Restauarnt, G.T.Road Karnal, Haryana
LGEIL, B-537, Hari Kunj, Keshav Nagar, Sitapur Road, Lucknow-226020
LGEIL, Village Jhande, Near Badowal Railway Station,
Opp. Ferozpur Road, Ludhiana.
LGEIL, Trade Star, 4th Floor, A Wing, J.B. Nagar, Andheri Kurla Road,
Andheri (E) Mumbai-400059
LGEIL, 5A, Road No.13, Behind Msrtc Workshop, MIDC Hinga, Nagpur-440016
LGEIL, 2nd Floor, Ankit Chandra Deep Complex, Bander Bageecha,
Near Samrat Hotel, Patna-800001.
LGEIL, 105/106, Premium Point, GM Road, Opp. Modern High School,
IIIrd Floor, Shivaji Marg, Pune-411005
LGEIL, Sanskruti Apartment, Opp. Dr.Ambedkar Bhawan, Near Atithi Chowk,
Akshar Road , Rajkot - 360004
613 to 616 , 6th Floor, Offizo, Magneto - The Mall, GE Road,
Raipur - 492001
LGEIL, 402, Commerce Tower, Opp. Gel Church Complex, Main Road, Ranchi
LGEIL, 1001-1004, Ascon Plaza, IInd Flr,Anand Mahal Road,
Behind Bhulka Bhavan School, Adajan, Surat-395009
LGEIL, Gall Shop No - 206,207, 2nd Floor, Sai Plaza , Above VijaySales
Opp. Cine Wonder Mall, Ghodbunder Road , Thane(West)-400607
LGEIL, Pama Complex, DLW,Lahartara Road, Shivdaspur, Manduadih,
Varanasi, UP-221002
LGEIL, Door No. 32-2/1-7, Ratnamamba Street, Prajasakti Nagar,
Vijaywada-520010, Andhra Pradesh
LGEIL, House No. 1-8-598/1, First Floor, Beside HDFC Bank, Nakkalgutta,
Hanamakonda-506001 (Warangal)
3/568, Thripuri Building, Wayanadu Road, First Floor,Near K.S.F.E,
East Nadakkavu, Calicut-673011
40040013-14
3292009/3292010 (Fax) 2215170
5625705 / (Fax) 2474055/32095436/32095437/32095438
41145145/41144750/41144751
4262847/4229861 (Fax) 4262848
2531430, 2534280
22883254 (51) Fax
5087389\90 (Fax) 5089107
65510501~04 (Fax) 26203506
2369765,2369743, 2370744, 4027444, 4027555, 2360977 (Fax)
2332197, 2332195
26991412/11/13 (Fax) 26991410
2644213/283
4047461- 62 - 63/4272867, 4047460 (Fax)
9811354152/3/64/65/266
2663895/2666958/2665983/2668984 (Telefax)
27207504, 05, 06/27204094 27201462 (Fax)
4250251/52
4065523~24, 4082157 (Fax)
5111118/5113028/5105392, 5111540 (Fax)
2477420, 2477419, 2474396, 2474384
2742384, 392 / 5120030 (Fax)
2219201,2219202 (Telefax)
2757538,39,2759121 (Fax) 2757559
2804412 - 19
28352882-2887 / 28352889 (Fax)
235120, 235122, Fax : 234401
3298714, 2541845 (Fax)
66030100,732/733/734/735, 66030740 (Fax)
2481499,2467692 (Fax)
4053171/4037470 (Fax) 4038426/10/11
3294026, 2331815
2730982/83, 2730984 (Fax)
25472633/2637 25472602(Fax)
2373432/36/37
2497283/87, (Fax) 2497284
2551453
2366755, 2366756, 2366678, (Fax) 2766678
lInstall the earth wire to prevent short-circuit due to leaking current and electric shock.
vFkZ dkrkjvo’;tksM+ nsa rkfddjaVyhdgksus ij’kkWVZ lfdZVugks vkSjfctyhdk>VdkuyxsA
lIt is attached at the back of the washer. Connect it to the metal water pipe. If the water pipe is made of plastic, it
does not have the earth effect.
;grkjokW’kjlfdZVds ihNs yxkgsAbls ikuhds /kkrq
ds ikbils tksM+ nsaAvxjikbiIykfLVddkgS rks vFkZ
ugha gksxkA
lNever connect the earth wire to the gas pipe,
lightning
arrester,telephone connector etc.
vFkZ ds rkjdks xSlikbi]ykbVfuaxvjsLVj¼rfM+r
pkyd½;k
VsyhQksudusDVjls utksM+saA
Connecting the earth wire (Only for models with two prong plug) /
vFkZ dkrkjtksM+uk¼dsoynks fiuds Iyxokys ekWMyds fy,½
Other earthing method / vFkZdjusdsvU;rjhds
lAfter connecting the earth wire
to the earth copper plate, bury
it at least 75 cm deep under the
wet ground.
vFkZ ds rkjdks vFkZ dhrk¡cs dh
IysVls tksM+us ds cknxhyh
tehuesa dels de75 lsa0eh0
uhps xkM+ nsaA
lConnect to the earthing-only
outlet.
flQZ vfFk±xokys fLopls tksM+
nsaA
lWhen installing it in an area
where earthing is not possible,
pu r cha s e a sh o r t- c i rc u i t
breaker (15mA at operation,
7.5mA at idle) and connect it to
the outlet.
vxje’khu,slhtxgj[khgS]
tgk¡ vfFk±xdjuklEHkougks rks
,d’kkWVZ lfdZVczsdj¼15mA
pykrs le;vkSj7.5mA can
fLFkfresa½[kjhndjmls fctyh
ds fLopls tksM+ nsaA
Connecting the power plug / fctyhdkIyxyxkuk
lCheck if the voltage setting of the machine matches the outlet
voltage.
tk¡pysa fdokWf’kaxe’khudhoksYVstlsfVax]lkWdsVdhoksYVstds
vuq:igksA
lInsert the power plug into the outlet.
ikojIyxdks lkWdsVesa yxknsaA
lIf AC outlet with ground terminal is used, grounding is not
needed. If not, never forget earthing (earthing method above)
vxjxzkmaMVfeZuyokys ,lhvkmVysVdkbLrsekydjjgs gksa rks
vfFk±xvko’;dugha gSAvxj,slkugha gS rks vfFk±xdjukuHkwysaA
¼Åijcrk,x,rjhds ds vuqlkj½
Gas pipe
Earth
wire
123
456
789
0
Ground terminal
Short-circuit breaker
Earth
wire
Earth
wire
Earth copper plate
75cm
INSTALLATION / e’khuyxkuk
4
IMPORTANT INSTRUCTIONS / egRoiw.kZ funsZ’k
1. Before operating machine read the instruction manual carefully.
e’khupykus ls igys baLVªD’kueSuqvydks lko/kkuhiwoZdi<+ ysaA
2. Always keep the machine on the floor level.
e’khudks ges’kklerylrgijghj[ksaA
3. During operation machine should be kept perpendicular to the slope of
the floor to avoid motion.
e’khupykus ds nkSjkumls Q’kZ ds <kyijledks.kfLFkfresa j[ksa rkfdogfgys ughaA
4. Before operating properly earth the machine, to avoid electric shock.
e’khudks pykus ls igys mls vPNhizdkjls ^vFkZ*djnsukpkfg,rkfdfctyhds
>Vds ls cpktkldsA
5. When not in use take the power cord out from the socket.
tce’khubLrsekyugks jghgks rks ikojdksMZ dks lkWdsVls ckgjfudkynsukpkfg,A
6. During spinning and drain, check that drain hose is lowered.
e’khuds fLifuaxvkSjikuhckgjfudyus ds nkSjkutk¡pdjysa fdMªsugkStuhps gSA
7. Before putting clothes in the Wash Tub check the pockets thoroughly
for Coins, Keys and other objects.
diM+ksa dks okW’kVcesa Mkyus ls igys tscksa dhvPNhrjgtk¡pdjysa fdmuesa flDds]
pkfc;k¡ ;kvU;oLrq,a rks ugha gSaA
8. Transfer the clothes from Wash Tub to Spin Dryer Basket one by one.
okW’kVcls diM+s fLiuMªk;jckLdsVesa ,d-,ddjds LFkkukUrfjrdjsaA
9. In case you notice excessive vibration or abnormal noise during
spinning, immediately open the Spin Dryer Cover and rearrange the
laundry evenly.
;fnvkidks fn[kkbZ ns fdfLifuaxds le;vR;f/kddEiu;kvlkekU;vkoktgks jghgS
rks rqjUrghfLiuMªk;jdojdks [kksynsa vkSjnqckjkls diM+ksa dks cjkcjls lSVdjsaA
10. In case of any doubt contact the nearest service center or Dealer.
;fnvkidks dksbZ lUnsggS rks utnhdhlfoZllSUVj;kMhyjls lEidZ djsaA
SAFETY MEASURE / lqj{kkmik;
Manufacturer is not responsible for accidents caused by the
user as a result of not following the user’s guide.
vxje’khudkbLrsekyfunsZ’kiqfLrdkesa fn,x,funsZ’kksa ds vuqlkjufd;ktk,rks mlls
gksus okyhnq?kZVukds fy,fuekZrkftEesnkjugha gksxkA
C h e c k t h e w a s h i n g
instructions labels on the
clothing to be washed.
diM+ksa ijyxs /kqykbZ funsZ’k
yscyvPNhrjgi<+ ysaA
PREPARATION BEFORE WASHING / /kqykbZ ls igys rS;kjh
Before washing / /kqykbZ ls igys
Don't forget to remove any objects from the
pockets of the clothing. Object left in the
pockets will damage the clothing or washing
machine (especially cause clogging of the
drain hose).
diM+ksa dhtscsa [kkyhdjukuHkwysaAmuesa iM+h
phtsa okf’kaxe’khu;kdiM+ksa dks foÑrdjnsaxhA
¼[kkldjfudklhikbiesa #dkoVgks ldrhgS½A
Start washing after
separating an oiled
or dyed laundry.
rsyls jaxs gq,diM+ksa
dks vyxNkaVus ds
ckn/kqykbZ ’kq:djsaA
123
Preparation / rS;kjh
nConnect the water supply hose to the
water supply inlet.
ikuhds ikbidks okWVjlIykbZ buysV
ls tksM+ nsaA
nSet the supply selector lever to
“WASH” for washing and rinsing to
“SPIN” for interim spin rinse.
lIykbZ lysDVjyhojdks /kqykbZ vkSj
[kaxkyus ds fy,ßokW’kÞijvkSjfLiu
fjUlds fy,ßfLiuÞijj[ksaA
lNote : The water Selector lever should
not be placed near the center (as
shown in Fig. (A) otherwise water
flows to the wash and spin tub
simultaneously).
okVjlysDVjyhojdks chpksachpuj[ksa
¼tSlkfp=k,esa n’kkZ;kx;kgS½vU;Fkk
ikuhokW’kvkSjfLiuVcnksuksa esa ,d
lkFkHkjsxkA
nUse new inle t h ose
available with machine/
ne’khuds lkFknhxbZ ubZ
uyhdkmi;ksxdjsaA
nConnect the power cord
to the electrical outlet.
fctyhds rkjdks lkWdsV
esa yxknsaA
nDrain Hose / Mªsugkst¼fudklh
ikbi½
lAlways keep the drain hose
flipped down while washing is in
process
/kqykbZ djrs le;blikbidks
ges’kkuhps fxjkdjghj[ksaA
(Fig. A)
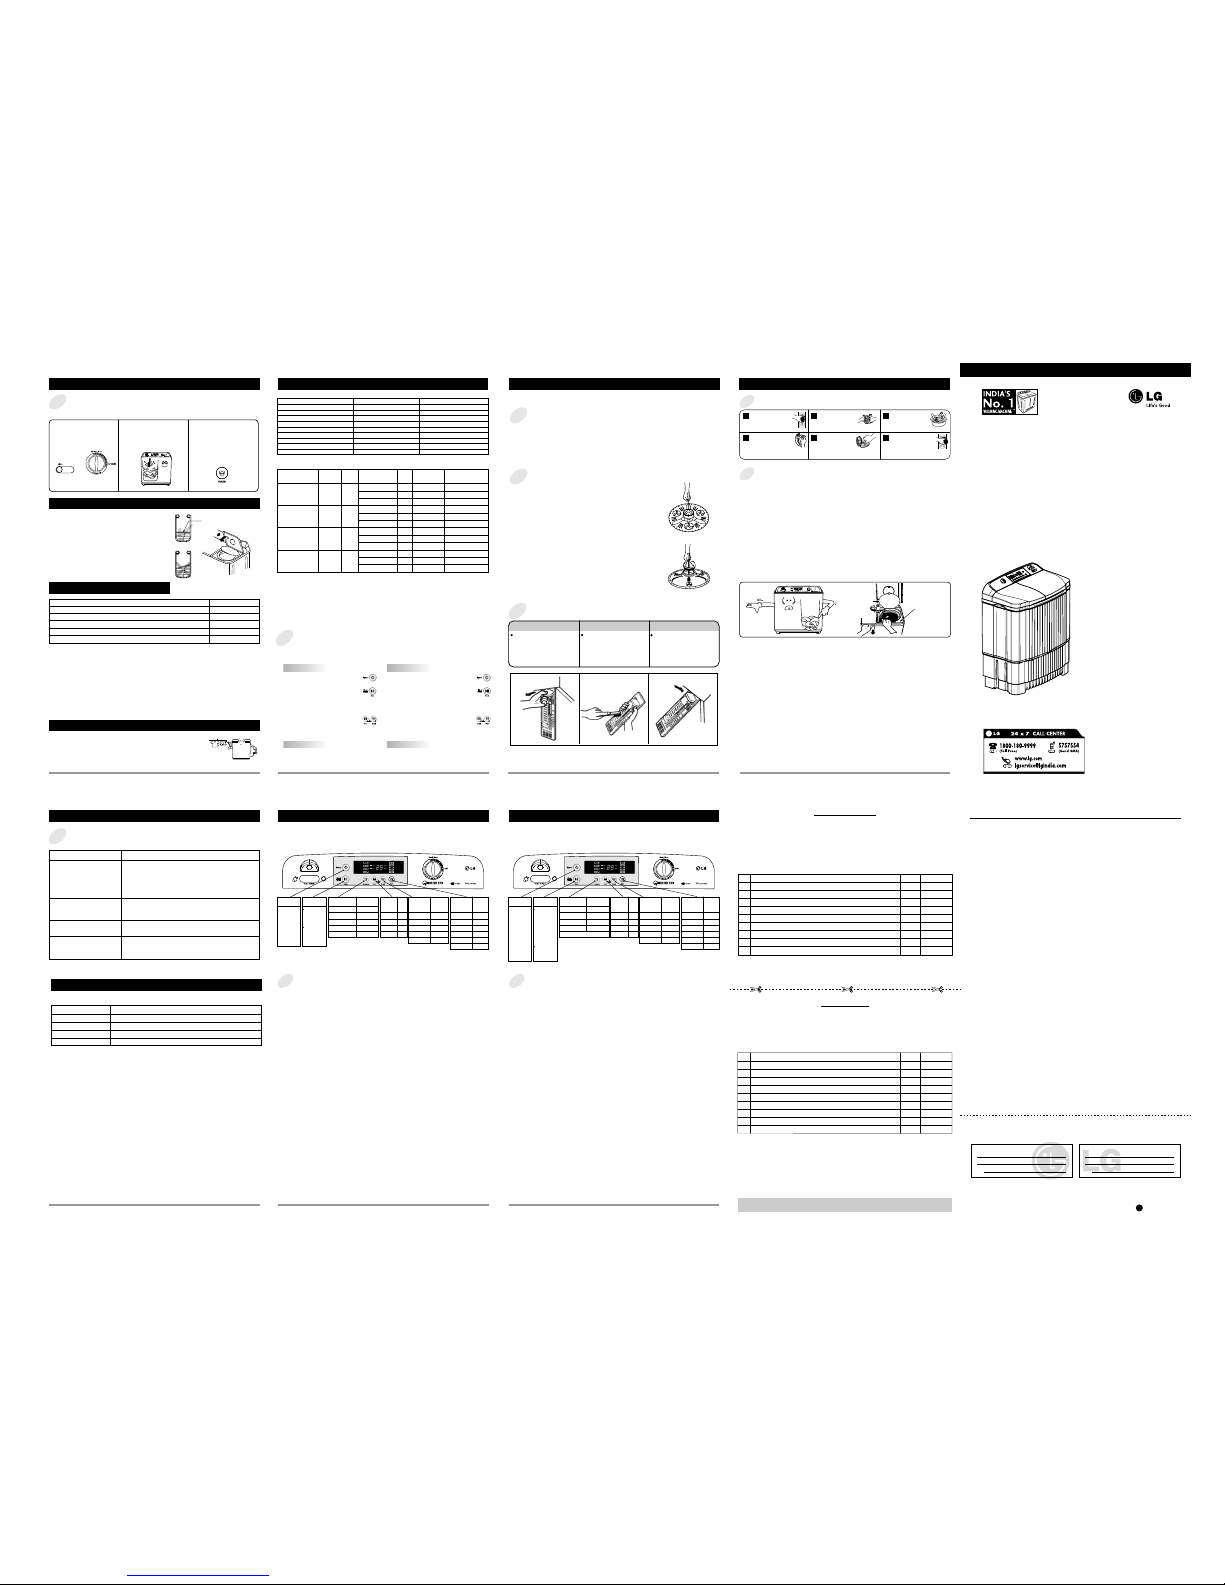
HOW TO WASH / /kqykbZ dkrjhdk
Set the dra in selector to
“WASH
MªsulysDVjdks ßokW’klfjUlÞ
fLFkfresa j[ksaA
lRINSE” position.
1S e t t h e w a t e r
selector to “WASH”.
okWVjlysDVjdks
ßok’kÞijj[ksaA
2Open the water tap and fill water in the
wash tub about halfway to the desired
water level.
uy[kksydjokW’kVcesa fu/kkZfjrLrjls
djhcvk/kkikuhHkjysaA
3
WATER SELECTOR
okWVjlysDVj
WASH
DRAIN SELECTOR
MªsulysDVj
8 9
HOW TO WASH / /kqykbZ dkrjhdk
Set the desired wash time.
vc/kqykbZ dkle;lsVdjysaA
8
Select the Wash Programme according to
kinds and quantity of the laundry.
okW’kizksxzkedks diM+ksa dhfdLevkSjek=kkds
fglkcls lysDVdjsaA
lRefer to TABLES for REFERENCE on page 12 for
information on how to select the appropriate washing
time. / /kqykbZ dklghle;r;djus dhtkudkjhds
fy,i‘"B12 ijlanHkZ ds fy,nhxbZ rkfydkns[ksaA
10 Spinning in the spin dryer basket :
lPut the laundry into the spin dryer basket.
lPut the laundry down lightly.
lPlace the safety cover horizontally on the laundry.
lSet the desired spin time with the spin timer.
fLiuMªk;jckLdsVesa diM+s fupksM+uk%
ldiM+ksa dks fLiuMªk;jckLdsVesa j[ksaA
ldiM+ksa dks gYds ls uhps nck;saA
lbuds Åijls¶Vhdoj
leryj[knsaA
lfLiuVkbejls le;
fuf’prdjnsaA
6
lRefer to TABLES for REFERENCE on
page 12. / i‘"BijlanHkZ ds fy,nhxbZ
rkfydkns[ksaA
12
10
HOW TO RINSE / [kaxkyus ¼fjUl½dkrjhdk
Interim spin rinse / FkksM+kfLiufjUl¼fjUlls FkksM+k[kaxkyuk½
nInterim spin rinse prior to regular rinsing will remove sudsy water from the laundry and improve rinsing
efficiency.
iwjhrjg[kaxkyus ls igys diM+ksa dks FkksM+kfLiufjUldjus ls lkcqudkikuhfudytk,xkvkSjmUgsa csgrj<axls
[kaxkyktkldsxkA
After washing
lPut the laundry into the spin
dryer basket.
lPlace the safety cover hori-
zontally on the laundry.
/kqykbZ ds ckn
ldiM+ksa dks fLiuMªk;jckLdsV
esa MkynsaA
lls¶Vhdojdks muij
leryj[knsaA
1
Set the water selector to “SPIN”.
okWVjlysDVjdksßfLiuÞijdj
nsaA
2
Al l o w t h e w a t e r t o f l o w
appropriately.
vcmlesa ikuhHkjnsaA
3
Turn off the water supply, close
the safety cover-2 and spin dryer
cover.
ikuhdhlIykbZ cUndjds ls¶Vh
doj-2 vkSjfLiuMªk;jdoj<d
nsaA
4
Set the desired spin time
with the spin timer
fLiuVkbejls le;r;
djnsaA
5
After spinning
lPut the laundry into the
w ash tub and rinse
fLifuaxds ckn
ldiM+ksadksfQjokW’kVc
esa Mkydj[kaxkyysaA
6
Economical water supply rinse / [kaxkyus ¼fjUl½esa ikuhdhcpr
nThis course allows you to save water as this course is to rinse after feeding appropriate water to the tub.
;grjhdkvkidks ikuhdhcprdjokrkgS D;ksafdblrjhds esa diM+s Vcesa fuf’prek=kkesa ikuhHkjus ds ckn
gh[kaxkys tkrs gSaA
Set the drain selector to “WASH
MªsulysDVjdks ßokW’klfjUlÞ
fLFkfresaj[ksavkSjVcesafuf’pr
ek=kkesa ikuhHkjysaA
lRINSE” position and feed
appropriate water to the tub.
1
Set the rinse time using control
plate (wash) keys.
¼ok’k½daVªksyIysVls [kaxkyus dk
le;fuf’prdjnsaA
2
Put the laundry into the spin
dryer basket and set the spin
time with the spin using control
plate keys .
diM+ksa dks fLiuMªk;jckLdsVesa
MkydjfLiudaVªksyIysVls le;
fuf’prdjnsaA
3
Put the laundry into the wash tub and repeat 1 to 3 course.
diM+ksa dks okW’kVcesa MkydjfQjls 1ls 3rddhfØ;knksgjk,aA
4
WATER SELECTOR
okWVjlysDVj
SPIN
Water Selector
okVjlysDVj
Drain Selector
MªsulysDVj
WASH
: This is a warning sign specifying user’s applications which might be dangerous.
: This is a sign specifying ‘Strictly Forbidden’ applications.
WARNING
:
Failure to comply with the instructions under this
sign may result in major physical injuries or death.
CAUTION
: Failure to comply with the instructions under this
minor physical injuries or damages to the product.
sign may result in
Put the appropriate amount of detergent and the
laundry into the wash tub. And add water to the
desired water level.
vcokW’kVcesa fuf’prek=kkesa fMVts±VvkSjdiM+s
MkynsaAikuhdks fu/kkZfjrLrjrdHkjysaA
4
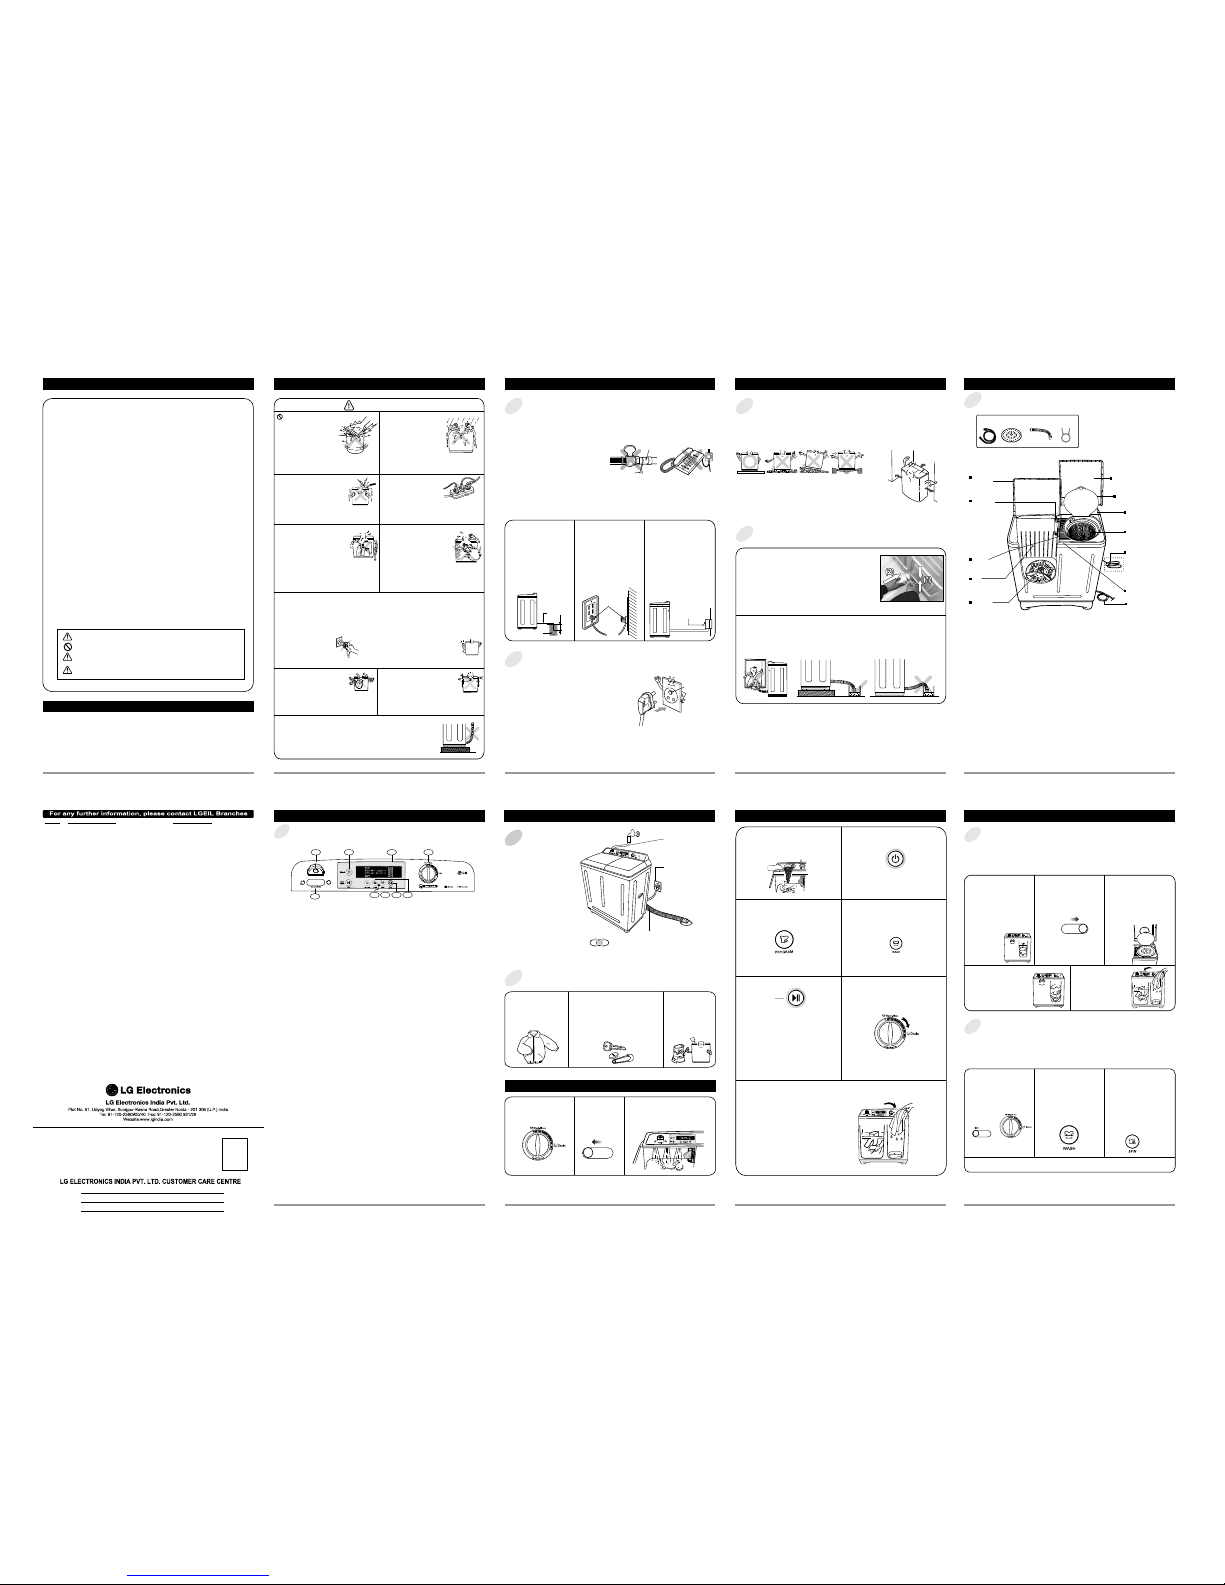
PARTS IDENTIFICATION / fgLls iqtks± dhigpku
Accessories / vU;midj.k
(Please do not match this figure with model as it may be different from your model. These are schematic diagrams only.)
¼Ñi;kblfp=kdks vius ekWMyls ufeyk;sa D;ksafd;gvkids ekWMyls fHkégks ldrkgSA;s dsoyjs[kkfp=kgSaA
Safety Cover
ls¶Vhdoj
Inlet Hose
buysVikbi
Snap Ring
LuSifjax
Drain Hose
MªsugkWt
PULSATOR
iYlsVj
TUB
Vc
COLLAR
SCRUBBER
dkWyj LØcj
OVER FLOW
FILTER
vksoj ¶yks fQYVj
WASHING
COVER
okf'kax doj
SPIN DRYER
COVER
fLiu Mªk;j doj
SAFETY
COVER-2
lS¶Vh doj-2
SPIN DRYER
BASKET
fLiu Mªk;j ckLdsV
EARTH WIRE
(For models with
two prong plug)
vFkZ dk rkj
¼nks fiu ds Iyx
okys ekWMy ds fy,½
SAFETY
COVER-1
lS¶Vh doj-1
POWER CORD
fctyh dk rkj
PANEL
iSuy
7
When washing is finished, select the drain
selector to “DRAIN” position and drain the water
out.
/kqykbZ ds cknMªsulysDVjdks Mªsuijdjnsa vkSj
ikuhfudkynsaA
DRAIN SELECTOR
MªsulysDVj
PARTS IDENTIFICATION / fgLls iqtks± dhigpku
Control Panel / dUVªksyiSuy
(Please do not match this figure with model as it may be different from your model. These are schematic diagrams only.)
¼Ñi;kblfp=kdks vius ekWMyls ufeyk;sa D;ksafd;gvkids ekWMyls fHkégks ldrkgSA;s dsoyjs[kkfp=kgSaA
7
6
5
INSTALLATION / e’khuyxkuk
Installation area / e’khuyxkus dkLFkku
lSelect flat and firm floor.
dksbZ Bksl]lerytxgpquysaA
lIncorrect installation may cause severe noise and break down.
xyr<axls yxkus ijHkkjhdEiuvkSj[kjkchgks ldrhgSA
lMaint ain mor e than 10 cm gap
between the side of drain hose and the
wall.
fudklhikbivkSjnhokjds chpdels
de10 lsa0eh0dhnwjhj[ksaA
lThe base openings must not be obstructed by carpeting when
the washing machine is installed on a carpeted floor.
vxjQ’kZ ijdkyhufcNkgks rks okf’kaxe’khuds uhps dk[kqyk
fgLlkdkyhuls canugksus ik;sA
Drain Hose Installation / fudklhikbiyxkuk
Notes / fVIi.kh:
lBe sure to re-route the hose so that it is not kinked or has sharp bends which will prevent proper drainage.
ikbidks lh/kkdjysa rkfdmlesa ,saBu;krh[ks eksM+ ujgtk,aAbuls lghfudklhesa #dkoVvkldrhgSA
lUse only new hose set provided with the machine.
ges’kke’khuds lkFknhxbZ ubZ uyhdkghmi;ksxdjsaA
lPress the clamp as shown in the direction (1).
fn’kk(1) esa crk,x,rjhds ls DySEidks nck,aA
lPush the hose towards the body of the washing machine as shown in
the direction (2).
gkStdks e’khudhckWMhdhvksjnck,a]tSlkfdfp=k(2) esa n’kkZ;kx;kgSA
lRelease the Clamp.
DySEidks NksM+ nsaA
SAFETY MEASURE / lqj{kkmik;
WARNING / psrkouh
In Operation
lDo not insert the hand inside
the spin dryer basket while the
machine is in operation. Do not
let c hil dre n cli mb on t he
machine or climb into the tub.
Injury may occur.
Installation Area
lAvoid area exposed to snow,
rain, or where humidity is high.
It may cause electric shock.
pykusesa
lpyrhe’khuesa fLiuMªk;jckLdsVds HkhrjgkFku
MkysaAcPpksa dks e’khuds Åij;kVcesa up<+us nsaA
blls pksVyxldrhgSA
e’khuj[kusdkLFkku
le’khu,slhtxguj[ksa tgka cQZ ;ko"kkZ
vkrhgks ;kuehT+;knkgksA
blls fctyhdk>VdkyxldrkgSA
Switch Area
lAvoidwatering on the switch area.
It may cause electric shock or fire.
Electric Outlet
lAvo id co nn ec ti ng sev er al
electric devices to single outlet.
It may cause fire.
fLopdkLFkku
lfLopds vkl&iklikuhufxjus nsaA
blls fctyhdk>VdkyxldrkgS ;k
vkxHkhyxldrhgSA
fctyhdkIyxyxkusdkLFkku¼vkmVysV½
l,dghlkWdsVesa fctyhds dbZ midj.k,dlkFku
yxk,aA
blls vkxyxldrhgSA
Volatile Material
lDo not use volatile material such as
Benzene, Gasoline, bug killer. Do not
leave strong alkaline substance such
as bleach inside the tub.
Damage on plastic surface and rubber
parts may occur.
Heat
lAvoid electric heater, candle light,
cigarette light, bug smoker, etc. near
the machine.
It may ignite or deform plastic part
Toyu’khy¼ok"i’khyinkFkZ½
lcsUthu]xSlksyhu;kdhVuk’kdtSls Toyu’khyinkFkks± dk
mi;ksxudjsaACyhptSls rst+ {kkjh;inkFkZ Vcesa uNksM+saA
buls IykfLVddhlrgvkSjjcM+ okys fgLlksa dks uqdlku
gks ldrkgSA
rki
le’khuds iklfctyhdkghVj]eksecÙkh]tyrhgqbZ
flxjsV;kdhM+s Hkxkus ds fy,/kqvka djus okykmidj.k
vkfnuj[ksaA
blls fpaxkjhHkM+dldrhgS vkSjIykfLVdds iqtks± dh
vkÑfrHkhfcxM+ ldrhgSA
Power Cord
l( ).
lIf the power supply cord is damaged, it must only be replaced by a repair shop appointed by the manufacturer, because
special purpose tools are required.
fctyhdkrkj
l¼ ½
lvxje’khuls tqM+kfctyhdkrkj¼ikojdkWMZ½[kjkcgks tk,rks fuekZrk}kjkfu;qDrnqdkuls ghcnyok;sa D;ksafdmlds
fy,fo’ks"kmidj.kksa dhvko’;drkiM+rhgSA
Properly ground the washer. Follow details in installation instructions
e’khudks Bhdls vFkZ djsaAbUlVkWys’kuds foLr‘rfunsZ’kksa dkvuqlj.kdjsa
Hot Water
lAvoidusing hot water over 50°C.
It may deform plastic parts or cause
malfunction.
Installation
lInstal l the wa shing ma chine o n a
horizontal support.
Otherwise, it may cause vibration and noise
xeZikuh
l50° ls0ls vf/kdxeZ ikuhdkmi;ksxudjsaA
blls IykfLVdds fgLlksa dk:ifcxM+ ldrkgS
;k[kjkchHkhgks ldrhgSA
e’khuyxkuk
lokf’kaxe’khudks lerytxgijj[ksaA
vU;Fkkmlesa dEiuvkSj’kksjgks ldrkgSA
23
lDonot treat the power supply
cordwith your wet hand.
l fctyhds rkjdks xhys gkFkls
uNq,aA
lPlug out the power supply cord, when cleaning or not
using the washing machine for a long time.
le’khudks lkQdjus ls igys ;kyEcs le;rdbLrseky
udjus ijfctyhds rkjdks ckgjfudkynsaA
Drain Hose / MªsugkWt
lThe level of the drain should be slightly lower than the lowest part of the washing machine in
order to ensure proper and complete drainage and to avoid falling of overflowing water on
electrical parts.
ukyhokf’kaxe’khuds lcls fupys fgLls ls dqNuhphgksuhpkfg,rkfdikuhlgh<axls iwjhrjg
fudylds vkSjfo|qrHkkxksa ijQkyrw cgrs gq,ikuhds fxjus ls cpktkldsA
It may cause electric shock.
blls fo|qrvk?kkryxldrkgSA
It may cause electric shock or fire / bllsfo|qrvk?kkr;kvkxyxldrhgSA
Model : WP-15097M
2
1 8 7 5
5.
6.
7.
8.
Drain Selector /
Select "WASH RINSE" for washing and rinsing, and "DRAIN" to drain the water from the tub.
MªsulysDVj
Spin /
Select the desired time for spinning.
fLiu
2.
Water Selector /
Select "WASH" to supply water for washing and rinsing and "SPIN" for spin shower rinse.
okWVjlysDVj
/kqykbZ ;k[kaxkyus ds fy,ikuhHkjus ls igys ßokW’kÞvkSjfLiu’kkWojfjUlds fy,ßfLiuÞijdjsaA
3.
Wash Timer /
Select the desired time for washing or rinsing.
okW’kVkbej
/kqykbZ ;k[kaxkyus ds fy,visf{krle;lSVdjsaA
Vcdkikuhfudkyus ds fy,ukscßMªsuÞvkSj/kqykbZ rFkk[kaxkyus ds fy,ßokW’k-fjUlÞijj[ksaA
fupksM+us ¼fLifuaxds fy,visf{krle;lysDVdjsaA
Cold water inlet /
Select this inlet when opting for cold water wash.
dksYM+ okWVjbuysV
tcBaMs ikuhls /kqykbZ djuhgks rks bldkiz;ksxdjsaA
1.
Controller /
Provide total control of washing as per need.
dUVªksyj
Power S/W /
Press this S/W for connecting or disconnecting machine for mains.
ikojfLop
vko’;drkuqlkj/kqykbZ dkiw.kZ fu;U=k.kiznkudjrkgSA
e’khudks esUlls tksM+us ;kgVkus ds fy,blfLopdks nck,aA
63
Press Power S/W.
ikojfLopdks nck,aA
5
Power
l
l 12
l 8
l5
15
9
lPress the “Start/Pause” button at first time the
washing begins.
lPress the “Start/Pause” button again to stop
operation.
(Washing operation resumes by pressing the
“Start/Pause” button again).
l“Start/Pause” nckrs ghe’khupkyw gks tkrhgSA
le’khudks jksdus ds fy,“Start/Pause” cVudks
nksckjknck;saA
¼nks ckj“Start/Pause” cVuncknsus ije’khu
fQjls pkyw gks tkrhgSA
Start
Pause
l
l 12
l 8
l5
15
l Dry (11 min)
l 8
l 6
l 4
l2
4.
Soak Time /
Select the desired time for soaking.
okW’kVkbej
lkWfdaxds fy,visf{krle;lSVdjsaA
9.
Child Lock Function / pkbZYMykWdQaD’ku
Use to lock or unlock the control buttons to prevent settings from being changed by a lock,
Push the Sock & Wash Buttons simultaneously and to unlock push them one more time during
the washing process.
dUVªksycVudks ykWd;kvuykWddjus ds fy,iz;ksxdjsa rkfdlSfVaxykSd)kjkcnyus dks jksdktkldsA
SOAK vkSjWASH cVudks ,dlkFk/kdsysa vkSjvuykWddjus ds fy,okf’kaxizfØ;kds nkSjku,dckj
vkSj/kdsysaA
49
(refer to page 12)


0(~2 User manual")


