LHZ 25312 User manual

Thermostat d’ambiance
réf. 25312
Thermostat d’ambiance sans fil
à transmission radio
9419-233-10/06.08
Thermostat d’ambiance sans fil, programmable
et à transmission radio
Présentation du produit
Bouton Reset pour un retour à la configuration
d’origine.
Affichage du mode de fonctionnement (Auto,
Confort, Réduit ou réglage de l’heure).
Affichage de la température ambiante.
Symbole de température ambiante.
Grand afficheur multifonction.
Indicateur d’enclenchement du chauffage.
Témoin d’usure des piles.
Bargraphe affichant le niveau de la consigne
de température.
Touches +et –pour les différents réglages.
Touche Prog pour accéder aux 3 programmes
préenregistrés.
Touche OK pour valider les différents réglages.
Touche Mode pour entrer dans les différents
modes de fonctionnement.
Vis de montage.
Trappe pour accéder aux piles.
!Le premier appui sur un bouton de votre
thermostat active le rétroéclairage.
Installation
Otez le film protecteur de l’afficheur.
Le thermostat d’ambiance doit être installé à
environ 1,5 mètres du sol, sur un mur intérieur, à
l’abri des projections d’eau, du rayonnement
solaire direct et de toute perturbation thermique
telle que lampe d’éclairage, téléviseur, tuyau de
chauffage, courant d’air, cheminée etc.
Vous pouvez fixer le thermostat d’ambiance soit
sur une boîte d’encastrement soit directement
en saillie.
• Descendez la trappe à piles .
• Ouvrez le produit en dévissant la vis .
• Fixez le socle sur le mur ou sur une boîte
d’encastrement à l’aide de 2 vis.
• Refermez le produit en revissant la vis .
• Refermez la trappe à piles .
1
Ce thermostat d’ambiance à transmission radio est
conçu pour vous apporter confort et économies d’énergie.
Il permet de programmer et de réguler votre chauffage
selon 2 niveaux de température (confort et réduit).
Ses 3 programmes préenregistrés P1, P2 et P3,
facilement modifiables, vous permettent jour après
jour d’adapter votre chauffage à votre mode de vie.
Mise en place/remplacement des piles
Votre thermostat est équipé d’un témoin d’usure des piles
; veuillez, dès son apparition, procéder au
remplacement de celles-ci (utiliser uniquement 2 piles alcalines 1,5V LR03).
Les piles ont une durée de vie d’environ 1 an.
• Descendez la trappe à piles .
• Insérez deux piles alcalines 1,5V LR03 suivant le schéma dessiné dans le fond du produit en
respectant les polarités.
• Refermez la trappe à piles .
!Vous avez 20 secondes pour procéder au changement des piles.
Au delà de ce laps de temps, le thermostat retourne en configuration usine.
Mise à l’heure
A la mise en service ou après un reset, l’indication 12:00 clignote.
• Avec les touches +ou –, réglez l’heure courante (un appui long permet un défilement rapide des minutes
puis des heures).
• Valider en appuyant sur la touche
OK
.
Pour modifier le réglage de l’heure :
• Par appuis successifs sur la touche MODE, positionnez le curseur sous le symbole .
• Avec les touches +ou –, réglez l’heure courante (un appui long permet un défilement rapide des minutes
puis des heures).
• Validez en appuyant sur la touche
OK
.
!L’heure s’arrête de clignoter et est automatiquement prise en compte après une temporisation de
30 secondes si la validation par la touche
OK
n’est pas effectuée.
• A tout moment, vous avez la possibilité de maintenir la touche
OK
appuyée pendant 3 secondes,
pour afficher l’heure en lieu et place de la température ambiante. Pour revenir en mode Affichage
de la température, effectuez la même opération.
FR GB DE
IT ES
+
+
–
+

Configuration de l’émetteur avec le
récepteur
• Appuyez pendant plus de 3 secondes sur le
bouton poussoir du récepteur. Le voyant
clignote, relâchez la touche.Vous êtes en mode
configuration.
• Appuyez pendant 3 secondes sur le bouton
Reset de l’émetteur.
Le voyant du récepteur arrête de clignoter
au bout de 5 secondes environ.
Le lien émetteur/récepteur est établi.
• Paramétrez l’heure.
Effacement du lien
• Appuyez pendant plus de 10 secondes sur le
bouton poussoir du récepteur. Le voyant
vert clignote lentement puis plus rapidement.
• Appuyez à nouveau pendant 3 secondes sur le
bouton poussoir du récepteur. Le voyant
arrête de clignoter, tous les liens sont effacés.
Réglage des températures
Votre thermostat gère 2 niveaux de températures :
• la température Confort : c’est la température
que vous souhaitez pendant vos heures de
présence (20°C par exemple).
• La température Réduit : c’est la température
que vous souhaitez pendant vos absences de
courtes durées ou pendant les nuits (16°C
dans notre exemple).
Nous vous conseillons un écart minimum de 4°C
entre les températures Confort et Réduit.
Pour modifier la température Confort
• En mode Auto, appuyez sur les touches +ou –
pour modifier la consigne. La modification est
temporaire (le dernier segment du bargraphe
clignote).
Au prochain pas de programme, le thermostat
tiendra compte de la consigne habituelle.
• En mode Confort, appuyez sur les touches +
ou –pour modifier la consigne. La modification
est permanente.
Pour modifier la température Réduit
• En mode Auto, appuyez sur les touches +ou –
pour modifier la consigne. La modification est
temporaire (le dernier segment du bargraphe
clignote).
Au prochain pas de programme, le thermostat
tiendra compte de la consigne habituelle.
• En mode Réduit, appuyez sur les touches +ou
–pour modifier la consigne. La modification est
permanente.
Les températures Confort et Réduit sont
réglables de +5°C à +30°C par pas de 0,5°C.
Lorsque vous réglez les températures Confort et
Réduit, celles-ci clignotent puis sont enregistrées.
Quand le réglage est terminé, après 5 secondes, le
thermostat affiche automatiquement la température
ambiante. La consigne de température est affichée
en permanence sur le bargraphe.
Lorsqu’il s’agit d’une consigne de température
temporaire, le dernier segment du bargraphe
clignote.
Programmation
Pour programmer votre chauffage, vous disposez
de 3 programmes préenregistrés et modifiables
P1, P2 et P3 :
• P1 : Confort de 6h00 à 23h00.
Réduit de 23h00 à 6h00.
• P2 : Confort de 6h00 à 8h30
et de 17h30 à 23h00.
Réduit de 8h30 à 17h30
et de 23h00 à 6h00.
• P3 : Confort de 6h00 à 8h30, de 11h00 à 14h00
et de 17h30 à 23h00.
Réduit de 8h30 à 11h30, de 14h00 à
17h30 et de 23h00 à 6h00.
• Le premier horaire de programmation apparaît
et clignote. Le curseur sous le symbole
indique l’heure de début d’une période de tem-
pérature Confort.
• Par appuis successifs sur la touche OK, faites
défiler les différents horaires de programmation.
• Lorsque le curseur se trouve sous le
symbole , il indique l’heure du début d’une
période de température Réduit.
• Lorsque l’horaire de la dernière plage est validé
avec la touche OK, le thermostat se met en
mode Auto et affiche la température ambiante.
• Avec les touches +ou –, modifiez si nécessaire
l’horaire de début de chaque plage (un appui
long permet un défilement rapide des minutes).
En mode Auto le thermostat gère automatique-
ment la température souhaitée (Confort ou
Réduit) selon le programme défini.
A la mise en service, c’est le programme P1 qui
est actif en mode Auto.
Pour sélectionner le programme souhaité :
• En mode Auto, appuyez sur la touche Prog
pour afficher le programme souhaité (P1, P2 ou
P3).
• Le programme affiché clignote (par exemple
P1).
• Validez avec la touche OK.
Dérogation permanente
Ce mode transforme l’appareil en simple
thermostat électronique. Il ne tient plus compte
de la programmation horaire.
• Appuyez sur la touche Mode et positionnez le
curseur , selon votre choix sous le symbole
ou (Confort ou Réduit).
• Pour modifier la température Confort ou
Réduit, appuyez sur les touches +et –.
• La consigne de température s’affiche en lieu et
place de la température ambiante et clignote
puis le thermostat revient à l’affichage de la
température ambiante.
Dérogation temporaire
Ce mode permet de modifier temporairement
la consigne de température durant un pas de
programme.
• En mode Auto, appuyez sur les touches +ou –
pour modifier la consigne de température.
• Le dernier segment du bargraphe clignote alors
jusqu’au prochain pas de programme.
Au prochain pas de programme, le programme
reprend les consignes de températures définies.
Que faire si ?
• Le chauffage ne se met pas en marche :
- le récepteur n’est pas alimenté (voyant
éteint).Vérifiez le fusible et le disjoncteur.
- reconfigurez le récepteur.
• L'application ne se met pas en marche ou
ne s’arrête pas :
- le récepteur ou l'émetteur est dans une zone
perturbée par des émissions d'ondes (radio
amateur, télévision, borne réseau GSM etc.) :
déplacez le récepteur ou l'émetteur hors de la
zone perturbée.
- Le récepteur est hors de portée de l’émetteur,
rapprochez-le suffisamment du récepteur.
Si le problème persiste contactez votre électricien.
Caractéristiques techniques
Alimentation : 2 piles 1,5V LR03
Autonomie : environ 1 an
Réserve de marche : max. 20 sec.
Fréquence d’émission : 433.92 Mhz
Transmitter duty cycle : 10%
Plage de réglage des températures Confort et
Réduit : 5°C à 30°C
Plage d’affichage de la température ambiante :
0°C à 40°C
Distance d’émission : 100 mètres en champ libre
Température de fonctionnement : 0°C à +40°C
Température de stockage : -20°C à +60°C
Humidité relative : 90% max à 25°C
Indice de protection : IP 31
Classe d’isolation : III
Dimensions : 120 x 80 x 35 mm
IK : 04
Normes : NFC – 73251, NF EN 60730-1,
EN 300 220-1V2.1.1, EN 300 220-2V2.1.1
Made in France
Utilisable partout en Europe et en Suisse
2
6h 23h
6h 8h30 17h30 23h
6h 8h30 11h30 14h 17h30 23h

Room thermostat
ref. 25312
Cordless room thermostat
with radio transmission
Cordless room thermostat, programmable
with radio transmission
Product presentation
Reset button to return to the original
configuration.
Display of operating mode (Auto, Comfort,
Reduced or time-setting).
Ambient temperature display.
Ambient temperature symbol.
Big multifunction display.
Heating ON indicator.
Batteries low indicator.
Bargraph showing level of set temperature.
+and –keys for the various settings.
Prog button for access to the 3 prerecorded
programs.
OK button for confirmation of the various
settings.
Mode button to enter the various operating
modes.
Screw enabling the wall bracket to be separated
from the product.
Batteries acces trap.
!The first stroke on thermostat button activates
the backlight.
Installation
Remove the protective film from the display.
The room thermostat must be installed about
1.5 metres from the floor, on an interior wall,
protected from splashing with water, direct
sunlight and all thermal interference such as
lamps, television set, heating pipe, fireplace,
draughts etc.
You can fix the room thermostat either on a
flush-fitting box or directly surface-mounted.
• Lower the battery access trap .
• Open the product by unscrewing the screw .
• Fix the bracket to the wall or on a flush-fitting
box with 2 screws,
• Close the product by tightening the screw .
• Close the batter access trap .
3
This infrared room thermostat is designed to bring you
comfort and economies of energy. It enables you to
programme and regulate your heating to 2 levels of tem-
perature (comfort and reduced).
To programme your heating you have available 3
prerecorded and modifiable programs (P1, P2 and
P3) which will allow you to control heating to suit
your way of life on a daily basis.
Putting in the batteries
Your thermostat is equipped with a batteries low indicator
.As soon as it appears, please proceed
to replace the batteries use only 2 LR03 1,5V alkaline batteries).
Battery lifetime is about 1 year.
• Lower the battery access trap .
• Insert 2 LR03 1,5V batteries as shown in the diagram in the bottom of the product ensuring correct
polarity.
• Close the battery access trap .
!You have twenty seconds to change batteries.
Beyond this time, wished temperature and programs must be adjust again.
Time setting
When putting into service or after a reset: the indication 12:00 flashes.
• Using +or –keys,set the current time (maintain key down for a longer time to make minutes scroll faster).
• Press OK to confirm.
To change the time setting
• By repeated pressures on the MODE button, position the cursor under .
• Using +or –keys,set the current time (maintain key down for a longer time to make minutes scroll faster).
• Press OK to confirm.
!Time display stops flickering and is automatically updated in 30 seconds if no validation by
OK
key
occurs.
• To display the time instead of the ambient temperature you can press the
OK
key at any time.To
display the the ambient temperature instead of time you can press the
OK
.
FR GB DE
IT ES
+
+
–
+

Coding the transmitter with the
receiver
• Press the receiver’s pushbutton for more
than 3 seconds.The indicator light will start
flickering, release the pushbutton.The system is
in configuration mode.
• Press the Reset button during 3 seconds of
the transmitter.
The indicator button will stop flickering, at
the end of 5 secondes.
The transmitter/receiver link is now established.
• Set time.
For clearing all transmission/reception links:
• Press the receiver’s pushbutton for more
than 10 seconds. The indicator light flickers
slowly, then more quickly.
• Press again the receiver’s pushbutton more
than 3 seconds. The indicator light stops
flickering, all links have been cleared.
Adjusting the temperature set
Your thermostat controls 2 levels of temperatures:
• Comfort temperature: this is the temperature
level you want during the time you are present
(20°C for example).
• Reduced temperature: this is the temperature
you want during short absences or at night
(16°C for example).
We advise a difference of 4 °C (minimum) between
the Comfort and Reduced temperatures.
To change the Comfort temperature:
• In Auto mode, using +or –keys to modify the
set-point. Such modification is temporary (last
segment of bargraph flickers). On next program
step, the thermostat will operate on the usual
set-point.
• In Comfort mode, using +or –keys to modify
the set-point. Such modification is permanent.
To change the reduced temperature:
• In Auto mode, using +or –keys to modify the
set-point. Such modification is temporary (last
segment of bargraph flickers). On next program
step, the thermostat will operate on the usual
set-point.
• In Reduced mode, using +or –keys to modify
the set-point. Such modification is permanent.
The Comfort and Reduced temperatures can
be set from +5°C to +30°C in steps of 0.5°C.
When you adjust the Comfort and Reduced,
finished, after 5 seconds the thermostat automa-
tically displays the ambient temperature.
The current set temperature is permanently
displayed on the bargraph.
In the case of a temperature set-point, the last
segment of the bargraph flickers.
Programmation
To programme your heating you have available 3
prerecorded and modifiable programs: P1, P2 and
P3:
• P1: Comfort from 6h00 to 23h00.
Reduced from 23h00 to 6h00.
• P2: Comfort from 6h00 to 8h30
and from 17h30 to 23h00.
Reduced from 8h30 to 17h30
and from 23h00 to 6h00.
• P3: Comfort from 6h00 to 8h30, from 11h00 to
14h00 and from 17h30 to 23h00.
Reduced from 8h30 to 11h30, from 14h00
to 17h30 and from 23h00 to 6h00.
• The first programming time schedule appears and
flickers.The cursor under the symbol indi-
cates the start time of a Comfort temperature
cycle.
• Scroll the various programming schedules by
pressing the OK key repeatedly.
• When the cursor is under the symbol ,
it indicates the start time of a Reduced
temperature cycle.
• When the schedule of the last cycle is confirmed
using the OK key, the thermostat is set to Auto
mode and displays the room temperature.
• Using keys +or –, modify the start time of each
cycle as required (maintain key down for a
longer time to make minutes scroll faster).
In Auto mode the thermostat manages auto-
matically the desired temperature (Comfort or
Reduced) according to the program set.
On startup, P1 program is active in Auto.
To select the desired program:
• In Auto mode, press Prog key to display the
desired program (P1, P2 or P3).
• The displayed program flickers (for example P1).
• Press OK to confirm.
Permanent override
This mode transforms the appliance into a simple
electronic thermostat.
It no longer takes the timed program into
account.
• Press the Mode key and position the operating
pointer , under the symbol or (Comfort
or Reduced) as you choose.
• To change the Confort or Réduit, use the +
and –keys.
• The set temperature is displayed instead of the
ambient temperature and flashes, then the
thermostat returns to display of the ambient
temperature.
Temporary override
This mode allows to modify the temperature set-
point temporarily during a program step.
• In Auto mode, press the +or – keys to modify
the temperature set-point.
• The last segment of the bargraph then flickers
until the next program step.
On the next program step, the defined temperature
set-points are again active.
Troubleshootings
• The heating does not start:
- receiver’s power supply is cut off (the
indicator light is off). Check fuse and circuit
breaker.
- re-install receiver.
• The system does not start or does not
stop:
- the receiver or transmitter is disturbed by
radio transmission (radio ham, TV monitor,
cellular phone re-transmitter, etc.): attempt to
remove the source of disturbance.
- Receiver is outside of transmitter’s range, move
transmitter closer to receiver.
In case of persistent problem, call on your
electrician.
Technical specifications
Supply: 2 batteries type 1,5V LR03
Lifetime: about 1 year
Power reserve: max. 20 sec.
Transmission frequency: 433.92 Mhz
Transmitter duty cycle: 10%
Range of setting of Comfort and Reduced
temperatures: 5°C to 30°C
Range of display of ambient temperature;
0°C to 40°C
Transmission distance: 100 metres in a clear field
Operating temperature: 0°C to +40°C
Storage temperature: -20°C to +60°C
Hygrometry: 90% max to 25°C
Degree protection: IP 31
Class Insulation: III
Dimensions: 120 x 80 x 35 mm
IK: 04
Standards: NFC – 73251, NF EN 60730-1,
EN 300 220-1V2.1.1, EN 300 220-2V2.1.1
Made in France
Usable in all Europe and Switzerland
4
6h 23h
6h 8h30 17h30 23h
6h 8h30 11h30 14h 17h30 23h

Raumthermostat
Art. Nr. 25312
Drahtloser Raumthermostat
mit Funkübertragung
9419-233-10/06.08
Drahtloser programmierbarer Raumthermostat
mit Funkübertragung,
Produktbeschreibung
Reset für die Neuaktivierung der werkseitigen
Einstellung.
Anzeige der Betriebsart (Auto, Komfort,
Absenkbetrieb oder Einstellung der Uhrzeit).
Temperaturanzeige.
Symbol für Raumtemperatur.
Großes Multifunktionsdisplay.
Anzeige Heizung in Betrieb.
Kontrollleuchte des Batterienladezustands.
Balkenanzeige zur Darstellung des
Soll-Temperaturniveaus.
Tasten +und –für die verschiedenen
Einstellungen.
Prog-Taste zum Zugreifen auf die 3 werkseitig
gespeicherten Programme.
Taste OK zum Bestätigen der verschiedenen
Einstellungen.
Mode-Taste zur Eingabe der verschiedenen
Betriebsarten.
Schraube zum Trennen des Wandsockels vom
Produkt.
Deckel des Batterienfachs.
!Ein erster Druck auf eine Taste Ihres
Thermostats aktiviert die Diplaybeleuchtung.
Installation
Die Schutzfolie vom Display ziehen.
Den Raumthermostat in etwa 1,5 Meter Abstand
vom Boden im Innenbereich an einer Wand vor
Wasserspritzern, direkter Sonnenbestrahlung und
allen Wärmeeinflüssen, wie zum Beispiel
Beleuchtung, Fernseher, Heizungsrohr, Zugluft,
Kamin, geschützt installieren.
Der Raumthermostat kann in einer Unterputzdose
oder in Aufputzmontage installiert werden.
• Den Deckel des Batterienfachs nach unten
schieben.
• Das Produkt durch Aufschrauben der Schrauben
öffnen.
• Den Sockel an der Wand oder in der
Unterputzdose mit 2 Schrauben befestigen.
• Das Produkt durch Einschrauben der Schrauben
.
• Das Batterienfach wieder schliessen.
5
Der Raumthermostat wurde konzipiert, um Ihnen
Komfort zu bieten und beim Energiesparen zu helfen.
Er erlaubt das Programmieren und Regeln Ihrer
Heizungsanlage auf 2 Temperaturniveaus (Komfort und
Absenkbetrieb).
Zum Programmieren Ihrer Heizanlage verfügen Sie
über 3 werkseitig gespeicherte, änderbare Programme
(P1, P2 und P3), die Sie in die Lage versetzen, Ihre
HeizungTag fürTag auf Ihre persönlichen Bedürfnisse
abzustimmen.
Einlegen der Batterien
Der Thermostat verfügt über eine Ladezustandsanzeige der Batterien
; sobald diese Anzeige
eingeblendet wird, müssen die Batterien ersetzt werden. (zwei alkalische Batterien 1,5 V Typ LR03).
Die Lebensdauer der Batterien beträgt ca. 1 Jahr.
• Den Deckel des Batterienfachs nach unten schieben.
• Zwei Batterien Typ LR03 1,5 V in Übereinstimmung mit der Skizze im Batterienfach unter Berücksichtung
der Polung einlegen.
• Das Batterienfach wieder schliessen.
!Sie haben 20 Sekunden Zeit um die Batterien zu wechseln.Danach ist eine neue Einstellung derTemperatur
erforderlich.
Uhrzeiteinstellung
Bei der Inbetriebnahme oder nach einem Reset blinkt die Anzeige 12:00.
• Mit der Taste +oder –,die Uhrzeit einstellen (längeres Niederhalten lässt die Minuten und dann die Stunden
schneller ablaufen).
• Bestätigen Sie mit der Taste
OK
.
Ändern der Uhrzeit:
• Durch mehrmaligen Drücken der Taste MODE, den Cursor unter das stellen.
• Mit der Taste +oder –,die Uhrzeit einstellen (längeres Niederhalten lässt die Minuten und dann die Stunden
schneller ablaufen).
• Bestätigen Sie mit der Taste
OK
.
!Die Uhrzeit hört auf zu blinken und wird automatisch nach einerVerzögerung von 30 Sekunden über-
nommen, falls keine Bestätigung mittels der Taste
OK
erfolgt.
• Jederzeit erlaubt ein anhaltendes Drücken der Taste
OK
die Anzeige der laufenden Uhrzeit.
FR GB DE
IT ES
+
+
–
+

Verknüpfung
• Taste des Empfängers 3 Sekunden drücken.
Die Kontrolleuchte blinkt,Taste loslassen.
Sie sind jetzt im Konfigurationsmodus.
• Die Taste Reset des Senders 3 Sekunden
lang drücken.
Die Kontrolleuchte des Empfängers hört auf
zu blinken nach ungefähr 5 Sekunden.
DieVerknüpfung zwischen Sender und Empfänger
ist jetzt erstellt.
• Uhrzeit anstellen.
Zurücksetzen
• Taste des Empfängers 10 Sekunden drücken.
Die Kontrolleuchte des Empfängers blinkt
erst langsam, dann schnell.
• Erneut 3 Sekunden lang die Taste des
Empfängers drücken. Die Kontrolleuchte
des Empfängers, hört auf zu blinken, sämtliche
Verknüpfungen sind gelöscht.
Temperatureinstellungen
Der Raumthermostat verwaltet 2Temperaturniveaus:
• die Komfort-Temperatur: das ist das
Temperaturniveau, das Sie während Ihrer
Komfort wünschen (zum Beispiel 20 °C).
• Die Absenkbetrieb-Temperatur: das ist das
Temperaturniveau, das Sie während Ihrer kurzen
Abwesenheit oder nachts wünschen (zum
Beispiel 16 °C).
Wir empfehlen einen Unterschied mindestens
von 4 °C zwischen der Komfort- und der
Absenkbetrieb-Temperatur zu belassen.
Ändern der Komfort-Temperatur:
• Im Automatikbetrieb Sollwert mitTaste +oder
– verändern. Die Änderung ist vorübergehend
(das letzte Segment der Balkenanzeige blinkt).
Beim nächsten Programmierschritt berücksichtigt
das Thermostat den üblichen Sollwert.
• Im Komfort-Modus, Sollwert mit Taste +oder –
verändern. Die Änderung ist permanent.
Ändern der Absenkbetrieb-Temperatur:
• Im Automatikbetrieb Sollwert mitTaste +oder
– verändern. Die Änderung ist vorübergehend
(das letzte Segment der Balkenanzeige blinkt).
Beim nächsten Programmierschritt berücksichtigt
das Thermostat den üblichen Sollwert.
• Im Absenkbetrieb-Modus, Sollwert mit Taste +
oder –verändern. Die Änderung ist permanent.
Die Temperaturen Komfort und Absenkbetrieb
sind in 0,5 °C-Schritten von +5 °C bis +30 °C
verstellbar.
Beim Einstellen der Temperaturen Komfort und
Absenkbetrieb blinken diese und werden dann
gespeichert. 5 Sekunden nach dem Einstellen zeigt
der Raumthermostat automatisch die
Raumtemperatur an. Die laufende Solltemperatur
wird ständig auf der Balkenanzeige dargestellt.
Handelt es sich um einen vorübergehenden
Temperatursollwert, blinkt das letzte Segment
der Balkenanzeige.
Programierung
Zum Programmieren Ihrer Heizanlage verfügen
Sie über 3 werkseitig gespeicherte, änderbare
Programme: P1, P2 und P3.
• P1: Komfort von 6h00 bis 23h00.
Absenkbetrieb von 23h00 bis 6h00.
• P2: Komfort von 6h00 bis 8h30
und von 17h30 bis 23h00.
Absenkbetrieb von 8h30 bis 17h30
und von 23h00 bis 6h00.
• P3: Komfort von 6h00 bis 8h30, von 11h00
bis14h00 und von 17h30 bis 23h00.
Absenkbetrieb von 8h30 bis 11h30, von
14h00 bis 17h30 und von 23h00 bis 6h00.
• Das erste Zeitprogramm wird angezeigt und
blinkt. Der Cursor unter dem Symbol zeigt
den Anfang eines Komfortzeitraums.
• Durch mehrmaligen Drücken der Taste OK
blättern Sie die unterschiedlichen Zeitprogramme
durch.
• Sobald sich der Cursor unter dem Symbol
befindet zeigt den Anfang eines Absenkbetrieb-
zeitraums.
• Sobald das Programm des letzten
Temperaturzeitraums mit der OK-Taste bestätigt
wurde, schaltet das Thermostat in
Automatikbetrieb und zeigt die
Raumtemperatur an.
• Mit den Tasten +oder –, können Sie nach
Bedarf die Anfangsuhrzeit der unterschiedlichen
Zeiträume verändern (eine längere Betätigung
derTasten dient zum Schnellvorlauf der Minuten).
Im Automatikbetrieb lenkt das Thermostat
automatisch die gewünschte Temperatur
(Komfort oder Absenkbetrieb) gemäß den
Vorgaben des Programms.
Bei Inbetriebnahme ist P1 im Automatikbetrieb
aktiv.
Auswahl des gewünschten Programms:
• Im Automatikbetrieb,Taste Prog betätigen,
um das gewünschte Programm anzuzeigen (P1,
P2 oder P3).
• Das angezeigte Programm blinkt (beispielsweise
P1).
• Bestätigen Sie mit der Taste
OK
.
Permanente Ausnahmesteuerung
Diese Betriebsart verwandelt das Gerät in einen
einfachen elektronischen Thermostat. Er
berücksichtigt die Uhrzeitenprogrammierung nicht.
• Auf dieTaste Mode drücken und den Cursor ,
nach Wunsch unter das Symbol (Komfort)
oder (Absenkbetrieb).
• Zum Ändern der Komfort-Temperatur oder
der Absenkbetrieb-Temperatur auf die Taste
+oder –drücken.
• Die Solltemperatur wird blinkend an Stelle der
Raumtemperatur angezeigt, danach kehrt der
Thermostat zur Anzeige der Raumtemperatur
zurück.
Zeitweilige Ausnahmesteuerung
Dieser Modus dient zur zeitweiligen Änderung
des Temperatursollwertes während eines
Programmabschnittes.
• Im Automatikbetrieb Sollwert mit Taste +
oder – verändern.
• Das letzte Segment der Balkenanzeige blinkt
jetzt bis zum nächsten Programmabschnitt.
Beim nächsten Programmabschnitt übernimmt
das Programm wieder die vorgegebenen
Temperatursollwerte.
Was tun wenn?
• Die Heizung schaltet sich nicht ein:
der Empfänger steht nicht unter Spannung
(Kontrolleuchte leuchtet nicht). Sicherung
und Leistungsschutzschalter überprüfen.
- den Empfänger neu verknüpfen.
• Die Anwendung schaltet nicht ein oder
schaltet nicht aus:
- der Sender oder der Empfänger wird durch
Störsignale gestört (CB-Funk, Fernsehbildschirm,
Handy-Signalverstärker usw.): versuchen Sie die
Quelle der Störsignale in grösserer Entfernung
aufzustellen.
- Der Empfänger befindet sich nicht in
Senderreichweite.Gehen Sie nahe genug an den
Empfänger heran.
Sollte das Problem anhalten, wenden Sie sich an
Ihren Elektriker.
Technische Daten
Stromversorgung: 2 alkalische Batterien
Typ LR03 1,5 V
Autonomie: etwa 1 Jahr
Gangreserve: max. 20 SeK.
Funkfrequenz: 433.92 Mhz
Transmitter duty cycle : 10%
Einstellbereich des Sollwerts: 5°C bis 30°C
Anzeigebereich der Raumtemperatur:
0°C bis 40°C
Sendebereich: 100 Meter im Freifeld
Betriebstemperatur: 0°C bis +40°C
Lagertemperatur: -20°C bis +60°C
Luftfeuchtigkeit: 90% max bei 25°C
Schutzgrad IP 31
Isolationsklasse: III
Abmessungen: 120 x 80 x 35 mm
Stossfestigkeit IK 04
Normen: NFC – 73251, NF EN 60730-1,
EN 300 220-1V2.1.1, EN 300 220-2V2.1.1
Made in France
Überall in Europa und Schweiz einsetzbar
6
6h 23h
6h 8h30 17h30 23h
6h 8h30 11h30 14h 17h30 23h

Termostato ambiente
rif. 25312
Termostato ambiente a
trasmissione infrarossa
Termostato ambiente programmabile
a trasmissione infrarossa
Presentazione del prodotto
Reset per ritornare alla configurazione d’origine.
Visualizzazione della modalità di funzionamento
(Auto, Comfort, Ridotta o regolazione dell’ora).
Visualizzazione della temperatura.
Simbolo della temperatura ambiente.
Ampio visualizzatore multifunzioni.
Indicatore d’attivazione riscaldamento.
Spia luminosa batterie scariche.
Indicatore a scala con visualizzazione del
livello di temperatura programmato.
Tasti +e –per l’esecuzione delle diverse
regolazioni.
Tasto Prog per accedere ai 3 programmi
preregistrati.
Tasto OK per convalidare le varie regolazioni.
Tasto Mode per entrare nelle varie modalità
di funzionamento.
Vite per rimuovere la base per installazione a
parete dal prodotto.
Coperchio vano batterie.
!La prima pressione su un bottone del vostro
termostato attiva la retroilluminazione.
Installazione
Togliere la pellicola di protezione del visualizzatore.
Il cronotermostato ambiente deve essere installato
a circa 1,5 metri da terra, su una parete interna,
lontano da spruzzi d’acqua, raggi solari diretti e da
qualsiasi fattore di disturbo termico quale una
lampada, un televisore, un tubo di riscaldamento,
una corrente d’aria, camino ecc.
Potete fissare il cronotermostato ambiente su una
scatola d’incastro o direttamente sulla parete.
• Abbassare il coperchio del vano batterie .
• Aprire il prodotto, svitando la vite .
• Utilizzando due viti, fissare la base sulla parete
o in una scatola d’incastro.
• Richiudere il prodotto riavvitando la vite .
• Richiudere il coperchio del vano batterie .
7
Il presente termostato ambiente a trasmissione
adio è stato progettato a garanzia di comfort e
risparmio energetico. Grazie a questo cronotermostato,
potrete programmare e regolare il riscaldamento in base
a 2 livelli di temperatura (comfort e ridotta).
I suoi 3 programmi preregistrati P1, P2 e P3,
facilmente modificabili, ogni giorno di adattare il
riscaldamento al vostro stile di vita.
Alloggiamento delle batterie
Il sensore di temperatura è provvisto di una spia luminosa d’indicazione del consumo batterie
;
Qualora si accenda, sostituire le batterie (utilizzare due batterie alcaline da 1,5V, tipo LR03).
Le batterie hanno una durata pari a circa 1 anno.
• Abbassare il coperchio del vano batterie .
• Inserire due batterie LR03 da 1,5 V secondo lo schema riportato sul fondo del prodotto, rispettando la
polarità.
• Richiudere il coperchio del vano batterie .
!Avete 20 secondi per procedere al cambio delle pile.
Trascorso 20 secondi, bisognerà regolare nuovamente la temperatura desiderata.
Regolazione dell’ora
In fase di avviamento o dopo un reset, l’indicazione 12:00 lampeggia.
• Con i tasti +o –, regolare l’ora corrente (una pressione prolungata permette uno scorrimento rapido dei
minuti quindi delle ore).
• Confermare premendo il tasto
OK
.
Per modificare la regolazione dell’ora:
• Con pressioni successive sul tasto MODE, posizionare il cursore sotto il simbolo .
• Con i tasti +o –, regolare l’ora corrente (una pressione prolungata permette uno scorrimento rapido dei
minuti quindi delle ore).
• Confermare premendo il tasto
OK
.
!L’ora non lampeggia più ed è automaticamente presa in considerazione dopo una temporizzazione di
30 secondi se non si effettua la convalida mediante il tasto
OK
.
• E’ sempre possibile premere il tasto
OK
per 3 secondi, per visualizzare l’ora in sostituzione della
temperatura ambiente.
FR GB DE
IT ES
+
+
–
+

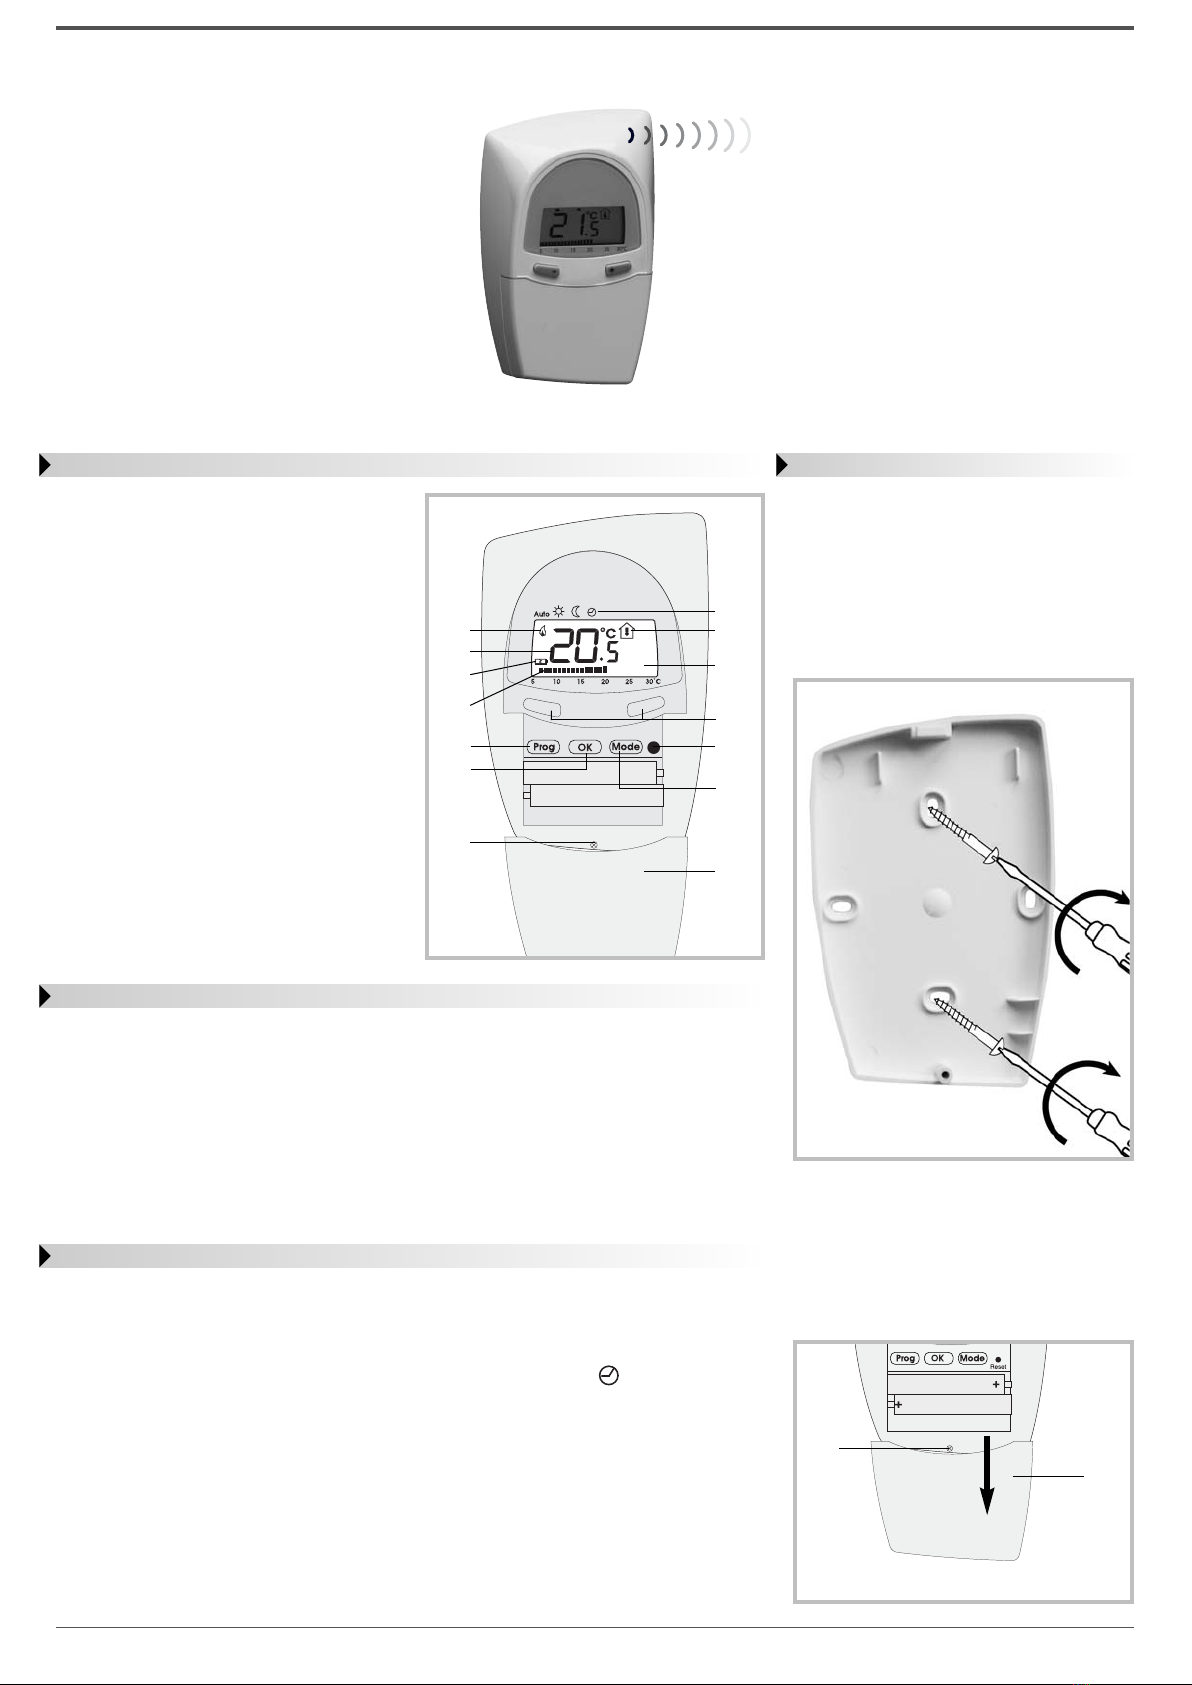
Configurazione del trasmettitore
con il ricevitore
• Premere per più di 3 secondi il pulsante
del ricevitore. La spia lampeggia, rilasciare il
pulsante. Questo è il modo configurazione.
• Premere per 3 secondi il pulsante Reset
del trasmettitore.
La spia del ricevitore non lampeggia più
dopo circa 5 secondi.
Il collegamento trasmettitore/ricevitore è creato.
• Parametrizzate l’ora.
Soppressione del link
• Premere per oltre 10 secondi il pulsante del
ricevitore. La spia si mette a lampeggiare
lentamente, poi sempre più rapidamente.
• Premere di nuovo per 3 secondi il pulsante
del ricevitore. La spia smette di lampeggiare,
vengono cancellati tutti i collegamenti.
Regolazione delle temperature
Il termostato ambiente programma 2 livelli di
temperature:
• la temperatura Comfort : si tratta del livello di
temperatura da voi desiderato durante le ore
di presenza (ad esempio, 20°C).
• La temperatura Ridotta : si tratta del livello di
temperatura da voi desiderato durante i periodi
di assenza di breve durata o durante le ore
notturne (ad esempio, 16°C).
Vi consigliamo uno scostamento da 4°C minimo
tra la temperatura Comfort e Ridotta.
Per modificare la temperatura Comfort
• In modo Auto, premete i tasti +o – permodifica-
re l’impostazione. La modifica è temporanea
(l’ultimo segmento del bargraph lampeggia).
Al prossimo passo del programma, il termostato
terrà conto dell’impostazione abituale.
• In modo Comfort, premete i tasti +o –per
modificare l’impostazione.
La modifica è permanente.
Per modificare la temperatura Ridotta
• In modo Auto, premete i tasti +o – permodifica-
re l’impostazione. La modifica è temporanea
(l’ultimo segmento del bargraph lampeggia).
Al prossimo passo del programma, il termostato
terrà conto dell’impostazione abituale.
• In modo Ridotta, premete i tasti +o –per
modificare l’impostazione.
La modifica è permanente.
Le temperature Comfort e Ridotta sono rego-
labili da +5°C a +30°C, con intervalli di 0,5°C.
In fase di regolazione delle temperature
Comfort et Ridotta, i valori lampeggeranno,
quindi saranno registrati.
Dopo 5 secondi dal termine della regolazione, il
cronotermostato visualizzerà automaticamente
la temperatura ambiente.
La temperatura in fase di programmazione è
costantemente visualizzata sull’indicatore a scale.
Programmazione
Per programmare il riscaldamento, avete a disposi-
zione 3 programmi preimpostati e modificabili: P1,
P2 e P3 :
• P1 : Comfort dalle ore 6h00 alle ore 23h00.
Ridotta dalle ore 23h00 alle ore 6h00.
• P2 : Comfort dalle ore 6h00 alle ore 8h30
e dalle ore 17h30 alle ore 23h00.
Ridotta dalle ore 8h30 alle ore 17h30
e dalle ore 23h00 dalle ore 6h00.
• P3 : Comfort dalle ore 6h00 dalle ore 8h30,dalle
ore11h00 alle ore 14h00
e dalle ore 17h30 alle ore 23h00.
Ridotta dalle ore 8h30 alle ore 11h30,
dalle ore14h00 alle ore 17h30 e dalle ore
23h00 alle ore 6h00.
• La prima ora di programmazione appare e
lampeggia. Il cursore sotto il simbol indica
l’ora d’inizio di un periodo di temperatura
Comfort.
• Mediante pressioni successive sul tasto OK, fate
scorrere le varie ore di programmazione.
• Quando il cursore si trova sotto il simbolo ,
indica l’ora dell’inizio di un periodo di temperatura
Ridotta.
• Quando si convalida l’ora dell’ultimo campo
mediante il tasto OK, il termostato si mette in
modo Auto e visualizza la temperatura ambiente.
• Mediante i tasti +o –, modificate se necessario
l’ora d’inizio di ogni campo (una pressione
lunga permette uno scorrimento rapido dei
minuti).
In modo Auto il termostato gestisce automati-
camente la temperatura voluta (Comfort o
Ridotta) secondo il programma stabilito.
Alla messa in servizio, il programma P1 è attivo
in modo Auto.
Per selezionare il programma desiderato :
• In modo Auto, premere il pulsante Prog finché
sia visualizzato il programma desiderato (P1, P2
o P3).
• Il programma visualizzato lampeggia
ad esempio, P1).
• Confermare premendo il tasto
OK
.
Deroga permanente
Questo modo trasforma l’apparecchio in un semplice
sensore di temperatura elettronico, senza tenere in
considerazione la programmazione oraria.
• Premere il pulsante Mode e posizionare il
cursore , sotto il simbolo o (Comfort
o Ridotta).
• Per modificare la temperatura Comfort o
Ridotta, premere i tasti +e –.
• La temperatura di programmazione sarà visua-
lizzata in sostituzione della temperatura
ambiente e lampeggerà, quindi sul sensore di
temperatura sarà nuovamente visualizzata la
temperatura ambiente.
Deroga temporeana
Questo modo permette di modificare tempora-
neamente la temperatura impostata durante un
passo del programma.
• In modo Auto, premere i tasti +e – per
modificare la temperatura.
• L’ultimo segmento del bargraph lampeggia allora
fino al prossimo passo del programma.
Al prossimo passo del programma, quest’ultimo
riprende le temperature precedentemente
impostate.
Che cosa fare se… ?
• Il riscaldamento non si avvia :
- il ricevitore non è alimentato (spia spenta).
Verificare il fusibile e l’interruttore automatico.
- avvicinarsi sufficientemente al ricevitore.
• Il prodotto non si accende o non si spegne :
- il ricevitore o l'emettitore si trovano in un'area
perturbata da altre onde (radio-amatori, televi-
sione, antenne GSM ecc.) spostate il ricevitore
o l'emettitore in un'altra zona non perturbata.
- Il ricevitore è fuori dalla portata dell’emettitore,
avvicinarsi sufficientemente al ricevitore.
Se il problema persiste, contattare il proprio
elettricista.
Caratteristiche tecniche
Alimentazione : 2 batterie 1,5V LR03
Autonomia : a circa 1 anno
Riserva di marcia : max. 20 sec.
Frequenza radio : 433.92 Mhz
Transmitter duty cycle : 10%
Campo di regolazione delle temperature
Comfort e Ridotta : 5°C a 30°C
Campo di visualizzazione della temperatura
ambiente : 0°C a 40°C
Portata normale : 100 metri in campo aperto
Temperatura di funzionamento : 0°C a +40°C
Temperatura di stoccaggio : -20°C a +60°C
Umidità relativa : 90% max a 25°C
Indice di protezione : IP 31
Classe d’isolamento : III
Dimensioni : 120 x 80 x 35 mm
Resistenza all’urto : IK04
Norme : NFC – 73251, NF EN 60730-1,
EN 300 220-1V2.1.1, EN 300 220-2V2.1.1
Made in France
Utilizzo ammesso in tutti i paesi Europei
e in Svizzera.
8
6h 23h
6h 8h30 17h30 23h
6h 8h30 11h30 14h 17h30 23h

Termostato de ambiente
ref. 25312
Termostato de ambiente sin
hilos de transmisión por radio
9419-233-10/06.08
Termostato de ambiente sin hilos, programmable
de transmisión por radio
Presentación del producto
Botón Reset para volver a la configuración de
origen.
Visualización del modo de funcionamiento
(Auto, Confort, Reducida o puesta en hora).
Visualización de la temperatura ambiente.
Símbolo de la temperatura ambiente.
Gran pantalla multifunción.
Indicador de encendido de la calefacción.
Indicador del desgaste de las pilas.
Bargrafo del nivel de la consigna de
temperatura.
Teclas +y –para las diferentes regulaciones.
Tecla Prog para acceder a los 3 programas pre-
registrados.
Tecla OK para confirmar las diferentes
regulaciones.
Tecla Mode para entrar en los diferentes
modos de funcionamiento.
Tornillo para separar el zócalo mural del
aparato.
Tapa del compartimiento de las pilas.
!La primera presión del botón del termostato
activa la retroiluminación.
Instalación
Quitar la película protectora de la pantalla.
El termostato de ambiente debe instalarse
aproximadamente a 1,5 metros del suelo, sobre
una pared interior, protegido de salpicaduras de
agua, rayos solares directos y perturbaciones
térmicas tales como lámparas, televisores, tubos
de calefacción, corrientes de aire, chimenea...
Se puede fijar el termostato de ambiente en una
caja mural o directamente en saliente.
• Bajar la tapa de las pilas .
• Abrir el aparato quitando el tornillo .
• Fijar el zócalo a la pared o a una caja mural con
2 tornillos.
• Cerrar el aparato poniendo el tornillo .
• Cerrar el compartimento de las pilas .
9
Este termostato de ambiente de transmisión por radio
ha sido creado para aportarle a usted confort y ahorro de
energía. Con él podrá programar y regular la calefacción
según 2 niveles de temperatura (confort y reducida):
Los tres programas preregistrados P1, P2 y P3,
fácilmente modificables, le permiten adaptar la
calefacción a su modo de vida cotidianoe.
Colocación de las pilas
Este termostato está equipado con un indicador de desgaste de las pilas
. En el momento en que
aparezca en pantalla, cambiar las pilas (utilizar dos pilas 1,5 V alcalinas tipo LR03).
Las pilas tienen una duración aproximada de 1 año.
• Bajar la tapa de las pilas .
• Introducir dos pilas LR03 1,5V según el esquema dibujado en el fondo respetando la polaridad.
• Cerrar el compartimento de las pilas .
!Tiene 20 segundos para proceder al cambio de las pilas.
Pasado este tiempo, serà necesario reajustar la temperatura deseada.
Puesta en hora
Al poner en servicio o después de un reset, la indicación de 12:00 parpadea.
• La hora se regula con las teclas +o –(al apretar continuamente van apareciendo rápidamente los minutos
y las horas).
• Confirmar pulsando la tecla
OK
.
Para modificar la regulación de la hora:
• Pulsando repetidas veces la tecla MODE, colocar el cursor bajo el símbolo .
• La hora se regula con las teclas +o –(al apretar continuamente van apareciendo rápidamente los minutos
y las horas).
• Confirmar pulsando la tecla
OK
.
!La hora para de parpadear y queda registrada automáticamente tras una temporización de 30 segundos
si no se efectúa la validación mediante la tecla
OK
.
• En todo momento pulsando pulsando continuamente la tecla
OK
pulse durante 3 segundos, para
visualizar la hora en lugar de la temperatura ambiental.
Para visualizar de nuevo la temperatura efectúe la misma operación.
FR GB DE
IT ES
+
+
–
+

Configuración emisor/receptor
• Mantener pulsado durante más de 3 segundos
el pulsado del receptor.El testigo parpadea,
relajar el pulsado. El receptor está en modo
configuración.
• Mantener pulsado durante 3 segundos la tecla
Reset del emisor.
El testigo del receptor deja de parpadear
despues de 5 segundos.
La configuración emisor/receptor queda
establecida.
• Parametraje de la hora.
Borrado configuración
• Mantener pulsado durante más de 10 segundos
el pulsado del receptor. El testigo parpadea
primero lentamente y luego mas rapidamente.
• Pulsar de nuevo durante 3 segundos el pulsador
del receptor. El testigo deja de parpadear,
todos las sincronizaciones han sido borrados.
Regulación de la temperatura
Este termostato puede gestionar 2 niveles de
temperatura:
• la temperatura Confort : es el nivel de tempe-
ratura que usted desea durante su tiempo de
presencia (20ºC por ejemplo).
• La temperatura Reducida : es el nivel de tempe-
ratura que usted desea durante sus ausencias
de corta duración o por la noche (16ºC por
ejemplo).
Le aconsejamos una diferencia de 4°C minimo
entre la temperatura Confort y Reducida.
Para modificar la temperatura Confort
• En modo Auto, pulse las teclas +o – para
modificar la consigna. Esta modificación es
temporal (el último segmento del barografo
parpadea).
En el próximo paso de programa el termostato
recuperará la consigna habitual.
• En modo Confort, pulse las teclas +o – para
modificar la consigna.
Esta modificación es permanente.
Para modificar la temperatura Reducida
• En modo Auto, pulse las teclas +o – para
modificar la consigna. Esta modificación es
temporal (el último segmento del barografo
parpadea).
En el próximo paso de programa el termostato
recuperará la consigna habitual.
• En modo Reducida, pulse las teclas +o – para
modificar la consigna.
Esta modificación es permanente.
Las temperaturas Confort y Reducida se pueden
regular desde +5ºC a +30ºC con pasos de 0,5ºC.
Al regular las temperaturas Confort y Reducida,
céstas parpadearán y quedarán registradas.Cuando
haya terminado la regulación, al cabo de 5 segundos,
el termostato mostrará automáticamente la
temperatura ambiente. La consigna de temperatura
en curso aparece permanentemente en el bargrafo.
Si se trata de la modificación temporal de una
consigna de temperatura el último segmento del
barografo parpadea.
Programación
Para programar la calefacción se disponen de 3
programas preregistrados y modificables: P1, P2 y
P3:
• P1: Confort de 6h00 a 23h00.
Reducida de 23h00 a 6h00.
• P2: Confort de 6h00 a 8h30
y de 17h30 a 23h00.
Reducida de 8h30 a 17h30
y de 23h00 a 6h00.
• P3: Confort de 6h00 a 8h30, de 11h00 a 14h00
y de 17h30 a 23h00.
Reducida de 8h30 a 11h30, de 14h00 a
17h30 y de 23h00 a 6h00.
• El primer horario de programación aparece y
parpadea. El cursor bajo el símbolo indica
la hora de inicio de un período de temperatura
Confort.
• Presione varias veces la tecla OK para visualizar
los diferentes horarios de programación.
• Cuando el cursor se encuentra bajo el
símbolo , indica la hora de inicio de un período
de temperatura Reducida.
• Cuando se valida el horario del último margen
con la tecla OK, el termostato se pone en modo
Auto y visualiza la temperatura ambiental.
• Con las teclas +o –, modifique si necesario el
horario de inicio de cada margen de temperatura
(una presión larga hace adelantar rápidamente los
minutos).
En modo Auto el termostato controla automá-
ticamente la temperatura deseada (Confort o
Reducida) según el programa definido.
El programa P1 es el programa por defecto en
modo Auto.
Para seleccionar el programa deseado:
• En modo Auto, pulse la tecla Prog para visualizar
el programa deseado (P1, P2 o P3).
• El programa visualizado parpadea (P1 por
ejemplo).
• Confirmar pulsando la tecla
OK
.
Derogaciones permanentes
Este modo transforma el aparato en un simple
termostato electrónico.
No tiene en cuenta la programación horaria.
• Pulsar la tecla Mode y colocar el cursor
debajo del símbolo o (Confort o
Reducida) a elección.
• Para modificar la temperatura Confort o
Reducida, pulsar las teclas +y –.
• La consigna de temperatura aparecerá parpadeando
en el lugar de la temperatura ambiente,después el
termostato volverá a mostrar la temperatura
ambiente.
Derogaciones temporal
Este modo permite la modificación temporal de
la consigna de temperatura durante un paso de
programa.
• En modo Auto, pulse las teclas +o - para
modificar la consigna de temperatura.
• El último segmento del barografo parpadea
hasta el paso de programa siguiente.
En el próximo paso de programa el programa
recupera las temperaturas de consigna definidas.
¿Qué hacer si ?
• La calefacción no se pone en marcha:
- el receptor no recibe alimentación (testigo
apagado). Revisar el fusible y el interruptor.
- volver a instalar el receptor.
• La aplicación no se pone en marcha o no
se deja:
- el receptor está perturbado por una emisión de
ondas (radioaficionado, pantalla de televisión,
reemisor de teléfono móvil...): intentar desplazar
la fuente de emisión de las ondas perturbadoras.
- El receptor está fuera del alcance el emisor,
acercarse más al receptor.
Si el problema continúa, llamar al electricista.
Caracterìsticas técnicas
Alimentación: 2 pilas 1,5V LR03
Autonomía: Alrededor de 1 año
Reserva de marcha: max. 20 seg.
Radiofrecuencia: 433.92 Mhz
Transmitter duty cycle : 10%
Intervalo de regulación de las temperaturas
Confort y Reducida: 5°C a 30°C
Intervalo de visualización de la temperatura
ambiente: 0°C a 40°C
Distancia de emisión: 100 m. en campo libre
T° de funcionamiento: 0°C a +40°C
T° de almacenamiento: -20°C a +60°C
Higrometría 90% max a 25°C
Indice de protección: IP 31
Clase de protección: III
Volumen: 120 x 80 x 35 mm
Resistencia al choque: IK04
Normas : NFC – 73251, NF EN 60730-1,
EN 300 220-1V2.1.1, EN 300 220-2V2.1.1
Made in France
Utilizable en toda Europa y en Suiza
10
6h 23h
6h 8h30 17h30 23h
6h 8h30 11h30 14h 17h30 23h
Table of contents
Languages: