LIC EZ LINK 3 User manual

1
3 07/18
EZ LINK 3 - User Guide
If you need any further assistance please contact the EZ Link
Support Line – 0800 439 5465 (0800 4 EZLINK)

2
3 07/18
CONTENTS
EZ Link User Guide 1
0800 Number 1
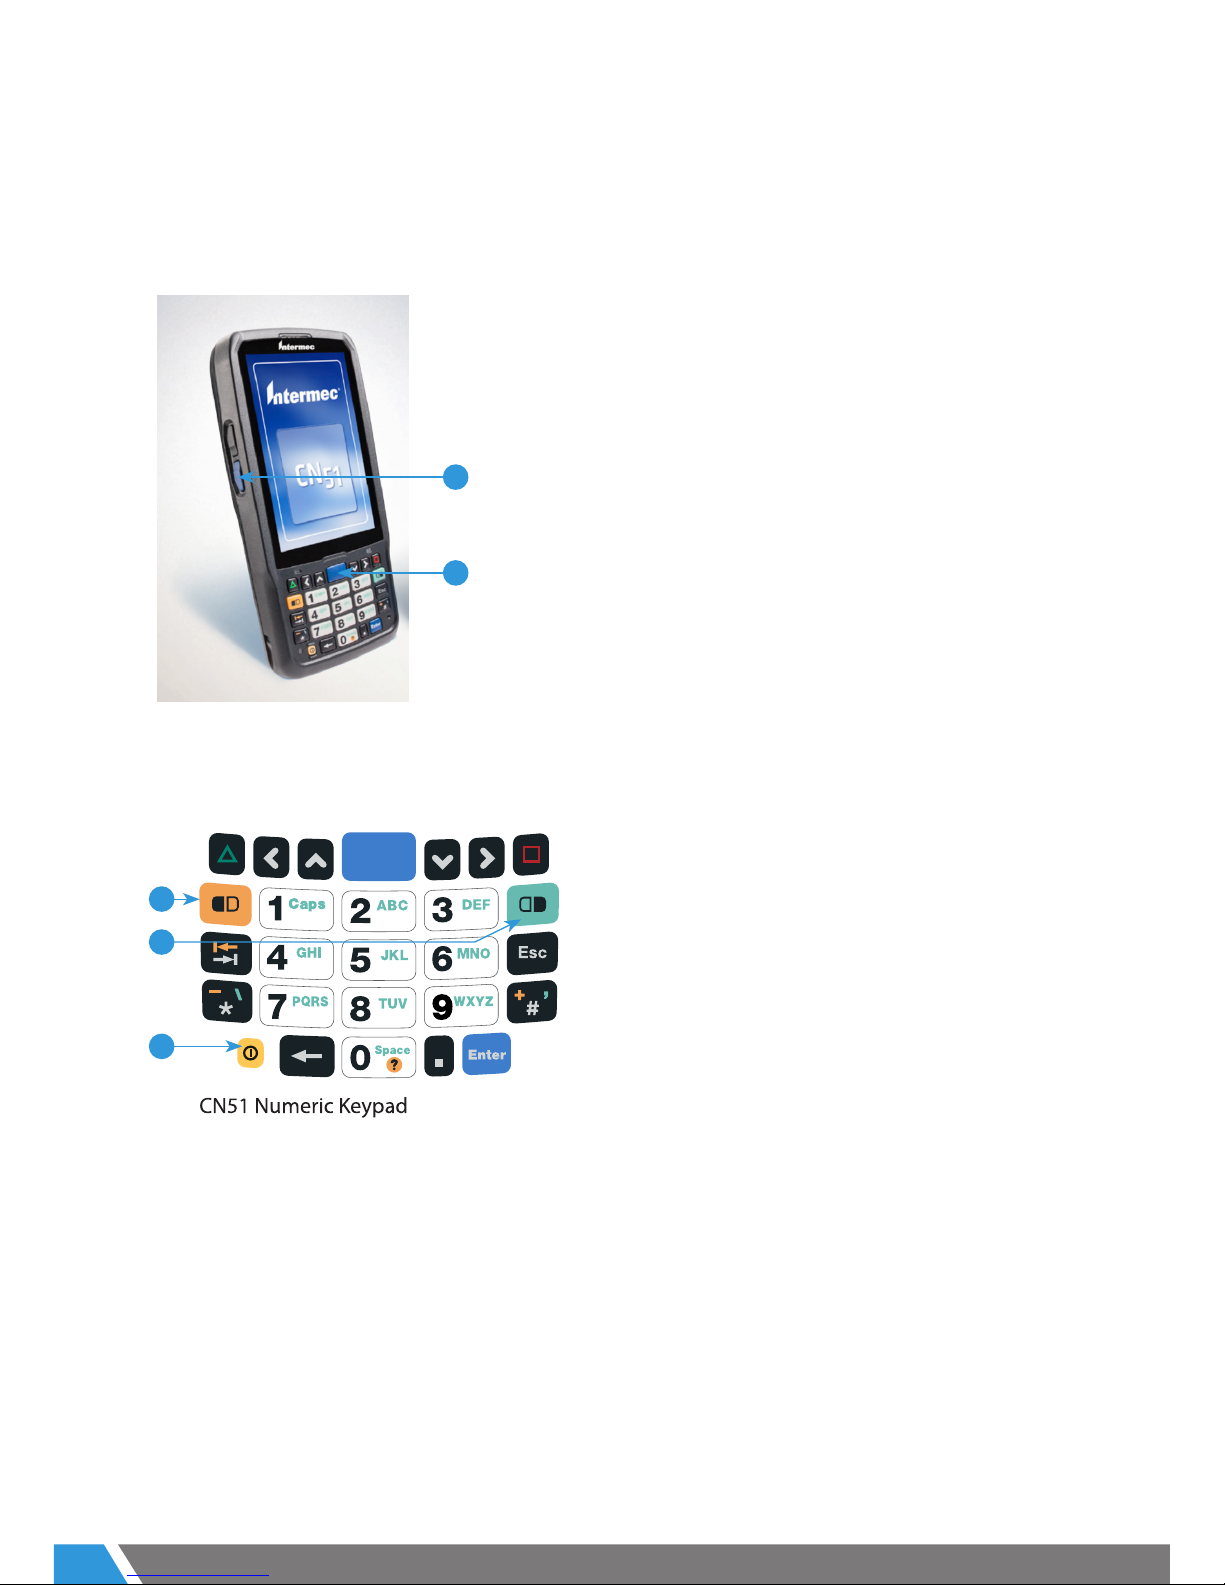
Intermec CN51 mobile computer (HHU) 3
Scanner buttons 3
Logging in 4
Navigating and logging out 4
Conrming test info 5
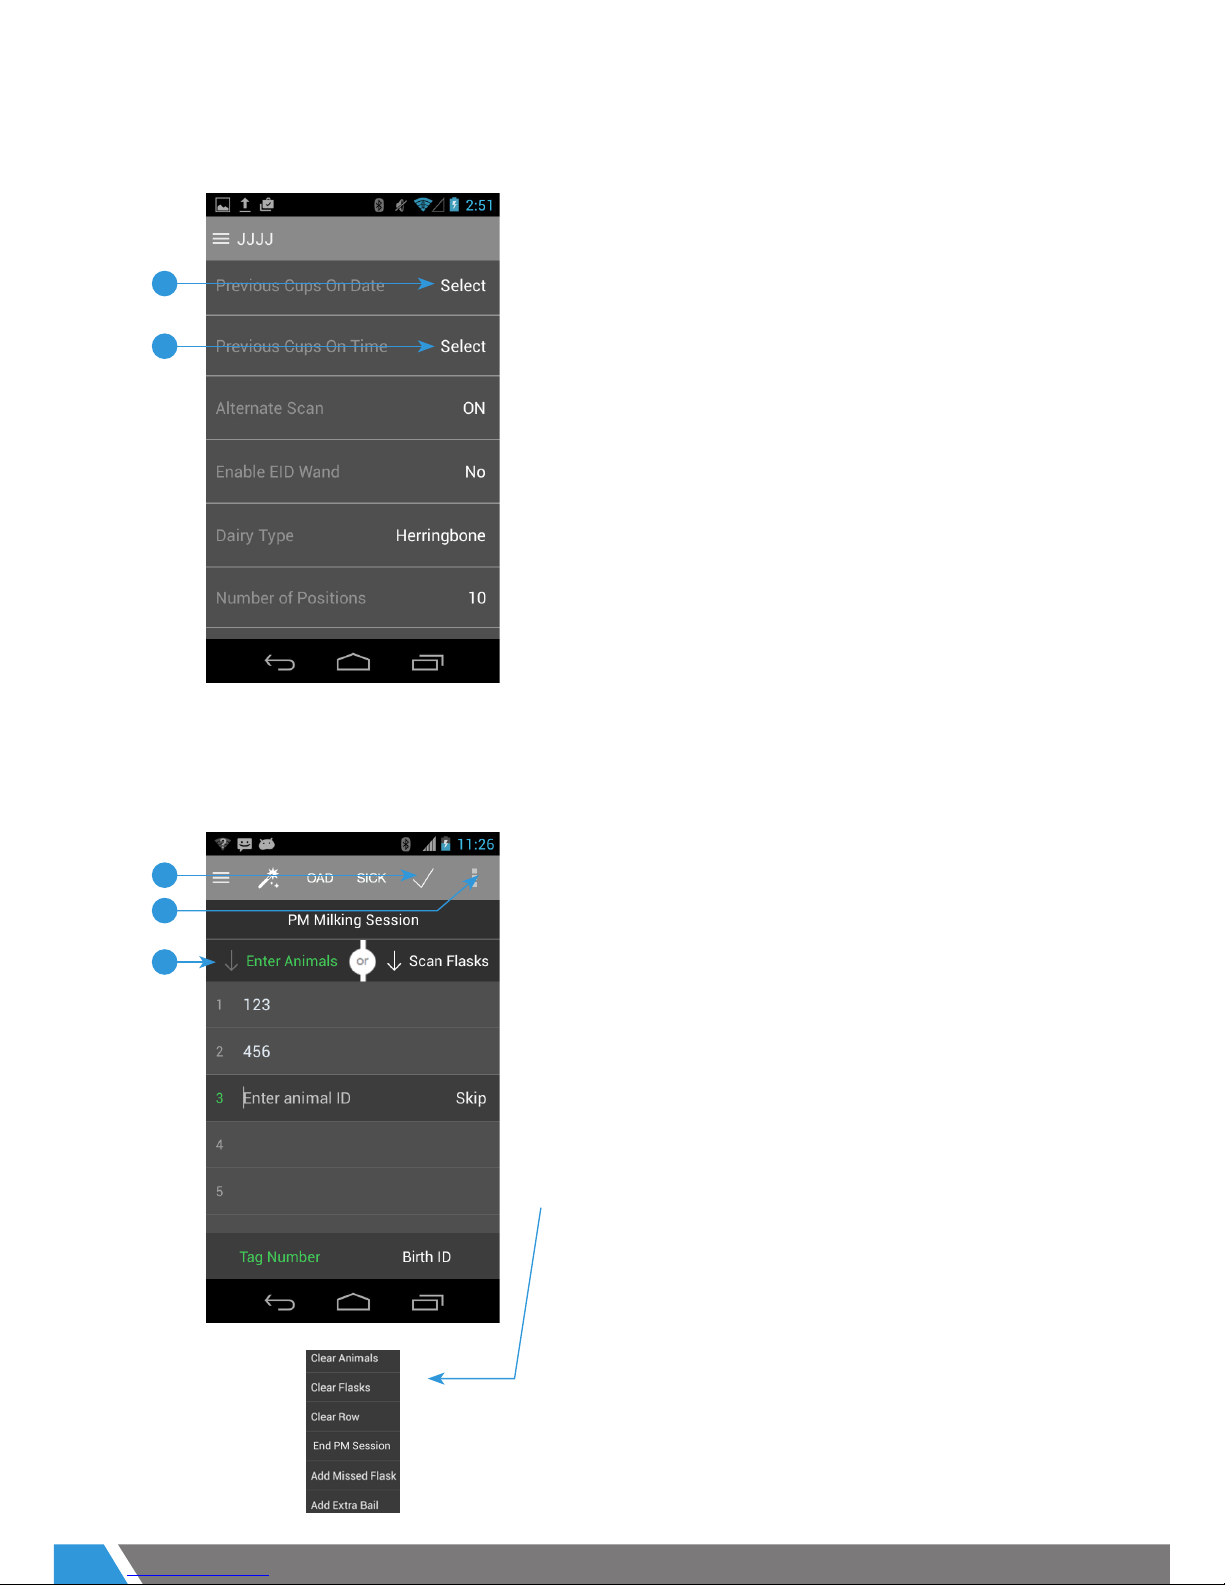
Recording > herringbone > sequential screen 5
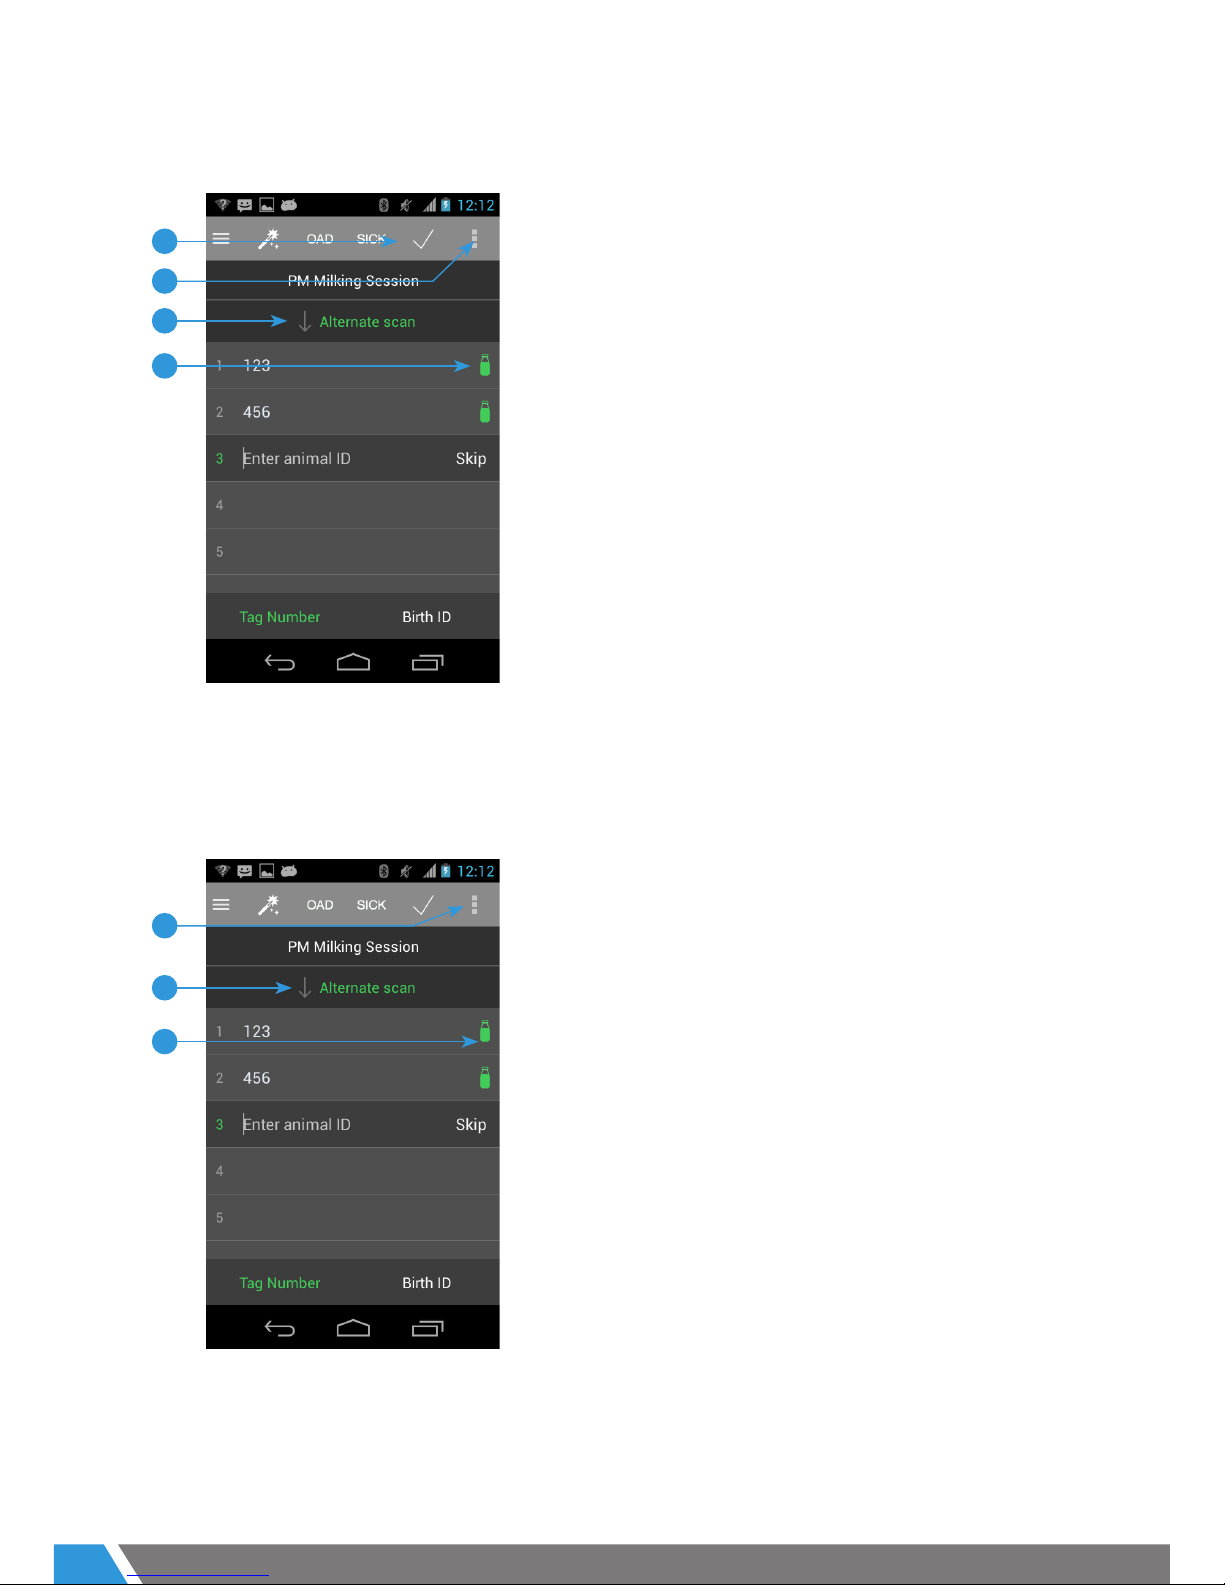
Recording > herringbone > alternate screen 6
Recording > rotary > alternate screen 6
Recording > enter animals (manually) 7
Recording > enter animals via EID wand 7
Recording > edit animal IDs 8
Recording > animals unknown to MINDA 8
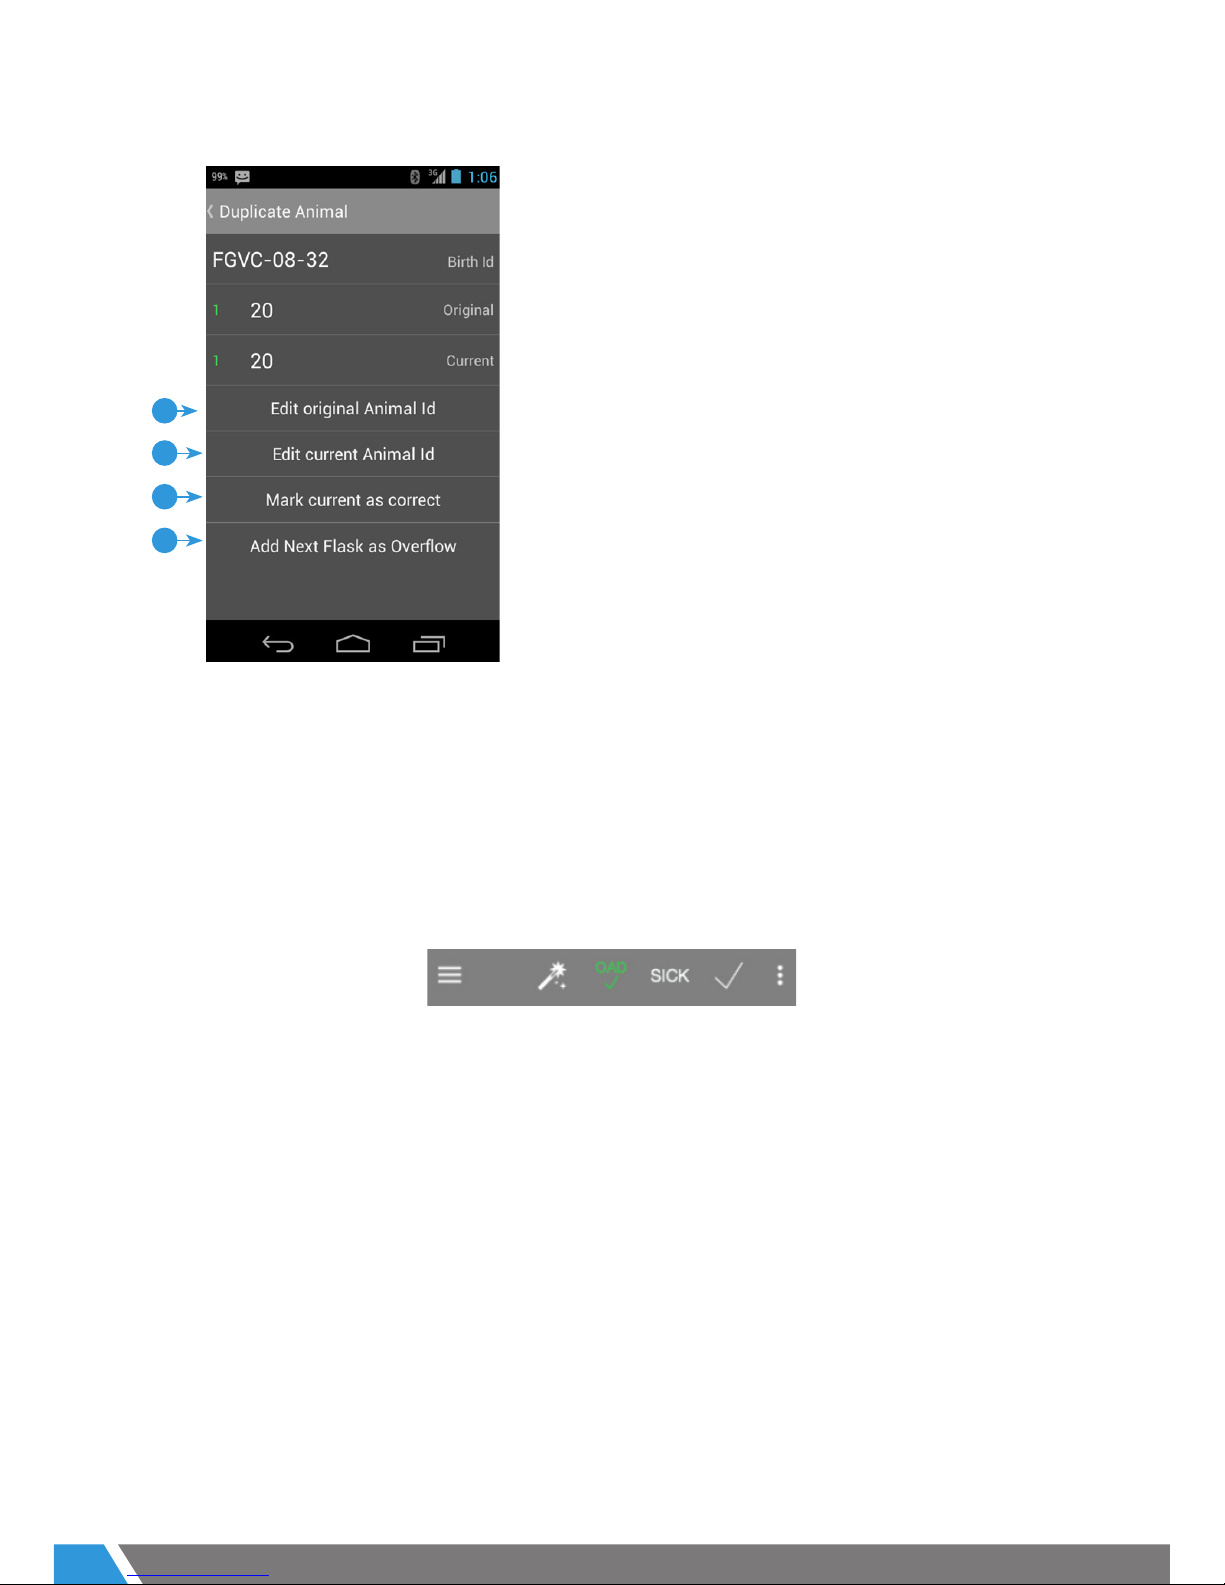
Recording > duplicate animals 9
Recording > OAD animals 9
Recording > sick animals 10
Recording > abnormal Codes 10
Recording > slow milking animal 11
Recording > add missed animal 11
Recording > scanning asks 11
Recording > rescanning asks 12
Recording > duplicate asks 12
Recording > overow asks 13
Recording > add missed ask 13
Recording > query ask 14
Recording > skip a bail 14
Recording > add extra bail 15
Recording > add missed bail 15
Recording > ending with a short row 15
Recording > clear animals/asks/row 16
Recording > delete sample 16
Recording > end Session 17
Reviewing > data edit options 17
Reviewing > single-sample animals 18
Reviewing > unknown to MINDA lter 18
Reviewing > duplicate animals lter 19
Reviewing > more lters 19
Reviewing > agged Animals 20
Reviewing > abnormal Codes 20
Providing feedback 21

3
3 07/18
Intermec CN51 mobile computer (HHU)
The Intermec CN51 is a robust mobile computer, also referred to as an HHU (Handheld Unit),
with a powerful barcode scanner.
To Scan flasks, there are two scanner buttons:
1. Left hand bottom side button
2. Centre button
1. Orange Key – character/function button
2. Green Key – character/function button
If these keys are accidently touched an orange
or green led light will display towards the
bottom of the device. Simply tap the orange or
green button again, so you have full function of
the keypad.
3. Power Button – This allows you to power the
device on/off. Note – no data will be lost if you
need to restart the device throughout a herd
test.
Scanner buttons
EZ Link Keypad
1
2
1
2
3

4
3 07/18
Logging in
Navigating and logging out
1. To log in, use the keyboard to enter your
Participant Code (if you don’t know your Code
please refer to the sticker on the HHU or on the
EZ Link box).
2. Then tap Sign In.
1. To display the menu of screens, tap the
menu icon ( ).
To select a screen, tap its name.
The active screen is currently highlighted in
white.
1
1
2
How to: Navigate to different screens within EZ Link.

5
3 07/18
Confirming test info
Recording > herringbone > sequential screen
How to: Confirm your shed and test details are correct.
How to: Record animals, then flasks, row by row.
1
2
To enter or change details, tap on the values in
white text.
Mandatory:
You must enter Cups On settings to continue
with your herd test.
1. To enter your previous cups on date, tap
Select.
2. To enter your previous cups on time, tap
Select.
PM/AM sampling; do not change this time at the AM
Session, go straight to recording.
If all required fields aren’t completed the following message
will display “One or more mandatory fields are missing”
please return and complete all required fields, please note
you may need to scroll.
1. To reverse the recording direction, tap the
arrow.
(This can only be selected at the start of the row, take note of
the starting bail position number)
After recording a row of animals, then flasks, you must
complete the row.
In a short row you are required to skip all remaining bails
before you can scan flasks and then complete the row.
2. To complete a row, tap the tick.
When you complete the last row, you must end
the session.
3. To end the session, tap the 3 dots, then
select End Session.
2
3
1

6
3 07/18
Recording > herringbone > alternate screen
Recording > rotary > alternate screen
How to: Record animal/flask, animal/flask, etc.
3
1
2
4
1. Alternate scan displays. Tap the arrow to
reverse the recording direction.
(Select alternate scan in Confirm Test Info)
2. A green flask indicates a successful flask
scan before allowing you to record the next
animal ID.
3. To complete a row, tap the tick.
When you complete the last row, you must end
the session.
4. To end the session, tap the 3 dots, then
select End Session.
3
1
2
1. Alternate scan displays. Tap the arrow to
reverse the recording direction.
(This can only be selected at the start of the session)
2. A green flask indicates a successful flask
scan before allowing you to record the next
animal ID.
When you complete the last round, you must
end the session.
3. To end the session, tap the 3 dots, then
select End Session.

7
3 07/18
Recording > enter animals (manually)
1
2
2
1
1. To enter an Animal ID, use the HHU keyboard
to type the Animal ID number, then press the
HHU’s ENTER key.
2. To switch between Tag Number and Birth ID,
tap the desired ID type.
The Birth ID format is
PTPT-YY-XXXXX.
The Participant Code prefix is pre-filled (press
HHU’s key to change). YY is the last 2 digits
of the birth year. XXXXX is the unique animal
no.
Recording > enter animals via EID wand
Note: To use this functionality, Enable EID
Wand must be set to Yes in the Confirm Test
Info screen.
1. The current bail displays with a green bail
number. When pressing the green button
on wand, EZ Link receives the Animal ID, it
displays in white text and the next bail number
turns green.
2. To switch to manually entering an animal ID,
tap the green wand (it will change to white, tap
it again to return to using the wand).

8
3 07/18
Recording > edit animal IDs
1
2
1. To edit an Animal ID, first tap on the
appropriate animal ID.
2. Next, tap Edit Animal ID.
In the subsequent editing screen, use the
key on the HHU keyboard to remove incorrect
numbers, then retype the correct numbers and
tap DONE in the top right of the screen.
Recording > animals unknown to MINDA
For most herd tests, herd details are pre-
downloaded into EZ Link from MINDA.
Any animals not recorded in the MINDA data
download display in red when recorded in
EZ Link. If a herd is manually set-up (not
downloaded from MINDA), all animal IDs will
display in white text.
Duplicate animals (see page 9), which are
designated by Animal IDs of 10001 or higher,
also display in red.
All animals unknown to MINDA can be
displayed via the Unknown Animals filter on
the Review screen (see page 18).

9
3 07/18
Recording > duplicate animals
1
2
3
4
If you record a duplicate animal ID, this screen
will display.
1. and 2. If you know which one is incorrect, tap
the applicable editing option and enter the
correct number.
3. If the current one is correct, but you are
unsure about the original one, tap Mark
current as Correct. 10,000 is added to the
original ID. Note: for a Birth ID, 10,000 is added
to the unique number portion.
4. For overflow flasks tap Add Next Flask as
Overflow.
There are two ways to record an animal as once-a-day (OAD) milkers.
As shown in the Tutorial, you can record an animal as OAD by tapping the OAD icon at
the top of the Record screen.
Tapping once changes the icon to green with a tick, and results in only the current
animal being marked as OAD. Tapping twice changes the tick to a lock and results in
all subsequent animals being marked as OAD (until you tap the OAD icon again, which
changes it back to white text.)
Alternatively, you can tap on the animal ID to bring up the edit options (as shown on
page 13). Then tap on Mark as OAD, which will mark that animal is OAD. When an animal
is already marked as OAD, this option changes to Unmark as OAD.
Recording > OAD animals

10
3 07/18
Recording > sick animals
There are two ways to record an animal as sick.
As shown in the Tutorial, you can record an animal as sick by tapping the SICK icon at
the top of the Record screen.
Tapping once changes the icon to green with a tick, and results in only the current
animal being marked as sick. Tapping twice changes the tick to a lock and results in
all subsequent animals being marked as sick (until you tap the SICK icon again, which
changes it back to white text.)
Alternatively, you can tap on the animal ID to bring up the edit options (as shown on
page 10). Then tap on Record Abnormal Code, which displays all available Abnormal
Codes (as listed on page 18). Tap on Sick, then tap DONE in the top right of the screen.
Recording > Abnormal Codes
2
1
To display the codes you first need to tap on
the applicable animal ID to display the edit
options (as shown on page 8). Then tap Record
Abnormal Code.
1. Tap the applicable Code.
2. Tap DONE to return to the edit options list.
Note: You can change or remove an Abnormal
Code, but only one can be recorded per
session.

11
3 07/18
Recording > slow milking animal
Recording > scanning flasks
A slow milking animal is one that goes around a rotary shed more than once before she
is completely milked out, without a change in flask.
You don’t need to worry about this situation as you can either skip the bail on the
second time around (don’t re-record the animal and flask), or you can record the
animal and flask again as normal and EZ Link will automatically recognise the animal is
a slow milker.
If the flask is changed a Duplicate Animals screen will appear, there is however an
option to record as an overflow, linking the two flasks to the same animal.
The position of the HHU’s scan buttons are shown on page 4.
A successful scan is indicated by a green light at the top of the HHU, a beep sound, and
HHU vibrates. A green flask also displays on the screen.
If you hit the scan button multiple times on the same flask a message will display
advising of a failed scan. Make sure that a green flask is displayed next to the animal.
Recording > add missed animal
1
2
1. To add a missing animal, first tap on the bail
number where the animal should be.
2. Next, tap Add Missed Animal.
This action moves all animals already entered
down one bail, leaving the current bail empty
to enter the missed animal. If flasks have been
scanned, these do not move.

12
3 07/18
Recording > rescanning flasks
To display the Rescan Flask window, you first
need to tap on the applicable animal ID to
display the edit options, then tap Rescan
Flask.
Then rescan the flask and follow on-screen
instructions
Recording > duplicate flasks
1
2
3
If you record a duplicate flask, this screen will
display.
1. and 2. If you know one is incorrect, tap the
applicable editing option and scan the correct
flask.
3. If you are unsure which is correct, tap Mark
samples as Mixed. The ‘Mixed’ Abnormal Code
will be applied to both samples.

13
3 07/18
Recording > overflow flasks
To display the Scan Flask (for overflow)
window, you first need to tap on the applicable
animal ID to display the edit options, then tap
Add overflow flask.
Then scan the overflow flask
Recording > add missed flask
1
2
1. To add a missing flask, first tap on the
3 dots.
2. Next, tap Add Missed Flask.
Follow the prompts on screen to scan back
through the flasks. Once the missing flask is
located, you will be prompted to add.
This action moves all flasks already entered
down one bail, leaving the current bail empty
to scan the missed flask. If animals have been
entered, these do not move.

14
3 07/18
Recording > query flask
If you are uncertain if a flask has been scanned or not, EZ Link enables you to check.
This function can be accessed at any time, once the herd test is underway, via the slide-
out menu.
When you scan the flask, EZ Link will display a message to confirm if the flask was
previously scanned and, if so, the ID of the animal it was recorded with.
Note: You can scan any number of flasks.
Recording > skip a bail
How to: Skip an empty bail.
1
1. To skip a bail, tap Skip on the bar of the
appropriate bail.
Note: When selected, Skip changes to Unskip.
You can click Unskip to undo.

15
3 07/18
Recording > add extra bail
Recording > add missed bail
Recording > ending with a short row
This function is used when an extra animal squeezes into a row in a herringbone
shed (eg, there are 20 cups but 21 animals have squeezed into the row and you milk all
animals using one set of cups twice).
To add an extra bail, tap on the 3 dot drop down menu select Add Extra Bail.
If you have missed entering an animal and scanning a flask earlier in a row or round,
you can insert the missed bail in the appropriate position.
To add the missed bail, tap the bail number where the missing animal and flask are
located then, from the edit options (as shown on page 8), tap Add missed bail.
The new empty bail will raise all of the other bail numbers by one, leaving the current
bail empty to enter the missed animal and flask.
In a short row you can skip all of the empty bails by
completing the following steps:
1. Tap on the tick
2. Click Yes to skip the remaining bails.
The extra bail will be added to the end of the row (eg, position 21 for a 20-bail
herringbone shed).
Note: You can add as many extra bails as you like.

16
3 07/18
Recording > clear animals/flasks/row
Recording > delete sample
How to: Clear incomplete recordings in a herringbone shed.
1
1
2
3
To re-record a row, you can quickly clear all
animal IDs, flask barcodes, or both.
2. To clear animals, flasks, or both, tap the 3
dots, then select:
Clear all animals, Clear all flasks, or Clear row.
1. To delete a sample, first tap on the
appropriate animal ID/bail to bring up the edit
options.
2. Next, tap Delete Sample.
3. Follow the warning on screen and select Yes
if you wish to proceed.

17
3 07/18
Recording > End Session
1
1. To end your session, tap on the 3 dots and
click End Session.
You cannot re-enter an ended session.
Reviewing > data edit options
How to: Access data edit options to resolve issues.
2
1
To access this list, in the review screen tap on
the line of the animal whose data you want to
edit.
1. To edit data, tap the applicable edit option.
2. To return to the review screen, tap < Edit
button.

18
3 07/18
Reviewing > single-sample animals
How to: Filter records to show single-sample animals.
1
2
(Applies only to 2-sample herd testing.)
1. To display all single-sample animals, tap
the single sample filter icon.
2. To resolve, tap on the animal ID then tap
either Mark animal as OAD, Edit Abnormal
Code, or Merge with AM/PM single sample*.
* To select one of these animals, tap its ID,
then follow the on-screen instructions.
Reviewing > unknown to MINDA filter
How to: Filter records to show animals unknown to MINDA.
2
1
1. To display all animals unknown to MINDA,
tap the unknown to MINDA filter icon.
2. To resolve, tap on the animal ID then tap
either Edit Animal ID or Change to Unsampled
Animal ID*.
* Displays lactating animals downloaded from
MINDA that were not sampled during the herd
test. To select one of these animals, tap its ID.

19
3 07/18
Reviewing > duplicate animals filter
How to: Filter records to show duplicate animals.
1
2
1. To display all duplicate animals, tap the
duplicate animals filter icon.
2. To resolve a duplication, tap on the animal
ID then tap either Edit Animal ID or Change to
Unsampled Animal ID*.
* Displays lactating animals downloaded from
MINDA that were not sampled during the herd
test. To select one of these animals, tap its ID.
Reviewing > more filters
How to: Apply more filters to your herd test records.
2
1
1. To display more filter options, tap the more
filters icon, then tap one of:
No Calving Date
Lactating Animals Not Sampled*
OAD
Flagged Animals
Abnormal Code
* Illustrated.
2. For resolution options, tap on the animal ID
then follow on-screen instructions.

20
3 07/18
Reviewing > Flagged Animals
How to: Filter by particular Flagged Animal reasons.
2
1
This list is accessed via the More filters list of
options (as shown on page 19).
1. To apply a Flagged Animal sub-filter, tap
the reason and a tick will appear. (You can
select multiple reasons.)
2. Tap DONE.
Reviewing > Abnormal Codes
How to: Filter by particular Abnormal Codes.
1
2
This list is accessed via the More filters list of
options (as shown on page 19).
1. To apply an Abnormal Code sub-filter, tap
the Code and a tick will appear. (You can
select multiple reasons.)
2. Tap DONE
Table of contents