LIFEPLUS T663 Operating manual

Thank you for choosing a LIFEPLUS wash machine.
This owner's manual will provide you with valuable
information necessary for the proper care and
maintenance of your new product.
Please take a few minutes to read the instructions
and familiarize yourself with all the operational
aspects of your new product.
IMPORTANT SAFETY INSTRUCTIONS PAGES 3-4
INTRODUCTION
SECTION 1
PRODUCT INTRODUCTION PAGES 5
PACKAGE INCLUDE PAGES 5
INSTALLATION AND ADJUSTMENT PAGES 6
SECTION 2
USE OF DRAIN PIPE PAGES 7
INSTALL THE WATER INLET PIPE PAGES 8-9
SECTION 3
PREPARATION BEFORE WASHING PAGES 10-11
USE OF DETERGENT PAGES 12-13
SECTION 4
USER'S GUIDE PAGES 13-15
COMMON PROGRAM DESCRIPTION PAGES 15-16
FAULT DETECTION GUIDE PAGES 16
SECTION 5
WASHING CAPACITY AND DETERGENT PAGES 17
SECTION 6
TABLE OF CONTENTS
CLEANING AND MAINTENANCE PAGES 17-18
TROUBLESHOOTING GUIDE PAGES 19-20
SECTION 7
WARRANTY PAGES 21

Please read this manual carefully before installation and keep it for future reference.
This manual contains important information on the installation, use, and care of your
appliance to prevent you from injury and property damage.
• Read all instructions before using the appliance.
• Before use, the washing machine must be properly installed as described in this manual.
• Please plug the power cord into a 110V socket, and the grounding wire end of the socket
must be reliably grounded. If possible, it is best to use a leakage protector.
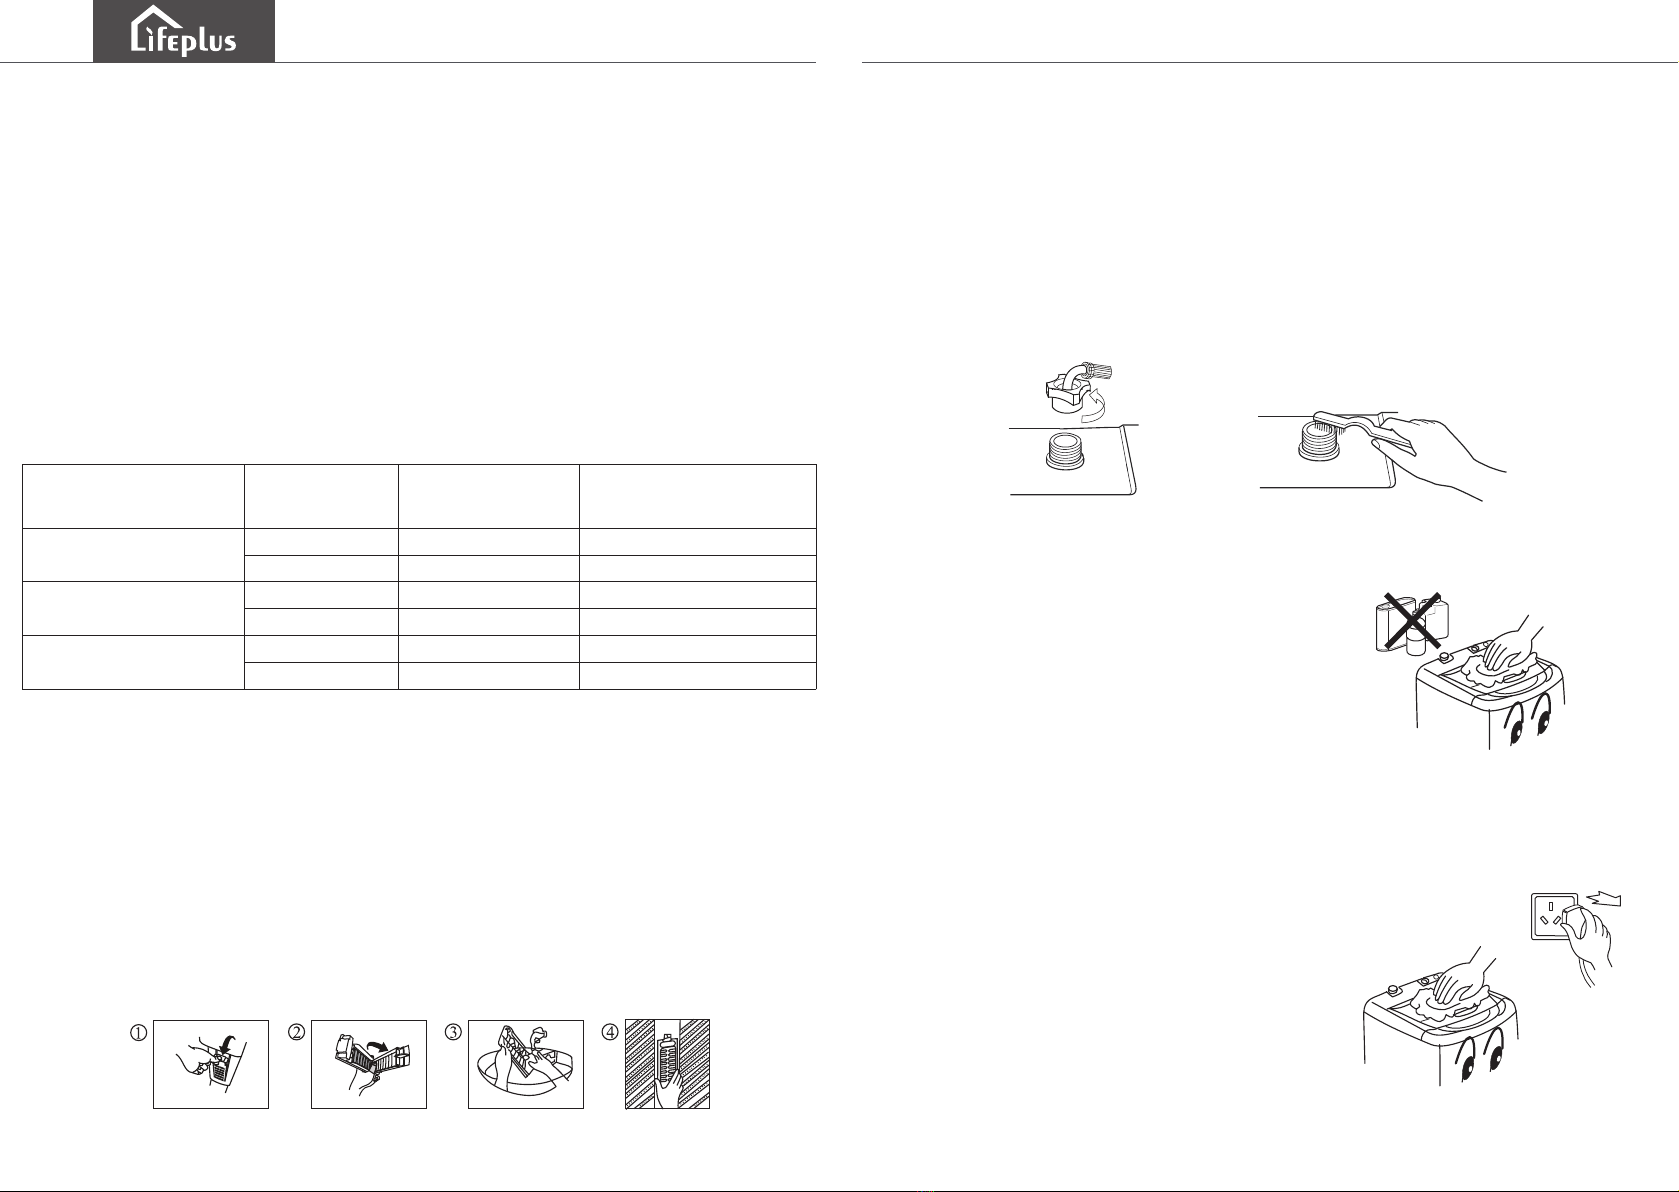
• When the washing machine is in normal use, the plug should be easy to insert and pull
out by hand. When maintaining, cleaning or moving the washing machine, be sure to
unplug the power plug and turn off the faucet. Do not plug or unplug the power plug with
wet hands.
• Do not allow children to play on or in the appliance. Close supervision of children is
necessary when the appliance is used near children.
• Keep all package away from children. There is a risk of suffocation.
• Do not install this appliance near a heater or inflammable material.
• Do not install this appliance in a humid, oily, or dusty location, or in a location exposed
to direct sunlight or water (rain drops).
• When the washing machine is installed on a carpeted floor, the carpet should not block
the ventilation holes at the bottom of the washing machine.
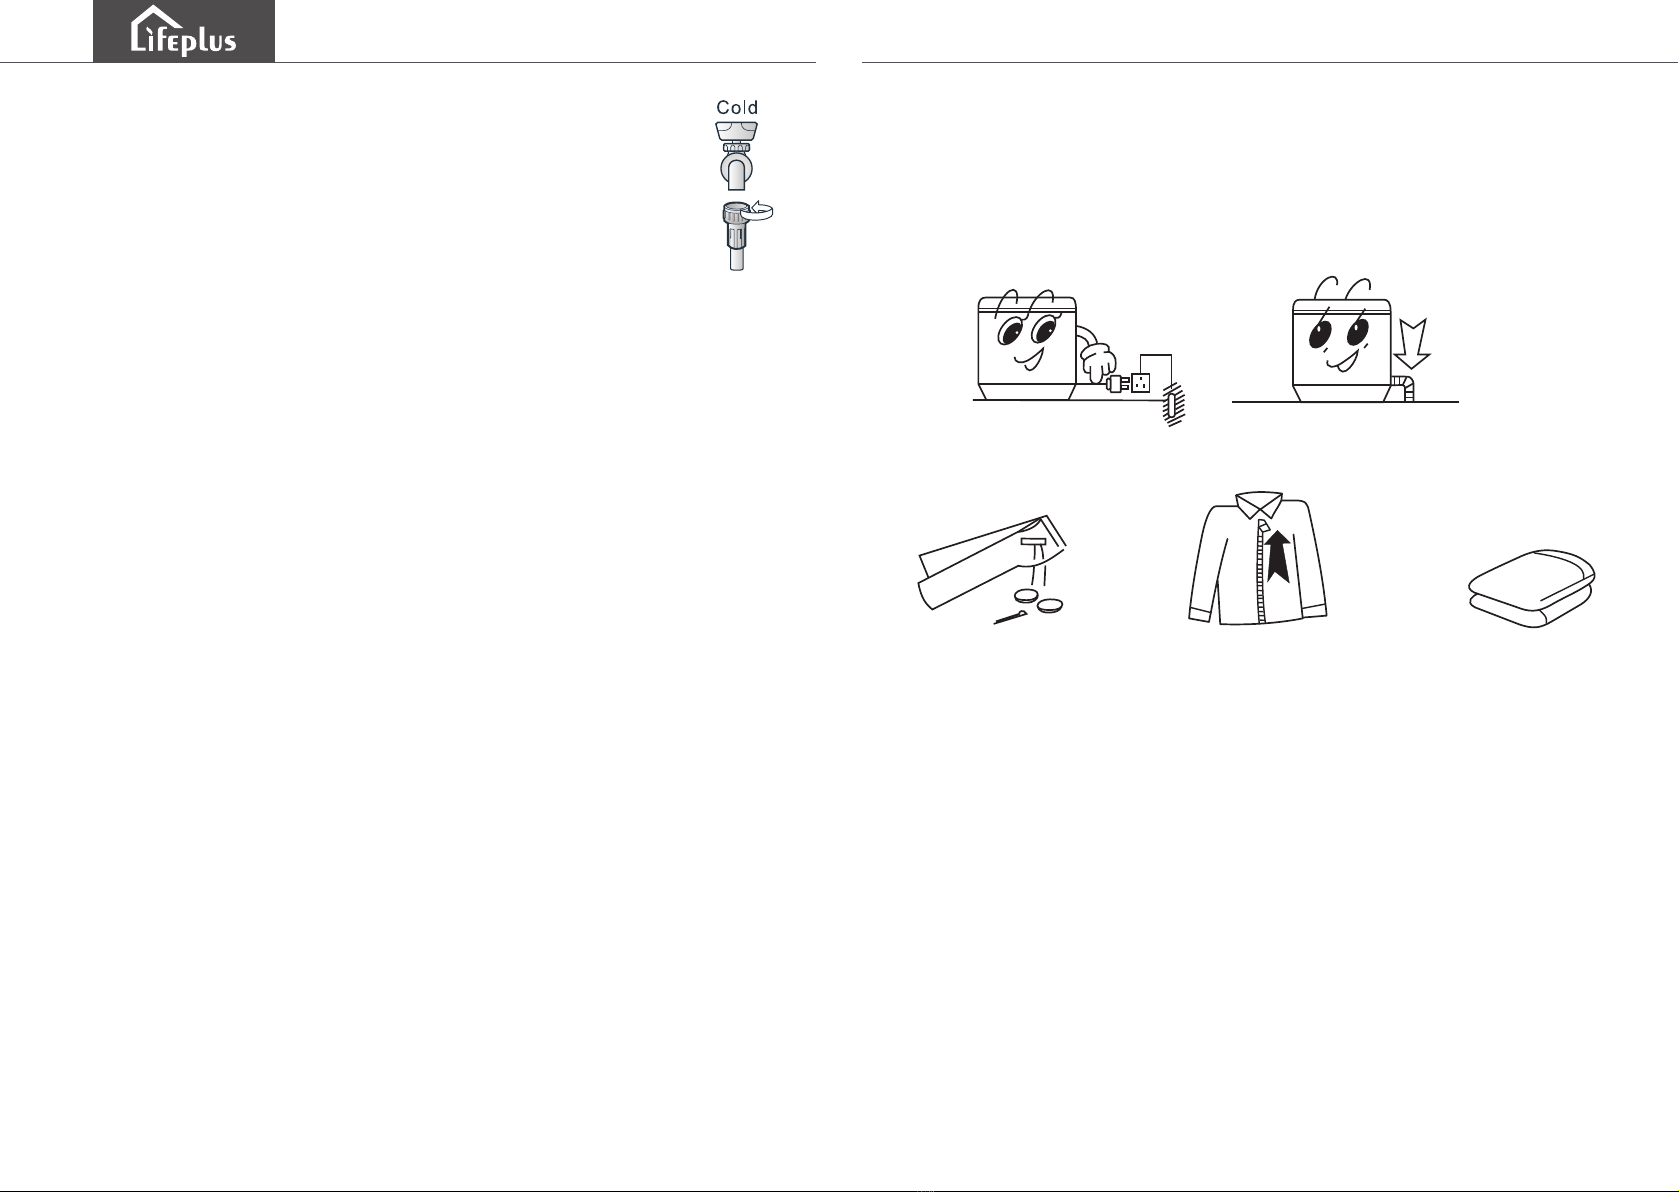
• Do not use hot water above 50° to wash clothes.
• Do not wash down, polyester/cotton products and waterproof clothing such as raincoats,
etc., so as not to damage the products and the machine.
• Do not place items exposed to cooking oil in your washer. Items contaminated with
cooking oil may contribute to a chemical reaction that could cause a load to catch fire.
• Do not wash or dry articles that have been previously cleaned in, washed in, soaked in,
or spotted with gasoline, dry-cleaning solvents, other flammable or explosive substances
as they give off vapors that could ignite or explode.
• Keep the area underneath and around your appliances free of combustible materials
(lint, paper, rags, etc.), gasoline, chemicals and other flammable vapors and liquids.
• Do not disassemble, repair, or modify the washing machine by yourselves.
• Do not force the washer lid open while the washer is operating.
• Before the appliance is removed from service or discarded, remove the lid of the
washing or drying compartment.
• Remove substances such as dust or water from the power plug terminals and contact
points using a dry cloth on a regular basis. Unplug the power plug and clean it with a
dry cloth.
• Do not share a socket with other electrical appliances. It cannot be used when the
power plug is damaged and the plug is loosely inserted into the socket.
• Do not ground the appliance to a gas pipe, plastic water pipe, or telephone line.
Improper grounding may result in electric shock, fire or explosion.
• Do not reach into the washer while the laundry tub is rotating. Before loading, unloading,
or adding items, press the Start/Pause button and allow the laudry tub to a complete
stop before reaching inside.
• Turn off the water faucets and unplug the washer if the machine is to be left for an
extended period of time, such as during vacations.
• Do not place any non-laundry objects, such as shoes, food waste, or animals into the
washer.
• Do not press the buttons using sharp objects such as pins, knives, etc.
• Do not wash laundry contaminated by oils, creams, or lotions usually found in skincare
shops or massage clinics.
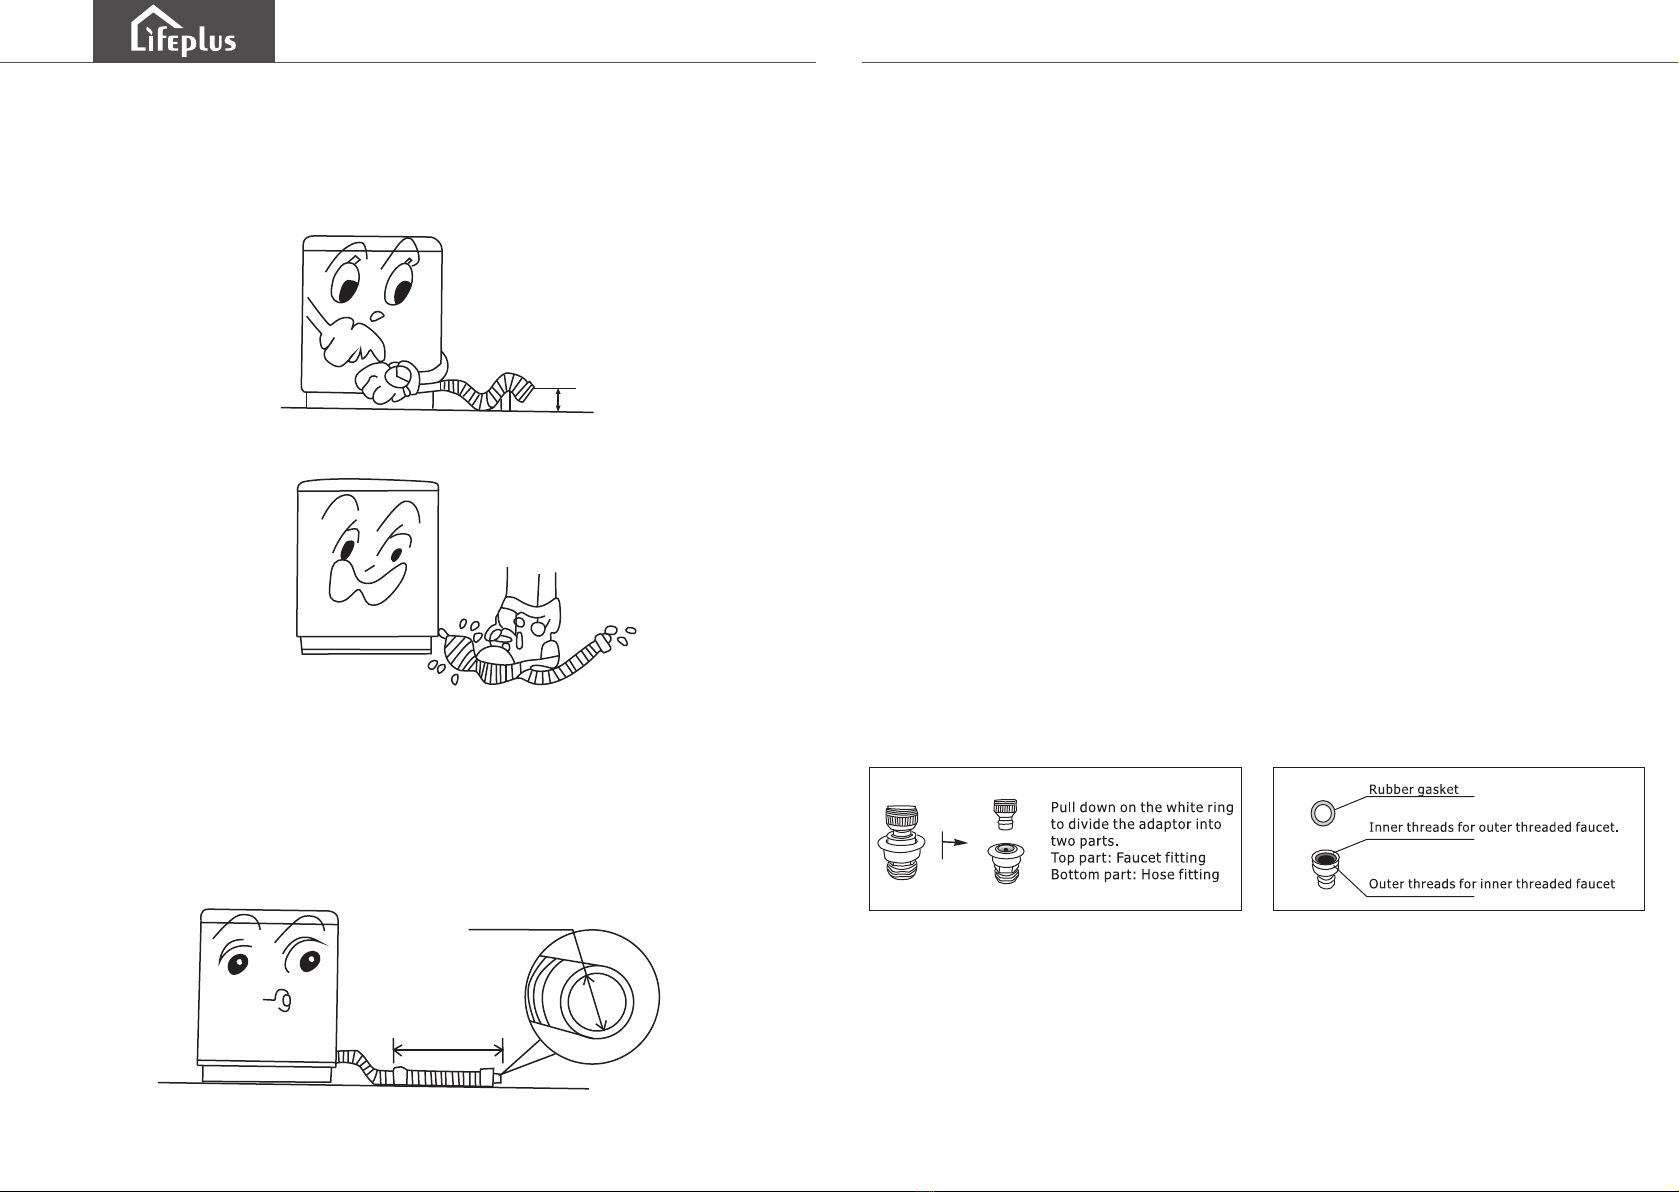
• Ensure that the water inlet pipe is connected before washing clothes.
• Do not use hot water from water cooling/heating devices.
• Do not use natural hand-washing soap in the washer.
• Do not wash large laundry items such as bedding in the washing net. Place smaller
items, such as lace socks and underwear in the washing net.
• Do not use hardened detergent.
IMPORTANT SAFETY INSTRUCTIONS
!
- 3 - - 4 -

Step 1: Unpack
Remove the washing machine from the bottom of the package and place it in an
appropriate position. Open the cover and take out the accessories from the washing tub.
( Do not test the machine or wash anything on the foam packing pad. )
Step 2: Install Bottom Cover
Put the side similar to “ ” up, and gently insert it from the back of the washing machine
until you hear a "click" sound.
Step 3: Level Your Washer
See if the washer is leveled by checking the position of the tub or using a leveling gauge.
1. Slide the washer into position.
2. Open the lid of the washer, and pour the water into the tub to just below the pulsator
level.
3. If the washer is leveled, the pulsator is positioned at the center of the washer as shown
in the figure. If not, level your washer by turning the front leveling feet clockwise or
counterclockwise as necessary.
PRODUCT INTRODUCTION
PACKAGE INCLUDE
Top Cover
Filter
Outer Cylinder
Control Panel
Washing Tub
Body
Adjustable Nut
Washing Machine
* Please check whether the accessories in the above picture are complete. If the washing
machine is damaged or incomplete during transportation, please contact the seller timely.
Drain Pipe Assembly
Owner's Manual
Quick Connection Adaptor
Bottom Cover
Water Supply Hoses
Base
Drain Pipe
Bottom Cover
Pulsator
Power Plug
Groove
Bottom Cover
Faucet
Inlet Pipe
Power Cord
INSTALLATION AND ADJUSTMENT
- 5 - - 6 -
WASHING MACHINE
PRODUCT USE GUIDE
T663

USE OF DRAIN PIPE
- 7 - - 8 -
1. The height of the drain pipe should be less than 47 inches, otherwise it will cause poor
drainage. If the draining time is too long, the washing machine will stop midway.
2. DO NOT step on or squeeze the drain pipe.
3. If the drain pipe is too long, it can be cut from the middle part. For smooth drainage,
the front end of the drainage pipe can be cut diagonally.
4. When the drain pipe needs to be lengthened, please purchase another drain pipe.
The inner diameter of the drain pipe is not less than 1.2 inches and the length is not
more than 59 inches.
INSTALL THE WATER INLET PIPE
1. The Quick Connection Adaptor is primarily for quick connection to a single faucet. If the
faucet does not match the water inlet pipe, the quick connection adaptor is required. The
adaptor consists of two parts that quickly connect or disconnect. One part, the faucet
fitting, is for connection to the faucet and the other part, the hose fitting, connects to the
cold water hose of the washer.
- Pull back on the white ring to free the faucet fitting from the adaptor for installation into
the faucet.
- Screw the end of the cold water hose onto the base of the hose fitting.
- If the faucet has internal screw threads, unscrew the aerator if present from the tip of
the faucet. Then screw the faucet fitting into the faucet. Make sure that the black rubber
gasket is on the top of the adaptor before screwing it in.(The black rubber gasket is
about 2mm higher the top of the adapter)
- If the faucet has external screw threads, remove the gasket from the top of the faucet
fitting, and screw the fitting over the external threads.
- Pull back on the white ring to connect the two parts of the adaptor back together.
NOTE: When connected to a single faucet, be sure to run cold water only.
3. Tighten the fittings by hand until they are snug, and then tighten them an additional
two-thirds of a turn with a wrench.
< 59 in
> 1.2 in
< 47 in

- 9 - - 10 -
PREPARATION BEFORE WASHING
1. Connect the water inlet pipe and open the faucet valve.
2. Fasten the buttons and pull the zippers.
3. Do not wash too much, jeans and bulky clothes should be loosely placed.
Precaution
• Check whether the clothes are suitable for washing in the washing machine;
• Separate clothes that are easy to fade;
• Please put the clothes that are not easy to absorb water into the water by hand;
• For clothes with more mud and dust, please remove the dirt first, especially the dirty
parts, you can dip detergent in advance, so that it is easier to remove the dirt on the part;
• Turn over and throw in the clothes that are easy to pilling and long pile;
• Do not put clothes contaminated by chemicals directly into the washing machine;
• Please put small items, easy-entangled clothing, worn clothing and plush into a net bag
for washing.
Clean out your pockets
and take out coins,
hairpins, etc.
Fasten the buttons and
pull the zippers.
DO NOT wash too much.
Jeans and bulky clothes
should be loosely placed.
Gound
When you fasten the fittings, do not fasten them too tightly or apply
tape or seal to the faucets or water supply intakes. This can damage
the fittings. After you have connected the water supply hoses to the
faucet, ensure that they are connected securely by pulling the water
supply hoses downwards.
4.
Place the unconnected ends of the hoses into a bucket and open the faucets connected
to the two water supply hoses for 10 or 15 seconds to remove any substances from the
hoses. Close the faucets before continuing.
5. Connect the ends of the water supply to the water supply intake connections at the top
of the washer.
The water hose connected to the COLD faucet must be connected to the cold water
supply intake.
6. Tighten the fittings by hand until they are snug, and then tighten them an additional
two-thirds of a turn with a wrench.
Ensure that the water supply hoses are not twisted or bent. If the hoses are twisted
or bent, the hoses can leak and cause electric shock due to the water leakage. To
ensure the correct water usage, connect to the COLD water faucet.
7. Turn on the COLD water supplies and check all the water supply intake connections
and the faucets for water leaks.
NOTE: After the connection is completed, if there is water leakage, please connect
again according to the above steps. Please use the water inlet pipe provided by the
manufacturer. The old water inlet pipe cannot be reused and do not use other
self-provided water inlet pipes to avoid water leakage.

USE OF DETERGENT
How to use washing powder?
1. Melt directly in the washing machine.
(1). Inject a small amount of water (Choose the lowest water
level).
(2). Put in the washing powder, run for about 30 seconds, and
press "Start/Pause" after it is fully melted.
(3). Put in the laundry, select the appropriate water level, and
press "Start/Pause" again.
3. The instant method of washing powder: Dissolve washing
powder in 86°F water.
4. Please put in the washing powder appropriately according
to the washing volume and the selected water level and water
volume. In order to ensure the washing effect when using the
express program, it is recommended to use liquid detergent.
5. It is recommended to use low-foam detergent.
6. There are differences in the dosage of different washing powders.
For the specific dosage, please refer to the instructions for use of
washing powders.
How to use bleach?
1. After pouring water to the specified water level, dilute the bleach in a container and
slowly pour it into the washing bucket.
2. Colored or patterned clothes are easy to fade, so avoid using bleach.
3. The bleaching agent should not directly contact the laundry.
4. The usage method and dosage of bleaching agent are in accordance with the
instructions of bleaching agent.
5. Use the powder bleach after melting.
- 11 - - 12 -
Washing Instructions
• The washing and dewatering capacity of the washing machine refers to the standard
washing that can be washed and dried at one time. The amount of one wash must be
below the rated capacity.
• The thickness, size, and type of the cloth will affect the actual washing capacity. It is
advisable to put an appropriate amount of laundry in one wash, and the laundry can be
turned normally during the washing process.
• Don't choose high water level for cloth under 2.2 lbs to prevent splashing.
Reference Weight of Laundry
Work Clothes (2.5 lb)
Put the washing powder
directly into the washing
machine or first dissolve
the washing powder in
other containers and
then pour it into the
washing machine.
Jeans (1.7 lb)
Blended Fabric
Coat (1.7 lb)
Single Bed Sheet
(1.3 lb)
Socks (0.1 lb)
Underpants
(0.2 lb)
T-shirt
(0.4 lb)
Shirt
(0.7 lb)
Pajamas
(0.5 lb)
Toweling Coverlet
(2.0 lb)
Jacket
(1.7 lb)

USER'S GUIDE
Description Of the Control Panel
1. Power
When the washing machine starts, press the "Power" button to trun on the power, and
the washing machine enters the initial working state.
When running or paused, press the "Power" button to cut off the power, and the washing
machine is in standby working state.
If the machine does not start within 10 minutes, it will automatically cut off the power. After
washing, it will beep and automatically cut off the power.
2. Program
During the pause or standby process, press the "program" button to choose the desired
program: 01—Standard, 02—Spin, 03—Quick, 04—Soak, 05—Gentle, 06—Air Dry,
07—Retain Water, 08—Tub Clean.
The "program" is invalid during running, and it can be changed during pause.
The timing will be restarted after changing the program.
3. Water Level
(1). The water level defaults to "3 gears" no matter it is the initial state of the start or the
program selection.
(2). When the machine is just turned on or paused in the middle, press the "Water Level"
button to select the water level, and the appropriate water level can be selected according
to the amount of clothes. Gears 1, 2 are low water levels, gears 3 and 4 are medium
water levels, and gears 5 and 6 are high water levels. During "Speed" and "Spin", the
water level is not adjustable.
(3). "Speedy" is a fixed program, and the water level is not adjustable.
(4). During washing (including rinsing), if you want to add water, press the "Start/Pause"
button, then press the "Water Level" button to select a higher water level, and press the
"Start/Pause" button. The washing machine will automatically replenish water to a higher
level. If the changed water level is lower than the current water level in the bucket, it will
continue to run without replenishing water after the suspension is started, and the changed
low water level will be executed next time when there is a water intake action.
(5). Automatic water replenishment: During the process of "Soak", "Wash" and "Rinsh", if
the washing machine detects that the water level has dropped to the set water level, the
washing machine will stop working and then continue to run after automatically
replenishing water to the set water level.
Precautions
1. When installing the washing machine, be sure to remove the transport base and
bracket at the bottom of the washing machine, otherwise it cannot be used.
2. During installation or initial use, a small amount of water will flow out of the drain pipe,
which is the residual water during routine inspection of the factory.
3. When the washing machine is finished, please unplug the power plug and turn off the
faucet to prevent accidental fire and water leakage.
- 13 - - 14 -
Standard
START / PAUSE
Remain (min)
Indicate Detergent
WATER LEVEL
CHILD LOCK
PROGRAM POWER
Spin
Speedy
Soak
Gentle
Air Dry
Retain Water
Tub Clean

COMMON PROGRAM DESCRIPTION
Standard
Name
The program mainly washes dirty clothes that need to be changed
frequently.
The water flow is weak, which is used to wash thin or clean clothes.Gentle
The program is used to wash clothes that are not too dirty, and the
washing time is shorter.
Speedy
Before washing, let the clothes fully soak, so that the washing powder
can completely dissolve and penetrate the fibers of the clothes; during
the soaking process with interval rotation, the stains can be easily
disintegrated, and the cleaning effect is better.
Soak
Descripton
FAULT DETECTION GUIDE
E0
Digital instructions Cause
Manual power off or the water
level sensor is repaired normally.
Open the top cover, press the "no
water" item in the "abnormal
phenomenon and disposal method"
to overhaul, then close the top
cover to release the alarm.
E1
Open the top cover, perform
inspections in accordance with
the item "No water" in "Abnormal
phenomenon and solution", and
then close the top cover to release
the alarm.
E2
Close the top cover to release the
alarm.
E3
Open the top cover, level the
clothes in the washing tub, and
then close it to release the alarm.
E4
Close the top cover to release the
alarm.
The water level sensor is
abnormal or the plug is loose.
The water level is still less
than the set water level after
filling or for 20 minutes.
After draining for more than
5 minutes, it still cannot drop
to the set water level.
The lid is opened during spin.
Dehydration imbalance alarm.
The door cover is opened
during the operation of the
child lock.
E5
Solution
Spin Only the spin program, no washing or rinsing process. It is a program
selected according to needs.
By the suction effect of the high-speed rotation of the barrel, the wet
clothes are further dehydrated, which is drier than ordinary spin.
Air Dry
4. Start / Pause
After selecting the program, press "Start/ Pause" to work.
During operation, press "Start/ Pause" to pause the operation, press it again to continue
the program until the remaining time is completed.
If you want to change the contents of "program", "process" and "water level" during
operation, you must frist press "Start/ Pause". Press it again after changing the settings,
the program will continue to run until the end.
5. Child Lock
Setting method: In normal operation, press the "Water Level" and "Program" buttons at
the same time, the child lock is turned on, and the other buttons except the "Power" button
become invalid.
Releasing method: In the child lock state, press the "Water Level" and "Program" buttons
at the same time to release the child lock function.
Washing machine energy efficiency test program:
Normal procedures are used for energy efficiency testing, and 3 water levels are used for
half load.
- 15 - - 16 -

The washing and dewatering capacity of the washing machine refers to the standard
laundry that can be washed and de-dried at a time.The amount of one wash must be
below the rated capacity.
The thickness, size, and type of cloth will affect the actual washing capacity.
It is advisable to put an appropriate amount of laundry in one wash, and the laundry
can be turned normally during the washing process.
DO NOT choose a high water level for the cloth under 2.2lb to prevent dripping and
splashing.
Amount of Clothes
(lb) Water Level
507 0.91
< 3.3 575 12
913 1.66
845 1.45
744 1.24
676 1.13
3.3 - 5.5
5.5 - 12
Water Volume
(oz.)
Quantity of Washing
Powder (oz.)
CLEANING AND MAINTENANCE
After using it, please promptly remove the lint debris attached to the filter.
When cleaning it, please unplug the power plug from the socket.
Filter Cleaning
Take the filter down, open it and take out the sundries. After cleaning it with water, put it
back on the washing machine.
Cleaning of the Inlet Valve Joint
After a long time of use, the filter of the inlet valve port is easily blocked by debris, which
will hinder the water inlet. Please clean it up as follows:
1. Turn off the faucet and turn on the power supply.
2. Turn off the power after starting the washing machine for 5 seconds (make the water in
the water inlet pipe flow into the bucket).
3. Remove the water inlet pipe joint and use a brush to clean the sundries on the filter.
Cleaning the Outside of the Body
After using it, please wipe off the remaining stains on the chassis with a moist and soft
cloth.
1. DO NOT directly clean it with water.
2. Wipe with neutral detergent.
3. DO NOT wipe with thinner, gasoline or alcohol.
Complete Cleaning of Washing Machine
1. After using it, turn off the faucet.
2. After using it, drain the water immediately, and do not leave the water in the washing
machine barrel for a long time.
3. The power plug must be unplugged for maintenance.
4. Wipe the surface of the washing machine and the
water drops in the bucket with a soft cloth, and then
close it after opening the top cover for a period of
time (1 hour).
WASHING CAPACITY AND DETERGENT
- 17 - - 18 -
Gasoline Thinner
Alcohol

Abnormal Phenomenon
- The faucet is not turned on.
- Inlet valve filter is clogged.
- Water pressure is too low
or water is cut off.
- Turn on the faucet and press
the "Start/Pause" button.
- Clean the water inlet valve and
press the "Start/Pause" button.
- When the water pressure
reaches the allowable value,
use it again.
No water or too slow.
- The washing machine is
tilted.
- Dehydrated clothes are
placed on the wrong side.
- There are foreign objects
such as coins in the
washing machine.
- Level the washing machine.
- Organize clothes.
- Remove foreign objects from
the washing machine.
The washing machine
makes a weird noise
- Power failure.
- The power plug is not
inserted tightly.
- The power socket is dead.
- The power switch button
is not pressed.
- Use it after power on.
- Plug in the power plug tightly.
- Check the power socket or
change another socket.
- Press the power switch button.
The washing machine
does not work.
Light does not shine.
- Do not put the drain pipe
down or the outlet is too
high.
- The drain pipe is blocked,
bent or kinked.
- Lower the drain pipe,
reopen and close the cover.
- Remove foreign objects or
unblock the drain pipe,
reopen and close the cover.
Not draining or draining
too slowly.
Possible Cause Solution
Common Phenomenon
- Adjust the balance to prevent the clothes
from being misplaced.
When spin starts, it occurs intermittently.
- The washing machine program sets the
drain time, and the dehydration starts
after a period of time.
When you press the "Process" button
and select "Spin", the washing machine
will not spin.
- This is the remaining water during the
factory inspection of performance.
When using the washing machine for
the first time, a small amount of water
may flow out of the drain pipe.
- The safety switch operates because the
laundry is biased to one side. Filled it with
water and agitated, the deviation of the
laundry is eliminated and the dehydration
is performed again.
In the final spin, the display becomes
rinse and water-in.
Cause
- The screw of the water
inlet pipe joint (connecting
with the faucet) is loose or
offset.
- The joint between the
water inlet pipe and the
water inlet valve of the
washing machine is not
tightened.
- Correctly tighten the joint
screws.
- Tighten the water inlet valve
connector of the washing
machine.
Water leakage at the
water inlet pipe joint
- Laid-down clothing causes
the safety switch to operate.
- The tilting of the washing
machine caused the safety
switch to operate.
- The top cover is not closed
after draining.
- Open the lid again after the
dehydration starts.
- Reorganize the clothes and
close the lid.
- After the washing machine is
placed horizontally, reopen and
close the top cover.
- Close the top cover.
Do not spin
TROUBLESHOOTING GUIDE
- 19 - - 20 -

After-sales Service Letter of Commitment:
To provide customers with premium products and services is our commitment to every
customer.
All products purchased in our company are guaranteed to keep in good repair for 1 year.
If quality problems happen in guarantee period, our company will maintain for free or
provide replacement.
Additionally, our company provides technical support and fittings for life. After-sales
service isn't restricted by time and hear feedback idea of users and deal with them in
time. If you are caught in some problems when using our products, welcome to contact
us at any time.
Email us: [email protected]
WARRANTY
- 21 -
Table of contents