LED Streifen und Verbinder
Benutzeranleitung
Vielen Dank für den Kauf des Lightpro LED-Streifens
und Verbinders. Dieses Dokument enthält die notwen-
digen Informationen für den korrekten, efzienten und
sicheren Gebrauch des Produkts. Weitere Informatio-
nen zur Installation und zum Anschluss Ihres Beleucht-
ungsplans nden Sie im allgemeinen Handbuch zum
Lightpro 12-Volt-System und in Ihrer Transformator-Be-
nutzeranleitung.
Bitte lesen Sie die Informationen in diesem Handbuch
sorgfältig durch, bevor Sie das Produkt in Betrieb neh-
men. Bitte bewahren Sie dieses Handbuch zusammen
mit dem Produkt auf, um zukünftig nachschlagen zu
können.
PRODUKTBESCHREIBUNG
Der Lightpro LED-Streifen ist ein Lichtschlauch für den
Außenbereich. Der Streifen kann vor der Installation
auf die gewünschte Länge zugeschnitten werden. Hin-
weis: Beachten Sie vor dem Schneiden die Hinweise in
dieser Anleitung!
Dieses Produkt eignet sich als Außenbeleuchtung in
Kombination mit dem 12-Volt-System von Lightpro.
Eine unsachgemäße Verwendung des Produkts kann
Auswirkungen auf die Sicherheit, die Gewährleistung
und den ordnungsgemäßen Betrieb des Produkts und
/ oder anderer Teile des Systems haben.
Spezikationen LED-Streifen
Artikelnummer 175L
Leistung (pro Meter) 2,2W
Lichtstrom (pro Meter) 80-100lm
Schutzart IP67
Umgebungstemperatur -20°C bis 50°C
Dimmbar Nein
Spezikationen LED-Streifen-Verbinder
Artikelnummer 176L
Maximale Leistung 36W
Afmetingen (l x b x h) 1m x 28mm x 28mm
Schutzart IP44
Umgebungstemperatur -20°C bis 50°C
Kabellänge 1m
ANWENDUNG
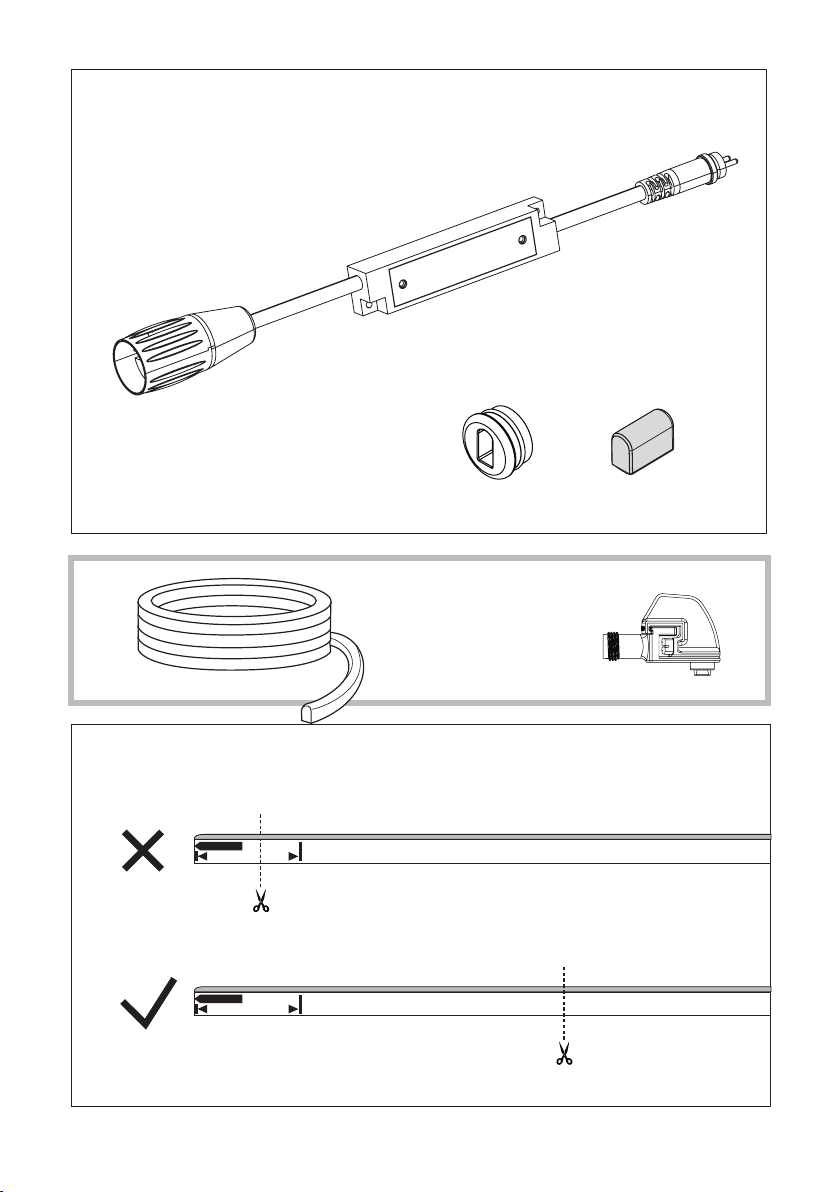
Verpackungsinhalt
[Bild A]
1. Verbinder
2. Gummiabdichtung
3. Abschlusskappe
Überprüfen Sie, ob alle Teile in der Verpackung
vorhanden sind. Bei Fragen zu Einzelteilen, Service,
Reklamationen oder anderen Angelegenheiten
können Sie uns jederzeit kontaktieren. E-Mail: info@
lightpro.nl
Separat erhältlich
[Bild B]
1. LED Steifen (Artikelnummer 175L)
2. Lightpro Verbinder (Artikelnummer 137A)
SCHNEIDEN
[Bild C]
Der LED-Streifen kann auf die gewünschte Länge
zugeschnitten werden.
Sie die folgenden Anweisungen zum Schneiden:
1. Auf dem LED-Streifen bendet sich eine Markierung
mit dem Aufdruck DO NOT CUT HERE. In diesen
Teil des Streifens darf niemals geschnitten werden.
2. Der Streifen kann nach Bedarf gekürzt werden. Der
Teil des Streifens, der an den Verbinder ange-
schlossen wird, muss mindestens eine Markierung
enthalten.
3. Kurze (verbleibende) Teile des LED-Streifens, an
denen keine Markierung vorhanden ist, leuchten
beim Anschluss an den Verbinder nicht auf.
4. Es ist möglich, dass am Ende des Streifens einige
Zentimeter nach dem Schneiden nicht aueuchten.
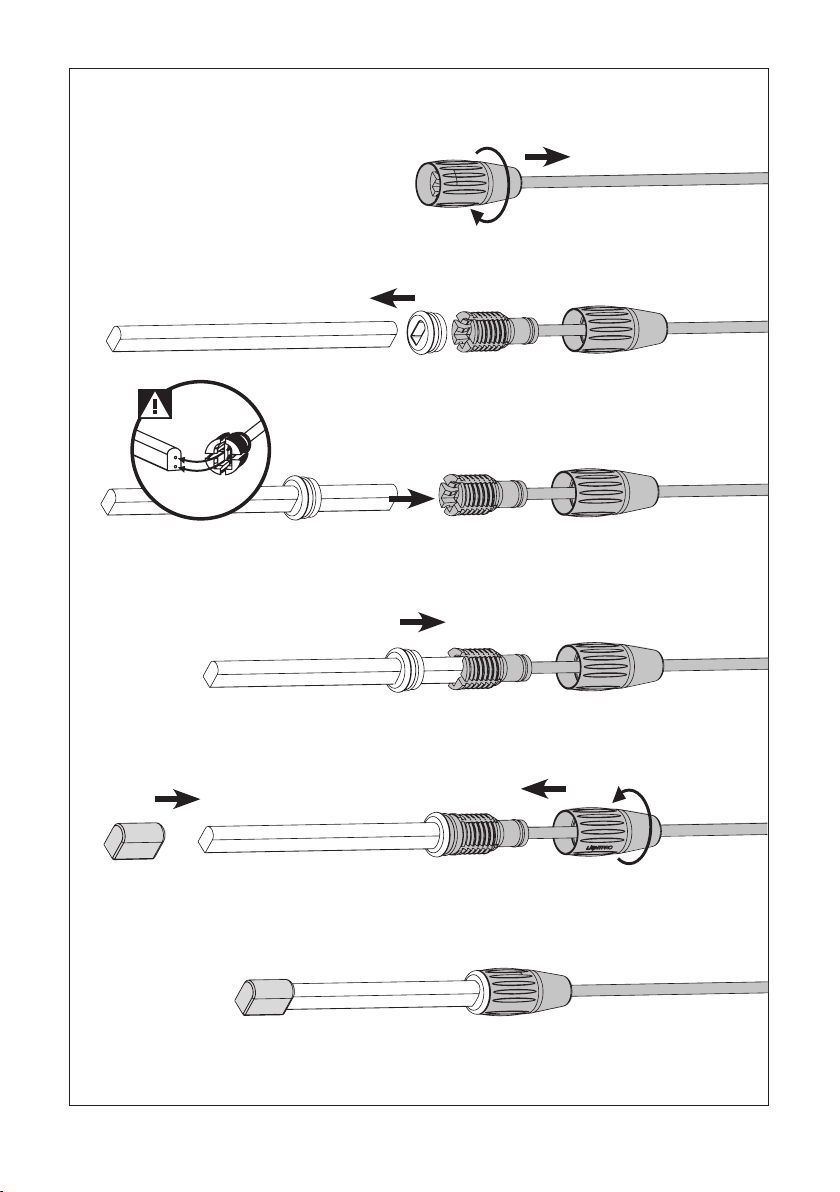
MONTAGE
[Bild D]
1. Lösen Sie den Schraubverschluss und schieben Sie
ihn nach hinten.
Der LED-Streifen muss in der richtigen Richtung
an den Verbinder angeschlossen werden. Beachten
Sie beim Anschließen die Pfeilrichtung mit dem
Aufdruck CONNECTOR. Der Pfeil zeigt in Richtung
des Verbinders.
2. Platzieren Sie die Gummiabdichtung ca. 5 cm auf
dem LED-Streifen.
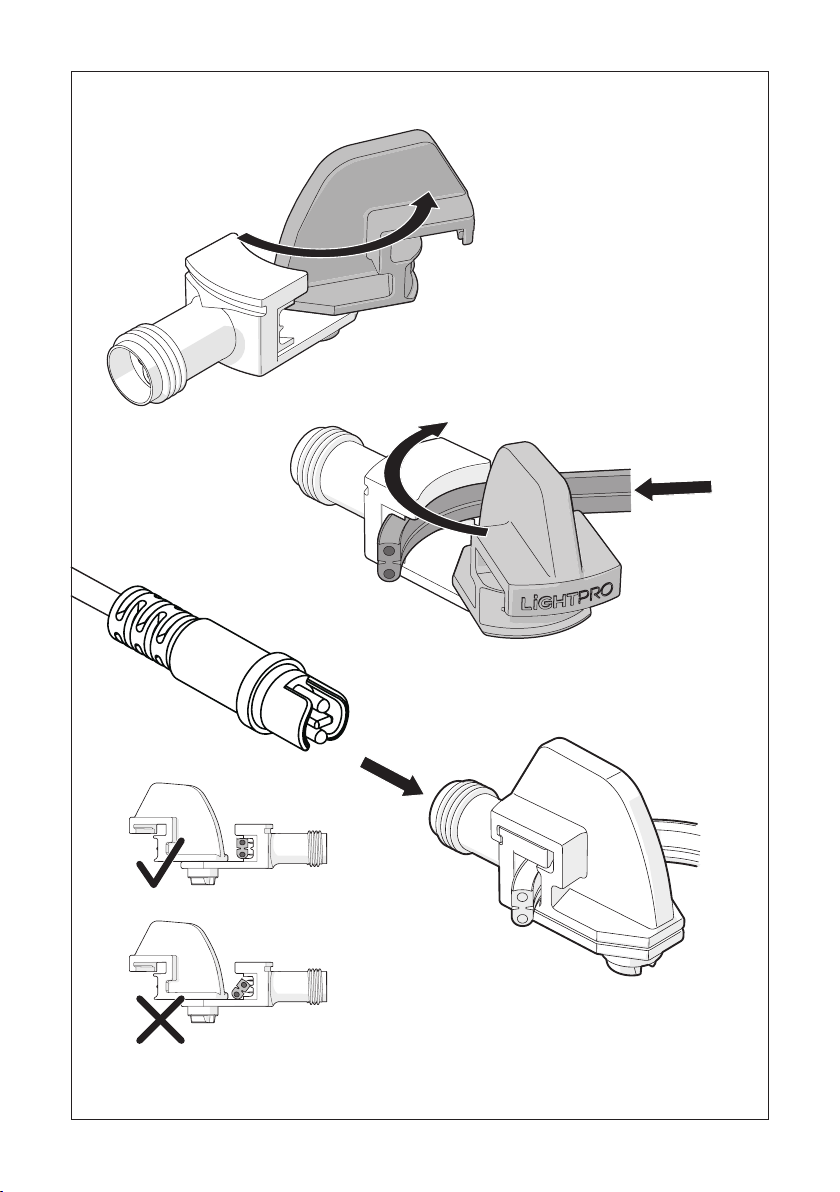
3. Verbinden Sie den LED-Streifen mit dem Verbinder.
Stellen Sie sicher, dass die Stifte im Verbinder einen
guten Kontakt zu den Leitern im Streifen haben.
4. Drücken Sie die Gummiabdichtung gegen den
Verbinder.
5. Setzen Sie den Schraubverschluss auf den Verbinder
und ziehen Sie ihn fest an.
6. Platzieren Sie die Abschlusskappe am Ende des
LED-Streifens
D