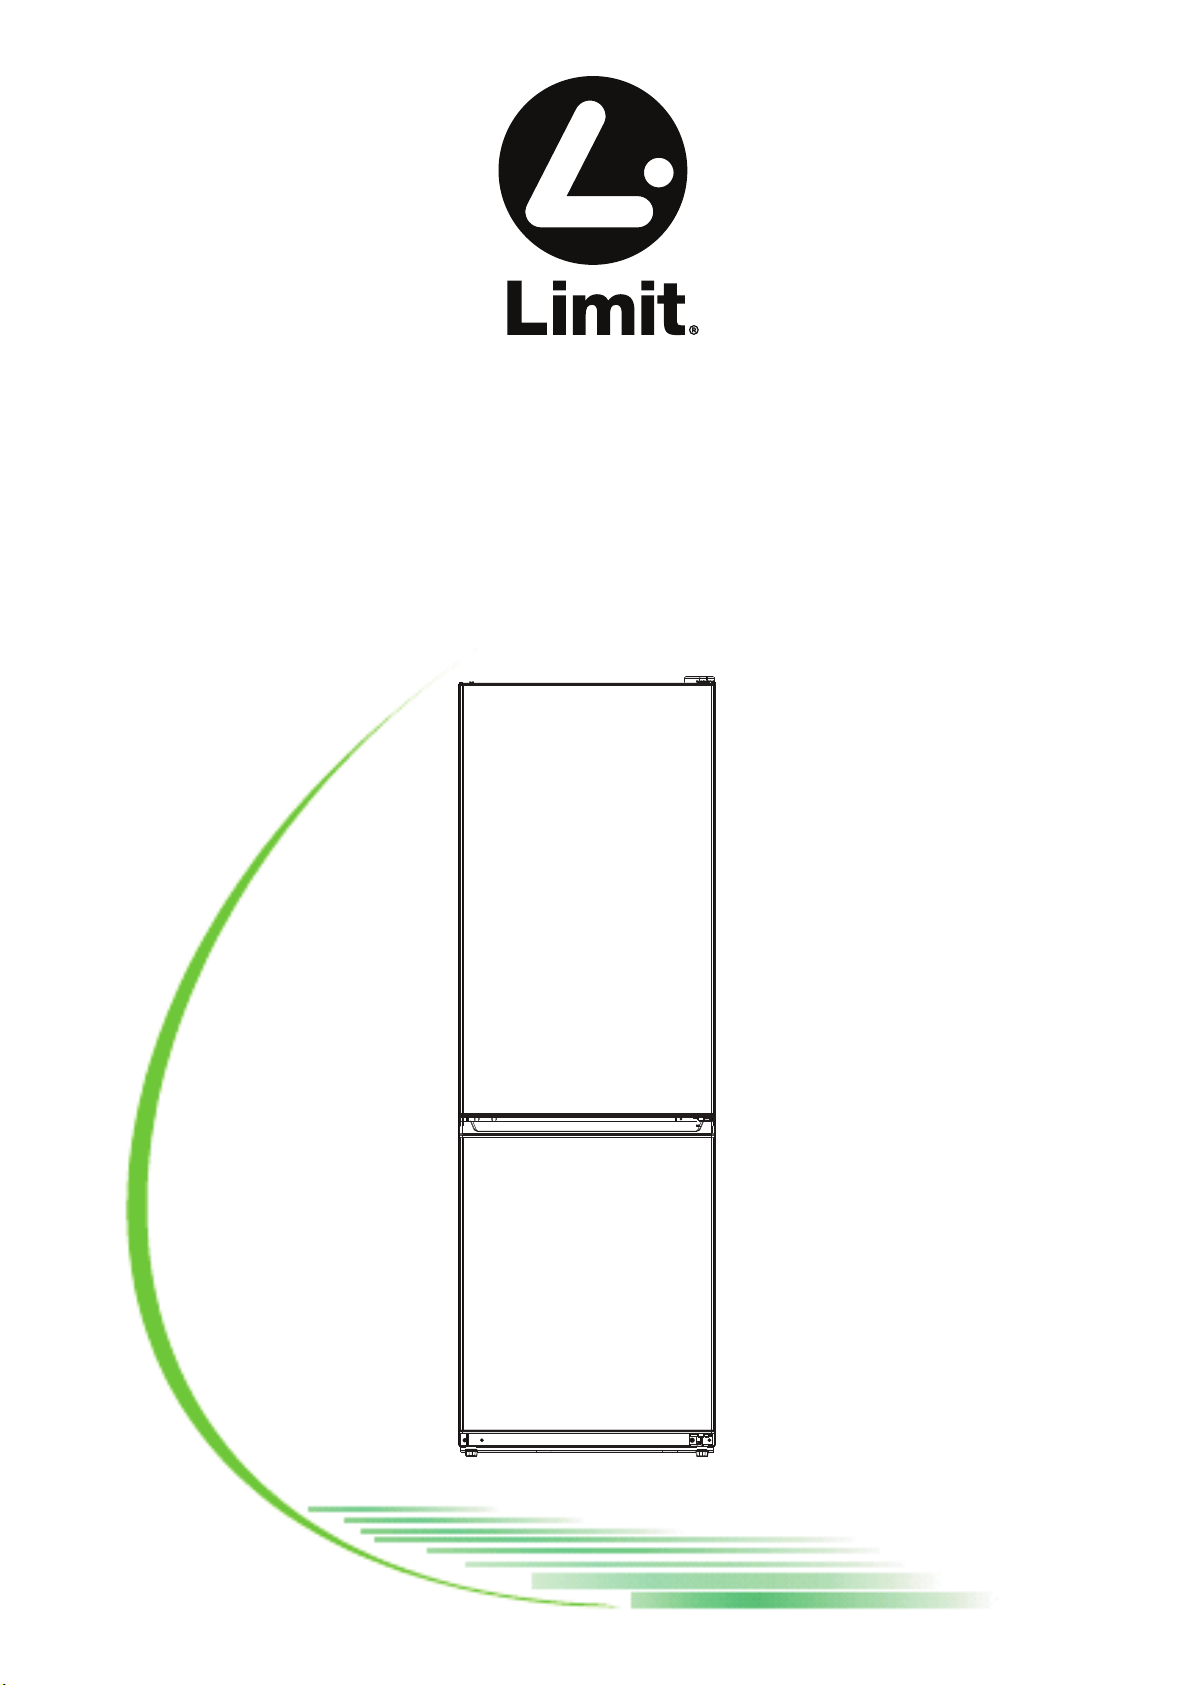
LIMIT LIDD266 User manual

LIDD266
Koelkast


losdraaien
Middelste scharnier

Refrigerator
LIDD266
Safety instructions
• This appliance can be used by children aged from 8 years
and above if they have been given supervision or instruction
concerning use of the appliance in a safe way and understand
the hazards involved. Cleaning and maintenance by the user
must not be carried out by children, unless they are aged 8 years
or over and only under adult supervision. Keep the appliance and
its cable out of reach of children under 8 years of age.
• This appliance can be used by persons with reduced physical,
sensory or mental abilities or lack of experience and
knowledge if they have been given supervision or instruction
concerning use of the appliance in a safe way and understand
the hazards involved.
• Children must not use the appliance as a toy.
• If the supply cord is damaged, it must be replaced by the
order to avoid a hazard.
• This appliance is intended to be used in household and similar
applications such as:
–
environments;
–farm houses;
–by clients in hotels, motels and other residential type
environments;
–bed and breakfast type environments.
• WARNING: Keep ventilation openings, in the appliance
enclosure or in the built-in structure, clear of obstruction.
• WARNING: Do not use mechanical devices or other means
to accelerate the defrosting process, other than those
recommended by the manufacturer.
• WARNING: Do not damage the refrigerant circuit.
• WARNING: Do not use electrical appliances inside the food
storage compartments of the appliance, unless they are of the
type recommended by the manufacturer.
• Do not store explosive substances such as aerosol cans with a
.
• .
• Regarding the information for the installation, operation,
maintenance and disposal of the device, refer to the following
paragraph of the instruction manual.
•
• For disposal of product, refer to <Disposal> and
.
• For the replacement method of light bulb, refer to
.
32
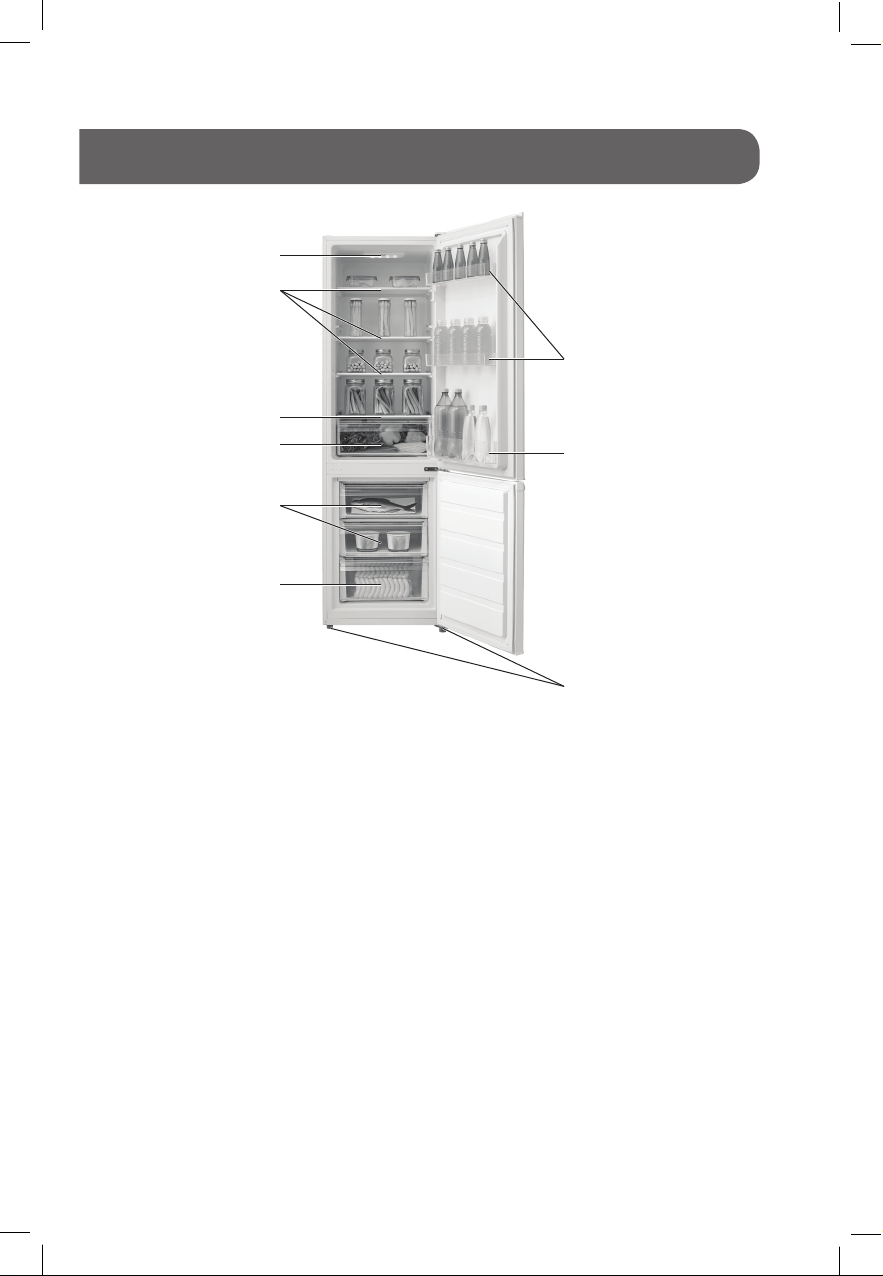
Description of the device
1. Thermostat knob
2. Glass shelf
3. Vegetable box cover
4. Vegetable box
5. Freezer drawer
6. Bottom drawer
7. Door balcony
8. 2L bottle balcony
9. Adjustable feet
NOTE:The appliance design is subject to change without prior notice.
5
1
2
3
4
5
6
9
8
7

Installation
Use
time to allow the system to settle. Do not position next to any heat source e.g.
cooker, boiler or indirect sunlight etc.
Allow at least 10cm of space at the top and 10 cm of space on both sides of the appliance and
between the back of the appliance and the wall for adequate air circulation.The appliance is not
designed for recessed installation (“building in”).
installation, slight unevenness can be overcome by adjusting the front feet.
NOTE:
once the appliance has had time to settle.
• This appliance is designed to operate in ambient temperature between 16°C and 43°C. If these
temperatures are exceeded, i.e. colder or warmer, the appliance will not operate correctly. If the
ambient temperatures are exceeded for long periods, the temperature in the freezer section will
rise above -18°C and food spoilage may occur.
• Remove all packaging materials from the appliance. Wash the inside of the cabinet with
lukewarm water and bicarbonate of soda (5ml to 0.5 liter of water). Dry the appliance
thoroughly.
•
maximum position for at least 2 hours before introducing food to be stored, and then readjust to
the normal position.
• If there is a power failure, do not open the door.
lasts for less than 12 hours. If the failure is longer, then the food should be checked and either
eaten immediately or cooked and then re-frozen.
SETTING THE THERMOSTAT KNOB
The refrigerator is controlled with a thermostat knob located inside the fridge, towards the upper
right-hand corner. Turn the knob from the MIN position towards the higher numbers for colder
temperatures.The knob can be adjusted from setting MIN, MED, MAX.
Higher settings on the knob (MAX) mean lower temperatures (colder) in all compartments of the
appliance.
correct setting of the temperature control knob, depending on your ambient conditions.
Set the thermostat knob to a middle position to achieve -18°C in the freezer compartment.
Please Note:
appliance or re-inserting the plug into the wall outlet. This is to allow the protection device in the
compressor to reset.
If the compressor fails to start correctly remove the plug and wait for 5 minutes before you try again
then the compressor should restart normally.
• The room temperature
• How often the door is opened
• How much food is stored
• Position of the appliance
When you set the correct temperature, all these factors mentioned above shall be taken into account.
76
SHOPPING FOR FROZEN FOOD
The appliance is rated as a 4 star freezer and can freeze fresh food and store pre-frozen food.When
you are buying frozen food, look at the Storage Guidelines on the packaging. You will be able to store
each item of frozen food for the period shown against the 4 star rating.
FREEZING FRESH FOOD
Ensure that your freezing operations are carried out under the most hygienic conditions as freezing
alone does not improve the food.
.
plastic bags or stored in airtight containers. This will prevent food from dehydrating and to prevent
any strong odors of some foods transferring to milder ones.
To freeze raw meat, wrap in plastic bags or in airtight containers and place on the lowest shelf to
avoid cross contamination.
Do not allow raw meat to come into contact with cooked foods. For safety, only store raw meat for
two or three days. Fruit and vegetables should be thoroughly cleaned and placed in the crisper.
Milk and other liquids should be sealed with lids and placed in the bottle shelf in the door.
NOTE:
the temperature in the refrigerator. If required, change the thermostat temperature settings. Reverse door
STORING FROZEN FOOD
All frozen food you purchase should be placed in the freezer as soon as possible to avoid them from
defrosting and spoiling.
All storage recommendations printed on the packaging of frozen food by the manufacturer should
always be followed.
position for at least 2 hours before introducing food to be stored, and then readjust it to the normal
position.
are removed.
MAKING ICE CUBES
1. Fill the ice tray with ¾ full of clean water.
2. Place the tray in the top freezing drawer.
3. Close the door.
To remove the ice cubes from the tray, put the tray under running water for a while and then twist
the tray slightly to loosen the ice cubes.
Follow the following stages to reverse the door from its initial position.
1. Remove the hinge cover.
Remove the hinge cover
98
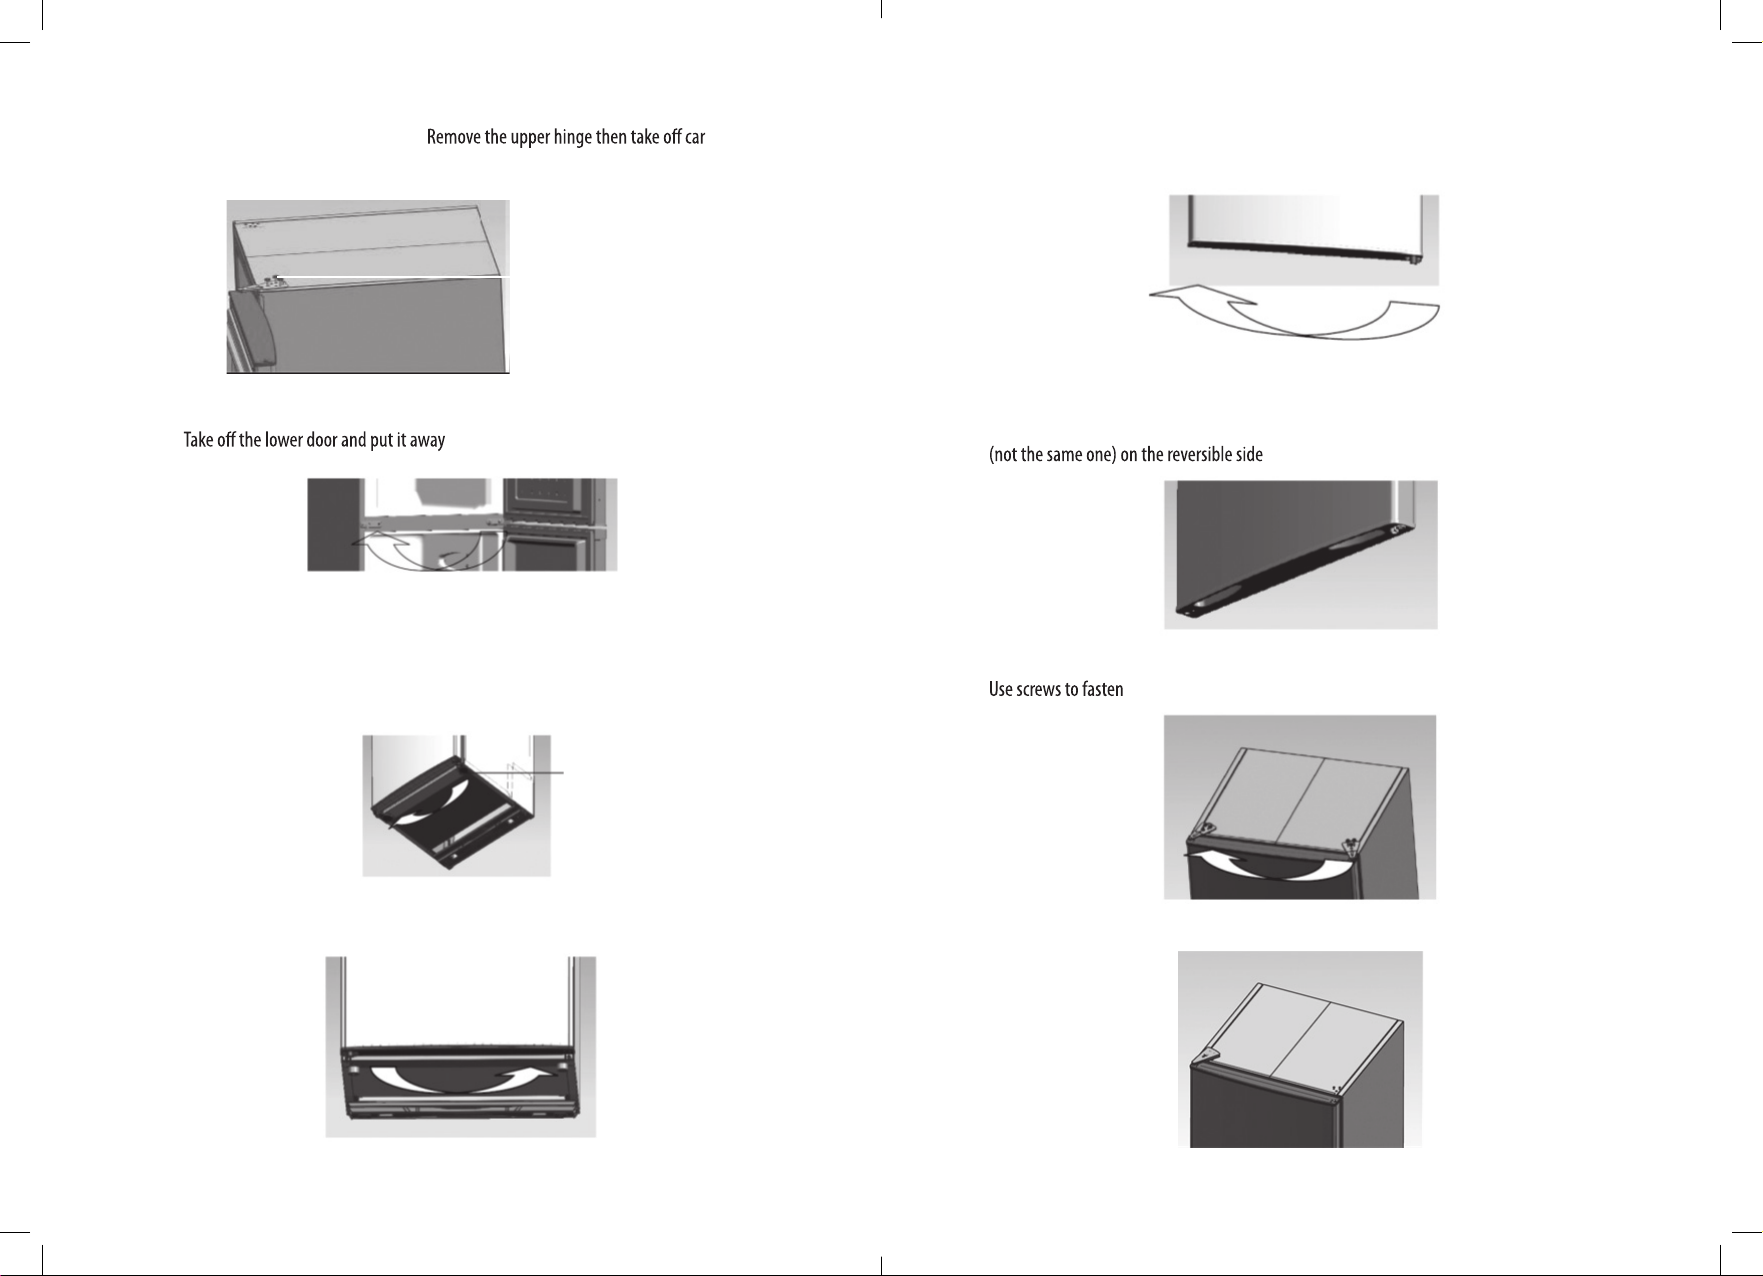
2. Remove three screws with suitable tools. efully the
fridge compartment door.
3. Remove middle hinge, screws, screw caps and plastic inserting nails. Install them on the other
side. .
Remove three screws
4. The disassembly and installation of bottom parts :
A. Disassemble lower hinge and screws.Then install them on the other side and consolidate the
lower hinge.
Note: the refrigerator-freezer incline angle less 45°.
B. Swap over the position of the adjustable foot to the other side of the cabinet.
8. Move the hinge to another side of the box after removing the screws on the hinge;
.
9. Install the hinge cover after fastening the hinge.
C. Swap over the position of the lower door block to the other side. Install the screws and
consolidate them.
5. Install the lower door and take care of its alignment with the appliance body.
6. Tighten the screws of the middle hinge on the reversible side.
7. Install the top door and remove the existing top door block. Install a new top door block
. Screw it down.
1110

ATTACHEMENT
1. Components that could be transferred from one side to the other directly after disassembling are
listed below:
cpacdnepotroodpot– overslip (2pcs)
–top cover buckle (1pc)
tfahsegnih– sleeve (1 or 2pcs)
–screws of top hinge (3 pcs)
)cp1(ylbmessaegnihelddim–
)scp2(egnihelddimfoswercs–
tresni– nail (2 pcs)
)scp2(pacwercs–
)cp1(reppotsrood–
)cp1(ylbmessaegnihmottob–
)scp3(egnihrewolfoswercs–
2. The component that could be swapped over from one side to the other only after reconstruction
is listed below:
–top hinge assembly
3. Components that could be swapped over from one side to the other in pairs are listed below:
–adjustable foot with internal thread (used with the lower hinge)
–
4. Components that could not be reused temporarily are listed below :
–left fridge door stop
potsroodegdirfthgir–
Note :
Ensure the Appliance is unplugged and empty.
Adjust the two leveling feet to their highest position.
We recommend you have someone to assist you.
.
You should rest the Appliance on something solid e.g. a chair just below the top panel.
.
Maintenance
FRIDGE DEFROSTING
The fridge defrosting process is carried out automatically every time the compressor stops.
The defrost water is automatically routed to the drain port and into a tray placed on the top of the
compressor to the rear of the appliance from which it evaporates.
Make sure the drain port on the fridge at the rear of the appliance is kept clear.
FREEZER DEFROSTING
Frost will accumulate inside the freezer depending upon the length of time during which the door is
left open or the amount of moisture introduced.
.
This might allow air to penetrate the cabinet, thus encouraging continuous running of the compressor.
Thin frost formation is quite soft and can be removed with a brush or plastic scraper. Do not use metal
or sharp scrapers, mechanical devices or other means to accelerate the defrosting process. Remove all
.
.
For the removal of heavy ice deposits disconnect the appliance from the mains supply and empty
the contents into cardboard boxes and wrap in thick blankets or layers of paper to keep them cold.
as quickly as possible.
An increase in temperature of frozen food packages during defrosting will shorten the storage life.
Provided that the contents are well wrapped and placed in a cool area, they should keepfor severalhours.
Examine thecontents when replacing them in the freezer and if some ofthe packages have thawed out.
soda and then dry thoroughly. Wash all removable parts in the same way and reassemble.
Reconnect the appliance to the mains supply and leave for 2 to 3 hours on setting number MAX
before introducing the food back into the freezer and setting the thermostat to your normal setting.
1312

NOISE FROM YOUR APPLIANCE
You may notice some rather unusual noises.The noises are caused by circulation of refrigerant in the
cooling system. It has become more pronounced since the introduction of CFC free gases.This is not a
.
PROLONGED OFF PERIODS
If the appliance is not in use for a long period of time, proceed as follows:
1. Disconnect from the mains supply.
2. Clean and dry the inside (see‘Cleaning and maintenance’).
3. Leave the door open to prevent any unpleasant smells from building up while the appliance is
not in use.
NOTES FOR USE
Do clean and defrost your appliance regularly.
Do check contents of the compartments every so often.
Do store commercially prepared food in accordance with the instructions given on the packets.
Do choose high quality fresh food and be sure it is thoroughly clean before freezing it.
Do wrap all food in food quality polythene bags or air tight containers and make sure any air is excluded.
Do Not store poisonous or any dangerous substances in your freezer. It is designed for the freezing of
.
Do Not consume food which has been frozen for an excessive length of time.
Do Not leave the door open for long periods, as this will make the appliance more costly to run and
cause excessive ice formation.
Do Not use sharp objects such as knives to remove the ice from the appliance. Only use a plastic scraper.
Do Not put hot food into the appliance. Let it cool down to room temperature.
may burst.
Do Not give children ice-cream and water ices direct from the freezer as the low temperature may
cause‘freezer burns’on the lips.
Do Not try to keep frozen food which has thawed; it should be eaten within 24 hours or cooked and
re-frozen.
Changing the LED light
The LED light of this appliance cannot be changed by user.
Contact aftersale or repair service for replacement.
Cleaning
Troubleshooting
1. Unplug the appliance.
2. Remove all substances.
3. Clean the inside and outside walls with a clean sponge or soft cloth using
.2 liters of water.
4. Rinse well and wipe dry with a cleansoft cloth.
If the appliance is not to be used for a long period of time then it is recommended
avoiding unpleasant odors.
Before calling for service please check the following.
THE APPLIANCE IS NOT WORKING.
Check the plug is inserted correctly into the mains socket.
Check there is power to the mains socket by plugging another appliance in, if the other appliance do
not work either, check the fuse in the plug.
THE APPLIANCE IS NOISY WHEN OPERATING.
Check the appliance is level and it is not in contact with another appliance or kitchen furniture.
THE APPLIANCE DOES NOT COOL SUFFICIENTLY.
If the door has been opened too often or it has been left open for a while it will take time for the
appliance to reach its set temperature.
.
Check if a large quantity of fresh food has been introduced.
1514
warm water or
to remove all the
Removal devices household uses
The European directive 2012/19/EU onWaste Electrical and Electronic Equipment (WEEE),
requires that old household electrical appliances must not be disposed of in the normal
unsorted municipal waste stream. Old appliances must be collected separately in order to
optimize the recovery and recycling of the materials they contain, and reduce the impact on
human health and the environment.
The crossed out“wheeled bin”symbol on the product reminds you of your obligation, that when you
dispose of the appliance, it must be separately collected.
Consumers should contact their local authority or retailer for information concerning the correct
disposal of their old appliance.
Accessories
Disposal
Energy label
FR/ENG manual
Egg tray
Left fridge door stop
Sliding cover
The refrigerating gas contained in the circuit of this appliance is isobutane (R600a); it causes a low
. Please contact your local disposal department for advice on the
correct method of disposal.
16
MODE D'EMPLOI
Réfrigérateur
LIDD266
Instructions de sécurité
• Cet appareil peut être utilisé par des enfants âgés d’au moins
8 ans et par des personnes ayant des capacités physiques,
sensorielles ou mentales réduites ou dénuées d’expérience ou
de connaissance, s’ils (si elles) sont correctement surveillé(e)
s ou si des instructions relatives à l’utilisation de l’appareil en
toute sécurité leur ont été données et si les risques encourus
ont été appréhendés. Les enfants ne doivent pas jouer avec
l’appareil. Le nettoyage et l’entretien par l’usager ne doivent
.
• Si le cordon d’alimentation est endommagé, il doit être
remplacé par le fabricant, son Service Après-Vente ou une
.
• Cet appareil est destiné à être utilisé dans des applications
domestiques et analogues telles que:
–les coins cuisines réservés au personnel des magasins,
bureaux et autres environnements professionnels;
–les fermes;
– l’utilisation par les clients des hôtels, motels et autres
environnements à caractère résidentiel;
– les environnements de type chambres d’hôtes;
• MISE EN GARDE: Maintenir dégagées les ouvertures de ventilation
dans l’enceinte de l’appareil ou dans la structure d’encastrement.
• MISE EN GARDE: Ne pas utiliser de dispositifs mécaniques ou
autres moyens pour accélérer le processus de dégivrage autres
que ceux recommandés par le fabricant.
• MISE EN GARDE: Ne pas endommager le circuit de réfrigération.
• MISE EN GARDE: Ne pas utiliser d’appareils électriques à
l’intérieur du compartiment de stockage des denrées, à moins
qu’ils ne soient du type recommandé par le fabricant.
• Ne pas stocker dans cet appareil des substances explosives telles
.
• MISE EN GARDE: Remplir uniquement avec de l’eau potable.
• En ce qui concerne les informations pour l'installation, la
manipulation, l'entretien et le nettoyage de l'appareil,
référez-vous aux paragraphes 《Installation》,
《Utilisation》《Entretien》et 《Nettoyage》 de la notice.
Débrancher l'alimentation électrique avant toute opération.
•
•
Attention: risque d’incendie
• Pour la mise au rebut de l’appareil, se référer au chapitre
usagés>.
• Lampe non remplaçable par utilisateur.
Contacter SAV en cas de dysfonctionnement.
32

1
2
3
4
5
6
9
8
7
Description de l’appareil
1. Thermostat réfrigérateur
2. Clayettes verre
3. Couvercle de bac à légumes
4. Bac à légumes
5. Tiroirs de congélation
6. Tiroir de congélation grand volume
7. Balconnets latéraux
8. Balconnet pour bouteilles 2L
9. Pieds ajustables
REMARQUE:
5
Table of contents
Languages:
Other LIMIT Refrigerator manuals


