LG LFD2278 Series User manual

LFD22786**
GF22WGS LFDS22520*
GM-F223RSXM LM-F223RSX
P/No. MFL67851603-8
www.lg.com
OWNER’S MANUAL
BOTTOM FREEZER
REFRIGERATOR
Please read this manual carefully before operating
your set and retain it for future reference.
ENGLISH ESPAÑOL
MANUAL DE USUARIO
REFRIGERADOR
CON CONGELADOR INFERIOR
Lea detenidamente este manual antes de empezar
a utilizar el refrigerador y guárdelo como referencia
para el futuro.
Model Name/Nombre de Modelo **=color number/número de color
Copyright © 2014 - 2018 LG Electronics Inc. All Rights Reserved.

5
REFRIGERATOR INSTALLATION
WARNING
EXCESSIVE WEIGHT HAZARD
Use the assistance of two or more persons to move or
install the refrigerator. Not following these instructions
may cause injury to the back and other parts of the
body.
UNPACKING
“This appliance is intended to be used in household and
similar applications such as:
-Staff kitchen areas in shops, offices and other working
environments; farms houses and by clients in hotel, mo-
tels and others residential type environments.
-Bed and breakfast type environments; catering and si-
milar non-retail applications.”
To remove adhesive tape residue, rub it well with your
fingers and a little liquid detergent. Clean with warm
water and let dry.
Do not use sharp instruments, rubbing alcohol, flammable
liquids or abrasive cleaning products to remove the
adhesive tape or glue. These products can damage the
surface of your refrigerator. For more information, see
the section on “Important Safety Instructions”.
The shelves come already installed in their factory
position. Remove the shelves and replace them
according to your spacing needs.
Moving Your Refrigerator:
Your refrigerator is extremely heavy. Make sure you
protect the floor when moving your refrigerator for
cleaning or servicing. Always pull your refrigerator
straight out when moving it. Do not shift from side
to side or “walk” the refrigerator when attempting to
move it as this can cause damage to the floor.
WARNING
EXPLOSION HAZARD
Keep all flammable materials and vapors (such as
gasoline) away from the refrigerator. Not following
these instructions may cause death, explosion or fire.
INSTALLATION
1. Avoid placing the unit near heat sources, direct
sunlight, or humidity.
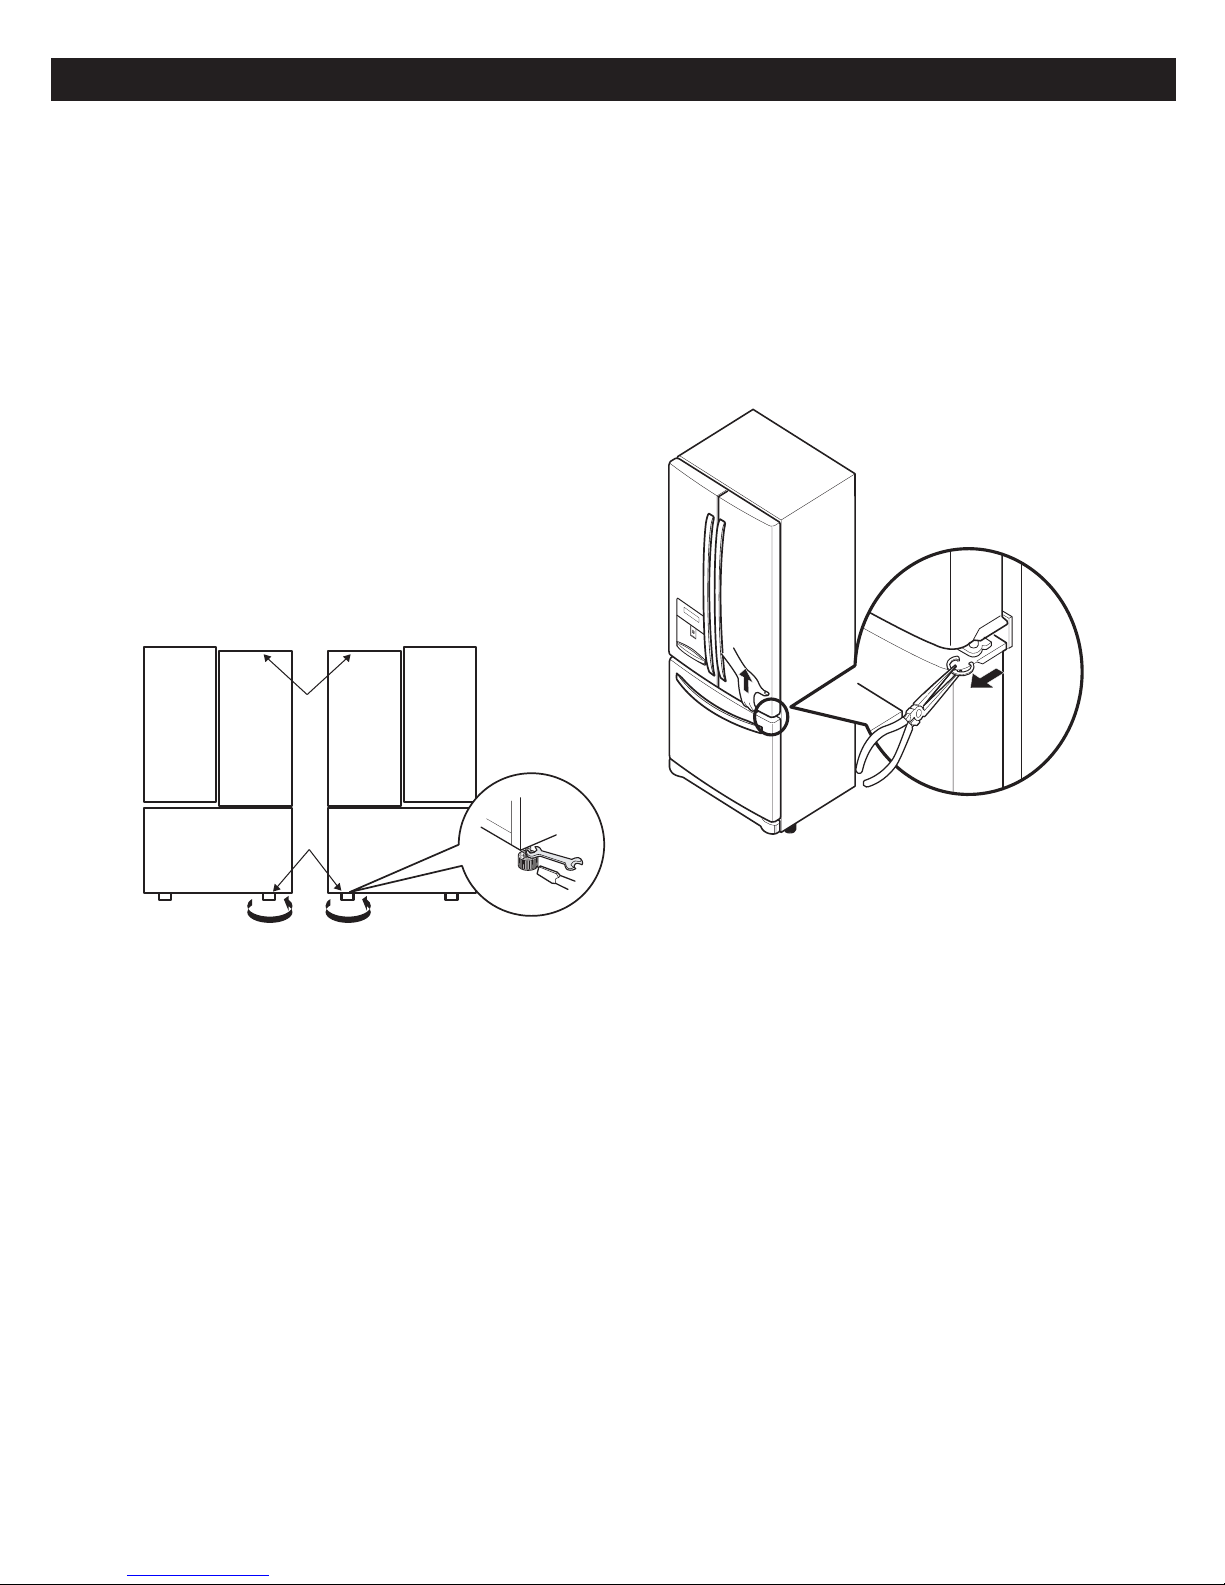
2.To avoid vibration, the unit should be leveled. If needed,
adjust the leveling screws to compensate for an
unleveled floor. The front should be slightly taller than
the rear to ensure that the doors close properly. The
leveling screws can easily be turned by slightly tilting
the front of the refrigerator, turning the leveling screws
clockwise ( ) to raise it and counter-clockwise
( ) to lower it.
3.Install the refrigerator in an area between 55 °F
(13 °C) and 110 °F (43 °C). If the surrounding temperature
is lower or higher than previously mentioned, it can
adversely affect the unit.
CAUTION: Avoid placing the unit near heat
sources, direct sunlight or humidity.
ONCE INSTALLED
1. Carefully clean your refrigerator and remove and dust
accumulated during shipping.
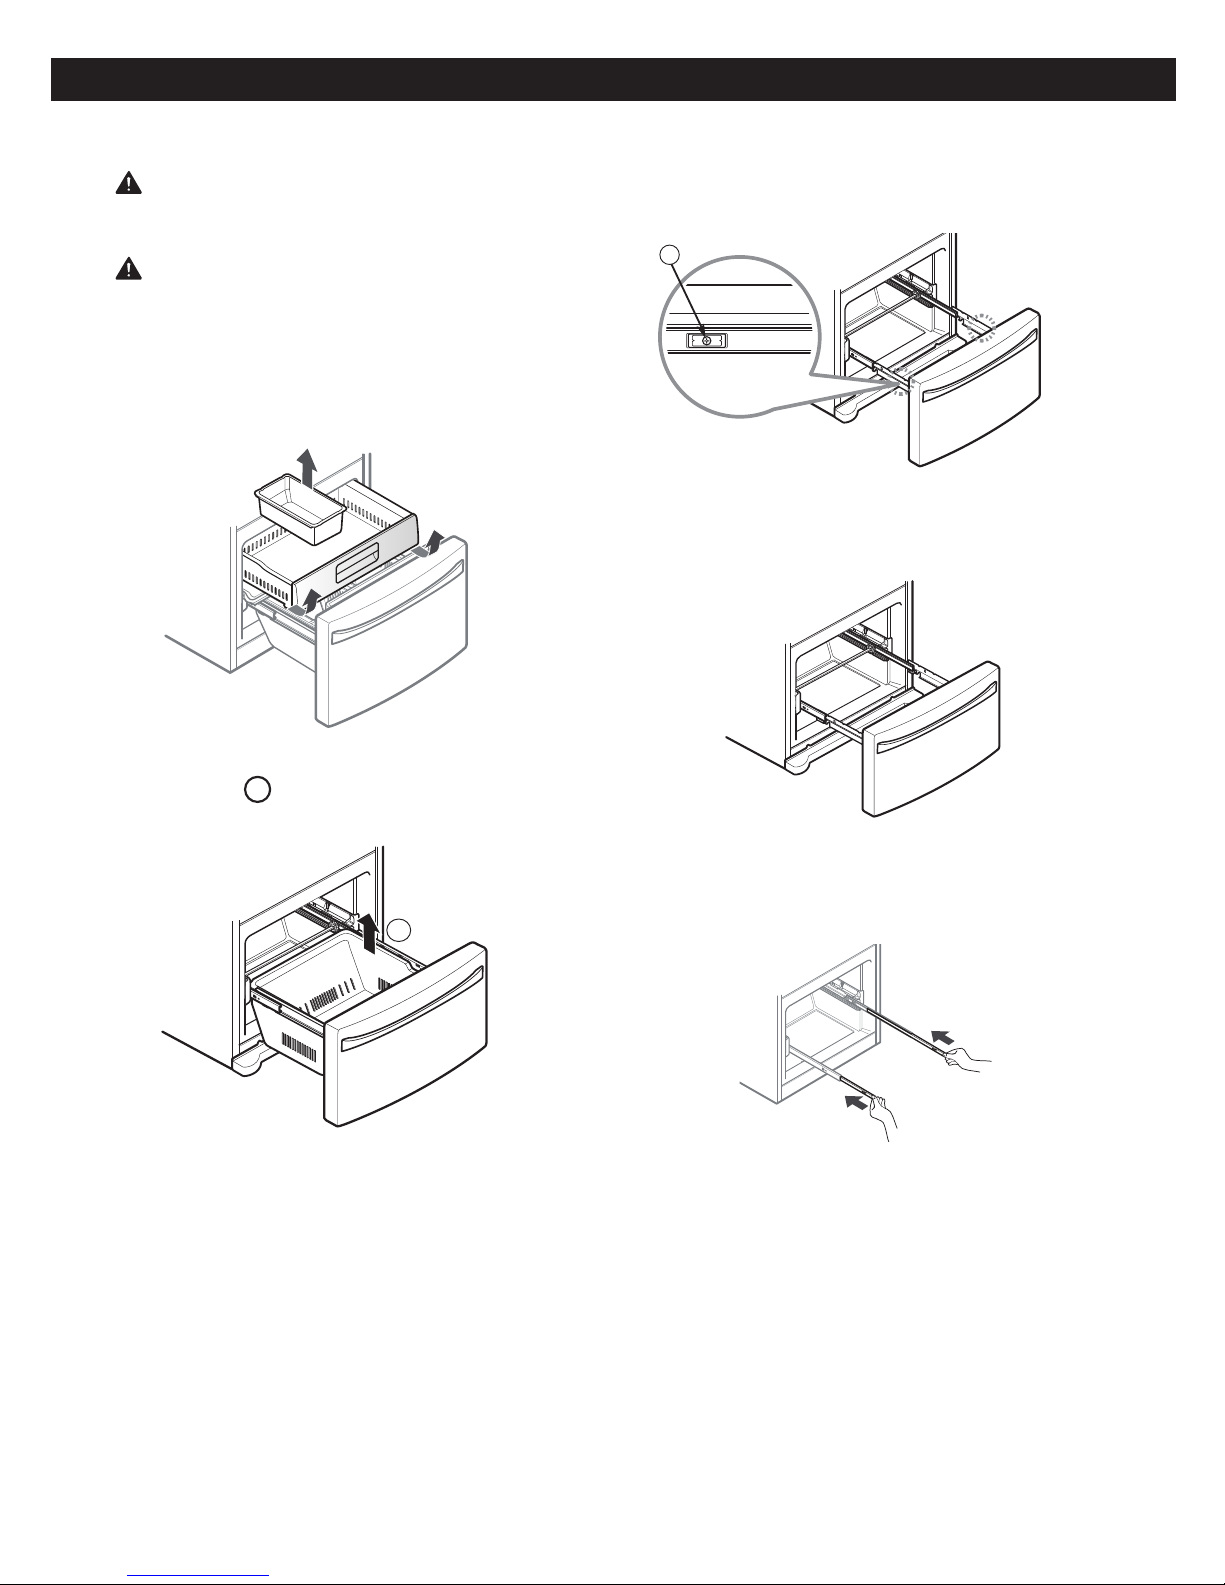
2.Install accessories such as the ice bin, door racks,
shelves, etc., in their proper places. These are already
packed to prevent any possible damage during
shipping.
3.Leave your refrigerator on for 2 to 3 hours before
storing food inside. Verify that there is a flow of cold air
in the freezer compartment to ensure proper cooling.
Your refrigerator is now ready for use.
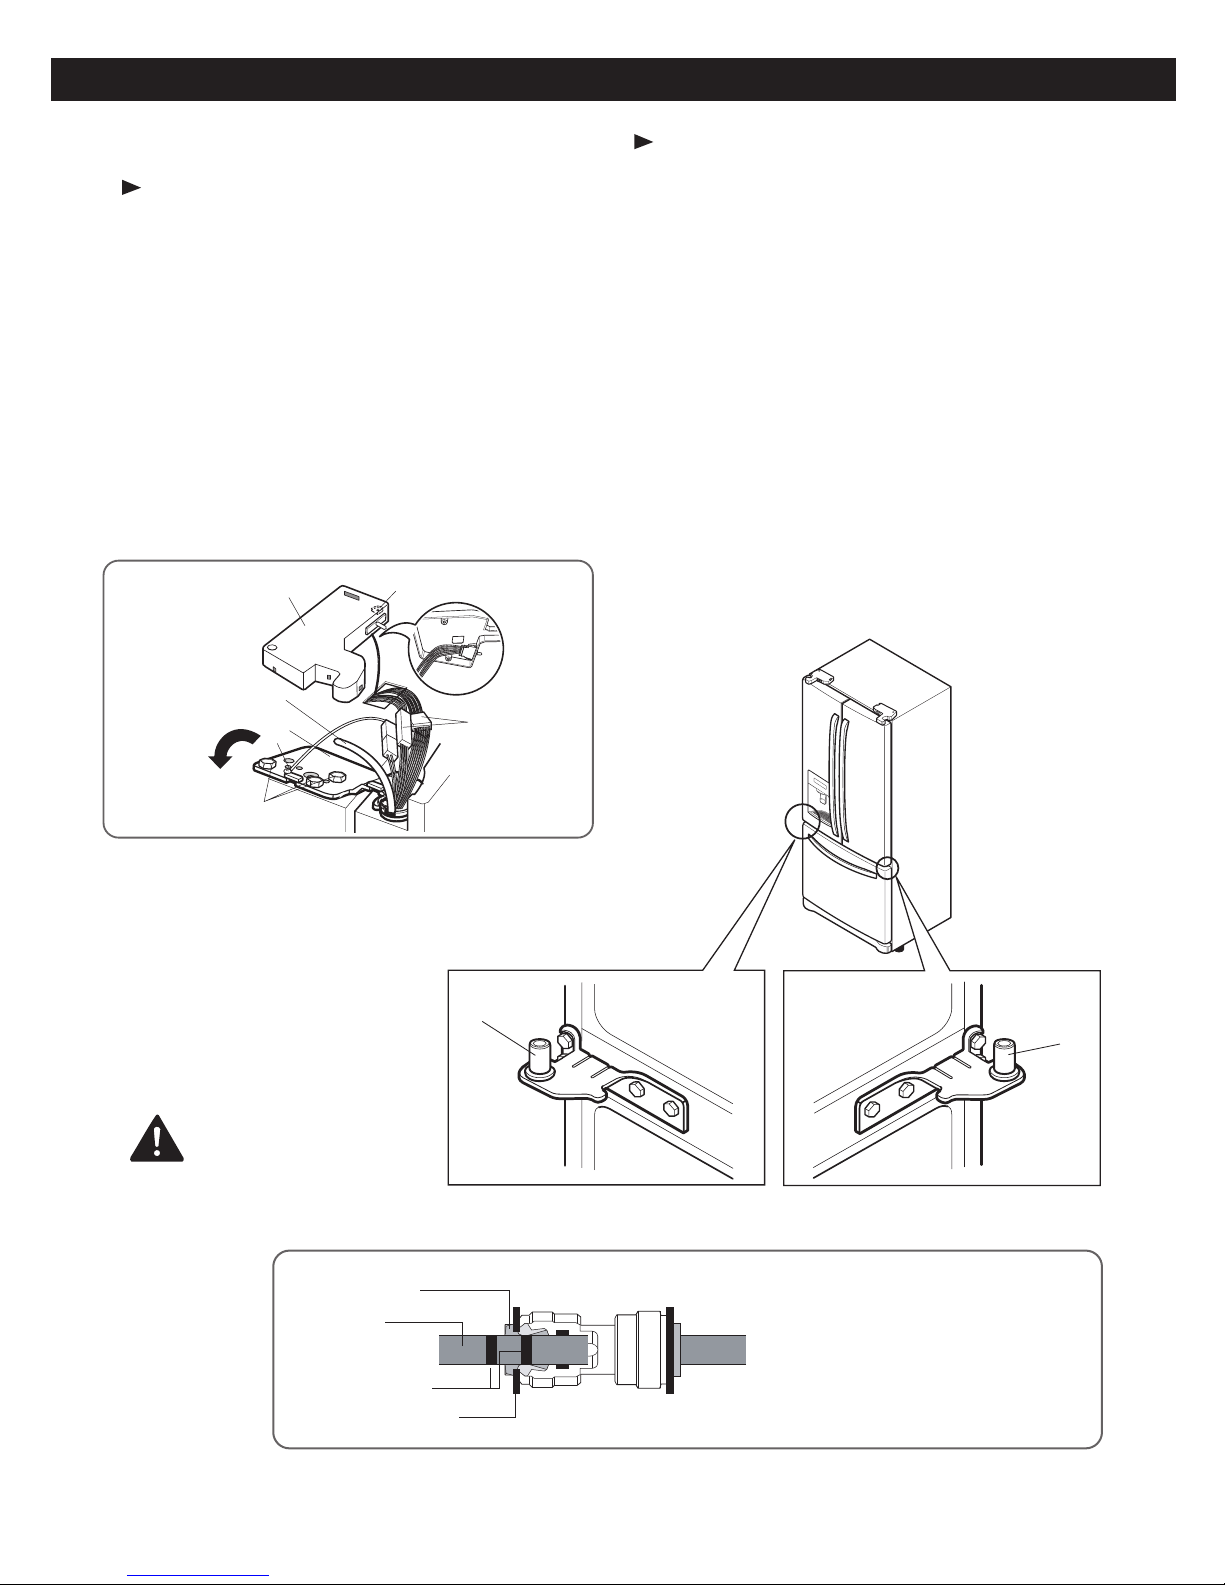
WARNING:
• Take care when working with the hinges, base cover
and stops, etc. You may injure yourself.
• DO not place your hands or any tools in the air vents,
the base cover or in the bottom of the refrigerator. This
may cause injury or electrical shock.
Keep a Proper Distance from Adjacent
Flooring
To avoid noise and vibration, the unit must be leveled and
installed on a solidly constructed floor. If required, adjust
the leveling legs to compensate for unevenness of the
floor. The front should be slightly higher than the rear to
aid in door closing. Leveling legs can be turned easily by
tipping the cabinet slightly. Turn the leveling legs to the
left to raise the unit or to the right to lower it. (See Leveling
and Door Alignment.)
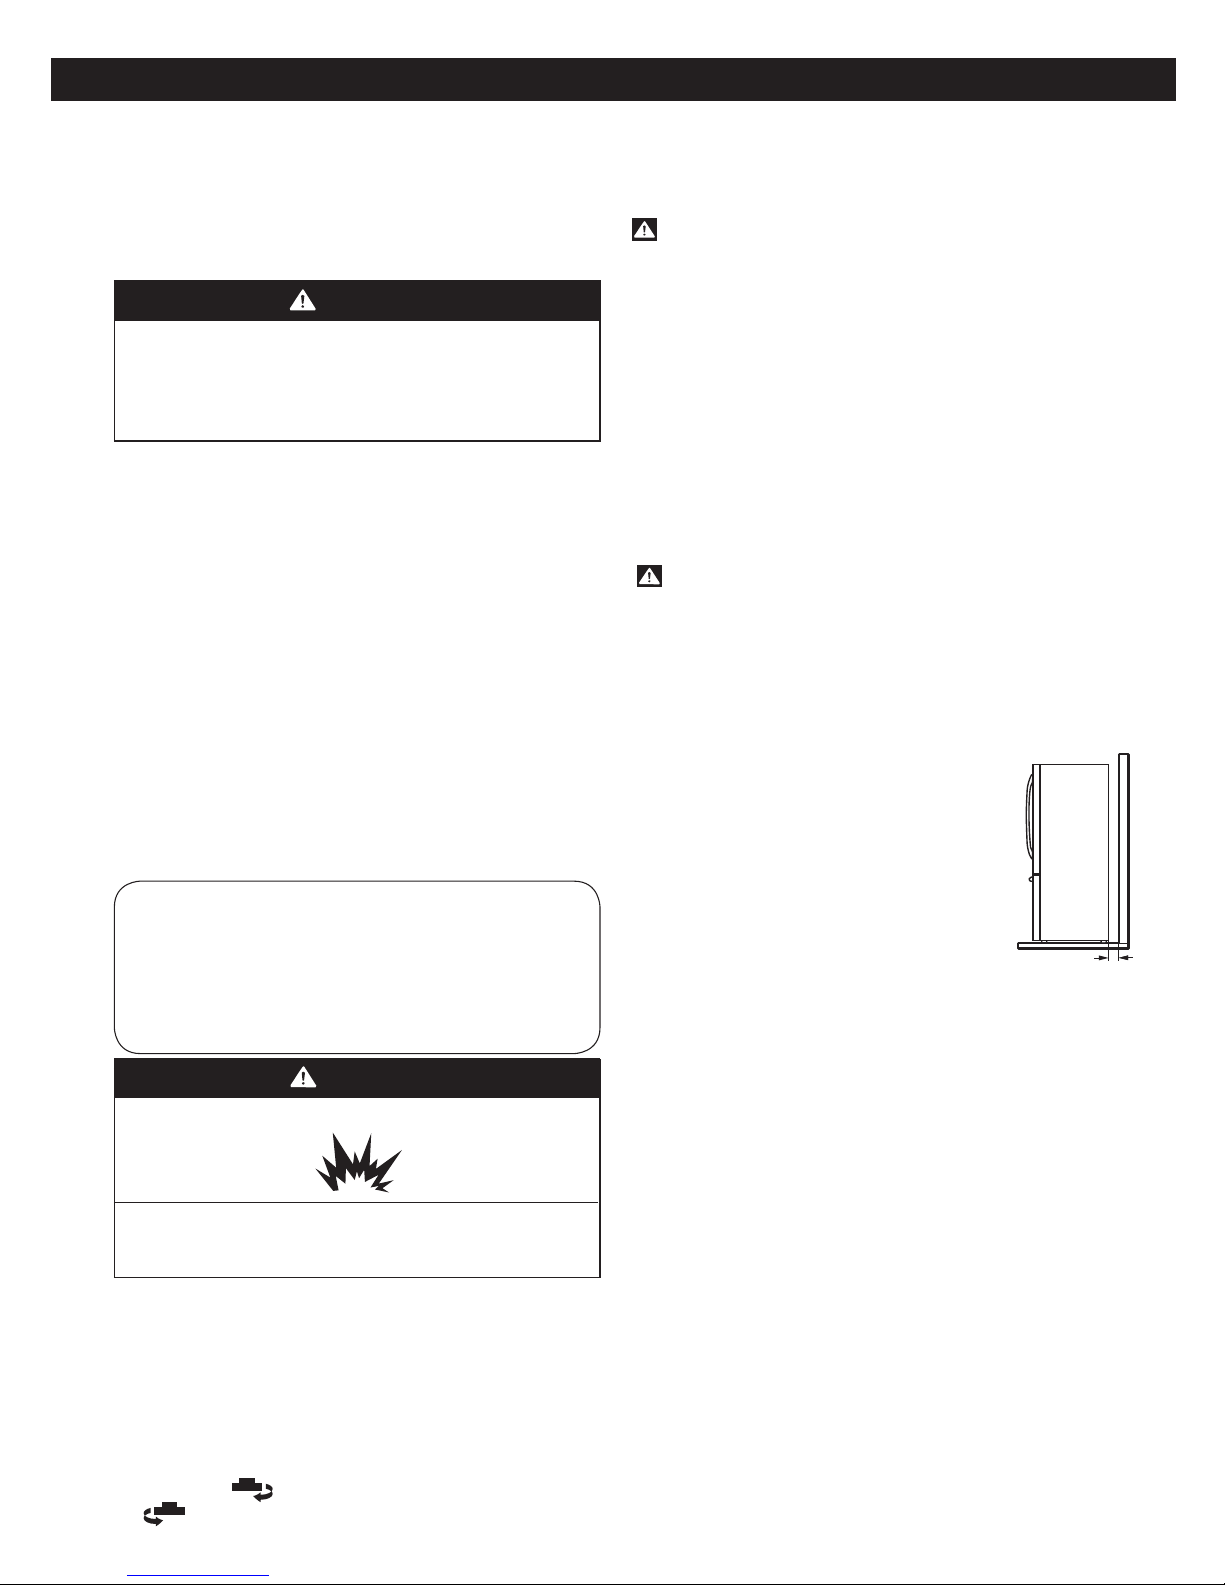
Objects
Please keep the refrigerator at an adequate
distance from other objects. Insufficient
spacing can reduce the refrigerator’s
freezing efficiency and increase electricity
consumption.
(5.08 cm) 2”
Before installing your refrigerator, remove any tape or
temporary stickers. Please remove vinyl from doors
before connecting unit to the electrical supply (on some
models). Do not remove any stickers that feature
warnings, the model serial number or the technical label
of the product located on the back of the refrigerator.

6
HOW TO REMOVE AND INSTALL THE REFRIGERATOR DOORS
For moving the refrigerator through a house door, it might be necessary to remove refrigerator and freezer door
handles.
NOTE: Removing the doors is always recommended when it is necessary to move the refrigerator through a narrow
opening. If it is necessary to remove the handles, follow the directions below.
TOOLS YOU MIGHT NEED OR USE
3/8 in (10 mm)
1/4 in (6 mm)
Hex Socket Wrench Phillips Screwdriver Flat Head Screwdriver Allen Wrench
HOW TO REMOVE REFRIGERATOR DOOR HANDLE
NOTE: Handle appearance may vary from
illustrations on this page.
Loosen the set screws with a 3/32 in (2,5 mm). Allen
wrench and remove the handle.
NOTE: If the handle mounting fasteners need to be
tightened or removed, use a 1/4 in (6 mm). Allen
wrench.
HOW TO REPLACE REFRIGERATOR DOOR HANDLE
NOTE: Handle appearance may vary from
illustrations on this page.
Place the handle on the door by fitting the handle
footprints over the mounting fasteners and tightening
the set screws with a 3/32 in (2,5 mm) Allen wrench.
NOTE: If the handle mounting fasteners need to be
tightened or removed, use a
1/4 in (6 mm) Allen wrench.
REFRIGERATOR INSTALLATION
Mounting
Fasteners
Set Screw
Allen
Wrench
1/4 in (6 mm)
3/32 in (2,5 mm)

7
REFRIGERATOR INSTALLATION
NOTE: Removing the doors is always recommended when it is necessary to move the refrigerator through a narrow
opening. If it is necessary to remove the handles, follow the directions below.
HOW TO REMOVE FREEZER DOOR HANDLE
NOTE: Handle appearance may vary from illustrations on
this page.
Loosen the set screws located on the lower side of the
handle with a 3/32 in (2,5 mm). Allen wrench and remove
the handle.
NOTE: If the handle mounting fasteners need to be
tightened or removed, use a 1/4 in (6 mm). Allen
wrench.
HOW TO REPLACE FREEZER DOOR HANDLE
NOTE: Handle appearance may vary from illustrations on
this page.
Place the handle on the door by fitting the handle
footprints over the mounting fasteners and tightening
the set screws with a 3/32 in (2,5 mm). Allen wrench.
NOTE: If the handle mounting fasteners need to be
tightened or removed, use a 1/4 in (6 mm). Allen
wrench

8
REMOVING AND REPLACING
REFRIGERATOR DOORS
WARNING
Excessive Weight Hazard:
Use two or more people to remove and install the
refrigerator doors. Failure to do so can result in back
or other injury.
WARNING
Electrical Shock Hazard
•Disconnect the electrical supply to the refrigerator
before installing. Failure to do so could result in
serious injury or death.
•Do not put hands, feet or other objects into the air
vents or bottom of the refrigerator. You may be
injured or receive an electrical shock.
To remove the left refrigerator door:
On the back of the refrigerator, pull the water tube out of
the collet fitting on the connector by pressing the fitting
release ring (see picture below).
CAUTION: Before you begin, remove food and bins
from the doors.
1. Open the door. Remove the top hinge cover screw (1).
Lift up the cover (2).
2. Remove the cover.
3. Pull out the tube (3).
4. Disconnect all wire harnesses (4).
5. Remove the grounding screw (5).
6. Remove the three bolts (6) using a 10mm socket
wrench. Lift off the top hinge (7).
CAUTION: When lifting the hinge, be careful that the
door does not fall forward.
7. Lift the door from the middle hinge pin and remove
the door.
8. Place the door, inside facing up, on a non-scratching
surface.
To remove the right refrigerator door:
1. Open the door. Remove the top hinge cover screw (1).
Lift up the cover (2).
2. Remove the cover.
3. Remove the three bolts (3) using a 10mm socket
wrench. Lift off the top hinge (4)
CAUTION: When lifting the hinge, be careful that the
door does not fall forward.
4. Lift the door from the middle hinge pin and remove
the door.
5. Place the door, inside facing up, on a non-scratching
surface.
REFRIGERATOR INSTALLATION
(1)
(2)
(4)
(3)
(6)
(7)
(5)
(1)
(2)
(3)
(4)

REFRIGERATOR INSTALLATION
9
Reinstalling the Refrigerator Door
Left Door
1. Lower the door onto middle hinge pin (10).
2. Line up the holes in the top hinge with the holes in
the top of the refrigerator. Insert and tighten the
three Bolts (6) in the hinge.
3. Install the grounding screw (5) and connect the two
wire harnesses (4).
4. Push the water tube (3) located at the top of the left
door into the hole beside the left hinge on the top of
the cabinet until it exits through the back.
5. Insert the water supply tube (3) into the connector
until you see only one scale mark. Fully insert the tube
over 5/8 in. (15 mm).
6. Hook tabs on left side of hinge cover (1) under the
edge of the top hinge (7) and position the cover in
place. Insert and tighten the cover screw (1).
CAUTION
Right Door
1. Lower the door onto middle hinge pin (9).
2. Line up the holes in the top hinge with the holes in
the top of the refrigerator. Insert and tighten the three
Bolts (6) in the hinge.
3. Hook the tabs on right side of hinge cover (2) under
the edge of the top hinge (4) and position the cover in
place. Insert and tighten the cover screw (1).
REFRIGERATOR INSTALLATION
After inserting, pull the tube to
make sure that it is secure and
reinsert the clip.
Tube
Scale Mark
Collet
Clip
(9)
(10)
(1)
(2)
(4)
(3)
(6)
(7)
(5)

10
HOW TO REMOVE THE FREEZER DRAWER
WARNING: Use two or more people to remove and
install the freezer drawer. Failure to do so can result in
back or other injury.
Remove the screws (2) of the rail on both sides.
Grasp the drawer on each side and pull it up to separate
it from the rails.
With both hands, hold the center bar and push it in to
allow both rails to slide in simultaneously.
CAUTION: Do not hold the handle when removing or
replacing the drawer. The handle may come off, causing
personal injury.
REFRIGERATOR INSTALLATION
Pull the drawer open to full extension. Remove the
lower basket 1by lifting the basket from the rail
system.
1
To remove, pull the drawer out to full extension. Lift
the drawer up and out, making sure to clear the rail
system.
2

REFRIGERATOR INSTALLATION
11
HOW TO REPLACE THE FREEZER DRAWER
Pull out each rail to full extension.
REFRIGERATOR INSTALLATION
• Hook the door support (1) into the rail tabs (2) on both
Grasp the drawer on each side and hook door
supports 1into the rail tabs 2located on both
sides.
Lower the door into its final position and tighten the
screws 3located on both sides.
With the drawer pulled out to full extension, insert the
lower basket 4in the rail assembly.
To replace, with the drawer pulled out to full extension,
insert the drawer in the rail assembly.
4
2
1
3

12
LEVELING AND DOOR ALIGNMENT
Leveling
Door Alignment
If the space between your doors is uneven, follow the
instructions below to align the doors:
1. With one hand, lift up the door that you would like to
raise at the middle hinge.
2. With your other hand, use pliers to insert snap ring as
shown.
3. Insert additional snap rings until the doors are aligned.
(Three snap rings are provided with the refrigerator in the
Use & Care Guide packet.)
REFRIGERATOR INSTALLATION
After installing, plug the refrigerator’s power cord into
a 3-prong grounded outlet and push the refrigerator
into the final position.
Your refrigerator has two front leveling legs—one on
the right and one on the left. Adjust the legs to alter
the tilt from frontto-back or side-to-side. If your refrig-
erator seems unsteady, or you want the doors to close
more easily, adjust the refrigerator’s tilt using the
instructions below:
NOTE: Tools Required: 11/16 in (18 mm) wrench or flat
blade screwdriver.
1. Turn the leveling leg to the left to raise that side of
the refrigerator or to the right to lower it. It may take
several turns of the leveling leg to adjust the tilt of the
refrigerator.
NOTE: Having someone push backward against the
top of the refrigerator takes some weight off of the
leveling legs. This makes it easier to adjust the legs.
2. Open both doors again and check to make sure that
they close easily. If the doors do not close easily, tilt the
refrigerator slightly more to the rear by turning both
leveling legs to the left. It may take several more turns,
and you should turn both leveling legs the same
amount.
NOTE: Your refrigerator is uniquely designed with two
fresh food doors. Either door can be opened or closed
independently of the other. You may have to exert
slight pressure on the doors to get them to close
completely.
This manual suits for next models
4
Table of contents
Other LG Refrigerator manuals
Popular Refrigerator manuals by other brands

Sub-Zero
Sub-Zero ICBBI36FSPHRH installation guide

Continental Refrigerator
Continental Refrigerator CRB117 Specifications

Avanti
Avanti ARBC17T2PG instruction manual

GE
GE Profile GSHF3KGZ Dimensions and installation information

Fridgemaster
Fridgemaster MC55174FF user manual

Frigidaire
Frigidaire GLRT184RA Factory parts catalog