linarie RENNES LS60I3Z User manual

www.linarie.com.au
RENNES
LS60I3Z

TABLE OF CONTENTS
Additional information on products, accessories,
warranty, replacement parts and services can be
found at www.linarie.com.au
2
www.linarie.com.au
Correct Conditions of Use
The appliance is intended for use in the home and similar
environments only. It is not intended for commercial use.
The appliance is not suitable for outdoor use, non-stationary
installation.
The electricity connection must be made by a qualified
specialist. Installation must comply with the valid
standards, regulations and laws. All safety and warning
information and the operating and installation
instructions must be complied with.
The cooktop is to be used solely for preparing food at home.
It may not be used for any other purpose.
1. General Information .............................. 03
1.1 Appliance information
2. General Safety Instructions .................... 03
2.1 General safety information
2.2 Safety instruction - Installation
2.3 Correct use & Operation ......................... 04
2.4 Disassembling and Disposal
of the Appliance
2.5 Accessories and Spare parts
3. Product introduction ...............................04
3.1 Technical specification
3.2 Top view
3.3 Touch control panel
3.4 Working theory.........................................05
4. Installation ..............................................05
4.1 Selection of installation equipment
4.2 Before installation ....................................06
4.3 After installation
4.4 Before locating the fixing bracket
4.5 Adjusting the bracket position
4.6 Caution
4.7 Connecting the cooktop to the main supply .07
5. Operation .................................................07
5.1 Touch control
5.2 Choosing the right cookware
5.3 How to use your induction cooktop .............08
5.3.1 Start cooking
5.3.2 Finish cooking
5.3.3 Using the boost function
5.3.4 Locking the controls
5.3.5 Timer control
6.3.6 Flex zone
6. Cooking guidelines ..................................10
6.1 Cooking tips
6.2 Detection of small particles
7. Heat settings ............................................10
8. Care and Cleaning....................................11
9. Troubleshooting .......................................11
10. Environmental tips .................................13
10.1 Disposal considerations
10.2 Disposing your old appliance
11. Warranty and After sales .......................13
11.1 Warranty
11.2 After sales service
11.3 Replacement of spare parts
Adherence to the directions for use in this manual is
extremely important for health and safety. Failure to strictly
adhere to the requirements in this manual may result in
personal injury, property damage and affect your ability to
make a claim under Linärie’s manufacturer’s warranty
provided with your product. Products must be used,
installed and operated in accordance with this manual.
You may not be able to claim on Linärie’s manufacturer’s
warranty in the event that your product fault is due to
failure to adhere this manual.

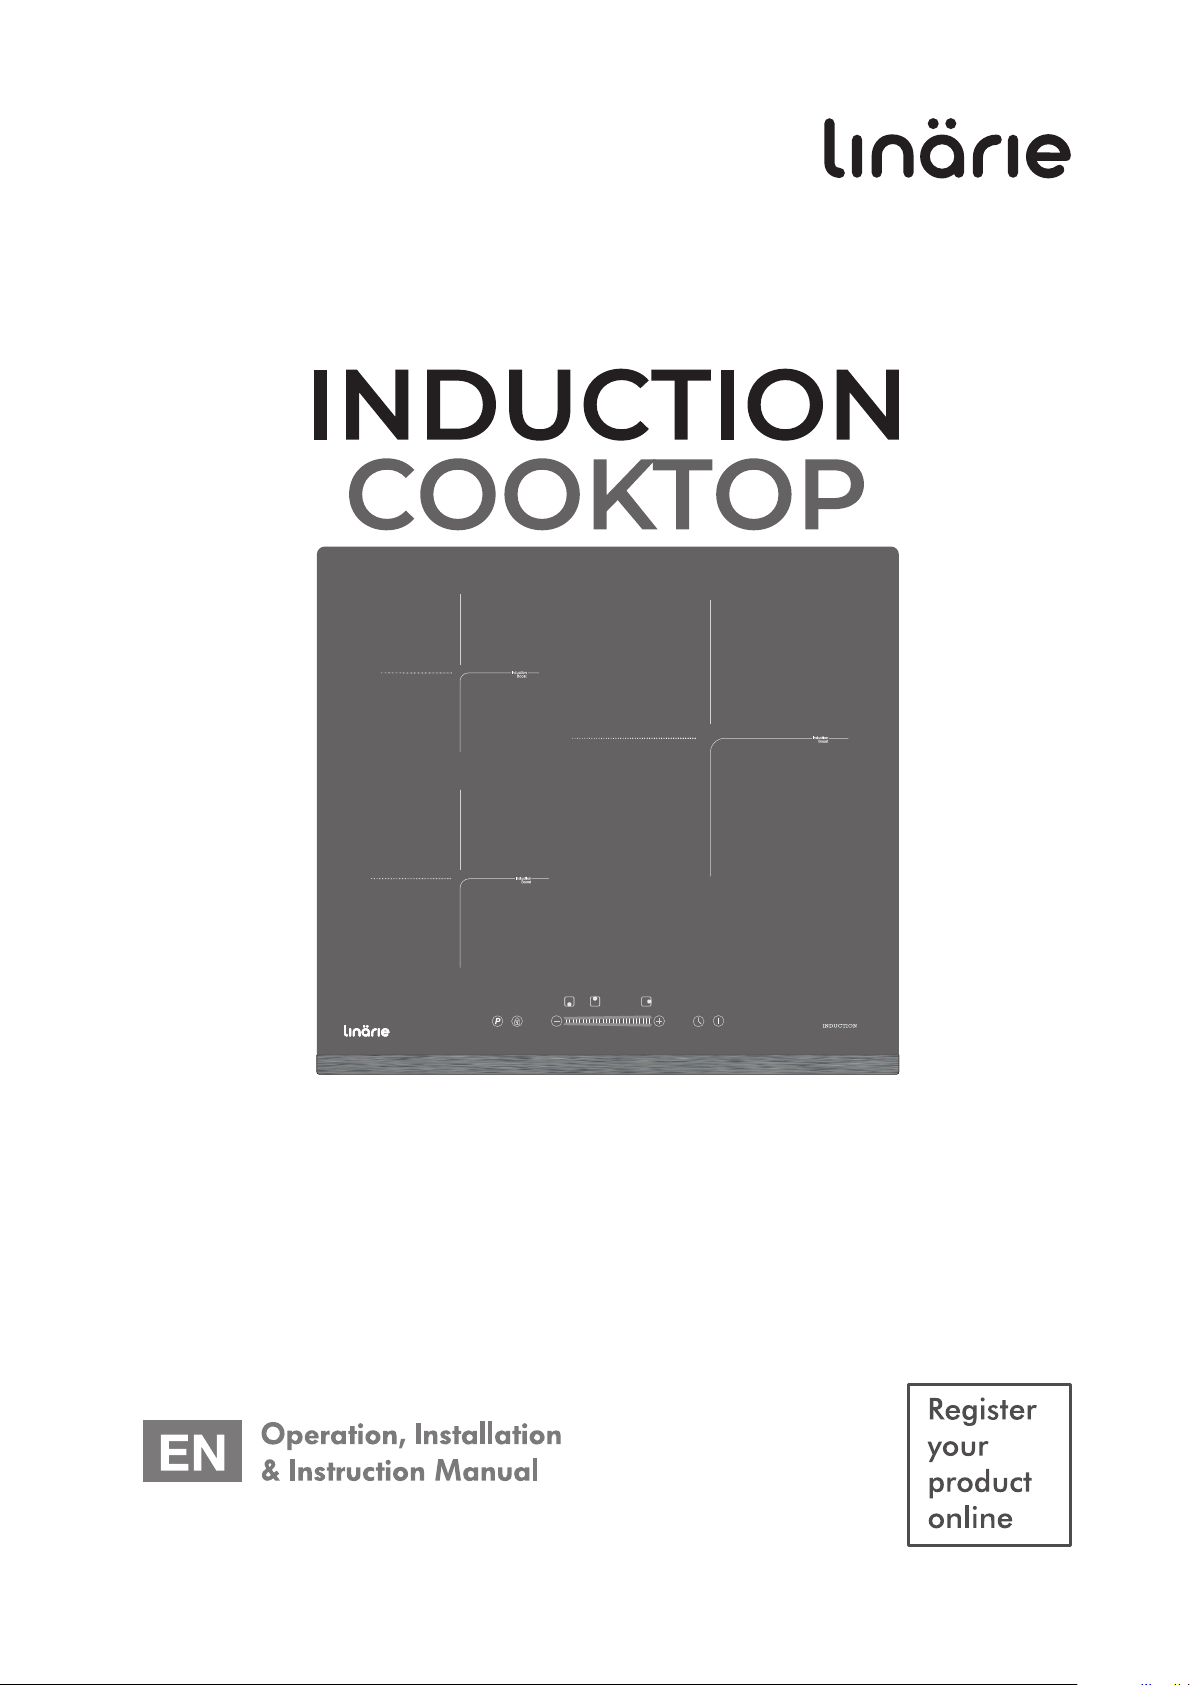
1. GENERAL INFORMATION
A damaged appliance can be dangerous. If you find the
appliance is damaged or marked, you must report it within
7 days if you wish to claim for damage/marks under the
manufacturer’s warranty. This does not affect your statutory
rights. Do not use a damaged appliance.
The manufacturer's warranty will be invalidated if the
appliance is not repaired by a Linärie approved service
technician.
Faulty components must only be replaced by genuine Linärie
spare parts. The manufacturer can only guarantee the safety
of the appliance when Linärie replacement parts are used.
If the power cord is damaged, it must only be replaced by a
Linärie authorized service technician or suitably qualified
electrician in order to avoid a hazard.
Linärie cannot be held liable for noncompliance with these
instructions, resulting from incorrect or improper use or
operation.
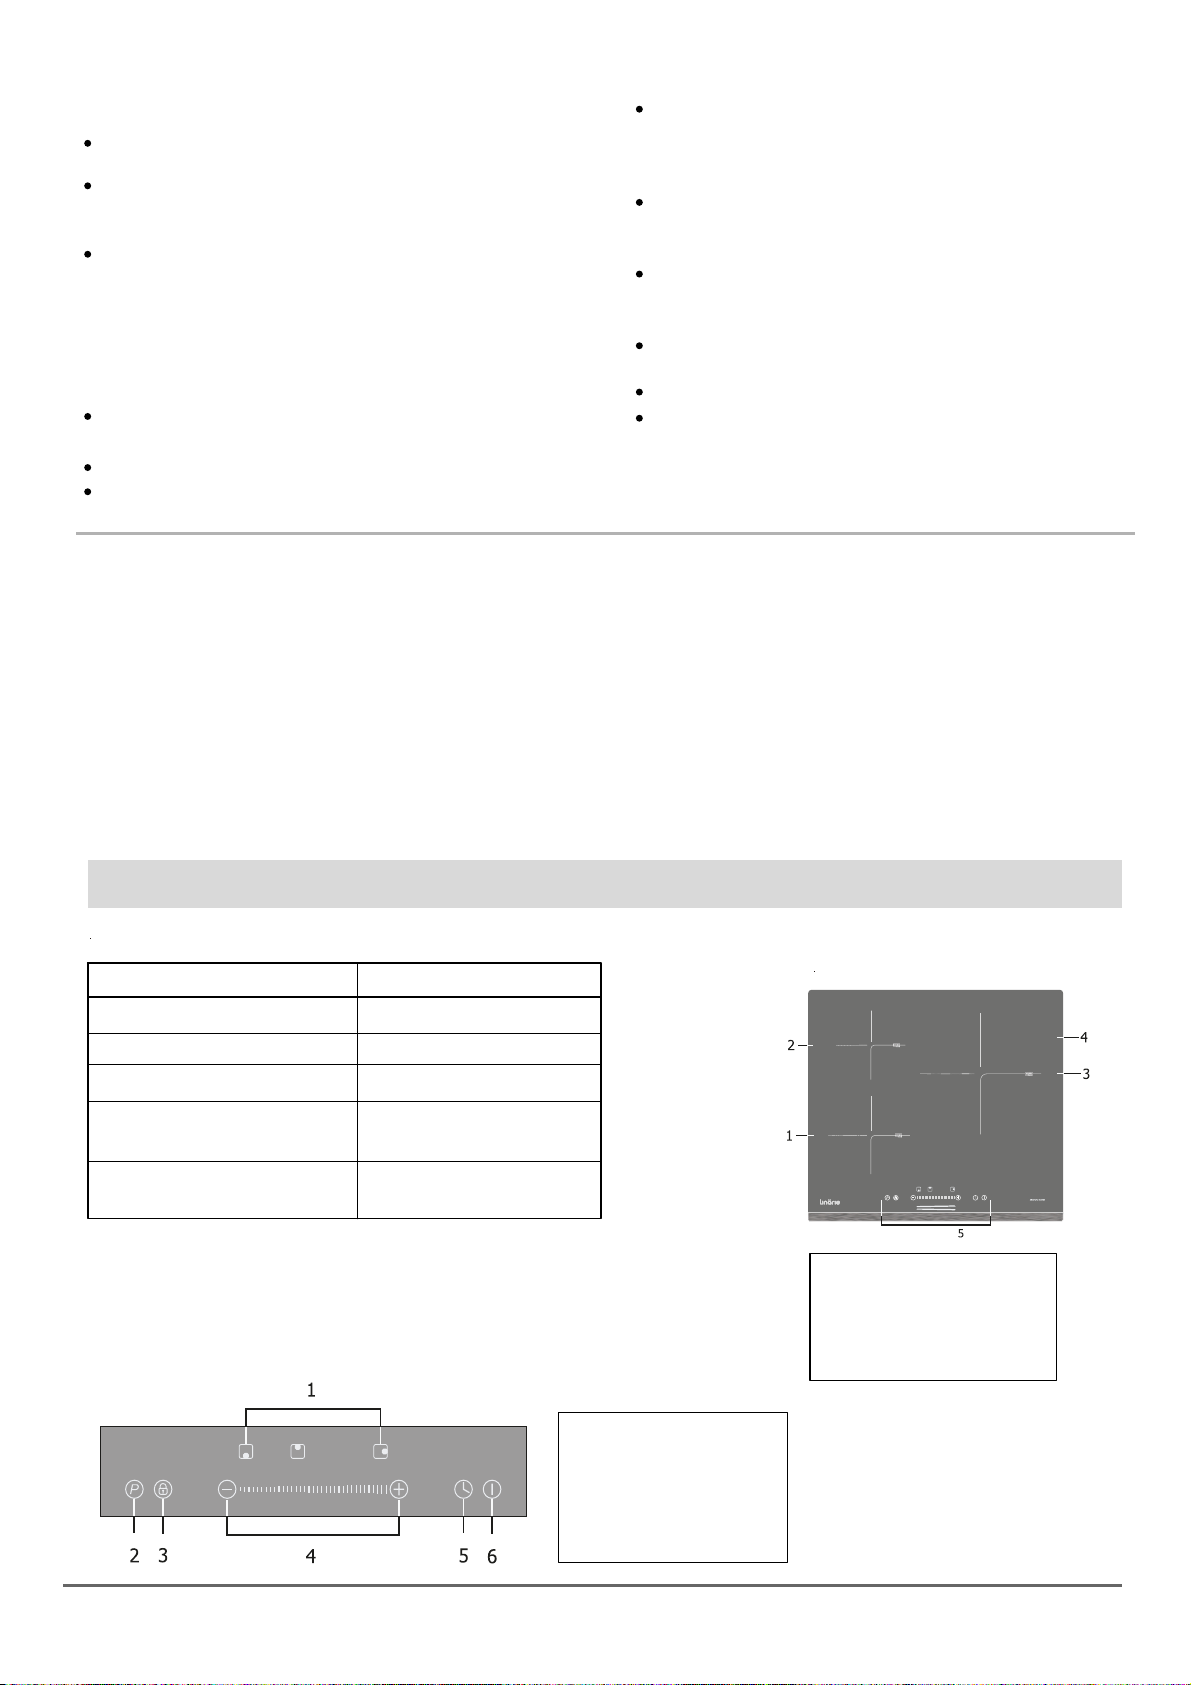
1.1 Appliance Information
w w w . lina r ie . c o m . a u 3
Cleaning & Maintenance
2. GENERAL SAFETY INTRUCTIONS
Unauthorized Modifications
Unauthorised modifications can cause the appliance to
pose risks. Do not conduct any modifications to the
appliance.
The device must be cleaned regularly. Dirt can lead to
damage or the buildup of odors. (See “Cleaning and
maintenance” section).
Always clean the appliance exactly as indicated in
the operating instructions.
Always ensure the appliance is switched off before
cleaning or replacing parts.
There is a risk of fire if cleaning is not carried out as
described in these operating instructions.
In areas which may be subject to infestation by
cockroaches or other vermin, pay particular attention to
keeping the machine and its surroundings in a clean
condition at all times. Any damage which may be
caused by cockroaches or other vermin will not be
covered by the machine warranty.
2.1 General Safety Instructions
Children and People with Special Needs
2.2 Safety Instructions - Installation
This appliance is not intended for use by persons (including
children) with reduced physical, sensory or mental capabi-
lities, or lack of experience and knowledge, unless they have
been given supervision or instruction concerning use ofthe
appliance by a person responsible for their safety.
The appliance is NOT suitable for use by children
without supervision.
Young children should be supervised near the appliance
to ensure they do not play with this appliance.
Children may be able to wrap themselves in packing
material or pull it over their heads with the risk of
suffocation. Keep children away from any packing material.
I
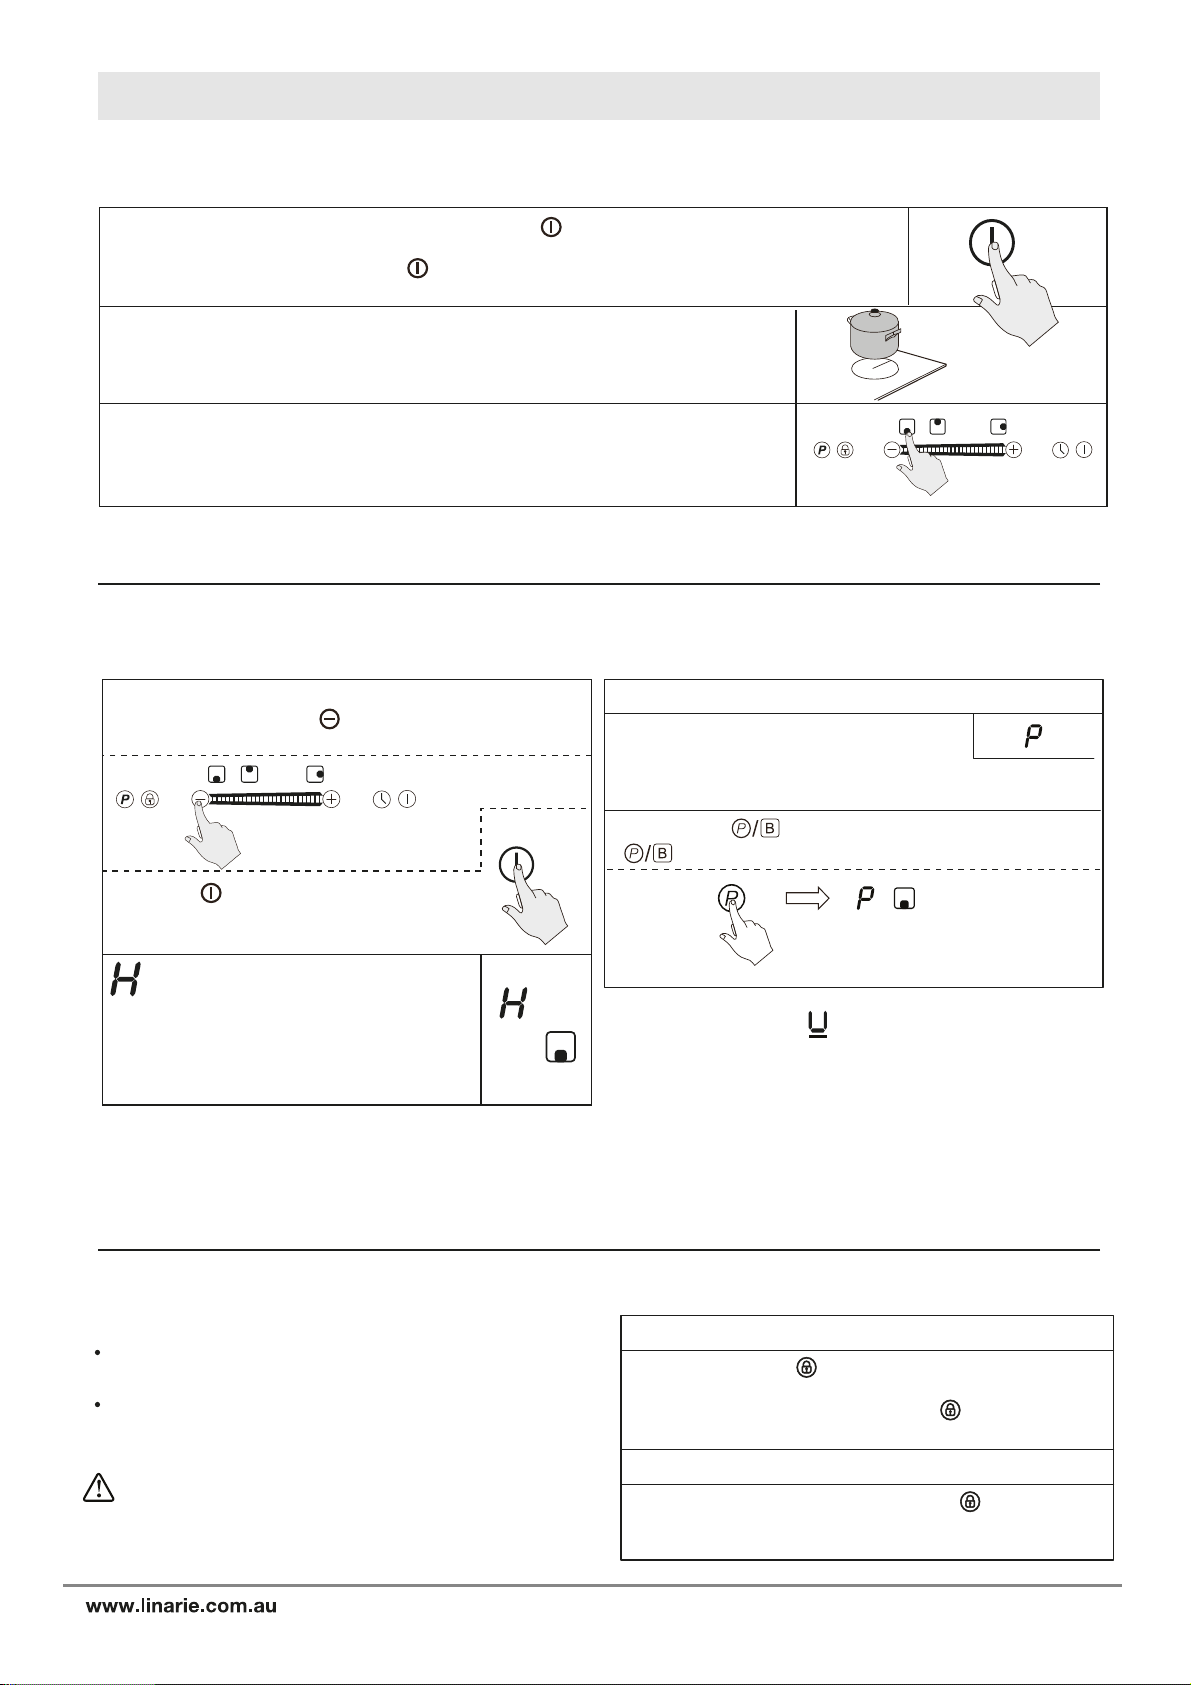
Do not cook on a broken or cracked cooktop. If the cooktop
surface should break or crack, switch the appliance off
immediately at the mains power supply and contact a qualified
technician.
n order to avoid any potential hazard, the installation
instructions must be followed.
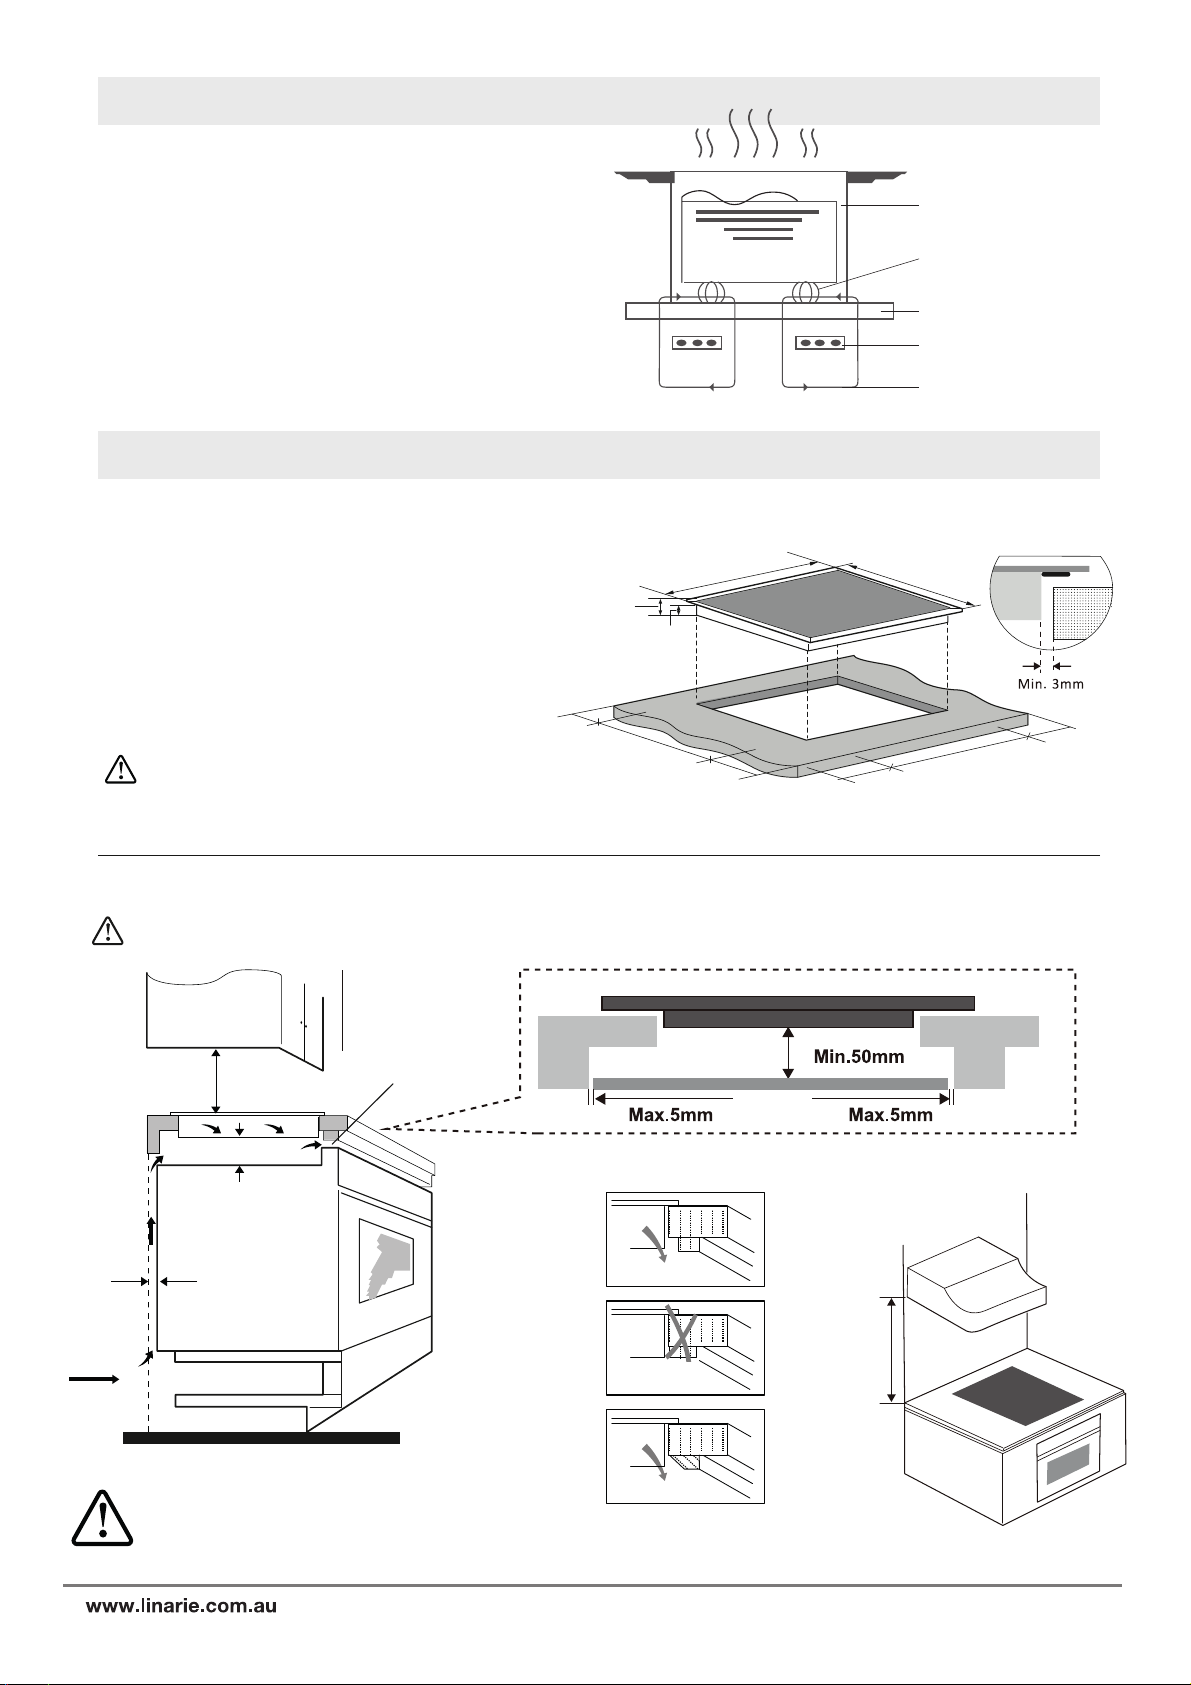
Observe all regional regulations for the installation of
ventilation systems.
During installation, maintenance and repair work, the
appliance must be disconnected from the mains
electricity supply. It is only completely isolated from the
electricity supply when:
– the mains circuit breaker is switched off, or
– it is switched off at the wall socket and the plug is
withdrawn from the socket.
Do not pull the mains connection cable but the mains
plug to disconnect your appliance from the mains
electricity supply.
Do not connect the appliance to the mains electricity
supply by a multi-socket unit or an extension lead.
This appliance complies with electromagnetic safety
standards.
The appliance complies with the stipulated safety
requirements in Australia. The user is responsible for
appliance cleaning and maintenance as well as its safe
use. Improper use can lead to personal injury and
damage to property.
Tampering with electrical connections or components
and mechanical parts is highly dangerous to the user
and can cause operational faults. Only open the housing
as described in the instructions given in “Installation”
and in the “Cleaning & Maintenance” sections of this
booklet. Under no circumstances should any other parts
of the housing be opened.
THIS APPLIANCE MUST BE PROPERLY EARTHED. It is
most important that this basic safety requirement is
present and tested regularly and, where there is any
doubt, the household wiring system should be inspected
by a qualified electrician.
Linärie cannot be held liable for noncompliance with
these instructions, resulting from incorrect or improper
use or operation.
The appliance must only be installed and assembled by
trained specialists who are familiar with and comply with
the standard national regulations and supplementary
regulations of ventilation systems.

www.linarie.com.au 4
3.1 Technical specification
3. PRODUCT INTRODUCTION
Cooking cooktop
Weight and dimensions are approproximate.
Because we continually strive to improve ourproducts that we
may change the specifications and designs without prior notice.
Cooking zones
Supply voltage
Installed electric power
Product size LxWxH
(mm)
Building-in Dimensions
A x B (mm)
LS6013Z
3 Zones
220-240V~50Hz or 60Hz
6100W
590x535x58
560x490
3.2 Top view
3.3 Touch control panel
1. Max. 1600/2000 W zone
2. Max. 1200/1500 W zone
3. Max. 2200/2600 W zone
4. Glass plate
5. Touch control panel
1. Cooking zone selector
2. Power boost
3. Key lock
4. Power/ Timer setting
5. Timer
6. On/ Off
2.3 Correct Use & Operation
For safety reasons, this appliance may only beused after
it has been built in.
Reliable and safe operation ofthis appliance can only be
assured if it has been connected to the mains electricity
supply.
Before using the appliance, ensure that all packaging
materials are removed from the appliance and make
sure that the connection data onthe data plate [voltage
(V) and frequency (Hz)] indicated onthe appliance
corresponds to the voltageand frequency ofthe power
supply in your household. Consult a qualified electrician
if in doubt.
Never leave the appliance unattended when in use.
Boilover causes smoking snd greasy spillovers may ignite.
Never leave utensils or any objects on the appliance.
Never use the appliance for warming or heating the room.
Only use the appliance on a dry, stable,
level and horizontal surface and distance 10 cm
back-round surrounding.
When cooking, pay attention to the heat-up speed of
the cooking zones. Avoiding boiling the pots dry as
there is a risk of the pots overheating!
Do not place empty pots and pans on cooking zones
which have been switched on.
Always switch off the cooktop after using.
Fats and oils may ignite fire. Always be careful in
preparing food with fats and oils. Never extinguish
ignited fats and oils with water! Put the lid on the pan
and switch off the cooking zone.
After use, always turn off the cooking zones and the
cooktop as described in this manual. Do not rely
on the pan detection feature to turn off the cooking
zones when you remove the pans.
2.4 Disassembling and Disposal of the
Appliance
2.5 Accessories and Spare parts
(see the “EnvironmentalTips” section for best practices on
disposing ofthis appliance).
The device must only bedisassembled by trained
specialists who are familiar with and comply with the
standard national regulations and supplementary
regulations ofthe local utility companies.
Work on electrical components must only be conducted by
trained electrical personnel.
Incorrect components can lead to personal injury or
damageto the appliance. Only use original Linärie spare
parts for repairs.
Modifications, additions oralterations to the appliance
can lead to safety risks. If spare parts oraccessories from
other manufacturers are used, the warranty will be
invalidated, and Linärie cannot accept liability.
Please check www.linarie.com.au for more information.

5
cont. product introduction
Iron pot
Magnetic circuit
Ceramic glass plate
Induction coil
Induction currrents
Induction cooking is safe, advance, efficient, and
economical cooking technology. It works by electromagnetic
vibrations generating heat directly in the pan, rather than
indirectly through heating the glass surface. The glass
become hot only because the pan eventually warms it up.
Energy-saving.
4. INSTALLATION
Cut out the work surface according to the sizes shown in the
drawing. For the purpose of installation and use, a minimum
of 5 cm space shall be preserved around the hole. Be sure the
thickness of the work surface is at least 30mm. Please select
heat resistant and insulated work surface material (wood and
similar fibrous or hygroscopic material shall not be used as
work surface material unless impregnated) to avoid the
electrical shock and larger deformation caused by the heat
radiation from the hotplate.
As shown.
560
50
50
50
50
490
58
52
590 535
4.1 Selection of installation equipment
: The safety distance between the hotplate and the cupboard above the hotplate should be at least 60mm.
760mm
Unit (mm)
760
50 min
20 min
Air intake
Air exit (5mm)
Under any circumstances, make sure the Induction cooktop is well ventilated and the air inlet and outlet are
not blocked. Ensure the induction cooktop is in good work state. As shown below
3.4 Working Theory/ Advantage of Induction cooktop
The safety distance between the sides of the
cooktop and the inner surfaces of the worktop
should be at least 3mm.
There are ventilation holes around outside of
the cooktop. YOU MUST ensure these holes are
not blocked by the worktop when you put the
cookyop into position.

6
www.linarie.com.au
cont. installation
The adhesive that join the plastic or wooden material of the furniture, MUST be heat resistant of not below 150ºC.
Gently place the appliance on a stable and smooth surface
(use the packaging). Do not carry out any physical
force on the control panel of the appliance.
The rear wall, adjacent and surrounding surfaces must be able to withstand a temperature of 90°C.
4.5 Adjusting the bracket position
1.
Install and fix the brackets on the appliance
as shown.
Screw
Screw
Worktop/ cupboard
Bracket
Glass
Bracket
Screw hole Bottom/ housing
2. Insert and align the appliance into the installation
opening.
3.
4.6 Caution
1. The induction hotplate must be installed by a qualified personnel or technicians. We have professionals at your service.
Please never conduct the operation by yourself.
2. Do not install the cooktop directly above a dishwasher, fridge, freezer, washing machine or clothes dryer, as the
humidity may damage the electronics
3. The induction hotplate shall be installed such that better heat radiation can be ensured to enhance its reliability.
4. The wall and induced heating zone above the table surface shall withstand heat.
5.To avoid any damage, the middle layer and adhesive must be resistant to heat.
6. Do not use a steam cleaner.
Be sure the work surface is square and level, and no
obstruction with space requirements.
The work surface is made of heat – resistant and
insulated material.
If the cooktop is installed above an oven, the oven must have
a cooling fan.
The installation will comply with all clearance require-
ments and applicable standards regulations.
A suitable isolating switch providing full disconnection
from the mains power supply is incorporated in the
permanent wiring, mounted and position to comply
with the local wiring rules and regulations.
The isolating switch must be on an approved type and
provide a 3 mm distance that separate all poles
or in all active phase conductors if the local wiring
rules allow for this variation of the requirements.
The isolating switch will be easily accessible to the
customer with the cooktop installed. You consult local
building authorities and by- laws if in doubt regarding
installation.
You use heat resistant and easy to clean finishes such
as ceramic tiles for the wall surfaces surrounding the
cooktop.
The power supply cable does not come in contact with
cupboard doors or drawers.
There is adequate flow of fresh air from outside the
cabinet to the base of the cooktop.
If the cooktop is installed above a drawer or cupboard space,
a thermal protection barrier is installed below the base
of the cooktop.
The isolating switch is easily accessible.
Gently place the unit on a stable and smooth surface.
(You can use the packaging.)
Do not apply force on the controls that showed from
the cooktop.
4.2 Before Installation
4.3 After installation 4.4 Before locating the fixing brackets

7
www.linarie.com.au
cont. installation
5. OPERATION
4.7 Connecting the cooktop to the mains power supply
The appliance must be connected to the mains by a qualified professional, who is familiar with and
adheres to the local requirements and supplementary regulations of your electricity supplier.
1.Your household power supply must meet the power consumption of the appliance.
2.The voltage and power cord must meet the values on the technical data sheet.
3.Do not use adapters, reducers and branching devices as they can cause overheating.
4. The power chord must not come in contact with hot areas; and its temperature must need exceed 5°C.
5. When the socket is not accessible for the user or a fixed electrical connection of the appliances is required, an all-pole
disconnecting device must be incorporated during installation. Disconnecting devices are switches with a contact
opening distance of at least 3mm. These include LS – switches, fuses and protectors EN30335. Read the information
on the technical data sheet and the connection diagram below before connecting the appliance to the mains.
The electricity supply must be formed from a 16A automatic cut-out.
If in doubt, always contact the local building authorities and consult the relevant legal provisions.
6. Do not bend or compress the power chord.
7. Check the power chord regularly. The power chord must be replaced by a qualified professional only.
> Suitable Only (for the model without plug).
Installation (380V) rare Installation (220V) common
5.1 Touch control 5.2 Choosing the right Cookware
Before using your induction cooktop Read this guide, taking special note “Safety Warnings” section.
The controls respond to touch, so you don’t need to
apply any pressure.
Use the ball of your finger, not its tip.
You will hear a beep each time a touch is registered.
Make sure the controls are always clean, dry, and
that there is no object (e.g. a utensil or a cloth)
covering them. Even a thin film of water may make
the controls difficult to operate.
Do not use cookware with jagged edges or a curved base.
Only use cookware with a base suitable for induction cooking.
Look for the induction symbol on the packaging or on the
bottom of the cookware.
You can check whether your cookware is suitable by carrying
out a magnet test. Move a magnet towards the base of the pan.
If it is attracted, the pan is suitable for induction.
If you do not have a magnet:
1. Put some water in the pan you want to check.
2. If does not flash in the display and the
water is heating, the pan is suitable.
Cookware made from the following materials is not suitable:
pure stainless, aluminum or copper without a magnetic base,
glass, wood, porcelain, ceramic, and earthenware.
Make sure that the base of your pan is smooth, sits flat against
the glass, and is the same size as the cooking zone. Use pan
whose diameter is as large as the graphic of the zone selected.
Using a pot a slightly wider energy will be used at its maximum
efficiency. If you use smaller pot efficiency could be less than
expected. Pot less than 140 mm could be undetected.
Always centre your pan on the cooking zone.
Always lift pans off the induction cooktop – do not slide,
or they may scratch the glass.
Remove any protective film that may be still on your induction cooktop.

cont. operation
5.3.1 Start cooking (please check control panel on page 3)
5.3.2 Finish cooking
If the display flashes alternately with the
heat setting
Place a suitable pan on the cooking zone that you wish to use. Make sure the
bottom of the pan and the surface of the cooking zone are clean and dry.
To turn on one or more cooking zone, place a compatible pot or pan on the
desired cooking zone. Touch the cooking zone selector key
(corresponding to the chosen cooking zone), the power
display will show a “-”. Touch the chosen cooking zone key within 5 seconds.
Press the “ ”key, it will make a “beep”
once, and it will turn off. The unit is
now on the standby mode.
Beware of hot surfaces
will show which cooking zone is hot to
touch. It will disappear when the surface has
cooled down to a safe temperature. It can
also be used as an energy saving indicator
as you can use the cooking zone that is still
hot. This means that: You have not place a pan on the correct
cooking zone or, the pan you are using is not suitable for
the induction cooking or, the pan is too small or not properly
centered on the cooking zone.
No heating takes place unless there is a suitable
pan on the cooking zone.
5.3.3 Using the Boost function
Activate the boost function
Touching the “ ” key will show on the display as a
“ ”boosting the heating power to the highest level.
Boost is the highest power level, designed
for quickly heating or boiling larger
quantities. Boost will operate for maximum of 5 minutes.
After 5 minutes, it will automatically revert to power level 9.
8
5.3 How to use your induction cooktop
While on the standby mode, touch the main power “ ”key, the induction cooktop will make a
“beeping sound” once indicating that it is ready to use.
If only the indicator light above the “ ” key is lit up, the cooking zone key is ON, or
Locked key are not chosen within 30 seconds, the unit will automatically return to standby mode.
Touch the key of the cooking zone you use, the digital
display will blink, press “ ” key to adjust “ - ”, the
cooktop will switch off.
5.3.4 Locking the controls To lock the controls
To unlock the control
You can lock the controls to prevent unintended use for
example children accidentally turning the cooking zones on.
When the controls are locked, all the controls except the
ON/ OFF control are disabled.
Touch or hold the “ ” key for 2 seconds to activate the
function. The unit will make a “beep” sound and the
indicator light will turn on above the “ ” key. The
controls are now locked.
While in lock mode, Touch or hold the ” “key for two
seconds to deactivate the function. The indicator light will
turn off.
When the cooktop is in the lock mode, all the controls are
disable are disabled except the ON/OFF, you can
always turn the induction cooktop off with the ON/OFF
control in an emergency, but you shall unlock the cooktop
first in the next operation

9
www.linarie.com.au
cont. operation
5.3.5 Timer control
With the desired heating zone Powered ON and flashing, press the “Time” key.
The timer display will flash and show a ”00” or “30”, Press the “+” or “-” to
increase or decrease to the desired time. Choose up to 99 minutes.
Once the timer is set, timer starts if no other key is touch after 3 to 5 seconds,
the timer display will flash and remain active for that particular cooking zone.
When the time reaches “-” a “beeping” sound will go off indicating that the
time is up, and selected heating zone shut off automatically.
If you want to set another zone to switch-off automatically, choose the cooking
zone and press “Time” key. Repeat the same steps above.
If you want to check the remaining time for another cooking zone, press the
cooking zone selector key, until the indicator for the desired burner flashes.
If more than one switch - off time is programmed, the one with shortest remaining
time will show on the display, the indicator for that particular zone will flash.
Cancelling the timer:
Choose the cooking zone key for the desired burners, then touch the ”timer’’, then
the timer of the selected cooking zone has been cancelled.
You can use the timer in two different ways:
As two independent zones
a. Put a pan on the right up side or the right down
side of the flexible zone.
b. Put two pans on both sides of the flexible zone.
Notice: Make sure the pan is bigger than 12cm.

10
www.linarie.com.au
Take care when frying as oils and fats heat up very quickly,
particularly if you are using PowerBoost. At extremely high
temperatures oils and fats will ignite spontaneously and this
presents a serious risk.
Delicate warming for small amount of food.
Melting chocolate, butter and foods that
burn quickly.
Gentle simmering
Slow warming
Reheating
Rapid simmering
Cooking rice
Reduce the temperature when food is cooked or heated.
Using a lid will reduce cooking times and save energy by
retaining the heat.
Minimize the amount of liquid or fat to reduce cooking times.
Start cooking on a high setting and reduce the setting when
the food has heated through.
6.1 Cooking Tips
Heat
setting
1-2
3-4
Suitability
Sauteing
Cooking paste
Pancakes
Searing
Stir - frying
Bringing soup to the boil
Boiling water
5-6
7-8
9/P
Simmering occurs below boiling point, at around 85ªC,
when bubbles are just rising occasionally to the surface of
cooking liquid. It is the key to delicious soups and tender
stews because the flavours develop without overcooking
the food. You should also cook egg-based and flour
thickened sauces below boiling point.
Some tasks, including cooking rice by the absorption method,
may require a setting higher than the lowest setting to ensure
the food is cooked properly in the time recommended.
Stand the meat at room temperature for about
20 minutes before cooking.
Heat up a heavy - based frying pan.
Brush both sides of the steak with oil, drizzle a
small amount of oil into the hot pan and then
lower the meat onto the hot pan.
Turn the steak only once during cooking. The exact
cooking time will depend on the thickness of the
steak and how cooked you want it. Times may vary
from about 2-8 minutes per side. Press the steak to
gauge how cooked it is – the firmer feels the more
’well done’ it will be.
Leave the steak to rest on a warm plate for a few
minutes to allow it to relax and become tender
before serving.
To cook juicy flavorsome steak:
6.1.1 Simmering, cooking rice
6.1.2 Searing steak
Choose an induction compatible flat- based wok or
a large frying pan.
Have all the ingredients and equipment ready.
Stir – frying should be quick. If cooking large
quantities, cook the food in several smaller batches.
Preheat the pan briefly and add two tablespoons of oil.
Cook any meat first, put it aside and keep warm.
stir- fry the vegetables. When they are hot but still
crisp, turn the zone to a lower setting, return the
meat to the pan and add your sauce.
Stir the ingredients gently to make sure they are
heated through.
Serve immediately.
6.1.3 For stir –frying
7. HEAT SETTINGS
6. COOKING GUIDELINES
The settings below are guidelines only. The exact setting will depend on several factor, including your cookware and the
amount you are cooking. Experiment with the induction cooktop to find the settings that best suit you.

11
www.linarie.com.au
Fan noise coming
from the cooktop.
A cooling fan built into your cooktop
prevents the electronics from
overheating.
This is normal and needs no action.
Pans is not heated
and appears on
the display.
Pan is suitable for induction cooking or
it is too small for the cooking zone or
it is not properly centered.
Use the cookware that is suitable for induction cooking.
See “choosing the right cookware”.
The cooktop turned
OFF unexpectedly.
An error code is
displayed.
Technical fault. Please note down the error code, switch the power
of the induction cooktop OFF at the wall, and contact
a qualified technician.
8. CARE AND CLEANING
9. TROUBLESHOOTING
1. Switch the power of the cooktop OFF.
2. Apply a cooktop cleaner while the
glass is still warm not hot.
3. Rinse and wipe dry with a clean
cloth or paper towel.
4. Switch the power of the cooktop
back ON.
1. Switch the power off.
2. Soak up the spill.
3. Wipe the touch control area with a
clean damp sponge ot cloth.
4. Wipe the area completely dry with
a paper towel.
5. Switch the power back ON.
Everyday soiling on
the glass.
(fingerprints, marks
stains left by food
or non sugary
spillovers on the
glass)
When the power is switch off, there will be no “hot surface”
indication but the cooking zone may still be hot!
Take extreme care.
Situation What to do Remarks
Always read the label to check if your cleaner is suitable.
Never leave cleaning residue on the cooktop;
the glass may become stained.
Remove these immediately with a fish
slice, palette knife of razor blade
scraper suitable for induction glass
cooktops, but beware of hot cooking
zone surfaces:
1. Switch the power off the wall.
2. Hold the blade or utensils at a 30ª
angle and scrape off.
3. Clean the soiling or spill up with a
dish cloth or paper towel.
4. Follow steps 2 to 4 for “Everyday
soiling on glass” above.
Boilovers, melts and
hot sugary spills on
the glass.
Spillovers on the
touch controls.
Remove stains left by melts and sugary food or spillovers
as soon as possible. If left to cool on the glass, they may
be difficult to remove or even permanently damage the
glass surface.
Cut hazard: when the safety cover is retracted, the
blade in a scraper is razor-sharp. Use with extreme
care and always store safely and out of reach
of children.
The cooktop may beep and turn itself off, and the touch
controls may not function while there is liquid on them.
Make sure you wipe the touch control dry enough before
turning the cooktop back on.
No power. Make sure the induction cooktop is conected to the power
supply and the switch is on. Check wether there is a power
outage in your area. After checking, and the problem persists,
call a qualified technician.
The controls are locked.
There maybe a slight film of the water
over the controls or you may be using
the tip of your finger when touching
the controls.
The touch controls
are unresponsive
Unlock the controls, See section “Using your induction
cooktop” for instructions.
The touch controls
are difficult to
operate.
Make sure the touch control area is dry and use the ball of
your finger when touching the controls.
Rough - edged cookware.
Unsuitable, abrasive scaurer
or cleaning products used.
The glass is being
scatched.
Use cookware with flat and smooth bases.
See “Choosing the right cookware”.
This may be caused by the construction
of your cookware (layes of different
metal vibrating differently).
Some pans make
crackling noises.
This is normal for cookware and does not indicate fault.
This is cause by the technology of
induction cooking.
The cooktop makes
a humming noise
when used on a
high heat setting.
This is normal but the noise should be slowing down or
disappear when you decrease the heat setting.
Problem Possible causes Possible solution
The induction
cooktop cannot be
turned on.

12
www.linarie.com.au
cont. troubleshooting
1. Failure code that occur when customer is using and Solution;
2. Specific Failure and Solution
Plug in,
No “BI”
heard
*U
*E1
- Is there blackouts?
- Check for damaged fuse and socket.
- Check if cooking vessel suits for the cooker.
- Check if the pot is centered.
- Check if the bottom diameter is not larger
than 12cm.
- Check for low voltage.
*E2
*E3
- Check for high voltage.
- Check sensor open for short-circuits.
The LED does not turn on
when unit is plugged in
Cooking mode indicator
comes on, but heating
does not start.
Fan motor sounds
is not normal
The fan motor
is damaged.
Heating zones of the
same side (Such as the 1st
and 2nd zone) would
display “Er”
Ambient temperature may be too high.
Air intake or air vents maybe blocked.
There is something wrong with the fan. Check if the fan is running smoothly. If not,
replace the fan.
Some keys wont work, or
LED dislay is not normal
Heating suddenly stops
and the display
flashes “ ”.
No power supplied.
Accesorial power board and
display board failure.
Check connection.
Check if the outlet is working and tightly secure the plug.
ERROR
FAILURE PROBLEM SOLUTION
CHECK POINTS
Accesorial power board is damaged. Replace the accessorial power board.
The display board is damaged.
Pan type is wrong. Use a proper pot. (refer to page 7)
Pan detection circuit is damaged.
Pot diameter is too small.
Replace the display board.
*E4
*E5
*E6
*Er
- Check IGBT open for short-circuits.
*IGBT- insulated – gate bipolar transistor, A semiconductor device use to control the load of power supply.
- Surface temperature is higher than 280ºC.
- Check ambient temperature if it is high.
- Signal problem between control pcb and
main pcb.
- Check suction and exhaust outlets and see
if the fan is running.
- Check under warm/ milk section if the set
temperature has been reached.
- Check the protective device if triggered or
not. Wait for 10minutes to confirm.
The power board is damaged.
Power board and display board
connection failure.
Display board communication part is
damaged.
The main board is damaged.
Check connection.
Replace the display board.
Replace the power board.
Replace the fan.
Replace the power board
The induction cooktop is equipped with a self-diagnostic function. With this test the technician is able to check the function of
several components without disassembling or dismounting the cooktop from the working surface.
High temperature of the cooktop.

13
10.2 Disposing of your old appliance
10. ENVIRONMENTAL TIPS
11. WARRANTY & AFTER SALES SERVICE
The transport and protective packaging has been selected
from materials which are environmentally friendly for
disposal, and can normally be recycled.
Recycling the packaging reduces the use of raw materials
in the manufacturing process and also reduces the
amount of waste in landfill sites. Ensure that any plastic
wrappings, bags etc. are disposed of safely and kept out
of the reach of babies and young children. Danger of
suffocation.
Observe all safety and warning information during
operation (see the “General Safety Instructions” section).
Observe all safety and warning information during
operation (see the “General Safety Instructions” section).
Incorrect components can lead to personal injury or
damage to the appliance. Use only genuine original
Linärie spare parts.
Modifications, additions or alterations to the appliance
can lead to safety risks. If spare parts or accessories from
other manufacturers are used, the warranty will be
invalidated, and Linärie cannot accept liability.
Please check www.linarie.com.au for more information.
Model:…………………………………………………………
Serial Number:.………………………………………………
Register your product www.linarie.com.au
In the event of a fault which you cannot remedy yourself,
please contact Linärie.
The manufacturer’s warranty for this appliance is 2 years.
The contact details for Linärie are given at the beginning
and of these instructions.
When contacting Linärie, please quote the model and
serial number of your appliance. These can be found on
the data plate, after removing the grease filter.
Electrical devices marked with this label may not be
disposed of in domestic waste at the end of their service
life.
Electrical and electronic appliances often contain valuable
materials. They also contain specific materials, compounds
and components, which were essential for their correct
function and safety. These could be hazardous to human
health and to the environment if disposed of with your
domestic waste or if handled incorrectly. Please do not,
therefore, dispose of your old appliance with your
household waste.
Please dispose of those materials by contacting your local
authorities and ask for the correct method of disposal.
Please ensure that your old appliance poses no risk to
children while being stored prior to disposal.
By disposing of this product in accordance with the
regulations, you protect the environment and the health of
those around you from negative consequences.
10.1 Disposal considerations
11.1 Warranty 11.3 Replacement of spare parts
11.2 After sales service
Record model & serial number
www.linarie.com.au

LIKE TO
KNOW MORE?
© Linärie
For further information on all Linärie appliances,
or to obtain detailed dimension and installation
information, phone or email our Customer Care
team or visit our website:
Australia
www.linarie.com.au
Follow Us
@Linarie.Appliances
www.linarie.com.au

Operating and installation instructions: Original √ Translation
Osass Australia Pty Ltd.
ACN 005 635 398
ABN 96 005 635 398
Linärie Contact
www.linarie.com.au
The distribution and duplication of this document, as well as the use and disclosure of its contents
are prohibited unless expressly authorised.
These operating and installation instructions have been drawn up with the greatest of care. But it
cannot be ruled out that subsequent technical modifications have not yet been incorporated or
the relevant content has not yet been adapted. Please accept our apologies in this eventuality. An
updated version can be requested from our team. Subject to printing errors and mistakes.
© Linärie
All rights reserved.
www.linarie.com.au
Table of contents
Other linarie Cooktop manuals