linarie MARSEILLE RAHP9X User manual

Downdraft rangehoodRAHP9X
www.linarie.com.au

TABLE OF CONTENTS
2
CONGRATULATIONS
Congratulations and thank you for choosing Linärie to
introduce a new comfort of cooking in your home. We are
sure you will find your new appliance a pleasure to use and
a great asset to your kitchen.
This appliance complies with all relevant safety
requirements in Australia. Inappropriate use can, however,
lead to personal injury and damage to property.
In order to operate the unit correctly and safely, please read
this instruction manual carefully before installation and
usage. This user manual which provides you with all
required instructions related to safety, installation, use and
maintenance of the appliance.
For future reference, please store this booklet in a safe place
and ensure that all users are familiar with the contents. Pass
them on to any future owner of the
appliance.
Record Model & Serial Number
Model:.............................................................................................................................
Serial Number .........................................................................................................
Register your product www.linarie.com.au
Adherence to the directions for use in this manual is extremely
important for health and safety. Failure to strictly adhere to the
requirements in this manual may result in personal injury, property
damage and affect your ability to make a claim under Linärie’s
manufacturer’s warranty provided with your product. Products must
be used, installed and operated in accordance with this manual. You
may not be able to claim on Linärie’s manufacturer’s warranty in the
event that your product fault is due to failure to adhere this manual.
Correct Conditions of Use
The appliance is intended for use in the home and similar
environments only. It is not intended for commercial use.
The appliance is not suitable for outdooruse, non-stationary
installation (e.g. on ships, vehicles), or heating rooms.
It must only beused to extract vapors and remove odors
from cooking. Any other usage is at the owner's risk.
Where a recirculation rangehood is fitted above a gas
cooktop, please ensure that there is anadequate supply of
fresh air into the room in which it is installed. Please seek the
advice ofa qualified gas fitter if necessary.
Linärie does not assume any liability for damage
arising from non-adherence to these documents
and from improper assembly. The electricity connection
must be madeby a qualified specialist. Installation must
comply with the valid standards, regulations and laws. All
safety and warning information and the operating and
installation instructions must be complied with.
Additional information onproducts, accessories,
warranty, replacement parts and services can be
found at www.linarie.com.au
1. General Information .............................. 03
1.1 Appliance information
2. General Safety Instructions .................... 03
2.1 General safety information
2.2 Safety instruction - Installation
2.3 Exhaust air Operation ..............................04
2.4 Correction use & Operation
2.5 Disassembling and Disposal
ofthe Appliance ......................................05
2.6 Accessories and Spare parts
3. Description of the Functions ...................05
3.1 Air extraction mode
3.2 Recirculation mode
3.3 Guide to the appliance
4. Technical data sheet...............................06
5. Installation ..............................................06
5.1 Pre-installation
5.2 Safety distance
5.3 Installation {Air extraction} ......................08
6. Operation .................................................08
6.1 Control panel and function keys
6.2 Energy saving tips .......................................9
7. Troubleshooting.........................................9
8. Cleaning and maintenance.......................10
8.1 Stainless steel
8.2 Control panel
8.3 Cleaning agents
8.4 Aluminum grease filter
8.5 Removing the aluminum glass filter
8.6 Activated carbon filter ................................11
8.7 Replacing lamps
9. Environmental tips....................................12
10. Warranty and After sales service

Cleaning & Maintenance
1. GENERAL INFORMATION
2. GENERAL SAFETY
A damaged appliance can be dangerous. If you find the
appliance is damaged or marked, you must report it within
7 days if you wishto claim for damage/marks under the
manufacturer’s warranty. Thisdoes not affect your statutory
rights. Do not use a damaged appliance.
The manufacturer's warranty will be invalidated if the
appliance is not repaired by a Linärieapproved service
technician.
Faulty components must only be replaced by genuine Linärie
spare parts. The manufacturer can only guarantee the safety
of the appliance when Linärie replacement parts are used.
If the power cord is damaged, it must only be replaced by a
Linärieauthorized service technician or suitably qualified
electrician in order to avoid a hazard.
Linärie cannot be held liable for noncompliance with these
instructions, resulting from incorrect or improper use or
operation.
1.1 Appliance Information
Unauthorized Modifications
Unauthorised modifications can cause the applianceto
pose risks. Do not conduct any modifications to the
appliance.
The device must be cleaned regularly. Dirt can lead to
damage or the buildup of odors. (See “Cleaning and
maintenance” section).
Always clean the appliance exactly as indicated in
the operating instructions.
Always ensure the appliance is switched off before
cleaning or replacing parts.
Clean the appliance immediately after any food
spillage and the filter regularly to keep the appliance
working efficiently.
There is a risk of fire if cleaning is not carried out as
described in theseoperating instructions.
Make sure no water penetrates inside the device when
cleaning. Do not use a steam cleaning applianceto
clean thisappliance. The steam could reach electrical
components and cause a short circuit.
In areas which may be subject to infestation by
cockroaches or other vermin, pay particular attention to
keeping the machine and its surroundings in a clean
condition at all times. Any damage which may be
caused by cockroaches or other vermin will not be
covered by the machinewarranty.
2.1 General Safety Instructions
Children and People with Special Needs
2.2 Safety Instructions - Installation
Thisappliance is not intended for use by persons (including
children) with reduced physical, sensory or mental capabilities, or
lack of experience and knowledge, unless they have been given
supervision or instruction concerning use of the applianceby a
person responsible for their safety.
The appliance must only be installed and assembled by trained
specialists who are familiar with and comply with the standard
national regulations and supplementary regulations of ventilation
systems.
The appliance is NOT suitable for use by children
without supervision.
Young children should be supervised near the appliance
to ensure they do not play with thisappliance.
Children may be able to wrap themselves in packing
material or pull it over their heads with the risk of
suffocation. Keep childrenaway from any packing
material.
In order to avoid any potential hazard, the installation
instructions must be followed.
Observe all regional regulations for the installation of
ventilation systems.
During installation, maintenance and repair work, the
appliance must be disconnected from the mains
electricity supply. It is only completely isolated from the
electricity supply when:
– the mains circuit breaker is switched off, or
– it is switched off at the wall socket and the plug is
withdrawn from the socket.
Do not pull the mains connection cable but the mains
plug to disconnect your appliance from the mains
electricity supply.
If the rangehood is used with cookers that burn gas or
other fuels, there must be adequate ventilation in the
room.
Insufficient distance between the cooktop and the
rangehood can result in damage to the rangehood.
The appliance complies with the stipulated safety
requirements in Australia. The user is responsible for
appliance cleaning and maintenance as well as its safe
use. Improper use can lead to personal injury and
damage to property.
3
INSTRUCTIONS

Ensure that all specified vents, openings and airspaces
are not blocked.
All ducting, pipework and fittings must beof
non-flammable material.
The appliance must not be connected to a chimney or
vent flue which is in current use for exhausting fumes
from appliances burning gasorother fuels. Neither
should it be connected to ducting which ventilates rooms
with fireplaces. (See “Exhaust Air Operation” section).
Do not connect the appliance to the mains electricity
supply by a multi-socket unit oran extension lead.
Extension leadsare a fire hazard and do not guarantee
the required safety ofthe appliance.
Tampering with electrical connections or components
and mechanical parts is highly dangerousto the user
and can cause operational faults. Only open the
housing asdescribed in the instructions given in
“Installation” and in the “Cleaning & Maintenance”
sections ofthis booklet. Under no circumstances should
any other parts ofthe housing beopened.
THIS APPLIANCE MUST BE PROPERLY EARTHED. It is
most important that this basic safety requirement is
present and tested regularly and, where there is any
doubt, the household wiring system should be inspected
by a qualified electrician.
Linärie cannot be held liable for noncompliance with
these instructions, resulting from incorrect or improper
use oroperation.
2.3 Exhaust Air Operation
2.4 Correction Use & Operation
WARNING
Danger ofpoisoning from recirculated exhaust gases! Do not
operatethe appliance in extract air mode if it is operated together
with a roomair-dependent fireplace and sufficient air circulation is
not guaranteed.
CAUTION
The rangehood can get very hot during cooking dueto heat rising
from the cooktop. Do not touch the housing orthe grease filters
until the rangehood has cooled down.
For safety reasons, this appliance may only beused after
it has been built in.
Reliable and safe operation ofthis rangehood can only
be assured if it has been connected to the mains
electricity supply.
Before using the appliance, ensure that all packaging
materials are removed from the appliance and make
sure that the connection data onthe data plate [voltage
(V) and frequency (Hz)] indicated onthe rangehood
correspond to the voltageand frequency ofthe power
supply in your household. Consult a qualified electrician
if in doubt.
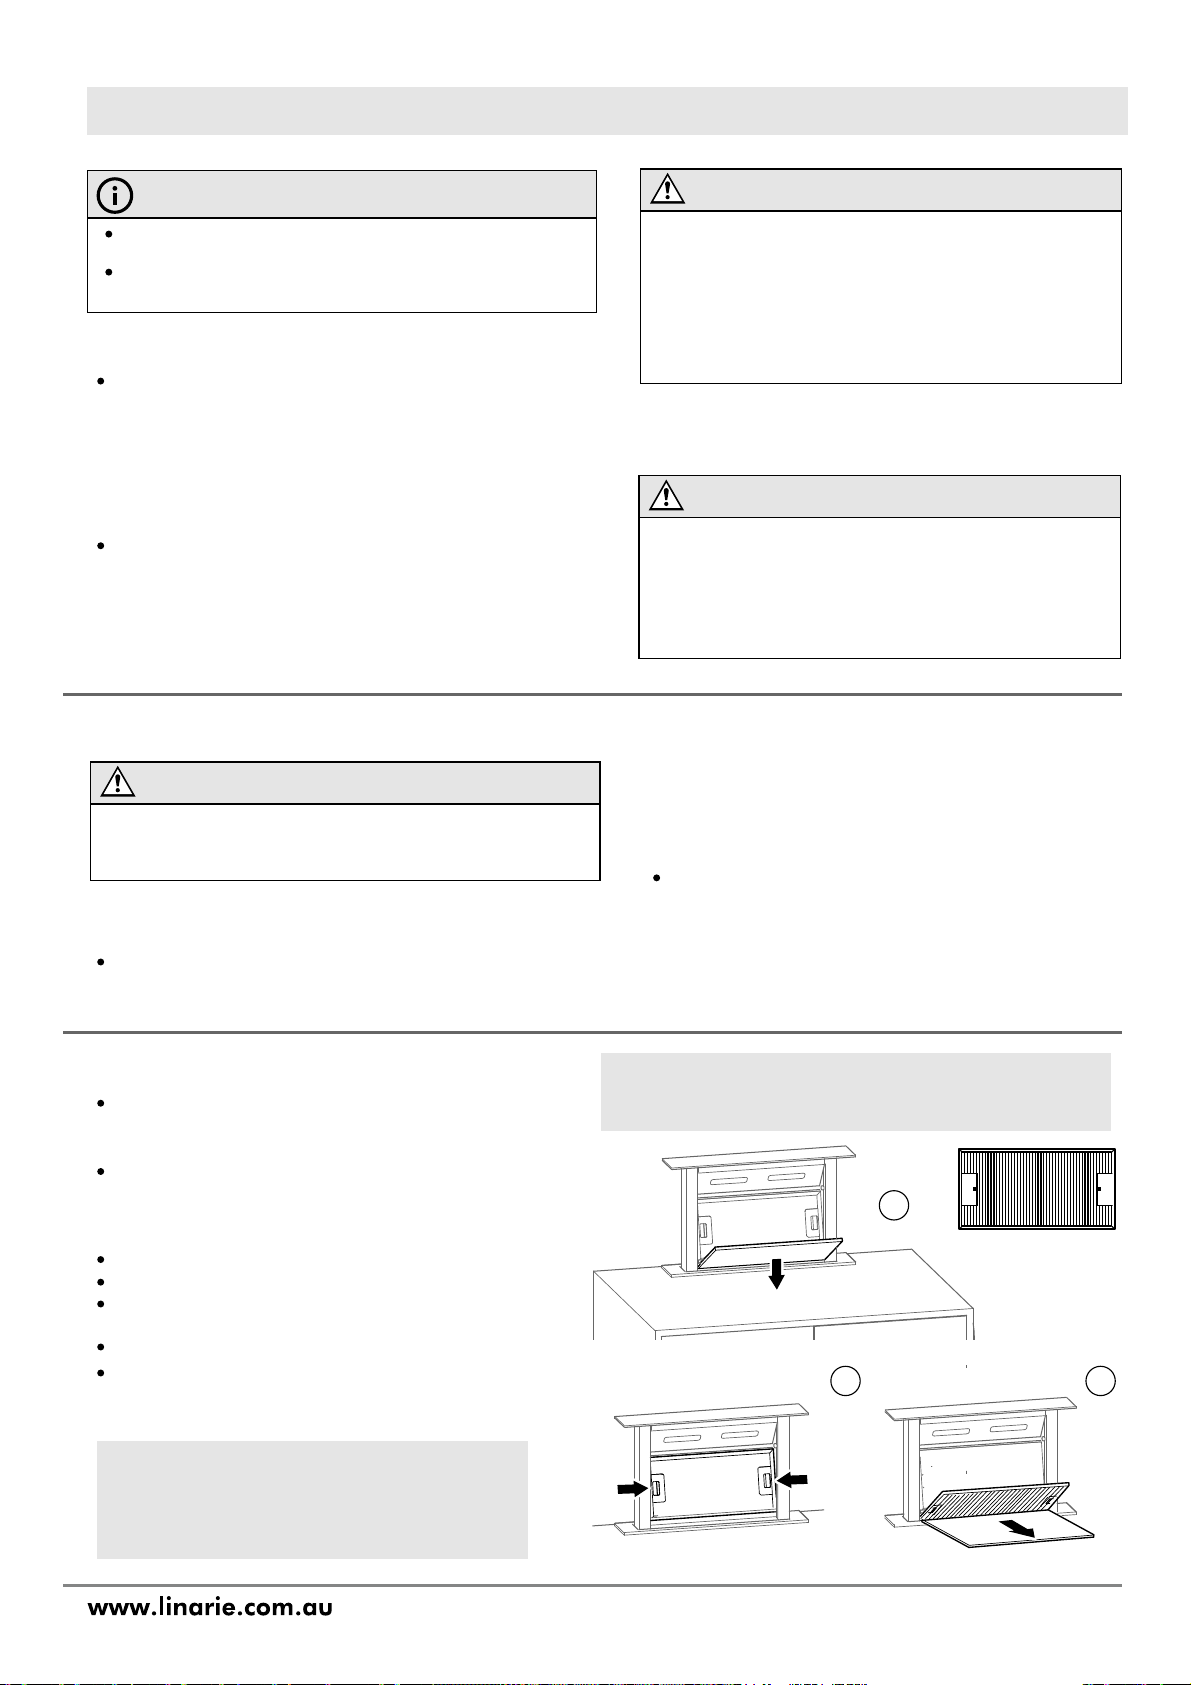
DO NOT use the rangehood without the filters in place.
This way you will avoid the risk ofgrease and dirt getting
into the appliance and hindering its smoothoperation.
Never use anopen flame beneaththe rangehood. To
avoid the danger of fire, do not flambé orgrill over an
open flame. When switched on, the rangehood could
draw flames into the filter. Fat deposits could ignite,
presenting a fire hazard.
DO NOT store or spray flammable materials in the
appliance or near this appliance while it is in operation
(e.g. aerosols).
The rangehood can become damaged when exposed
to excessive heat.
– Select a panwhich is suitable for the size ofthe
burner.
– Regulatethe flame so that it does not burn up the
sides ofthe pan.
– Avoid overheating the pan (e.g. when cooking with a
wok).
Always switch the rangehood onwhen a cooking zone
is in use, otherwise condensation may collect in the
rangehood, which could cause corrosion.
When cooking with oil or fat, chip pans and deep fat
fryers etc., do not leave the pans unattended. Never
leave anopen grill unattended when grilling.
Overheated oil and fat can ignite and could set the
rangehood on fire.
Safe operation is only possible if the negative pressure at
the location ofthe fireplace does not exceed 4 Pa (0.04
mbar). This can beachieved if the air required for
combustion can flow in through non-closable openings
in doors and windows in conjunction with a supply air /
exhaust air wall box. Inany case, have a master chimney
sweep advise you and assess the entire ventilation
system ofthe house. If necessary, they can tell you the
necessary measure for ventilation.
If the rangehood is used exclusively in recirculation
mode, where the air is directed back into the room in
which it is located, operating a heating appliance
which depends onthe roomair at the same time is not
hazardous.
Roomair-dependent fireplaces such asgas, oil, wood or
coal heaters, boilers or instantaneouswater heaters draw
the air from the roomand lead it outdoors throughan
exhaust pipe or chimney. In extract air mode, air is
extracted from the kitchen and neighbouring rooms.
Without sufficient supply air, negative pressure is created.
The heating appliance will be starved ofoxygen, impairing
combustion. Toxic gases from the chimney or exhaust pipe
can be sucked back into the living rooms.
Make sure that sufficient fresh air supply is guaranteed
and that the air can circulate.
A supply air/exhaust air wall box is not sufficient to
ensure compliance with the limit value.
4

3. DESCRIPTION OF THE FUNCTIONS
2.5 Disassembling and Disposal of the
Appliance
3.1 Air extraction mode
3.3 Guide tothe appliance
Non-return flap
2.6 Accessories and Spare parts
Depending onthe model ofthe rangehood, the following
options are available:
The air is drawn in and cleaned by the grease filter and
directed outside.
The air is drawn in and cleaned first by the grease filter
and then by a charcoal filter. The cleaned air is then
recirculated back into the kitchen.
When using recirculation mode, ensure a sufficient
supply of fresh air, e.g. by opening a window.
(see the “EnvironmentalTips” section for best practices on
disposing ofthis appliance).
The device must only bedisassembled by trained
specialists who are familiar with and comply with the
standard national regulations and supplementary
regulations ofthe local utility companies.
Work on electrical components must only be conducted by
trained electrical personnel.
The non-return flap is designed to prevent the exchange of
roomand outside air taking place. The flap is closed
when the rangehood is switched off. When the rangehood
is switched on, the non-return flap opens for the cooking
vapors to beblowndirectly outside. Ifthe on-site
ventilation system does not have a non-return flap, the
nonreturn flap supplied must be fitted.
Ensure a normal and comfortable room climate (humidity
of 45–60%), e.g. by opening natural ventilation openings
or using domestic ventilation systems.
After every use in recirculation mode, switch the
rangehood to a low level for about 15 minutes.
Incorrect components can lead to personal injury or
damageto the appliance. Only use original Linärie spare
parts for repairs.
Modifications, additions oralterations to the appliance
can lead to safety risks. If spare parts oraccessories from
other manufacturers are used, the warranty will be
invalidated, and Linärie cannot accept liability.
Please check www.linarie.com.au for more information.
3.2 Recirculation mode
5
1. Control panel and function keys
2. Retractable deflector plate
3. Lighting
4. Extraction panel edge
5. Aluminum grease filter
6. Activated charcoal filter
7. Motor
8. Exhaust connection
2
1
3
5
6
4
7
8

5.1 Pre-Installation
5.2 Safety Distance
WARNING
Before installation, it is important to read the information given on
the following pages aswell asthe "General Safety Instructions" at
the beginning ofthis booklet. Failure to install the appliance
correctly could invalidateany warranty or liability claims and lead
to prosecution.
WARNING
If you are fitting a front panel madeofwood orplastic to the
rangehood, observe the safety distances given by the cooktop
manufacturer regarding the use of easily flammable materials.
Before installing the rangehood, peel off any protective
plastic covering and remove polystyrene from inside
behind the fan motor.
The minimum distances between the wall and the cooktop
(including trivets, dials - depending on model) and the
side ofthe rangehood are as follows, unless a greater
distance is specified by the manufacturer ofyour cooking
appliance. See also "General Safety instructions" section.
5. INSTALLATION
15mm
500/
800°+1 top view
95°+1
25
6
4. TECHNICAL DATA SHEET
ParameterValue
Power Supply Voltage
Dimensions
(width, depth x height)
98.5 x52 x84.5
580/880
260
69
335max
115
115
88
718
260
Carton Size
(width, depth x height)
90 x11.5 x105.3
Weight (incl. accessories /
packaging) 37.5kg
Weight (NOT incl. accessories /
packaging)
29.5 kg
Rangehood
Power Levels4 Speeds
Electronic Control Slide control
Max. Air Extraction Power
Power Supply Voltage
Dimensions
(width, depth x height)
Carton Size
(width, depth x height)
Weight (incl. accessories /
packaging)
Weight (NOT incl. accessories /
Rangehood
Power Levels
Electronic Control
Air Extraction Power 700m3/h
MotorPower 230W
Rated Lamp Power (x2) 1.5W
Sound Power Level <71dB(A)
Filter
Aluminum/Stainless Steel Surface 5 Layers
Accessories
Remote Control (Wireless) No
220-240V ~
50Hz

Insert the hood in the cabinet as shown.
1Use 2pcs of ST4x8mm screw and 2pcs ST4x14mm
to fix the hood.
3Fix the pipe onthe outlet using 4pcs of ST4x14mm
unto the PCB box. Insert the cavity to the hood
using 8pcs ofM4x10mm screw. Choose wind
direction according to size of cabinet.
Attach attach exhaust pipe.
4
2
1
2
cont. installation
Fix the power supply with 4 screws.
Connect the power.Distance between the edgeofthe rangehood and
the electrical hub/ or induction hub should be
at least 40mm. As shownbelow.
40mm
5
7

WARNING
6.1 Control Panel and Function Keys
Timer Button
Speed Button
Light Button
Power Button
Motor ON/OFF setting:
Speed setting:
Light intensity setting:
Best results are obtained by using a low speed for
normal conditions and a high speed when odors are
more concentrated.
Turn the hood on for a few minutes before you start
cooking.
The hood should be left on for 15 minutes after
cooking oruntil all odors have dispersed.
The control switches are located onthe front panel of
the unit. See Imagebelow.
This control system consist ot two parts, power panel
and touch panel. Touch panel contains five function
buttons. [power, speed, light, timer and slide control]
Touch timer buttonwhen light or motor is working
and the hood will enter into timer setting. When pilot
timer is flashing, slide [ ]to select the timer
section. Choose from 5-10-15-20-25-30-35-40.
The motorand light will beoff automatically when
timer is finished. The hood will work with the same
timer setting when you turn it onagain.
Touching the speed or control the light intensity
when timer is set will turn off the timer function
automatically.
Press the buttonto switch the rangehood onand off.
The rangehood will work at the speed that works the
last time.
Touch the POWER button for 2seconds, the
rangehood will slide upwards and works at first
speed. Touch again for another 2seconds, the
rangehood slides downand stopsworking.
Touch the speed button, the motorturns on; touching
it again will turn it off.
When the hood slides up, the light will turn on
utomatically for 8-10 seconds.
Touch the light buttonto turn onand off.
Touch this area , slide your finger on it.
Sliding through1st and 2nd bar (lowest speed),
3rd-4th (2nd speed), 5th-6th (3rd speed), 7th-8th (full
speed).
The rangehood may only beoperated when the aluminum
stainless steel grease filter and ofthe rangehood is installed
(see “Installation Instructions” section).
Clean the cooking zone before using the cooktop for the
first time (see the “Cleaning” section).
Observe all safety and warning information during
operation (see the “General Safety Instructions” section).
Touch the light buttonto flash the pilot light
- slide [ ]buttonto control the light’s intensity.
Pilot light stops flashing if no function adjusment
is made in 15 seconds.
6. OPERATION
8
5.3 Installation [Air Extraction]
The following rules must be strictly observed to
achieve optimum air extraction.
Make sure that the exhaust pipe extends as short and
straight aspossible.
Do not reduce the size or restrict the exhaust pipe. When
using exhaust air pipes, always install the pipe tightly to
minimise pressure loss.
Non-compliance with these basic instructions will reduce
the performance and increase the noise level ofthe
rangehood.
All installation work must be carried out by an
electrician ora qualified person.
Do not connect the exhaust pipe ofthe rangehood to an
existing ventilation system used for another appliance,
e.g. a flue, gaspipes or hot air pipes.
In case the exhaust air pipe is bent, the angle ofthe
exhaust air pipe should not be less than 120°. Never
point the exhaust air pipe downwards, but always
horizontally orguide the pipe from the starting point
upwards to the air outlet onthe outside wall.
After installation, please make sure that the rangehood is
positioned horizontally to prevent grease from
accumulating.
Make sure that the exhaust pipe selected for installation
complies with the relevant standards and is fire-retardant.
CAUTION
Before installation, it is important to read the information given
on the following pages aswell asthe "Appliance Dimensions"
and the "Warning and Safety instructions" sections at the
beginning ofthis booklet. This is particularly crucial when using
the rangehood at the same time asa heating appliance that
relies onoxygen from the same room, which could result in the
build-up oftoxic fumes.
The rangehood should be installed according to local and
national building regulations. Seek approval from the building
inspectorwhere necessary.
CAUTION
Risk of injury! For safety reasons, only use the size of fastening or
mounting screw recommended in these operating instructions.
Non-compliance with these instructions can lead to injuries and
electric shocks.
Remember that any constriction ofthe airflow will reduce extraction
performance and increase operating noise.
NOTE
cont. installation

6.2 Energy Saving tips
This rangehood operates very efficiently and economically.
The following will help you to save even more energy when
using it:
Ensure that there is sufficient ventilation in the kitchen
when cooking. In extraction mode, if there is insufficient
air flow the rangehood cannot operate efficiently and this
causes increased operating noise levels.
Always cook with the lowest possible setting. This
produces fewer cooking vapors, so you can use a lower
rangehood power level and therefore benefit from
reduced energy consumption.
Check the power level selected on the rangehood. A
lower power level is generally sufficient for the majority of
cooking. Only use the Booster setting when necessary.
Whena large volume of cooking vapors is being
produced, switch to a high-power level in good time.
This is more efficient than operating the rangehood
for longer to try to capture cooking vapors which have
already been distributed throughout the kitchen.
Make sure that you switch the rangehood off after use.
Clean or change the filtersat regular intervals. Heavily
soiled filters reduce performance, increase the risk of
fire and are unhygienic.
9
Problem Possible Cause Possible Solution
The light turns on but
the motor does not
work
The motor is switched off. Switch on the motor with the SPEED button.
The motor switch is broken. Contactaspecialist company.
The motor is broken. Contactaspecialist company.
Lights and engine
do not work.
Your mains security fuse is
flipped or broken. Flip the fuse switch or replace the fuse.
The power cable is loose or
not connected.
Connect the power cord correctly.
The light does not
work.
The light is broken.
Oneway valve and outlet are
not tightly sealed.
Leakage from the connection
of chimney and cover
Replace the bulb.
Unsatisfactory suction
performance.
Oil leakage
The rangehood has
switch off during
operation.
The distance between the
cooker and the rangehood
is too far.
Reduce the distance.
Check that the fan speed is set high enough for the task
Clean the grease filter.
Turn off the hob and wait for the deviceto reset.
7. TROUBLESHOOTING
Checkto see if the kitchen is adequately vented to allow
the entry of fesh air.
If set up for recirculation, check that the charcoal filter
is still effective.
(recommended to be replaced every 2-3months)
If set up for extraction, check that the ducting and
outlets are not blocked.
Take down the one way valve and seal with sealant.
Take chimney down and seal.
Fix the distance. If the distance is not appropriate, the
motor will cut out frequently which willdamage the hood.
The safety cut-out device
has been tripped off.
WARNING
Any electrical repairsto thisappliance must conform to your local, state and federal laws. Please contact the service center if in any
doubt before undertaking any of the above. Always disconnect the unit from the power source whenopening the unit.
If you have completed all of the above checks and is still experiencing difficulty,
please contact your local Linärie Service Center (see the “Warranty and Spare Parts” sections).
Observe all safety and warning information during operation. ( see the General Safety Instructions” section)

WARNING
The stainless steel must be cleaned regularly (weekly)
to ensure a long service life. Stainless steel surfaces
can be cleaned with a proprietary nonabrasive
cleaning agent designed specifically for use on
stainless steel.
Observe all safety and warning information during operation
(see the “General Safety Instructions” section).
Before maintenance or cleaning, the rangehood should always
be disconnected from the power supply. Make sure that the
rangehood is switched off and the plug has been removed.
Exterior surfaces are prone to scratches and dents. Therefore,
please follow the cleaning instructions to achieve the best
possible result without damage.
WARNING
Do not use stainless steel cleaning agents onthe controls.
Use neutral cleaning agents and avoid using harsh cleaning
chemicals, strong household cleaners orproducts containing
abrasive cleaners asthis will affect the appearance ofthe
appliance and may remove the printed symbols onthe control
panel.
WARNING
An oversaturated filter is a fire hazard. The aluminum grease filter
in the appliance removes solid particles from the kitchen vapors,
grease, dust, etc., therefore, preventing soiling ofthe rangehood.
8. CLEANING & MAINTENANCE
8.1 Stainless steel
The control panel can be cleaned with warm soapy
water. Make sure the cloth is clean and thoroughly
wrung out before cleaning the control panel.
Use a dry, soft clothto remove excess moisture after
cleaning.
The reusable aluminum filter can be cleaned by hand.
Soakthem in water together with a grease-dissolving
detergent for about 3 minutes and then brush them
gently with a soft brush. Do not apply too much
pressure to avoid damaging the filter. Allow the filter
to air dry afterwards, but do not place it directly in the
sun. Filters should alwaysbewashed separately from
crockery and kitchen utensils!
The grease filter should be cleaned regularly (at least
every 3-4 weeks) to avoid a build-up ofgrease
When removing the grease filter do not tilt it
downwards at anangle. This can damagethe
retaining pins.
With the deflectorplatepushed in, grip the front of
the deflectorplateand hold the grease filter securely.
Whilst holding the grease filter, pull the deflectorplate
out as shown.
Then pull the filter downwards to remove it.
Switch off the fan.
Soakthe aluminum filter into a solution ofwarm
water and mild detergent for about 10minutes.
Clean with soft cloth/ brush.
Rinse thoroughly and dry wel.
8.2 Control panel
8.4 Aluminum grease filter
Grease filter cleaning intervals
8.5 Removing the aluminum grease filter
Cleaning the grease filter by hand
Remove the filter as shown in the image
below and reinsert the filter in reverse order.
8.3 Cleaning agents
GENERAL INFORMATION
Allow the appliance to cooldown completely before cleaning and
maintenance.
The surfaces and controls are susceptible to scratches and
abrasion. Please observe the following cleaning instructions.
When handling agrease filter, be careful not to
drop it. This can result in damage tothe filter
and the cooktop below. Make sure you hold the
filter securely at all times when handling it.
1
2 3
Aluminum filter
10

cont. cleaning and maintenance
WARNING
Make sure that the filter is tightly closed. It can otherwise detach
and become dangerous. Ifanactivated carbon filter is connected,
the suction power is reduced.
WARNING
The lamps become hot when in use. Allow the lamps to cool
down completely before changing them.
The lamp must be replaced by the manufacturer, its after-sales
service or similarly qualified persons.
Always switch off the power supply before carrying out any work
on the appliance.
Always hold the lamp with a clothorgloves when inserting or
removing it to ensure that sweat does not come into contact with
the lamp, asthis can reduce its life.
If the rangehood is connected for recirculation, a charcoal
filter must be inserted in addition to the grease filter. This
is designed to absorb cooking odors.
The installation ofthe activated carbon filter is done as
follows:
Disconnect the rangehood from the power supply
before installation.
Press the filter lock and remove the main filter.
Replace the main filters.
Reconnect the power supply.
The activated charcoal filter should be changed after 3 to
6 months, depending onyour cooking habits. Allow the
appliance to cooldown completely before maintenance.
Replacement charcoal filters can beobtained from
www.linarie.com.au
The used activated charcoal filter can bedisposed with the
normal household waste.
Observe all safety and warning information during
operation (see the “General Safety Instructions”
section).
The lamps should be replaced with the following:
ILCOS D code: DSS-1.5-65-S-120/33
LED Type: Rectangle LED Lamp
Wattage: 2 x1.5W
Voltage Range: DC 12V
Dimensions:
Disconnect the rangehood from the mains electrical
supply before replacing the lamps
Open the decorative doorofthe downdraft.
Insert a small flat screw driver into the gap and pry up
the lamp fitting and disconnect the plug.
8.6 Activated carbon filter
8.7 Replacing the lamps
To replace the lamps:
Installing and replacing the activated charcoal filter
When tochange the activated charcoal filter?
Disposing of the activated charcoal filter
4
5
Charcoal filter
(CF152)
2
3
1
11

9.2 Disposing of your old appliance
9. ENVIRONMENTAL TIPS
10. WARRANTY & AFTER SALES SERVICE
The transport and protective packaging has been selected
from materials which are environmentally friendly for
disposal, and can normally be recycled.
Recycling the packaging reduces the use of raw materials
in the manufacturing process and also reduces the
amount ofwaste in landfill sites. Ensure that any plastic
wrappings, bags etc. are disposed of safely and kept out
of the reach ofbabies and young children. Danger of
suffocation.
Observe all safety and warning information during
operation (see the “General Safety Instructions” section).
Observe all safety and warning information during
operation (see the “General Safety Instructions” section).
Incorrect components can lead to personal injury or
damageto the appliance. Use only genuine original
Linärie spare parts.
Modifications, additions oralterations to the appliance
can lead to safety risks. If spare parts oraccessories from
other manufacturers are used, the warranty will be
invalidated, and Linärie cannot accept liability.
Please check www.linarie.com.au for more information.
Model:…………………………………………………………
Serial Number:.………………………………………………
Register yourproduct www.linarie.com.au
In the event ofa fault which you cannot remedy yourself,
please contact Linärie.
The manufacturer’s warranty for this appliance is 2 years.
The contact details for Linärie are given at the beginning
and ofthese instructions.
When contacting Linärie, please quotethe model and
serial number ofyourappliance. These can be found on
the data plate, after removing the grease filter.
Electrical devices marked with this label may not be
disposed of in domestic waste at the end oftheir service
life.
Electrical and electronic appliances often contain valuable
materials. They also contain specific materials, compounds
and components, which were essential for their correct
function and safety. These could be hazardousto human
health and to the environment if disposed ofwith your
domestic waste or if handled incorrectly. Please do not,
therefore, dispose ofyourold appliance with your
household waste.
Please dispose ofthose materials by contacting your local
authorities and ask for the correct method ofdisposal.
Please ensure that yourold appliance poses no risk to
children while being stored prior to disposal.
By disposing ofthis product in accordance with the
regulations, you protect the environment and the health of
those around you from negative consequences.
9.1 Disposal considerations
10.1 Warranty10.3 Replacement of spare parts
10.2 After sales service
Record model &serial number
12

LIKE TO
KNOW MORE?
© Linärie
For further information on all Linärie appliances,
or to obtain detailed dimension and installation
information, phone or email our Customer Care
team or visit our website:
Australia
www.linarie.com.au
Follow Us
@Linarie.Appliances
www.linarie.com.au

Operating and installation instructions: Original √ Translation
Linärie Contact
www.linarie.com.au
The distribution and duplication of this document, as well as the use and disclosure of its contents
are prohibited unless expressly authorised.
These operating and installation instructions have been drawn up with the greatest of care. But it
cannot be ruled out that subsequent technical modifications have not yet been incorporated or
the relevant content has not yet been adapted. Please accept our apologies in this eventuality. An
updated version can be requested from our team. Subject to printing errors and mistakes.
© Linärie
All rights reserved.
www. linarie . c om.a u
Mart Online Services Pty Ltd.
ACN 657 824 050
Table of contents
Other linarie Ventilation Hood manuals
Popular Ventilation Hood manuals by other brands

Novy
Novy Fusion 680 Operating and installation instructions

Stirling
Stirling STR-BRH instruction manual

NEFF
NEFF I95CBS8W0 Series User manual and assembly instructions

ETNA
ETNA A4345T Instructions for use

ARC Appliances
ARC Appliances SYP-6002 instruction manual

KKT KOLBE
KKT KOLBE Sinus Insel TC9 Installation instruction

ElectrIQ
ElectrIQ eiQCURV60SC Installation and user manual

Pkm
Pkm 9080B T Series instruction manual

Faber
Faber STILO Wall Mount Canopy Rangehood installation instructions

Viesta
Viesta VDI90230EG instruction manual

Elitair
Elitair Range Hood MC-I-6090 User instructions

Miele
Miele DA 249-4 Alu Operating and installation instructions