Linden Group L24HTV17a User manual

23.6” (60cm) HD LED LCD TV
Instruction Manual
L24HTV17a
24 Month Manufacturer’s Warranty


1
Contents
Guide to the Television 3
Front / Right Side View and Rear Controls 3
Rear View and Sockets 4
Remote Control 5
Installing Batteries in the Remote Control 8
Remote Control Operation Range 8
Turning the TV On for the First Time 9
−First Time Setup 9
−Selecting the Input Source 11
−Channel Selection 11
−Listening to the Radio (Radio Mode) 11
−Display Channel Information 11
−Volume Adjustment 11
Caring for the Environment 12
Responsible Disposal of the Packaging 12
Responsible Disposal of Appliance 12
Safety Information and Warnings 13
Symbols 13
Important Safety Instructions 13
Item in the Box 15
Basic Set Up 16
Installing the Base Stand 16
Mounting the TV to a Wall 17
Advanced Connection Diagrams 18
Making Video and Audio Connections 18
Connecting an AV Device Using an HDMI Cable 18
Connecting a Computer Using a VGA Cable 19
Connecting an AV Device Using a Component (YPbPr) Cable 19
Connecting an AV Device Using Composite Cable 20
Connecting a Coaxial Audio Receiver 20
Connecting Headphones 21
Advanced Features 22
Picture Setting 22
Sound Setting 23
−Stereo / Dual Sound Reception (ATV Mode) 23
Channel Setting 24
−Auto Scan 24
−DTV Manual Scan (DTV Mode) 25
−ATV Manual Scan (ATV Mode) 26
−Auto Channel Update (DTV Mode) 27
−Channel Edit (DTV Mode) 27
−Channel Edit (ATV Mode) 28
−Favourite Manager 29
−Signal Information (DTV Mode) 30
Lock Setting 31
−Lock System 31
−Channel Locks 32
−Parental Rating (DTV Mode) 33
−Lock Keypad 34
−New Password 35
−Clear Lock 35

2
Setup Setting 36
−OSD Language 36
−Audio Languages (DTV Mode) 36
−Subtitle (DTV Mode) 37
−Teletext 38
−Blue Screen 39
−Mode Setting 39
−Time Settings 40
−HDMI CEC Control 42
−PVR Settings (DTV Mode) 43
−OAD (Over Air Download) 44
−Restore Factory Default 45
EPG (Electronic Programme Guide) (DTV Mode) 46
−Switch On / Off EPG 46
−Select a Programme 46
Digital Teletext (DTV Mode) 47
−Teletext within Digital Service 47
Connecting a USB Storage Device 48
Viewing Photos 48
Listening to Music 49
Viewing Movies 50
My Text 50
Time Shift Function 52
Recording DTV Programme onto a USB Storage Device 53
Timer Programming (DTV Mode) 54
Play Recorded Programme 56
Troubleshooting 58
Other Information 60
Maintenance 60
Display Modes 61
Technical Specifications 62

3
Guide to the Television
Front / Right Side View and Rear Controls
Item Description
1POWER LED
Illuminates blue when the TV is turned on. Illuminates red when the TV is in
standby mode. The LED will illuminate blue and then blink red and blue confirming
that a timer recording programme has started in the standby mode.
2IR (Infrared Receiver) Receives IR signals from the remote control.
Do not put anything near the sensor, as its function may be affected.
3 VOL + / – Adjusts the volume.
Press to select and adjust a setting in the OSD menu.
4 CH + / – Press to select a channel or select a sub-menu from the OSD menu.
5MENU Displays the OSD (on screen display) menu.
6 INPUT
Press to select among different input signal sources:
TV / ATV / AV / YPbPr / HDMI / PC / USB.
Use the buttons on the remote control to select the input, and then press the
OK button to confirm.
7Switches the TV on from standby mode.
Switches the TV back to standby mode.
3
4
5
6
7
INPUT
1
2
4
Guide to the Television
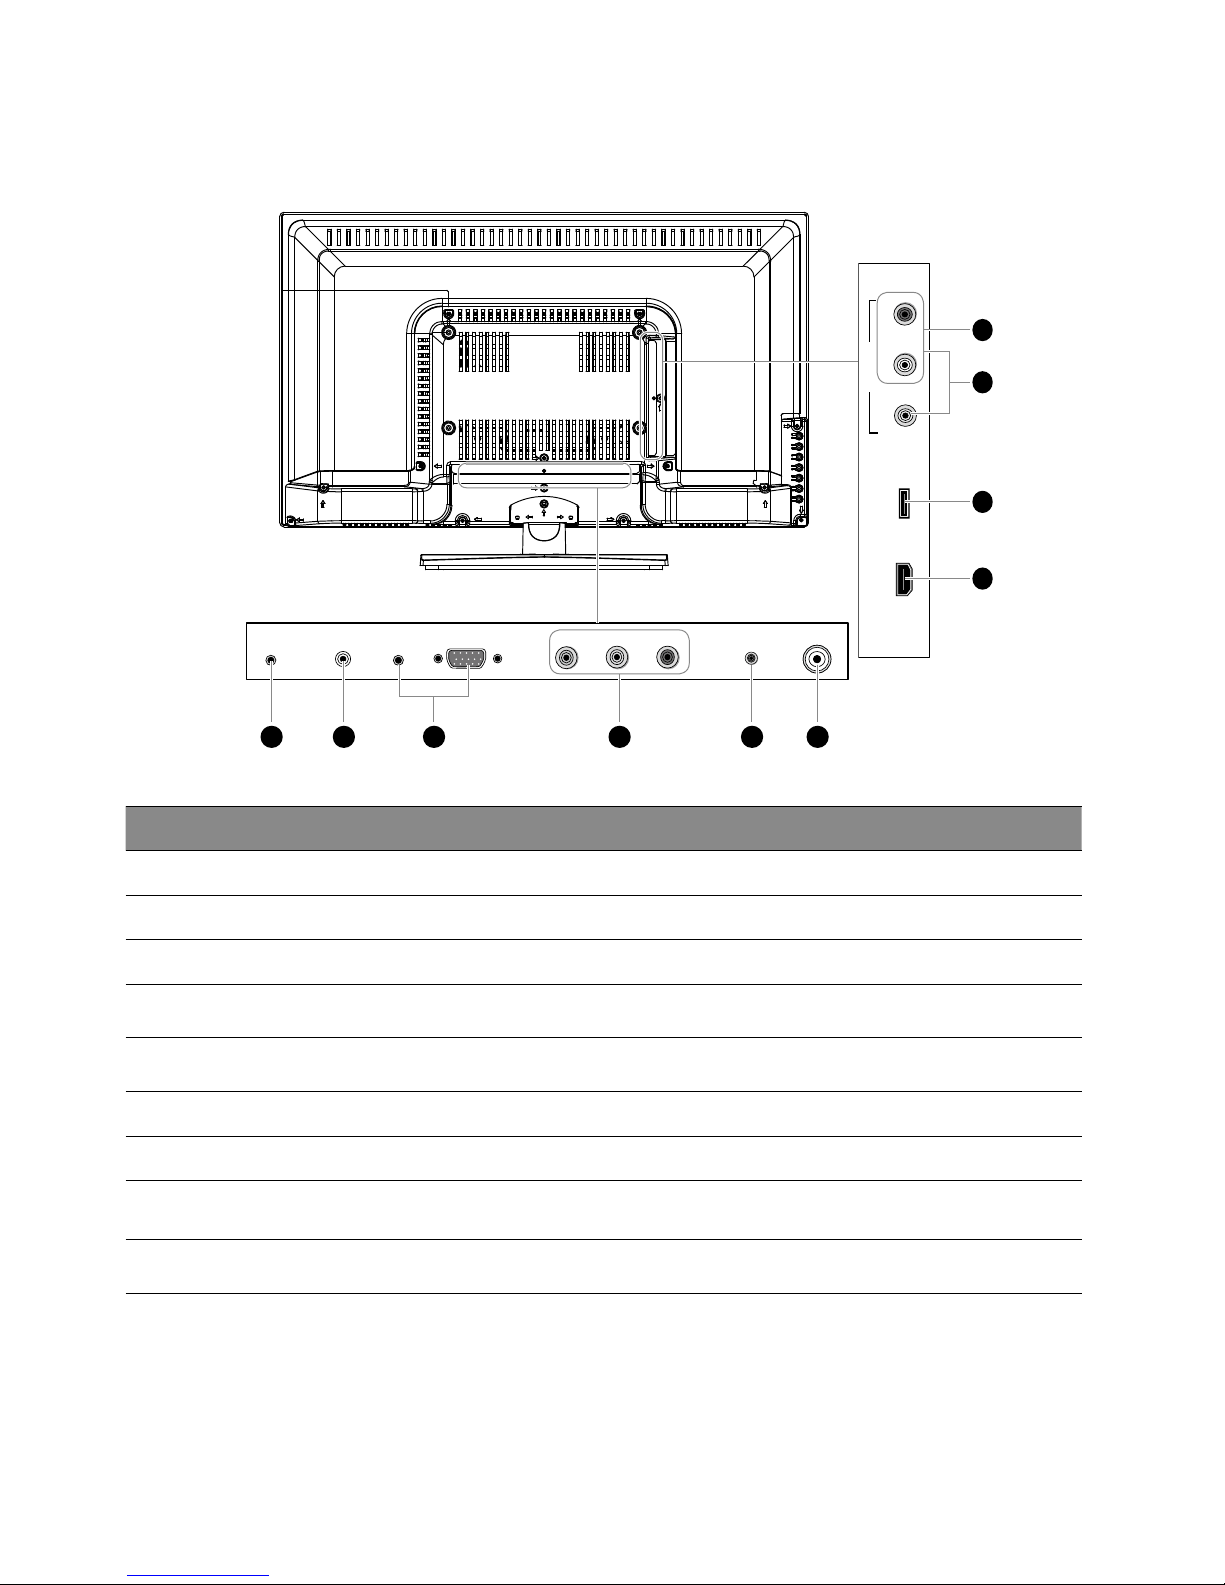
Rear View and Sockets
Item Description
1 DC IN Connects the mains adapter cable to the mains socket.
2 HEADPHONE Connects to the headphones.
3 PC AUDIO / VGA Connects to a computer or other devices with a VGA interface.
4 Y, PB, PR / AUDIO (L/R) Connects to a DVD player, Digital Set-Top-Box, or other AV devices with component
(YPbPr) video and audio output sockets.
5 Digital Audio Output
(Coaxial) To connect to the audio socket on the digital/standard 5.1 audio system.
6 RF Connects to the aerial socket on the wall with the RF coaxial cable.
7 VIDEO / AUDIO (L/R) Connects to the Composite output sockets on external video devices.
8 USB Allows the insertion of a USB storage device to play video, audio, photo and text
files (USB mode) and record DTV programmes on to a USB storage device.
9 HDMI Connects to a High-Definition (HD) signal output device, such as a set-top box, blu-
ray disc player or AV receiver.
21 43 5 6
USBHDMI RL
AV INPUT
VIDEO
RF
Digital Audio Output
(COAXIAL)
PC AUDIOHEADPHONEDC IN VGA Y Pb Pr
9
8
7
4
5
Guide to the Television
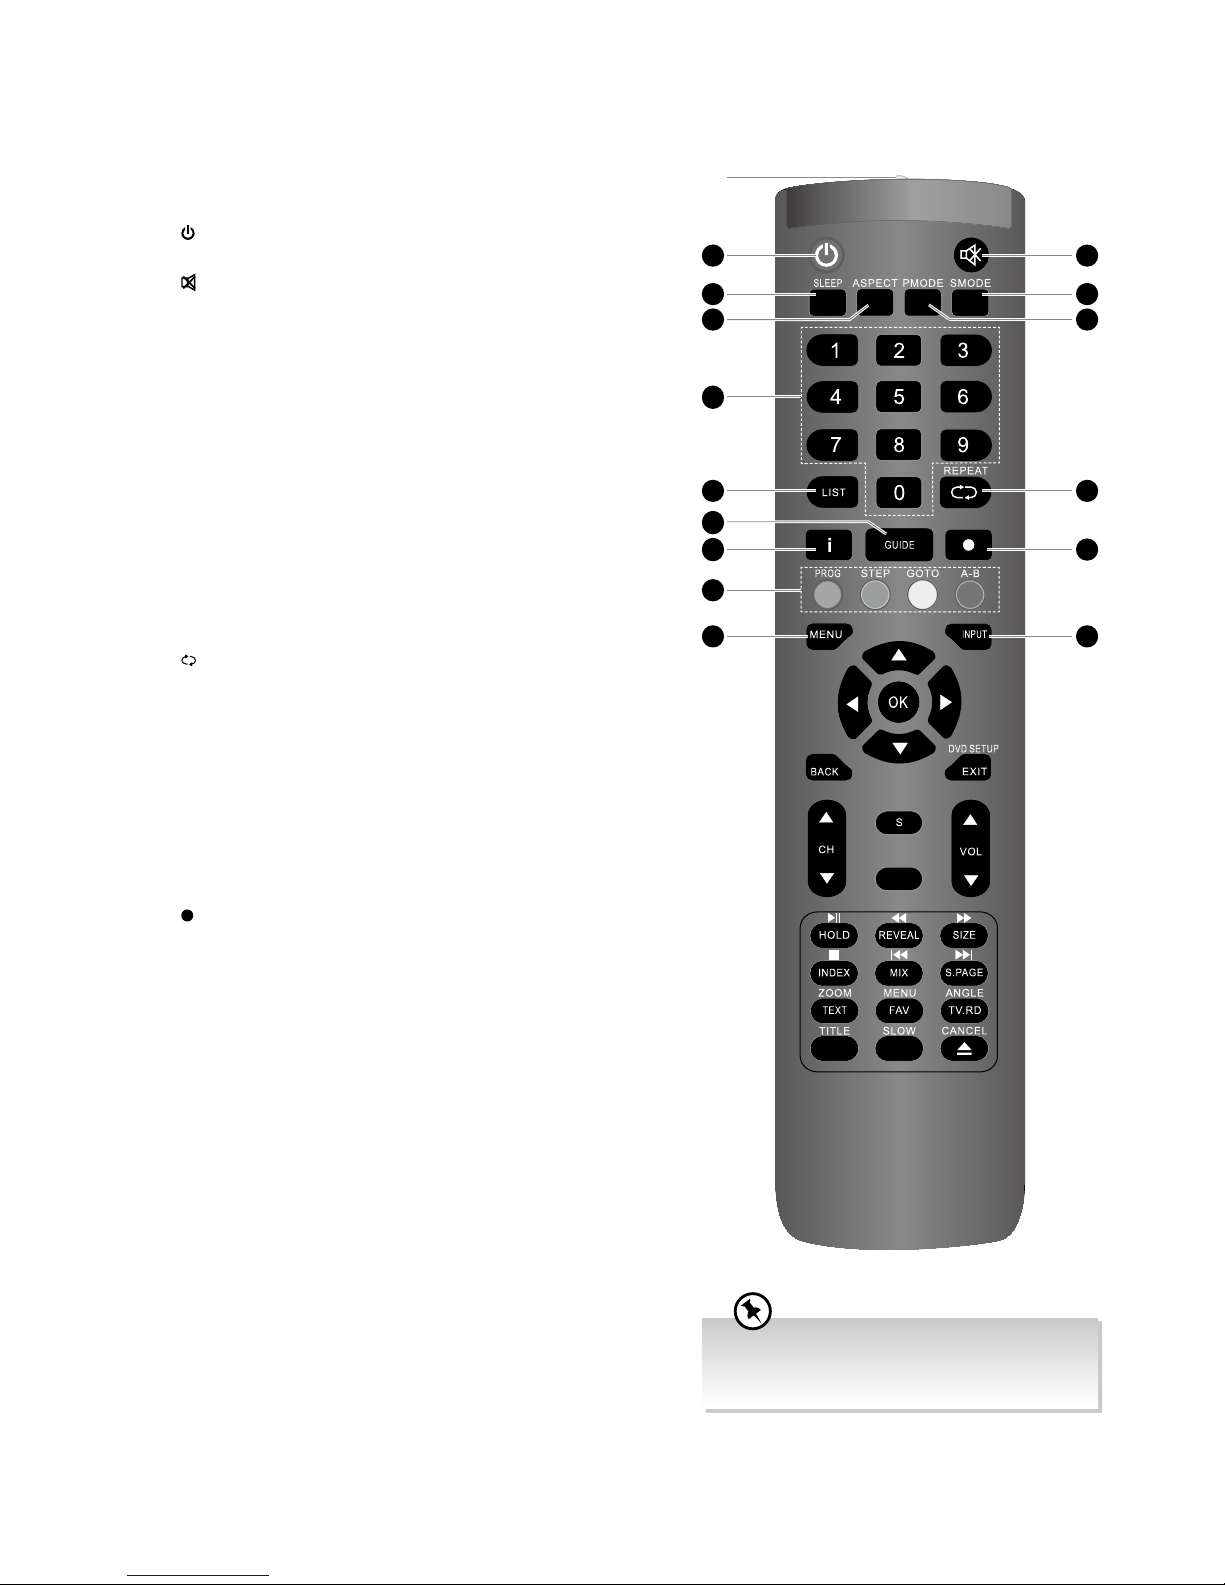
1. Infrared LED
Sending IR signals to TV. Do not put anything near the sensor,
as its function may be affected.
2.
Switch the TV between on and standby mode.
3.
Mute and restore your TV sound.
4. SLEEP
Set the TV sleep timer: OFF / 5 / 15 / … / 120 / 240 min.
5. ASPECT
Watch the screen in various formats: Auto / 4:3 / 16:9 /
Zoom / Subtitle / Smart Zoom.
6. SMODE
Select sound mode: Standard / Movie / Music / Personal.
7. PMODE
Select picture mode: Standard / Mild / Personal / Dynamic.
8. 0-9 Number Button
• Press to select a programme.
• Select numbered items in a menu. (DVD mode)
9. LIST
• Display the channel list. (ATV / DTV mode)
10.
• Return to the previous viewing channel. (ATV / DTV mode)
• Return to menu (DVD mode)
REPEAT
Select between different repeat modes. (DVD mode)
11. GUIDE
Displays the EPG Electronic Programme Guide. (DTV mode)
12. i
• Display the present channel information such as the current
time and channel name. (ATV / DTV mode)
• Display the present disc information. (DVD mode)
13.
Record the current programme. (DTV mode).
14. Coloured buttons
• Access the TELETEXT items (ATV / DTV mode)
• Access menu options.
PROG (RED)
• Access menu options.
• Programme the DVD. (DVD mode)
STEP (GREEN)
Play the playback forward frame by frame. (DVD mode)
GOTO (YELLOW)
Skip to a specific location on a DVD / CD. (DVD mode)
A–B (BLUE)
Repeat a segment between A and B. (DVD mode)
15. MENU
Display the OSD (On Screen Display) menu.
16. INPUT
Select among the different input signal sources:
DTV / ATV / AV / YPbPr / HDMI / PC / USB.
Remote Control
Please note that there are DVD mode
functions on the remote control only operate
on TV models with a built-in DVD player.
AUDIO
2
4
9
14
15
5
3
6
10
16
7
13
8
12
11

6
Guide to the Television
17.
Allows you to navigate the OSD menus and adjust the
system settings to your preference.
OK
Confirm the selection in the OSD menus.
18. BACK
Return to the previous menu in the OSD menus.
19. Exit
Exit the OSD menu.
DVD SETUP
Display and exit the DVD setup menu. (DVD mode)
20. S (Subtitle)
• Display subtitles which are broadcast with the
programme. (DTV mode)
• Display subtitles on the DVD. (DVD mode)
21. CH /
Select a channel.
22. VOL /
Adjust the volume.
23. AUDIO
• Turn on / off the Audio Description (AD) function (only
applicable when the TV programme has this feature).
(DTV mode)
• Select different Audio mode on DVD mode. (DVD
mode)
• Select Stereo / Dual Sound Reception. (ATV mode)
24. HOLD (No Function)
• To start the timeshift playback. (DTV mode)
• To start playback or pause. (DTV / DVD / USB mode)
25. REVEAL (No Function)
Reverse playback rapidly. (DVD / USB mode)
26. SIZE (No Function)
Advance playback rapidly. (DVD / USB mode)
27. MIX (No Function)
To skip to the beginning of the previous chapter / track /
photo. (DVD / USB mode)
28. INDEX (No Function)
Stop the playback or recording. (DVD / USB / DTV
mode)
29. S.PAGE (No Function)
Skip to the beginning of the next chapter / track /
photo. (DVD / USB mode)
Please note that there are DVD mode
functions on the remote control only operate
on TV models with a built-in DVD player.
AUDIO
26
29
25
24
28
2221
20
27
23
19
17
18
7
Guide to the Television
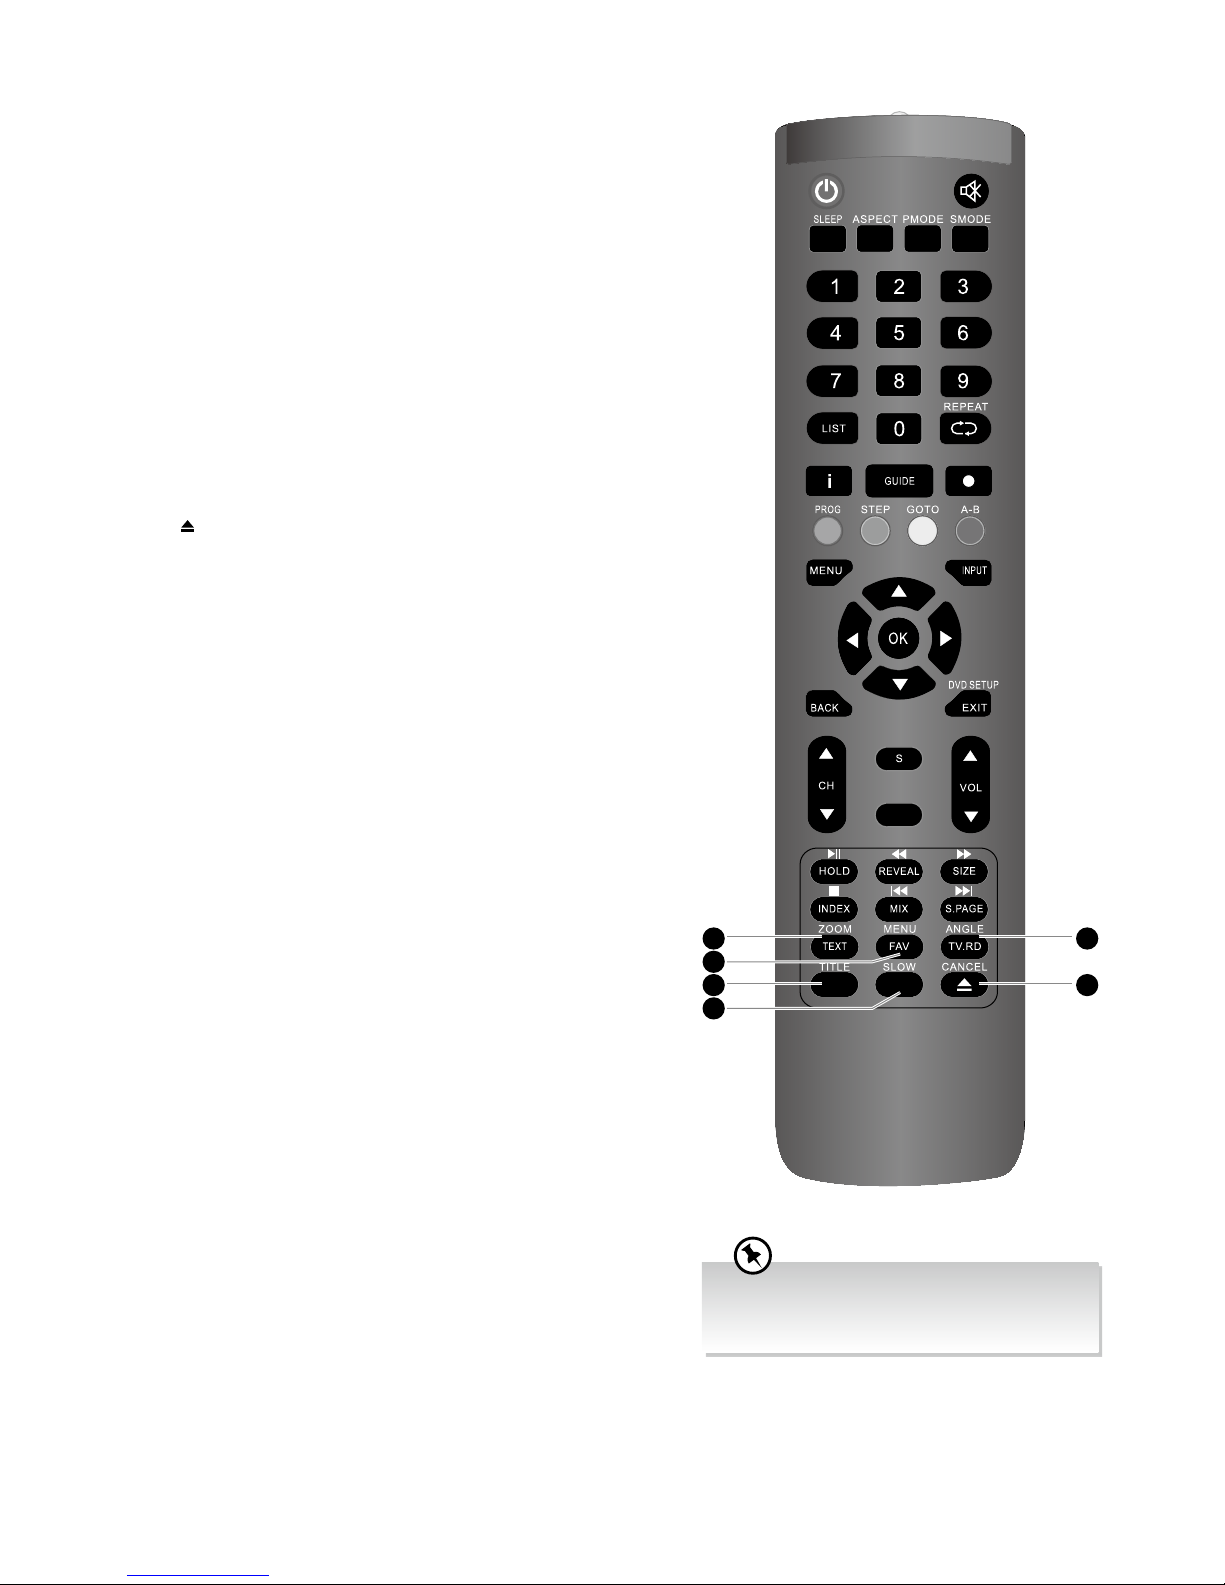
30. TEXT
Turn on and off the teletext function. (DTV mode)
ZOOM
Zoom in on the displayed frame. (DVD mode)
31. FAV
Display the favourite channel list. (ATV / DTV mode)
(DVD) MENU
Display the DVD menu. (DVD mode)
32. TV.RD
A short-cut to switch input source to TV / Digital radio
channels.
ANGLE
Select different angles for the video. (DVD mode)
33. TITLE
Display the DVD title content. (DVD mode)
34. SLOW
Play video slowly. (DVD mode)
35.
Eject a disc. (DVD mode)
CANCEL (No Function)
Please note that there are DVD mode
functions on the remote control only operate
on TV models with a built-in DVD player.
AUDIO
32
35
30
33
31
34
8
Guide to the Television
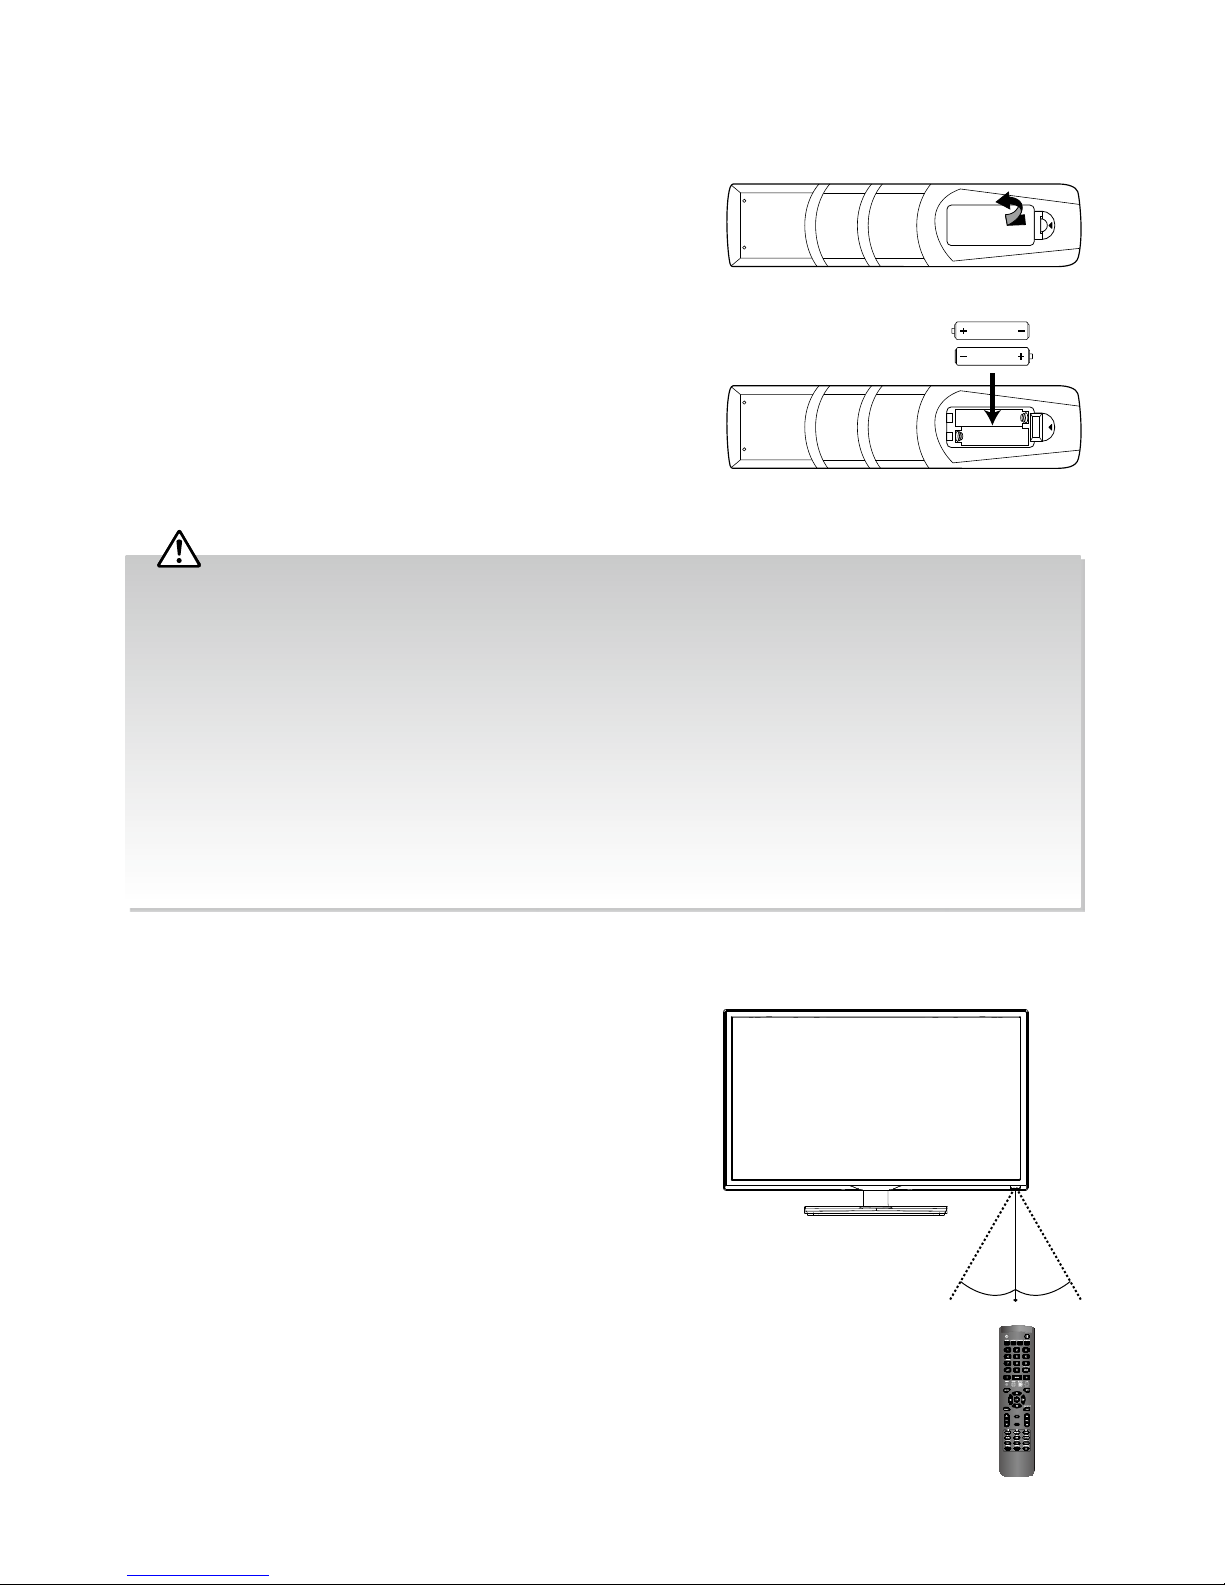
Remote Control Operation Range
Point the remote control at the TV no more than 5 metres from the
remote control sensor on the TV and within 60° in front of the TV.
The operating distance may vary depending on the brightness of
the room.
Installing Batteries in the Remote Control
1. Press and lift the back cover to open the battery compartment of the
remote control.
2. Insert two AAA size batteries. Make sure the (+) and ( - ) ends of
the batteries match the (+) and ( - ) ends indicated in the battery
compartment.
3. Close the battery compartment cover.
AUDIO
30° 30°
5M
Handling the Batteries
• Improper or incorrect use of batteries may cause
corrosion or battery leakage, which could cause
fire, personal injury or damage to property.
• Only use the battery type indicated in this manual.
• When the batteries are exhausted, the remote will
not function. Replace both batteries at the same
time with new ones.
• Do not install new batteries with used ones and do
not mix different types of batteries.
• Do not dispose of used batteries as domestic
waste. Dispose of them in accordance with local
regulations.
Handling the Remote Control
• Take care of your fingernails when you press and
hold the battery release tab.
• Do not drop or cause impact to the remote control.
• Do not spill water or any liquid on the remote
control.
• Do not place the remote control on a wet object.
• Do not place the remote control under direct
sunlight or near sources of excessive heat.
• Remove the battery from the remote control when
not in use for a long period of time, as it could
cause corrosion or battery leakage and may
result in physical injury and/or property damage
including fire.
9
Guide to the Television
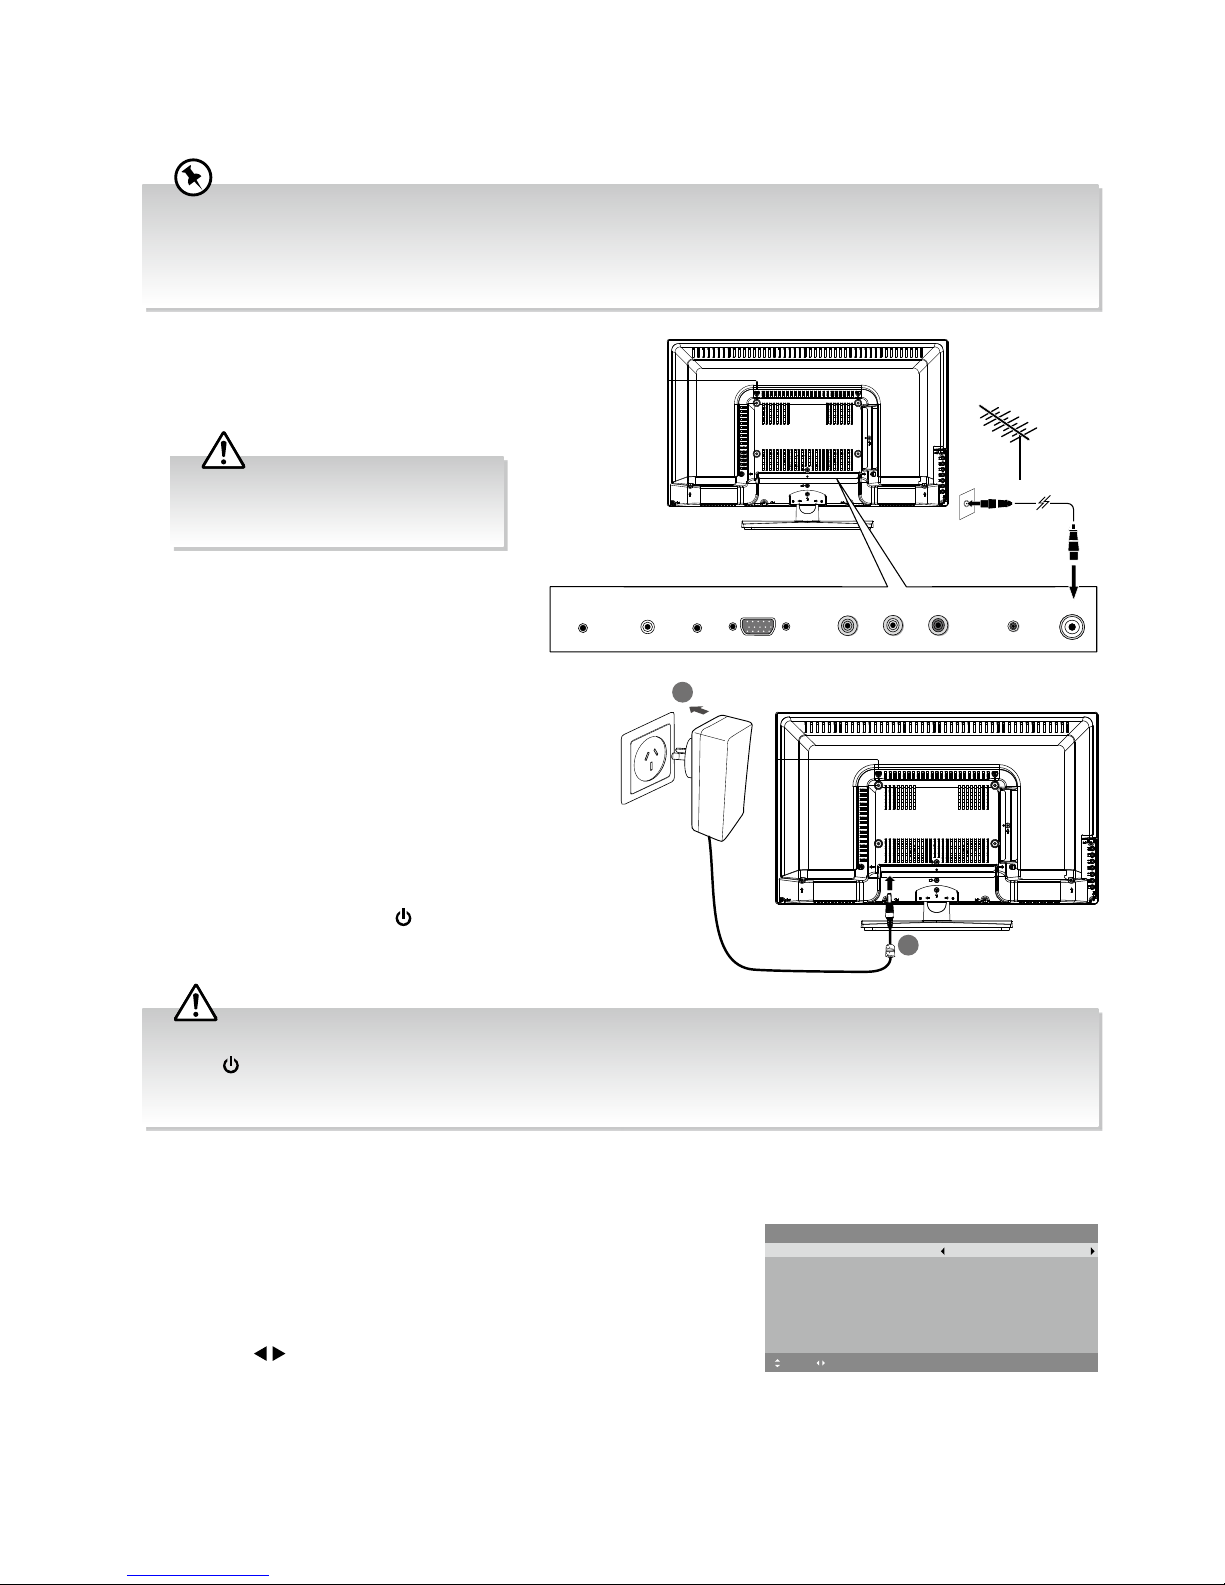
Turning the TV On for the First Time
2. Unwind the mains adapter cable to its full
length. Connect the AC socket at the rear of
the TV. Connect the mains adapter cable to a
mains socket after you have completed all the
connections. Make sure the mains plug is fully
inserted into the mains socket.
3. At this stage, the TV switches to standby mode.
The red LED indicator will illuminate on the front
panel of the TV.
4. In standby mode, press the button on the rear
panel of the TV or on the remote control to turn
the TV on. The red LED indicator will turn blue.
First Time Setup
1. The first time you turn the TV on, it will go straight into the First
Time Setup menu. Please ensure the aerial is plugged in. (If you
have already installed the TV using the Quick Start Guide, please
go to the section “Selecting the Input Source” on the next
page.)
2. Press the buttons to select your desired language to be
displayed on the menu. The default on-screen menu language is set
as English.
RF
Digital Audio Output
(Coaxial)
PC AUDIOHEADPHONEDC IN VGA Y Pb Pr
RF coaxial cable
(not included)
OR
2
1
To the mains socket
To DC IN Socket
1. Connect one end of the RF coaxial cable to
the aerial socket on the wall and the other end
of the cable to the RF (75Ω) socket at the rear
right bottom of your TV.
First Time Setup
OSD Language English
Mode Setting Home Mode
Country Australia
Auto Scan DTV
LCN
Move Adjust MENU: Return EXIT: Exit
On
Start
Please connect your aerial, change any settings you wish and select Start then
press OK to start tuning.
• When an item in main menu is displayed gray, it means that the item is not available or cannot be adjusted.
• Unless otherwise stated, all operations described are based on remote control use.
• If you are going to watch TV using a set-top box, simply connect your TV and set-top box via a HDMI cable and
select HDMI in the Input Source menu.
Do not connect the TV to the mains
supply until you have completed all
the connections.
• Always disconnect the TV from the mains socket when not in use for a long period of time.
• The button on the rear panel of the TV or on the remote control is only used for switching the TV into standby,
it does not disconnect the TV from the mains power. To completely disconnect the mains power, please remove the
mains plug from the mains socket.
10
Guide to the Television
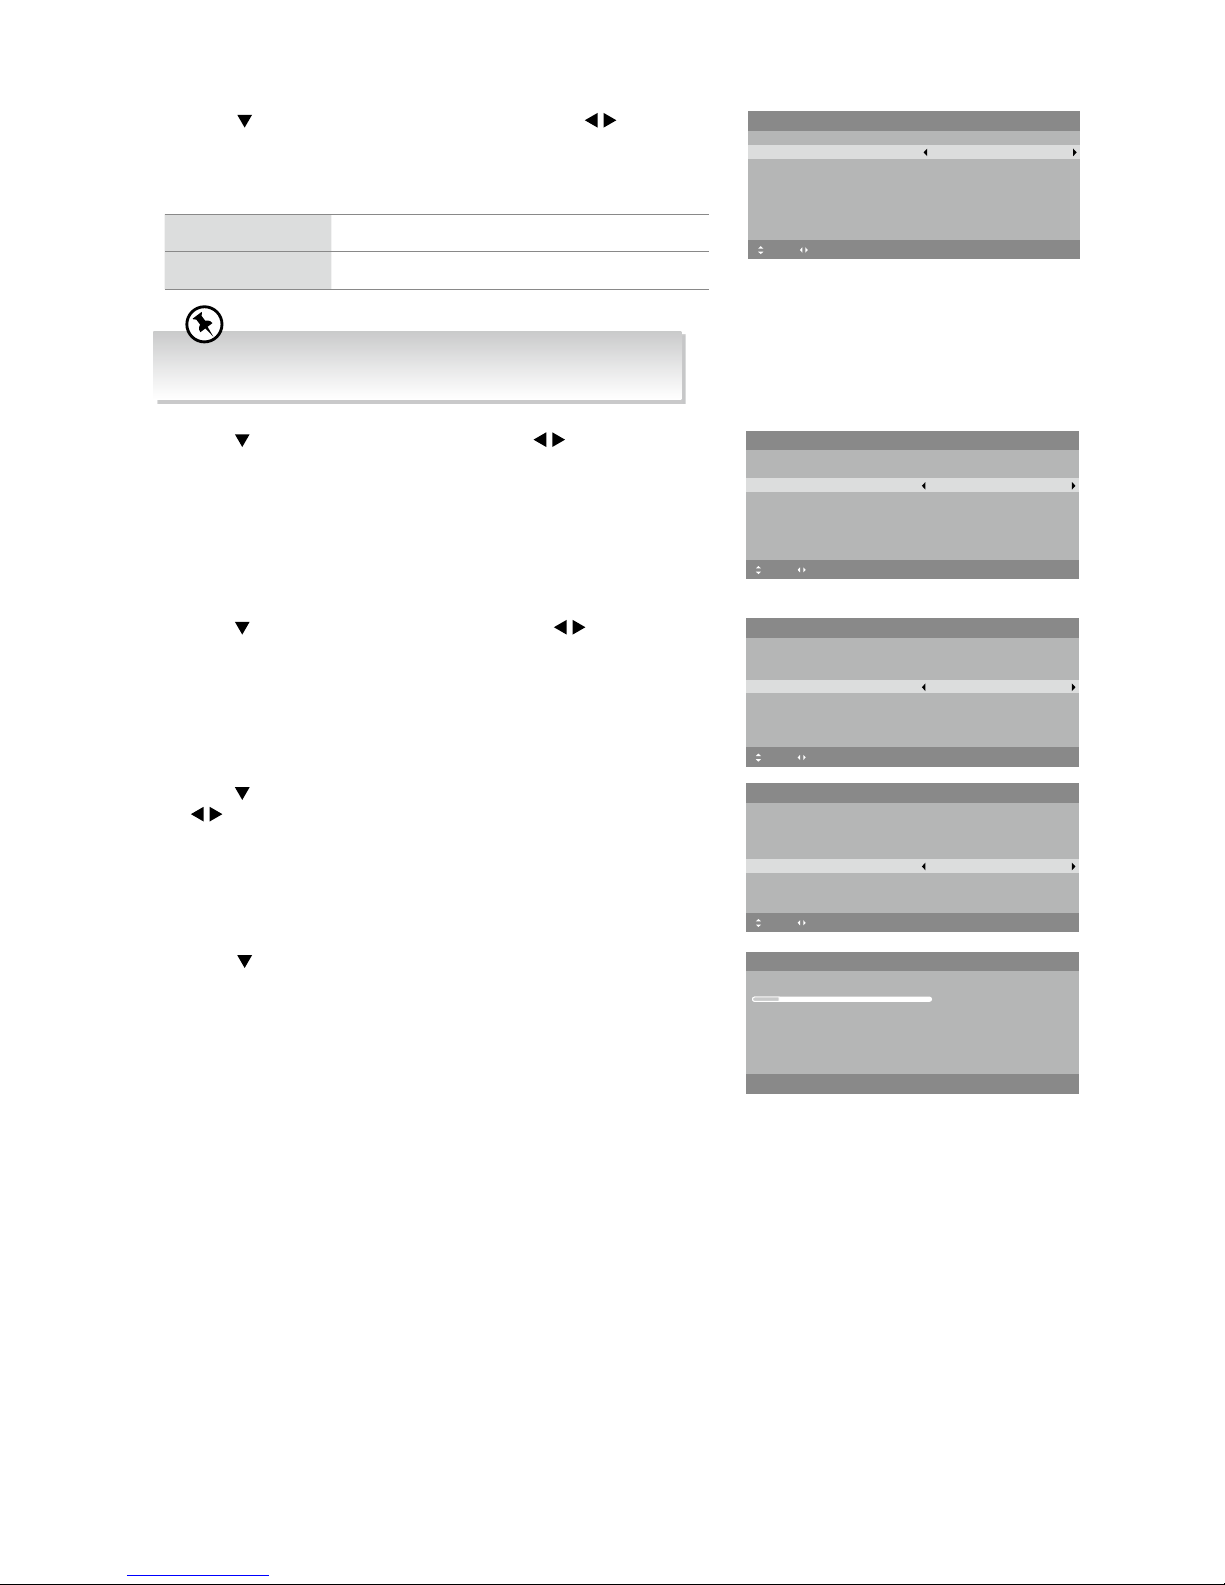
7. Press the button to select Start and then press the OK button.
Channel tuning will commence. This operation may take up to few
minutes. The display will show the progress of the tuning and the
number of channels found.
8. If you select DTV + ATV and you want to skip the DTV tuning during
scanning, press the MENU button to interrupt the tuning half way.
9. After tuning is complete, the channels are arranged in a preset
order. If you wish to skip channels, modify the preset order or
rename channels, select Channel Edit under the Channel menu
(refer to page 27-29 for details).
6. Press the button to select LCN (Logical Channel Number). Press
the buttons to select On / Off.
5. Press the button to select Auto Scan. Press the buttons to
select DTV / ATV / DTV + ATV.
4. Press the button to select Country. Press the buttons to
select the country option.
First Time Setup
OSD Language English
Mode Setting Home Mode
Country Australia
Auto Scan DTV
LCN
Move Adjust MENU: Return EXIT: Exit
On
Start
Please connect your aerial, change any settings you wish and select Start then
press OK to start tuning.
First Time Setup
OSD Language English
Mode Setting Home Mode
Country Australia
Auto Scan DTV
LCN
Move Adjust MENU: Return EXIT: Exit
On
Start
Please connect your aerial, change any settings you wish and select Start then
press OK to start tuning.
First Time Setup
OSD Language English
Mode Setting Home Mode
Country Australia
Auto Scan DTV
LCN
Move Adjust MENU: Return EXIT: Exit
On
Start
Please connect your aerial, change any settings you wish and select Start then
press OK to start tuning.
Auto Scan
Scanning CH22
Digital Channels Found:
DTV :0 Radio :0 Data :0
MENU: Stop EXIT: Exit
3. Press the button to select Mode Setting. Press the buttons
to select your desired mode. If select Store Mode, a pop-up menu
will be display. Press the OK button to confirm or press any button
to cancel and return to the Mode Setting menu.
Home Mode Intended for use in home environment.
Shop Mode Intended for use in retail environment.
First Time Setup
OSD Language English
Mode Setting Home Mode
Country Australia
Auto Scan DTV
LCN
Move Adjust MENU: Return EXIT: Exit
On
Start
Please connect your aerial, change any settings you wish and select Start then
press OK to start tuning.
For the best picture quality in your home environment, we
recommend setting the TV to Home Mode.
11
Guide to the Television
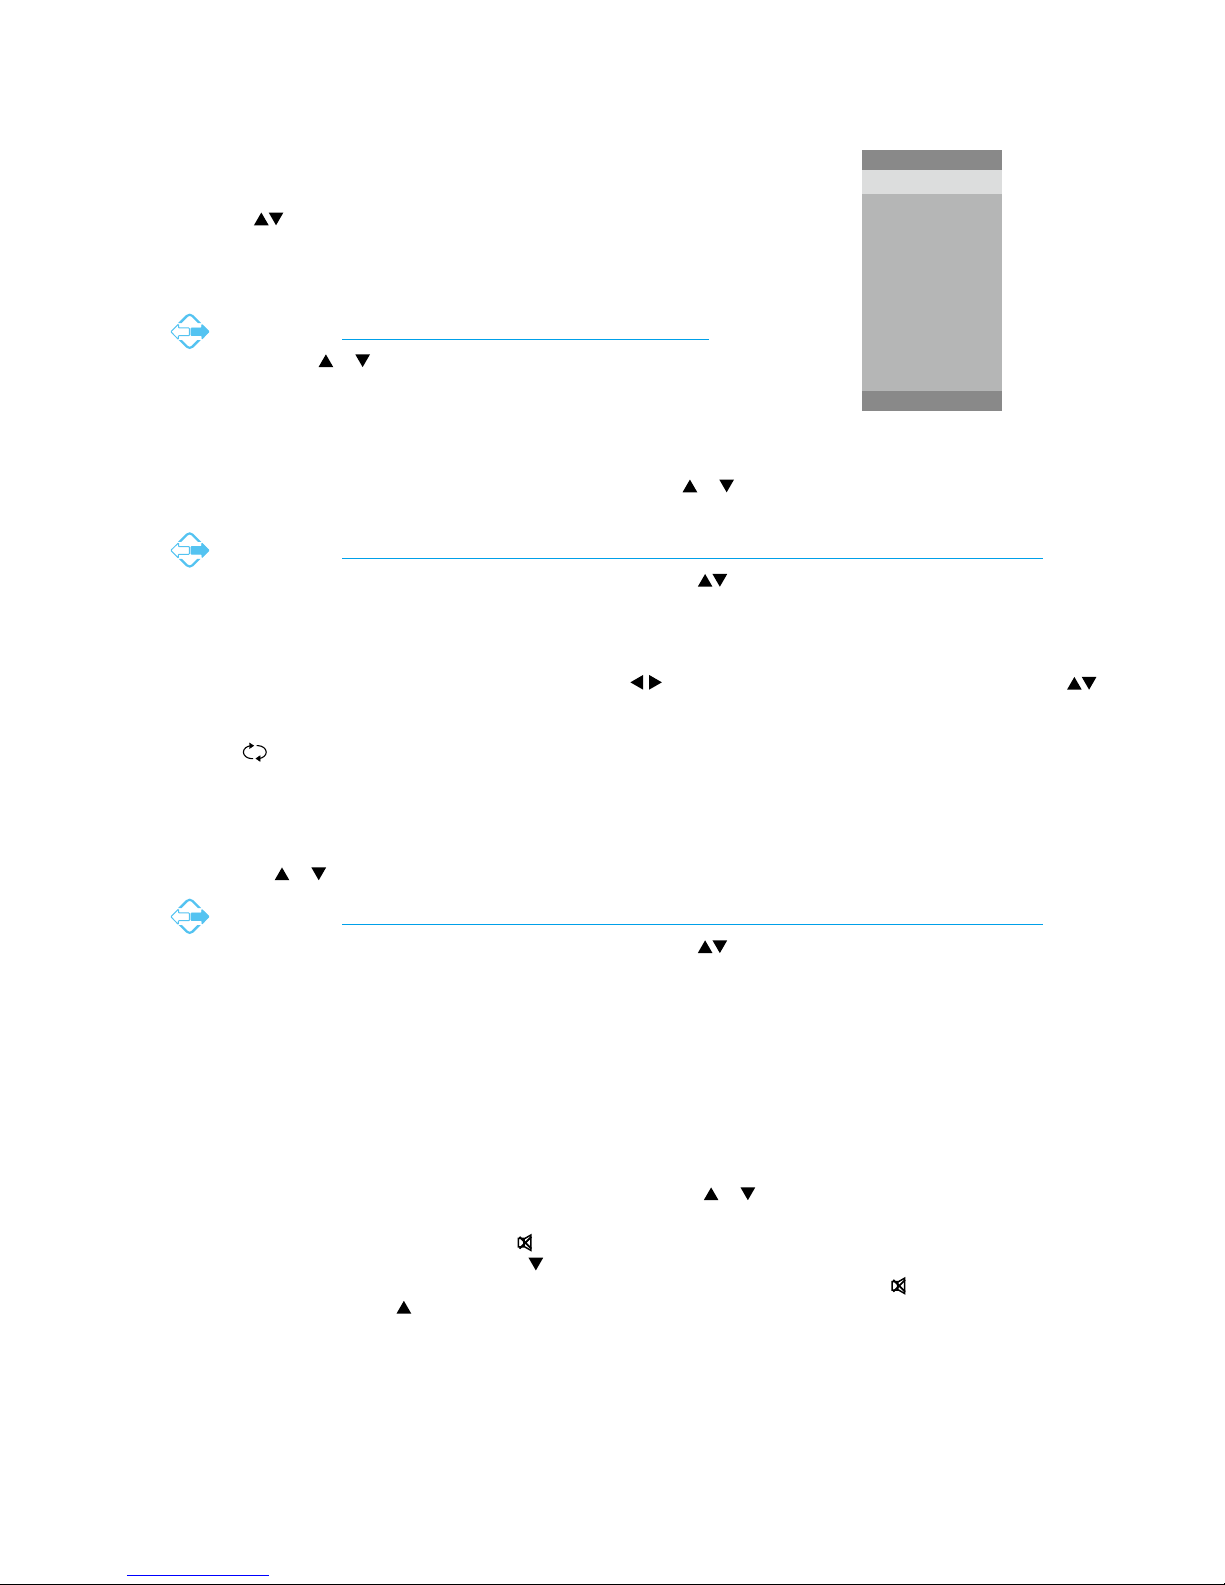
Selecting the Input Source
1. Press the INPUT button on the TV or on the remote control to
display the INPUT SOURCE list.
2. Press the buttons to select the input source that you want:
DTV / ATV / AV / YPbPr / HDMI / PC / USB.
3. Press the OK button to confirm your selection.
Alternative
Press the CH / buttons to switch to DTV mode directly.
INPUT SOURCE
INPUT: Exit
DTV
ATV
AV
YPbPr
HDMI
PC
USB
Channel Selection
• Press the CH + / – buttons on the rear panel of the TV or the CH / buttons on the remote control repeatedly or
the 0-9 buttons to select the channel.
Alternative
Press the LIST button to enter the Channel List. Then use the buttons to highlight and select the
channel. Press the OK button to view the selected channel.
• If a blocked channel is selected, the password screen will be displayed. Press the 0-9 buttons to enter the password,
the channel will then be unlocked (refer to page 32 for details on Channel Locks).
• Press the FAV button to view the Favourite List. Then the buttons to select your favourite list and then use the
buttons to highlight and select the channel from the list. Press the OK button to view the selected channel (refer to page
29 for details on Favourite Manager).
• Press the button to return to the previously viewed channel.
Listening to the Radio (Radio Mode)
• In DTV mode, press the TV.RD button to switch between DTV and Digital radio channel.
• Press the CH / buttons on the remote control repeatedly to change the radio stations.
Alternative
Press the LIST button to enter the Channel List. Then use the buttons to highlight and select the
station. Press the OK button to listen to the selected station.
• Press the GUIDE button to see all the stations in the Programme Guide (refer to page 46 for details on EPG).
Display Channel Information
Press the ibutton to view the current information.
Volume Adjustment
• Press the VOL + or –button on the rear panel of the TV or the VOL / buttons on the remote control to adjust the
volume.
• If you wish to switch the sound off, press the button. You can turn the volume down while your TV is in mute mode.
Press the VOL – button on the TV or the VOL button on the remote control, you will see the volume level reduce, but
you won’t hear anything at the moment. To listen to your TV at the new lower level, press the button again or VOL +
button on the TV or the VOL button on the remote control.

12
Caring for the Environment
Responsible Disposal of the Packaging
The packaging of your television has been selected from environmentally friendly materials and can usually be recycled.
Please ensure these packing materials are disposed of correctly.
Plastic wrapping can be a suffocation hazard for babies and young children, please ensure all packaging materials are out
of reach and are safely disposed of. Please ensure they are offered for recycling rather than throwing these materials away.
Responsible Disposal of Appliance
At the end of its working life, do not throw this television out with your household rubbish. An environmentally friendly
method of disposal will ensure that valuable raw materials can be recovered and used again.
Electrical and electronic appliances contain materials and substances which, if handled or disposed of incorrectly, could be
potentially hazardous on the environment and human health.
Observe any local regulations regarding the disposal of electrical consumer goods and dispose of it appropriately for
recycling. Contact your local authorities for advice on recycling facilities in your area.
The plug must be rendered useless and the cable cut off directly behind the appliance or the machine to prevent misuse.

13
Safety Information and Warnings
Symbols
The symbols used in this manual or on the back cover of the television set means:
Read this Instruction Manual before use
Enclosures contain dangerous voltages
Please refer to important operating and maintenance/servicing instructions that accompany the appliance
Important Safety Instructions
When using any electrical apparatus, always observer safety regulations and use basic safety precautions to reduce the
risk of fire, electric shock, and/or personal injury including any of the following:
1. Read, keep and follow this Instruction Manual, ensuring to heed all warnings.
2. Keep out of reach of young children. This television is not suitable for use by young children or infirm persons without
supervision. Young children must be supervised to ensure that they do not play with the television.
3. This television is not intended for use by persons (including young children) with reduced physical, sensory or mental
capabilities, or lack of experience and knowledge, unless they are supervised or have been given instructions
concerning the use of the television by a person who is responsible for their safety.
4. Ensure that the television is positioned in a stable location to avoid the risk of the television falling. Many injuries,
particularly to children, can be avoided by taking simple precautions such as:
-Using a stable and appropriately sized television cabinet. Ensure its stability by using a television safety strap to
attach the television to the cabinet.
-Use the stand which has been supplied with your television set.
-Ensuring the television is not hanging over the edge of supporting furniture.
-Not placing the television on tall furniture (e.g. cupboards, book cases etc.) without anchoring both the furniture and
the television to a suitable support.
-Ensure that the television is placed directly on supporting furniture, avoiding placing fabric, cloth or other materials
between the television and the supporting furniture.
-Educating children about the dangers of climbing on furniture to reach for the television and/or its controls.
5. WARNING! Do not insert any objects into any openings of the television.
6. WARNING! Do not touch any moving parts of the television.
7. WARNING! Do not use this television near water, or in an area exposed to water splashes or dripping. To avoid the
risk of fire or electric shock, do not expose this television to rain and/or moisture.
8. WARNING! Do not place objects filled with liquid, such as vases, on or above the television.
9. DO NOT immerse in any liquid whilst in use or whilst cleaning. Clean only with a damp cloth and dry with a dry
towel. Do not use harsh abrasives as these may damage plastic parts.
10. DO NOT block ventilation openings. Keep away from curtains, newspapers and restricted areas. Install in accordance
with specific manufacturer instructions. Always allow sufficient space around the television to avoid overheating.
11. DO NOT install near heat sources such as radiators, gas heaters, stoves or other apparatus (including amplifiers) that
produce heat. Do not place the television in direct sunlight.
12. WARNING! Do not place naked flame sources, such as lit candles, on the television.
13. WARNING! Connect to a suitable 100-240V ~ 50/60 Hz power supply only.
14. Use the power cord with care - do not damage the power cord in any way. If the power cord is damaged, it must be
replaced by either the manufacturer, the manufacturer’s service agent or qualified service personnel. The power cord
must be replaced only with an authorised replacement from an authorised service agent.
15. Only use attachments/accessories specified by the manufacturer.
16. Unplug this television during lightning storms or when unused for long periods of time.
17. Please consider the environment when disposing of any batteries.
18. Refer all servicing to qualified personnel. Servicing is required when the apparatus has been damaged in any way,
such as when the power supply cord or plug is damaged, liquid has been spilled or objects have fallen into the
apparatus, the apparatus has been exposed to rain or moisture, does not operate normally, or has been dropped.
19. WARNING! Do not use the television outdoors.

14
Safety Information and Warnings
20. For household use only; this television is not intended for commercial use.
21. This television is intended to be used in household and similar applications such as;
-offices and other working environments;
-farm houses;
-by clients in hotels, motels, bed and breakfast and other residential type environments.
22. If this apparatus is to be used by a third party, please supply these instructions with it.
23. No liability will be accepted for any personal injury or damage caused by failure to follow these instructions.
24. Danger of explosion if battery is incorrectly replaced. Replace only with the same or equivalent type.
25. Batteries (battery pack or batteries installed) shall not be exposed to excessive heat such as sunshine, fire or the like.
26. The mains plug is used as the disconnect device, the disconnect device shall remain readily operable.
TO AVOID RISK OF ELECTRIC SHOCK, DO NOT REMOVE COVER (OR BACK).
NO USER-SERVICEABLE PARTS INSIDE. REFER SERVICING TO QUALIFIED
SERVICE PERSONEL. DO NOT BLOCK THE VENTILATION SLOTS ON THE
BACK-COVER.
RISK OF ELECTRIC SHOCK
DO NOT OPEN
CAUTION
15
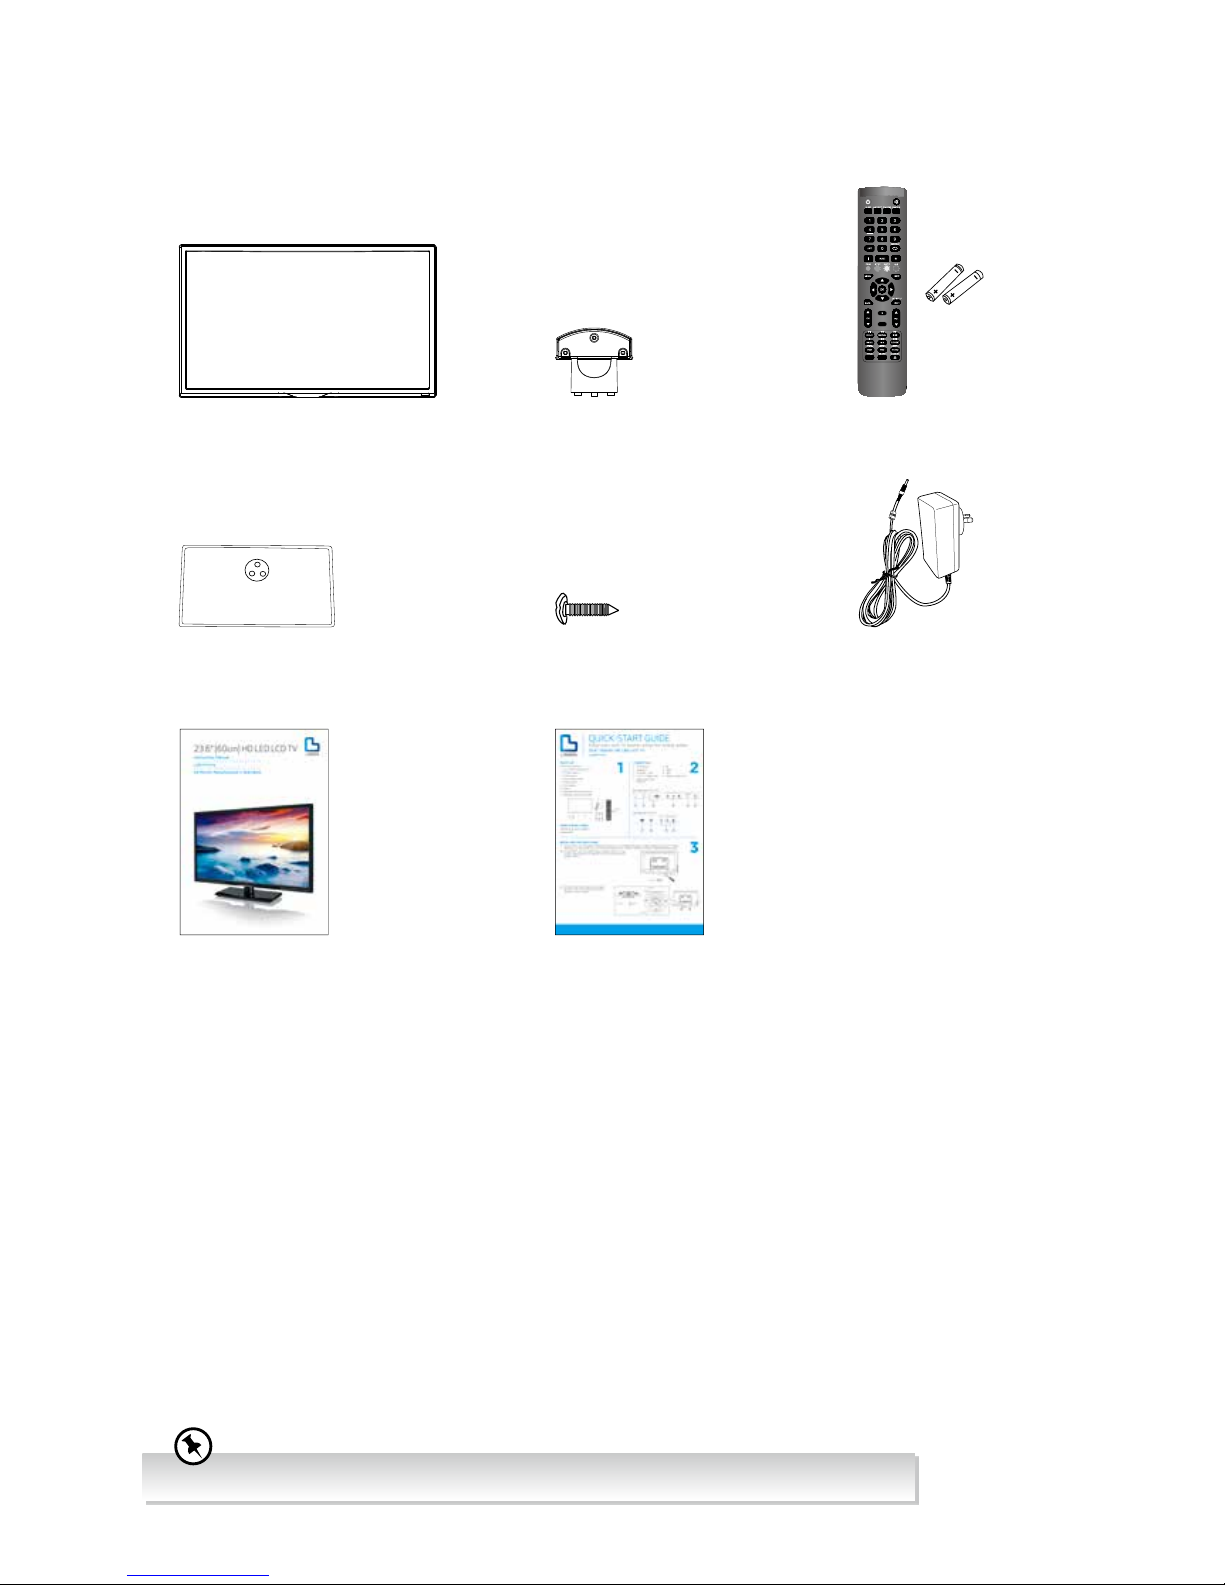
Item in the Box
Remove all packaging from the TV. Retain the packaging. If you dispose of it please do so according to local regulations.
The following items are included:
Instruction Manual Quick Start Guide
TV Base
TV Stand Support Remote Control / AAA Batteries x 2
AUDIO
TV
Screw x 6
If you require additional assistance, please call our customer care center on 1300 530 800.
Mains Adapter Cable

16
Basic Set Up
1. Disconnect all cables connected to the TV.
2. Lay the TV down on a flat surface with the back side facing up, and ideally at the edge of a table so that the base of
the TV slightly overhangs on it. Please make sure a soft cushioned material (such as a pillow or thick piece of foam) is
placed beneath the screen.
Installing the Base Stand
1. To install the TV stand, first attach the stand support to the TV by using 3 screws. Align with the screw holes then use 3
screws to fix the stand support to the TV.
2. To install the base stand, align the screw holes, then secure with a screw driver (not included) using the 3 screws
provided.
Screw x 3
TV Front Base Stand Front
screw in
Screw x 3
screw in
The LCD display is very fragile, and must be protected at all times when installing and removing the base stand. Be
sure that no hard or sharp object, or anything that could scratch or damage the LCD display, comes into contact with
it. DO NOT exert pressure on the front of the TV at any time because the screen could crack.
• Please read this instruction manual carefully while setting up your TV.
• If you require additional assistance, please call our customer care center on 1300 530 800.
The screw holes will only align if the front of the base stand is at the front of the TV.

17
Basic Set Up
1. To remove the stand assembly, untighten the screws holding the stand assembly to the rear of the TV. Slide the stand
assembly out.
2. Mounting on the wall. This TV is designed to be wall-mounted with a standard 200 mm x 100 mm mounting kit (sold
separately) designed for flat-panel TVs. Mount this TV according to the instructions included in the mounting kit. Due to
space restrictions, we recommend that you make all connections (refer to page 18-21 and page 48 for details) before
mounting on to the wall.
Mounting the TV to a Wall
Screw x 3
unscrew
200 mm
100 mm
Four mounting holes
(size M4 screw)
• Remove the stand assembly before mounting the TV onto the wall.
• It is recommended that two people take part in the installation.
Keep all the spare screws should you want to use the stand assembly option.
• Please read this instruction manual carefully while setting up your TV.
• If you require additional assistance, please call our customer care center on 1300 530 800.

18
Advanced Connection Diagrams
Connecting an AV Device Using an HDMI Cable
• This TV can accept High-Definition Multimedia Interface (HDMI) supports HDCP (High-Bandwidth Digital Content
Protection) Protocol.
• This TV has a total of 1 HDMI input socket, please make sure the correct input source is selected and corresponds to
your connected HDMI input socket.
• When you connect to the output of an HD ready player (blu-ray disc player, game console, set-top box or computer)
switch to the HDMI function and the TV will automatically detect the resolution used by the HDMI source.
• To get the best picture quality, adjust the blu-ray disc player, game console or set-top box output resolution up to 1920 x
1080p.
1. Use an HDMI cable to connect the TV’s HDMI
input socket to the external AV device’s HDMI
output socket.
2. Plug the connected devices into the mains socket
before switching on the TV.
3. Press the button on the rear panel of the TV or
on the remote control to turn on your TV.
4. Press the INPUT button on the TV or on the
remote control to display the INPUT SOURCE
List. Use the buttons to select HDMI and then
press the OK button to confirm.
Making Video and Audio Connections
Not all AV devices have the ability to connect to a TV, please refer to the owner’s manual of your AV device for
compatibility and connection procedures.
When connecting any external AV device, do not connect the mains adapter cable to the mains socket until all other
connections are complete.
Signal Type
Separate Audio
Connection
Required
HDMI
HDMI
(480i/480p/576i/576p/720p/1080i/
1080p*)
No
VGA
PC
Yes
PC AUDIO
Y Pb Pr
Component Video
(480i/480p/576i/576p/720p/1080i/
1080p*)
Yes
R L
VIDEO
Composite Video
Yes
R L
Best Video
Performance
*1080i/1080p: Although this TV is compatible with a 1080i/1080p input, it is possible
that the screen may not display the exact resolution and consequently the
picture quality will be adjusted accordingly.
USBHDMI RL
AV INPUT
VIDEO
Rear Right Side View of TV
Blu-ray Player / DVD Player /
Recorder
Set-top Box
Game Console
HDMI Cable
(not included)
Although this TV is able to connect to an HDMI
device, it is possible that some devices may not
operate correctly.
Table of contents
Other Linden Group LCD TV manuals


