Linden L15DPF17 User manual

----
Instruction manual
L15DPF17
12 month manufacturer's warranty
--------------------------------------------------------------------------
--------------------------------------------------------------------------
Digital Photo Frame
”
----

14
Contents
Package contents..........................................................................
Safety precautions........................................................................
Guide to the device.......................................................................
Remote control..............................................................................
Preparations.....................................................................................
Main menu.........................................................................................
Movie play.........................................................................................
Photo play.........................................................................................
Music play..........................................................................................
Ebook....................................................................................................
Setting................................................................................................
2
4
5
6
8
10
1 1
1 1
13
12
Calendar............................................................................................. 14
1
Explorer.............................................................................................. 16
Troubleshooting.............................................................................17
Specifications.................................................................................. 18

2
Safety precautions
Warning
Safety instruction
Congratulations for purchasing your new digital photo frame. With this Digital Photo Frame,
you can easily and quickly view photos directly from your digital camera’s memory card.
You can even create a slide show with multiple transition effects. The Digital Photo Frame is
compatible with the following memory cards and device: SD, MMC and USB device.
•
The product shall not be exposed to dripping or splashing liquids and no objects filled with
liquids, such as vases, shall be placed on the product. Dry location use only.
•
No naked flames sources, such as candles, should be placed on or near the product.
•
Keep the digital photo frame clean and never store it next to a heat source or in dirty, humid
or wet places. Keep it out of direct sunlight.
•
Press the buttons gently. Pressing them or the screen too hard can damage the digital photo
frame.
•
Do not use the product in an extremely dry environment as this can lead to static discharge,
which can damage the digital photo frame.
•
Do not subject the product to harsh impacts. Do not drop the appliance. These may result in
damage to the product and loss of data.
•
Do not attempt to repair or disassemble the unit by yourself. Only qualified service personnel
should perform repairs.
•
The digital photo frame is for indoor use only.
•
Only use the DC 12V power adaptor supplied with this product. Do not unplug the adaptor
when viewing the pictures.
•
Do not block the ventilation holes on the back of the digital photo frame.
•
Children should be supervised to ensure that they do not play with the appliance.
•
Please unplug the product when you do not intend to use it for a long period of time to
prevent overheating and damage to the screen.
•
Please insert the plug into the DC IN jack completely on the unit before connecting the AC
adaptor to mains supply.
•
This product can only play files with compatible format.
•
Do not use the product in extreme temperature, the best operating temperature is 5°C-35°C.
•
Do not allow metallic objects to touch the DC plug when the player is on.
• High voltage inside. Do not open the casing of the digital photo frame. Refer servicing to
qualified personnel only.
• To reduce the risk of fire or electric shock, do not expose this product to rain or moisture.
• To avoid permanent loss of data, do not insert or remove memory cards or USB device
when the power is on.

• Button Battery Warnings
1. CAUTION: Do not ingest battery, Chemical Burn Hazard
2. The remote control supplied with this product contains a
coin/button cell battery. If the coin/button cell battery is
swallowed, it can cause severe internal burns in just 2 hours
and can lead to death.
3. Keep new and used batteries away from children.
4. If the battery compartment does not close securely, stop
using the product and keep it away from children.
5. If you think batteries might have been swallowed or placed inside any part of the body, seek
immediate medical attention.
6. If you suspect a child has swallowed a button battery, immediately go to a hospital emergency
room.
7. Examine devices and make sure the battery compartment is correctly secured, e.g. that the
screw or other mechanical fastener it tightened.
8. Dispose of used button batteries immediately. Flat batteries can still be dangerous.
9. Tell others about the risk associated with button batteries and how to keep their children safe.
10. Call the Poisons Information Centre on 13 11 26 for additional treatment information.
Cleaning and care
• Always turn off the unit and remove the power adaptor from the mains outlet before cleaning
the unit.
• Use a soft dry cloth to clean this product.
• Never spray or pour liquids directly onto the screen or casing.
• Do not use abrasive materials or chemical cleaners such as alcohol, benzene, etc. Do not allow
any water or other liquid to enter the appliance.
• Do not drop the unit, which is a complicated electronic device and cannot withstand shock
from falls.
• Do not hit or scratch the screen. Handle it with care. The LCD panel of the photo frame is made
of glass and therefore is sensitive to excessive force or contact with sharp edges.
3

4
Package contents
Main Unit
Items not shown:
Statutory notice
Warranty card
AC AdaptorRemote Control
Stand
Please make sure the following items are included in the package. If an item is damaged or
missing, please contact your dealer.
User Manual

playing video. Press
to skip backward/forward when
to turn down/up the volume.Left/Right
13. USB port
1 1. Mini USB
Digital Photo Frame view
Note: Due to production improvements, the appliance may differ slightly from the
diagram shown. Diagrams in this instruction manual are for reference only.
In power on mode, press MENU key go directly to main menu. Press Return key to return to
upper menu. Press UP/Down/Left/Right to move the cursor in the menu upward, downward,
to the left, or to the right, respectively. Long press UP/Down
1. Remote sensor 9. Speaker
2. MENU 10. Stand hole
3. Return
4. UP/Previous 12. SD/MMC card slot
5. Down/Next
6. Right/VOL+ 14. Earphone jack
7. Left/VOL- 15. Power On/Off
8. OK/Enter 16. DC 12V IN
5
Guide to the device
11
10
9
12
1
2
13
14
15
16
3 4 5 6 7 8

6. Tighten the screw at the rear of the remote control.
Remote control
Preparation of the Remote Control
1. Loosen the screw at the rear of the remote control.
2. Push the button towards left.
3. Pull the battery loader out.
4. Insert the battery into the receptacle make sure the
polarity matches the marks inside the component.
5. Insert the receptacle into the remote control.
Cell data
Battery type: 1x CR2025, 3 V
Service life: approximately 1 year (for normal use and room temperature)
Using Of Remote Control
Point the remote control towards the sensor window on the main unit when
operating.The remote control works best at a distance less than 3 m and at
an angle of up to 30 degree to the front of the unit. No obstacles may stand
in the way between remote control and infrared sensor and do not place the remote control
in direct sunlight. If the remote control fails to work even when it is operated near the player,
replace the battery.
Notes on batteries
If the remote control is not used for a long period of time, please remove the battery from the
compartment.
Do not heat batteries or dispose of them in fires.
Do not dismantle, deform or modify batteries.
6
Buttons of the remote control

Fast backward/Fast forward.
Enter the Music mode directly.
Enter the Movie mode directly.
Enter the Calendar mode directly.
Turn down the volume.
Enter the Setup mode directly.
Enter the Photo mode directly.
1. : Power on/off.
2. : Background music for slideshow mode.
3. : Mute the audio of the digital photo frame, press it again to activate the sound.
4. PHOTO:
5. : Play or pause the file.
6. : Move the cursor in the menu upward, downward, to the left, or to the right,
respectively.
7. SETUP:
8. VOL+: Turn up the volume.
9. VOL-:
10. :
1 1. : Play the previous or next video/audio file.
12. CALENDAR:
13. ENTER: Press to confirm selection.
14. EXIT: Return to upper menu.
15. MOVIE:
16: MUSIC:
7

Preparations
Getting started:
Step 1: Install the stand at the rear of the digital photo frame.
Step 2: Insert the DC plug of adaptor to the unit and plug the power adaptor into an available
AC 100-240V wall outlet.
Step 3: Insert memory devices into the correct slot and turn power to ON position on the side
Of the unit.
Installing the stand
Install the stand to the stand hole; place it on a stable and flat surface so that it stands up.
Connecting the power supply
1. Place the digital photo frame on a stable and flat surface.
2. Insert the DC plug of the adaptor into the DC 12V IN on
the side of the digital photo frame, and then connect
power adaptor to an available AC 100V-240V 50/60Hz
mains outlet.
3. Switch the OFF/ON key on the side of the digital photo
frame to power ON/OFF.
4. When the unit is not being used for a long time, switch
the OFF/ON key to power it off again and unplug the
AC adaptor from mains outlet.
Connecting a USB device
You can view the pictures, listen to music or watch videos
from the USB memory device by connecting it to the digital
photo frame.
Note: Not all USB storage devices can be read in this digital
photo frame.
Inserting memory cards
To view the pictures, listen to music or watch videos from
a compatible memory card, insert it into the respective card
slot in the Digital Photo Frame.This Digital Photo Frame is
compatible with the following memory cards: • SD • MMC
Insert a SD or MMC card into the 2- in -1 card slot correctly
according to the indication on the unit.
8

files in memory device from computer.
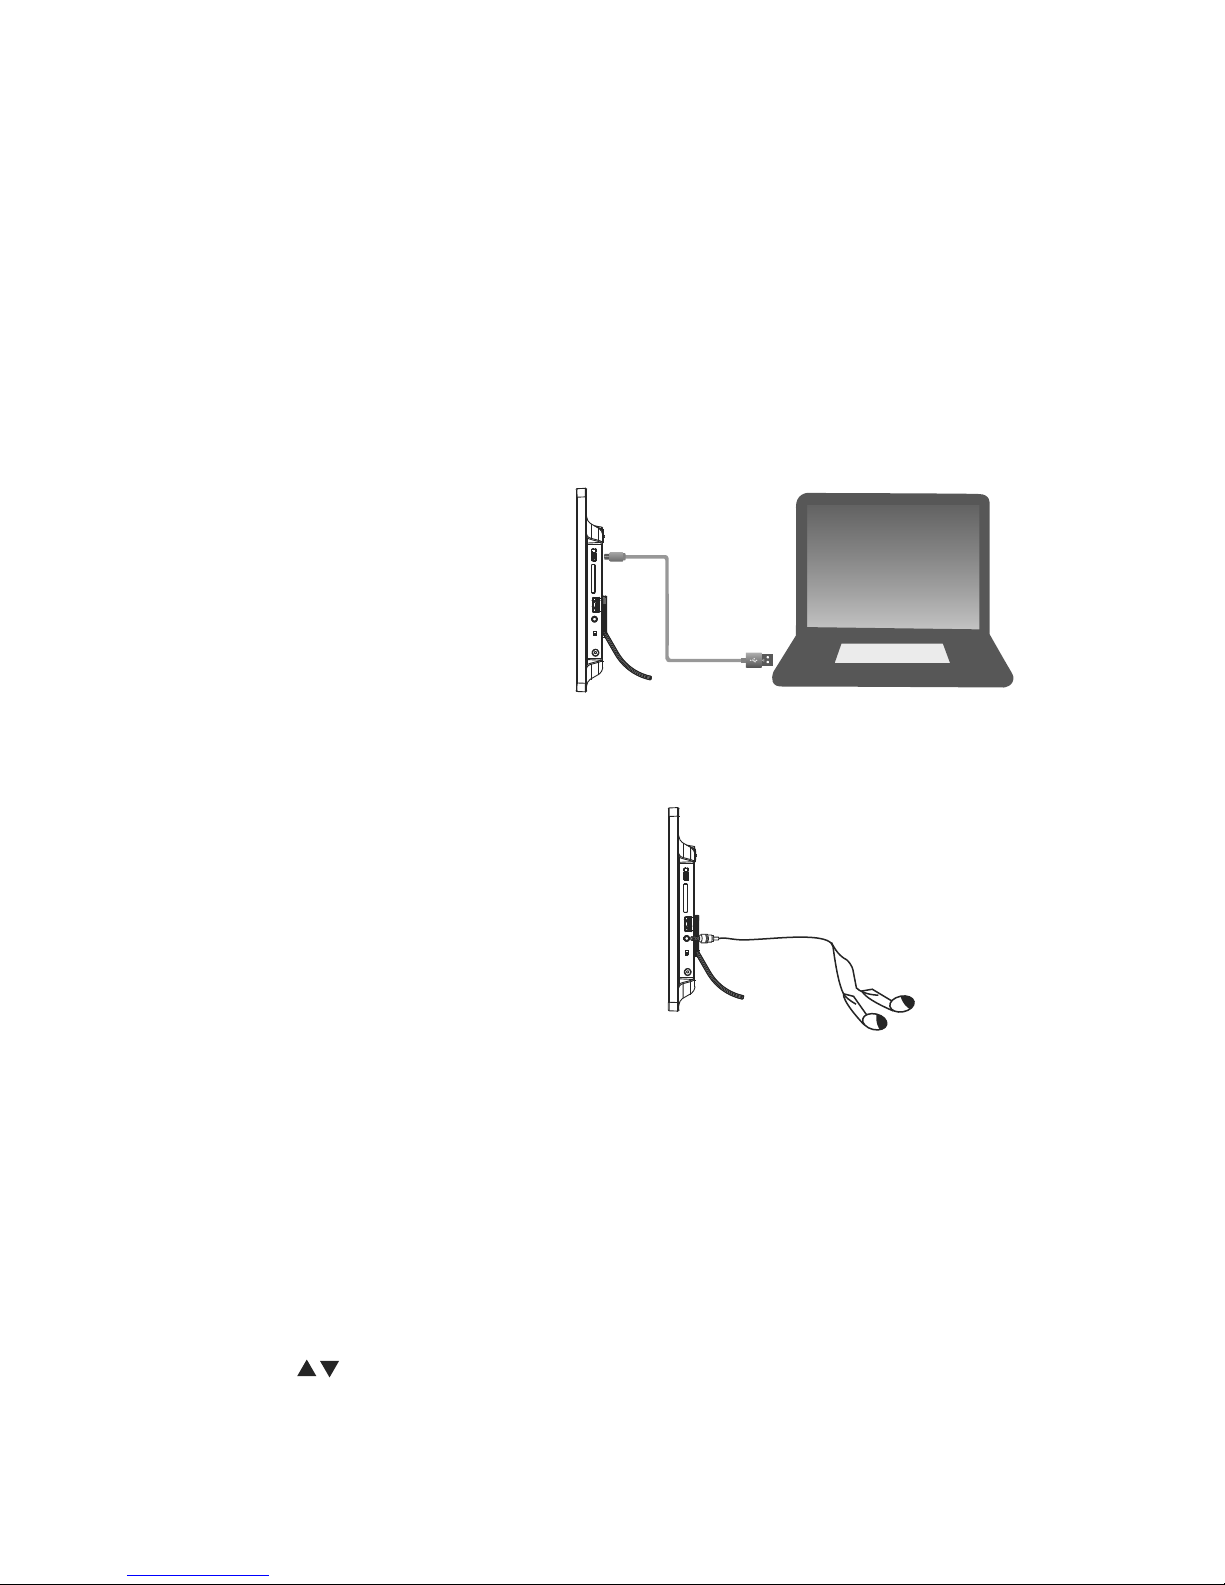
frame to a computer.You can also delete
device by connecting the digital photo
or video from computer to the memory
photo frame, you can copy pictures, music
Plug in the memory device to the digital
1. When headphones or earphones are connected to the earphone jack, the main
1. This unit can play picture, video and music in USB device or memory card.
Notes:
2. If your USB device or memory card is loaded with images but do not display, the format of your
USB device or memory card might not be compatible with the unit.
3. Do not force the memory card into the slot. If you are not able to insert the memory card easily
and completely, you may have inserted it incorrectly.
4. To remove the card, pull out the card slowly. Please DO NOT remove the memory card just after
inserting it into the unit or when the unit is processing the files. Wait until the screen is stable.
5. SD Card maximum support is 64GB (FAT32 format), USB maximum support is 8GB(FAT32
format).
6. This unit may not be compatible with all USB devices and memory cards, this is not an indication
of a problem with the unit.
Connecting the computer
Connecting headphones
A stereo earphone jack has been provided on
the digital photo frame for private listening.
To use this jack, plug in the earphones(not
included) with a stereo mini-jack 3.5mm
plug to the earphone jack and adjust the
volume to a comfortable listening level.
Note: Make sure the USB cable and memory device are well connected before
you copy or delete the files.
Notes:
speakers will be automatically muted.
2. Be sure that the digital photo frame is set at a low volume level before connecting
the headphone.
3. Increase the volume gradually for comfortable listening.
4. Listening at high volume for a long period could cause hearing loss.
9
Selecting the memory device
Plug in memory device and then switch OFF/ON key on the side of Digital Photo Frame to
power on the unit, it will enter Movie play automatically. Press EXIT key twice to enter into
memory device selecting interface. You will see the options “local disk” and “usb” on the
screen, press key to select the desired memory device, then press ENTER key to confirm.
Press EXIT key to return to memory device selecting interface.

Others mode on main menu. press
screen, otherwise it will display nulldisk. Press key to choose Movie/Photo/Music/Ebook/
“usb” on the
containing Movie/Photo/Music are inserted, You will see the options “local disk” and
Turn on the digital Photo Frame and enter into the main menu. If SD/MMC card and USB device
10
Note: The Digital Photo Frame may be slow to read some large capacity memory cards
and USB devices. Please wait for the device to be recognized.
1. Press key to choose an input source : Memory Card or USB device.
2. Press key to choose Movie/Photo/Music/Ebook/Others mode on main menu.
3. And then press ENTER key to confirm your selection.
Main menu
ENTER key to confirm your selection.

Press key to pause or play the video playing.
Press key to return to the video playlist, press again to return to main menu.
Movie play
11
When a SD/MMC card or USB device containing video is inserted, press key to select Movie
mode on the main menu and press ENTER key to enter into movie interface, a video playlist
will appear.
Press key to select the desired video.
Press ENTER key or press MOVIE directly on the remote control to start playing the video.
Press VOL+/VOL- to turn up or turn down the volume.
Press to skip backward or skip forward the video playing.
Press to play the previous or next video.
Photo play
Viewing photos
When a SD/MMC card or USB device containing photos is inserted, press key to select
Photo mode on the main menu and press ENTER to enter into photo interface, a photo playlist
will appear.
EXIT

Rotate: Rotate the photo.
Scale: Set the photo display ratio.
PHOTO
key or press directly on the remote control to start slideshow.
key to select Set Bg/Zoom/Rotate/ Slideshow/Scale, press
key to enter into photo adjusting interface, press
Press key to pause or play the slideshow.
Set Bg: Set the photo as background.
Press key to set slideshow with background music if there is an available music file.
12
Adjusting photos
When playing a photo, long press EXIT
ENTER key to confirm selection.
Zoom: Enlarge the photo.
Slideshow: Set the style of photo transition while playing slideshow.
Press key to select the desired photo.
Press ENTER
Press ENTER key to enter the single picture mode, and press key to skip pictures.
Press EXIT to return to photo playlist, press again to return to main menu.
Music Play
When a SD/MMC card or USB device containing music is inserted, press key to select Music
mode on the main menu and press ENTER to enter into music interface, a music playlist will
appear. And the music will play automatically.

Press key to select the desired music or press directly on the remote control to
MUSIC
Jump: select to jump to desired page directly.
Press to play the previous or next music.
Color: Set the text color.
Auto play: set auto play speed.
Music: set background music on/off.
to turn up or turn down the volume of background music.
key to confirm.
key to select music/auto play/color/jump, press key to adjust setting item, press
key to enter into e-book setting interface, pressWhen playing a ebook, long press
Press key to display previous or next page.
When a SD/MMC card or USB device containing ebook is inserted, press key to select
Press key to pause or play the music.
playlist will appear.
key to enter into ebook interface, a ebookEbook mode on main menu and press
to turn up or turn down the volume.
start playing music.
13
Press key to select the desired file and press ENTER to start reading.
Ebook
ENTER
Press VOL+/VOL-
Press to skip backward or forward the music.
Press EXIT to return to main menu.
EXIT
ENTER
Press EXIT to return to ebook playlist, press again to return to main menu.
Press VOL+/VOL-

key or press key on the remote control to enter into calendar
CALENDAR
interface .
on the remote control to enter into setting interface.
key or press key directly
SETUP
1. Press key to select Other mode on main menu
Time: Set the clock.
Alarm Setup: Set an alarm.
14
Language: Set the system display language.
Slide Speed: Select interval time for slideshow.
Repeat: Select repeat play mode.
Autoplay: Set autoplay mode.
Reset Setting: Select to reset all settings to default.
Breakpoint play: Select to play the same spot on a video file if the video playing is breaked off
in the middle.
Brightness: Adjust the screen brightness.
Date: Set the date.
Mode: Select time format to 12-hour or 24-hour.
Auto Poweron: Set auto poweron time.
Auto Poweroff: Set auto poweroff time.
Press key to select Other mode on main menu. Press key to select Calendar mode
and press ENTER
Calendar
The Setting interface lets you customise and configure the digital photo frame.
2. Press key to select Setting mode and press ENTER
3. Press to select setting items and press ENTER to confirm.
4. Press or to adjust the desired option.
5. Press EXIT key to return main menu.
Setting

key to select the calendar display mode.
15
Press ENTER

to enter into explorer interface, press key to select option, press key to confirm.
key
When a SD/MMC card or USB device containing photo/music/video is inserted, press key
to select Other mode on main menu. press key to select Explorer mode, press
key, the Date/Mode/Time setting menu will appear. Press key to select
Explorer
ENTER
Long press EXIT key to “Yes” or “NO” to delete file, then press key to select option, press
ENTER key to confirm.
16
Long press EXIT
Date/Mode/Time, press ENTER key to confirm, press or to adjust the desired option.
ENTER

connected.
card via digital photo
frame.
to visit USB device or SD
photo frame to computer,
17
Troubleshooting
Symptom or problem Possible cause/solution
No power The power connector is not completely inserted into the unit.
Screen freezes The unit may have malfunctioned. Switch it off and wait for
a few minutes before turning it on again.
Characters in display are
incorrect
Make sure that you have selected the correct language.
Unable to insert memory
card or USB device.
Memory card or USB device is not inserted correctly; insert
the card in the opposite side.
The unit cannot recognize
the memory device
inserted.
1. Memory card or USB device is not inserted correctly.
2. The memory device may be damaged. Please try a new
device.
3. Make sure that you are using a memory card type, which
is supported by the unit.
4. Some unpopular memory cards or USB devices are not
compatible with the product. Use a memory card or USB
device, which matches with the Digital Photo Frame.
5. It is slow to read the mass capacity memory device; you
should wait for a minute.
There is a memory card or
USB device inserted in the
unit, but the photo frame
is not able to read the card
or USB device.
Connecting the digital
the computer is not able
1. Make sure that you are using a memory card or USB
device type, which is supported by the unit.
2. Make sure that the memory card or USB device is inserted
all the way into the correct slot.
3. The memory card or USB device is damaged.
4. Make sure the USB cable and memory device are well
Note: Not all USB storage devices or Memory cards
can be recognized for this digital photo frame.

product are subject to change without notice and may differ slightly from the unit
Support video format
Support audio format
Support picture format
Support memory cards
For use only with Audio/Video or similar equipment.
Output: DC 12V 1.5A
18
Specifications
Display Screen size: 15” color TFT LCD
Screen resolution: 1280 x 800 pixels
Power adaptor Input: AC100-240V, 50/60Hz, 0.65A Max
USB port USB port 2.0 supports most of the USB device
SD, MMC
JPEG
MP3
NOTE: As a result of continual improvements, the design and specifications of this
illustrated on the packaging.
AVI, MOV, MKV, MP4 (720P)
Support ebook formart TXT
Operating temperature 5°C ~ 35°C

lindenproducts.com.au
Distributed by:
M.E.W. (Australia) Pty Ltd,
15 Vaughan St, Essendon Fields, Vic 3041
ACN 152 719 036
Customer care: Aus-1300 530 800
customercare@lindenproducts.com.au
While every effort has been made in the preparation of this
instruction manual the publishers cannot be held responsible
for the accuracy of the information contained herein or any
consequence arising from it.
E2284
Table of contents