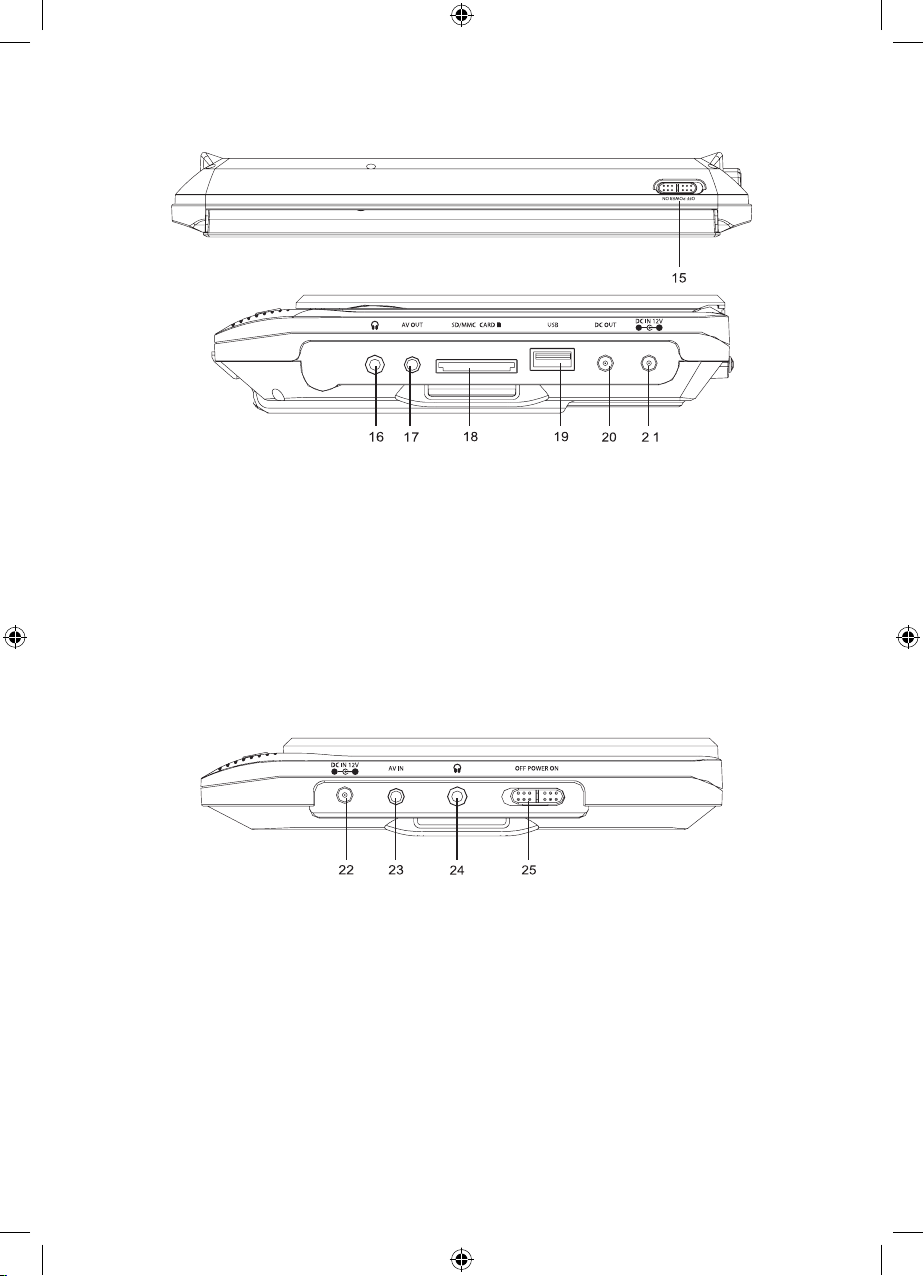
Linden L7DSCD17 User manual

1

1
Contents
Guide to the Device.................................................................................................................... 2
Caring for the Environment......................................................................................................... 4
Safety Information and Warnings ............................................................................................... 5
Items in the Box.......................................................................................................................... 8
Installation Instructions................................................................................................................ 9
Basic Set Up ............................................................................................................................ 12
Operation Instructions .............................................................................................................. 15
Troubleshooting ....................................................................................................................... 19
Care and Maintenance ............................................................................................................ 20
Technical Specifications ............................................................................................................ 20

2
Guide to the device
Control Reference Guide
DVD Player
Monitor
9. DISPLAY ON/OFF: Press to turn on or off the display.
10. MUTE: Press to turn off the sound. Press again to resume the sound.
11. Display Setup: Press to enter to display setup menu.
12. VOL-: Press to decrease volume level.
13. VOL+: Press to increase volume level.
14. Power Indicator: Green Indicator will turn on when the unit is powered on, and turn off if the unit
is powered off.
1. Play/Pause Press to switch between play and pause.
2. STOP Press to stop the playback.
3. DISPLAY ON/OFF: Press turn on or turn off the display.
4. VOL-: Press to decrease volume level.
5. VOL+: Press to increase the volume level.
6. Charge Indicator: Red Indicator will turn on when the unit is charging, and turn Green when the
unit is fully charged.
7. Remote Control Sensor
8. Power Indicator: Green Indicator will turn on when the unit is powered on, and turn off if the unit
is powered off, and turn red in stand-by mode.

3
DVD Player
Monitor
15. ON/OFF: Power ON/OFF Switch Slide to ON position to power on Slide to OFF position to
power off
16. EARPHONE: Earphone jack
17. AV OUT: Audio/video output jack
18. SD/MMC CARD: Card slot
19. USB: USB port
20. DC OUT: To Connect to sub unit
21. DC IN 12V: DC 12V input jack connected to AC/DC adapter (included)
22. DC IN 12V: DC IN jack, connected to the DC OUT jack on main unit by the supplied DC
connection cable.
23. AV IN: Audio/Video input jack, connected to the AV OUT jack on the main unit by the supplied
AV connection cable.
24. EARPHONE: Earphone jack.
25. POWER ON/OFF: Slide to ON position to power on the unit. Slide to OFF position to turn off.
NOTE: Due to production improvements, the appliance may differ slightly from the diagram shown.
Diagrams in this instruction manual are for reference only.

4
Caring for the environment
Responsible disposal of the packaging
The packaging of your appliance has been selected from environmentally friendly materials
and can usually be recycled. Please ensure these are disposed of correctly.
Plastic wrapping can be a suffocation hazard for babies and young children, please ensure
all packaging materials are out of reach and are safely disposed of. Please ensure they are
offered for recycling rather than throwing these materials away.
Responsible disposal of the appliance
At the end of its working life, do not throw this appliance out with your household rubbish.
An environmentally friendly method of disposal will ensure that valuable raw materials can be
recovered and used again.
Electrical and electronic appliances contain materials and substances which, if handled or
disposed of incorrectly, could be potentially hazardous on the environment and human health.
Observe any local regulations regarding the disposal of electrical consumer goods and dispose
of it appropriately for recycling. Contact your local authorities for advice on recycling facilities
in your area.
The plug must be rendered useless and the cable cut off directly behind the appliance to
prevent misuse.

5
Safety information and warnings
CAUTION: RISK OF ELECTRIC SHOCK DO NOT OPEN
CAUTION: TO REDUCE THE RISK OF FIRE AND ELECTRIC SHOCK, DO NOT REMOVE
THE COVER(OR BACK) OF THE UNIT, REFER SERVICING ONLY TO QUALIFIED SERVICE
PERSONNEL.
The lightning flash with arrowhead symbol within an equilateral triangle is intended to alert the
user to the presence of uninsulated (dangerous voltage) within the product’s enclosure that may
be of suffcient magnitude to constitute a risk of electric shock.
The exclamation point within an equilateral triangle is intended to alert the user to the pres-ence
of important operation and servicing instructions in the literature accompanying the appliance.
WARNING:
To prevent fire or shock hazard, do not expose this device to rain or moisture. Dangerous high
voltage is present inside the enclosure. Do not open the cabinet.
CAUTION:
This Digital Video Disc player employs a laser system. To Prevent direct exposure to the laser beam,
do not try to open the enclosure or defeat the safety interlocks. When open and the interlocks are
defeated, visible laser radiation is present.
Use of controls, adjustments, or performance of procedures other than those specifed herein may
result in hazardous radiation exposure. DO NOT STARE INTO THE BEAM.
TEMPERATURE CAUTION: Do not leave the player in a closed car on a sunny day, exposed to
direct sunlight or near any source of heat such as a Tv set. [Otherwise the surface of the player may
warp, change colour or be damaged.] When the player is used for a long period: the surface may
be hot; this is not a malfunction, however, take caution against burns.
USING CAUTION: To prevent electric shock, do not remove covers. No user-serviceable parts
inside. Refer servicing to qualified service personnel.
BEWARE OF WATER SPLASHING: To avoid electric shock or short circuits, do not place the
DVD player where water or other liquids might splash on to it.
LASER BEAM WARNING: Do not stare at the laser beam. Strong light will cause eye injury.
Notice:
The stand by/on switch on this unit will not completely shut off all power from AC outlet. Since the
power cord serves as the main disconnect device for the unit, you will need to unplug it from the AC
outlet to shut down all power.
Therefore, make sure the unit has been installed that the power cord can be easily unplugged
from the AC outlet. in case of an accident or to avoid fire hazard, the power cord should also be
unplugged from the AC outlet when left unused for a long period of time (for example: when on
holiday)
Do not make any changes or modifications to the equipment unless
otherwise specified in the manual.

6
Safety Information and Warnings
1. Read Instructions: All the safety and operating instructions should be read before the product
is operated.
2. Retain Instructions: The safety and operating instructions should be retained for future reference.
3. Heed Warnings: All warnings on the product and in the operating instructions should be
adhered to.
4. Follow Instructions: All operating and usage instructions should be followed.
5. Cleaning: Unplug this product from the wall outlet before cleaning. Do not use liquid cleaners or
aerosol cleaners. Use a damp cloth for cleaning.
6. Attachments: Use only attachments recommended by the manufacturer. Use of other attachments
may be hazardous.
7. Water and Moisture: Do not use this product near water (e.g., near a bath tub, washbowl,
kitchen sink, laundry tub, in wet basements, or near a swimming pool and the like).
8. Accessories: Do not place this product on an unstable cart, stand, tri-pod, bracket, or table. Use
only with carts, stands, tripods, brackets, or tables recommended by the manufacturer or sold
with the product. Any mounting of the product should follow the manufacturer’s instructions and
should use a mounting accessory recommended by the manufacturer.
9. Ventilation: Slots and openings in the cabinet are provided for ventilation to ensure reliable
operation of the product and to protect it from overheating. These openings should never be
blocked by placing the product on a bed, sofa, rug, or other similar surface. This product should
not be placed in a built-in installation such as a bookcase or rack unless proper ventilation is
provided or the manufacturer instructions have been adhered to.
10. Power Sources: This product should be operated only from the type of power source indicated
on the rating label. If you are not sure of the type of power supply to your home, Consult your
product dealer or local power company. For products intended to operate from Battery power or
other sources, refer to the operating instructions.
11. Power-Cord Protection: Power supply cords should be routed so that they are not likely to be
walked on or pinched by items placed upon or against them, paying particular attention to
cords at plugs, convenience receptacles, and at the point which they exit from the product.
12. Protective Attachment Plug: The product may be equipped with an attachment plug with
overload protection. This is a safety feature. See the operating instructions for replacement or
directions to reset the protective device. If replacement of the plug is required, be sure the service
technician has used a replacement plug that has the same overload protection as the original
plug as specifed by the manufacturer.
13. Overloading: Do not overload wall outlets, extension cords, or integral convenience receptacles
as this can result in a risk of fire or electric shock.
14. Object and Liquid Entry: Never push objects of any kind into this product through openings
as they may touch dangerous voltage points or short-out parts that could result in a fire or
electric shock. Never spill liquid of any kind on the product.

7
15. Servicing: Do not attempt to service this product yourself as opening or removing covers may
expose you to dangerous voltage or other hazards. Refer all servicing to qualifed service
Personnel.
16. Heat: The product should be situated away from heat sources such as radiators, heat registers,
stoves, or other products (including amplifiers) that produce heat.
17. Always operate the product from a power source of the same voltage, frequency and rating as
indicated on the rating label.
18. This appliance is not intended for use by persons (including children) with reduced physical,
sensory or mental capabilities, or lack of experience and knowledge, unless they have been
given supervision or instruction concerning use of the appliance by a person responsible for
their safety.
19. Children should be supervised to ensure that they do not play with the appliance.
20. Do not operate the product with a damaged adaptor, or if the product malfunctions, or is
dropped and damaged in any manner.
21. If the adaptor is damaged, it must be replaced with an equivalent adaptor in order to
avoid hazard.

8
Items not shown:
Instruction manual (this document)
Statutory warning
Warranty card
DVD player
Monitor
Car Adaptor
Items in the box
L7PDVD17
AC Adaptor
Remote control
2 x In-car headrest mounts
2 pairs of Earphones
1 x DC to DC cable
1 x 3.5mm to 3.5mm
cable

9
Installation instructions
A. Using the Car Power Adapter
The included 12V car power adapter is designed for use with vehicles that have a 12V, negative
ground electrical system.
Using the DVD Player and the Monitor Together
Using the DVD Player or the
Monitor Separately
Cautions:
• Use this unit only with the included 12V car power adapter. Use with other car adapters
could damage the unit, or even your vehicle.
• The included 12V car power adapter is for use with this unit only. Do not use it with any
other equipment.
• In the interest of traffic safety, drivers should not operate the unit or view videos while driving.
• When the inside of the 12V power outlet is dirty with ashes or dust, the plug section may
become hot due to poor contact. Be sure to clean the 12V power outlet before use.
• After use, disconnect the 12V car power adapter from both the unit and 12V power outlet.
• If the unit is not properly attached to a vehicle, it may become airborne in the event of an
accident and cause damage, injury, or death.
• Check your local traffic laws for rules governing the use of video devices in vehicles.
DVD player right side
Monitor right side
DC to DC
cable
3.5mm audio
/video cable
(included)
To DC 12V
power outlet
To A/V OUT &
DC OUT jacks To A/V IN &
DC IN 12V jacks
Car power
adaptor
To DC IN
12V jack
DVD player right side
To DC IN
12V jack
To DC 12V
power outlet
Car power
adaptor
Fuse Replacement instructions
Press and hold
Press and hold Fuse
Caution
For continued protection against risk of fire, replace
only with same type and rating of fuse.
IMPORTANT
This car adapter is for use with 12 volt batteries only.
WARNING:
Disconnect this car power adapter when
not in use. Not for use in 24V vehicles.

10
16
B. Watching a DVD on the DVD Player and the Monitor
You can watch the same DVD on the DVD player and the monitor.
C. Connecting a TV (for the DVD Player Only)
If your TV has Audio/Video inputs, you can connect the DVD player to your TV using a standard AV
cable(not included).
D. Using Headphones/Eaphones
Turn down the volume before connecting the headphones/earphones. Slowly raise the volume with
the headphones on until you reach your desired volume. When headphones are connected, the
speaker is automatically disabled.
DVD player right side
Monitor right side
Monitor right side
DC to DC cable
(included)
3.5mm audio
/video cable
(included)
1. Connect the DVD player and the monitor
using the included DC cable and AV cable.
2. Turn on the DVD player and the monitor.
3. Play a DVD on the DVD player; the monitor
will play the same DVD at the same time.
AV cable (not included) TV
Video in
Yellow Red White
Audio in
1. Connect your TV to the DVD player using an
AV Cable.
2. Turn on the TV and follow the instructions
included with it to play the DVD.
Note:
Make sure to use the correct Audio/Video cable. Connecting the plugs incorrectly may cause a
weak signal.
If your TV does not have Audio/Video inputs, you will need to purchase an RF modulator (sold
separately) and follow the instructions included with it to connect the unit to your TV.
Warning:
Excessive sound pressure from earphones
and headphones can cause hearing loss.
Avoid listening to sound at excessive levels
which could be harmful to your ears.
Headphones / Earphones
[1/8” (3.5mm) diameter
plug]

11
DVD player Monitor
Mounting in the vehicle
Use the supplied mounting straps to install the DVD player and monitor on the back of the vehicle’s
headrests. Tightly wrap the mounting strap around the headrest.
Mounting the DVD Player
SAFETY WARNING!
• This unit should never be used by the vehicle’s driver or left unsecured in the vehicle while driving.
• If this unit is being used in your vehicle, be sure that it is secured or held safely, and does not
obstruct any safety device, including air bags or seat belts.
• All passengers should wear seat belts when using this unit in a moving vehicle.
• If in doubt, please contact your vehicle manufacturer for further advice.
Installation Guide
Using the stand for desktop use
You can stand the DVD PLAYER UP on a desk or
table using the stand on the back.
r
Car power
adaptor
DC cable
AV cable
Remote control
Mounting strap

12
Remote Control
The remote control transmits a directional
infrared beam. Be sure to aim the remote
control directly at the infrared remote sensor
during operation. The sensor may not be
able to receive signals properly if the sensor
is covered, if there is a large object between
the remote control and the sensor, or if it is
exposed to direct sunlight or a strong case,
change the direction of the light or reposition
the unit to avoid direct lighting.
Refer to the diagram. Remove the battery
compartment cover located on the rear of the
remote control. Insert batteries, making sure to
match their polarities (+/-) to the markings on
the inside of the compartment. Replace
the cover.
To use the remote, point it at the remote sensor
of the player. Operate the remote within 15 feet
of the sensor and at an angle of +/- 60 degrees.
Batteries in the remote will last for approximately
1 year. Replace the batteries if the remote
control does not work. Do not mix old with new
batteries, or different types of batteries.
Remove the batteries from the remote if it will not
be used for a long period of time.
Basic set up
2 x AAA batteries
Battery compartment cover

13
Setup
Various features of the player can be adjusted in
the SETUP menu.
1. Press to enter the player’s setup menu.
2. Press the direction buttons to select the
desired item.
3. Press ENTER to confirm.
Item Description Default setting
OSD Sets the language of the player’s onscreen display. English
Subtitle Sets the default subtitle track of loaded DVDs English
Audio Sets the default language audio track of loaded DVDs. English
DVD menu Sets the default subtitle track of loaded DVDs. English
Language Setup
Video
Item Description Default setting
Aspect Ratio Sets the aspect radio of the display 4:3 is used with
widescreen television displays 16:9
TV System
Sets the player’s Video Out signal type Set this to
correspond with your Tv’s Video System type.
PAL is the standard used in Australia/New Zealand
PAL
Screen Saver
When set to ‘ON’ and the player is left unused for 5
minutes, the screen saver appears on the screen.
When set to ‘OFF’ screen saver function is turned off.
ON
Last Memory
When set to ‘ON’ the DVD player remembers the last
played time and continues playing from there the next
time it is turned on.
OFF
Logo Type Set the start logo as you like: default, Jacket,
blue SCR, Captured Default
Mp3 Lyric Choose to display or turn off lyrics when playing
mp3 files. ON
Audio Setup
Item Description Default setting
Channel Output Sets the audio channel mix mode (LT/RT, Stereo). Stereo

14
Rating
Item Description Default setting
Parental
Control
Sets the maturity rating level of play.
The player will not play any discs rated higher than
this setting.
This setting is password protected (the initial password
is: 0000).
Level: 1to 8(8
Adult is default)
Set Password
Change the Parental Ctrl password. Enter the old password, and then the
new password. If you have forgotten the password, please contact Customer
Service for assistance.
DEFAULT To reset all the settings to factory default settings.
This does not reset the parental control password. RESET
Disc requirements
This DVD player supports playback of the following discs.
This unit can play back DVD,DVD-R/RW, SVCD,VCD,CD,CD-R/RW,Kodak picture CD,MP3,MP4.
Type Disc mark Content type Disc size Max playback time
DVD-Video disc Audio + Video
(moving picture) 12cm
133 min (SS-SL)
242 min (SS-SL)
266 min (SS-SL)
484 min (SS-SL)
Audio compact
disc (CDs) Audio 12cm 74 min
Jpg CDs Still picture 12cm

15
Operation instructions
Basic Playback
1. Prepare the connections and power supply.
2. Load a disc.
Press the Open button to open the disc compartment lid. Load a disc with the label-side facing
up. Close the lid manually.
If a single-sided disc is loaded upside-down, the player will display BAD DISC.
3. Start playback.
Press Play/Pause button to start playback (some discs may start playing automatically).
Play/Pause/Stop
Press to play the disc for the first time.
Press during playback to pause. Press again to resume playback.
Press during playback to stop the disc (Pre-Stop) Press to resume playback.
Press when the disc is Pre-Stopped to stop playback completely (When is pressed, the
disc will start playing from the beginning.)
Next/Previous(Skip)
Press to skip forward one track (DVD, CD, MP3, etc).
Press to skip back one track (DVD, CD, MP3, etc).
Forward/Reverse (Search)
Press for a while to fast-forward/ reverse through the disc.
Each successive press of will change the rate of fast-forward/ reverse playback.
Play -> 2x -> 4x -> 8x -> 16x -> 32x
Slow
press SLOW key to slow down the speed of the playback.
Each successive press of SLOW key will change the rate of slow-motion playback.
Play ->1/2 -> 1/4 -> 1/8 -> 1/16 -> 1/32
Press to resume normal playback.
Note:
Audio will be muted during fast- forward, fast-reverse, and slow-motion playback
Menu Navigation
To navigate DVD disc menus or the player’s setup menus:
• Press the DIRECTION keys (arrows) to select a desired feature or option
in the menu.
• Press ENTER to confirm a selection in the menu.
• For some menu options ,you may be able to use the numeric keypad
to input data.
Turning on the Unit
1. Slide the ON/ OFF switches on the DVD player and the monitor to the ON positions.
The start-up picture will appear on the screens.
2. After use, slide the POWER ON/ OFF switches on the DVD player and the monitor to the OFF
positions (power off).

16
Numeric Keypad
• Use the numeric keypad to skip directly to a DVD chapter or CD track. (Some discs may not
allow direct access function.)
• Use the numeric keypad to input numeric data in menu option fields when possible.
Note:
Use the 10+ key for inputting numbers greater than 10. For example, to choose 11, press 10+
and 1; to choose 21, press 10+ two times and then 1.
Turning Display ON/OFF
• Press ‘LCD ON/OFF’ button on the unit to turn the display ON/ OFF.
Adjusting the Volume
• Press Vol+ and Vol- to adjust the volume up and volume down.
• Press ‘Mute’ button on the remote control to mute the sound. Press again to restore sound.
Disc Error Messages
The following messages will be displayed on-screen if there is a problem with the format of the
loaded disc.
• BAD DISC. The player is equipped with automatic disc quality detection software. If the player
detects a disc that is damaged or has a format problem, it may play the disc at a lower quality
or stop play completely, depending on how damaged the disc is.
• DVD Players and discs are designed with region numbers which dictate the region(printed
on the rear panel of the DVD case).If the region number does not match the region number
your DVD player is set to, you will not be able to play the disc. if you try to play the DVD, the
message “WRONG REGION” will appear on OSD.
• The Region Number of this player is 4.
Note:
DVD disc production quality may vary, some discs may deviate from the industry stand-ard.
Some incorrectly-formatted discs may still play, however, the playback and operational quality of the
disc may be substandard.
Power Management
If the player will not be in use for a long period of time, set the Power Switch to the OFF position and
unplug the player.

17
Function buttons
OSD
Press the OSD button to show playback information.
Setup
Press it to enter the player’s setup menu. Enter the Setup menu to adjust the player’s Internal
settings, please see the SETUP section for more details.
Zoom
Press ZOOM to change the magnification level of the picture.
During DVD playback, each successive press of ZOOM will change the level of magnification.
During JPEG CD playback, each successive press of ZOOM will change the level of
magnification.
When the magnification level is greater than Normal/100%, use the NAVIGATION keys
to pan around the magnified picture.
When the magnification level is equal to 100%, use the NAVIGATION keys to rotate
the picture.
Note: The picture quality will decrease as the zoom level (magnification) increases.
Audio
During playback of a DVD that has been mastered with alternate language/audio tracks,
Press AUDIO to hear the alternate tracks.(A DVD may have up to 8 selectable audio
tracks.)
Title
Press the TITLE button during DVD playback to return to the DVD’s Title menu.
PBC
Press the PBC button during VCD playback to return to the VCD’s Main PBC.
Repeat Playback of Chapter/Title/ALL of a Disc
Press REPEAT to change the repeat mode of the player. Each successive press of REPEAT will
change the mode as follows:
Repeat Chapter -> Repeat Title -> Repeat Disc -> Repeat Off
Repeat from A to B
Press ‘A-B’ once to set initial point (A).
Press ‘A-B’ a second time to set final point (B).
Now the program will be played from A to B repeatedly.
Press ‘A-B’ a third time to cancel Repeat.
DVD/USB/SD mode:
Press SD/ USB button to switch between DVD and SD/ USB modes.
Supports USB 32GB Max (FAT32 format).
Supports file formats VCD/SVCD/DVD/MP3/MP4/JPEG/HDCD/CDDA/WMA/CD-G/
HDVD/Kodak PICTURE CD/ FLV in USB memory device.

18
Multi-Ianguage Subtitles
During playback of a DVD that has been mastered with subtitles, press SUBTITLE to view the
available subtitle tracks. (A DVD may have up to 32 selectable subtitles.)
CD Ripping Function
You may rip the CD disc content to USB or SD memory device. When it is playing CD
disc, insert USB or SD memory device to the unit, and then press Copy button to run to the
ripping function menu. And then follow the instrunction.
Do not take out the USB or SD Memory device during ripping.
Copy Function
The file format: MPEG-4, Mp3, TXT, JPG format in the disc or in the USB/SD memory
device can be copied to USB and SD memory device When the player is playing one of
these formats, press Stop button first, and then choose the files that you want to copy, and
then press Copy button to fulfill the copy operation.
Goto
Press this key one time to select the disc time.
Prees this key two times to select the track time.
Press this key three times to select the track from the available tracks.
Clear
When there is wrong input, press this key to delete.
Program
Use this key to pre-set tracks to play in a particular order.
Press ‘PROG’ key to enter the menu. Use direction keys to select the field, and arrange them
in order by entering numbers for each track.
Once the tracks are in order, press ‘PLAY’ to start playing.
To exit, press ‘PROG’ key again and then press ‘STOP’.
L/R
Press this button to select the audio track recorded on the disc to be played back (Right, left
or Stereo). This function is mostly applicable to Karaoke VCD, mp4 discs etc.

19
Troubleshooting
If you experience a problem with your appliance, check here for solutions to help you solve the
problem. If after these checks you are still experiencing problems with your appliance, contact
Customer Service for advice.
There is no power to the device.
• Ensure that the Power Switch on the main unit is physically set to the ON position.
• Ensure that the AC adapter cord is securely connected to the player and the proper wall outlet.
• If the monitor is connected, make sure that the DC-DC cable is connected to DC Out on the DVD
player and DC In on the monitor.
The device will not play the disc.
• Ensure that a supported disc is loaded in the player label-side up.
• Ensure that the disc’s rating level does not exceed the player’s parental rating level.
• Ensure that the disc is not damaged or too dirty.
• Clean the disc or try another disc. Moisture may have condensed inside the player.
• Remove the disc and leave the player on for 1-2 hours and then try again.
• If the monitor is not playing the disc, make sure that the DC-DC cable is securely connected to
the AV Out port on the DVD player and the AV In port on the monitor.
There is no picture when connected to the TV.
• Ensure that the TV set has been powered on and is set to the correct AV mode
• Ensure that the connections between the player and the TV are secure and correct.
• Check if the connection cables are damaged.
The picture is noisy or distorted.
• The disc may be damaged or dirty. Clean the disc or try another one.
• Reset your TV’s color system.
• Ensure that the player is connected directly to the TV (and not through a VCR, cable box, satellite
receiver, etc.)
The picture is not full-screen.
• Change the aspect ratio setting of your player from the Setup menu.
• Select a different aspect ratio option from the DVD disc menu.
There is no sound or distorted sound.
• Ensure that the TV and amplifer have been turned on and properly set up.
• Ensure that the TV and amplifer connections are secure and correct.
• Try a different Audio track of the DVD by pressing AUDIO.
• Ensure that the MUTE function of the TV, Amplifer, or Player is not engaged.
The remote control doesn’t work.
• Ensure that the Power Switch has been physically set to the ON position.
• Ensure that there are no obstacles between the remote and the player.
• Point the remote at the remote sensor on the main unit.
• Ensure that the batteries in the remote retain a charge and have been installed correctly.
• Try replacing the remote’s batteries.
The player has malfunctioned.
• Turn off player, after 1 minutes, turn on the player again.
Table of contents