LinQTab LQSC48 User manual

1
LinQ
Tab
LQSC48
LQSC48 – Full HD 1080p Waterproof Sports Camera
User Manual
Please read this manual before operating your device, and keep it for future reference.

2
Copyright
© LinQTab is a registered trademark of eXiom Technologies and its related entities.
The Bluetooth® word mark, figure mark (stylized “B Design”), and combination mark (Bluetooth
word mark and “B Design”) are registered trademarks and are wholly owned by the Bluetooth
SIG.
microSD™ and the microSD logo are Trademarks of the SD Card Association.
Wi-Fi, the Wi-Fi CERTIFIED logo, and the Wi-Fi logo are registered trademarks of the Wireless
Fidelity Alliance, Inc.

3
Table of Contents
LQSC48 – Full HD 1080p Waterproof Sports Camera User Manual...........................................................................1
Copyright..............................................................................................................................................................2
Table of Contents......................................................................................................................................................3
General notices for use ..........................................................................................................................................4
Disclaimer.............................................................................................................................................................4
Box Contents ............................................................................................................................................................4
Getting Started..........................................................................................................................................................5
Product Specifications...........................................................................................................................................5
Features.................................................................................................................................................................6
Safety Precautions:................................................................................................................................................6
Camera Overview Diagram: ..................................................................................................................................7
Operating instructions: ..............................................................................................................................................8
Initial Camera Setup..............................................................................................................................................8
Before using the Camera for the first time..........................................................................................................8
Camera Operations................................................................................................................................................9
Turn your camera on / off ..................................................................................................................................9
To Record..........................................................................................................................................................9
Video Setup.......................................................................................................................................................9
Camera View Screen Icons .............................................................................................................................. 10
System Setup................................................................................................................................................... 11
Snapshot.......................................................................................................................................................... 11
Photo Setup.....................................................................................................................................................12
Remote Control................................................................................................................................................... 15
Remote Specifications .....................................................................................................................................15
Remote Operation............................................................................................................................................ 15
Charging The Camera.......................................................................................................................................... 16
Setting The Date And Time.................................................................................................................................16
File Protection.....................................................................................................................................................16
Optional Accessories...............................................................................................................................................17
Trouble Shooting.....................................................................................................................................................18
Customer service..................................................................................................................................................... 18

4
General notices for use
This product is a highly advanced electronics device. Disassembly, customization or
repairs without the appropriate knowledge and precautions can leadto dangerous
situations with chance of damaging the product and causing serious personal injuries.
Avoid use in extreme conditions such as high or low temperatures, high humidity or
moist environments and around magnetic fields. Also avoid long-time exposure to
sunlight.
Only use the manufacturer permitted accessories to avoid damages to the product and
possibly warranty loss.
Please follow the relevant local environmental regulations to deal with obsolete
machines and accessories.
Use a protective folder to avoid extreme physical shocks to the device (i.e. of dropping).
Disclaimer
The screenshots in this manual are for reference only. They may be made on a device
with a different resolution or hardware configuration than yours and therefore can be
slightly different that the final product.
The manufacturer takes no responsibility for loss of information or data caused by
hardware or software failure. The user is responsible for performing timely backups of
important data.
Allinformation and images used inthis user manualare provided ‘as is’and aresubject
to change without notice.
The manufactureraccepts no liability for the information offered in this document.
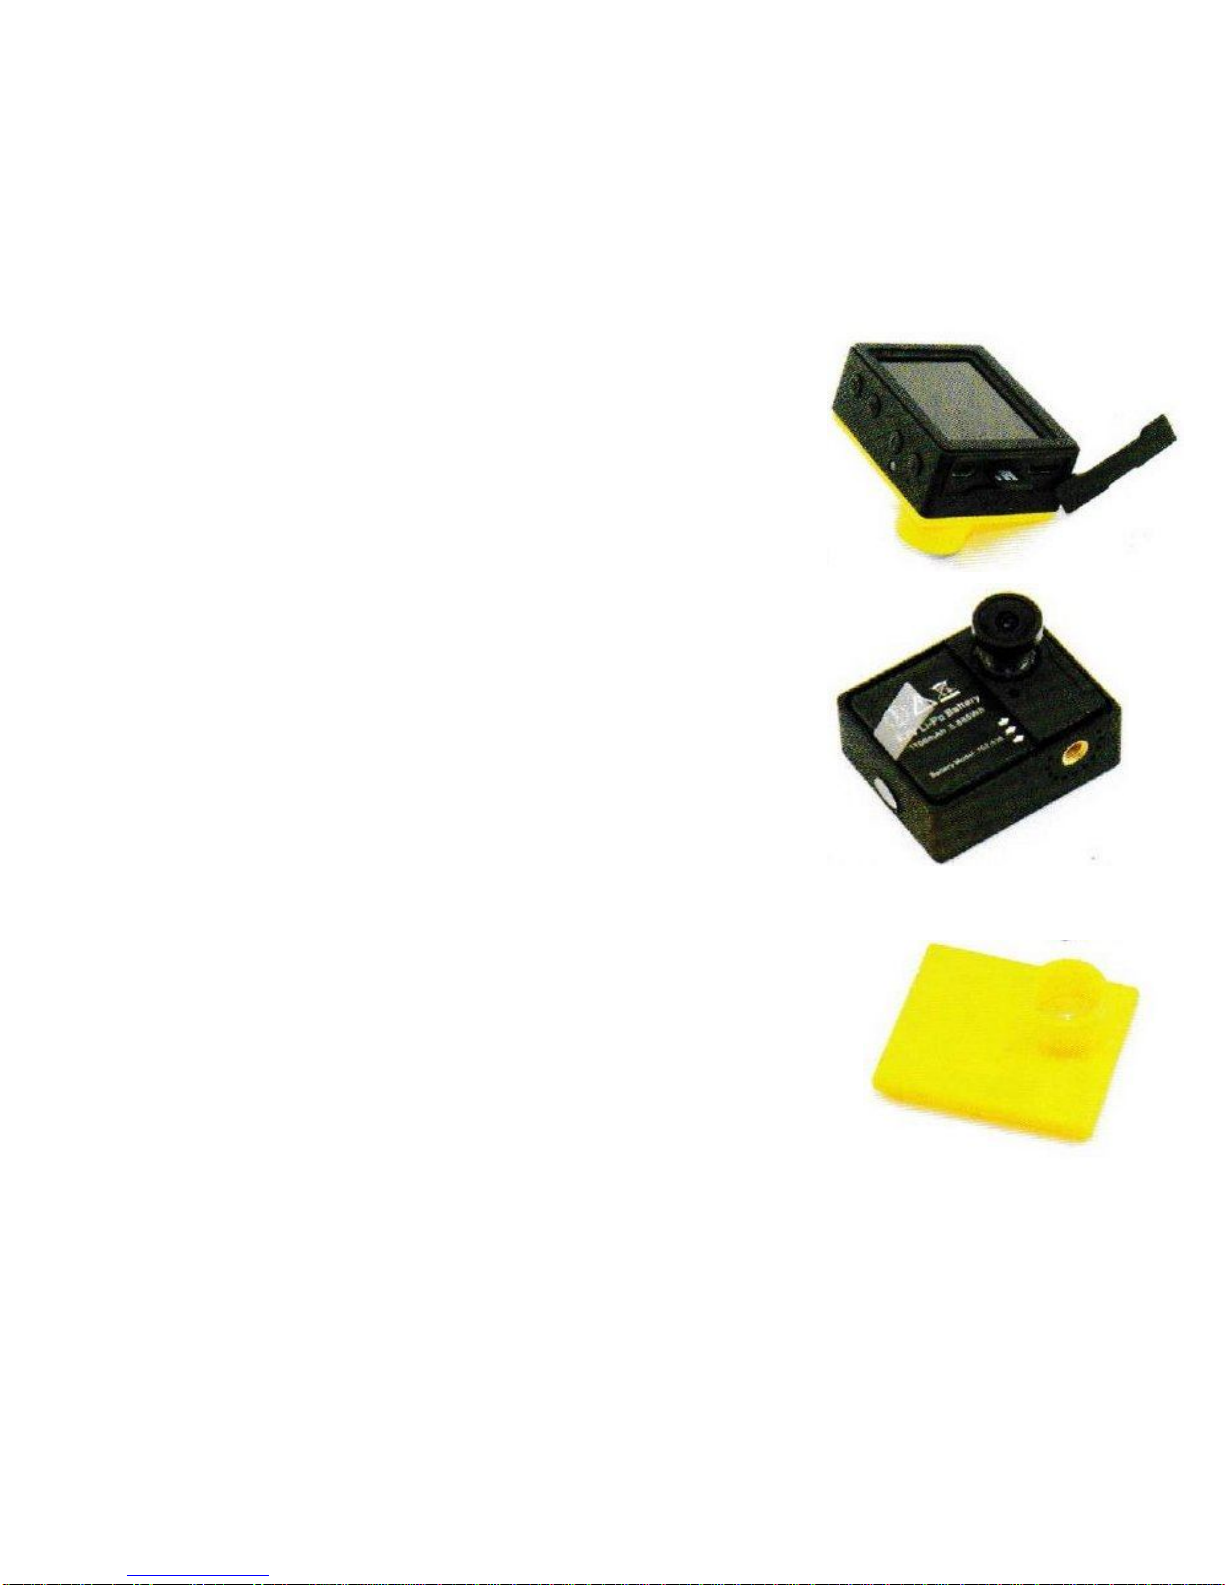
Box Contents
1 x LQSC48 Unit
1 x Remote Control
1 x Battery
1 x USB cable with Power Adapter
1 x User Manual

5
Getting Started
Product Specifications
LQSC48
Full HD 1080p Digital Sports Camera
Model No. LQSC48 - Full HD 1080p Waterproof Digital Sports Camera
Image Sensor 1/3 inch CMOS
View Angle 160 degrees(standard)
Pixel 12 mega pixels
Digital Zoom 4×
Screen 2 inch TFT LCD
Screen Resolution 480×240
Video Resolution
& Frame Rate
1920X1080(1080P)@30fps
1280X720(720P)@60fps
1280X720(720P)@30fps
848X480(WVGA)@60fps
640X480(VGA)@60fps
Video Codec H.264
Video Format MOV
Photo Resolution
VGA 640X480
1.3M 1280X960
2MHD 1920X1080
3M 2048X1536
5M 2592X1944
8M 3264X2448
10M 3648X2736
12M 4032X3024
Photo Format JPEG
Battery 3.7V/1000mAh Li-polymer battery
Battery Working Time 90minutes(1080P video recording)
Memory Support Micro SD card up to 64GB
G Sensor Included
HDMI Mini HDMI connector
AV Out Support
USB Interface USB 2.0
Color Silver Gray
Dimension 59 mm x 47 mm x 39 mm
Weight 72 grams (with battery)
The information contained in this document is subject to change without notice.

6
Features
Thank you and congratulations on your purchase of the LinQTab Portable Power Bank. Please read this manual
through carefully to maximize your enjoyment of the product and to ensure your own safety.
Safety Precautions:
1. Do not use the camera in extremely hot, cold, dusty or damp environment.
2. lnstall the shockproof case before using and try to avoid dropping the camera.
3. The camera itself is not waterproof. Please put the camera into waterproof case and
closed it tightly before using underwater, do not use it underwater over 60meters or
more than 4 hours.
4. The camera requires a micro SD card to work, please insert card before using.
5. The battery life varies according to the using environment. A colder environment will
drain the battery quicker, average battery working time is 1.5 hours.
6. Please remove the battery or charge the camera if not using for more than 5 days.
7. Do not disconnect the camera from PC during uploading or downloading footage, it
may damage the camera or files.
8. We will not take responsibility for the data lost problem, which can be caused by
camera damage, repair or any other reasons. Please follow user manual and backup
your data in time.
9. Do not take the camera apart by yourself for any reasons. This will break the tamper
seal and void out warranty. If you have any questions or problems, please contact the
dealer first
10. Do not use the camera in very dark or strong light. Image quality will be not good and
that may even hurt camera lens.
7
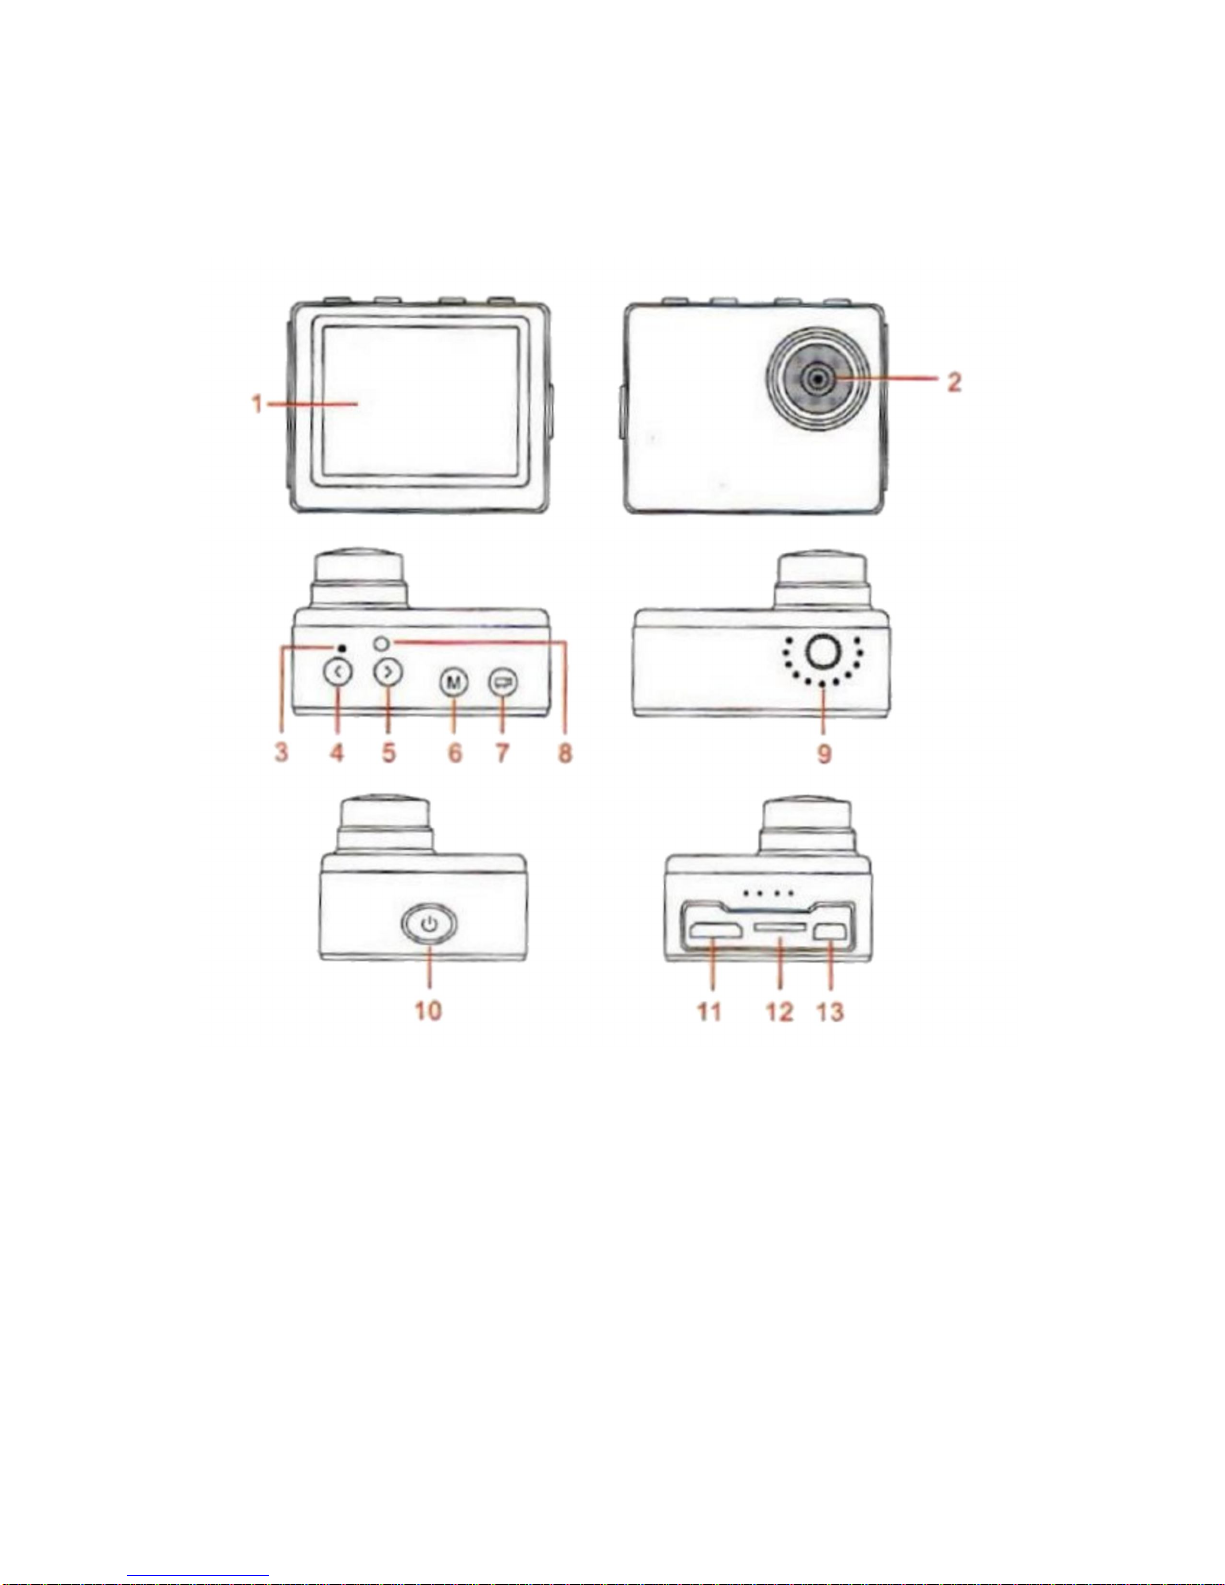
Camera Overview Diagram:
1. LCD
2. Lens
3. Microphone
4. Down
5. Up
6. “M” button – Menu Mode Switch
7. Record button - Record/Stop/Snapshot/0K
8. Indicator 1
9. Screw hole
10. Power button / Indicator 2
11. HDMI connector
12. Card slot
13. USB connector
8
Operating instructions:
Initial Camera Setup
Before using the Camera for the first time
1. Open card slot cover.
2. Insert a Micro SD card {up to 64GB) into slot, please format the
memory card before using.
3. Put battery into battery slot thentighten the battery cover.
4. This camera saves videos by .mov format, can be played by
Windows media player & QuickTime player directly. This camera
records full HD videos, big bitrates. If playback is not smooth, please try other players or High
configuration computers.
Attention: make sure the camera turned OFF before insert or remove
the card!

9
Camera Operations
Turn your camera on / off
Action Steps and Indicators
Turn On Press power button shortly,
– Indicator 1 turns on (Green)
– Indicator 2 turns on (Blue)
– LCD turns on
Now the camera is ready for use in
standby mode.
Turn Off Press and hold the power button for 2-3
seconds then release. The indicators and
LCD will turn off, now the camera is now
powered off.
To Record
1. Turn on the cameraand into Standby Mode.
2. Press button shortly, Green indicator 1 flashes, and Recording icon is shown on LCD
at the same time.
3. Press button again, Green indicator1 stops flashing.
Video Setup
Under Video mode, press the button shortly to enter video specifications setup.
10
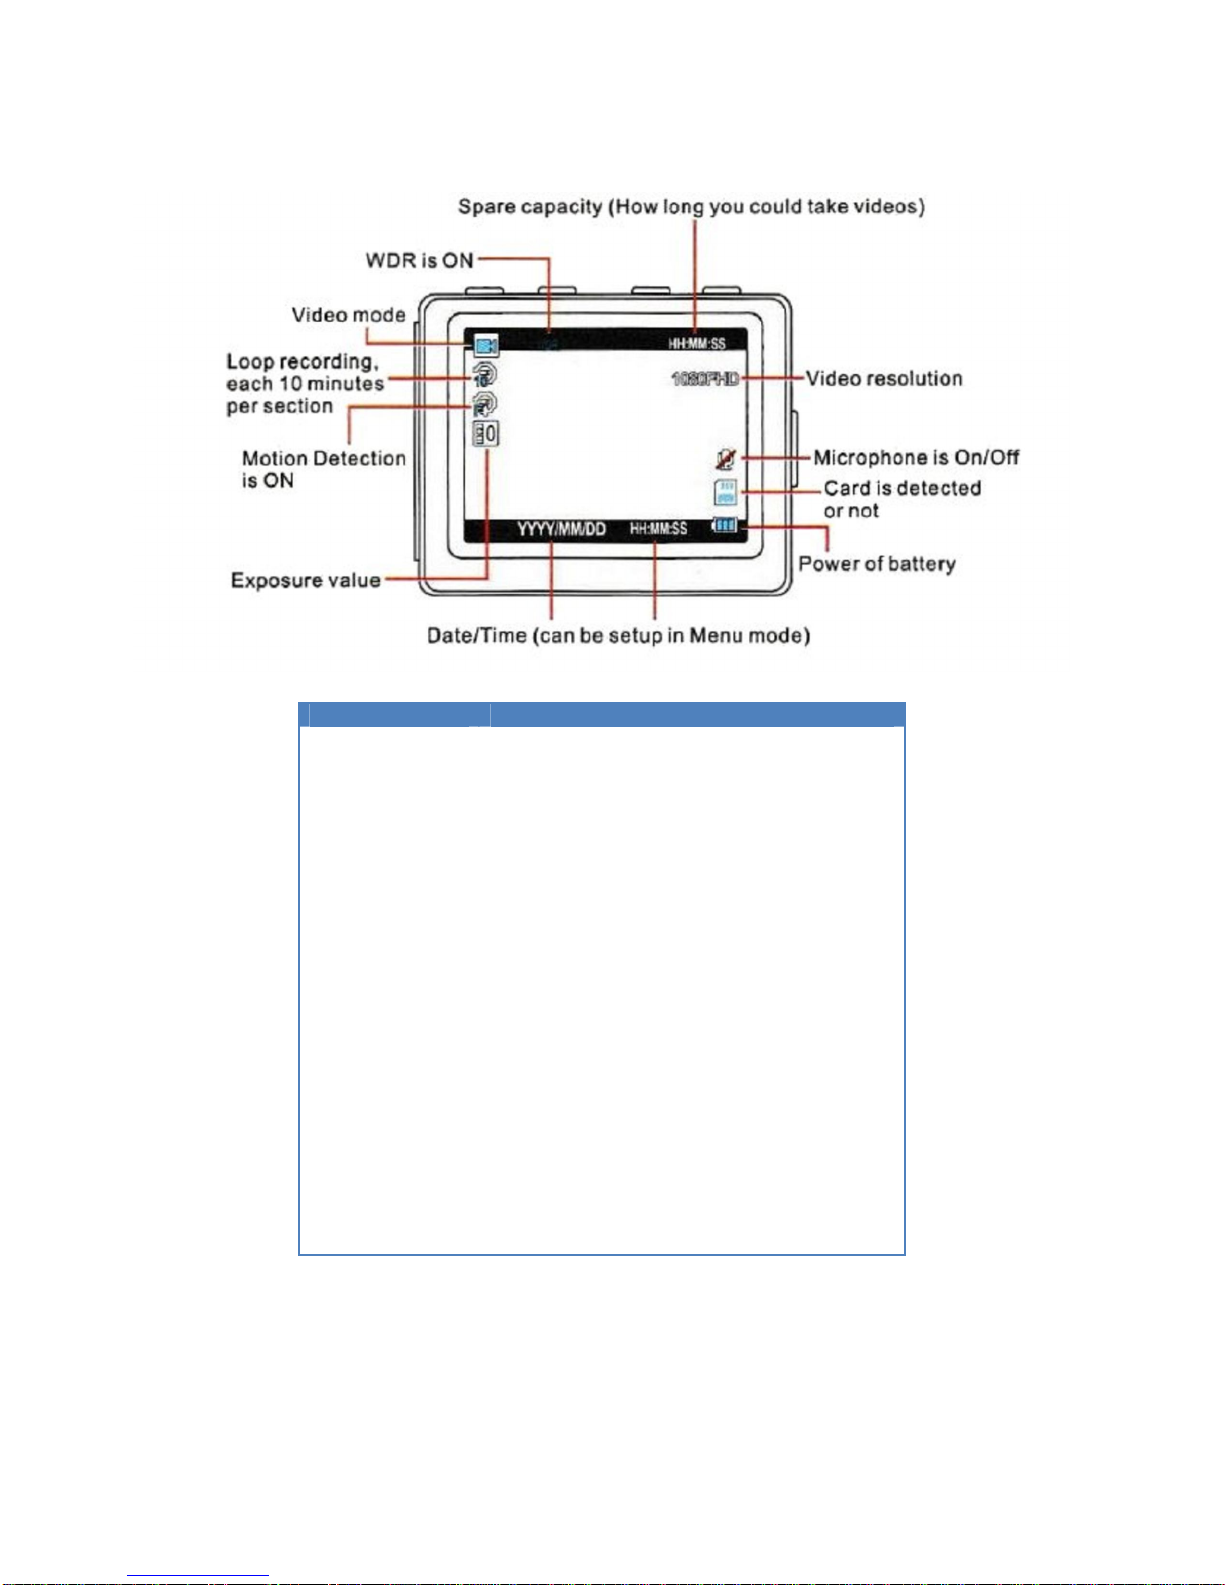
Camera View Screen Icons
FEATURE SETTINGS AVAILABLE
Resolution 1080 Full HD 1920x1080 @ 30fps
720P 1230 X 720 @ 60fps
720P 1230 X 720 @ 30fps
WVGA 848 X 480 @ 60fps
VGA 640 X 480 @ 60fps
Loop Recording Off / 2 minutes / 3 minutes / 5 minutes /
10 minutes / 15 minutes / 20 minutes
WDR On
Exposure +2.0 +5/3 +4/3 +1.0 +2/3 +1/3 +0.0
-1/3 -2/3 -1.0 -4-/3 15/3 -2.0
Motion
Detection On / Off
Recording
Audio On / Off
Date Stamp On / Off
G Sensor On / Off

11
System Setup
Under video mode, press Button twice shortly to enter system specifications setup.
SYSTEM SETTING SETTING OPTIONS
Date / Time YYYY/MM/DD HH:MM:SS (Can be set by users)
Key Tone On / Off
Language English / French / Spanish / Portuguese / German /
ltalian / Simplified Chinese / Traditional Chinese /
Russian / Japanese
AV Out NTSC / PAL
Frequency 50Hz / 60Hz
Screen Saver Off / 3 Minutes / 5 Minutes / 10 Minutes
Motor On / Off
Format SD Card
Default Setting Cancel / OK
Version Version 2014.0-122.01 (this may update further)
Snapshot
1. Under video standby mode, press and hold the button for 2 seconds, the Green
indicator 1 turns off and then the camera enters Photo mode.
2. Press the Button shortly, the Green indicator 1 flashes once, it means you already
took photo and saved in memory card automatically.

12
Photo Setup
Under Photo mode, press the Button shortly to enter snapshot specifications setup.
OPTIONAL SETTING SETTING MODES
Capture Mode Single / 2S Timer / 5S Timer / 10S Timer
Resolution in Megapixels
12M / 10M / 8M / 5M / 3M / 2M HD / 1.3M VGA
Sequence On / Off
Quality Fine / Normal / Economy
Sharpness Strong / Normal / Soft
White Balance Auto/Daylight/Cloudy/Tungsten/Fluorescent
Colour Colour / Black & White / Sepia
ISO Auto / 100 / 200 / 400
Exposure +2.0 +5/3 +4/3 +1.0 +2/3 +1/3 +0.0
-1/3 -2/3 -1.0 -4-/3 15/3 -2.0
Anti-Shaking On / Off
Date Stamp On / Off
The system specifications can be also set by this mode, press the button twice shortly to
enter setting.

13
Playback
On The Camera
1. Under photo mode, press and hold the button for2 seconds to enter playback. The
Green indicator 1 turns on and the LCD shows icon.
2. Press the and/or buttons to select video / photo you recorded.
3. Press the button shortly to play videos.
Please Note:
- When review recording files, press the button shortly to enter Menu.
- Here are three options: Delete, Protect and Slide Show.
- Press the Button again to exist.
On The PC
1. Make sure the camera is off and keep the card in camera.
2. Connect camera to computer via USB cable we provided in package then the device turns
on directly. Two options will be shown on LCD, Mass Storage and PC Camera.
3. Select Mass Storage then press the button shortly, it shows “found new hardware"
on the computer (Note: this will take up to 30 seconds).
4. 0pen “Removable Disc" on the computer, you will see your video and /or photo files.
Please transfer to computer for playback. You can copy or delete the files from the card.
5. Safely remove hardware and then eject the disk, disconnect the camera from computer.
TIP: Or you can simply remove the Micro SD card and use a PC card reader to access or play the
files.

14
On The TV - HDMI Out
1. 0pen the connectors cover, connect the camera and TV with the HDMI cable (optional)
provided.
2. Select correct “HDMI" mode on TV,turn on camera then press and hold the button
for playback mode, indicator 1 turns green.
3. Press the and/or buttons toselect vide or photo you recorded.
4. Press the button shortly to play videos.
AV Out
1. Connect the camera to monitor or other display device viaRCA cable (OEM) we provided.
2. Turn on the camera, the image will output real time.
3. Press and hold the button into playback mode.
4. Press the and/or buttons to select video or photo you recorded.
5. Press the button shortly to play videos.
15
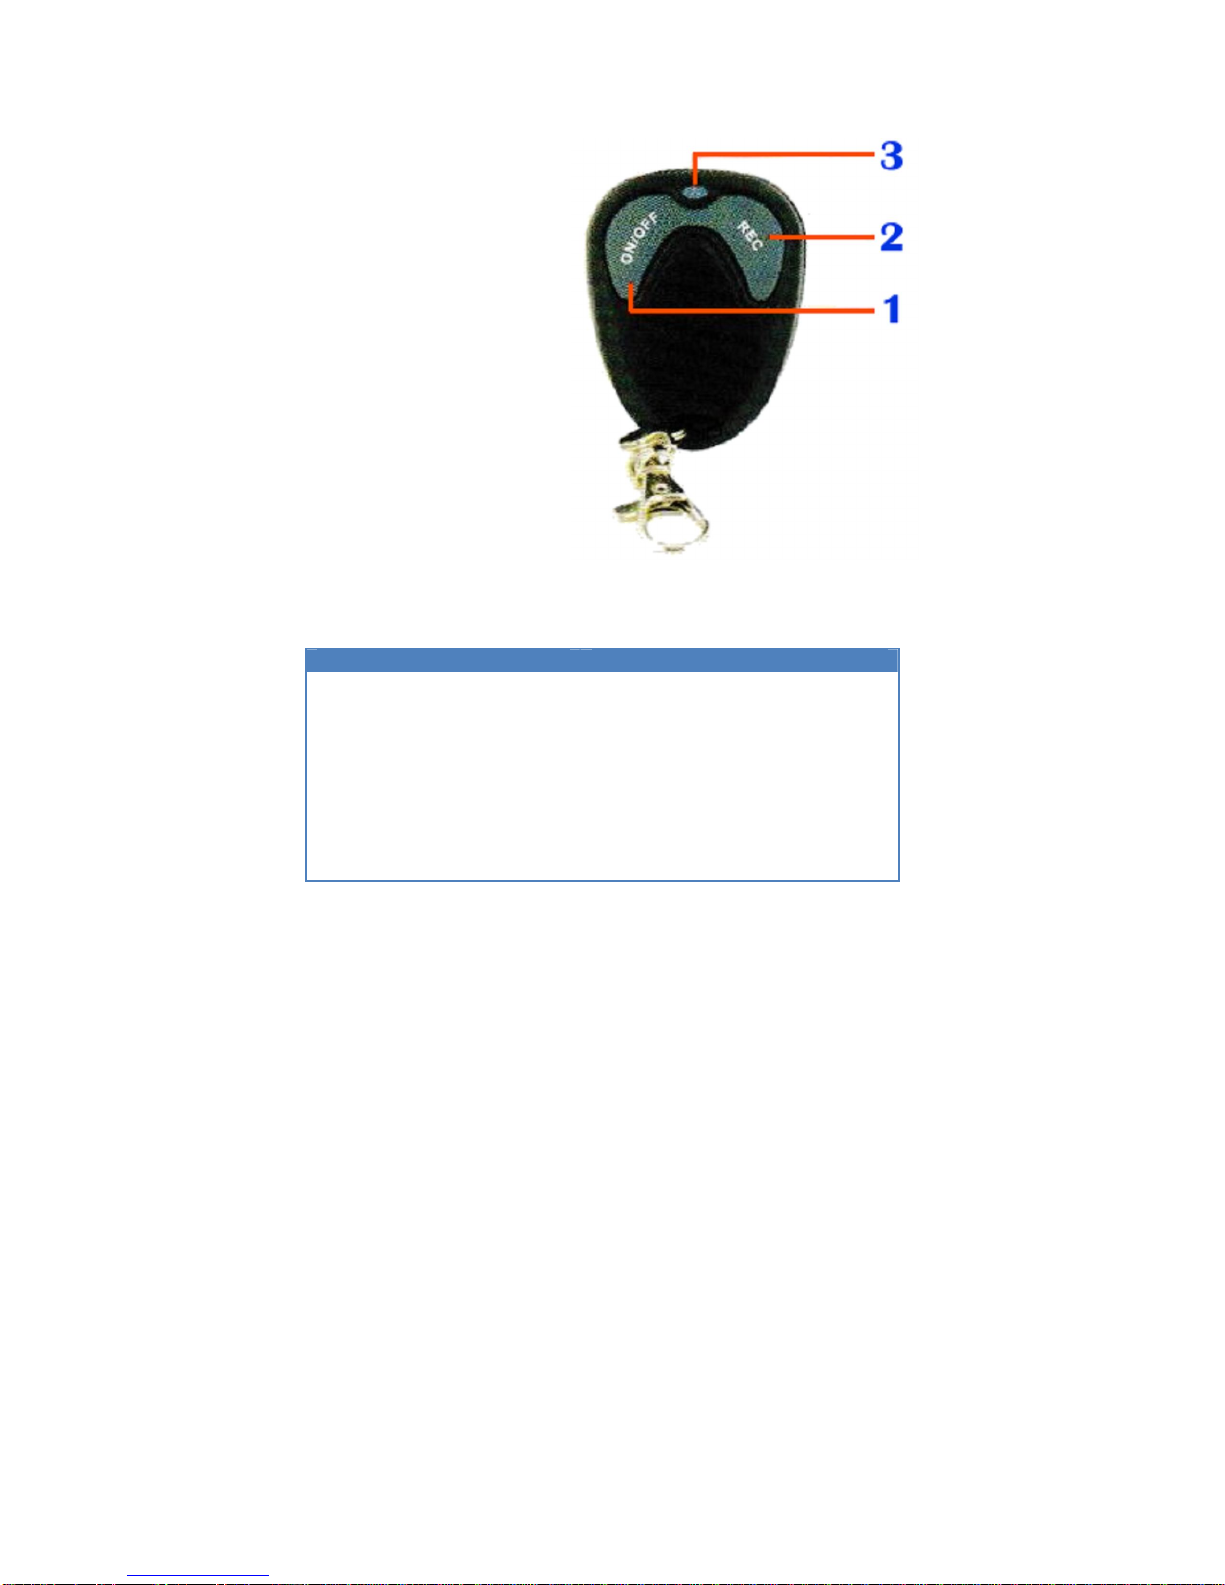
Remote Control
1. On / 0ff button
2. Record / Stop / Snapshot button
3. Indicator
Remote Specifications
REMOTE SPECIFICATION VALUE
Frequency 433 MHz
Transmission Range Approx. 5 to 8 Meters
Colour Black
Dimension 41 x 52 x 14 mm
Weight 22 grams
Battery 12 Volt Button Battery Stack
Working Voltage DC 12V
Working Current 10 mA
Transmitted Power >= 10 mW
Remote Operation
Turn On / 0ff
Press and hold the On/Off key on remote control for 2-3 seconds until the Green indicator 1
turns on, the camera is now powered on.
Press and hold the On/Off key on remote control for 2-3 seconds until the Green indicator 1
turns off, the camera is now powered off.
Record / Stop
Turn on the camera, wait 1-2 seconds until camera enter standby mode, press REC key on
remote control shortly, the camera will record automatically.
Press REC key again, the camera will stop recording and save the files.
NOTE: You can switch the Photo mode on the camera then take photos by remote control in the
same way.

16
Charging The Camera
1. Connect the camera to your PC, Laptop or USB charger using the USB cable provided.
2. 0nce connected the indicator2 turns red on camera then flashes, the unit is charging now.
3. After around 3-4 hours, the red indicator stops flashing then turns off. It is full charged.
4. Disconnect the camera from your PC, Laptop or USB charger.
Setting The Date And Time
1. Turn on the camera into standby mode.
2. Enter System setup, select Date/Time then press the button to enter.
3. Use the and/or buttons to change numbers, use button to confirm and
skip to next.
4. Press the button to exit.
File Protection
Press the button shortly while recording, now the file is protected. It will not be rewritten
even the loop recording open. You could also protect some in cards when you review after
recording.

17
Optional Accessories

18
Trouble Shooting
Q1 : Camera does not record, what can I do?
A1 : Make sure yourcamera has power.
Check there is a micro SD card in slot, format it on camera.
Change another card for trying, suggest brand ones. Brands like Kingston.
Reset the camera (Open the front cover and remove the battery)
Q2: The remote control is not working, what can I do?
A2: Check if there is still power. When you press keys on remote control, the indicator should
be Blue.
The battery pack can be changed when open the remote control by screwdriver.
Q3 : The camera cannot be charged, what shall l do’?
A3 : Try another USB cable or another charger.
Try to reset camera.
Change to another battery.
Q4 : How do I know the power is low?
A4 : The indicator 2 turns red and flashes quickly, the camera may turns off soon with buzzer
and vibrator warning.
Q5: How doI know the card IS full?
A5: The camera will tum off with buzzer & vibrator warning.
Q6: The camera is hot while using or charging, is that normal?
A6: Yes, that is normal, not quality issue. Please do not worry.
Q7 : Why are the video and audio out of sync on PC?
A7 : Copy the video files to your computer then try again.
Make sure that the player is latest version and supports H.264 mov format video playing.
Customer service
If you have any questions or suggestions, please contact us:
E-mail: contactus@exiomtech.com
Table of contents


