Linx HD 1080 Car Camcorder User manual

HD 1080 Car Camcorder
Use only original DC
5V car charger
User’s Guide <Version 01>

- 1 -
Content
Content Page
1. Noticifications……………………………………. 2 ~ 3
2. Quick installation guideline- setup ……………. 3 ~ 4
3. Display review…………………………………... 5 ~ 7
4. Quick installation guideline - Installation……… 8 ~ 14
5. Setup Menu………………………………………. 15 ~ 16
6. Contents in package……………………………. 17
7. Product specifications………………………….. 18 ~ 19
8. Buttons and appearance………………………. 20 ~ 23
9. Product features………………………………… 24
10. Frequently asked questions and trouble
shooting……………………………………………… 25 ~ 31

1. Noticifications
Congratulations on your purchase of the HD 1080 Car
Camcorder. Please refer to below recommendations for
safe use of the product:
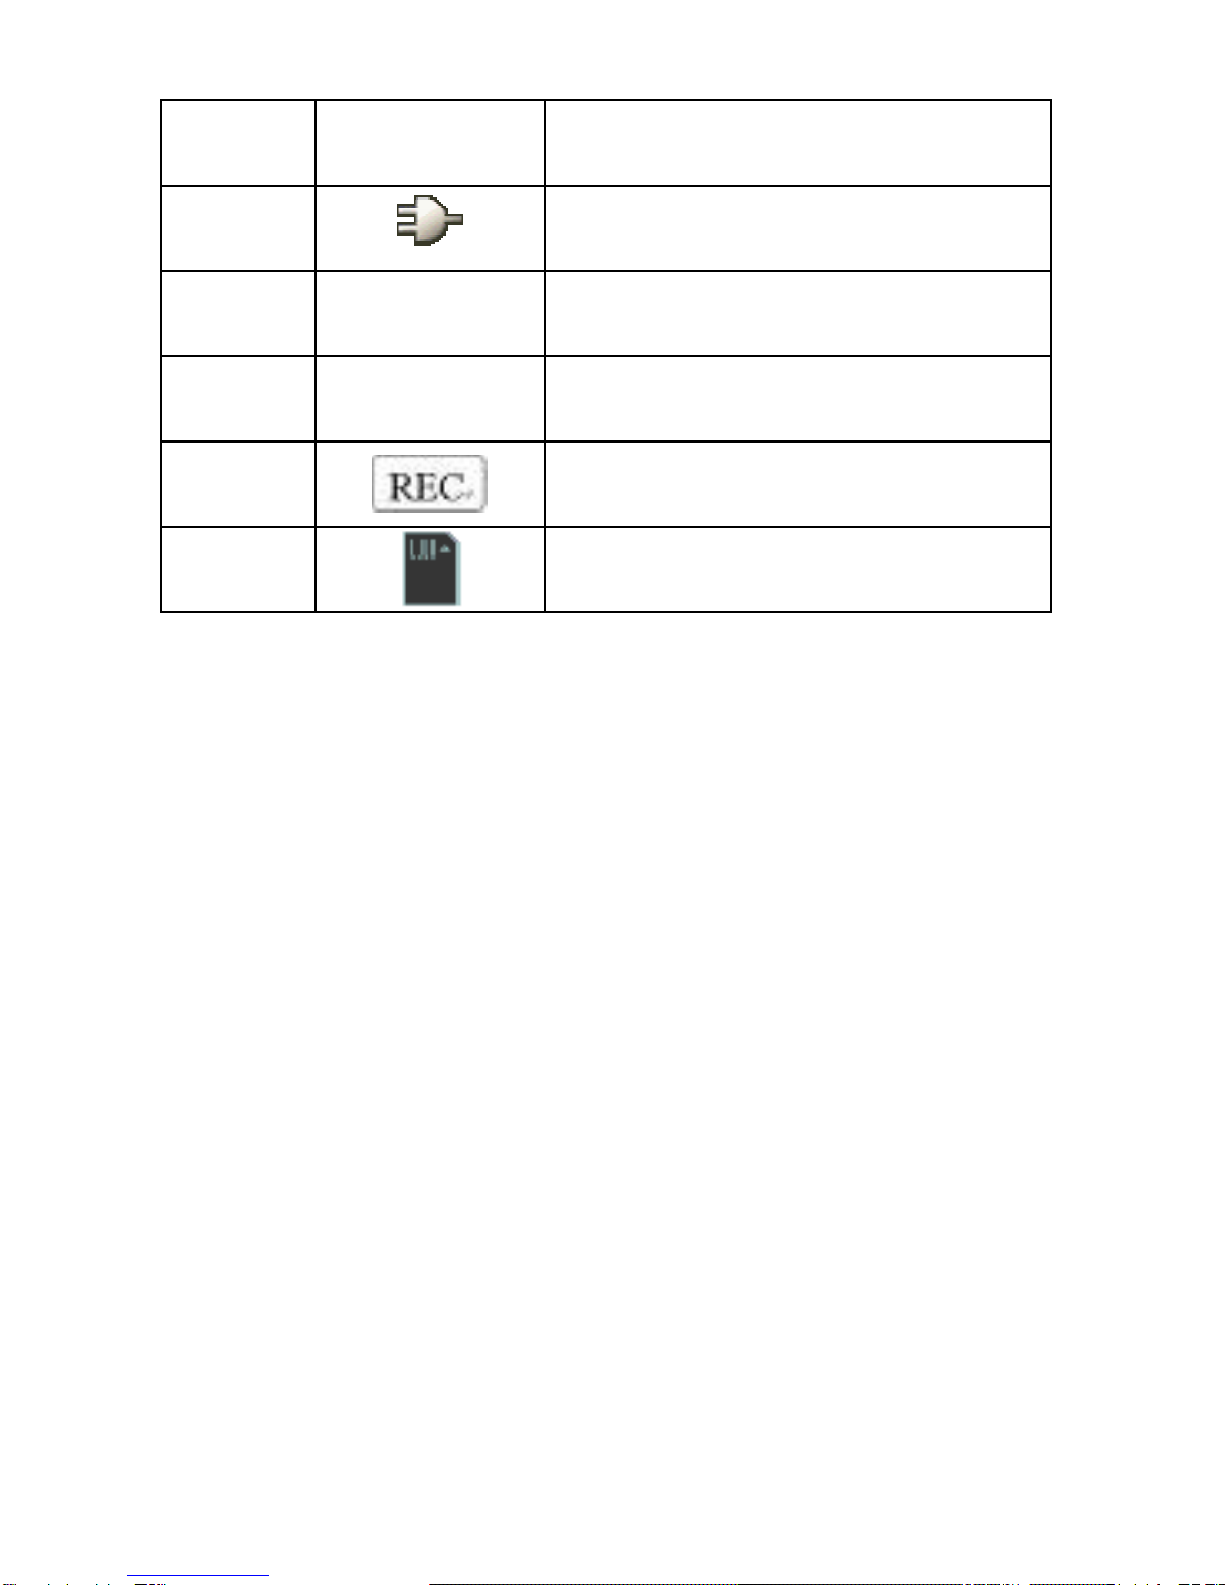
We recommend you to fully charge the battery
before using your HD 1080 Car Camcorder for
the first time. Charge the battery with the
included DC 5V car charger by inserting it in
the cigarette lighter for about 10 minutes. The
power status LED indicator will light in blue
before the battery is fully charged.
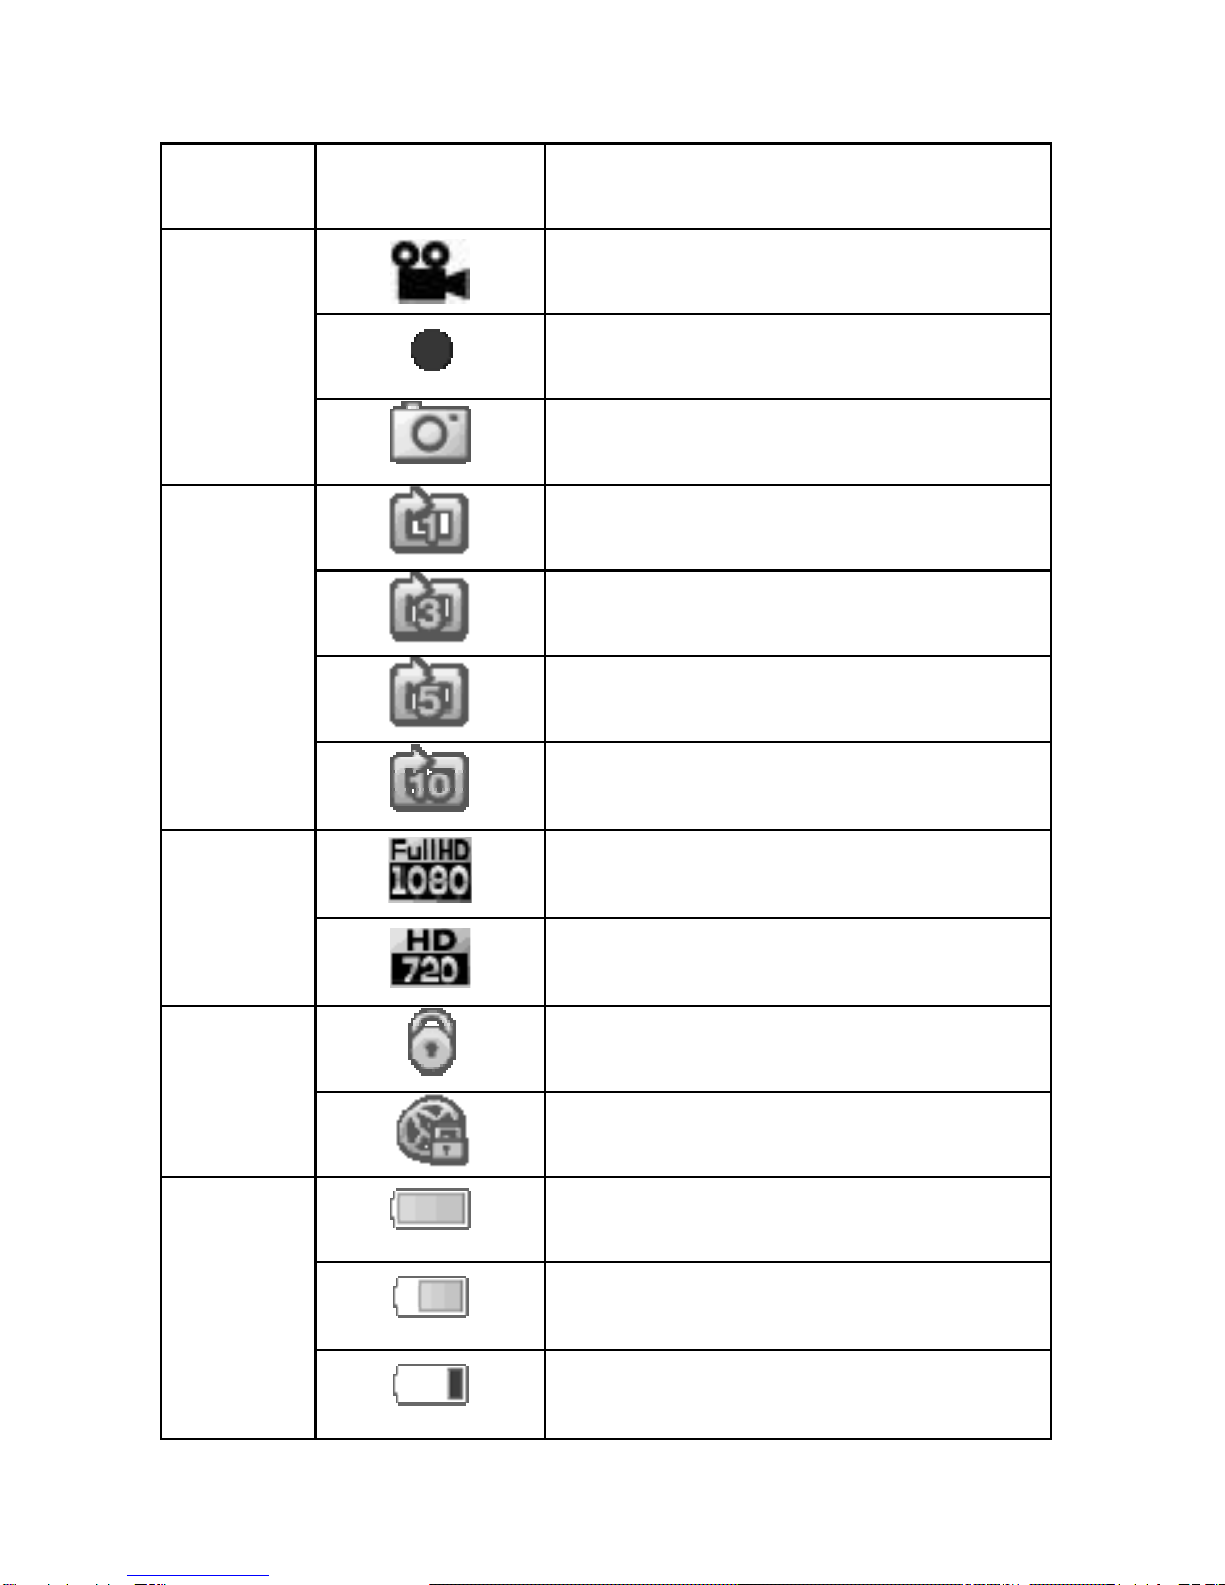
1. Insert the Micro SD card in the memory card slot
before power on the product.
2. For first time usage, please enter the function menu
and set up correct date and time before using.
3. Make sure no obstacle is near the lens and keep the
windshield clean of any dirt and dust for clear
recording images.
4. Please ensure all installations are firmly done.
5. For your safety, do not operate the Car Camcorder
during driving.
6. Keep the lens clean. Clean your Car Camcorder with
dry and soft cloth. Do not clean with detergent or
damp cloth, as liquid may be absorbed by it and lead
to damage.
7. Unplug the power cord (of car charger) and stop using
the Car Camcorder if any abnormality is encountered.
- 2 -

Do not attempt to disassemble or repair by yourself.
8. If any problem with the product is found, please
contact with QQLinx’s customer service center, return
the Car Camcorder (with included accessories) to the
dealer where you bought your product, or deliver it to
QQLinx maintenance department for inspection.
2. Quick installation guideline-Setup
< Step 1: Insert the micro SD card >
Insert the micro SD card in the memory card slot
until it “clicks” into the slot as illustrated below:
Remove the memory card:
Press the card gently downward, the memory will be
released from the slot.
- 3 -

- 4 -
Note:
1. The Car Camcorder supports micro SD/SDHC
32GB memory card.
2. Insert the memory card in correct direction,
otherwise the Car Camcorder or the memory card
may be damaged.
3. If the memory card cannot be detected by your Car
Camcorder, please remove and re-insert the
memory card, or replace with a new memory card.
<Step 2: Setup date and time>
For first time usage, please enter the function menu
and set up correct date and time before using. See
page 15 for more setup information.

3. Display Review
- 5 -
DISPLAY
HH:MM HH:MM:SS
A
F
BC DE
G H I

Zone ICON Description
Recording Mode (Stand by)
Recording
A
Photo shot
Loop Recording Period(1 min)
Loop Recording Period(3 min)
Loop Recording Period(5 min)
B
Loop Recording Period(10
min)
Recording
Resolution(1080)DISPLAY
C
Recording
Resolution(720)DISPLAY
Manual File Lock activated
D
Auto File Lock activated
Battery indicator(Full charged)
Battery indicator (2/3
charged)
E
Battery indicator (Low
power)
- 6 -

- 7 -
Zone ICON Description
External power
F HH:MM Recording period
G HH:MM:SS Time indicator
H Recording
I Memory Card detected

4. Quick Installation Guideline- Installation
< Holder Installation>
- 8 -
Top screw
knob Top screw
Knob (Knob 1)
Screw knob
for Global
axis (Knob 2)
Latch
Sucking Disc
Clean the windshield with clean cloth where the Car
Camcorder is to be attached.
Attach the suck disc to the preferred position on the
windshield and push the latch toward yourself to fix it
firmly.
< Main unit Installation >
Attach knob1 to Car Camcorder’s rear cover by
screwing it.
Rotate the global axis to adjust a best recording angle,
setup the Car Camcorder by locking knob2 firmly.
(Facing the global joint, turn knob2 clockwise to screw
tight it and counterclockwise to loosen it.)

<Connection Installation >
Step Description
1
Screw the top screw
on the holder to Car
Camcorder’s screw
hole on its upper side.
Tips:
1. Turn knob1 clockwise to attach it to the screw hole
on the top of your Car Camcorder.
(Facing the Car Camcorder, turn knob1 clockwise.)
- 9 -

Step Description
2
Move your Car
Camcorder to a
proper location, press
the plastic sucker on
the preferred position
on the windshield,
then push out the
latch to fix your Car
Camcorder on the
windshield.
Tips:
1. Clean the windshield where the Car Camcorder is to
be attached with soft, clean cloth.
2. Ensure that there is no dirt and debris in the sucking
disc by cleaning it with soft cloth if necessary.
3. Attach the sucking disc to the windshield and push
the latch out side to fix it firmly at the location you
prefer to attach it.
Note:
In most cases, you can attach your Car Camcorder at
center or rightward position behind the rearview mirror. You
can choose other location as long as it does not hinder safe
driving.
- 10 -

Step Description
3
Release knob2
slightly, fine tune
the shooting angle
of your Car
Camcorder to find a
best angle of
recording, and then
turn knob2
clockwise to fix it.
Tips:
1. Turn on your Car Camcorder
without connecting the car
charger, let the Car
Camcorder stay in standby
mode.
2. Refer to the picture showed
in the display, adjust the
holder’s global joint to get a
best shooting angle.
Recommended shooting Angle:
1. Bottom of the display must cover both ends of your car’s
front.
2. Center of the display must align with the one of your car.
Turn knob2 clockwise to lock it after above adjustments are
done successfully.
- 11 -

Step Description
4
Insert one end of the
cable of car charger to
your Car Camcorder’s
USB power input and
the other to the
cigarette lighter.
(Hide the cables in
your car if possible)
Tips:
1. Insert the DC jack of your car charger to the DC
input of your Car Camcorder.
2. Loop the car charger cable around the connection
rod of your rearview mirror or the holder.
3. After 1 and 2, fix and hide the car charger cable in
the car interior, for example, the seams along the
door frame, or under the carpet. (You can use a
coin or a card to fix the cable in the seams in the
car interior)
- 12 -

4. Insert the charger’s lighter connector into the
cigarette lighter; the installation is completed.
< Cabling of your Car Camcorder >
- 13 -

- 14 -
Note:
Disconnection between car charger and cigarette
lighter tends to occur due to different cigarette lighter
positions among different car models and the
vibration of the car during driving. This disconnection
may lead to abnormal power On/Off switching.
How to cope with it::
1. Push the two grounding plates at the car
charger’s connector outward slightly, this
can help to firm the connection.
2. Use Velcro strips to fix the car charger on
the cigarette lighter.
In case of a cigarette lighter extension set is used to
supply power for multiple devices, please ensure it
has sufficient power and enough consumption
current for multiple devices connected to it.
Otherwise, it may lead to malfunctions for devices
connected to it e.g. Car Camcorder, navigators, and
mobile phone.
To solve such problem, connect the Car Camcorder
directly to the cigarette lighter or replace the
extension set with one w higher amp value.

- 15 -
5. Setup Menu
Main Option Sub options Content
Playback
Mode
Video Review
Photo Review
Resolution 1920x1080
1280x720
Loop recording 1 min / 3 min /
5 min/ 10 min
Sound recording ON / OFF
G-sensor
sensitivity Level OFF / Low /
Normal / High
Power off Delay Instant power off /
15 sec / 30 sec
Recording
Mode setup
Motion Detection ON / OFF
Capture
Mode
Setting
Image Size
3M 2048x1536
5M 2592x1944
8M 3264x2448
12M 4032x3024
Time Setup Year/ Month/ Day
Hr / Min / Sec
LCD Display Always on /
30 sec / 60 sec
System
Setting
Beep Sound ON / OFF

- 16 -
Format YES / NO
Shake Power-ON
Sensitivity OFF / Low /
Normal / High
Shaking
Power-ON Rec.
Time
1 min/ 3 min/
5 min
Language
English /
Simplified
Chinese /
Traditional
Chinese
Default setting Cancel / Confirm
Firmware version
Back Back

6. Contents in Package
1. Main Unit x 1 5.User’s Manual x 1
- 17 -
2. Cigarette power x 1
3. Camcorder Holder x 1 6. Quick Installation Guide x 1
4.8GB micro SD Memory card x 1

- 18 -
7. Product specifications
Light sensor HD 2.0Mega Pixel CMOS
Device color Black
Camera angle Wide-angle 113 degrees
Memory support MicroSD / SDHC (Max. 32GB)
Video format MOV
Dynamic resolution
(cam) HD 1280x720 / HD 1920x1080
(30 frames per second)
Static resolution
(camera) 4032x3024(12M) / 3264x2448(8M)
2592x1944(5M) / 2048x1536(3M)
Display 2.5” TFT LCD
Aspect ratio 16:9
Photo format JPEG
Power supply Charger DC12V~24V to 5V internal
lithium battery
Charging by Car charger
Battery capacity About 40 minutes consecutive
recording
(fully charged new battery)
Microphone Manual settable: On/Off
Motion detection Manual settable: On/Off

- 19 -
G-sensor
sensitivity Manual settable: OFF / Low / Normal
/ High
G-sensor recording Manual settable: 1 / 3 / 5 min
Date /Time display Year / Month / Day , Hr / Min / Sec
Auto recording
enabling Fast start up
Auto power off after
engine off Instant power off / 15 sec / 30 sec
Computer
transmission
interface USB ver.2.0
TV output Yes, (HDMI out)
Recording when
charging Yes
Loop recording Yes
Recording time 1 min / 3 min / 5 min / 10 min
Language English/Chinese
Working
temperature 32 ~ 140 degrees Fahrenheit
Dimensions (main
body) 98×42×28 (W×L×H; mm)
Table of contents