Lippert FURRION FCR18ACAFA-SV User manual

18 Cu.ft. 110V French Door Refrigerator with Ice Maker
MODEL LIPPERT PN
FCR18ACAFASV 2023056917
INSTRUCTION MANUAL
*Picture shown here is for reference only.
This manual contains the product's basic information, safety, maintenance,
replaceable parts, fault diagnosis and basic troubleshooting procedures.

English
CCD-0008353 Rev: 01-09-24 - 1 -
Thank you and congratulations on purchasing this Furrion product. Before operating your new product, please read
these instructions carefully. This instruction manual contains information for safe use, installation and maintenance of
the product.
Please keep this instruction manual in a safe place for future reference. This will ensure safe use and reduce the risk of
injury. Be sure to pass on this manual to new owners of this product.
The manufacturer does not accept responsibility for any damages due to not following these instructions.
Table of Contents
Table of Contents................................................................................................................................................................................. 1
Important Safety Instructions............................................................................................................................................................ 2
Power Source Requirement................................................................................................................................................................ 3
Features and Parts ............................................................................................................................................................................... 4
Preparation and Installation .............................................................................................................................................................. 5
Refrigerator Unit Preparation....................................................................................................................................................... 5
Site Preparation and Installation................................................................................................................................................. 5
Installation Guide of Door Shelves.............................................................................................................................................. 7
Connecting Water Supply ............................................................................................................................................................. 7
Ice Maker.......................................................................................................................................................................................... 8
Operational Instructions..................................................................................................................................................................... 9
Functions and Operation.................................................................................................................................................................... 11
Maintenance and Cleaning ................................................................................................................................................................ 12
Troubleshooting................................................................................................................................................................................... 13
Specifictions ......................................................................................................................................................................................... 15

English
CCD-0008353 Rev: 01-09-24
- 2 -
Important Safety Instructions
CAUTION
RISK OF ELECTRIC SHOCK
DO NOT OPEN
This symbol indicates that dangerous voltage constituting a risk of electric
shock is present within your refrigerator.
This symbol indicates that there are important operating and maintenance
instructions in the literature accompanying your refrigerator.
WARNING
1. Read these instructions.
2. Keep these instructions.
3. Heed all warnings.
4. Follow all instructions.
5. Do not use your refrigerator near water.
6. Clean only with a damp cloth.
7. Do not block any ventilation openings. Follow installation process from manufacturer's instructions.
8. Do not install near any heat sources, such as radiators, heat registers, stoves, or other apparatus (including amplifiers)
that produce heat.
9. Refer all servicing to qualified service personnel. Servicing is required when your refrigerator has been damaged in any
way, such as spilled liquid, objects falling onto the refrigerator, your refrigerator being exposed to rain or moisture, or
the refrigerator does not operate properly.
10. To reduce the risk of fire or electric shock, do not expose your refrigerator to rain, moisture, dripping or splashing. No
objects filled with liquids should be placed on top of the refrigerator.
11. Your refrigerator is not intended for use by any person (including children) with reduced physical, sensory or
mental capabilities or lack of experience or knowledge, unless given supervision or instruction concerning use of your
refrigerator by a person responsible for their safety.
12. Children should be supervised to ensure that they do not play with your refrigerator.
ELECTRIC SHOCK HAZARD
Failure to follow these instructions may result in electric shock, fire or death.
1. WARNING - Keep ventilation openings, in both your refrigerator and the build-in structure, clear of obstruction.
2. WARNING - Do not touch the interior of your refrigerator with wet hands. This could result in frostbite.
3. WARNING - Do not use mechanical devices or other means to accelerate the defrosting process, other than those
recommended by the manufacturer.
4. WARNING - Do not damage the refrigerator circuit.
5. WARNING - Do not damage the refrigerant tubing when handling, moving or using your refrigerator.
6. WARNING - DANGER - Never allow children to play with operate or crawl inside your refrigerator.
Risk of children entrapment. Before your throw away your old refrigerator:
Remove the electrical connection wiring and also ensure that the doors are removed and leave the shelves in place to
prevent children from being trapped inside - DANGER OF SUFFOCATION!

English
CCD-0008353 Rev: 01-09-24 - 3 -
Power Source Requirement
This appliance must only be connected to a 110Volt power source.
The circuit must be protected properly between the appliance and power supply main.
Note: Only authorized or qualified professionals should perform repair services for this appliance.
1. WARNING - Do not use electrical appliances inside the food storage compartments of the refrigerator unless they are
of the type recommended by the manufacturer.
2. Maintenance - Disconnect the power source from your refrigerator before carrying out user maintenance on it.
3. If a component part is damaged, it must be replaced by the manufacturer, its service agent, or similar qualified persons
to avoid a hazard.
4. Follow local regulations regarding disposal of your refrigerator due to flammable refrigerant and gas. All refrigeration
products contain refrigerants, which under the guidelines of federal law must be removed before disposal. It is the
consumer's responsibility to comply with federal and local regulations when disposing of this product.
5. Do not store explosive substances such as aerosol cans with a flammable propellant in this device.
6. This appliance is intended to be used in the recreational vehicle.
7. When user cannot open the door at one side, please check if the other side of the door is fully closed. Users are only
allowed to open the door when one side is fully closed.
8. WARNING - To avoid a hazard due to instability of the appliance, it must be fixed in accordance with the instructions.

English
CCD-0008353 Rev: 01-09-24
- 4 -
Features and Parts
Note: Actual refrigerator configuration may vary slightly from the image above.
Note: Refrigerator will perform at optimal efficiency with all shelves, drawers and baskets in their
original position.
Refrigerator Door Shelves
Vertical Baffle Guide Block
Glass Shelves
Fruit and
Vegtable
Crispers
Crisper Cover
Refrigerator
Door Seal
Lower Freezer Drawer
Upper Freezer Drawer

English
CCD-0008353 Rev: 01-09-24 - 5 -
W D H
32 ¼"(820 mm)
29 ¼" (743 mm)
including door
27 ⁄" (695 mm)
without door
70" (1778 mm)
Unobstructed ventilation shall be maintained around the refrigerator or an embedded structure.
Preparation and Installation
Site Preparation and Installation
Install the refrigerator in a convenient location away from extreme heat and cold. Allow sufficient clearance between
the refrigerator and side so the doors will open without obstruction. Refrigerator is not designed for recessed
installation. Select a space with a strong level floor.
1. Ventilation requirements
The position you select for the refrigerator installation should be well-ventilated with minimal hot air. Do not place
your refrigerator close to a heat source and avoid exposure to direct sunlight to guarantee optimum refrigerator
performance with minimum energy use.
2. Heat dissipation space
During operation, the unit gives off heat to surroundings. Ensure that there is adequate space between the refrigerator
and neighboring walls or large objects. A minimum spacing of 1” (25mm) is required on both sides and backside of the
refrigerator.
Exterior dimensions listed below:
Refrigerator Unit Preparation
1. Packaging
Remove all packaging, including the foam backing at the bottom of refrigerator and the tape fixing accessories in
the box.
2. Standing time
Place the refrigerator in a proper up-right position for more than one hour before connecting power to ensure
refrigerant settling for its normal operation.
3. Cleaning
Make sure the accessory parts inside the refrigerator are present and the inside is wiped with a soft cloth.
70"
(1780 mm)
29 ¼"
(743 mm)
including
door
27
⁄"
(695 mm)
without
door
32 ¼"
(820 mm)
Clearances defined with 1" cavity for installation.
Minimum dimensions listed below:
70 ¾"
(1797 mm)
34 ¼"
(870 mm)
including
door
25 ⁄"
(645 mm)

English
CCD-0008353 Rev: 01-09-24
- 6 -
4. Fixing the refrigerator to the cabinetry
The refrigerator can be affixed to the RV cabinetry by installing the screws provided (Fig.1), or a similar Pan Head type
where the shank connects into the backer support by 1" (25 mm). Screw into the holes on the inner compartment, as
shown in the above image.
5. Fixing the shelves in the refrigerator compartment
The glass shelves in the refrigerator compartment are affixed in production for safety. The shelves can be
adjusted to different heights by removing the two screws that attach the retention bracket. For safety, reattach the
retention bracket using the same screws that were removed.
6. Door and drawer function
The refrigerator doors function as French door style. The user can open the door freely on both sides. The Freezer is a
bottom drawer that slides out. Ensure the latches and handles function properly.
7. Leveling
Make sure to level your refrigerator using the front leveling feet. If not leveled properly, the refrigerator door gasket's
sealing performance will be affected, or the refrigerator may even fail to operate.
8. Power-on
After completing the standing time requirement, connect the refrigerator to the dedicated power supply battery in the
RV, then the compressor will start working. Open the freezer door after 1 hour to check operation. If the compartment’s
internal temperature drops significantly, it indicates the refrigeration system is working normally.
Note: Refrigerators cannot be transported upside down. If they are transported upside down carelessly,
refrigerators must be placed upright for 2 hours before they can be energized.
3. Level ground
To ensure proper function, the refrigerator must be placed on a flat, firm and stable surface, and rest level on
four supports.
Fig. 1
Both sides are fixed with matching screws

English
CCD-0008353 Rev: 01-09-24 - 7 -
Connecting Water Supply
1. Access to a household cold water line with water pressure between 20 and 120 psi is needed.
2. A water supply line will be required to connect between the main supply line and inlet valve on the refrigerator, addi-
tional fittings may be required to make the connection.
3. Connect the supply line appropriately by threading the 1/4" fitting connection on the inlet valve of the refrigerator.
Installation Guide of Door Shelves
Place the tray above the mounting position on the inside of the refrigerator door (Fig.2) and slide the shelf down
toward the bottom of the door until it locks into place (Fig.3).
Reverse for removal of shelf.
Note: Before making the connection to the refrigerator, be sure that the refrigerator power cord is not plugged
into the wall outlet.
1. Place end of water supply line into sink or bucket. Turn On water supply and flush supply line until water is clear. Turn
OFF water supply at shut off valve.
2. Remove the plastic flexible cap from the water valve inlet (Fig. 4).
3. Make the appropriate water line connections between the refrigerator and main water supply (Fig. 4).
4. Turn ON water supply at shutoff valve and tighten any connections that leak.
WARNING - Connect to potable water supply only.
1/4" Threaded Connection
Water Inlet Valve
Water Valve
Ferrule (Sleeve)
Plastic Water Tubing to
Ice Maker Fill Tube Required- Water Supply Line
Fig. 4
Fig. 2 Fig. 3
tray off upward.

English
CCD-0008353 Rev: 01-09-24
- 8 -
Ice Maker
●After turning on your refrigerator, the ice will start to be made between 12 and 24 hours.
●The ice maker produces 3.5 lbs of ice per day, depending on the temperature of the freezer, how often the door
opens, and other using conditions (amount of food in the freezer, etc).
●In order to turn on/off the ice maker, press the power button (Fig. 5) for 2 seconds.
●The ice maker will fill up (and start making ice) between 12 and 24 hours after the refrigerator is turned on.
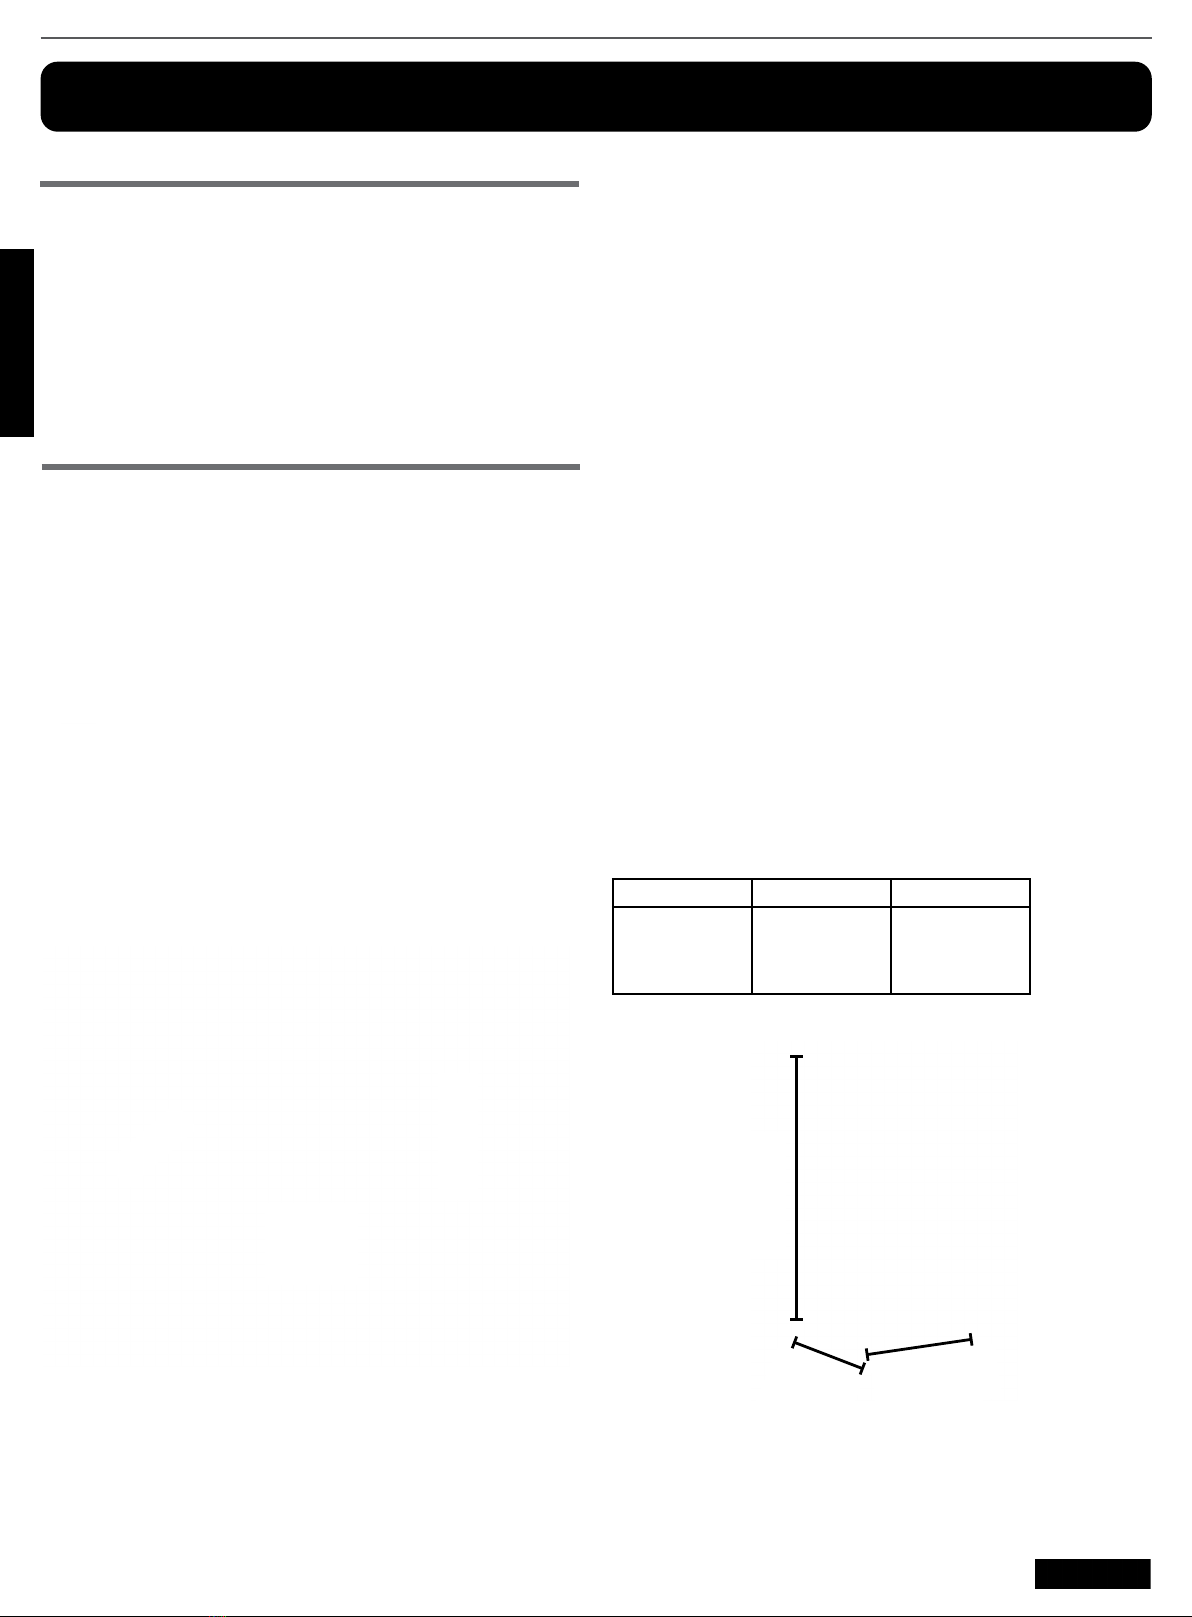
●Throw away the first batch of ice. Make sure that nothing interferes with the sensor (Fig. 5).
●When the ice reaches the sensor, the ice maker will stop to make ice immediately.
●It’s normal that some ice gets stuck. If the ice is not used frequently, the older cubes of ice will be opaque in color,
smaller, and with a strange flavor.
The ice maker is not producing ice or not enough ice
●If it is new installation, wait 12 to 24 hours after ice maker installation for ice production to begin. It will take 72
hours for full ice production.
●Check if the refrigerator is connected to a water supply or the supply shut off valve is turned on.
●Reverse osmosis filtration systems can reduce the water pressure below the minimum amount and result in ice
maker issues.
●A kink in the line can reduce water flow. Straighten the water source line.
●Confirm ice maker is in the ON position.
●The recommended temperature for the freezer compartment for normal ice production is 0°F. If the freezer
temperature is warmer, ice production will be affected.
●If the doors are not properly closed, ice production will be affected.
Sensor
Power Button
Fig. 5
Ice Maker Winterization
During the winter months, you need to ensure that the water connection to the refrigerator is not freezing up
otherwise this could lead to burst water lines and damage to the refrigerator.
1. Turn on your refrigerator and ice maker, and make sure the ice bin is below.
2. Winterize your RV per the manufactures instructions which should include filling the water system with antifreeze that
is safe for portable water systems.
3. Discard any ice or water that accumulates in the ice bin, and turn off your refrigerator.
Note: Only use RV antifreeze for portable water applications.
To Un-Winterize
In addition to following your RV manufactures instructions:
1. Turn on your refrigerator and ice maker.
2. Purge fresh water through the ice maker with several rounds of ice production.
3. Continue ice production until ice is clear, and the antifreeze has been purged.
4. Discard ice.
Note: An additional method can be accomplished by removing the ice maker, and bypassing the water line.
Contact an authorized service dealer.
Ice Maker Sanitizing
If unit is stored for a long period, the ice maker should be cleaned by running fresh water through it and discarding the
first few batched of ice at the start of every season. If the ice has a strange taste/odor/color, run a sanitizing solution
through your RV water system per the manufacture's instructions. purge several batches of ice with fresh water to
ensure the sanitizing solutions has been completely removed.

English
CCD-0008353 Rev: 01-09-24 - 9 -
Operational Instructions
1. Operational Precautions
●Do not operate the appliance below the operating temperature range for extended periods of time. This might effect
the appliance's performance in the long term.
●The internal temperature could be affected by factors like the location of temperature and frequency of door
opening, etc.
●Drinks should not be stored in the freezer compartment or the low-temperature compartment.
●Do not cover or block the vents or grilles of your refrigerator
●Please take caution when operating the doors:
WARNING
Please follow the method shown in Fig. 6 to use the flip rail correctly. Otherwise, if it is used as shown in Fig. 7
(the flip rail is in the unfolded state), the left and right doors of the refrigerator will not close normally, and the
flip rail may be damaged.
The flip rail is equipped with a heater to prevent frost, so it may feel warm, which is a normal phenomenon and
will not affect the preservation of food.
2. Instructions for food storage
2.1 Food storage location:
Due to the cold air circulation in the refrigerator, the temperature of each area in the refrigerator is different so load
foods based on the degree of coldness required.
2.2 Use of fresh food compartment
Set the temperature of the fresh food storage compartment between 33.8° F ~ 42.8°F (1°C ~ 6°C), and store the
foods that are intended for short-term storage, or to be eaten at any time.
This is suitable for the storage for foods that do not need to be frozen, but should remain colder, such as cooked
food, milk, fruit juice, beer, eggs, and condiments that need cold preservation. The crisper box is suitable for
preservation of fruit and vegetables.
2.3 Precautions for food storage
Before food is put into the refrigerator, it is advisable to seal them to prevent water evaporation. This will help keep
fruits and vegetables fresh and help minimize odors.
Do not over-pack the refrigerator compartment. Keep enough space between foods, if items are too close, the cold
air flow will be blocked, thus affecting the refrigeration effect. When storing food, keep a distance away from the
inner wall; and do not place water-rich food close to the refrigerator rear wall to avoid food freezing.
Note when food has been added to the refrigerator to minimize food waste and spoilage due to food being kept past
its expiration date.
2.4 Use of frozen food compartment
The freezer temperature is controlled below 3.2°F (-16°C), and it is advisable to store the food for long-term
preservation in the freezer compartment, but the storage duration indicated on the food packaging should be
adhered to.
This is suitable for the storage of ice cream, frozen food, and any other food that needs to be preserved for a
long time.
Flip Rail
Correct Way
Flip Rail
Incorrect Way
Fig. 7Fig. 6

English
CCD-0008353 Rev: 01-09-24
- 10 -
5. Traveling
Use caution when storing food in the refrigerator while traveling. Heavy and hard-sided containers (glass/metal) may
shift and bounce which could cause damage to the refrigerator or container. It is advised to secure/protect items well
or store in a separate container until reaching your destination. Make sure the doors are secured and locked into their
position appropriately before departing.
6. Power Supply Interruption
This refrigerator works on 110V power supply. Always estimate the operation time based on your available battery
capacity if using a inverter to power the refrigerator.
If you are aware of an upcoming power outage:
●Adjust the thermostat knob to the lowest setting an hour in advance so that the food will freeze (do not store new
items at this time). Reset the temperature mode to normal when power returns in a timely manner.
●You can also make ice in a watertight container in advance and use it in the upper part of the freezer to help the
food items stay fresh longer.
4. Extended Storage
●If the appliance will not be used for several months, turn it off first, then disconnect the power source.
●Take out all foods.
●Clean and dry the interior thoroughly. To prevent odor and mold growth, leave the door ajar: block it open or have
the door removed, if necessary.
●Keep the cleaned appliance in a dry, ventilated place and away from any heat source.
●Do not place heavy objects on the top.
The unit should not be accessible to child's play.
3. Energy Saving Tips
●Let hot foods cool to room temperature before placing in the refrigerator.
●Be sure to wrap foods properly, and wipe containers dry before placing them in the refrigerator. This cuts down on
frost build-up in the refrigerator.
●Organize and label food to reduce door openings and extended searches.

English
CCD-0008353 Rev: 01-09-24 - 11 -
Functions and Operation
2. Button Instructions
●"Fridge" button (Fig. 8): To adjust setting the temperature of the refrigerating area, press the button.
●"Freeze" button (Fig. 8): To adjust setting the temperature of the freezing area, press the button.
●"Select" button (Fig. 8): with each press of the button (within 5 seconds), the function icon flickers. You can switch
among quick freezing - intelligence successively. No operation within 5 seconds will end the function.
●Press the "Select Button" (Fig. 8) for 8 seconds, temperature display unit can be switched to Celsius or Fahrenheit,
light of °F/°C will be turned on accordingly.
3. Setting of the Refrigerator Area
●The LED display turns bright when the door is open. Push the "Fridge" button (Fig. 8). The buzzer will ring. Then
the refrigerating area turns into the setting condition. The temperature patterns flash and the temperature of the
refrigerating area increase by 1. The temperature will recycles as "33"—"45".
WARNING - The temperature will be set finally and the flash will disappear without setting operation over 5 seconds.
●The zone shown is for humidity adjustment (Fig. 9). Users can slide the module left or right in accordance with the
food situation. When the module locates in the "LOW" side, the humidity is low in crisper. When the module locates
in the "HIGH" side, the humidity is high in crisper.
4. Setting of the Freezer Area
●The LED display turns bright when the door is open. Push the "Freeze" button (Fig. 8). The buzzer rings. Then the
freezing room turns into the setting condition. The temperature patterns flash and the temperature of the freezing
room increase by 1. It will cycle from "5" — "-8".
WARNING - The temperature will be set successfully and the flash will disappear or stop setting over 5 seconds.
1. Setting the functions
●The LED display turns bright when the door is open. Push the "Select" button to set functions.
●Entering the quick freezing mode: Push the "Select" button (Flashing 5 times). When the quick freezing pattern turns
bright, it is in the quick freezing mode.
●Exiting the quick freezing mode: Push the "Select" button (Disappear). When the quick freezing pattern disappears,
it is exiting the quick freezing mode.
Note: In quick freezing mode, the temperature of the freezer area is fixed at low temperature, and it cannot be
regulated. It will exit the quick freezing mode within 24 hours after finishing freezing.
●Entering the smart mode: Push the "Select" button (Flashing 5 times). When the smart pattern turns bright, it is in
the smart mode.
●Exiting the smart mode: Push the "Select" button (Disappear). When the smart pattern disappears, it is exiting the
smart mode.
Note: In the smart mode, the temperature of cooling area and freezer area change as the change of the
environmental temperature and regulate the temperature automatically.
WARNING - Push the "Select" button, exit the smart mode, and all selects pattern disappear, then it exits the setting of
select modes. Regulate the temperature automatically.
Temperature
Control Quick Freezing
°F/°C hpld 8 sec
Smart
Refrigerator
Temperature
Display
Freezer Button
Freeze
Temperature
Area Display
Refrigerator Button Select Button
Function Mode
Area Display
2. Operational Guidance of Display
●The below picture is a schematic diagram of the electronic display (Fig. 8).
Fig. 8

English
CCD-0008353 Rev: 01-09-24
- 12 -
Humidity Control
Fig. 9
Fig. 10
Maintenance and Cleaning
2. Internal and External Cleaning
Any food residue in the refrigerator is liable to produce bad odors, so the refrigerator must be cleaned regularly. The
refrigerator food compartment should be cleaned at least once a month.
Remove all shelves, crisper, bottle racks, cover board and drawers, etc. and clean them with a soft towel or sponge
dipped in warm water or neutral detergent.
Clear off any dust accumulated on the rear panel and side plates of the refrigerator often.
After using detergent, be sure to rinse it with clean water, and then wipe it dry.
Do not use hands to clean under the base of the refrigerator to avoid harm from sharp metal edges.
Do not use bristle brush, steel wire brush, detergent, soap powder, alkaline detergent, benzene, gasoline,
acid, hot water or any other corrosive or soluble items to clean the cabinet surface, door gasket, plastic
decoration parts, etc. to avoid damage.
1. Replacement of LED Light
●When the lighting is damaged, please remove the cover first and then replace the LED lighting.
●The specific operations are shown in the following diagram:
1. Please move the cover and the thermostat out 1 ⁄" - 1 ⁄" (3-5 mm) in the direction of the arrow (Fig. 10).
2. Take off the cover and thermostat downwards in the direction of the arrow (Fig. 11).
3. Pull the connection terminal (Fig. 12). Use a screwdriver to remove the LED light board and replace it.
Note: If the LED lamp is abnormal, it should be replaced by professionals. Do not take dismantling and replace it
privately in order to avoid damage.
Fig. 12
Fig. 11

English
CCD-0008353 Rev: 01-09-24 - 13 -
Troubleshooting
IMPORTANT!
When the compressor is being turned on, the refrigerator will make some sounds/noises, like gurgling - this is
perfectly normal.
Repairs to refrigerators/freezers may only be performed by competent service engineers. Improper repairs can
give rise to signicant hazards for the user. If your appliance needs repairing, please contact your specialist
dealer or your local Service Centre.
Normal Condition Cause and/or Solution
Button failure Please check the control board. whether the fridge under lock mode.
When under lock mode, all buttons can’t work.
Low voltage, the compressor
can’t start Charge the RV-batteries by connecting the RV to the shore power.
Long time to start When the surrounding ambient temperature is high, it will take a
while to feel the compartments cooling.
Middle beams feel hot Middle beams feel hot after a period of time of the appliance
running, it's a normal condition.
Dew drops
When external air ows into the cool inner surface of the fridge, dew
drops can be formed. If the humidity of the installed location is high
or during the rainy season, dew drops can form on the outer side of
the fridge. This is a natural condition that occurs during the humid
weather. Wipe the water drops with a dry cloth.
Noise
When you operate the fridge for the rst time, the fridge will operate
at high speed to cool fast and the sound can seem louder.
When the internal temperature falls below a certain level, the noise
will subside.
When the operation of the compressor is starting or ending; various
parts expanding/contracting or various control devices operating
or temperature change within the fridge, you will hear the sounds,
these are normal sounds.
Compressor hot
When working, the temperature of the compressor housing may rise
to more than 176 °F (80 °C) - please do not touch the compressor, it
may cause serious injury.
WARNING - Before troubleshooting, disconnect the power supply.
Carefully wipe dry the door gasket and clean the groove. After cleaning, fix the four corners of the door gasket first and
then embed it segment by segment into the door groove.
3. Shelf and Crisper Removal
●Refrigerator Shelf - When removing the shelf, lift it up first and then pull it out; when installing the shelf, place it
into position before putting it down. Keep the shelf rear flange upward, to prevent food from contacting the liner
wall. When taking out or putting in the shelf, hold it firmly and handle with care to avoid damage.
●Crisper - After using or cleaning the crisper cover, be sure to put it back onto the crisper, so that the internal
temperature of the crisper will not be affected.
4. Defrosting
This appliance is designed with an automatic defrosting function, thus no manual defrosting is required.
Note: Do not spray the water directly when cleaning, so as not to affect the insulation performance of electrical
components. Use a dry rag when cleaning electrical components such as switch and light.
Note: Do not use hard brushes, wire brushes, detergents, gasoline, lacquer thinner, acetone and other organic
solvents, hot water or acid, alkali to clean the refrigerator.

English
CCD-0008353 Rev: 01-09-24
- 14 -
Normal Condition Cause and/or Solution
Compressor long time running
When the ambient temperature is too high or put too much fresh
foods into the refrigerator, it will take a longer time to cool down
until the appliance runs at the setting temperature.
Abnormal odors in refrigerator Odorous foods shall be packaged tightly; check for bad foods; the
inside of refrigerator shall be cleaned.
Ice maker failing to work normally
Check the ice maker switch is turned on; whether the freeer
compartment door is closed or ajar; Whether the water valve is
opened; whether water supply is obstructed, or water pressure is
too low; Whether the temperature of freezer compartment is high
due to just power connection or frequent use.
Water leakage from ice outlet
upon power-on for the rst time
During power up, the system will undergo a self-check process
which will allow a little water ow out of the ice maker. This is
normal, and should be dried up.
Ice frozen together when ice
maker operates normally
If ice is not used frequently, ice cubes may freeze together; take out
the frozen ice cubes from the ice storage box, break into pieces and
then put back, or discard directly.
Fault Possible Cause Solution
No display on
the display
panel
No power. Check whether the power is on.
Check the fuse.
Alarm sound Door has been open for
more than 1 minute. Close the door completely.
The compressor
is not working
Compressor will turn on/
o normally to maintain
temperature.
Do the cavity compartments maintain a cold
temperature - everything is normal.
The unit is in defrosting
mode, no power. Check all wiring connections and fuses.
The unit was not turned
o during storage, and
over temped.
Disconnect power so that no display or cavity light
illuminates, and reconnect power. This will reset power
to the unit.
Compressor
runs too long
The fridge has recently
been disconnected for a
period of time;
Put too much fresh or hot
food ; Doors are opened
too frequently
or too long.
lt takes some hours for the refrigerator to cool down
completely ; Hot food will cause the fridge to run longer
until the desired temperature is reached ; Warm air
entering the fridge cause it to run longer. Open the
door less often.
Vibrating noise
Floor is uneven or weak;
Items placed on the top
of the fridge are vibrating;
Fridge is touching wall or
cabinets.
Be sure oor is level and solid and can adequately
support refrigerator; Remove items; Move refrigerator
so that does not touch the wall or cabinets.
Before calling for service, review this list. It may save you both time and expense. This list includes common
occurrences that are not the result of defective workmanship or materials in this appliance.

English
CCD-0008353 Rev: 01-09-24 - 15 -
Specifictions
Note: if the above descriptions are inapplicable to troubleshooting, do not disassemble and repair it
yourself. Repairs carried out by inexperienced persons may cause injury or serious malfunctioning. Contact
the local store where your purchase was made. This product should be serviced by an authorized technician
and only genuine parts should be used
When the refrigerator is not in use for long periods, disconnect from the power source, empty, clean and
keep doors open to prevent unpleasant odors.
Specications
Total Capacity 18 Cu.ft.
Freezer Capacity 5 Cu.ft
Refrigerator Capacity 13 Cu.ft.
Door Type French door
Handle Pocket handle
Control Type LED Display with electronic control
No. of Shelves 3
No. of Crisper Total 4 drawers, 2 in fridge compartment, 2 in
freezer compartment
Cooling Type Compression cooling system
Refrigerant R600a
Rated Voltage 110V
Temperature Range Refrigerator: 32°F to 43°F (0°C to 6°C) adjustable-
Freezer: -10°F to 5°F (-23°C to -15°C) adjustable
Working Temperature Range 50°F to 110°F (10°C to 43°C)
Defrost Automatic

LIPPERT PN 2023056917
CCD0008353
Furrion, LLC (Furrion) are wholly owned subsidiaries of Lippert Components, Inc. (Lippert)
Furrion, LLC (Furrion) sont des filiales en propriété exclusive de Lippert Components, Inc. (Lippert)
Furrion, LLC: 52567 Independence Ct., Elkhart, IN, 46514
Furrion Innovation Center & Institute of Technology
Centre d’innovation et institut de technologie Furrion
22244 Innovation Drive, Elkhart, IN 46514-5514, USA
Toll free/Numéro gratuit/Línea telefónica gratuita:1-800-789-3341
©2007-2023 Furrion, LLC. All rights reserved.
©2007-2023 Furrion, LLC. Tous droits réservés.
For Patent Info: www.Lippert.com/patents
Pour des informations sur les brevets: www.Lippert.com/patents
FURRION.COM
The contents of this manual are proprietary and copyright protected by Lippert. Lippert prohibits the
copying or dissemination of portions of this manual unless prior written consent from an authorized Lippert representative has been pro-
vided.
Any unauthorized use shall void any applicable warranty.
The information contained in this manual is subject to change without notice and at the sole discretion of
Lippert. Revised editions are available for free download from lippert.com.
Please recycle all obsolete materials.
Les renseignements contenus dans le présent manuel peuvent seulement être distribués sous forme de document complet, à moins de
recevoir l’approbation explicite de Lippert Components pour distribuer desparties individuelles. Tous les renseignements contenus dans le
présent manuel peuvent être modiés sans préavis. Les éditions révisées pourront être téléchargées gratuitement sur le site lci1.com. Ces
renseignements sont considérés comme étant factuels jusqu’à ce qu’une version révisée les rende désuets.
Veuillez recycler tout le matériel désuet.
For all concerns or questions, please contact Lippert.
Communiquer avec Lippert Components si vous avez des questions ou des préoccupations.
This manual suits for next models
1
Table of contents