manuals.online logo
Brands
  1. Home
  2. •
  3. Brands
  4. •
  5. LiveAction
  6. •
  7. Network Hardware
  8. •
  9. LiveAction LiveWire User manual

LiveAction LiveWire User manual

1Install LiveWire
Attach the included feet and screw one end of
the power supply cable to the DC jack on the
back of LiveWire™, and plug the other end of the
cable into a reliable power source.
Warning: Do not place anything on top of or on
either side of LiveWire as this may cause the unit
to overheat.
2
Connect LiveWire to the Network
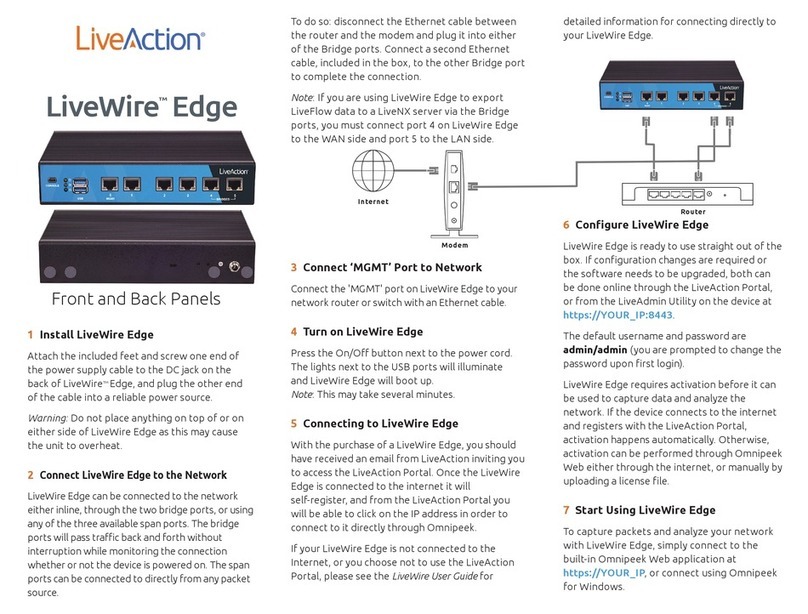
LiveAction suggests connecting LiveWire inline
between your Internet source or modem and
your network router or switch. LiveWire’s Bridge
ports will pass traffic back and forth without
interruption while monitoring the connection
whether or not the device is powered on.
To do so: disconnect the Ethernet cable between
the router and the modem and plug it into either
of the Bridge ports. Connect a second Ethernet
cable, included in the box, to the other Bridge port
to complete the connection.
Note: If you are using LiveWire to export IPFIX
flow data to a LiveNX server, you must connect
port 4 on LiveWire to the WAN side and port 5
to the LAN side.
3Connect ‘MGMT’ Port toNetwork
Connect the 'MGMT' port on LiveWire to your
network router or switch with an Ethernet cable.
4Turn on LiveWire
Press the On/Off button next to the power cord.
The lights next to the USB ports will illuminate
and LiveWire will boot up.
Note: This may take several minutes.
5Identify LiveWire IP Address
LiveWire comes pre-configured toobtain
its IP address via DHCP. The IP address is required
to configure and use LiveWire, as described in
Steps 6 and 7. If you are not familiar with how to
look up the IP address assigned to LiveWire,
please obtain the IPaddress from your network
administrator. The MAC address on the bottom of
LiveWire is useful in determining the corresponding
IP address.
Note: If an IP address is not assigned to LiveWire
by the DHCP server within two minutes of being
connected to the network, LiveWire defaults to
a static address of 192.168.1.21.
Internet
Modem
Router
6Configure LiveWire
LiveWire is ready to use straight out of the box;
however, to change settings with the confi-
guration utility, use a web browser to connect
to the IP address identified in Step 5.
Settings that can be changed include the device
name, MGMT IP address, time zone, NTP server,
and reporting options: None, Local, Remote
ELK Server, and Export Data to LiveNX.
Username: admin Password: savvius
7Start Using LiveWire
To view a graphical representation of your
network, use a web browser to go to
https://YOUR_IP:8443; or to get more
in-depth data about your network, connect
to LiveWire from Omnipeek Connect (via the
Capture Engine window).
LiveWire™
Front and Back Panels
Using LiveWire
LiveWire™is useful in many ways:
Network Monitoring
When LiveWire is connected inline to the
network, it immediately begins collecting
network statistics for long-term reporting
and trending. Understanding the network
and solving problems is extremely easy using
either the built-in dashboards or LiveNX
(sold seperately). The built-in dashboards are
convenient if you have only a few LiveWire
units deployed. The LiveNX dashboard is
recommended when multiple LiveWire units
are deployed and you wish to aggregate the
data from all units in a single dashboard.
Network Troubleshooting
Omnipeek®is the premier software for under-
standing network performance and operation
based on packet data. With Omnipeek you can
capture and decode packets and interact with
high level visualizations to understand
network and application performance, user
activity, security issues, and much more.
The registered owner can download the latest
version of Omnipeek Connect from their
MyPeek account at:
https://mypeek.savvius.com
LiveNX Integration
To configure LiveWire to export IPFIX flow
data to a LiveNX server, change the Reporting
Options in the configuration utility to 'Export
Data to LiveNX,' and specify the LiveNX server
IP address and the WAN Router MAC.
Additionally, in the LiveNX application, when
adding a LiveWire to LiveNX from the Add Device
dialog, configure the 'Enter SNMP connection
settings for this device' option as follows:
SNMP Version: Version 3
User Name: admin
Authentication Protocol: SHA
Authentication Password:
Ys2Q5Xxu7g3gUoHxfUFifqiXSXjd2tkc
Privacy Protocol: AES
Privacy Password:
x3Fmpv9OpIsnk0Qg3rH25BKBd66fxzSK
Reset to Factory Defaults
In the event you need to reset LiveWire to its
factory settings, use a paper clip or similar object
to hold down the reset button for three seconds.
If any settings need to be changed after reset,
the configuration utility will need to be run again.
www.liveaction.com
Copyright 2018 LiveAction.
All rights reserved.
LiveWire is a trademark of LiveAction.
#110818
LiveWire™
QUICK START GUIDE
Simplify the Network

Other LiveAction Network Hardware manuals

LiveAction LiveWire Edge User manual

LiveAction

LiveAction LiveWire Edge User manual

LiveAction LiveWire Edge User manual

LiveAction

LiveAction LiveWire Edge User manual

Popular Network Hardware manuals by other brands

IgniteNet MetroLinq ML2.5-60-35 quick start guide

IgniteNet

IgniteNet MetroLinq ML2.5-60-35 quick start guide

GeoVision GV-MNVR1000 quick start guide

GeoVision

GeoVision GV-MNVR1000 quick start guide

weintek iR-ETN40P Installation instruction

weintek

weintek iR-ETN40P Installation instruction

Amtran Qualcomm QCS8250 user guide

Amtran

Amtran Qualcomm QCS8250 user guide

SIGMA TEK FDD Power Installation Guide

SIGMA TEK

SIGMA TEK FDD Power Installation Guide

Ubiquiti Loco5AC quick start guide

Ubiquiti

Ubiquiti Loco5AC quick start guide

Juniper CTP2000 Series Hardware guide

Juniper

Juniper CTP2000 Series Hardware guide

AT&T activeARC Hardware installation guide

AT&T

AT&T activeARC Hardware installation guide

DBTEL DB-6802-L1 Quick installation guide

DBTEL

DBTEL DB-6802-L1 Quick installation guide

Clare Controls ClareVision CV-M32810-08 installation guide

Clare Controls

Clare Controls ClareVision CV-M32810-08 installation guide

Furukawa electric FBS LightDrive LD2500 Series installation guide

Furukawa electric

Furukawa electric FBS LightDrive LD2500 Series installation guide

DCB 8 DBRA Setup and configuration guide

DCB

DCB 8 DBRA Setup and configuration guide

FS T5850-24S2C quick start guide

FS

FS T5850-24S2C quick start guide

Lucent Technologies Stinger Administration guide

Lucent Technologies

Lucent Technologies Stinger Administration guide

CommScope FPX Series installation instructions

CommScope

CommScope FPX Series installation instructions

Blue Coat ProxySG 300 Series Replacing the Compact Flash Card

Blue Coat

Blue Coat ProxySG 300 Series Replacing the Compact Flash Card

Biotector Network Control Unit user manual

Biotector

Biotector Network Control Unit user manual

ETC Echo Expansion Bridge installation guide

ETC

ETC Echo Expansion Bridge installation guide

manuals.online logo
manuals.online logoBrands
  • About & Mission
  • Contact us
  • Privacy Policy
  • Terms and Conditions

Copyright 2025 Manuals.Online. All Rights Reserved.