Living & Co CM4656 User manual

Coffee Machine
Operation instructions
CM4656

1
Contents
SAFETY INSTRUCTIONS
PRODUCT OVERVIEW
OPERATION
CLEAN AND MAINTENANCE
CLEANING MINERAL DEPOSITS
TROUBLE SHOOTING
ENVIRONMENTAL PROTECTION
Page
2
4
5
10
11
14
12

SAFETY INSTRUCTIONS
Before using the electrical appliance, the following basic precautions should
always be followed including the following:
1. Read all instructions and keep this manual in a safe place for future
reference.
2. Remove any packaging materials from the product.
3. Before using, check that the voltage of wall outlet corresponds to the rated
voltage marked on the rating plate (220-240V AC 50/ 60Hz).
4. To protect against fire, electric shock and injury to persons, do not immerse
cord / plug or appliance, in water or other liquid.
5. The product should not be left unattended during use.
6. Remove plug from wall outlet before cleaning and when not in use. Allow
appliance to cool down completely before moving, touching components or
before cleaning.
7. Do not operate the appliance with a damaged cord or plug or after the
appliance malfunctions, or is dropped or damaged in any manner. Return
appliance to the nearest authorized service facility for examination and
repair.
8. The use of accessory attachments not recommended by the appliance
manufacturer may result in fire, electric shock or injury to persons.
9. Place appliance on a dry, flat and stable surface or table, do not hang
power cord over the edge of table or counter.
10.Ensure the power cord is positioned such that it cannot come into contact
with hot surfaces of the appliance.
11. Do not place the coffee maker on or near hot surfaces of exposed fire in
order to avoid damage.
12.To disconnect, remove plug from wall outlet. Always hold the plug and
never pull directly on the cord.
13.Do not use the appliance for other than its intended use.
14.Close supervision is necessary when your appliance is being used near
children.
15.Take extra care when operating the steam function in order to avoid burns.
16.Do not touch the hot surfaces of the appliance, only use handles or knobs
intended.
17.Do not attempt operation of the coffee maker without water.
18.Do not remove the Portafilter when appliance in brewing coffee or making
steam.
19.Connect plug to wall outlet before using and turn any switch off before plug
21300 886 649
AU
1300 886 649
AU 2
is removed from wall outlet.

20.This appliance is not intended for used by persons (including children) with
reduced physical, sensory or mental capabilities, or lack of experience and
knowledge, unless they have been given supervision or instruction
concerning use of the appliances by a person \responsible for their safety.
21.Children should be supervised to ensure that they do not play with the
appliance.
22.If the supply cord is damaged, it must be replaced by an authorized service
agent.
23.Do not use outdoors.
24.The appliance should not be stored within an ambient of less than 0Ԩor
greater than 45Ԩ, the environment should be dry and well ventilated.
25.The appliance is intended for household use only.
1300 886 649
AU
3

PRODUCT OVERVIEW
1RWH 'XH WR FRQWLQXHG SURGXFW LPSURYHPHQW LPDJHV DQG LOOXVWUDWLRQV LQ WKLV PDQXDO PD\ YDU\
VOLJKWO\ IURP WKH SURGXFW SXUFKDVHG $OO LPDJHV LQ WKLV PDQXDO DUH IRU UHIHUHQFH SXUSRVHV
RQO\ 3DUWV DUH QRW QHFHVVDULO\ SLFWXUHG WR VFDOH
Carafe (Water /
Coffee jug)
Carafe handle
Frothing device
Steam tube
Measuring spoon / Tamper
Brewing head
Detachable filter basket
Portafilter (Filter holder)
Temperature gauge
Filter support lever
Water tank lid
Control knob
Indicator Light
Top cover
Portafilter handle
Drip tray (removable)
Carafe cover
41300 886 649
AU
1300 886 649
AU 4

OPERATION
A. WHEN USING FOR THE FIRST TIME:
1. Remove the coffee maker from the packaging and check all accessories are provided
(refer product overview).
2. Clean all the detachable components in accordance with the following section of
“CLEANING AND MAINTENANCE”.
3. In order to flush the internal components, operate the appliance according to section “B”
and “C” but with no ground espresso coffee inserted. Repeat 2-3 times, disposing of the
heated water after each use.
B. MAKING ESPRESSO COFFEE:
1. Ensure the surface on which the coffee maker is placed is level, clean and free of water
and other substances and position the coffee maker in a convenient location near a mains
electrical supply socket.
2. Remove the water tank lid by turning it anti-clockwise. Carefully pour the appropriate
amount of water into the tank using the carafe provided. WARNING: Do not exceed the
maximum capacity (240ml). Ensure water used is clean and not pre-heated.
CAUTION: 1). the carafe provided has cup level markings, the maximum tank capacity
is equal to the ‘4 cups’ mark (240ml). The minimum tank capacity is equal to the 2 cups
mark (120ml).
2). Before pouring the water into the water tank, be sure the power cord is
unplugged from the power outlet and the control knob is in the
2))
5(/($6(
position.
NOTE: A standard coffee shot is considered as 30ml, double shot 60ml. The 240ml
maximum capacity equates to 4 cups whereby each cup is a double shot.
3. Replace the water tank lid and turn clockwise until it is secured in position.
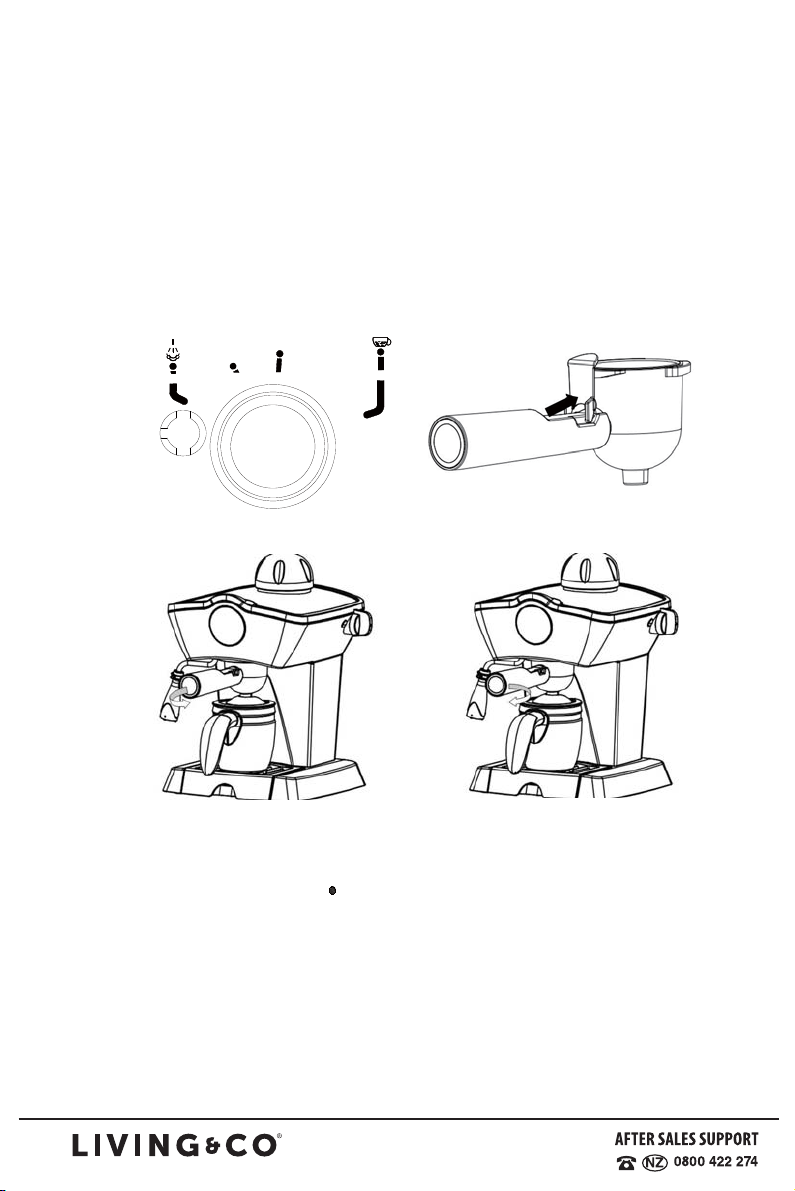
4. Fit the detachable filter basket into the Portafilter (filter holder), add ground espresso
coffee into the filter using the measuring spoon. A spoon of coffee can make
approximately 1 cup of coffee. Fill the filter with coffee to the desired level marking
depending on cups required (ensuring this aligns with water quantity added).
5. Tamping the ground coffee is now required, distribute the ground coffee evenly in the filter
and press down firmly with the tamping end of the measuring spoon and ensure that it is
level. Clean any excess ground coffee from the rim of the Portafilter (filter holder).
NOTE: The amount of force that is applied to the ground coffee during Tamping, will
directly affect how compacted the coffee is, this in turn affects how the steam passes
through the coffee and the level of extraction. If the ground coffee is lightly compressed,
this will result in reduced extraction and the coffee will be weaker than when compared to
that which has been well compacted, which will result in a stronger flavour. Some trial
and error may be required to obtain your ideal flavour.
5
1300 886 649
5

6. Place the Portafilter under the brewing head, align the ridges on the Portafilter with the
grooves on the brewing head, then insert the Portafilter into the “INSERT” position and
twist to the right until it is secured centrally (“LOCK” position) (see Fig. 1).
WARNING: Ensure the Portafilter (filter holder) is firmly inserted and secured into the
brewing head before proceeding.
7. Place the carafe centrally on removable shelf below the Portafilter (filter holder).
8. Plug the supply plug into the electrical socket and switch on. Turn the Control knob to the
coffee brewing position ( ) at which point the indicator light will illuminate.
9. The appliance will proceed to heat the water for approximately 2 - 3 minutes. When the
correct steam pressure is reached, coffee will flow into the carafe.
10. After the desired quantity of coffee has been dispensed, you can turn the Control knob to
the position. The indicator light will go out and the coffee will cease to flow from
the brewing head. Your coffee is now ready, you can remove the carafe.
11. Turn the Control knob to the 5(/($6
(
position, which will release the residual steam in
the heating tank.
WARNING: The excess pressure will release and discharge from the steam tube /
frothing device – ensure clear.
12. Before removing Portafilter or opening the tank lid, make sure the pressure in the tank has
been released. As above, this is done by turning the control knob to the
5(/($6(
position, the steam in the tank will eject from the steam pipe / frothing device. After the
pressure has been released, you can remove the water tank lid or remove the Portafilter
from the brew head. Take care as these parts will still hold residual heat. Wait for the parts
/2&.
)LJ
,16(57
61300 886 649
AU
1300 886 649
AU 6
to cool down before you handle directly.

13. To remove the Portafilter from the brew head, rotate the handle from the (“LOCK” position)
left to the “INSERT” position until it releases.
14. The used ground coffee residue will need to be removed from the filter. The Portafilter
handle incorporates a ‘filter support lever’. This can be folded from the rest position
towards the filter, which allows retention of the filter within the Portafilter head when
turning upside down to empty. Empty contents and rinse under running water to clean.
Once this process is complete you can fold the ‘filter support lever’ back to the original rest
position.
C. FROTHING MILK / MAKING A CAPPUCCINO or LATTÉ:
1). The first step in making a cappuccino / latté is to make a short espresso (See B. MAKING
ESPRESSO COFFEE).
3$86(
(
6
$
(/(
5
2))
AU
7
2). Turn the control knob to the
2))
5(/($6( position to ensure all steam has been released from
the heating tank.
3). Remove the water tank lid by turning it anti-clockwise. Carefully pour the appropriate
amount of water into the tank using the carafe provided (between 120ml and 240ml).
4). Replace the water tank lid and tighten clockwise until it is secured in position.
5). Pour the desired amount of cold (refrigerator temperature) fresh milk (approx. 1⁄3 full) into a
small jug or cup.

Note: In choosing the size of jug, it is recommended that the diameter is not less than 70
±5mm, and bear in mind that the milk increases in volume when heated, so make sure
the height of jug is adequate to contain.
6). Turn the control knob to the steam
position, the power indicator will illuminate and the
water will commence heating, after approximately 2 minutes, steam will discharge from the
frothing device / steam tube.
7). Insert the frothing device into the milk and hold the milk frothing jug at an angle so that the
frothing device sits below the surface of the milk (approximately 1 – 2 cm). Move the milk
around the inside of the milk jug in a circular motion by gently pivoting the jug. When the
desired volume of froth has been achieved, immerse the attachment device deeper into the
milk jug to heat the milk.
When the base of the milk jug becomes too hot to touch, adjust the control switch to the pause
position to cease steam being ejected. Then remove the jug from the frothing device.
Position the frothing device / steam tube so that the discharge will be directed into the drip tray.
8). Turn the steam control knob to
2))
5(/($6( position to release the residual steam from the
heating tank.
NOTE: The optimum milk temperature is 60ºC – 65ºC. A food thermometer could be used to
achieve the correct temperature. If the milk boils, or becomes too hot, the natural sweetness
and texture of the milk will be affected.
9). To avoid residual milk build up ensure frothing device / steam tube is cleaned immediately
after use. The frothing device can be detached from the steam tube for cleaning, by applying
a downward pressure. To ret the frothing device ensure it is securely attached to the steam
wand by inserting it onto the steam wand and
pushing rmly upwards onto the rubber surround.
10). Pour the steamed milk into each cup of freshly brewed espresso coffee and spoon in the
milk froth, in the following ratios:
Cappuccino Latté
¹/³ espresso ¹/³ espresso topped with steamed
8
130
0 886 649
AU
1300 886 649
AU 8
¹/³ steamed milk
¹/³ frothed milk
milk and about 10mm of frothed milk
(traditionally served in a glass)

NOTE:
Always ensure that the frothing attachment has been rmly pushed onto the steam wand. For
best results use fresh cold milk. Always clean the steam wand and froth enhancer immediately
after every use (refer to care and cleaning).
COFFEE MAKING TIPS
Tips On Making The Perfect Espresso
Don’t just rely on your coffee machine to do all the work. Making a good cup of coffee is an art.
Warming Your Cup Or Glass A warm cup will help maintain the coffee’s optimal temperature.
Preheat your cup by rinsing with hot water.
Pre-drying: Always wipe the lter basket and Portafilter (lter holder) dry before tamping with
ground coffee as moisture can encourage ‘drilling’ - this is when water bypasses the ground
coffee during extraction.
The Grind If using a pre-ground coffee, ensure an espresso grind suitable for espresso/
cappuccino machines is purchased.
If grinding coffee beans, the grind should be fine but not too fine or powdery. The grind will
affect the rate at which the water flows through the coffee in the filter and therefore the taste of
the coffee.
If the grind is too fine (looks like powder and feels like flour when rubbed between fingers), the
water will not flow through the coffee even when under pressure. The resulting coffee will be
over extracted, too dark and bitter, with a mottled and uneven créma on top. If the grind is too
coarse the water will flow through the coffee too quickly. This will result in an under-extracted
coffee lacking in flavor and without the thick créma on the top layer of coffee.
NOTE:
The taste of your coffee will, of course, depend on personal preference and on many other
factors such as:
• Freshness of the coffee bean
• Fineness or coarseness of the grind
• Tamping pressure (pressing down)
• Quantity of the coffee grind in the lter basket
We recommend experimenting by varying these factors to achieve the coffee taste of your
preference.
9
1300 886 649
AU
9

CLEAN AND MAINTENANCE
1. Turn the Control knob to the 5(/($6
(
position, which will release the residual steam in
the heating tank.
WARNING: The excess pressure will release and discharge from the steam tube / frothing
device – ensure clear.
2. Disconnect the coffee maker supply plug from the mains supply socket.
3. Let the coffee maker cool down completely before cleaning.
4. The external enclosure of the coffee maker can be cleaned by wiping down with a warm
damp cloth.
CAUTION: Do not clean with alcohol or solvent cleanser. Never immerse the housing in
water for cleaning.
5. To remove the Portafilter from the brew head, rotate the handle from the (“LOCK” position)
left to the “INSERT” position until it releases.
6. The used ground coffee residue will need to be removed from the filter. The Portafilter
handle incorporates a ‘filter support lever’. This can be folded from the rest position
towards the filter, which allows retention of the filter within the Portafilter head when
turning upside down to empty. Empty contents and rinse under running water to clean.
Once this process is complete you can fold the ‘filter support lever’ back to the original rest
position.
7. Remove the filter basket from the Portafilter and rinse these parts under water to remove
all coffee particles.
8. The frothing device can be detached from the steam tube for cleaning, by applying a
downward pressure.
9. Remove the drip tray by sliding towards you, empty contents and rinse well with water.
10. Water with dishwashing liquid can be used to clean the detached parts if required however,
ensure they are well rinsed in clean water afterwards. Dry all parts thoroughly and
re-assemble to your coffee maker.
11. To ret the frothing device ensure it is securely attached to the steam wand by inserting it
onto the steam wand and pushing rmly upwards onto the rubber surround.
12. Store the coffee maker in accordance with the Safety Instructions detailed earlier in this
manual.
1300 886 649
AU 10

CLEANING MINERAL DEPOSITS
After regular use, hard water can cause mineral build up in and on many of the inner
functioning components, reducing the brewing ow, power of the machine and affecting the
quality of coffee.
We advise decalcifying the machine on a regular basis (every 2-3 months) using a mixture of
white vinegar and water.
1). Follow the operating instructions for B. MAKING ESPRESSO COFFEE earlier in this
manual however, do not use ground coffee – leave filter basket empty and when filling the
water tank, use a mixture of 120ml of white vinegar combined with 120ml of fresh water 240ml
total).
2). Operate the unit with the control switch set to the brewing position (
)until
approximately 120ml of liquid has been dispensed into the carafe, then turn the control knob to
the pause position.
3). Position the frothing device / steam tube over the drip tray
4). Turn the control knob to the steam position, the liquid will now discharge from the
frothing device / steam tube into the drip tray area. Leave the switch in this position until now
more steam is ejected (indicating the water tank contents have been emptied).
5). Turn the control knob to
2))
5(/($6(
position to release the residual steam from the heating
tank.
WARNING: Ensure this step is followed before proceeding further.
6). Remove and rinse the drip tray in fresh water then replace back into position.
7). In order to now rinse the vinegar solution from the internal parts, now repeat Step 1) above
however, use 240ml of fresh water.
8). Repeat steps 2) to 6). It is advisable to repeat this process twice to ensure the parts are
thoroughly rinsed and all vinegar solution is removed.
11
AU
11

TROUBLE SHOOTING
1300 886 649
AU 12
Symptom Cause Corrections
Carafe leaking water or
water leaks out from the
lid
The carafe is not located
correctly
Ensure carafe is located centrally
below the brewing head
The level of water in the
tank exceeds the MAX
permitted.
The water level in the tank should be
within the scale of MIN (120ml) and
MAX (240ml).
Water leaks from the
bottom of coffee maker.
There is too much water in
the drip tray. Please empty and clean the drip tray.
The coffee maker
has malfunctioned.
Please contact an authorised
service facility for repair.
Water leaks out of outer
side of filter basket or
Portafilter.
There is some coffee
powder on filter edge.
Clean the rim of the Portafilter before
insertion. Wipe the inner surface of
the brew head.
The coffee has an
acidic taste.
The rinsing procedure was
not correctly followed
during the &/($1,1*
0,1(5$/ '(326,76
vinegarsection and
solution is still present.
Repeat steps 7) & 8) or CLEANING
MINERAL DEPOSITS section earlier
in this manual.
The coffee powder has
been stored in a hot, damp
location, or has reached its
expiry date.
Please use fresh coffee powder, or
store unused coffee powder in a cool,
dry place. After opening a new packet
of coffee powder, reseal it tightly and
store it in a refrigerator to maintain its
freshness.
The coffee maker does
not operate.
The supply plug is not
correctly inserted into
mains supply socket.
Ensure the plug is correctly inserted
and the outlet socket is switched on.
Ensure the outlet socket is in working
condition. If the appliance still does
not work, please contact an
authorised service facility for
inspection.

PRODUCT SPECIFICATIONS
Model
CM4656
Rated voltage
220-240V50Hz 800W
This product is intended for household use only.
11
AU
13
Coffee does not run
through The filter basket is blocked
Follow cleaning instructions and
ensure filter is clear of all coffee
residue
Coffee does not run
through
Control switch is not turned
to the brewing position or
the water tank is empty.
Follow the operating instructions for
B. MAKING ESPRESSO COFFEE.
Coffee grind is too fine,
along with excessive
tamping
Try a coarser blend of coffee or
reduce amount of force used when
tamping.
Too much coffee used, filter
basket is overfill
Reduce quantity of coffee (refer
operating instructions)
Coffee runs out too
quickly
Coffee grind is too coarse Try a finer blend of coffee
Coffee was not firmly
tamped
Increase the amount of force used
when tamping
Incorrect quantity of coffee
in the filter basket
Follow the operating instructions for
B. MAKING ESPRESSO COFFEE.
TROUBLE SHOOTING

Environmental Protection
Responsible Disposal
At the end of its working life, do not throw this product out with your household rubbish.
Electrical and electronic products contain substances that can have a detrimental effect
on the environment and human health if disposed of inappropriately. Observe any local
regulations regarding the disposal of electrical consumer goods and dispose of it
appropriately for recycling. Contact your local authorities for advice on recycling facilities
in your area.
Please keep the original packaging carton and materials in a safe place. It will help to
prevent any damage if the product needs to be transported in the future. In the event it is
to be disposed of, please recycle all packaging material where possible.
1300 886 649
AU 14

Warranty
We pride ourselves on producing a range
of quality home appliances that are both packed with features
and completely reliable. We are so confident in our products,
we back them up with a 1 year warranty.
Now you too can relax knowing that you are covered.
Customer Helpline NZ: 0800 422 274
This Product is covered by 1 year warranty when
accompanied by proof of purchase.
Table of contents
Other Living & Co Coffee Maker manuals