Living & Co 12PL-DVLC User manual

Model Number: 12PL-DVLC
Dishwasher
INSTRUCTION MANUAL
E209
0800 422 274
NZ

0800 422 274
NZ
2
03 Important Safety Instructions
06 Product Overview
08 Installation
12 Wash programs table
14 Quick start guide
15 Instructions
24 FAQs and Troubleshooting Guide
28 Other Useful Information
Contents

3
0800 422 274
NZ
READ CAREFULLY AND KEEP FOR FUTURE REFERENCE
Read this manual thoroughly before first use, even if you are familiar with this type
of product. The safety precautions enclosed herein reduce the risk of fire, electric
shock and injury when correctly adhered to. Keep the manual in a safe place for
future reference, along with any warranty information, your purchase receipt and the
packaging carton. If applicable, pass these instructions on to the next owner of the
appliance.
Pay particular attention to safety messages that follow the words:
DANGER, WARNING and CAUTION.
These words are used to alert you to a potential hazard that can seriously
injure you and others. The instructions will tell you how to reduce the chance
of injury and let you know what can happen if the instructions are not followed.
DANGER means that failure to read this safety statement may result in severe
personal injury.
WARNING means that failure to read this safety statement may result in
extensive product damage or serious personal injury.
CAUTION means that failure to read this safety statement may result in
minor or moderate personal injury, property or equipment damage.
Always follow basic safety precautions and accident prevention measures when
using an electrical appliance, including the following:
Electrical safety and cord handling
• Voltage: Before connecting and turning on the appliance, ensure the electrical voltage
and circuit frequency correspond to those indicated on the appliance rating label.
• WARNING! Ensure the outlet is properly earthed to the ground. If unsure, consult
a qualified electrician or a service representative. Improper connection of the
equipment grounding conductor can result in the risk of an electric shock if the
appliance malfunctions.
• WARNING! Do not modify the cord and plug provided with the appliance; if it does
not fit the outlet, have a proper outlet installed by a qualified electrician.
• WARNING! If the supply cord is damaged, do not use the appliance. A damaged
cord must be replaced by the manufacturer or its service agent or a similarly
qualified person in order to avoid a hazard. Contact our after sales support centre.
• Connection: Do not use an adaptor; do not use an extension cord. We recommend
you connect the appliance to a separate circuit serving only this appliance.
• Power cord: Do not kink or damage the power cord. Position it out of the way so
no one steps on or places anything on the cord or against it.
Important Safety Instructions

0800 422 274
NZ
4
• Inserting/removing the plug: Before you insert or remove the plug, make sure
the appliance is switched off and the power is switched off at the electrical outlet.
Remove by grasping the plug, do not pull on the cord.
• CAUTION! To reduce the risk of electric shock, do not immerse the unit, cord or
plug in water or other liquid. Do not expose it to rain or moisture.
• Auto switch off: To save energy, in standby mode the appliance will switch off
automatically when there is no operation in 30 minutes.
• RCD: Unless your home is already fitted with a residual current device (safety
switch), we recommend installing an RCD with a rated residual operating current
not exceeding 30mA to provide additional safety protection when using electrical
appliances. See your electrician for professional advice.
Installation
• WARNING! Do not install the dishwasher yourself. Have it installed by an
appropriately qualified, licensed plumber or dishwasher installer only.
• WARNING! Any electrical work required for the installation of this dishwasher
should be carried out by a qualified, licensed electrician.
• Power supply cord: During installation, the power supply cord must not be
excessively or dangerously bent or flattened. Do not tamper with the controls.
• Safe disposal: When removing an old dishwasher from service or discarding it,
remove the door to the washing compartment.
• Hose sets: Only use new hose sets when connecting this dishwasher to the water
supply; do not reuse old hoses.
• Water pressure: The maximum permissible inlet water pressure is 1MPa. The
minimum permissible inlet water pressure is 0.04MPa.
• Flammable objects: Do not install the appliance on or near any flammable or hot
objects.
• Ventilation: If there are any ventilation openings in the base, make sure they are not
obstructed by carpet.
• Proper installation: Install the dishwasher on an even, flat and stable ground. Do
not operate your dishwasher unless all enclosure panels are properly in place.
Usage conditions and restrictions
• Domestic use only: This appliance is intended for indoor domestic use only, which
includes use in households, staff kitchen areas in shops, offices, in farm houses
and in other working environments, use by clients in hotels, motels, bed and
breakfast establishments, other residential type environments and in catering and
similar non-retail applications. It is not suitable for industrial, commercial or trade
use. Do not use it for anything other than its intended purpose, and only use it as
described in this manual.
Important Safety Instructions (Cont.)

5
0800 422 274
NZ
• Usage restriction: The appliance is not intended for use by persons (including
children) with reduced physical, sensory or mental capabilities, or lack of
experience and knowledge, unless they have been given supervision or instruction
concerning use of the appliance by a person responsible for their safety.
• Children should be supervised to ensure they do not play with the appliance. Close
supervision is necessary when any appliance is used by or near children.
• WARNING! Never leave the appliance unattended while in use.
• Door: Do not abuse, sit on or stand on the door or dish rack of the dishwasher, or
use it for anything other than its intended purpose. Do not place any heavy objects
on the dishwasher door when it is open. The appliance could tip forward.
Open the door very carefully if the dishwasher is operating as there is a risk of
water squirting out.
The door should not be left wide open as this could increase the risk of someone
tripping over the door.
• Safe loading: Do not overload this dishwasher, it has a maximum capacity of 12
place settings. To ensure safe operation, follow a few simple rules when loading it:
—Place sharp items so they are not likely to damage the door seal.
—Place long bladed knives and other utensils with sharp points with their points
down in the basket or in a horizontal position to avoid potential hazards.
—Only wash plastic items that are marked dishwasher safe or the equivalent. For
plastic items not marked, check the manufacturer’s recommendations.
• Dishwasher detergent: Use only detergent and rinse additives designed for an
automatic dishwasher and keep them out of reach of children. Never use liquid
detergent (for manual washing up), soap or laundry detergent in your dishwasher.
DANGER! Some dishwasher detergents are strongly alkaline and can be extremely
dangerous if swallowed. Avoid contact with the skin and eyes.
DANGER! When the door of the dishwasher is open, make sure to keep children
away from the dishwasher. Even after a wash there could still be detergent left
inside. Make sure that the detergent compartment is empty after completion of the
wash cycle.
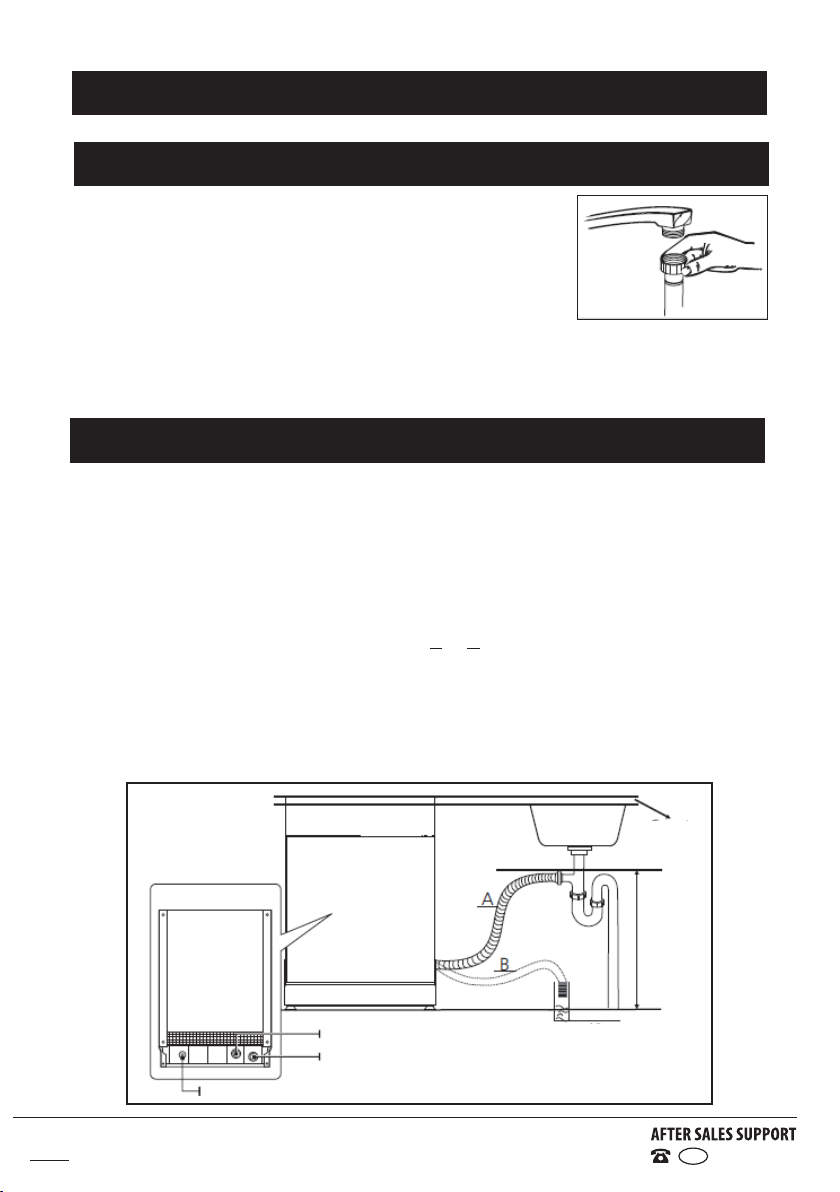
• Cleaning: Unplug before cleaning and performing maintenance on the appliance.
Use a soft cloth moistened with mild detergent for cleaning the appliance, and then
use a dry cloth to wipe it again.
• Do not modify or not attempt to alter this appliance or its controls in any way.
• Repair: Do not attempt to take the unit apart. Apart from regular maintenance as
described in this manual, this appliance is not designed to be dismantled by the
user. In case of damage or malfunction, have the unit repaired by trained personnel
only, or contact the after sales support line for advice.
• Misuse: Inappropriate use can result in property damage, injury or death. We assume
no liability for misuse of the appliance or noncompliance with these instructions.
Important Safety Instructions (Cont.)

0800 422 274
NZ
6
Dishwasher
1 Cup/cutlery rack
2 Upper basket
3 Upper spray arm
4 Inner pipe
5 Lower basket
6 Detergent dispenser
7 Rinse aid dispenser
8 Cutlery basket
Other inclusions (not shown)
Drain hose and water supply hose
Power cord and plug
Instruction manual
Warranty card
Product Overview
SCOPE OF DELIVERY: DISHWASHER
1
2
1
3
4
5
6
7
8

7
0800 422 274
NZ
Operation buttons
A POWER Press this button to turn on your dishwasher.
B PROGRAM Press this button to select the appropriate washing program,
the selected program indicator will light up.
CEXTRA
DRYING
Press this button to have dishes dried more thoroughly. (It can
only be used with the Intensive, ECO and 90 mins programs.)
DSTART/PAUSE Press this button to start the selected washing program or
pause it when the dishwasher is working.
Display indicators
ERinse aid indicator: illuminates when a rinse aid refill is required
FProgress indicator: illuminates when the program has finished
GProgram indicators: illuminate when the Intensive, ECO, 90 mins or Rapid
wash program is selected
ABC
G
Product Overview (Cont.)
CONTROL PANEL
NOTE: Due to continued product improvement, images and illustrations in this manual
may vary slightly from the product purchased. All images in this manual are for reference
purposes only. Parts are not necessarily pictured to scale.
D
EF

0800 422 274
NZ
8
DANGER! Make sure your electrical power is disconnected before installing the
dishwasher. Failure to do so can result in death or electric shock.
IMPORTANT! All relevant pipes and electrical equipment should be installed by
licensed plumbers, electricians or dishwasher installers. Make sure
to use new water supply and drain hoses; do not use old hoses.
IMPORTANT! Read this manual to familiarise yourself with all parts and operating
principles. Pay particular attention to the safety instructions.
• This product has been packaged to protect it against transportation damage.
Unpack the appliance but keep all packaging materials until you have made sure
your new dishwasher is undamaged and in good working order.
• The packaging carton is recyclable. Whenever possible, reuse the carton and
recycle it when disposing of the packaging materials.
• Plastic wrapping can be a suffocation hazard for babies and young children, so
ensure all packaging materials are out of their reach, and dispose of them safely.
• The baskets inside the dishwasher are taped to secure them during transport.
Remove any tape, ties and foam padding from inside the dishwasher.
• IMPORTANT! Using the loading instructions on pages 15–18 for guidance, make
sure all parts in the upper and lower baskets are properly installed inside the
dishwasher – you may need to relocate the cup/cutlery rack for appropriate usage.
• Unwind the cord to its full length and inspect it for damage. Do not use if damaged.
In case of damage, contact our after sales support centre for advice.
Installation
UNPACKING
POSITIONING THE APPLIANCE
• This dishwasher is freestanding. It can also be recessed under a single benchtop.
• Position the dishwasher close to an existing water inlet and drain connection and
make sure there is a power point nearby, or in an adjoining cabinet.
• The back should rest against the wall behind it and the sides along any adjacent
cabinets or walls.
• The dishwasher’s water supply and drain hoses can be positioned either to the right
or left sides to facilitate proper installation.
• Make sure the appliance does not stand on any water hoses or the power cable.

9
0800 422 274
NZ
• Position the dishwasher on a level and sturdy floor.
• If the floor is uneven, adjust the adjustable feet until
it reaches a horizontal position; just screw the feet
in or out a little (Fig. 1).
• The appliance should not be inclined more than 2°.
• Correctly levelled, the appliance will be more stable
and much less likely to move or cause vibrations
and noise during operation.
Fig. 1
Fig. 2
Fig. 3
Installation (Cont.)
LEVELLING THE APPLIANCE
FREESTANDING INSTALLATION
Between existing cabinets
• The height of the dishwasher, 845mm, has been
designed in order to allow the machine to be fitted
between existing cabinets of the same height in
modern fitted kitchens (Fig. 2). The feet can be
adjusted so that the correct height is reached.
• The laminated top of the machine does not require
any particular care.
Underneath an existing worktop
• In most modern fitted kitchens there is only
one single worktop under which cabinets and
electrical appliances are fitted. If you want to fit
this dishwasher under an existing worktop, you
need to remove the worktop of the dishwasher by
unscrewing the screws under the rear edge of the
top (Fig. 3: a).
IMPORTANT! Keep the screws! After removing the
worktop you will have to screw them back under the
rear edge of the top (Fig. 3: b).
• The height of the dishwasher will then be reduced
to 815mm (as per ISO regulations), which means it
should fit perfectly under your kitchen worktop.

0800 422 274
NZ
10
• Connect the cold water supply hose to a threaded 3/4”
connector. During use, the dishwasher will heat up the water
to the required temperature. Make sure the hose is not
kinked or squashed and is fastened tightly in place (Fig. 4).
• If the water pipes are new or have not been used for an
extended period of time, let the water run to make sure it is
clear and free of impurities. This step is necessary to avoid the risk of the water inlet
being blocked and damaging the appliance.
• WARNING! Always close the water tap after using the dishwasher.
Fig. 4
Fig. 5
Benchtop
Drain hose
Water inlet
Drain pipe
Mains cable
Back of dishwasher
max. 1000mm
∅ 40mm
Installation (Cont.)
COLD WATER CONNECTION
DRAIN HOSE CONNECTION
• The drain hose must be connected to the drain hose connector at the back of the
dishwasher. Insert the drain hose into a drain pipe with a minimum diameter of
40mm, or let it run into the sink, making sure to avoid bending, crimping or squashing
it. The height of drain pipe must be less than 1000mm from the floor. The free end of
the hose must not be immersed in water to avoid the backflow of water.
• The drain hose must be correctly fitted in order to prevent water leaks. It should be
connected at a height of no more than 1m (maximum) and secured with a hose clip.
Follow the illustration below (Fig. 5, option Aor B).
• If you need to drain any excess water from hoses and the sink is higher than 1m
from the floor, you will need to drain the excess water into a bowl or container held
underneath the pipe and lower than the sink.
• If you need a drain hose extension, make sure to use a similar hose that is no longer
than 4 metres, otherwise the cleaning effect of the dishwasher could be reduced.

11
0800 422 274
NZ
Make sure your electrical voltage and circuit frequency correspond to those indicated
on the rating plate and your electrical system is sized for the maximum voltage on
the plate. This appliance requires a 10A fused, copper-wired electrical supply. A time
delay fuse or circuit breaker is recommended, as well as provision of a separate circuit
serving only this appliance. A power outlet should be located in an adjacent cabinet.
To connect the dishwasher, insert the plug into a properly earthed, easily accessible
electrical socket. If the socket is not appropriate for the plug, replace the socket rather
than use an adaptor or the like as such devices could cause overheating and burns.
WARNING!
• Do not use an extension cord or an adaptor with this appliance.
• Do not bend the power cord. Do not place the appliance on top of the cord.
• Do not modify the plug provided with this appliance. If it does not fit into your
power point, have a suitable outlet installed by a qualified electrician.
Earthing
This appliance must be earthed. In the event of a malfunction or breakdown, earthing
will reduce the risk of an electric shock by providing a path of least resistance for the
electric current. This appliance is equipped with a cord having an equipment-earthing
conductor and an earthing plug. The plug must be inserted into an outlet that is
installed and earthed in accordance with all local standards and requirements.
WARNING!
• Ensure the outlet is properly earthed to the ground. If unsure, consult a qualified
electrician or a service representative. Improper connection of the equipment
grounding conductor can result in the risk of an electric shock in case of malfunction.
• Do not, under any circumstances, cut or remove the third grounding prong from the
power plug.
After your new dishwasher has been installed, and before using it for the first time,
make sure to check the following points to ensure safe and efficient operation:
• Is the dishwasher level and properly installed?
• Is the water tap open?
• Are the hose connections secured tightly and there is no leakage at either end?
• Are all electrical cords tightly connected?
• Is the power switched on at the power point?
• Are the inlet and drain hoses free of knots and kinks?
• Has all packing material been removed from the dishwasher?
• Is all product documentation stored safely for easy access?
Installation (Cont.)
ELECTRICAL CONNECTION
BEFORE FIRST USE

0800 422 274
NZ
12
* This program was used for testing the appliance to the Australian standard AS/NZS
2007.1 (tested with 12 place settings, rinse aid setting on 6, upper basket in the
lower position, and the door slightly opened (about 5cm) at the end of the program to
assist with drying of the dishes).
Wash programs table
Program Suitability Cycles Detergent (pre/main) Running Time (min.) Energy (kWh) Water (L)
Intensive
For heavily soiled loads, such as
pots, pans, casserole dishes and
dishes that have been sitting with
dried food on them for a while.
Prewash (50ºC)
Wash (60ºC)
Rinse
Rinse
Rinse (65ºC)
Drying
5 / 25g
(or all-in-1) 170 1.6 18.5
ECO *
For normally soiled loads, such
as plates, glasses, bowls and
lightly soiled pots and pans: the
recommended daily wash program.
Wash (45ºC)
Rinse
Rinse (45ºC)
Drying
25g
(or all-in-1) 185 0.75 11
90 mins
For lightly soiled loads that need
a quick wash.
Wash (65ºC)
Rinse
Rinse (65ºC)
Drying
30g
(or all-in-1) 90 1.2 11.5
Rapid
A shorter wash for lightly soiled
loads that do not need drying.
Wash (40ºC)
Rinse
Rinse (45ºC)
25g 30 0.6 11.5

13
0800 422 274
NZ
Wash programs table (Cont.)
Program Suitability Cycles Detergent (pre/main) Running Time (min.) Energy (kWh) Water (L)
Intensive
For heavily soiled loads, such as
pots, pans, casserole dishes and
dishes that have been sitting with
dried food on them for a while.
Prewash (50ºC)
Wash (60ºC)
Rinse
Rinse
Rinse (65ºC)
Drying
5 / 25g
(or all-in-1) 170 1.6 18.5
ECO *
For normally soiled loads, such
as plates, glasses, bowls and
lightly soiled pots and pans: the
recommended daily wash program.
Wash (45ºC)
Rinse
Rinse (45ºC)
Drying
25g
(or all-in-1) 185 0.75 11
90 mins
For lightly soiled loads that need
a quick wash.
Wash (65ºC)
Rinse
Rinse (65ºC)
Drying
30g
(or all-in-1) 90 1.2 11.5
Rapid
A shorter wash for lightly soiled
loads that do not need drying.
Wash (40ºC)
Rinse
Rinse (45ºC)
25g 30 0.6 11.5

0800 422 274
NZ
14
For detailed operating instructions, please read the corresponding content in this manual.
Install the dishwasher
Please refer to the “Installation” section on pages 8–11 in this manual. Make sure the water
tap is open.
Load the baskets
Load the baskets following the dishwasher
loading instructions on pages 15–18.
Prepare the dishes
Scrape off leftover food and soften burnt
food residues with water.
Fill/check the dispensers
Fill dishwasher detergent into the dispenser
compartment and ensure there is liquid
rinse aid in the dispenser (this is not neces-
sary if you use a detergent with rinse aid).
Select a program and run the dishwasher
Close the door and press the PROGRAM
button, then press START/PAUSE to start
the program. At the end of the program, wait
about 15 minutes before unloading.
Quick Start Guide

15
0800 422 274
NZ
ATTENTION: Before loading the dishwasher baskets:
It is not necessary to rinse the dishes under running water before you put them into
the dishwasher. However, we recommend you scrape off any large amounts of leftover
food and soften remnants of burnt food in pots and pans.
Place objects in the dishwasher in the following way:
• Hollow items such as cups, glasses, pots, pans, etc. should be placed upside
down so water cannot collect in the container or in a deep base.
• Curved items, or items with recesses, should be loaded at a slant so water can run off.
• All utensils should be stacked securely so they cannot tip over.
• All dishes and utensils should be placed in a way so the spray arms can rotate
freely during washing.
• Very small items should not be washed in the dishwasher as they could easily fall
out of the baskets and obstruct moving parts.
• Dishes and items of cutlery should not lie inside one another, or cover each other.
• To avoid damage to glasses, they must not touch.
• WARNING! Long bladed knives stored upright are a potential hazard! Always position
these and other sharp cutlery items horizontally on the cup/cutlery racks.
• Do not overload your dishwasher; it will hold a maximum of 14 standard place settings.
This is important for better washing results and lowers energy consumption.
• WARNING! Do not pull out the upper and lower basket at the same time, which
can lead to the appliance tipping forward.
Protecting your glass and tableware
Much of today’s tableware is dishwasher safe. However, not everything can be
washed safely in a dishwasher. The chemical composition of your dishwasher deter-
gent or the water temperature and duration of the wash program may adversely affect
some materials. To protect your special cutlery, glass and tableware from damage,
select a wash program with as low a temperature as possible (see page 12 for details).
We recommend you do not wash in a dishwasher the items listed below, and take
special care with items deemed of limited suitability. And when buying new dishes,
glassware, porcelain or cutlery, look for products labelled dishwasher safe.
Not suitable for the dishwasher: cutlery with wooden, china or mother-of-pearl
handles; plastic items that are not heat resistant; older cutlery with glued parts that
are not temperature resistant; bonded cutlery items or dishes; pewter or copper items;
lead crystal glass; steel items subject to corrosion (rusting); wooden platters.
Of limited suitability: some types of glasses can become dull with frequent machine
washing; items made of silver and aluminium tend to discolour from machine washing;
glazed patterns may fade with frequent machine washing.
Instructions
LOADING THE DISHWASHER

0800 422 274
NZ
16
Loading the upper basket
The upper basket is designed to hold
more delicate and lighter tableware
such as glasses, cups, small plates,
bowls and shallow pans (as long as
they are not too dirty).
Position these items securely so they
do not get moved by the spray of
water (Fig. 6).
The cup/cutlery rack
Place sharp, pointed knives on the
cup/cutlery rack in the upper basket
so that they do not obstruct the
rotation of the spray arms. Smaller
cups or similar lightweight items will
also fit there.
To make room for taller items in the
upper basket, you can remove the
cup/cutlery rack, or fold it down .
Adjusting the upper basket height
The height of the upper basket can easily be adjusted in order to create more space for
large utensils in the upper or lower basket. Follow the steps below (Fig. 7):
Instructions (Cont.)
Fig. 6:
Upper basket, loaded to fit 12 place settings
1: Cups 2: Saucers 3: Glasses
Fig. 7

17
0800 422 274
NZ
Loading the lower basket
The lower basket is designed to
hold dinner plates, larger items and
the cutlery basket (Fig. 8).
Pots, pans, serving dishes and
bowls are often the most difficult
to clean and fit best into the lower
basket. Always place pots, pans
and bowls upside down into the
basket or at a slant so the water
can flow out.
Load large serving dishes and lids
on the side of the baskets so they
do not block the rotation of the top
spray arm. To ensure the detergent
dispenser lid can open freely, the
maximum diameter for plates in
front of the detergent dispenser is
19cm.
Instructions (Cont.)
4: Dinner plates 5: Soup plates 6: Dessert dishes 7: Cutlery basket
Fig. 8:
Lower basket, loaded to fit 12 place settings
Folding down the spike rows
If you need more space for holding plates or a platter, you can fold down the spike
rows at the back of the lower basket (Fig. 9).
Fig. 9

0800 422 274
NZ
18
The cutlery basket
Your new dishwasher is equipped with a removable cutlery basket with anti-nesting grid.
You can use it with the anti-nesting grid up or down.
Fig. 10 shows you how to load the basket with the anti-nesting grid to hold a cutlery set
for 12 people.
WARNING!
Do not let any item extend through the bottom of the basket.
Always load sharp utensils with the sharp point down.
For personal safety and top quality cleaning, place your dishwasher-safe standard size
cutlery in the basket, making sure that:
• Cutlery is placed with the handles down.
• Items do not nest together (use of the anti-nesting grid will prevent this).
• Knives and other potentially dangerous utensils are placed sharp point down, or in
a horizontal position on the cup/cutlery rack in the upper basket.
• No item extends through the bottom of the basket.
• Long utensils are placed in a horizontal position in the upper basket.
Instructions (Cont.)
Fig. 10
1: Forks 2: Soup spoons 3: Dessert spoons 4: Teaspoons 5: Knives

19
0800 422 274
NZ
Dishwasher detergents have chemical ingredients that remove dirt, food and germs
and transport them out of the dishwasher. Commercially sold dishwasher detergents
are suitable for this purpose; they come in powder or tablet form.
Detergent tablets of different brands dissolve at different speeds; some cannot
dissolve and develop their full cleaning power during short wash programs. To ensure
the complete removal of detergent residues, we recommend choosing longer wash
programs when using dishwasher detergent tablets.
Adding detergent
We recommend adding one tablespoonful of dishwasher detergent (about 25g), or
follow the detergent manufacturer’s recommendations.
• Before the start of the program, fill detergent powder (or a detergent tablet) into
the detergent dispenser (Fig. 12: A). If the lid is closed, press the latch (Fig. 11) and
the lid will spring open. If you are washing heavily soiled dishes on the Intensive
program, you may also want to add some detergent in the smaller compartment
(12: B), if you are using powder detergent.
• Unless you use a detergent tablet with rinse aid, make sure there is sufficient liquid
rinse aid in the rinse aid dispenser. Check the optical indicator (Fig. 12: C).
• Close the lid of the detergent dispenser and press until you hear it lock in place.
WARNING!
• Only use detergent specifically made for use in dishwashers.
• Always add detergent just before starting the dishwasher, otherwise it could get
damp and will not dissolve properly. It is also a hazard to leave detergent in the
dispenser where children can reach it when the door is open.
• Dishwasher detergent is corrosive! Take care to keep it out of children’s reach.
Instructions (Cont.)
DISHWASHER DETERGENT
Fig. 11: Push latch to open Fig. 12
A
C
B
D

0800 422 274
NZ
20
RINSE AID
Rinse aid is automatically released during the last rinse to prevent water from forming
droplets on your dishes, which can leave spots and streaks. It also improves drying by
allowing water to roll off the dishes. Your dishwasher is designed to use liquid rinse aid.
Filling the rinse aid dispenser
CAUTION!
Only use specific, branded rinse aid for your dishwasher. Never fill the rinse aid
dispenser with any other substances (e.g. dishwasher cleaning agent, liquid
detergent) as this could damage the appliance.
The rinse aid dispenser is located inside the door next to the detergent dispenser.
Tturn the cap in anticlockwise direction (left) to open it and lift it out (Fig. 13).
Fig. 13: Turn anticlockwise to open Fig. 14: Pour in rinse aid
• Carefully pour rinse aid into the dispenser
until the level indicator turns completely
black (Fig. 14). Take care not to overfill.
• Replace the cap in the opening and turn
it clockwise (right) to close the dispenser
(Fig. 15).
CAUTION!
Clean up any rinse aid spilled while filling with an absorbent cloth or paper towel to
avoid excessive foaming during the next wash.
Do not forget to replace the cap before you close the dishwasher door.
Fig. 15: Turn clockwise to lock
Instructions (Cont.)
Table of contents