Living & Co GK-128A User manual

Contents
PRODUCT OVERVIEW
2
BEFORE USING
CAUTION
3
IDENTIFICATION OF PARTS
3-6
OPERATION GETTING STARTED 7
HOW TO USE
9-10
CARE FOR YOUR HAIR CLIPPER SET
11
IMPORTANT SAFETY INSTRUCTIONS
12
PROTECT THE ENVIRONMENT
13
SPECIFICATIONS
14
WARRANTY
15
Hair Clipper Set
INSTRUCTION MANUAL
GK-128A
GUIDE COMBS / CHARGING 8

BEFORE USING
Thank youfor choosing a Living & Co product. Our products are
designed to meet the highest standard of quality, functionality
and design. We hope youenjoy using your new appliance.
Please read theinstructionsfor use carefully and keep in a safe
place for the future reference.
CAUTION:
Use this appliance only for its intended use as described in
this manual. Do not use attachments not recommended by
us.
Do not use this product if it is not working correctly, if it has
been dropped or damaged, or immersed into water.
INDENTIFICATION OF PARTS:
1. On / Off Switch
2. Precision trimmer head
3. a & b, 2 guide combs for fitment to trimmer head
4. Charging indicator light
5.Charging adaptor
6.Comb
7. Lubricating oil
8. Cleaning brush
PRODUCT OVERVIEW
5
1300 886 649
AU
2
13 0 0 886 649
A U
13 0 0 886 649
A U

5
1300 886 649
AU
2
13 0 0 886 649
A U
13 0 0 886 649
A U
OPERATION OPERATION

GETTING STARTED
CHARGING YOUR HAIR CLIPPER: Before using your hair
clipper for the first time, charge for 8 hours.
Ensure the product is switched off.
Connect the charging adaptor to the product andthen to the
mains. The charging indicator will light up.
Your hair clipper cannot be overcharged. However, if the product
is not going to be used for an extended period time (2-3months),
unplug it from the mains and store. Fully recharge your hair
clipper when you would like to use it again.
To preserve the life of yourbatteries, let them run out every six
months thenfully charge for 14-16 hours.
When changing the trimmer heads or accessories, place the part
in the correct position, align with the body andthe lock and
press the parts to clip into position. (Fig.5 & 6).
Removal of the trimmer heads refer picture. (Fig 11-12)
5
1300 886 649
AU
2
13 0 0 886 649
A U
13 0 0 886 649
A U
OPERATION

GUIDE COMBS
Level
Length (mm)
1
1
2
2
3
3
4
4
5
5
6
6
7
7
8
8
9
9
10
10
Place the guide comb attachment next to the full size trimmer
head to align and then slide downwards. (Fig.9).
Align and click into position. (Fig.10).
When changing the guide comb’s level (10 variations as table
above shows), press the unlock button and hold down to allow
release. (Fig.11.) Then push with yourfinger outwards to
disconnect the part (Fig.12).
CHARGING THE APPLIANCE
•Ensure the product is switched off.
•Connect the charging adaptor to the mains socket outlet
and then the output lead to the product. The charging
indicator will light up (red in colour). (Fig 15 and Fig 16).
Note:the indicator light always show red even fully charged.
Please unplug the adaptor after the recommended charge time
is reached.
HOW TO USE
BEFORE YOU BEGIN
Always comb your beard or moustache with a fine comb before
you start trimming.
ATTACHING & REMOVING THE GUIDE COMBS
With the trimmer blade facing away from you, slide the guide
comb on top of the clipper blade and click into position.
With the trimmer blade facing away from you, carefully push the
guide comb away from the trimmer blade.
TO THIN AND TAPER THE BEARD/MOUSTACHE(Fig.1)
Attach a guide comb tofull size trimmer. If you are trimming for
the first time start with the maximum trimming length setting.
Turn the unit on.
Place the flat top of the trimmer comb against the skin.
Slowly slide the Hair Clipper through the hair. Repeat from
different directions if necessary.
If hair builds up in the trimmer comb during the trimming process,
switch the unit off, take off the comb and brush/rinse off.
TO DEFINE THE BEARD/MOUSTACHE LINE(Fig.2)
Hold the clipper with precision Trimmer Blade facing you (no
comb attached).
Start with edge of beard/moustache line and gently lower the
trimmer blade onto your skin. Use motions towards edge of
beard/moustache line totrim to desired locations in facial area
and away from beard in neck area
Level
Length (mm)
1
12
2
14
3
16
4
18
5
20
5
1300 886 649
AU
2
13 0 0 886 649
A U
13 0 0 886 649
A U

CARE FOR YOUR HAIR CLIPPER SET
CLEANING AND MAINTAINING
AFTER EACH USE.
1. Turn the hair clipper off.
2. Gently brush the remaining hairs away/rinse under warm
water from the guide comb and trimmer blade.
CLEANING WARNINGS
•Only the guide comb attachment and trimmer blade may be
removed from the product for cleaning.
•Cleaning should only be done with a soft brush, such as the
brush supplied with the product.
•Only use the light-grade oil supplied or sewing machine oil on
the blades.
•Do not use harsh or corrosive cleaners on the units or their
blades.
•Do not submerge in water as damage will occur.
STORAGE
•Always store this appliance and power supply in a moisture-
free area. Do not store it in temperatures exceeding 60℃.
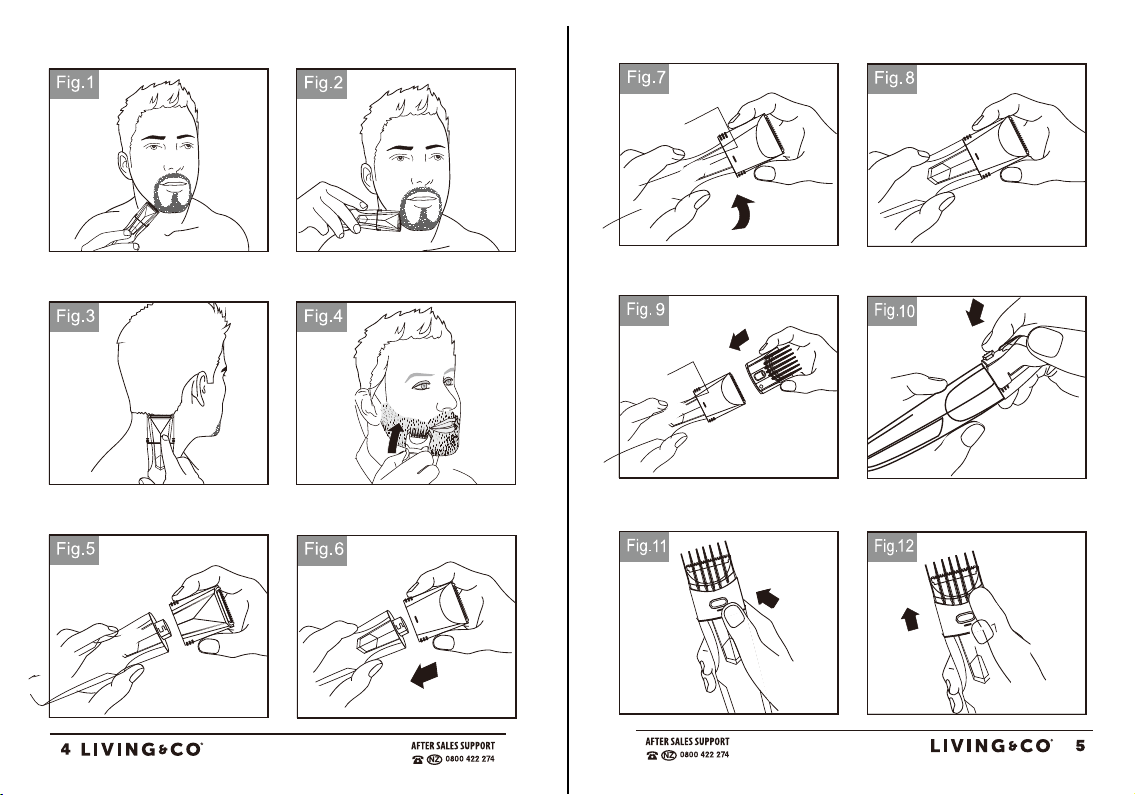
TRIMMING THE NAPE OF YOUR NECK(Fig.3)
NOTE: You will need a hand mirror for this operation if performing it
alone.
Before you begin, attach the full size Trimmer Blade.
Use yourfingers to lift the hair at the base of your head up.
Your index finger should be covering the roots of the hairs you are
lifting to prevent accidental removal by the clipper.
Using your other hand, hold the clipper to the base of your neck with
the cutting unit facing up, and move the clipper up the length of the
neck until it touches yourfinger covering the hair roots at the base
of your head.
Be sure to move the unit slowly when performing this operation and
to keep the hair roots at the base of your head out of the way of the
trimmer.
To trim in the most effective way, move the appliance slowly against
the direction of hair growth (Fig.4).
To trim the body hair with positioning comb if you wantto keep a
length, as picture shows. (Fig.5)
To trim the detailed beard and moustache with guide comb, as the
pic shows. (Fig.6)
ATTACHING & REMOVING THE TRIMMER HEAD
NOTE: Always ensure the clipper is switched off before changing
any attachments.
To remove, hold the clipper with one hand and turn the trimmer
head anticlockwise with the other.
5
1300 886 649
AU
2
13 0 0 886 649
A U
13 0 0 886 649
A U

IMPORTANT SAFETY INSTRUCTIONS
WARNING-TO REDUCE THE RISK OF BURNS,
ELECTROCUTION, FIRE, OR INJURY TO PERSONS:
Keep the power plug and cord away from heated surfaces.
Make sure the power plug and cord do not get wet.
Do not plug or unplug the product with wet hands.
Do not use the product with a damaged cord.
Charge, use and store the product at a temperature between
15℃and 35℃.
Never Immerse in water.
Always unplug from the mains when cleaning.
Only use the parts supplied with the appliance.
Keep this product out of reach of children. The use of this appliance
by persons with reduced physical, sensory or mental capabilities or
lack of experience and knowledge can give cause to hazards.
Persons responsible for their safety should give explicit instructions or
supervise the use of the appliance.
-Children shall not play with appliance.
-Cleaning and user maintenance shall not be made by children
without supervision.
PROTECT THE ENVIRONMENT
The product contains a Nickel Metal Hydride cell unit. Do not
dispose the trimmer in household waste at the end of its useful
life.
Do not throw away the appliance with the normal
household waste at the end of its life, but hand it at an
official collection point for recycling. By doing this, you
help to preserve the environment.
5
1300 886 649
AU
2
13 0 0 886 649
A U
13 0 0 886 649
A U

Warranty
We pride ourselves on producing a range
of quality home appliances that are both packed with features,
and completely reliable. We are soconfident in our products,
we pack them up with a 1 year warranty.
Now you too can relax knowing that you are covered.
Customer Helpline NZ: 0800 422 274
This product is covered by a 1 year warranty when
Accompanied by proof of purchase.
IM Version 1.0 – January, 2020
SPECIFICATIONS
Power source: AC100-240V 50/60Hz
Motor voltage: DC2.4V
Battery capacity: Ni-Mh AAA 600mAhX2
Charging time: 8 hours
Working time: 40-45min
5
1300 886 649
AU
2
13 0 0 886 649
A U
13 0 0 886 649
A U
Table of contents
Other Living & Co Hair Clipper manuals