Living & Co LMO9B User manual

L+C 9L MINI OVEN
INSTRUCTION MANUAL MODEL: LMO9B

Read these instructions carefully before using your toaster oven and keep it carefully.
If you follow the instructions, your toaster oven will provide you with many years of good
service.
SAVE THESE INSTRUCTIONS CAREFULLY

IMPORTANT SAFEGUARDS
1. Read all instruction and product labels and warnings before using the Toaster oven.
2. Do not touch the hot surfaces. The temperature of the door or the outer surface may be
high when the toaster oven is operating. Always use oven mitts when handling hot
materials and allow metal parts to cool down before cleaning. Allow the units to cool
thoroughly before putting in or taking off parts. Always use the handle when moving the
unit. It is recommended to leave a minimum clearance of 20cm between the oven and
any adjacent objects
3. When the unit is not be used and before cleaning, unplugs the toaster oven from the wall
outlet.
4. To protect against the risk of electrical shock, do not immerse the unit in water or other
liquid.
5. Do not operate any appliance with a damaged cord or plug or after the appliance
malfunctions or has been damaged in any manner. Return appliance to the nearest
authorized service facility for examination, repair or adjustment.
6. The use of accessory not recommended by manufacturer may cause injury to persons or
damage to appliance.
7. Do not store anything that beyond manufacturer’s recommendation when not using this
toaster oven.
8. Do not use outdoors or for commercial purpose, do not use this toaster oven for other
intended purpose.
9. Do not let the cord hang over the edge of table or counter.
10.Do not place the appliance near the hot gas or electronic burner or other toaster oven, for
this will cause fire.
11.A fire may occur if the toaster oven is covered or touching flammable material,
including curtains, draperies, walls and the like when in operation. Do not store any
items on top of the appliance during operation.
12.Do not place any flammable material such as paper, cardboard, plastic or other things

that may catch fire in the toaster oven.
13.Do not cover crumb tray or any part of the oven with metal foil, for it will cause
overheating.
14.Oversize food shall not be put into the appliance for it will cause fire or electronic shock
on the toaster oven
15.Extreme caution is necessary when disposing the hot grease when broiling.
16.Do not clean with metal sourcing pad. Pieces will break off the pad and touch electrical
part involving a risk of electrical shock.
17.To turn this appliance off returns all the controls to “OFF” position.
18.To avoid scalding, do not touch the tab of crumb tray before cooling it down completely.
19.This appliance is not intended for use by persons (including children) with reduced
physical, sensory or mental capabilities, or lack of experience and knowledge, unless
they have been given supervision or instruction concerning use of the appliance by a
person responsible for their safety.
20.Children should be supervised to ensure that they do not play with the appliance.
21.The appliance is not intended to be operated by means of an external timer or separate
remote-control system.
22.This appliance is intended to be used in household and similar applications such as:
–staff kitchen areas in shops, offices and other working environments;
–farm houses;
–by clients in hotels, motels and other residential type environments;
–bed and breakfast type environments.
23.Never operate the appliance with wet hands.
24.It is recommended to have a residual current device (safety switch) installed by qualified
electrician to provide additional safety protection when using all electrical appliances.

KNOW YOUR TOASTER OVEN

INTRODUCTION OF CONTROL PANEL (The control panel design is subject
to change without prior notice.)
Temperature control knob
Dial this knob to set temperature, the
maximum setting is 4500F。
Timer knob
Turn it to set proper toasting time, and
the longest toasting time that could be
got is 30min, with stay on function。

FOR THE FIRST USE
Remove packing materials and any stickers. Remove the detachable accessories from oven.
Wash in sudsy water, rinse and dry with a cloth or paper towel. Replace all the detachable
accessories in oven. Select a location for the unit. Do not place unit under cabinets or too
close to the wall to allow heat to flow without damaging counter space. Plug unit into
electrical outlet.
NOTE:
1. Initial start-up operation may result in minimal smell and smoke (about 15 min.). This is
normal. It is due to the protective substance on heating elements which protect them from
salt effects during shipping from factory. Keep the air draught in good condition in the
initial use.
2. The least limit between the food and the upper heating element should be 30mm, for the
perfect result.
3. The baking pan can just be placed on the grill rack.
4. Always monitor the food at this setting to ensure that you are not overcooking
5. The inner cavity is equipped with different height of slots for placing grill rack in order
to get perfect result.
6. Make sure the crumb tray is completely positioned in place before using.
7. The toaster oven is with “stay on” function, it means that if you rotate the timer to “stay
on” position, the toaster oven will not stop working until you manually shut it off.
WARNING: After finish toasting, move the food out of the oven chamber with glove in
order to avoid being scalded.
USING YOUR TOASTER OVEN
TOASTING
1. Rotate the temperature control knob clockwise to 4500F position. Both the heating
elements will work. Open the oven door and place the bread slice on the wire rack. One
slice of bread is placed in the center of wire rack, four slices side by side. Four slices will
be lighter than one slice–adjust timer accordingly.

NOTE –Remember to remove the baking pan firstly for even toasting result.
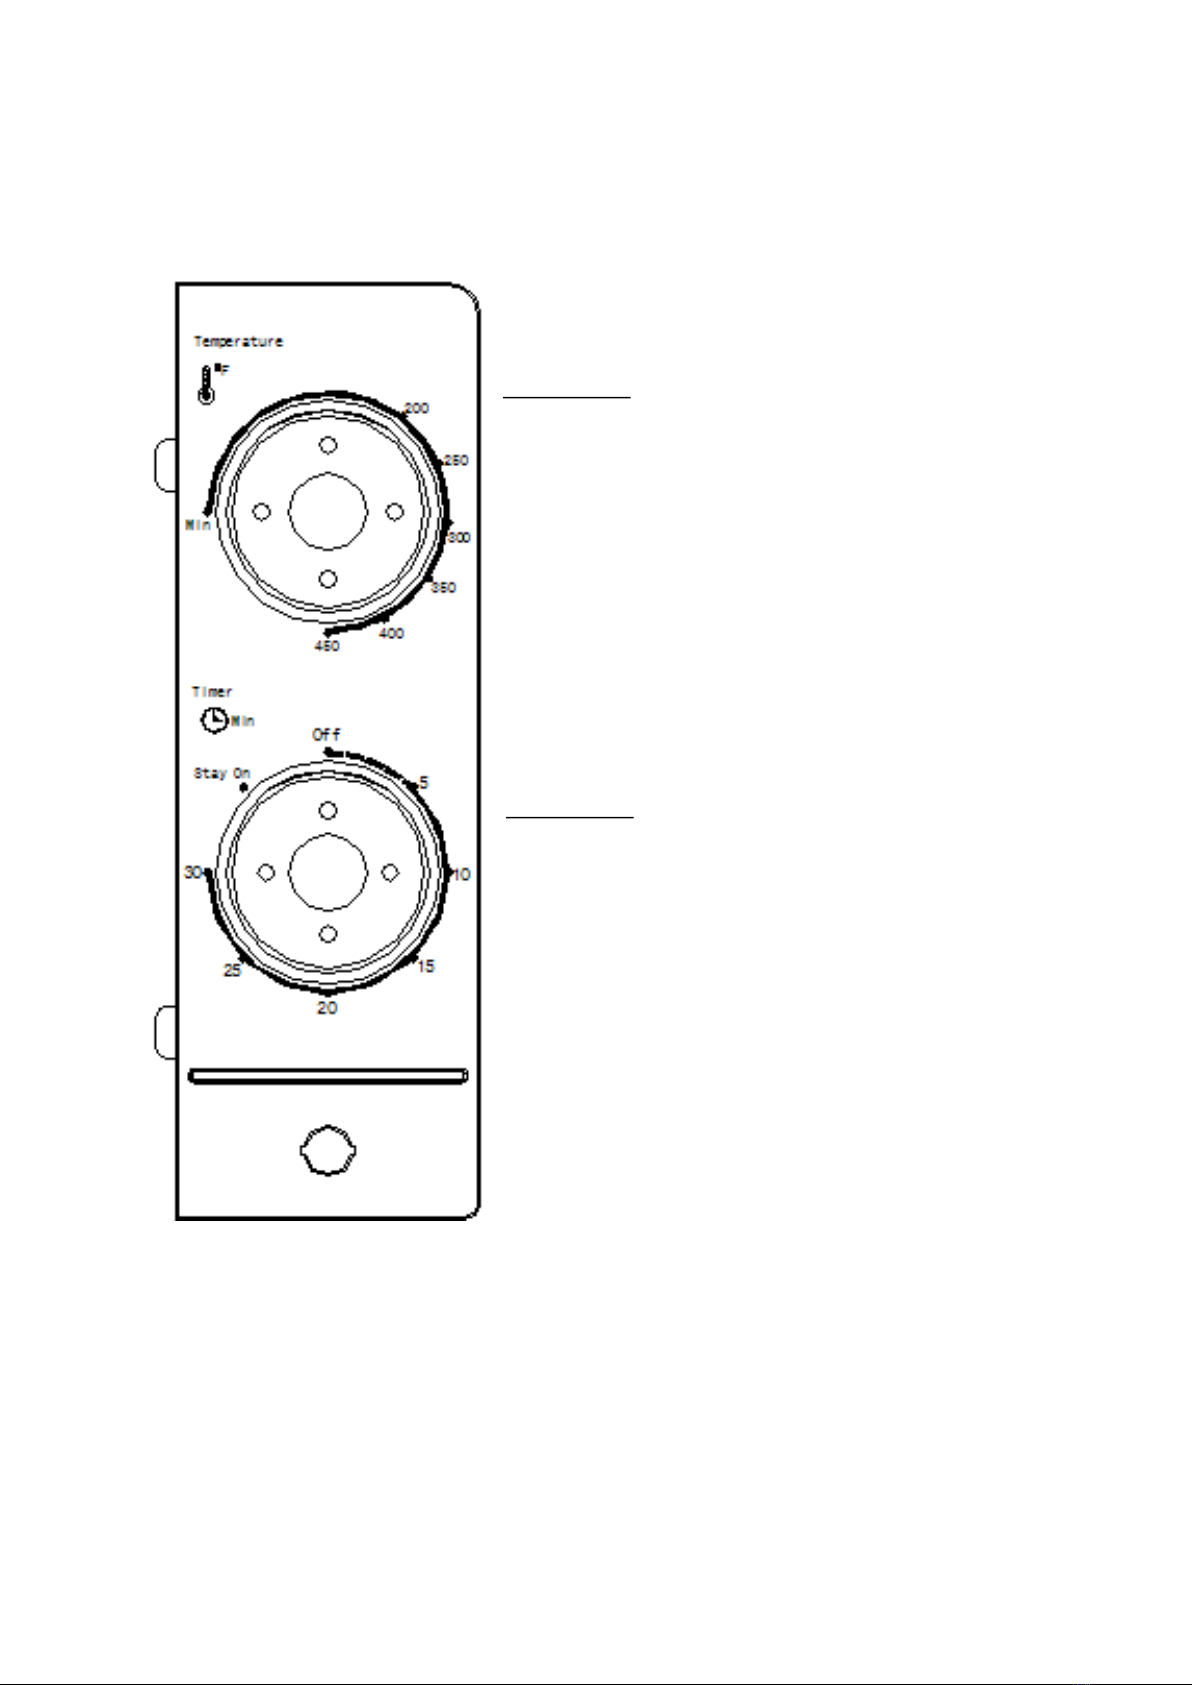
2. Time setting
Turn the time knob to the corresponding position depending on the bread color. Usually the
time is in the range of about 3-5 minutes. The more toasting time, the bread is darker. When
setting the timer dial for less than 5 minutes, always rotate Timer to over 5 minutes and
then rotate back to your desired time. This will ensure a safe and accurate timer setting. To
interrupt the toasting process just need to turn back the timer to OFF position. When the
timer has reached to OFF position a bell sound will be heard to prompt the completion of
toasting, also the power supply will be cut off automatically.
Note: the bread may catch fire if the toasting time is setting too long. Close supervision
is necessary during toasting and do not set the time too long.
BAKING (FOR BISCUIT, CAKE, PIZZAAND BREAD)
1. Put the baking pan above the wire rack. Put the foods on baking pan after about 10
minutes preheating, the suggested temperature is about 350-4500F.Temperature and time is
based on food type and thickness. Usually the proper temperature for baking the food like
bread or pizza is 3500F.
2. When baking, the upper and lower heating elements will cycle on and off to maintain the
constant temperature.
3. When baking is finished, turn the timer to OFF position.
4. Remove the food from the oven carefully.
GRILLING (FOR CHICKEN WINGSAND DRUMSTICKS)
1. Put the baking pan above the wire rack and place the food on baking pan. Always use the
baking pan when grilling the food like chicken wings or drumstick with fat, as it can catch
the drippings when grilling the food.
NOTE: We always suggest preheating oven about 10 minutes before placing the food.
2. Rotate the temperature controller clockwise to your desired temperature, usually for
grilling much thick food. It is advised that you should turn the temperature controller to the
4500F, as it can get better effect. When grilling, both the heating elements will work.
3. Set the time based on the food species, thickness. The heat element will be cycled on and
off to maintain the constant cavity temperature. For short time cooking, the time can’t be
set more than 30 minutes. For long time cooking (exceeding 30 minutes), you must set the
timer to STAY ON position. In this case once the food is over you must stop the oven
manually by turning the Timer to OFF position.

NOTE: Always monitor the food at this setting to prevent overcooking. Overturn the
food during the process or add the flavor if necessary. Always use oven gloves to avoid
the risk of scalding.
DEFROSTING
1. Remember to put the food on the baking pan when defrosting.
2. Put the baking pan on the wire rack, removing all paper or plastic wrapping. The
temperature should be set at 200-2500F.But it is unnecessary to preheat the oven. The time
needed for defrosting is largely dependent on food weight, type and shape. If the food is
thick and heavy,the temperature should be set at 2500F and long time is needed. It is
necessary to turn over the food. The oven temperature should not be set too high as this
may cause the food to be burned. If the food can be cut easily by knife the defrosting
process can be ended. Always cook food promptly after defrosting.
USEFULTIPS
1. Condensation will appear on the oven door for some foods and then disappear. This is
normal.
2. Cook food immediately after defrosting.
3. Frozen foods and thick meat will take longer to cook.
4. Avoid opening the Oven Door too frequently to prevent heat loss.
5. When baking, smoke will likely appear. Removing excess fat prior to baking can reduce
this.
CLEAN AND MAINTENANCE
1. Before cleaning the toaster, oven unplug it and allow it to cool completely.
2. Wash all the attachments with mild, soaped water including the grill rack and the baking
pan.
3. Immerse the attachments on the water to wash them completely, abrasive cleansers,
scrubbing brushes and chemical cleansers will damage the grill rack and baking pan.
4. Using a mild cloth to clean the inner of the oven, remember to clean it regularly.

5. To clean the door by using a hot cloth with detergent or soap.
6. Do not immerse the unit on water to clean the appliance.
7. Do not wipe the heating elements.
8. Do not install the grill rack or baking pan on the lower heating element directly.
9. Do not use any metal pad to clean the surfaces of oven to avoid reducing finish.
10.Press down the tab of crumb tray downwards (see Fig.1) and pull it outwards to open the
crumb tray (see Fig. 2). Wipe interior of crumb tray with a damp cloth. After cleaning,
close the crumb tray to the bottom of oven and then push it inwards.
NOTE: Do not touch the tab of crumb tray before cooling it down completely.
Fig.1 Fig.2
11.Dry all the attachments with a clean and dry cloth, then replace in position.
CAUTION
To prevent countertop from being damaged, the toaster oven must be operated with the
crumb tray in place, securely closed and cleaned of excess food.
Never operate your toaster oven with the oven door open.
Never put the baking pan (or any other accessory) directly on the top of the lower heating
elements.

TROUBLE SHOOTING
Item
Problem
Solution
1
Unit smokes during bake
function
Initial start up operation may result in minimal smell
and smoke (about 15 min.). This is normal. It is due
to the protective substance on heating. Elements
which protects them from salt effects during
shipping from factory.
Smoke in baking functions often means the multi –
use pan or Interior is dirty.
Smoke almost always appears in baking and is
normal. Cut off excess fat prior to baking to reduce
smoke
Stop using appliance if smoke source is the power
cord. Unplug.
2
The wire rack is stuck, and
oven door does not operate
smoothly
Remove wire rack and clean inside the rack grooves
inside oven chamber. Also, clean inside of crumb
tray. Check that hooks on oven properly aligned into
wire rack.
3
Toast black and smoking
or too light
Choose a lighter or darker crust setting

Table of contents
Other Living & Co Microwave Oven manuals
Popular Microwave Oven manuals by other brands

Hyundai
Hyundai H-MW2417 instruction manual

Willz
Willz WLCMWP09S2B-09 user manual

Frigidaire
Frigidaire FPMC2785KF - Professional 27" Electric Wall... Specification sheet

montpellier
montpellier MWBIC90044 Installation and operating instructions

Panasonic
Panasonic NN-S753 operating instructions

ALASKA
ALASKA MW1717 instruction manual