Living & Co BC-47F-F-53H User manual

45L Retro Bar Fridge
Model BC-47F-F-53H
User Manual
AFTER SALES SUPPORT
0800 422 274NZ

TABLE OF CONTENTS
P. 3
P. 7
P. 8
P. 10
P. 12
P. 14
P. 15
1. Safety Instructions
2. Product Overview
3. Getting Started
4. Product Use
5. Troubleshooting
6. Care and Cleaning
7. Technical Data
8. Note P. 15

3
1. Safety Instructions
IMPORTANT SAFETY INSTRUCTIONS
READ CAREFULLY AND KEEP FOR FUTURE REFERENCE
Read this manual thoroughly before first use, even if you are
familiar with this type of product. The safety precautions enclosed
herein reduce the risk of fire, electric shock and injury when
correctly adhered to. Keep the manual in a safe place for future
reference, along with the completed warranty card, purchase
receipt and carton. If applicable, pass these instructions on to the
next owner of the appliance.
Pay particular attention to messages that follow this
safety alert symbol or the words DANGER, WARNING
or CAUTION. These words are used to alert you to
a potential hazard that can seriously injure you and
others. The instructions will tell you how to reduce the
risk of injury and let you know what can happen if the
instructions are not followed.
WARNING:
Risk of fire
This symbol alerts you to take care as the appliance
contains flammable materials: Isobutane as refrigerant
and cyclopentane as insulation blowing gas. Do not
expose it to high heat, sparks and open flames.
The refrigerant isobutane (R600a) is contained within the
refrigerant circuit of the appliance, a gas with a high level of
environmental compatibility, which is nevertheless flammable.
During transportation and installation of the appliance, ensure that
none of the components of the refrigerant circuit become damaged.
WARNING: Never use an appliance with a damaged
refrigerant circuit!
If the refrigerant circuit becomes damaged, avoid proximity to
open fires and all types of heat and ignition sources. Thoroughly
ventilate the room in which the appliance is located.

4
It is hazardous for anyone other than an authorized service person
to service this appliance.
To reduce the risk of fire, electric shock or injury, always follow
basic safety precautions and accident prevention measures when
using this appliance, including the following:
1.1 Installation
• Heavy: This appliance is heavy, take care when moving
it. To avoid back or other injury, consider a two person lift or
mechanical aid when installing it. Failure to do so can result in
back or other injury.
• Damage: When unpacking, check the appliance carefully for
damage. If it is damaged, do not install the appliance. Contact
our customer support centre for advice on examination or return of
the damaged appliance.
• Protect from moisture: Install the appliance in an indoor area
protected from wind, rain, water spray or drips.
• Protect from heat: Do not install it next to an oven, grill or other
source of high heat, or where it will be exposed to direct sunlight for
prolonged periods of time.
• WARNING: Ventilation: To ensure proper ventilation, keep any
ventilation openings, in the appliance enclosure or in the built-in
structure, clear of obstructions. Ensure adequate air circulation
around the appliance to prevent overheating.
•Level: Install the appliance level in order to ensure proper operation.
1.2 Electrical Safety
•Voltage: Plug the appliance in a 220-240V, 50Hz, properly
earthed power outlet, which must be in good working order.
Make sure your outlet voltage and circuit frequency correspond to
the voltage stated on the appliance rating label.
• Power connection: Ideally, do not use an adaptor; do not
use an extension cord. Plug the power plug directly into a power
point that cannot easily be turned off accidentally, and that is
easily accessible so you can switch it off when required.

5
•Power cord: Do not kink or damage the power supply cord. Do
not leave it exposed or dangling. Secure it behind the appliance
so no one steps on or places anything on the power supply cord
or against it. A squashed or damaged power plug may overheat
and cause a fire.
•Damaged cord: Do not use a cord that shows cracks or abrasion
damage along its length or at either end. Any damage to the cord
may cause a short circuit, fire and/or electric shock. If the power
cord is damaged, it must be replaced by the manufacturer or its
service agent. Contact the customer sales support line for advice.
• Disconnection: Never unplug the unit by pulling the cord. Always
grip the plug firmly and pull straight out from the power point.
•Electrical work: If the installation of this appliance requires any
electrical work, make sure it is carried out by a qualified electrician.
1.3 Usage Conditions and Restrictions
•Indoor domestic use only: This appliance is intended for
indoor domestic use only, which includes use in households,
staff kitchen areas in shops, offices, in farm houses and in other
working environments, use by clients in hotels, motels, bed and
breakfast establishments, other residential type environments
and in catering and similar non-retail applications. It is not
suitable for industrial or commercial use.
•Intended purpose: Do not use this appliance for anything other
than its intended purpose, and only use it as described in this
manual. Do not attempt to alter or modify this appliance in any way.
•Usage restrictions: The appliance can be used by children
aged from 8 years and above, and persons with reduced
physical, sensory or mental capabilities, or lack of experience
and knowledge, if they have been given supervision or instruction
concerning use of the appliance in a safe way and understand
the hazards involved.

6
• Children: Supervise children to ensure they do not play with the
appliance. Never allow children to operate, play with or crawl
inside the appliance. Cleaning and user maintenance shall not
be made by children unless they are aged from 8 years and
above and supervised.
• WARNING! Do not use any electrical appliances (such as ice
cream makers) inside refrigeration appliances, unless they are
approved for this purpose by the manufacturer.
1.4 Cleaning and Maintenance
• Disconnect: Unplug the appliance before cleaning or servicing.
Failure to do so can result in electric shock, injury or death. Do
not connect or disconnect the plug when your hands are wet.
• Flames: Do not let open flames or ignition sources enter
the appliance.
•Flammable/explosive substances: Never clean this appliance
with flammable fluids. Do not store or use volatile, flammable or
explosive propellants or liquids in or close to this or any other
appliance. The fumes can create a fire hazard or explosion.
• Solvents: Do not use solvent-based cleaning agents or
abrasives on the interior as these may damage or discolor the
surfaces of the appliances.
• WARNING! Do not use mechanical devices or other means to
accelerate the defrosting process. Never use a sharp or metal
instrument to remove frost or clean the appliance. Use a plastic
scraper, if necessary.
• Service: Do not attempt to repair, modify or replace any part of
the appliance unless specifically recommended in this manual.
Refer all other servicing to a qualified technician, or contact the
after sales support line for advice on examination or repair of
the appliance.

7
2. Product Overview
Temperature Control Dial
-
prolonged periods of time.
-
10 minutes before restarting the unit. If you attempt to restart before this
Water
Collection Tray
Temperature
Control Dial
Door Shelf
Support
Shelf
Freezing (chiller)
Compartment
-
17
0
4
.
Use the temperature control dial to adjust the operating temperature
of the fridge. The reference numbers 0 - 7 indicate different cooling
levels and do not specifically relate to a preset temperature.
Operating temperatures will vary depending on ambient
temperature / frequency of the door being opened. However, as
a general guide, position 1 will provide a temperature of
approximately 8°C, position 4 approximately 3°C and position 7
approximately 0°C.
The first time you turn the unit on, set the temperature control dial to the
highest position (7). Then, after 24 hours, adjust the temperature control to
the setting that suits your needs, in most cases, position 4 should be
appropriate for normal use.
To turn the fridge off, turn the temperature control to the "0" position, then
unplug the unit from the power supply.
-
-

8
3. Getting Started
3.1 Unpacking
• Packaging materials: This product has been packaged to protect it against
transportation damage. Remove all packaging materials from around and inside the
appliance and keep the original packaging carton and materials in a safe place. It will
help prevent any damage if the product needs to be transported in the future, and
you can use it to store the appliance when it is not in use. In the event that the carton
is to be disposed of, please recycle all packaging materials where possible. Plastic
wrapping can be a suffocation hazard for babies and young children, so ensure all
packaging materials are out of their reach and disposed of safely.
• Power cord: Unwind the power cord to its full length and inspect it for damage. Do
not use the appliance if the appliance or its cord have been damaged or are not
working properly. In case of damage, contact our after sales support line for
advice on examination, repair or return of the damaged product.
• Read the manual: Before installing your new fridge read all safety instructions,
especially the sections on installation and electrical safety. Then follow the installation
instructions below and on the next page.
• Clean: Make sure the fridge is disconnected from the power supply before cleaning
the interior surfaces and all internal accessories with lukewarm water, a soft cloth and
a neutral/mild soap/detergent. This will remove any dust from transit and storage and
help remove the typical smell of a brand new product. Then dry thoroughly. Important:
Do not use harsh or abrasive detergents or powders as these will damage the finish.
3.2 Installation
3.2.1 Location
Install the appliance in an area that meets the following requirements:
•Ambient temperature: The ambient temperatures must correspond to the climate
class (T) indicated on the rating plate of the appliance: 16°C - 43°C.
•Floor surface: The floor must be sturdy, level and strong enough to support the unit
when it is fully loaded.
•Areas to avoid: Avoid areas where the appliance would be exposed to direct sunlight,
sources of heat (stove, heater, radiator, etc.), extreme cold ambient temperatures or
excessive moisture and high humidity. Installing it in the coolest area of the room will
save energy consumption and running costs.

9
3.3 Installation of the door handle
3.4 Adjustment of the Leveling Feet
•Turn the feet clockwise to
raise the front.
•Turn the feet counter-
clockwise to lower the fridge.
•Adjust both feet until the
fridge is stable and level.
The door handle will require fitment, the following components are included:
Handle Body Handle Cover ScrewsHex Key / Allen Wrench
•Align the screw holes in the handle
body with the respective holes in the
door.
•Insert the (3) screws into the holes
and use the Hex key / Allen wrench
to tighten
•Attach the handle cover. Push the
right-hand side of the cover into the
inner rim of the handle body first.
•Then, gently squeeze the opposite
end of the trim to clip into the left-
hand side of the body.
•Finally, press the central section of
the cover to "click" the cover into
position.

10
4. Product Use
4.1 Space Requirements
• Clearances: Ensure that air can circulate freely around the back of the cabinet,
which is necessary to cool the compressor and condenser. Allow at least 5-10cm
clear space at the back, top and sides of the unit.
• Overhanging wall units: Ideally, the appliance should not be positioned below
overhanging wall units. However, if the appliance must be positioned below an
overhanging wall unit, make sure to allow sufficient room so you can comfortably
open the lid and access the contents.
4.2 Electrical Connection
• WARNING! It must be possible to disconnect the appliance from the mains power
supply; the plug must therefore be easily accessible after installation.
• Before plugging in your new fridge let it stand upright for at least 4 hours.
This will allow the refrigerant gases to settle into the compressor and reduce the
possibility of a malfunction in the cooling system.
•When first starting up, and after a period out of use, allow the unit to cool down
on the highest setting (position 7) for at least 1hour before placing food in
the fridge.
•The appliance must be earthed. The plug of the power supply cord is equipped with
a contact for this purpose. Do not under any circumstances cut or remove the third
(earth) prong from the power cord. If the plug does not fit your outlet, consult a
licensed electrician for advice to have the outlet changed.
•Plug the unit into a dedicated, properly earthed wall outlet. Ensure that your outlet
voltage and circuit frequency correspond to the voltage stated on the rating label.
•Secure the fridge’s supply cord behind the unit. Do not leave it exposed or dangling
to prevent injury and accidental disconnection from the power supply.
•Adjust the temperature control as described below.
4.3 Going Away?
• Short vacation: Leave the fridge operating during vacations of less than a month.
•Long vacation: If you are not going to use the fridge for longer periods, remove all
food and unplug the power cord. Clean and dry the interior thoroughly. To prevent
odor and mould growth, leave the lid open slightly, blocking it open, if necessary.
(Restrict children’s access to the room with the open fridge to avoid creating a child
entrapment risk.)
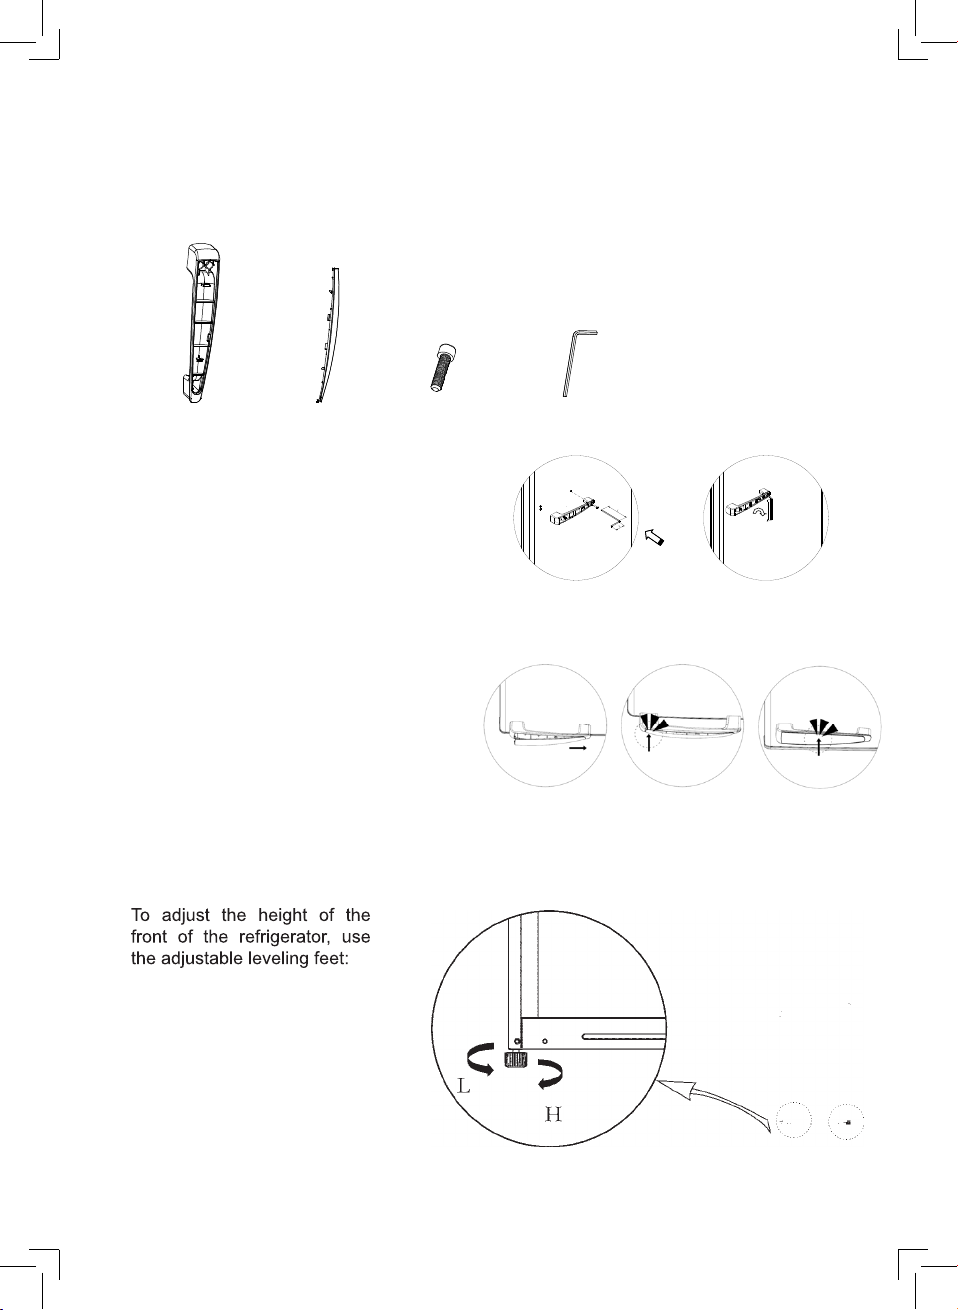
4.4 Moving the Fridge
•Remove all food from inside the fridge, securely tape down the shelves and tape the
door shut. Turn the leveling feet up to the base to avoid damage.
•Protect the outside of the unit with a blanket or similar soft material and make sure
the fridge stays secure in the upright position during transportation.

11
4.5 Fresh Food Storage
•The refrigerator compartment is suitable for short-term storage of fresh food.
The temperature inside varies depending on the amount of food stored and the
frequency of door opening.
• In order to maintain good cooling efficiency and to save energy, we recommend you
do not open the door for too long or too often. Do not overload the bar fridge, and
keep enough space around items for cold air flow. Do not block ventilation openings.
• The glass shelves are adjustable to suit individual storage requirements.
4.6 Chiller Compartment
The chiller compartment is not a true freezer, but can be used for freezing small items
such as ice cube trays and short term storage (3 - 4 days) of some frozen foods.
The temperature in this compartment does not get cold enough to freeze foods safely for
long periods of time. It works best when the food is already frozen.
• Do not store bottled beverages in the chiller compartment as liquids may expand
when frozen causing the bottle to break and potentially damage the appliance.
•The door of the chiller compartment is susceptible to breaking due to excessive ice
build-up. This part is not covered under your warranty. Be sure to defrost when the
ice reaches about 3 - 4mm in thickness.
• Drip tray
•The drip tray is designed to catch melting ice during defrosting. It slides into the
grooves underneath the chiller compartment. Empty any water out of the drip tray
periodically. Then wash and dry it before placing it back.
• Energy saving tips
• Place the fridge in the coolest area of the room, away from heat-producing appliances
and out of direct sunlight.
•Let hot foods cool to room temperature before placing them into the fridge.
Overloading the fridge forces the compressor to run longer.
•Wrap foods properly and wipe containers dry before placing them in the fridge. This
cuts down on frost build-up inside the fridge.
• Do not line any fridge storage bin with aluminum foil, wax paper or paper towels.
Liners interfere with cold air circulation, reducing cooling efficiency.
• Position food so that air can circulate freely around it.
• Do not leave the fridge door open for longer than required.
• Power Failure
• Most power failures are corrected within a few hours and should not affect the
temperature inside your fridge, if you minimize the number of times the door is
opened. However, if the power is going to be off for a longer period of time, you need
to take proper steps to protect your food.

12
5. Troubleshooting
If you experience a problem with your bar fridge, check in the following table for solutions
to help you solve the problem. If after these checks you still have a problem with your
fridge, contact our after sales support line for advice.
CAUTION: Before troubleshooting, disconnect the power supply. Any troubleshooting
that is not mentioned in this manual may only be carried out by a qualified electrician or
similarly qualified person.
Problem Possible cause
The fridge does not work. • It is not plugged in.
• The circuit breaker tripped or a blown fuse.
•The thermostat knob is set to the minimum position.
The compressor turns on
and off frequently. Does that
indicate that there is
a problem?
• The room temperature is hotter than normal.
•A large amount of food has been added to the fridge.
• The door is being opened too often.
• The door is not closed completely.
• The temperature control is not set correctly.
• The door gasket does not seal properly.
• The fridge does not have the correct clearances.
Note: It is normal for the compressor to switch
on/off periodically this indicates that the set
temperature is being regulated.
The temperature inside the
fridge is too warm.
• The temperature control is set too warm. Turn the
control to a cooler setting and allow several hours
for the temperature to stabilize.
• The door is kept open too long or is opened too
frequently. Warm air enters the fridge every time
the door is opened.
• The door is not closed completely.
• A large amount of warm or hot food might have
been stored recently. Wait until the fridge has had
a chance to reach its selected temperature.
• The fridge has recently been disconnected for a
period of time. At least 2 hours are required for the
fridge to cool down with the thermostat set to the
highest position.
The fridge seems to make
too much noise.
• The rattling noise may come from the flow of the
refrigerant, which is normal.
• As each cycle ends, you may hear gurgling
sounds caused by the flow of refrigerant.
• Contraction and expansion of the inside walls may
cause popping and crackling noises.

13
The door does not close
properly.
•The door was reversed and is not properly installed.
• The gasket is dirty or bent.
• The shelves, bins or baskets are out of position.
The fridge door does
not open.
• The door has just been opened, leave it for a
few minutes to allow the air pressure to equalize
before trying again
The external fridge surface
is warm.
• The exterior walls can be warm. This is normal
while the compressor works to transfer heat from
inside the fridge cabinet.
There are vibrations; what
is causing them? How can I
stop the vibrations?
•Check to ensure that the fridge is on a level surface.
• The floor is uneven or weak. The fridge rocks on
the floor when it is moved slightly.
• The fridge is touching the wall. Re-level the fridge
and move it away from the wall.
Moisture forms on the inside
or outside walls of the bar
fridge
• Hot and humid weather increases the internal rate
of frost build-up. This is normal.
• Open the door less often and make sure it is
always properly closed.
Excessive frost and ice has
built up.
• The fridge door has been left open.
• Something is preventing the door from closing.
• The door gasket is dirty or damaged.

14
6. Care and Cleaning
WARNING!
To reduce the risk of electric shock or injury, always switch off the appliance and
disconnect it from the power supply before defrosting or cleaning it.
6.1 Defrosting the Bar Fridge
• For efficient operation and minimum energy consumption, defrost the bar fridge
compartment when the frost on the chiller compartment walls is building up; do not
let frost build up to more than 3 - 4mm thickness. Then follow the simple steps below.
• Turn the temperature control to the minimum position, unplug the fridge and remove
the food. (Keep any food temporarily in a fridge or cooler bag to keep defrosting to
a minimum.)
• During the defrost cycle, the ice melts into the drip tray. To remove the water, either
take out the drip tray and/or place a collection container under the tray, or use a
sponge or towel to wipe the melting ice off the fridge floor.
• Defrosting usually takes a few hours. After defrosting, wipe the drip tray and chiller
compartment dry. Place the drip tray back under the chiller compartment and return
the thermostat dial to the desired position.
• To defrost quickly, remove all foods from the fridge and leave the door open. Place an
old towel underneath the appliance to collect any spillage.
WARNING!
• Never use sharp or metallic tools to scrape off frost as it may damage the
cooling system. To scrape ice off surfaces, use a plastic scraper.
•Do not use boiling water to accelerate defrosting because it may damage any
plastic parts.
6.2 Cleaning the Bar Fridge
• Turn the temperature control to the minimum position, unplug the bar fridge and
remove the food, shelves and tray.
• Wash the inside surfaces and the interior accessories with a damp, warm cloth
moistened in a water and baking soda solution (about 2 tablespoons of baking soda
to 1 liter of water). Wring excess water out of the cloth before cleaning around the
temperature control or any electrical parts. Rinse and wipe dry with a soft cloth.
• Clean the outside of the unit with a damp, well wrung out cloth. Keep the door gasket
(seal) clean.
• After everything is dry, place the appliance back into service.
WARNING!
• Never clean the unit with an abrasive, acid, oil or solvent based cleaning agent, or
with abrasive pads or scourers. Never use flammable fluids or sprays for cleaning as
the fumes from these substances can create a fire hazard or explosion.
•Never clean the appliance with a steam cleaner. Moisture could accumulate in the
electrical components, danger of electric shock! Hot vapors can lead to the damage
of plastic parts.
• The appliance must be completely dry before it is placed back into service.

15
7. Technical Data
Rated voltage 220 - 240VAC
Rated frequency 50Hz
Rated current 0.5A
Climate class T
Dimensions (mm) 495 (H) x 444 (W) x 485 (D)
Capacity 45L gross volume
Note: Volume can be subject to manufacturing tolerance
within 3%
Refrigerant R600a, 18g
Insulation blowing agent Cyclopentane
Temperature range 0 - 8 degrees Celcius
8. Note
8.1 Compliance
This appliance has been fully tested and meets all requirements as set out by standards
AS/NZS 60335.1 and AS/NZS 60335.2.24.
8.2 Responsible Disposal
• At the end of its working life, do not throw this appliance out with your household
rubbish. Electrical and electronic products contain substances that can have a
detrimental effect on the environment and human health if disposed of inappropriately.
Observe any local regulations regarding the disposal of electrical consumer goods
and dispose of it appropriately for recycling and recovery of the refrigerant and
blowing agent. Contact your municipal authorities for advice on recycling facilities
in your area.
• This refrigeration appliance contains flammable refrigerants and insulation blowing
gases, which must be removed before disposal. Contact your municipal authorities
for any codes or regulations concerning the disposal of such materials.

i
STOP
BEFORE
RETURNING
TO STORE
Read the manual.
It will help you get the
best out of your product.
Still have questions?
Call After Sales Support
0800 422 274
Warranty
We pride ourselves on producing a range
of quality products that are both packed with features and
completely reliable. We are so confident in our products, we back
them up with a two years warranty.
Now you too can relax knowing that you are covered.
Customer Helpline NZ: 0800 422 274
This product is covered by two years warranty
when accompanied by proof of purchase.
AFTER SALES SUPPORT
0800 422 274NZ
Table of contents
Other Living & Co Refrigerator manuals

Living & Co
Living & Co HD-333FWEN User manual

Living & Co
Living & Co LC-H129W User manual

Living & Co
Living & Co HC-689WE User manual

Living & Co
Living & Co NZF-129L User manual

Living & Co
Living & Co HD-268WEN-W User manual

Living & Co
Living & Co VBFG-LVC User manual

Living & Co
Living & Co HS-160RN User manual