Loc8tor Loc8tor Plus User manual
User Guide
For Loc8tor models
Loc8tor Loc8tor Plus
1 Loc8tor Handheld 1 Loc8tor Plus Handheld
2 Mini Homing Tags 3 Mini Homing Tags
1 Key ring loop / adhesive pack 1 Panic Homing Tag
Batteries included 2 Key ring loop / adhesive packs
Batteries included
Award
(5018) Loc8tor User Manual 3/5/06 9:37 pm Page 1

Welcome to Loc8tor, the great new product that helps you find your mislaid items and can even
stop you losing them in the first place*.
We've designed the Loc8tor to be versatile and easy to use, whether at home, out and about or
on business. Please take a few minutes to read through this User Guide to help you get the most
out of your purchase.
Loc8tor has been manufactured to quality standards to run trouble free and comes supplied with
a 12 month warranty. Please visit our website at www.loc8tor.com/support for additional product
information, contact details and frequently asked questions.
We'd love to hear from you, what you like about Loc8tor and any suggestions you have to
improve it. Visit www.loc8tor.com/feedback to have your say.
We hope you enjoy your new purchase and can now rest at ease, avoiding those frustrating
moments of mislaying your important items.
With best wishes.
Anthony Richards
Managing Director
*Loc8tor Plus - Comes supplied with Locate and Alert modes. Helps you find misplaced items
and allows invisible safety zones to be set around you to stop items going astray.
Loc8tor - Comes supplied with Locate mode. Helps you find misplaced items.
www.loc8tor.com/support
INTRODUCTION
2
(5018) Loc8tor User Manual 3/5/06 9:37 pm Page 2
Page
Quick Key Guide 3
Setting Up Your Loc8tor 4
Locate Mode - Find a mislaid item 5
Alert Mode* - Helps prevent items getting lost 6
Alert Activated 7
Mini Homing & Panic Homing Tags 8
Icons and Abbreviations 8
Menu Functions 9
Batteries 10
General Care 10
Changes 11
Warranty 11
Please Note Back cover
CONTENTS
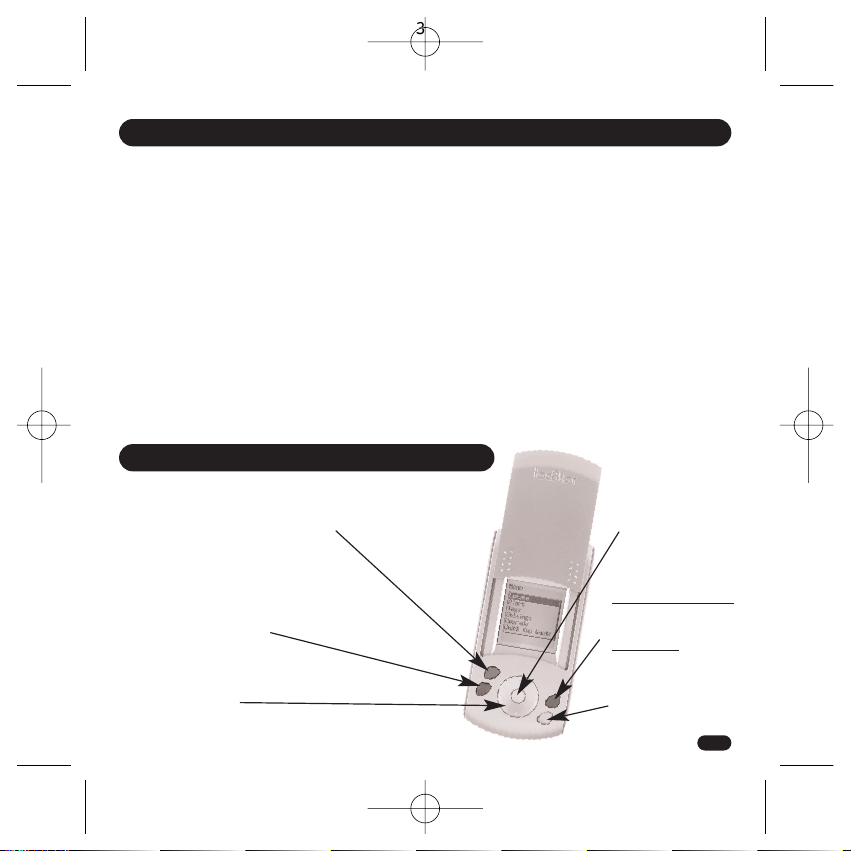
QUICK KEY GUIDE
Grey button
Shows list of registered Tags
that can be located
Blue button
Loc8tor & Loc8tor Plus
Shows Tag list and low
battery warnings
Loc8tor Plus
Alert mode Tag settings
Red button
Turns ON or OFF all
Alert enabled Tags
(Loc8tor Plus only*)
White button
Selects item
highlighted on screen
Navigation ring
Moves cursor around
screen: left, right, up, down
Yellow button
To register a new Tag
3
(5018) Loc8tor User Manual 3/5/06 9:37 pm Page 3

1. Insert batteries (2 x AAA)
With the Loc8tor buttons facing you push forwards and remove right hand
side panel. Insert batteries (See diagram in battery compartment for correct
insertion) and replace side panel.
Loc8tor has no ON or OFF button. To use press any button. It will
automatically turn ON.
2. Register Tags
•Pull out white strip in Tag to activate batteries
•Tag beeps and red light flashes once
•Place Tag next to Handheld making sure all other Tags have been moved
more than an arms length away
•Press Yellow register button on the Handheld
•Follow on-screen instructions
•Repeat process for each new Tag
3. Naming your Tags
•Tags can be personalised with a name of your choice up to 10
characters long
•Use navigation ring to highlight letters
•Press White button to select
•Press OK to finish
4. Attach Tags
Depending on use Tags can be attached with adhesive strips, key ring loop
or left loose.
Adhesive strips
Best used when attaching to a hard, flat surface. Peel off backing to attach.
Sticky tabs are not permanent but increase their bond with time. Ideally
leave for a minimum of 10 minutes. Strongest bond after 24 hours.
To remove insert flat tool under Tag and gently twist / prise off.
Key ring loop
Best used to attach Tag to items such as key ring, bags and belt loop.
Push loop through the Tag hole and then pull ring through the loop.
SETTING UP YOUR LOC8TOR
1.
3.
4.
4
(5018) Loc8tor User Manual 3/5/06 9:37 pm Page 4
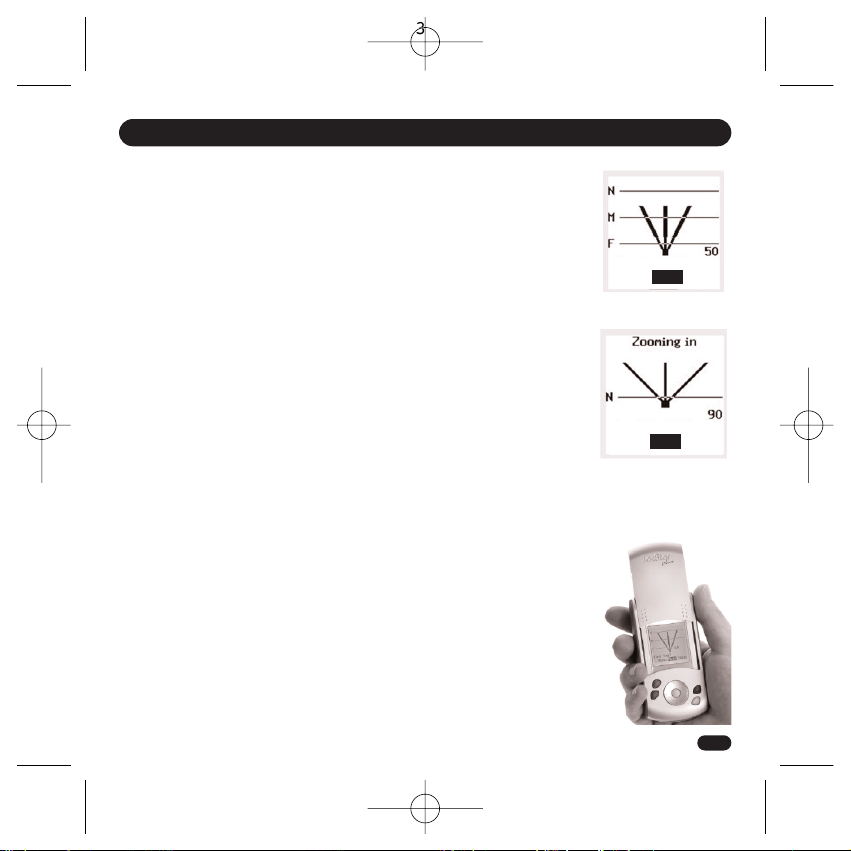
LOST
•Slide up lid and press Grey button (top left) to see list of Tags that can be
located
•Scroll down and select item to be found with White button
•Scan area slowly turning full 360° circle
•Once circle completed go back to direction of strongest audio and visual
signal
•Walk in this direction - As you get nearer audio pitch and frequency of beeps
increase, lines on screen extend and signal strength numbers increase (1)
•If in doubt, repeat 360° circle
•When signal strength lines get close to the top of the screen Tag is close by
•Try pressing select button on Handheld to Mute and listen for the Tag beep
When you are almost on top of Tag, screen changes to Zooming in mode to
guide you right in (2)
•Select and press STOP when the item is found
FOUND
TIPS
•Place the Tag on a surface and practice locating a few times to get a feel for
how it works
•If you are ever unsure which direction to go in slowly repeat full 360° circle
and then go in direction with the strongest signal strength
•Strongest signal is displayed when Handheld is pointing directly at Tag. Also
try moving Handheld up and down as Tag could be upstairs or downstairs
•If you are close to a wall whilst getting a strong signal check the room next
door
•If no signal is displayed try moving position to a different area
LOCATE MODE - FIND A MISLAID ITEM
5
Find Keys
Menu Mute Stop
Find Keys
Menu Mute Stop
(1)
(2)
(5018) Loc8tor User Manual 3/5/06 9:37 pm Page 5
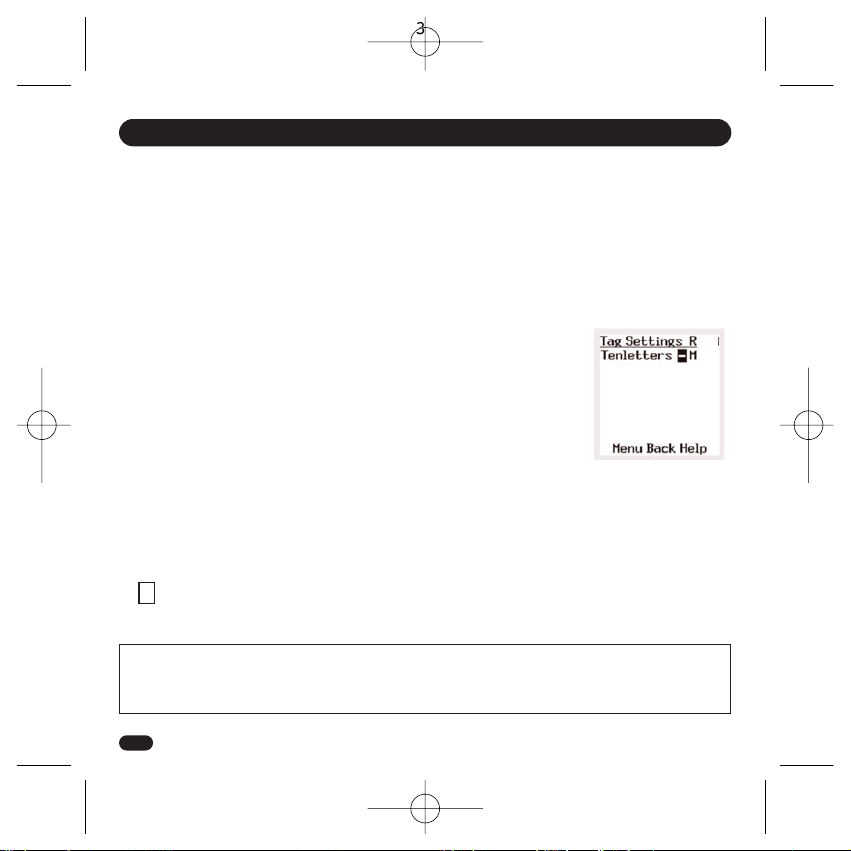
The Blue button (Tag Settings screen) controls your Alert settings. It enables you to decide what mode
each Tag is in, Locate or Alert, and to set the distance for your required safety zone (Near, Medium or Far)
for each Tag. Once you're happy with your settings simply press the Red button to activate Alert.
All Tags with a (3) will now automatically be in Alert mode.
Setting up Alert (Blue Button - Tag Settings Screen)
•Attach Tag in or on item to be protected
•Press Blue button for Tag Settings screen. A list of all your Tags will be displayed
Selecting the Safety Range (1)
•Scroll to the right hand column (under R) in line with selected Tag
•Use White button to select distance between Tag and your Handheld
N = Near, M = Medium, F = Far
Set Tag Mode
•Scroll to column with dash (-) next to the Tag name
•Press White button to make Tag alertable (3)
Repeat this process for each Tag
Using Alert Mode
•Press Red button to turn Alert mode ON or OFF for all Tags with (3) in Tag settings screen
•Tag beeps to confirm Alert mode is ON.
Your Tags are now in Alert. Should any Tag set in Alert mode go out of the preset safety zone the
Loc8tor Plus will vibrate, set off an alarm and advise which Tag has gone astray
An will appear in the bottom right hand corner when the Alert mode is on
ALERT MODE - HELPS PREVENT ITEMS GETTING LOST (Loc8tor Plus Model)
6
(1)
A
! Important Alert mode usability statement ! - A constant link between Handheld and Tag ensures you
are notified immediately when Tags go out of range. However if used continuously will significantly
reduce battery life. When not needed turn Alert mode off using Red button.
(5018) Loc8tor User Manual 3/5/06 9:37 pm Page 6
Other manuals for Loc8tor Plus
1
This manual suits for next models
1
Other Loc8tor GPS manuals


Popular GPS manuals by other brands


Telit Wireless Solutions
Telit Wireless Solutions SL869T3-I user guide
SpyX
SpyX Spy Tracker manual

Lowrance
Lowrance GlobalNav 212 Installation and operation instructions
ATTI
ATTI Shadow Tracker Micro Vision installation instructions

Garmin
Garmin GSC 10 - Speed Declaration of conformity

Teltonika
Teltonika FM6300 user manual


