Tripy 2 User manual

User’s manual
14/06/2010
This manual pertains to the revision 1.3.x of the Tripy II firmware
www.tripy.eu

2
Table des matières1.
1. Tripy II, much more than a GPS 7
2. Tripy II concepts 8
2.1. Preliminary 8
2.2. Paper road book & electronic road book 10
a.What’s a road book? . . . . . . . . . . . . . . . . . . . . . . . . . . . . . . . . . . . . . . . . . 10
b.Description of a digital road book . . . . . . . . . . . . . . . . . . . . . . . . . . . . . . . . . . . 11
2.3. How does Tripy II navigate ? 12
a.Map display . . . . . . . . . . . . . . . . . . . . . . . . . . . . . . . . . . . . . . . . . . . . 12
b.road book display . . . . . . . . . . . . . . . . . . . . . . . . . . . . . . . . . . . . . . . . . . 13
c.The best of both worlds . . . . . . . . . . . . . . . . . . . . . . . . . . . . . . . . . . . . . . . 15
d.A map to position yourself or visualize an itinerary . . . . . . . . . . . . . . . . . . . . . . . . . . . . 15
e.Compass display (beacon road book) . . . . . . . . . . . . . . . . . . . . . . . . . . . . . . . . . . 16
2.4. What happens as one leaves the itinerary? 17
a.Compass mode . . . . . . . . . . . . . . . . . . . . . . . . . . . . . . . . . . . . . . . . . . . 19
b.If you leave the itinerary while Tripy II displays the map . . . . . . . . . . . . . . . . . . . . . . . . . . 19
c.Re-computing the itinerary . . . . . . . . . . . . . . . . . . . . . . . . . . . . . . . . . . . . . . 19
3. What you need to know prior to using Tripy II 20
3.1. Tripy II GPS – knob functions 20
3.2. Switching ON, switching OFF & satellites synchronization 22
a.Starting Tripy II . . . . . . . . . . . . . . . . . . . . . . . . . . . . . . . . . . . . . . . . . . . 22
b.Satellites synchronization before departing . . . . . . . . . . . . . . . . . . . . . . . . . . . . . . . 23
c.Switching Tripy II OFF . . . . . . . . . . . . . . . . . . . . . . . . . . . . . . . . . . . . . . . . 24
d.Automatic switch off . . . . . . . . . . . . . . . . . . . . . . . . . . . . . . . . . . . . . . . . . 24
3.3. Language selection 25
3.4. Connecting Tripy II to the outside world 26
a.Connecting to the battery charger . . . . . . . . . . . . . . . . . . . . . . . . . . . . . . . . . . . 27
b.Permanent connection to the vehicle power supply . . . . . . . . . . . . . . . . . . . . . . . . . . . . 27
c.Connecting to the computer . . . . . . . . . . . . . . . . . . . . . . . . . . . . . . . . . . . . . 28

3
d.Connecting a USB memory stick. . . . . . . . . . . . . . . . . . . . . . . . . . . . . . . . . . . . 29
e.Connecting to another Tripy II . . . . . . . . . . . . . . . . . . . . . . . . . . . . . . . . . . . . . 29
3.5. Handling the batteries 30
a.Battery charging . . . . . . . . . . . . . . . . . . . . . . . . . . . . . . . . . . . . . . . . . . 30
b.Tips about how to handle the batteries . . . . . . . . . . . . . . . . . . . . . . . . . . . . . . . . . 32
3.6. Connecting to the vehicle power cable 33
3.7. Screen contrast and back lighting settings 34
a.Contrast setting. . . . . . . . . . . . . . . . . . . . . . . . . . . . . . . . . . . . . . . . . . . 34
b.Back lighting setting. . . . . . . . . . . . . . . . . . . . . . . . . . . . . . . . . . . . . . . . . 35
c.Impact of the lighting setting on the autonomy. . . . . . . . . . . . . . . . . . . . . . . . . . . . . . 35
3.8. Mounting Tripy II on the vehicle 36
3.9. Data transfer between Tripy II and PC 37
a.Favorites. . . . . . . . . . . . . . . . . . . . . . . . . . . . . . . . . . . . . . . . . . . . . . 39
b.POI’s . . . . . . . . . . . . . . . . . . . . . . . . . . . . . . . . . . . . . . . . . . . . . . . 40
c.Automatic tracks . . . . . . . . . . . . . . . . . . . . . . . . . . . . . . . . . . . . . . . . . . 40
d.Itineraries or road books . . . . . . . . . . . . . . . . . . . . . . . . . . . . . . . . . . . . . . . 41
e.Monitored POI’s (e.g. Speed traps) . . . . . . . . . . . . . . . . . . . . . . . . . . . . . . . . . . . 42
3.10. Data transfer between Tripy II and USB memory stick 43
3.11. Data transfer between two Tripy II’s 44
3.12. Firmware version and Tripy II update 45
3.13. Safe copy and Tripy II restoration 46
a.Back-up copy . . . . . . . . . . . . . . . . . . . . . . . . . . . . . . . . . . . . . . . . . . . . 46
b.Restoration of a back-up copy. . . . . . . . . . . . . . . . . . . . . . . . . . . . . . . . . . . . . 47
3.14. Access to the general RESET knob and memory card 48
a.Tripy II general RESET . . . . . . . . . . . . . . . . . . . . . . . . . . . . . . . . . . . . . . . . 49
b.Micro SD card extraction . . . . . . . . . . . . . . . . . . . . . . . . . . . . . . . . . . . . . . . 49
4. How to head for destination? 50
4.1. Preliminary 50
4.2. How to head for an address? 51

4
a.Town introduction and use of the virtual keyboard . . . . . . . . . . . . . . . . . . . . . . . . . . . . 51
b.Street introduction . . . . . . . . . . . . . . . . . . . . . . . . . . . . . . . . . . . . . . . . . 53
c.Routing profile . . . . . . . . . . . . . . . . . . . . . . . . . . . . . . . . . . . . . . . . . . . 54
4.3. How to head for a destination recently selected? 56
4.4. How to store a « favorite » location to return to it later on? 57
a.Store the current position as a « favorite ». . . . . . . . . . . . . . . . . . . . . . . . . . . . . . . . 57
b.Compute an itinerary towards a « favorite » location . . . . . . . . . . . . . . . . . . . . . . . . . . . 58
4.5. How to head for a point of interest (hotel, gas station, a.s.o...)? 59
4.6. How to head for a GPS coordinate (longitude – latitude) ? 62
5. How to navigate an itinerary ? 64
5.1. Preliminary 64
5.2. In and out of the navigation mode 64
5.3. Toggle the road book and map displays 65
5.4. Navigate under the road book display 66
a.Standard « pictogram » display . . . . . . . . . . . . . . . . . . . . . . . . . . . . . . . . . . . . 66
b.Ribbon display . . . . . . . . . . . . . . . . . . . . . . . . . . . . . . . . . . . . . . . . . . . 67
c.« Compass » display . . . . . . . . . . . . . . . . . . . . . . . . . . . . . . . . . . . . . . . . . 68
d.Simplified pictograms . . . . . . . . . . . . . . . . . . . . . . . . . . . . . . . . . . . . . . . . 69
e.Various « info borders » . . . . . . . . . . . . . . . . . . . . . . . . . . . . . . . . . . . . . . . 70
5.5. Map navigation and displaying the itinerary computed by Tripy II 71
a.“Riding direction” orientation . . . . . . . . . . . . . . . . . . . . . . . . . . . . . . . . . . . . . 71
b.“North” orientation . . . . . . . . . . . . . . . . . . . . . . . . . . . . . . . . . . . . . . . . . 72
5.6. Additional navigation functions 74
a.Re-compute an itinerary to final destination . . . . . . . . . . . . . . . . . . . . . . . . . . . . . . . 74
b.Re-compute towards a given waypoint . . . . . . . . . . . . . . . . . . . . . . . . . . . . . . . . . 75
c.Reseting the odometers . . . . . . . . . . . . . . . . . . . . . . . . . . . . . . . . . . . . . . . 76
d.Leaving the road book and switch back to the dashboard . . . . . . . . . . . . . . . . . . . . . . . . . 76
e.Store my position . . . . . . . . . . . . . . . . . . . . . . . . . . . . . . . . . . . . . . . . . . 76

5
6. How to look for a road book? 77
6.1. Preliminary 77
6.2. Find a road book in the library. 78
6.3. Search for one of your own road books 79
6.4. Search a road book recently ridden 79
6.5. Copy a road book from a USB memory stick 79
7. How to record a road book scouting trip ? 80
7.1. Preliminary 80
7.2. Start the recording of a scouting trip 80
8. How to immediately ride a scouting track ? 83
9. How to use the Trip Master ? 84
9.1. Preliminary 84
9.2. Reset 85
9.3. Quick reset of the partial trip counter 85
9.4. Adjusting the total 85
10. How to set the parameters ? 86
10.1. Preliminary 86
10.2. Screen settings 86
10.3. Statut de la réception GPS 86
10.4. Time zone setting 87

6
10.5. Language setting 87
10.6. Information screen 88
10.7. Advanced settings 89
a.Sound . . . . . . . . . . . . . . . . . . . . . . . . . . . . . . . . . . . . . . . . . . . . . . . 89
b.Key sound . . . . . . . . . . . . . . . . . . . . . . . . . . . . . . . . . . . . . . . . . . . . . 89
c.Automatic dashboard . . . . . . . . . . . . . . . . . . . . . . . . . . . . . . . . . . . . . . . . 89
d.Auto power off . . . . . . . . . . . . . . . . . . . . . . . . . . . . . . . . . . . . . . . . . . . 89
e.Show help screens . . . . . . . . . . . . . . . . . . . . . . . . . . . . . . . . . . . . . . . . . 89
f. GPS Coordinates . . . . . . . . . . . . . . . . . . . . . . . . . . . . . . . . . . . . . . . . . . 90
g.Keyboard . . . . . . . . . . . . . . . . . . . . . . . . . . . . . . . . . . . . . . . . . . . . . 90
11. How to update the speed trap warning file ? 91
11.1. Preliminary 91
11.2. Updating the speed traps files 91

7
Tripy II, much more than a GPS1.
Does a GPS represent the perfect guide for unforgettable rides?
Have you ever imagined creating your next road ride on a Tourist or Topographic digital map ?
Did you think possible the creation of a beautiful off-road ride based on a digital topographic map, or
even prepare your utmost adventurous raids on foreign exotic maps ?
You dreamed about it. Tripy did it !
Tripy II is a unique combination of a GPS and digital road book player/recorder designed to enjoy unfor-
gettable rides and create exclusive itineraries.

8
Tripy II concepts2.
Preliminary2.1.
The Tripy II GPS is a stand alone navigation system allowing the computation of an A-to-B itinerary and
displaying the itinerary in a traditional fashion as a scrolling map on its screen.
Nothing revolutionary, and pretty common to all GPS’es on the market. Tripy stands out when it comes
to riding the nicest rides in the optimal safety conditions considering its ease of use (readability, speed
to grasp a concise information, battery autonomy, no intrusive and boring voice prompting, a.s.o....).
Indeed, Tripy offers a unique type of display we call « electronic road book ». The « road book » type of
display is the most relevant for usage on bike, quad, as well as in cars and off road vehicles as it requi-
res far less attention and glancing time. This « subliminal guiding » is a non intrusive solution liberating
the pilot from tiring vocal prompting (even more tiring as it is used on small roads where frequent mes-
sages are given).

9
The Tripy II GPS allows you to:
•rideitinerariesdirectlycomputedbythedevice(introduceyourdestinationlocationaswellasthe
preferred route profile : Fast by highways – without highways – leisure trip, and Tripy II is ready to
bring you there),
•recordascoutingtrippriortopreparingaprofessionalqualityroadbook,
•re-runapreviouslyrecordedtrack,
•discoveroneofthemanyitinerariescreatedbyotherniceridesfansandalreadyavailableinits
memory (more than 500 itineraries Tripy II presents to you by order of proximity or provider),
•ndoutthelatestitinerariesfromtheTripycommunityonthewww.tripy.euwebsite,
•createyourselfyourownitinerariesinaveryaccuratefashionthankstospeciallyrichandadapted
maps (topographic maps, Michelin™ road maps, a.s.o....). Our PC software, RoadTracer Pro, will
allow you to enhance your itineraries with comments and pictograms displayed on the Tripy II GPS
as you go along, print a paper version of your road book, display your trace on GoogleMAP/Earth™
and much more,
•rideapaperroadbookanduseTripyIIasaprofessionaltripmaster(totalodometerwithadjustment
possibility, partial counter with one touch reset, averaging,).
In short, with the Tripy II GPS, the road matters as much as the destination.
Wandering and wondering without worrying, is now an accessible luxury !

10
Paper road book & electronic road book2.2.
What’s a road book?a.
The road book is the set of instructions (typically on paper) allowing to follow a pre-defined itinerary.
Road books sophistication and their reading accessories widely differ according to the application: one
day tourism, multiple days tours, off road rides, rally’s and raids.
The simplest road book is the list of towns, often hand written with the road numbers you have sticked
over your road map.
Commonly, the road book will indicate a simplified navigation pattern, using symbolised sequential
direction changes combined with millage indications (partial and total). The typical road book handed
over at the start of an organised tour (club or other organisation).
total
distance
waypoint
pictogram
waypoint
comment
partial distance
The road book is ideal to define an itinerary. It offers an accurate representation of each direction
change and provides also other added value information such as touristic, danger areas (tricky road
bend, gravel, a.s.o....), sightseeing points, quality inn’s, a.s.o...
Limiting the use of the traditional paper road book: without a co-pilot, it is difficult to read while driving;
it is not resisting the weather conditions encountered by bikers and quad riders; the measured millage
is sometimes inaccurate; having gone astray, it is difficult to return to the initial itinerary.
Tripy has combined the advantages of the paper road book with the GPS technology to offer a unique
system: the digital road book.

11
Description of a digital road bookb.
pictogram of
waypoint #20
In the RoadTracer software (supplied with Tripy II), the itinerary is represented by a trace composed of
successive points linked by straight lines (a small black arrow on each segment indicates the trace
direction). The trace is scattered with waypoints (see above waypoint # 20) usually representing direc-
tion changes (crossing, round-about, a.s.o....) but may also represent an information important to the
rider (danger, historical site to the right, worthwhile restaurant, a.s.o....).
All these information are part of the whole digital road book and are stored in a file that will be read and
interpreted by the Tripy II GPS upon riding of the itinerary. The digital road book may be crafted by
yourself by means of the RoadTracer software or automatically created by the Tripy II GPS when you ask
it to compute an itinerary towards your chosen destination.
Thanks to this precise and exhaustive definition of the itinerary, a Tripy digital road book will always be
read by all Tripy GPS models without the need for interpretation or itinerary modification as commonly
encountered with traditional GPS’es re-computing an itinerary based on a list of waypoints. In such a
way, three friends riding the same road book with Tripy are sure to meet at the same place for the lunch
pause !

12
How does Tripy II navigate ?2.3.
Map displaya.
Like other GPS’es Tripy offers a « map » type of display. In this mode, it represents a proximity map
directed in the riding direction. The zoom factor is adjustable from 100 m to 3 km. In the bottom left
corner of the screen one finds the reminder of the following road book waypoint. (next direction change)
and the distance to it (300 meters in the below example). At the bottom of the screen as well, Tripy
indicates the road number or street name and location where we are. On this « map » display, the iti-
nerary to follow is displayed as a large grey ribbon enhancing the road to follow. White arrows are
additionally superimposed on this grey line to clearly indicate the direction to follow.
Versus the « road book » type of display, the « map » display is interesting to assess more complex road
situations (in towns) yet requires additional rider attention. This mode is not recommended for bike or
quad riding.

13
road book displayb.
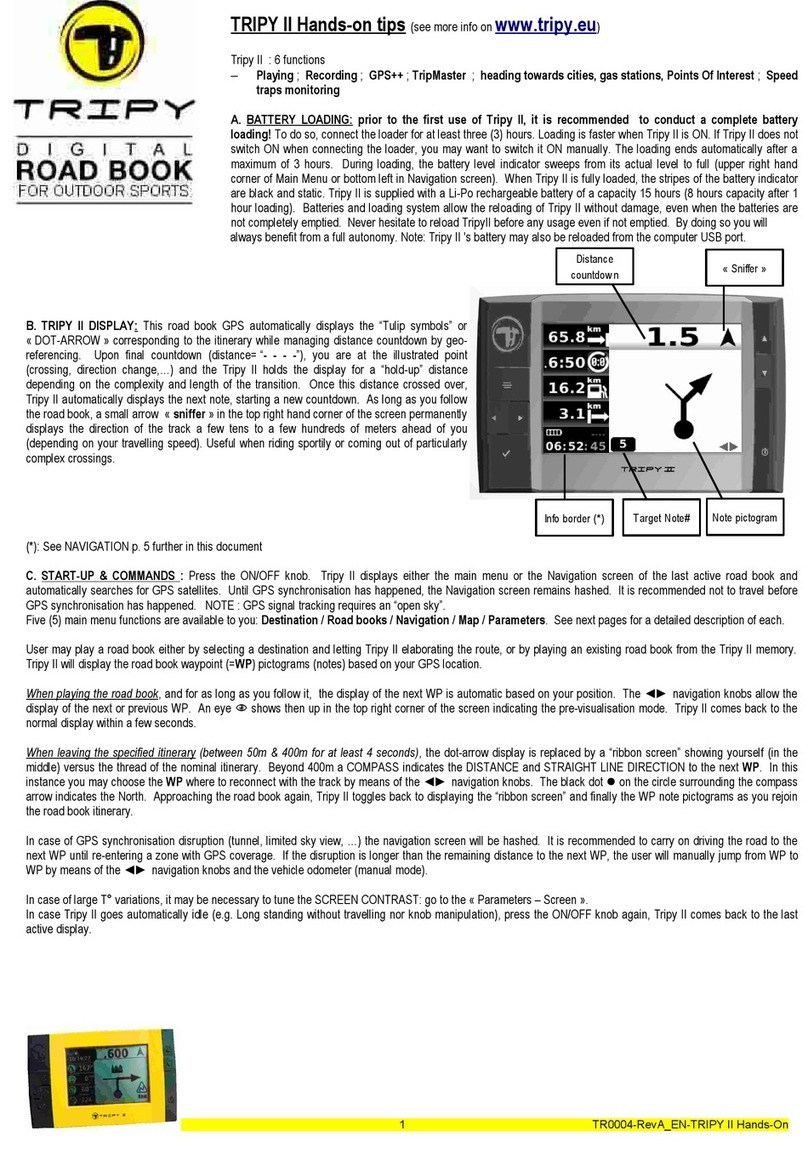
One of the characteristics of Tripy is its original display called « road book » or «tulip symbols ». Such
display type combined with the panoramic silver-back display, easily readable in full sunlight, is defini-
tely fitted for motor sports and especially bikes and quads. On such type of vehicles, the pilot must
remain concentrated on the route and cannot afford occupying his sight with a device requiring more
than a few tenth of a second.
In the « road book » type of display, Tripy II indicates in a very efficient manner the partial distance to
the next waypoint and updates that distance continuously. The more you get approach the next waypoint,
the lesser the distance.
sniffer
Pictogram of next
waypoint
next waypoint
number
remaining distance
info border
Below this partial distance, Tripy II displays the pictogram of the next waypoint and inform the pilot in
such a way of the situation he will encounter when reaching the position (when the partial distance is
null). A waypoint commonly represents a direction change but can also indicate a point of interest (dan-
ger, tourist attraction, a.s.o...)
On this « road book » type of view, the pilot grasps very quickly that 10.8 km remain before the next
waypoint. This information is sufficient to understand that the only thing to do is to enjoy the landscape
and the riding for a good while.
In the upper left corner, a small directional arrow continuously confirms the track general direction a
few tens of meters ahead of the vehicle. This little arrow called « sniffer » is somehow the scout explo-
ring the road ahead of you. It looks further ahead as you ride faster.

14
Finally, on the display right hand side, in an area called « info border », Tripy II displays different infor-
mation panels. You may easily toggle between panels by means of a knob. The various information
displayed are:
remaining distance to destination,•
estimated arrival time,•
actually driven kilometers since start,•
altitude,•
instantaneous speed,•
average speed,•
bearing followed,•
partial trip counter (manually reset by the user at leisure),•
total trip counter (manually reset by the user at leisure),•
GPS position (longitude/latitude),•
compass towards the next road book waypoint,•
close track (the track you are following),•
info border

15
The best of both worldsc.
We actively promote the usage of the « road book » type of display for the higher passive safety it pro-
vides, yet it is obvious that displaying the map is of interest in some complex situations. That is why you
may easily toggle between one type of display and the other one by a simple pressure on a knob (the OK
knob).
A map to position yourself or visualize an itineraryd.
Tripy II usually displays the map oriented in the riding direction, and you may select a zoom factor from
100 m to 3 km. Beyond this proximity zoom, the map is displayed North up for zoom factors from 15 km
to 500 km. That North up map (like paper maps) displays the countries’ borders and names of towns
of importance. It allows you to visualize the itinerary to figure out its main directions. You shall then be
able to review the itinerary of a « road book » providing either from the Tripy library, or computed by the
Tripy II GPS itself.
Proximity map oriented in the
riding direction at a 3 km zoom
North up map at a 15 km zoom
North up map at a 60 km zoom

16
Compass display (beacon road book)e.
Outside of known paths, when one does not have accurate data to produce an actual « road book », if
one has not had the time for site scouting before starting, Tripy II offers the possibility to create « beacon »
type road books. By means of a simple list of points for which the GPS coordinates are known, or points
of interest on an exotic map of the world, the RoadTracer software allows you to produce a « beacon »
type itinerary. It may then guide you from point to point by means of a compass indicator. By means of
an arrow, the display continuously indicates the direction to follow to reach the next point as well as the
distance to it. At any time, you may also display the track to follow in the « info border » pane or toggle
to the map display.
Even in our areas, the compass type of display may be useful. It allows you to reach a destination (town,
POI or even GPS coordinate) in a funny fashion letting you choose the road to use, yet keeping an eye on
the bearing.
Ben’s motto for this type of use:
« Wandering wondering without worrying – an achievable goal »

17
What happens as one leaves the itinerary?2.4.
When you leave the itinerary while Tripy II displays the road book, the display changes to the « ribbon »
mode, then the « compass » mode. Under the « ribbon » mode, you see the track you should have fol-
lowed versus your current position. The compass indicates the straight line distance and direction of
the next « road book » waypoint (typically the next change of direction).

18
In the above example, you may have to leave the itinerary because of road works. At location (A), the
vehicle carries on straight ahead instead of turning left. You may see the different display types following
each other on the Tripy starting from the « ribbon » display at the bottom (1). IT will be displayed in
such a way as long as you remain close to the track. If you carry on further away, Tripy changes to the
« compass » display (2) yet may at any time toggle to the « map » display (3) by means of a short pres-
sure on the OK knob. If you did not expressly asked for the « map » display when reaching the point (B),
the « compass » indicates a direction almost 90 degrees to the left (4) indicating clearly the need to bear
left at the next opportunity. At that same point (B), the map shows that at point (4) a road to the left will
lead you back to the itinerary (grey with white arrows).
In all cases, if you have left the itinerary, you may always decide to re-connect to it by means of the
compass or asking the Tripy II GPS to re-compute an itinerary.

19
Compass modea.
In the compass mode, the thick black arrow indicates the direction towards the next waypoint as well
as the straight line distance to it. In the above example, the vehicle leaves the itinerary at point (A).
Reaching the next 4 road crossing (point B), the compass shall be directed 90 degrees to the left. It will
be obvious that the road to the left leads to the waypoint 10. By means of the right & left arrow knobs
it is also possible to display the other road book waypoints (straight line distance and direction).
If you leave the itinerary while Tripy II displays the mapb.
If you are displaying the map at the moment you leave the itinerary, you’ll immediately see where you
are versus the normal itinerary (you may eventually modify the map zoom factor by means of the left &
right arrow knobs).
Re-computing the itineraryc.
At any time, you may ask the Tripy II GPS to re-compute an itinerary. Contrary to most traditional GPS’es,
Tripy does not automatically re-compute an itinerary from where you stand towards the final destination.
It always leaves you the choice of the point towards which you want to re-compute a connection route.
The advantage of such way of doing is that you remain master of the device that never re-computes in
an unwanted fashion risking missing the most interesting part of an original itinerary or the lunch get
together with your friends.

20
What you need to know prior to using Tripy II3.
Tripy II GPS – knob functions3.1.
Tripy II is fitted with a large panoramic silver-back reflective display. That technology ensures a perfect
readability in full sun light and its integrated LED lighting allows you to use it at night or in the twilight.
To ensure a great sturdiness and perfect readability, the display is protected by a non-glare, scratch
proof glass.
The interchangeable screen rim is available in two colours, allowing you to taint your Tripy II at your
taste (Tripy II comes with both a white and yellow covers).
menu
interchangeable
colour
LCD
display up arrow
down arrow
ON/OFF
screws for memory &
reset knob access cover
reset knob
SD memory slot &
reset knob access
left &
right arrow
OK
Table of contents
Other Tripy GPS manuals
Popular GPS manuals by other brands
SMART
SMART GT07 user manual

Becker
Becker TRAFFIC ASSIST PRO 7929 operating instructions

Magellan
Magellan Triton 200 - Hiking GPS Receiver Brochure & specs

Mannesmann
Mannesmann VDO KIENZLE Fleet Manager 100 user manual
Maestro
Maestro EVA1084 user manual

RadarFind
RadarFind T10-B011 installation instructions
