Loc8tor Loc8tor Plus User manual

User Guide
Manual del usuario / Mode d'emploi / Bedienungsanleitung
-For Loc8tor models -
Loc8tor:
1 Loc8tor Handheld
2 Mini Homing Tag
1 Key ring loop / adhesive pack
Batteries included
Index
nglish................................................................
spañol....................................................... ......14-27
Français.............................................................28-41
Deutsch.............................................................
Loc8tor plus:
1 Loc8tor Plus Handheld
3 Mini Homing Tags
1 Panic Homing Tag
2 Key ring loop / adhesive Pack
Batteries included
2-13
42-54

Welcome to Loc8tor, the great new product that helps you find your mislaid items and can even stop you losing
them in the first place*.
We've designed the Loc8tor to be versatile and easy to use, whether at home, out and about or on business.
Please take a few minutes to read through this User Guide to help you get the most out of your purchase.
Loc8tor has been manufactured to quality standards to run trouble free and comes supplied with a 12 month
warranty. Please visit our website at www.loc8tor.com for additional product information, contact details and
frequently asked questions.
We'd love to hear from you, what you like about Loc8tor and any suggestions you have to improve it. -mail us
at sales@loc8tor.com to have your say.
We hope you enjoy your new purchase and can now rest at ease, avoiding those frustrating moments of
mislaying your important items.
With best wishes.
Anthony Richards
Managing Director
*Loc8tor Plus - Comes supplied with Locate and Alert modes. Helps you find misplaced items and allows
invisible safety zones to be set around you to stop items going astray.
Loc8tor - Comes supplied with Locate mode. Helps you find misplaced items.
www.loc8tor.com www.loc8tor.co.uk
INTRODUCTION
2

Page
Quick Key Guide 3
Setting Up Your Loc8tor 4
Locate Mode - Find a mislaid item 5
Alert Mode* - Helps prevent items getting lost 6
Alert Activated 7
Mini Homing & Panic Homing Tags 8
Icons and Abbreviations
Menu Functions 9
Batteries 10
General Care 10
Changes 11
Warranty 11
Please Note 12-13
CONTENTS
QUICK KEY GUIDE
3
Grey button
Shows list of registered Tags
that can be located
Red button
Turns ON or OFF all
Alert enabled Tags
(Loc8tor Plus only*)
Navigation ring
Moves cursor around
screen: left, right, up, down
White button
Selects item
highlighted on
screen
Blue button
Loc8tor & Loc8tor Plus
Shows Tag list and low
battery warnings
Loc8tor Plus
Alert mode Tag settings
Yellow button
To register a new Tag
8

1. Insert batteries (2 x AAA)
With the Loc8tor buttons facing you push forwards and remove right hand side panel.
Insert batteries (See diagram in battery compartment for correct insertion) and replace
side panel.
Loc8tor has no ON or OFF button. To use press any button. It will automatically turn
ON.
2. Register Tags
•Pull out white strip in Tag to activate batteries
•Tag beeps and red light flashes twice
•Place Tag next to Handheld making sure all other Tags have been
moved more than an arms length away
•Press Yellow register button on the Handheld then select yes
•Follow on-screen instructions (see below Naming Tags)
•Repeat process for each new Tag
3. Naming your Tags
•Tags can be personalised with a name of your choice up to 10
characters long
•Use navigation ring to highlight letters
•Press White button to select
•Press OK to finish
4. Attach Tags
Depending on use Tags can be attached with adhesive strips, key ring loop or left loose.
Adhesive strips
Best used when attaching to a hard, flat surface. Peel off backing to attach.
Sticky tabs are not permanent but increase their bond with time. Ideally leave for a
Minimum of 10 minutes. Strongest bond after 24 hours.
To remove insert flat tool under Tag and gently twist / prise off.
Key ring loop
Best used to attach Tag to items such as key ring, bags and belt loop.
Push loop through the Tag hole and then pull ring through the loop.
SETTING UP YOUR LOC8TOR
1.
3.
4.
4

LOST
•Slide up lid and press Grey button (top left) to see list of Tags that can be located
•Scroll down and select item to be found with White button
•Scan area slowly turning full 360° circle
•Once circle completed go back to direction of strongest audio and visual
signal
•Walk in this direction - As you get nearer audio pitch and frequency of beeps
increase, lines on screen extend and signal strength numbers increase (1)
•Whenever in doubt, repeat 360° circle
•When signal strength lines get close to the top of the screen Tag is close by
•Try pressing select button on Handheld to Mute (
When you are almost on top of Tag, screen changes to Zooming in mode to guide
you right in (2)
•Select and press STOP when the item is found
FOUND
TIPS
•Place the Tag on a surface and practice locating a few times to get a feel for how it
works
•If you are ever unsure which direction to go in slowly repeat full 360° circle and
then go in direction with the strongest signal strength
•Strongest signal is displayed when Handheld is pointing directly at Tag. Also try
moving Handheld up and down as Tag could be upstairs or downstairs
•If you are close to a wall whilst getting a strong signal check the room next door
•If no signal is displayed try moving position to a different area
LOCATE MODE - FIND A MISLAID ITEM
5
(1)
(2)
) and listen for the Tag
Beep

The Blue button (Tag Settings screen) controls your Alert settings. It enables you to decide what mode
each Tag is in, Locate or Alert, and to set the distance for your required safety zone (Near, Medium or Far)
for each Tag. Once you're happy with your settings simply press the Red button to activate Alert.
All Tags with a ( ) will now automatically be in Alert mode.
Setting up Alert (Blue Button - Tag Settings Screen)
•Attach Tag in or on item to be protected
•Press Blue button for Tag Settings screen. A list of all your Tags will be displayed
Selecting the Safety Range (1 )
•Scroll to the right hand column in line with selected Tag
•Use White button to select distance between Tag and your Handheld
N = Near, M = Medium, F = Far
Set Tag Mode
•Scroll to column with dash (-) next to the Tag name
•Press White button to make Tag alertable ( )
Repeat this process for each Tag
Using Alert Mode
•Press Red button to turn Alert mode ON or OFF for all Tags with ( ) in Tag settings screen
•The Tag will beep to confirm Alert mode is ON.
Your Tags are now in Alert. Should any Tag set in Alert mode go out of the preset safety zone the
Loc8tor Plus will vibrate, set off an alarm and advise which Tag has gone astray
An will appear in the bottom right hand corner when the Alert mode is on
ALERT MODE - ELPS PREVENT ITEMS GETTING LOST (Loc8tor Plus Model)
6
A
! Important Alert mode usability statement ! - A constant link between Handheld and Tag ensures you are
notified immediately when Tags go out of range. However if used continuously will significantly reduce battery
life. When not needed turn Alert mode off using Red button.
(1)

Should one of the Tagged items go out of your safety zone the Handheld will vibrate, let off an alarm and the 'Tag
Status' screen will automatically appear.
The Tag Status lists which Tag/s have activated an Alert and whether the Tag is currently out of your designated safety
zone. If a Tag has gone out of range but since returned to the safety zone, it also enables an Alert to be muted or
removed from the Alert list altogether.
Using the Tag Status Screen
To turn all Alerts OFF press the Red button.
To individually remove each Tag from the Alert enabled list select the ( ) and change to a (-).
Note - To return to Tag Statu creen go to Alert option on main menu Tag Statu
ALERT ACTIVATED (Loc8tor Plus Model)
7
Select to
remove Tag
from Alert
enabled list
When shown Alarm active for
that Tag
When shown Alarm muted
Identifies
which Tag
activated
the Alert
– Select
item to
Locate
that Tag
If the Tag is out of the safety zone
an ‘!’ symbol will appear
If the Tag has gone out of the
safety zone but returned and now
safe an ‘A’ will appear
If a Panic Tag has been activated a
‘P’ will appear (see page 8)
Mutes all current Alert alarms Alert mode on

Activating a Panic Tag
For a Panic alarm to be activated, the Panic Tag must be set in Alert mode ( )
in the Tag Settings screen (Blue button) and the Alert mode switched on (Red
button)
To activate the Panic alarm, simply press the centre of the red button on the Panic
Tag. So long as the Panic Tag is within the set safety zone the Alert Alarm will be
activated - the Handheld will vibrate, let off an alarm and identify which Tag has
activated the Panic alarm
Give or attach the Tag to the child / dependant as appropriate.
MINI OMING & PANIC OMING TAGS
Look out for our Splash proof wrist strap that can help extend the range of
your Tag when attached to a child / dependant
8
ICONS AND ABBREVIATIONS
Throughout the menu system a
variety of icons are used to inform
on status. The screen shots
shown contain icons you can
expect to see whilst navigating
Homing Tag
Panic Tag
Both Mini Homing and Panic Homing Tags can be used to Locate items and if used with the Loc8tor Plus model used
in Alert mode.
The Panic Tag provides the additional function of enabling a child or dependant in need to activate an alert alarm to call
for help.

MENU FUNCTIONS
9
(1)
(2)
(3)
(4)
Locate - Same function as Grey button. Shows list of Tags that can be
located
Alert Options (Loc8tor Plus model only) (1)
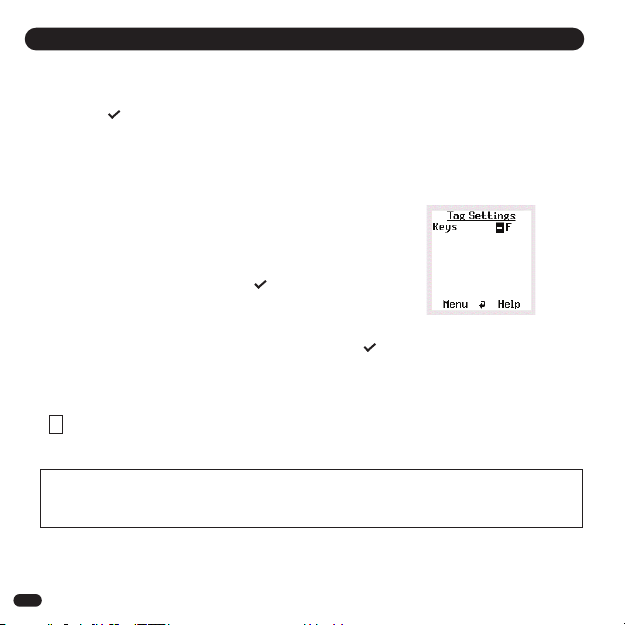
Range Settings - nables Near (N), Medium (M) and Far (F) range to be increased or
decreased as required
Tag Settings - Same function as Blue button
Tag Status - Control screen informing which Tag has activated an Alert alarm and
the Tags current status
Alert ON / OFF - Same function as the Red button
Tag Options (2)
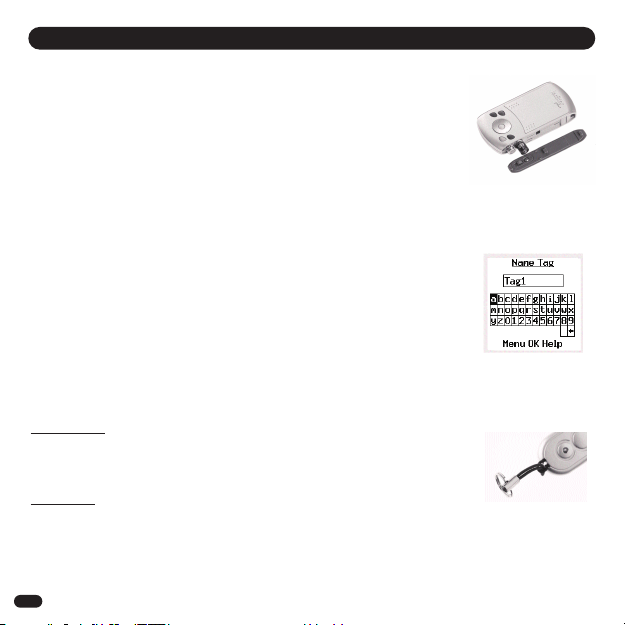
Register Tag - Same function as Yellow button. Register a new Tag
Rename Tag - Select Tag from list to be renamed. nter in new name followed by
OK
Unregister Tag - Select Tag from list to be unregistered
Place Tag next to Handheld and confirm Tag is to be unregistered
This enables a Tag to be used on a different Loc8tor Handheld
Settings (3)
Lock Keypad - Protects against buttons being accidentally pressed
To unlock press Red then Blue button
Volume - Select to adjust volume whilst locating, for Alert alarm or the
Keypad. Left / right on navigation ring decreases / increases
volume. Up / Down on navigation ring switches between volume
control and bottom menu
System Info - System information screen
Handheld ID. - It is recommend you keep a note of your Loc8tor Handheld ID
Should your Handheld ever become lost you can re-program
a new Handheld to re-register any of your existing Tags
Language - Select preferred language
Contrast - nables screen contrast to be made lighter or darker
Upgrade (4) - nables a Loc8tor Handheld to be upgraded to a Loc8tor Plus
(activates Alert mode). Contact place of purchase or visit
www.Loc8tor.com/upgrade for more details
elp / Key Guide - Quick guide to what each button does and the icons used
Help button also appears at the bottom of selected screens

andheld
•To replace batteries use 2 x AAA 1.5 volt or equivalent (Also see
Setting up your Loc8tor on page 4)
•A low battery icon will appear in the top right hand corner of the
screen when Handheld batteries are running low. Batteries are able
to be used until screen starts to fade.
Please Note - Battery life will vary depending on mode and frequency
of use.
Tags
•To change the batteries - there is a hole which you can thread the
lanyard through. Put your thumb nail or other flat tool at this end into the split line (line going around
the middle of the Tag). Keeping your thumb / flat tool in the split line move it around to the middle of
the long side. The Tag will pop open.
-Replace with SR54 (silver oxide) 1.5v button cells or equivalent to provide best battery life, keeping
the plus side face up nearest the lanyard hole.
-Replace the lid by putting one side in first then pushing shut.
-If batteries are correctly inserted Tag will beep when case is closed.
•If you locate a Tag and its battery is low a low Tag battery icon will appear in the Tag Settings screen
(Blue button) on the very right hand side of the screen. The Icon will appear in line with the Tag that
needs to be changed. Replace Tag batteries when icon is displayed to ensure Tag does not become
lost.
•The Loc8tor and Tags have not been designed to be waterproof. Please take care not to get wet.
•Never clean with water, detergent or cleaning agent - simply use clean, dry cloth.
•On the reverse of the Handheld lid are two black lines. These are aerials and essential to the
functioning of your Loc8tor. Take care not to scratch.
•Tag and Handheld operational temperature is between 0˚c to + 55˚C. Storage temperature is between
- 10˚c and + 60˚c.
BATTERIES
GENERAL CARE
10

The material in this User Guide is for information only and is subject to change without notice. Whilst reasonable
efforts have been made in the preparation of these instructions to ensure its accuracy, Loc8tor Ltd. assumes no
liability resulting from errors or omissions in this User Guide, or from the use of the information contained herein.
Loc8tor Ltd. reserves the right to make changes to the product design without reservation and without notification to
its users.
Terms & Conditions
Please contact place of purchase or Loc8tor website www.Loc8tor.com for full Terms and conditions.
Loc8tor Ltd warrants to the original purchaser that this product shall be free from significant defects in material and
workmanship for 1 year beginning on the date of purchase as shown on your receipt.
Should the product need to be returned it must be sent back to the original place of purchase to be processed. Proof
of purchase must accompany the returned product. If purchased direct from Loc8tor Ltd. a returns authorisation
number is required prior to the product being returned to us. Product must be returned by signed delivery in suitable
protective packaging.
This warranty does not apply to any product that has been subject to abuse, misuse, negligence, tampering or has
been modified in any way.
Without prejudice to your rights Loc8tor Ltd. may replace a defective product or issue a credit against future
purchases.
No other warranties, express or implied are made. Loc8tor Ltd. shall not be liable for any special, incidental or
consequential damages whether or not the purpose for which you purchased the product was made known to Loc8tor
Ltd, the retailer or otherwise. Your statutory rights are not affected in any way
S PAG 12 FOR ‘PL AS NOT ’ POINTS
C ANGES
WARRANTY
11

a. 183 metre / 600 feet range is based on clear line of sight. Actual range will vary depending on use, environment
and location.
b. Loc8tor is not a toy and should only be used by adults or with parental supervision.
c. Locate mode has been designed to help find your possessions. It should not be relied on to find people.
d. Alert mode has only been designed to act as an aid to warn against items getting misplaced or stolen. It is not a
replacement for parental supervision.
e. The Loc8tor Handheld works in one mode at a time. Whilst Locating an item Alert mode will be temporarily
switched off.
f. When a Tagged item goes out of the Far range in Alert mode it may be out of range to locate.
g. Usage of the Panic Tag button is limited to approximately 1,000 presses.
h. The Loc8tor is intended to be used in accordance with instructions.
i. B WAR OF CHOKING HAZARD – K P LOOS TAGS OUT OF TH R ACH OF YOUNG CHILDR N.
TAG
FCC ID: TUW-LOT11
IC: 6444A-LOT11
PLEASE NOTE
HANDH LD
FCC ID: TUW-LOH11
IC: 6444A-LOH11
Designed in the UK. Made in China for Loc8tor Ltd in compliance with ISO 9001:2000 Certification
Head Office
Loc8tor Ltd, Devonshire House, 404 – 406 Finchley Road, London, NW2 2HZ
Customer Services UK: 0870 111 7777 mail: sales@loc8tor.com
www.loc8tor.com www.loc8tor.es www.loc8tor.fr www.loc8tor.de www.loc8tor.co.uk
TH NTIR CONT NTS OF THIS BROCHUR © 2006, LOC8TOR LTD.
12

FCC STATEMENT
This equipment has been tested and found to comply with the limits for a Class B digital device, pursuant to part 15 of the
FCC Rules. These limits are designed to provide reasonable protection against harmful interference in a residential
installation. This equipment generates, uses and can radiate radio frequency energy and, if not installed and used in
accordance with the instructions, may cause harmful interference to radio communications. However, there is no
guarantee that interference will not occur in a particular installation. If this equipment does cause harmful interference to
radio or television reception, which can be determined by turning the equipment off and on, the user is encouraged to try
to correct the interference by one or more of the following measures:
• Reorient or relocate the receiving antenna.
• Increase the separation between the equipment and receiver.
• Consult the dealer or an experienced radio/TV technician for help.
CAUTION - Changes or modifications not expressly approved by Loc8tor Ltd can void the users authority to operate
the Loc8tor.
13

14
Español
Manual del Usuario
Para modelos Loc8tor
Loc8tor:
1 mando del Loc8tor
2 mini etiquetas identificativas
1 pack adhesivo y lazo para llavero
Pilas incluidas.
spañol...............................14-27
Loc8tor plus:
1 mando del Loc8tor Plus
3 mini etiquetas identificativas
1 etiqueta de emergencia
2 pack adhesivo y lazo para llavero
Pilas incluidas.

Bienvenidos a Loc8tor, el excelente e innovador producto que le ayudará a encontrar sus objetos
perdidos y que puede incluso evitar que los pierda*.
Hemos diseñado el Loc8tor para que sea versátil y fácil de utilizar, ya sea en casa, en el trabajo o allá
donde vaya. Por favor, tómese unos minutos para leer este Manual del usuario que le ayudará a sacar
el máximo provecho de su compra.
Loc8tor ha sido fabricado siguiendo estándares de calidad para funcionar sin problemas e incluye una
garantía de 12 meses. Por favor visite nuestra página Web www.loc8tor.es para obtener más
información sobre el producto, detalles de contacto y preguntas frecuentes.
Nos encantaría conocer su opinión, lo que le gusta sobre Loc8tor y cualquier sugerencia que pueda
ayudar a mejorarlo. Por favor, háganos llegar su opinión vía correo electrónico
en sales@loc8tor.com.
speramos que disfrute de su nueva compra y pueda relajarse, evitando esos momentos frustrantes
en los que no encuentra objetos importantes.
Atentamente.
Anthony Richards
Director jecutivo
*Loc8tor Plus - Incluye los modos de localización y de alerta. Ayuda a encontrar sus objetos perdidos
y le permite crear zonas de seguridad invisibles para evitar que se extravíen sus objetos.
Loc8tor - Incluye modo de localización. Ayuda a encontrar sus objetos perdidos.
www.loc8tor.es
INTRODUCCIÓN
15

Page
Guía de botones rápidos 16
Configurar su Loc8tor 17
Modo de localización – encontrar un objeto perdido 18
Modo de alerta* - ayuda a evitar que se pierdan objetos 19
Alerta activada 20
Mini etiquetas identificativas y etiquetas de emergencia 21
Iconos y abreviaturas 21
Funciones del menú 22-23
Pilas 24
Mantenimiento general 24
Cambios 25
Garantía 25
Por favor tenga en cuenta 26-27
ÍNDICE
GUÍA DE BOTONES RÁPIDOS
Botón gris
Muestra una lista de las etiquetas
registradas que puede localizar Botón azul
Loc8tor y Loc8tor Plus
Muestra la lista de
etiquetas y avisos de
batería baja
Loc8tor Plus
Configuración de etiqueta
en modo de alerta
Botón rojo
nciende o apaga
todas las etiquetas de
alerta activadas (sólo
para Loc8tor Plus*)
Botón blanco
Selecciona el objeto
resaltado en la
pantalla
Anillo de navegación
Mueve el cursor alrededor
de la pantalla: izquierda,
derecha, arriba, abajo
Botón amarillo
Registrar una nueva
etiqueta.
16

CONFIGURAR SU LOC8TOR
1.
3.
4.
17
1. Insertar las pilas (2 x AAA)
Coloque el Loc8tor con los botones hacia usted y empuje el panel lateral derecho hacia
delante para retirarlo. Inserte las pilas (consulte el diagrama en el compartimiento para
saber la correcta colocación de las mismas) y vuelva a colocar el panel lateral.
Loc8tor no tiene botón de encendido/apagado. Para utilizar el localizador pulse cualquier
botón y se encenderá automáticamente.
2. Registrar etiquetas
•Retire la tira blanca de la etiqueta para activar las pilas
•La etiqueta pita y la luz roja parpadea dos veces
•Coloque la etiqueta junto al mando para asegurarse de que las demás etiquetas se
más allá de su alcance
•Pulse el botón amarillo del mando para registrar la etiqueta y elija Sí
•Siga las instrucciones de la pantalla (consulte Nombrar etiquetas)
•Repita el proceso con cada nueva etiqueta
3. Nombrar etiquetas
•Las etiquetas pueden personalizarse con un nombre a su elección de hasta 10
caracteres
•Utilice el anillo de navegación para seleccionar las letras
•Pulse el botón blanco para seleccionar
•Pulse OK para terminar
4. Colocar las etiquetas
Dependiendo del uso, las etiquetas pueden adherirse con las tiras adhesivas, el lazo para
llaveros o dejarlas sueltas.
Tiras adhesivas
Se recomienda utilizar sobre una superficie sólida y plana. Retire la tira posterior para
adherir. Las etiquetas adhesivas no son permanentes pero aumentan su adherencia con
el tiempo. Se recomienda el uso durante un mínimo de 10 minutos. La mayor adherencia
se obtiene después de 24 horas. Para retirar introduzca un objeto plano bajo la etiqueta,
gire y arranque suavemente.
Lazo de llavero
Se recomienda adherir la etiqueta a objetos como llaveros, bolsos y cinturones.
Pase el lazo por el orificio de la etiqueta y después el aro a través de lazo.

MODO DE LOCALIZACIÓN – ENCONTRAR UN OBJETO PERDIDO
18
(1)
(2)
) y escuchar el pitido de la
PERDIDO
•Deslice la tapa y pulse el botón gris (margen superior izquierdo) para mostrar la
lista de etiquetas que pueden localizarse
•Desplace hacia abajo y seleccione el objeto a encontrar con el botón blanco
•scanee la zona lentamente girando 360º
•Una vez que haya dado completamente la vuelta, vuelva en la dirección en la
que perciba la señal visual y auditiva con más fuerza
•Camine en esa dirección – A medida que se acerca el volumen y frecuencia de
los pitidos aumenta, las líneas de la pantalla se extienden y la fuerza de la señal
aumenta (1)
•n caso de duda, repita el giro de 360º
•Cuando la fuerza de la señal se acerca al máximo, la etiqueta está próxima
•Intenté pulsar el botón del mando para silenciar (
etiqueta
Cuando esté casi encima de la etiqueta, la pantalla cambia al modo de zoom
para guiarle con precisión (2)
•Seleccione y pulse STOP cuando encuentre el objeto
ENCONTRADO
CONSEJOS
•Coloque la etiqueta sobre una superficie y practique unas cuantas veces para
comprobar como funciona
•Si en algún momento no sabe qué dirección tomar, muévase lentamente y repita
un giro de 360º y después vaya en la dirección con mayor fuerza de señal
•La señal más fuerte aparece cuando el mando está apuntando directamente
hacia la etiqueta. Intente también mover el mando hacia arriba y abajo ya que la
etiqueta puede estar en otra planta
•Si está junto a una pared cuando aumenta la señal, compruebe la habitación
contigua
•Si no se muestra la señal, intente cambiar de posición a una zona diferente

l botón azul (pantalla de configuración de etiquetas) controla sus opciones de alerta. Le permite decidir el modo
en cada etiqueta, modo de localización o modo de alerta, y configurar la distancia del área de seguridad necesaria
(cerca, medio o lejos) para cada etiqueta. Una vez que haya configurado el Loc8tor a su gusto, sólo tiene que pulsar
el botón rojo para activar la alerta. Todas las etiquetas con un ( ) estarán automáticamente en modo de alerta.
Configurar alertas (botón azul – pantalla de configuración de etiquetas)
•Adhiera la etiqueta al objeto que desea proteger
•Pulse el botón azul para entrar en la pantalla de configuración de etiquetas y aparecerá
una lista de todas sus etiquetas
Seleccionar el área de seguridad (1)
•Desplácese a la columna derecha junto a la etiqueta seleccionada
•Utilice el botón blanco para seleccionar la distancia entre la etiqueta y el mando
C = cerca, M = media, L = lejos
Modo de configuración de etiquetas
•Desplácese a la columna con el guión (-) junto al nombre de la etiqueta
•Pulse el botón blanco para activar la alerta de la etiqueta ( )
Repita este proceso para cada etiqueta
Utilizar el modo de alerta
•Pulse el botón rojo para activar o desactivar el modo de alerta para todas las etiquetas con ( ) en la pantalla
de configuración de etiquetas
•La etiqueta pitará para confirmar que se ha activado el modo de alerta.
Sus etiquetas están ahora en modo de alerta. Si cualquiera de las etiquetas en modo de alerta sale del área actual
de seguridad, el Loc8tor Plus vibrará, activará la alarma y avisará de que la etiqueta se ha alejado
Un aparecerá en el esquina inferior derecha en modo de alerta
MODO DE ALERTA – AYUDA A EVITAR QUE LOS OBJETOS SE PIERDAN
(Model loc8tor plus)
19
A
! Importante declaración de uso del modo de alerta! – Un constante vínculo entre el mando y la etiqueta te asegura
que recibirás un aviso inmediatamente cuando las etiquetas salgan del área de seguridad. Sin embargo, si se usa
continuamente reducirá significativamente la vida de las pilas. Cuando no sea necesario, apague el modo de alerta
con el botón rojo.
(1)

Si uno de los objetos etiquetados sale del área de seguridad, el mando vibrará, activará la alarma y la pantalla “ stado de
etiqueta” aparecerá automáticamente.
l estado de etiqueta enumera la(s) etiqueta(s) que ha activado la alerta y si la etiqueta se encuentra actualmente fuera
del área de seguridad designada. Si una etiqueta sale de esta zona pero vuelve a entrar en la misma, también silencia la
alerta y la retira totalmente de la lista de alertas.
Utilizar la pantalla de estado de etiqueta
Para apagar todas las alertas pulse el botón rojo.
Para retirar una a una las etiquetas de la lista de alertas activadas seleccione ( ) y cambie a (-).
Nota – Para volver a la pantalla de estado de etiqueta entre en opciones de alerta en el menú
principal de estado de etiqueta
ALERTA ACTIVADA (Model loc8tor plus)
20
Seleccione
para etirar la
etiqueta de la
lista de alertas
activadas
Cuando se muestre una alerta ac
tiva para esa etiqueta
Cuando se muestre que la alarma
ha sido silenciada
Identifica la
etiqueta que
activó la
alerta -
Seleccione
objeto para
localizar esa
etiqueta
Si la etiqueta sale del área de seguridad
aparecerá un símbolo “!”
Si la etiqueta ha salido del área de
seguridad pero ha vuelto a entrar,
aparecerá una “A”
Si una etiqueta de emergencia se activa
aparecerá una “P” (consulte la página 21)
Silencia todas las alarmas de alerta Modo de alerta
activado
Other manuals for Loc8tor Plus
1
Table of contents
Languages:
Other Loc8tor GPS manuals