Loewe TV Mimo 28 User manual

1
233–31288.021
Operating Instructions.
■Mimo 28
■Mimo 29 TV.
BAQ25B_31288_021_3_GB 22.05.2003, 15:09 Uhr1

2
Daily handling 10
Switching on/off 10
Changing channels 10
General menu operation 11
Adjusting the sound 11
Adjusting the picture 11
Operation on the set 11
Modes of operation 12 – 17
TV mode 12
Picture in picture 13
EPG mode 14 –15
Teletext mode 16
Video mode 17
Operating additional equipment 18 – 20
Logging in and connecting
AV equipment 18
Video playback 19
Loewe video recorders and direct
operation of Loewe DVD players 20
What to do if … 21 – 22
Technical data 23
Mechanical data
Electrical data
Accessories
Service addresses 24
Contents
Remote control – TV functions 3
Control panel 4
Rear connections 5
Welcome 6
Thank you
TV equipment
Setup and cleaning
For your own safety 7 – 8
Initial installation 9
Batteries – remote control
Connection
Switching on
Initial installation
BAQ25B_31288_021_3_GB 22.05.2003, 15:09 Uhr2

33
Radio mode on/off
Picture menu
Switch on/off
– in standby mode
Sound off/on (Mute)
EPG operation on/off
Blend in programme, time, title of the broadcast
/in the menu: blend out menu
Call up main information
/in the menu: switch info texts on/off
Call programme overview
/in the menu: confirm
Last programme
Programme info on/off
Personal teletext pages
on/off
Set picture format
Select programme up/down
/in the menu: select up/down
Teletext mode on/off
Call up menu
/in the menu: back
Video operation with
video operating line
on/off
PIP operation on/off
Direct operation
select for VCR/DVD/TV
Indicator: operate DVD
Indicator: Operate VCR
Set volume – / +
/in the menu: select or adjust
left/right
Select programme directly
/in the menu: numeric input
Control 150
LP
000
SV
OK
VTR
DVD
OK
TMEi
123
456
78
0
9
V=
You can assign other functions to these keys
for TV operation.Assign these functions in the
TV menu under – Settings – Function Keys.
Remote control – TV functions
BAQ25B_31288_021_3_GB 22.05.2003, 15:09 Uhr3

4
Control panel
+
–On/Off key
To display menu
Channel up/down
/in a menu: adjust
Standby indicator
Operating indicator
Headphones socket
Video input AVS
(Y/C, CVBS)
Video input AVS (CVBS)
Audio input
(white=left,
red= right)
Connections on the right side of the TV set
BAQ25B_31288_021_3_GB 22.05.2003, 15:09 Uhr4

5
AV2/RGB
AV1
SAT
SAT A/D
R
SUR
DIG OUT
DIG IN
SERVICE
AUDIO OUT
VHF/UHF
R
IR
1
L
2
SUBWOOFER
STAND SUB L
C
Audio output sockets
✳ Antenna socket 1st satellite tuner
✳ Antenna socket 2nd satellite tuner
✳ Connection for IR link
Antenna socket for antenna or cable system.
Insert antenna plug
from PIP tuner (splitter) here.
Antenna socket for picture-in-picture (PIP).
Insert antenna plug
of your antenna or cable installation here.
Digital tone inputs
Dolby digital module ✳
Digital tone output
Dolby digital module ✳
Service
socket/
Connection
Loewe audio systems
Connection for active
surround speakers
Dolby digital module ✳
Connection for active
center speaker
Dolby digital module ✳
Connection for subwoofer in the stand,
Loewe active loudspeaker systems
or Home Automation
Connection for
special subwoofer
Dolby digital module ✳
Sockets for video
recorder, DVD,
decoder etc.
(Euro-AV)
Rear connections
✳retrofittable
BAQ25B_31288_021_3_GB 22.05.2003, 15:09 Uhr5

6
Welcome
Thank you,
for choosing a Loewe product.
We are very happy to have you as a customer.
Loewe combines high quality in technology,
design and user friendliness. This applies
equally for TV, video and accessories.
Neither the technology nor the design are an
end in themselves but serve to give our
customers pure watching and listening
enjoyment.
We have not allowed ourselves to be led astray
by short-lived fashion trends in the design. You
have, after all, purchased a high-quality piece
of equipment which you don’t want to get tired
of looking at tomorrow or the day after .
About the set
We have designed the TV set in such a way
that it is easy to operate with menus. If
you need information about how to
operate it, just display the info texts with
the i button, you will soon get a grasp of
the relationships.
You will find the answers to many
technical questions in the index of your TV
set. If it’s a matter of operating the TV, you
can access a function directly from the
index. This saves you from having to read
through detailed operating instructions
and is the reason why this operating
manual you are reading only explains the
most important operating steps.
With the remote control, you can operate three
Loewe units, this TV, a Loewe video recorder
and a Loewe DVD player.
TV equipment
This operating manual describes the maximum
equipment.
Functions marked by ✳are not available in all
TV sets.
The illustrated menu contents may vary
depending on the TV equipment.
You can find out what equipment your TV has
in the main information – Technical spec. of TV
set.
Setup
Handholds are provided on the front right and
left sides of the TV set. Use these handholds to
carry the TV set
Please note that the feet of the TV set could
leave marks on soft wood furniture (e.g. deal,
pine, fir etc.) due to the weight and moving the
set about.
The plastic material of the feet contains
softeners which could in some cases etch the
surfaces of furniture.
In such cases you should place a firm underlay
about the same size as the base of the TV set
underneath it.
Please also read and observe the safety
instructions on the following pages.
Make sure no bright light or sunlight falls on
the screen and impairs the picture by
reflections.
Cleaning
Clean the TV set only with a damp, soft, clean
cloth (never use aggressive or abrasive cleaning
agents).
Disposal
Packing and box
You have chosen a very high-quality, long-
lasting piece of technical equipment. In
compliance with national regulations, we have
paid a fee to authorized disposal companies
who will collect the packing from the dealers.
Nevertheless we recommend that you keep the
original box and packing material so that the
TV set has optimum protection if you have to
transport it.
The TV set
Please consult your dealer for environmentally
friendly disposal of the TV set.
BAQ25B_31288_021_3_GB 22.05.2003, 15:09 Uhr6

7
For your own safety
For your own safety and in order to avoid
unnecessarily damaging your TV set, please
read and observe the following safety
instructions:
•This TV set is designed exclusively for
receiving and reproducing audio and visual
(AV) signals.
•It is designed for the home or office and
may not be used in rooms with high
humidity (e.g. bathroom, sauna) or a high
concentration of dust (e.g. workshops).
If the unit is used in the open air ensure
that it is protected against moisture (rain,
dripping or splashing water, or dew). Do not
place containers filled with water, such as
vases, on the TV set. High moisture and dust
concentrations produce creep currents in
the set which can lead to danger of electric
shock or fire.
The manufacturer’s warranty is only valid
for use of the TV set in the specified
permissible environment.
•This set may only be connected to a power
supply with the voltage and frequency
specified on the rating plate using the
enclosed power cable. The wrong voltages
can damage the set.
•If the set is moved from a cold environment
to a warm room, condensation forms on all
parts of the set. Moisture produces creep
currents in the set which can cause a fire. In
this case, you should leave the set for a
reasonable time to acclimatize (when the
condensation on the screen has evaporated)
before switching it on.
•Like every piece of electronic equipment,
your TV needs air for cooling. Obstructing
the air supply to the set can cause fires. The
air vents on the back of the TV set must
always be kept free. Do not leave
newspapers or cloths lying on the TV set.
The air supply is also impaired when the TV
set is placed on a blanket or a thick pile
carpet.
If the TV set is placed in a cabinet or on a
shelf, at least 5 cm clearance at the sides
and at least 10 cm at the top must be left to
allow air to circulate.
Stand the TV set in a place where it is not
exposed to direct sunlight or additional
heating from radiators.
•Magnetic fields influence the picture quality
of the TV set. Do not place loudspeakers or
other magnetic sources immediately next to
the TV set.
•Avoid dropping metal objects, needles,
paper clips, liquids, wax or similar into the
air vents at the back of the set. This causes
short circuiting of the set and could start a
fire. If anything should get inside the set,
switch it off immediately, pull out the plug
and call the after-sales service to check it.
Do not place vases filled with water, lighted
candles etc. on the top of the TV set.
10 cm
5 cm
5 cm
BAQ25B_31288_021_3_GB 22.05.2003, 15:09 Uhr7

8
For your own safety
•You should never attempt to remove the
rear panel of the TV yourself. The set
operates with high voltages which could be
fatal. Leave repairs and servicing of your TV
set to authorized TV technicians.
•Due to the picture tube, TV sets have their
center of gravity fairly near to the front. The
TV set therefore has a tendency to tip
forward relatively easily which could cause
injury to persons.
Only stand the TV set on a level, firm base.
The set must stand on all feet. The TV
should not overhang particularly when it is
placed in a cabinet or on a shelf.
If the TV is placed on a stand, makes sure
this is larger than the surface area of the
base of the TV.
When using turntables and drawer shelves,
make sure they have a sufficient load
capacity. We recommend you to use only original
parts, e.g. Loewe racks and stands.
If the TV set is placed on a console with
castors, move the console carefully because
the console and the TV could tip over.
Consoles with castors may considerably
reduce the stability of the sets placed on
them so only use consoles specially
designed and approved for the TV.
Never allow children to handle the TV set
unsupervised.
Do not allow children to play close to the TV
set, they could knock, push or pull it from
the stand and injure someone.
•Do not place the TV anywhere where it may
be exposed to vibrations because this can
lead to overloading of materials.
•Do not leave the TV on unsupervised.
•Pull out the antenna and mains plugs
during a thunderstorm. Surge voltages from
lighting strikes can damage the set both
through the antenna system and the mains.
You should also pull out the antenna and
mains plugs during long periods of absence.
•The mains plug of the TV must be easily
accessible so that it can be disconnected
from the mains quickly at any time.
•Lay the power cable so that it cannot be
damaged. The power cable may not be
kinked or laid over sharp edges, and may
not be walked over or exposed to chemicals;
the latter applies for the entire TV set. A
power cable with defective insulation can
lead to electric shocks and is a fire risk.
•When you pull out the mains plug, do not
tug the cable but hold the housing of the
plug. The cables in the mains plug could be
damaged and cause a short circuit the next
time it is plugged in.
BAQ25B_31288_021_3_GB 22.05.2003, 15:09 Uhr8

9
+
+
Initial installation
Batteries – Remote
control
To insert or change the batteries, press the
point marked by an embossed arrow. Push the
cover of the battery compartment down and
remove it. Insert the batteries of the alkaline
manganese type LR 03 (AAA) with the correct
polarity (+/–).
Then push the cover back on.
Note on disposal of batteries:
The original batteries do not
contain any pollutants such as
cadmium, lead and mercury.
Used batteries do not belong in
the domestic waste. They must
be taken to the appropriate
collection points according to the
national laws. Ask your dealer.
Connection
Mains
Connect the TV set to a 230V/50–60 Hertz
outlet.
Antennae
Remove the rear cover from the set by pulling
backwards. Clamp the cable in the cable holder
and lead it downwards through the opening.
Connect your antenna or cable system to the
VHF/UHF antenna socket.
If your TV is equipped with a picture-in-picture
tuner (PIP), plug the antenna plug protruding
from above the PIP antenna socket into the
antenna socket for the VHF/UHF tuner. Plug the
antenna plug of your antenna or cable system
into the socket of the PIP tuner.
If your TV set is equipped with one or two
satellite tuners, connect the SAT antennae to
the SAT sockets (see figure on page 5).
Refit the cover to the set.
Initial installation
Automatic programming of the TV set is started
the first time you switch it on. Follow the
menus.
First you have to select the menu language for
your set. Then you specify which antenna you
have connected to your TV and in what country
you are using it. Then you start the station
search. The TV set searches for, stores and sorts
all the stations which your antenna system
receives. You then see a list of the stored
stations in which you can mark your favorites.
Finally log in your video recorders, decoders,
Loewe audio system and Home Automation
with the connection wizard and connect these
to the TV set according to the illustrated
connection plan.
Select the settings with the
arrows on the ring ...
... confirm the settings with
OK. You then move on to the
next menu ...
... press this button if you want
information about the settings.
You can repeat initial installation at any time,
e.g. after moving house. Call the index in the
main information (ibutton). Then select the
item ”Repeat initial installation”. Then start
”Initial installation” with OK.
Switching on
Press the On/Off button so that
it snaps in.
i
OK
AV2/RGB
AV1
SAT
SAT A/D
SERVICE
AUDIO OUT
VHF/UHF
R
L
SUBWOOFER
STAND
R
SUR
DIG OUT
DIG IN
IR
1
2
SUB L
C
BAQ25B_31288_021_3_GB 22.05.2003, 15:09 Uhr9

10
Daily handling
Switching on/off
Your TV set is equipped with an eco-standby
power supply unit. The power consumption drops
to low power in standby mode. If you want to
save even more energy, switch the set off with
the On/Off switch. However, please note that
EPG data are then lost and timer recordings
programmed on the TV set will not be carried
out.
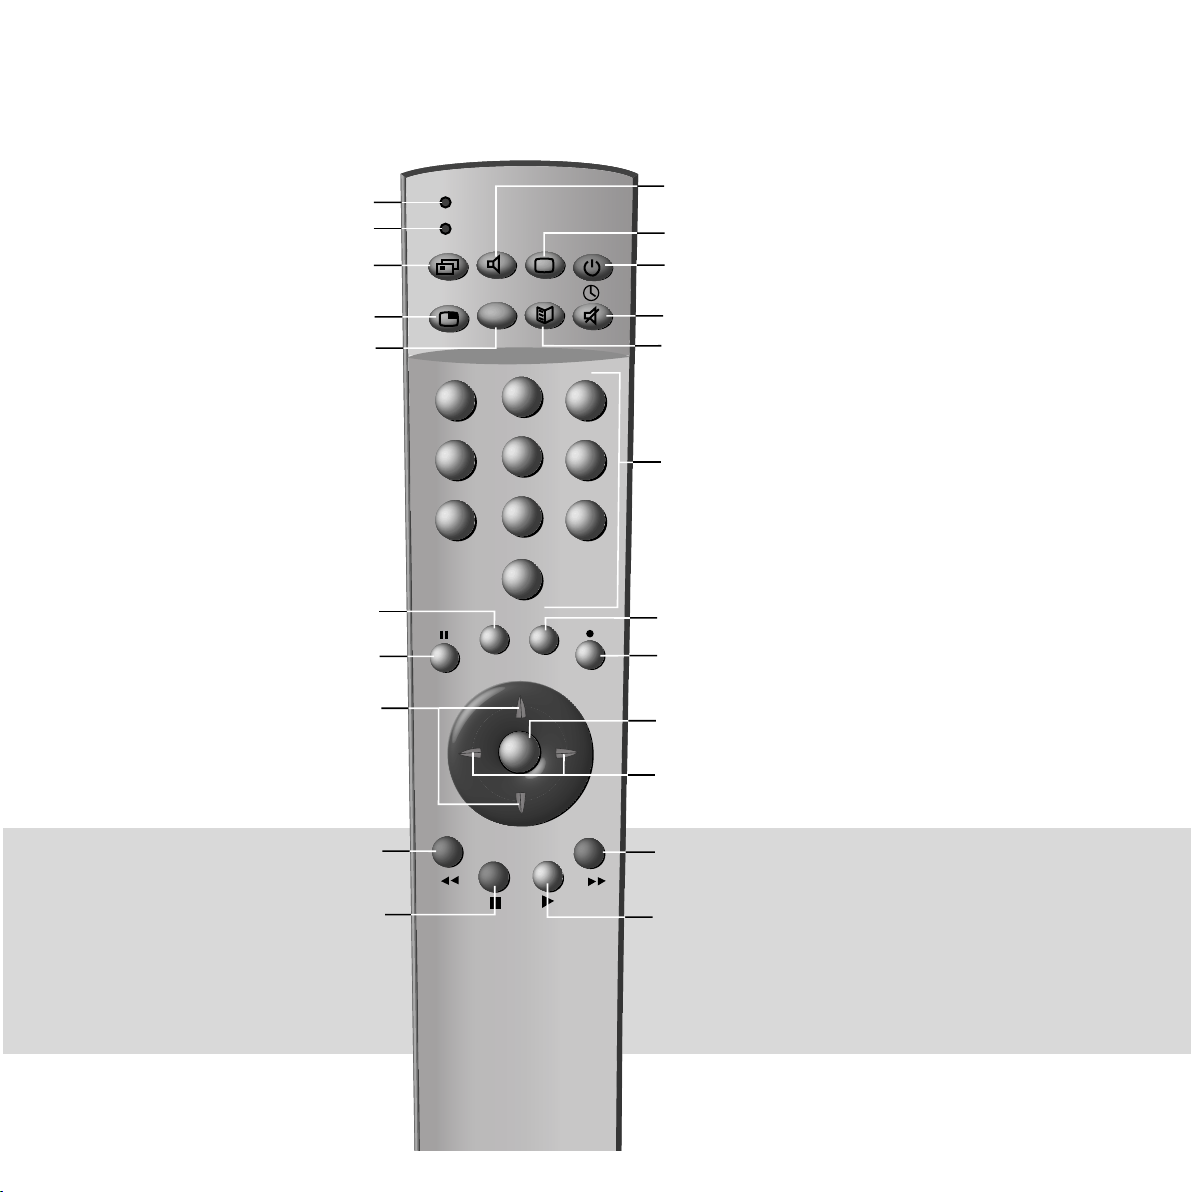
If the TV is switched on, you can
switch it off with the blue On/
Off button on the remote
control. The red standby LED on
the set lights up. If the green
(blue) LED also lights, a timer
recording is in progress, EPG
data is being acquired or radio
mode without screen display is
active.
From standby it is best to switch
back on with the blue On/Off
button or with a numeric key
(station 0-9). The green (blue)
operating LED then lights up.
When you switch on the TV with
OK, you see the station table
and can choose a station.
Switch on in the radio mode.
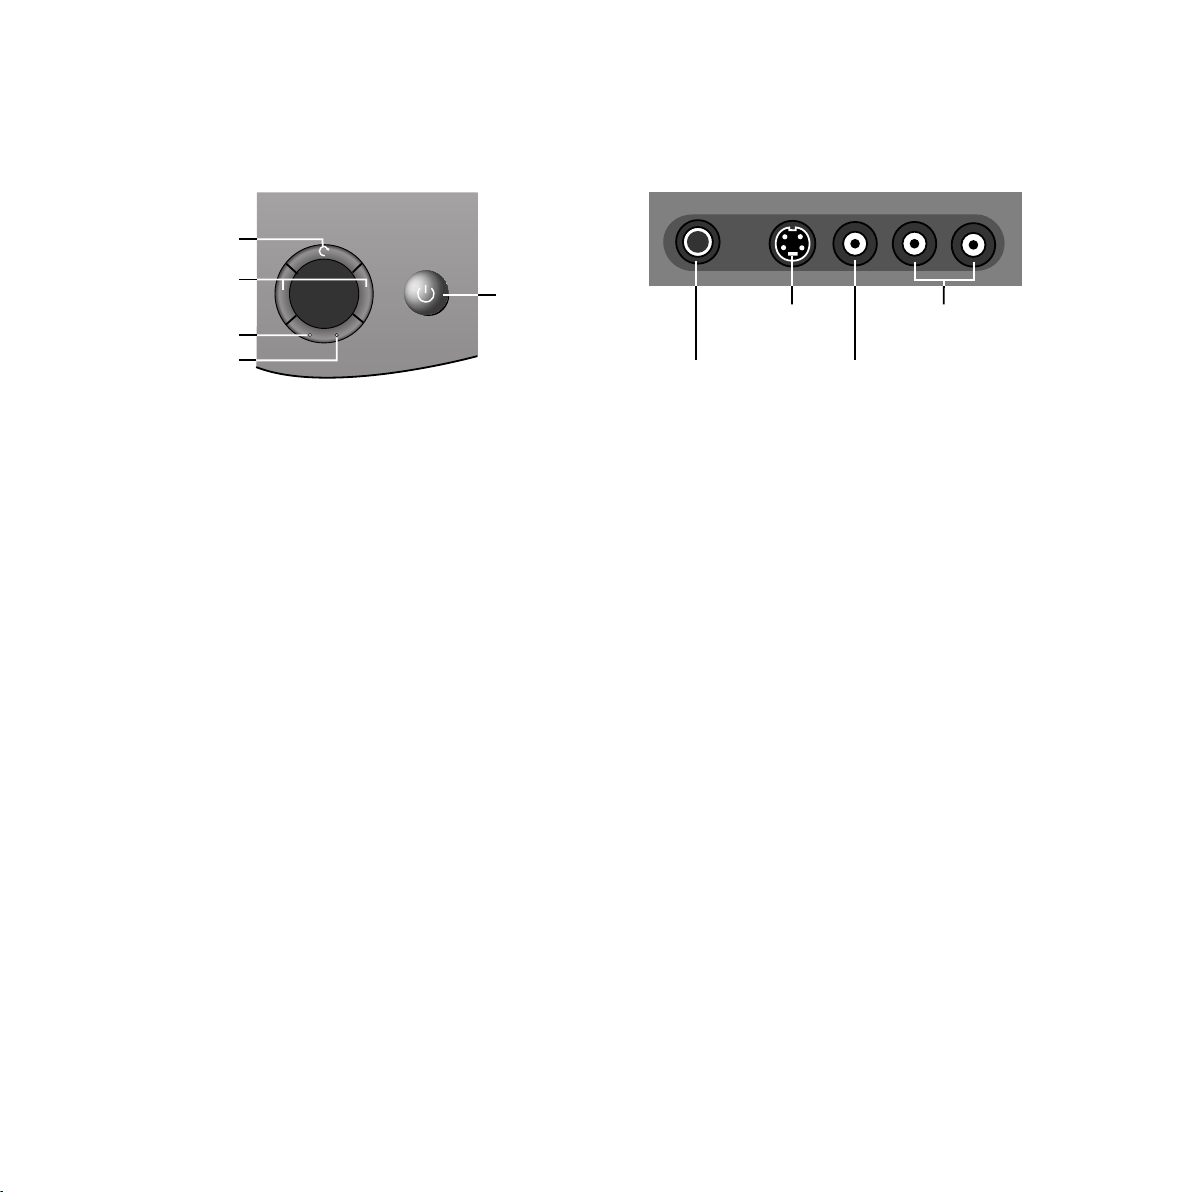
None of the indicators lights up
when you switch off the TV set
with the On/Off button on the
set.
Switch on the TV set with the
On/Off button on the set when it
is switched off.
Changing channels
Channels up/down (only favorite
stations if these are shown in the
station table).
With the numeric keys on the remote control
The set has a dynamic memory with 220/with DVB
1470 memory slots. If up to 9 stations are stored,
you only need to enter one number, up to 99 two
numbers, up to 999 three numbers and above 999
four numbers (please look in the station table to
find out how many stations have been stored).
1-digit stations
Keep the button 0 – 9 pressed for
one second, the channel then
changes immediately.
or press the button 0 – 9 briefly,
the channel then changes after 2
seconds (immediately when up to
9 stations are stored).
2-digit stations
Keep the second numeric key
pressed for one second, the
channel then changes immediately.
or press both numeric keys briefly,
the channel then changes after 2
seconds (immediately when up to
99 stations are stored).
3-digit stations
Keep the third numeric key pressed
for one second, the channel then
changes immediately.
or press the three numeric keys
briefly, the channel then changes
after 2 seconds (immediately when
up to 999 stations are stored).
4-digit stations
Press the four numeric keys briefly,
the channel then changes
immediately.
Depending on how many stations have been
stored, you can place one or more zeros in front of
the number and select for example station 7 = 07
or 007 or 0007.
About the station table
Call the station table with OK
Mark the station (the marked
station is shown in the PIP
picture)
or
Mark with numeric keys
Call the marked station
Sort alphabetically/numerically
(blue button)
Display favorite stations only
(yellow button)
Call Audio/Video programs – AV selection
for playing AV equipment (see
also page 19).
Select AV socket or VIDEO for
VCR transmitter.
1
long
short long
7
27
27
short short long
1278
all short
OK
VIDEO AV1 AV2 AVS
AV Selection
Channel overview: TV Numerical
6 S–RTL
7 N–TV
8 DSF
9 TM3
10 PRO7
11 RTL 2
12 WDR 3
13 BR 3
14 HR
15 MDR 3
M
i
0 9
E
Select and
press OK to proceed Menu
Info
End
Change sorting
Change programs
Favourite programs
OK
... Select program:
AVS
AV2
AV1
0 VIDEO
1 ARD
2 ZDF
3 SAT.1
4 RTL
5 VOX
6 NDR
Channel overview: TV Alphabetical
ARD
BR-ALPHA
BR3
CNN INT.
DSF
EUROSPRT
HOT
HR
KIKA
MDR 3
N–TV
N24
N3
M
i
E
Select and
press OK to proceed Menu
Info
End
Change sorting
Change programs
Favourite programs
OK
✳ABCDEFGHIJKLMNOPQRSTUVWXYZ
0
OK
OK
09
...
BAQ25B_31288_021_3_GB 22.05.2003, 15:09 Uhr10

11
Daily handling
Adjusting the sound
Adjusting the volume
Adjust the volume
Mute
Sound off;
Sound on: press button again or
adjust volume
Other sound settings:
Call TV menu
Mark ”Sound”
Call sound
functions
Mark sound
function
Set/
select
Sound settings: Sound via the loudspeakers of the
TV set or another system. Listening mode Stereo/
Panorama/Dolby Virtual. Sound select (language)
for loudspeaker, headphones and sound outputs.
Volume of the headphones, automatic volume,
max. volume, treble, bass and balance.
Set teletext volume
Sound off
Set volume
Adjusting the picture
Call the Picture menu
Call the TV menu
Mark ”Picture”
Call picture
functions
Select picture settings
Mark picture
function
Set/
select
Picture settings: contrast, picture adjustment,
colour, brightness, focus, colour tone, picture
format, noise reduction (DNC), movement
compensation (DMI) and automatic picture size
adaptation (AMD)✳.
Operation on the TV set
Changing channels on the TV set
Channel up
Channel down
Volume, contrast and color
Press the function
button until the
desired function
is marked
More volume,
contrast or color
Less volume,
contrast or color
Volume 36
Sound off
Sound on
M
OK
Sound
Sound via
Loudspeaker sound
Headphone sound
other ...
Headphone volume
Sound adjust
Listening mode Stereo Panorama Dolby Virtual
M
OK
Picture
Contrast
Picture adjustment
Brightness
Sharpness
Tint
other ...
Colour 32
General menu operation
With the TV and picture menus, we show you how
to navigate within the menus. Which buttons you
can use for operation is shown at the bottom of
the appropriate menu.
Call the TV menu
Mark
(white field)
Call the menu
with OK
or
>
Grey menu items cannot be
selected
Set
(setting value
and bar)
Mark other
menu items
Select
(frame)
Show/hide
info texts
Back to the previous menu level
Hide all menus
M
i
M
E
OK
Picture
other ...
Picture format
AMD
DNC off on
OK M
i
E
Back
Info
End
Picture
other ...
Picture format
AMD
DNC
iDNC (Digital Noise Control)
With DNC you can eliminate or reduce picture
interference, e.g. due to poor reception.
Picture
Contrast
Picture adjustment
Brightness
Sharpness
Tint
other ...
Colour 32
OK M
i
E
Back
Info
End
Direct control on TV
Contrast
Station –/+
Service
Colour
–+Change
Mark
Volume 16
Volume 36
Sound
TV menu
Standard settings
Settings
Sound
zap2text
OK M
i
E
Back
Info
End
Picture
Connections
TV menu
Standard settings
Settings
Sound
zap2text
Picture
Connections
TV menu
Standard settings
Settings
Sound
zap2text
Picture
Connections
+
–
+
–
+
–
+
–
BAQ25B_31288_021_3_GB 22.05.2003, 15:09 Uhr11

12
TV mode
In initial installation and daily operation, the TV
set is in TV mode.This is also the case when none
of the other modes of operation such as EPG,
Teletext, PIP,Video or Radio is selected.
Every one of these modes of operation has a
menu which you can call with the M-button and
with some color button assignments.
Function of the color buttons in TV mode
You can assign the functions of the four color
buttons yourself. The following functions are set
at the factory:
red: list or call personal teletext
pages
green: call picture format setting
yellow: call last viewed station
blue: call station info
You can assign other functions to the buttons in
the TV menu ”Settings” – ”Function keys”.
Status display
Show/hide status
Main information
Call main information
The explanation of the remote control shows
the function of every button in different modes
of operation of the TV set and the remote con-
trol.
The index answers many questions regarding all
aspects of the TV. If it is a question about the
operation, you have direct access to the operat-
ing function from the index.
Loewe TV sets are supplied in different models
with different equipment. You can find out what
equipment your TV has under the menu item
”Technical spec. of the TV set”.
When you have made all the settings and
connections, you can switch over to ”Simplified
control” using ”Select Mode”. Then the
”Settings” and ”Connections” can no longer be
launched in all modes of operation menus.
Switch ”Simplified control” back off when you
want to make settings.
Call the TV menu
Launch the TV menu
zap2text
Some stations use this service. If teletext pages
are referred to during a program, the TV set
saves and/or displays this page number. You call
the teletext page with the T button from the
display during the program or from this menu.
Standard values
You can save the setting for picture and sound
you have made in this menu and launch them
again later.
Connections
You will find information about this in the chap-
ter ”Logging in and connecting AV equipment”
on page 18.
Modes of operation
Some settings in the TV menu:
Child lock
Use the child lock if you want to prevent your
children watching after a certain time, once or
daily, all or certain programs.
On-screen displays
You can define duration and position of the
displays, the content of the program and status
display and activate or deactivate zap2text as a
display.
Timer functions
You can have your TV switch on and off at spe-
cific times or have yourself reminded by a signal
tone.
Time and date
When you receive teletext, the TV records the
right date and time settings. The time serves as
information for timer recordings, timer functions
and EPG. If you do not receive teletext you
should set the date and time and not switch the
TV off with the mains button as the settings will
then be lost.
Language
If ”your” menu language is not set, you have to
select the ”Language” menu in a language you
cannot understand:
Press the M-button (TV menu), mark the last
menu item (settings), press the OK button and
mark the last menu item (Language) under
”other ...” and press the OK button.
Now select the right language and confirm with
OK.
Main information
Autom. channel search
Explanation of the remote control
OK M
i
E
Back
Info
End
Operating information
Connections
Select control level
Select and call up
with OK
Technical spec. of TV set
Index
E
i
M
Clock 20:15
1 ARD Stereo
TV menu
Standard settings
Sound
zap2text
Picture
Connections
Settings
BAQ25B_31288_021_3_GB 22.05.2003, 15:09 Uhr12

13
Station scan
The frame around the PIP picture
must be green. If it is not, press
the green button.
Start the station scan with the
blue button. The PIP frame turns
blue.
The programs now change automatically.
Stop the program scan with the blue button. The
PIP frame turns green again.
Changing PIP picture/TV picture
The frame around the PIP picture
must be green. If it is not, press
the green button.
Change the pictures with the
yellow button.
Position of the PIP picture
Call the PIP menu with the M-
button.
Select ”Position”
Select the symbols for the
position
Hide the PIP menu
Modes of operation
Picture in Picture (PIP) ✳
Standard PIP functions:
In standard PIP, a PIP picture is displayed in the
current TV picture.The frame round the PIP
picture is initially green in standard PIP.
Show/hide PIP picture
PIP picture as still frame
The frame around the PIP picture
must be green. If it is not, press
the green button.
Press the red button to freeze
the PIP picture.
Press again – moving picture.
Changing the station of the PIP picture
The frame around the PIP picture
must be green. If not, press the
green button.
Then select the station as
normal.
Changing the station of the TV picture
The frame around the PIP picture
must be white. If it is not, press
the green button.
Then select the station as
normal.
M
2 ZDF
1 ARD
2 ZDF
3 WDR3
E
PIP menu
OK M
i
E
Back
Info
End
Position
Functionality iPIP Standard-PIP
E
PIP menu
OK
M
i
E
Back
Info
End
Position
Functionality
Setting ”iPIP”
Switch on PIP, call the PIP menu with the M
button.
Mark
”Functionality”
Select ”iPIP”
Hide menu
iPIP function:
In iPIP the TV picture currently displayed becomes
the PIP picture. Select another program for the TV
picture and keep your eye on the PIP picture. In
this way you can temporarily ”ban” commercials
or parts of programs to the PIP picture. In iPIP, the
frame round the PIP picture is orange.
PIP picture on/off
The PIP picture becomes a TV picture again when
you switch off PIP.
BAQ25B_31288_021_3_GB 22.05.2003, 15:09 Uhr13

14
Modes of operation
mark a station you want to watch (currently
running), memorize or record.
The frame turns blue when you press the blue
button. The blue frame signifies station selec-
tion. Use the arrow buttons < > to choose
between your favourite stations, all stations or
the station just set. You can select another indi-
vidual station by moving to “...” with >, marking
a station in the list and storing it with OK.
The respective current settings you last made in
the colour-framed first line are shown in addition
to the operating notes for the green, yellow and
blue buttons.
Direct input of time
You can also enter the time directly with the
numeric keys of the keypad. After entering the
first digit, the time is displayed first next to the
symbol of the green button by asterisks and is
then replaced by the entered numbers, e.g. 2100.
If the entered time has already passed, its entry is
used for the following day.
Watch a station or watch a memorized
station or memorize a station
You memorize the station marked with the g h
buttons by pressing the OK-button. The symbol +
is placed in front of the title of the station. The TV
switches over to this station when it starts.
Programming a VCR recording
You prepare the station marked with the g h
buttons for recording by pressing the red button.
Calling detailed information
If detailed information about the selected station
is available, you will see the T-button displayed
additionally. You can call the detailed
information with this button.
Other functions in the EPG menu:
List of memorized stations
You will find the stations you have memorized in
a list, also DVB radio stations.
Switch on TV at memo
You can have the TV switched on automatically
from standby at the time of the memorized
station. If you are not in at the time, a safety
prompt makes sure the TV switches off again
after 5 minutes.
Indicate/start memorized station
If the TV is already on when the memorized
station starts you can have the start of the
station indicated or the TV switched over
immediately.
Short info lines
Short infos are broadcast for many programs. Set
how many lines this information should have or
switch the short info lines off.
EPG entry
If you want to start EPG operation, you can
retain your last settings for topic and program
selection or start with all topics and all
programs.
EPG mode
EPG is the electronic program guide for TV
programs. With this system, you can easily find
the stations that interest you (sorted according to
time, day, topics and programs). You can
memorize stations and station recordings.
A wizard is activated the first time you use EPG
(not with DVB) which guides you through the
necessary settings. Then run the data acquisition
(see page 15).
Using the EPG
Switch EPG on/off
The first line is framed initially in green.
The green frame stands for time and date,
with the green button you switch between time
and day or, if the frame has a different color,
back to the green frame. With the arrow buttons
< > you select: now, later, the time or day for
starting stations. The list of stations below is
updated accordingly. With the buttons g h you
mark a station you want to watch (now running),
memorize or record.
The frame turns yellow when you press the yel-
low button. The yellow frame means you can
select topics. With the arrow buttons < > you
choose between personal topics, all topics and
the individual main topics such as Film, News,
Show, Music etc.The list of stations below is
updated accordingly. With the g h buttons, you
T
EPG Fri 03.08./20:08
Select and
memorize
with OK
Record
Day (Fri 3.8./now)
Topics (all topics)
Programs (all)
Fri 03.08. now soon 21:00 22:00 23:00 00:00 01:00 02:00 ...
OK
i
Info
Detai
Menu
End
19:15 VOX Zurück in die Vergangenheit
19:30 ZDF WISO
19:30 BR3 Immer weiter, immer höher und dann?
19:40 SAT1 echt wahr!
19:40 RTL Gute Zeiten, schlechte Zeiten –20:15
19:50 MDR Mach dich ran
20:00 ARD Tagesschau
20:00 HR3 Tagesschau
20:00 NDR Tagesschau
20:00 WDR Tagesschau
M
E
M
E
EPG Fri 03.08./20:08
Select
and view
with OK
Record
Day (Sat 3.8./12:00)
Topics (music)
Programs (all)
person. topics all - ... Hobby Sport Child Knowledge Music ...
OK
i
Info
Menu
End
12:00 NDR WunschBox -13:00
14:03 ARD WunschBox
20:45 MDR Das deutsche Schlagermagazin
21:00 NDR Bi uns to Hus
01:25 NDR Bi uns to Hus
12:00 NDR WunschBox
14:03 ARD WunschBox
M
E
EPG Fri 03.08./20:08
Select and
memorize
with OK
Record
Time (Sat 4.8./14:03)
Topics (Music)
Programs (fav.)
Favorite programs all ARD ...
OK
i
Info
Menu
End
14:03 ARD WunschBox -15:00
20:45 MDR Das deutsche Schlagermagazin
14:03 ARD WunschBox
BAQ25B_31288_021_3_GB 22.05.2003, 15:09 Uhr14

15
Modes of operation
EPG settings
If you want to change the provider or want to
have other programs evaluated, you can do this
in the EPG menu.
Provider search
EPG on/off
Call EPG menu
Mark ”Provider/Select station”
Call
Start provider search (green
button). This may take some
time.
Mark the provider
Save the provider
This is followed by a station search and a list of
TV stations is displayed which transmit data.
Move on to the provider selection with the OK-
button. If the stations offered are what you
want, move on to the station selection with the
blue button.
Selecting stations for EPG
Select the stations here for which information is
to be collected.
Stations marked by + are favorite stations.The
provider supplies information for stations
marked by E (terrestrial, cable and analog
satellites) and D (digital), these are already
marked (blue letters).
Mark the station/Remove the
marking
red: Only mark favorite stations
green: Mark all stations
yellow: Only mark this station
Back to the EPG menu
Switching data acquisition on/off
Mark ”Data acquisition” in the
EPG menu under ”other”
Select data acquisition off/on
If, for example, you cannot receive any EPG
providers and no DVB is installed in the TV set,
you should switch off the data acquisition.
Performing data acquisition
The data must be collected first after these
settings or every time the TV is switched off. To
do this, select the program which you have
defined as a provider and leave it switched on
for about one hour or switch the TV set to
standby mode. The green (blue) LED lights up in
addition to the red LED after about two minutes.
Data acquisition takes about one hour, in sets
with a DVB module a little longer. The data are
automatically collected between 2 and 5 in the
morning when the TV is switched off to standby.
Defining personal topics
You will find the programs that interest you
faster when you define your personal topics.
Mark ”Select personal topics” in the EPG menu
and put together your list of personal topics.
Radio mode
You can switch the radio mode on and off with
the Lbutton. If at least one satellite tuner and
possibly a DVB module are installed in your TV
set, you will be able to receive radio stations. If
none of these additional modules is installed,
you can only select the audio inputs and play
back through these with the station table or the
g h buttons.
M
OK
OK
M
i
E
EPG menu
List of memorized stations
Select provider/program
Favorite programs
Select personal topics
Switch on TV when marked yes
Memorized stations first report
other ...
Info
Back
End
OK
M
i
E
Select provider
Info
3SAT
PRO7
RTL2
TV 5
TRT 1
Select provider
and confirm
with OK Back
End
OK
Provider search
Change provider list
Program selection
M
OK
M
i
E
EPG menu
other ...
Data acquisition off on
Short info lines none
EPG entry last setting
Info
Back
End
OK
M
i
E
Select personal topics
InfoSelect topics
and mark with OK Back
End
OK
Film
News
Show
Hobby
Sport
Child
Knowledge
Music
Culture
General music
Jazz
Rock/Pop
Classical
Folk/Easy listening
Musicals/Opera
Other
mark all
Mark only
Program selection: 3SAT
0 VIDEO
1+ARD E
2+ZDF E
3+SAT.1 E
4+RTL E
5 VOX
6+S–RTL E
7+N–TV
8 DSF
9+S–RTL E
10+MDR 3
11 DSF
12 TM3
13+PRO7 E
14+RTL 2 E
15+WDR 3 E
16+BR 3 E
17+HR 3 E
18 KIKA
19 PHOENIX E
20 EUROSPRT
21 KABEL 1
22 MTV
23 CNN INT.
24 HOT
25 TV 5
26 VIVA
M
i
E
Back
Info
End
Select programs
and mark
with OK
OK
+ Mark
Mark all
Mark only
BAQ25B_31288_021_3_GB 22.05.2003, 15:09 Uhr15

16
Modes of operation
Other functions for selecting pages Displaying teletext pages
Stop self-turning pages (HOLD)
zoom: top half– bottom half –
normal size
TV picture on/off (Split text)
Mark a specified page number
on the page (Page Catching)
Teletext mode
Teletext transmits information such as News,
Weather, Sport, Program Previews and Subtitles.
Teletext on/off
Call
Scrolling in stored sub-pages. In
the bottom line you will see
which sub-pages you can
already call.
Call contents page 100
The TOP table is a general list of teletext. You can
only call the table on stations which use the TOP
operating system.
Call the TOP
table
Mark a general
topic
Select the Topics
column
Mark
a topic
Display page
Enter the page number directly
M
E
Table of Pages (TOP)
Back
End
Wetter
Vorhersage
Städte
Regional
Reisen
int. Städte
Biowetter
OK
Übersicht
tagesschau
Wetter
Sport 1
TV Guide
ARD heute
ARD morgen
FS-Sendungen
TV Guide 2
Kultur
Gesellschaft
weitere . . .
Select page and
press OK
to view
Teletext menu
Display teletext menu
Here you will find functions
such as ”New message”,
”Reveal” hidden information,
switch to other stations (if
another tuner is available),
enter 4-digit sub-page number
directly and program video
timer recordings via teletext.
In the settings you will find
menus to define the preview
pages, subtitle pages and
personal teletext pages.
Adjusting the volume
You can adjust the volume in teletext mode after
pressing the sound off/on button t.
T
Page selection
1OO 1OO ARD-Text O1.O7.O1 1O:3O:42
ARD-Text Teletext im Ersten
Letzte Meldung: Libyscher Botschafter
in London schließt Entschädigung für
Lockerbie-Opfer nicht mehr aus
Fußball: Rolf Hüssmann soll neuer
Sportdirektor beim VfB Stuttgart
werden . . . . . . . . . . . . . . . . . . . . . . . . . . . . . . . . 223
1O.3O Ein Zwilling zu viel . . . . . . . 314
12.OO Tagesschau um zwölf
tagesschau. . . . 11O TV Guide. . 3OO/4OO
Wetter. . . . . . . . . 17O Kultur. . . . . . . . . 5OO
Sport. . . . . 2OO/6OO TXT-Quiz. . . . . . . 555
Lotto/Toto. . . . . 666 Wirtschaft. . . . . . 7OO
Index. . . . . . . . . . 1O1 Impressum. . . . . .1O7
– +
Inhalt tagesschau
Many stations use the TOP operating system,
some use FLOF.Your TV supports both these
systems. The pages are divided into general
topics and topics. After switching on the
teletext, up to 390 pages are stored for fast
access.
Selecting pages with the colored buttons
The colored bars (in TOP) or the colored writing
(in FLOF) show you which colored buttons to
use to scroll to general topics and topics.
red: back to previously viewed
page (not with FLOF)
green: forward to next page
(not with FLOF)
yellow: to the next topic (only
in TOP and FLOF)
blue: to the next topic (only in
TOP and FLOF)
OK
Geld Optionen 2
1 2 3 4 5 67 8 9 1O
– +
Page selection OK view
wer
d
en . . . . . . . . . . . . . . . . . . . . . . . . . . . . . . . .
223
1O.3O Ein Zwilling zu viel . . . . . . . 314
12.OO Tagesschau um zwölf
tagesschau. . . . 11O TV Guide. . 3OO/4OO
Wetter. . . . . . . . . 17O Kultur. . . . . . . . . 5OO
Sport. . . . . 2OO/6OO TXT-Quiz. . . . . . . 555
Lotto/Toto. . . . . 666 Wirtschaft. . . . . . 7OO
Index. . . . . . . . . . 1O1 Impressum. . . . . .1O7
– +
Inhalt tagesschau
i
1OO 1OO ARD-Text O1.O7.O1 1O:3O:42
ARD-Text Teletext im Ersten
OK
OK
0
1 0 7
9
M
Menu
Station –/+
Sub-page
Recording
Settings
OK M
i
E
Bck
Info
End
Show
TOP table
News flash
Page selection
Lotto/Toto. . . . . 666 Wirtschaft. . . . . . 7OO
Index. . . . . . . . . . 1O1 Impressum. . . . . .1O7
– +
Inhalt tagesschau
Page selection
1OO 1OO ARD-Text O1.O7.O1 1O:3O:42
ARD-Text Teletext im Ersten
Letzte Meldung: Libyscher Botschafter
in London schließt Entschädigung für
Lockerbie-Opfer nicht mehr aus
Fußball: Rolf Hüssmann soll neuer
Sportdirektor beim VfB Stuttgart
werden . . . . . . . . . . . . . . . . . . . . . . . . . . . . . . . . 223
1O.3O Ein Zwilling zu viel . . . . . . . 314
12.OO Tagesschau um zwölf
tagesschau. . . . 11O TV Guide. . 3OO/4OO
Wetter. . . . . . . . . 17O Kultur. . . . . . . . . 5OO
Sport. . . . . 2OO/6OO TXT-Quiz. . . . . . . 555
Lotto/Toto. . . . . 666 Wirtschaft. . . . . . 7OO
Index. . . . . . . . . . 1O1 Impressum. . . . . .1O7
– +
Inhalt tagesschau
BAQ25B_31288_021_3_GB 22.05.2003, 15:10 Uhr16

17
Modes of operation
Pause (PAUSE)
Next chapter (only for DVD)
Previous chapter (only for DVD)
Record
Perform selected function.
When you start a recording, the program you
have just selected is recorded. You cannot switch
over to another channel, it is locked.You can
only switch over when the recording has
finished.
Exceptions:
1. You have installed several tuners (not PIP
tuners) in the TV set, then you can watch
another channel with the second tuner.
2. You can also watch the signal via an AV
connection (e.g. DVD player or a second
VCR).
3. In a VCR with Digital Link Plus the VCR tuner
is used for the recording (not for satellite
programs).
Video menu
Show the Video menu
OK
●
▼
▼
▼
▼
❚❚
The Video menu provides you with options for
timer programming by EPG, teletext or manually.
You can also change or delete timer data.
In the ”Connections” menu you can log other AV
equipment on or off and make a ”Digital Link
Plus data transfer. This serves to transfer the
transmitter data of the TV set (not satellite
stations) to the Digital Link Plus VCR.
Digital Link Plus VCRs have the possibility for
transferring the station data from the TV set to
the VCR via the Euro-AV cable (not for satellite
stations). Every time you change the station
memory of the TV, you are asked whether you
want to make a data transfer.
The receiver unit of the VCR is always used for
recording with a Digital Link Plus video recorder
(not satellite stations) and the tuner of the TV set
is available for watching TV.
The receiver unit of the VCR is always used for
recording with a Digital Link Plus video recorder
(not satellite stations) and the tuner of the TV set
is available for watching TV.
Loewe VCRs also have Digital Link, a system for
controlling Loewe VCRs via the Euro-AV cable. If
the Loewe VCR only has Digital Link, the TV tuner
is used for recording. If you have installed your
Loewe VCR in a concealed place, you can operate
the Loewe VCR with the remote control. Operati-
on with the control bar also works with Digital
Link.
Digital Link must be switched on on the
video recorder.
Only use fully wired Euro-AV cables, otherwise
Digital Link or Digital Link Plus will not work.
Video menu
Delete timer
Connections
OK M
i
E
Back
Info
End
Timer change
Timer recording
M
Video mode
You can operate Loewe video recorders and DVD
players with the video control bars even if they
are hidden. The VCR’s must be connected to the
Euro AV sockets (Scart) and logged in under the
”Connections” menu.
Digital Link must be switched on on the Loewe
video recorder. Only then can you use the
control bar. You also need Digital Link for timer
recordings of satellite programs controlled by
the TV set.
You can display up to two control bars but they
are only displayed by logged in VCR’s and DVD
players.
Show/hide video
control bar
Select the video control bar if
several VCR’s or a DVD player
and a VCR are connected.
Select function
Switch VCR/DVD on/off
Select video input (Euro-AV
socket) for the VCR
Rewind (only for VCR) or Scan in
rewind
Stop (STOP)
Playback (PLAY)
Fast forward (only for VCR) or
Scan in fast forward
V=
STOP
▼
▼
▼
▼
▼
❚❚
■
AUX
VCR STOP
▼
▼
▼
▼
▼
●
❚❚
■
OK
M
i
E
Menu
Info
End
DVD
▼
▼
■
▼
AUX
▼
▼
BAQ25B_31288_021_3_GB 22.05.2003, 15:10 Uhr17

18
Operating additional equipment
Search for and store the VCR station (if
there is no Euro AV cable)
Switch on the test station on the VCR or insert a
recorded tape and start playback.
Then call program 0 on the TV set (set ex-factory
to channel 36). Select the first menu item (VCR)
in the AV selection list.
To prevent ”normal” TV stations being found in
the search, pull out the antenna plug from the
antenna input of the VCR temporarily (the plug
attached to the cable to the antenna system).
Call the TV
menu
Mark
”Settings”
Call
Mark
”Stations”
Call
Mark ”Manual
setting”
Call
Mark ”Range”
and
Select ”UHF”
Mark
”Channel”
Enter channel
30
RFin
AV1/TV
AV2/Dec
RFout
AV2/RGB
AV1
SAT
SAT A/D
SERVICE
AUDIO OUT
VHF/UHF
R
L
SUBWOOFER
STAND
M
OK
OK
OK
Search for
channel (blue
button)
When the station is found:
Store (red
button)
A list of the stored stations is displayed
Overwrite program (program 0
marked)
Hide menus
Plug the antenna plug back into the VCR.
If you now get interference because a TV
station is transmitting on the same channel as
the VCR station, you have to change the
transmitting station on the VCR (see operating
instructions of the VCR) and search for the VCR
station on the TV again.
30
E
Logging in equipment
You have already logged in and connected all
connected devices (video recorders,
camcorders, DVD players, Loewe audio system,
Pay-TV decoders, Loewe home automation,
door intercom) with the connection wizard
when you put it into operation for the first
time. If you want to connect further or different
devices, you have to call the connection wizard
in the TV menu – ”Connections”.
Connecting VCR equipment
In addition to the connection via the Euro-AV
socket, you also have to connect the antenna
(only for antenna or cable systems) through the
VCR to the TV set. The antenna signal is then
available both to the tuner in the VCR and the
TV tuner.
Stations
Automatic search
Sort
Delete
Enter/change name
Manual adjustment
Preferred stations
Settings
Child lock
On-screen displays
Timer functions
AV settings
Time and date
other ...
Stations
Manual adjustment
Frequency 599.25 MHz
Name VIDEO
TV stand. B/G
OK
M
i
E
Back
Info
End
Channel E37 (E21...E69)
Col. st. Autom.
Range UHF
Search
0-9:Entry
Store
Store
0 VIDEO
1 ARD
2 ZDF
3 SAT.1
4 RTL
5 VOX
6 S–RTL
7 N–TV
8 DSF
9 S–RTL
10 N–TV
11 DSF
12 TM3
13 PRO7
14 RTL 2
15 WDR 3
16 BR 3
17 HR 3
18 KIKA
19 PHOENIX
20 EUROSPRT
21 KABEL 1
22 MTV
23 CNN INT.
24 HOT
25 TV 5
26 VIVA
M
i
E
Back
Info
End
Overwrite station
Insert station
OK
TV menu
Standard settings
Sound
zap2text
Picture
Connections
Settings
Manual adjustment
Frequency 591.25 MHz
Name VIDEO
TV stand. B/G
OK
M
i
Back
Info
Channel E36
Col. st. Autom.
Range VHF UHF Cable
Search
Manual adjustment
Frequency 543.25 MHz
Name VIDEO
TV stand. B/G
OK
M
i
E
Back
Info
End
Channel E30 (E21...E69)
Col. st. Autom.
Range UHF
Search
Store
0-9:Entry
BAQ25B_31288_021_3_GB 22.05.2003, 15:10 Uhr18

19
Operating additional equipment
Calling an AV program in the AV selection
list
Call AV selection list
Select AV socket or VIDEO for
VCR transmitter.
Now you will see the playback from the
connected AV unit.
Calling an AV in the station table
Call the station table
In the numeric sorting you will always find the
AV sockets at the top of the list without station
numbers.
Mark the AV socket
Now you will see the playback from the
connected AV unit.
0
VIDEO AV1 AV2 AVS
AV Selection
OK
Video playback
In order to see the VCR picture on your TV and
hear its sound you have several possibilities:
1. You can use the Euro-AV sockets on the TV
set and on the VCR. This is the best option of
all – good picture and sound quality.
If you are playing back from a VCR with
Digital Link Plus, the VCR picture is shown on
the current station slot.
If you are playing back from a standard VCR,
DVD player or camcorder, select the AV
socket to which the video signal is connected
in the AV selection list or the station table.
Video recorders emit a switching voltage
during playback which the TV set can decode
(can be activated for every VCR in the
connection wizard). Then the VCR picture is
shown on the current station slot as in Digital
Link Plus VCR’s.
2. You use the antenna connection between the
VCR and the TV set. The sound is only
broadcast in mono.To do this, select the first
menu item, e.g.VCR, in the AV selection list.
Channel overview: TV Numerical
6 S–RTL
7 N–TV
8 DSF
9 TM3
10 PRO7
11 RTL 2
12 WDR 3
13 BR 3
14 HR
15 MDR 3
M
i
E
Select and
press OK to proceed Menu
Info
End
Favourite programs
Change programs
Change sorting
OK
0 9
... Select program:
AVS
AV2
AV1
0 VIDEO
1 ARD
2 ZDF
3 SAT.1
4 RTL
5 VOX
6 NDR
BAQ25B_31288_021_3_GB 22.05.2003, 15:10 Uhr19

20
Operating additional equipment
Control 150
LP
000
SV
OK
VTR
DVD
OK
TMEi
123
456
78
0
9
V=
Select set to be
operated TV/DVD/VCR
Indicator: control DVD
Indicator: control VCR
Start playback
Stop tape
Select sound
/station language
selection
Select picture and
sound source
Switch on/off
in Standby
Display/close Timer list
Counter reset
Status display
In menu: close menu
Start recording (+ )
Call up station list
in menu: call up/confirm
Fast forward
/search forwards
Rewind
/search backwards
Station selection
up/down
/manual tracking
In menu:
select position
Pause (still frame)
/frame-by-frame
advance
Call up VCR Menu
switch to Long Play
/Standard Play
Display/close
ShowView timer Menu
Slow motion forwards
In menu: select/set
Select station directly
In menu: enter digits
Reverse play
In menu: select/set
Control 150
LP
000
SV
OK
VTR
DVD
OK
TMEi
123
456
78
0
9
V=
Indicator: DVD control
Indicator: VCR control
Beginning of chapter or
previous chapter
/search back
Stop
Pause
/single frame, slow motion
Menu bar on.
Select camera position active
DVD menu on;
in menu: close window
Menu bar on,
Repeat active
Select direct operation
for TV/VCR/DVD
Next chapter (up)
Beginning of chapter or
previous chapter (down)
in menu: select up/down
Set marker
Menu bar on,
Zoom active
Switch on/off
in standby
User interface of
loaded DVD on
Menu bar on,
Select Chapter active
Menu bar on, previous
function active;
in menu: info on/off
Title/Chapter Table;
in menu: cofirm the menu
selection
Playback
Next chapter
/search forward
Select Chapter;
in menu: enter digits
Status display on;
in menu: close menu
Search;
in menu: select right/left
Select the device to be operated:
for VCR:
the VTR indicator on the
remote control lights up ...
press again, the DVD indicator
lights up ...
press again, none of the
indicators lights, the TV is then
activated.
The TV cannot be operated if VTR or DVD is
switched on. In this case switch back to TV or wait
20 seconds until the remote control automatically
switches back to TV mode (none of the indicators
lights).
Loewe VCRs VV3600H, VV8500H and VV5000M
cannot be controlled with this remote control.
Please use the original remote control or the
video bar.
Functions for Loewe video recorders Functions for Loewe DVD players
Operating Loewe video recorders and
Loewe DVD players directly
You can switch over the remote control of the
TV set to operate Loewe video recorders and
Loewe DVD players. These devices can be
operated directly or, in the case of equipment
installed in a concealed place, by the TV set. In
this case the Digital Link function of the VCR
must be switched on.
BAQ25B_31288_021_3_GB 22.05.2003, 15:10 Uhr20
This manual suits for next models
1
Table of contents
Other Loewe Flat Panel TV manuals

Loewe
Loewe Spheros 32 HD User manual

Loewe
Loewe L 26 DVB-T/C CI Manual

Loewe
Loewe TV User manual

Loewe
Loewe Individual 46 Selection User manual

Loewe
Loewe Aconda 9272 User manual

Loewe
Loewe Modus L 37 User manual

Loewe
Loewe Xelos A 42 HD+ 100 User manual

Loewe
Loewe Xelos A 42 User manual

Loewe
Loewe HDTV User manual

Loewe
Loewe TV Spheros 42 HD User manual