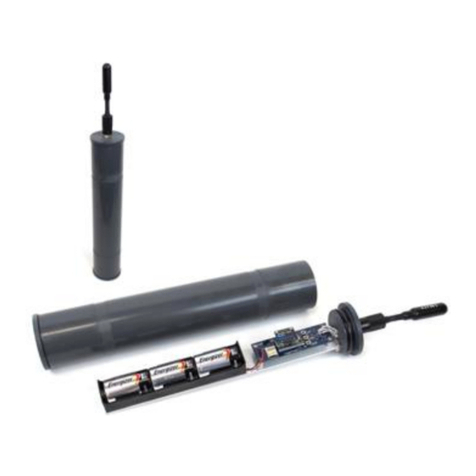
Loggerhead LS1 User manual

LS1/LS2 Manual 1
LS1/LS2 MANUAL
Long-Term Underwater Acoustic Recorder
Manual v2.0
Updated 19 March 2021
www.loggerhead.com

LS1/LS2 Manual 2
Overview
Hardware
LS1/LS2 are dataloggers designed for collecting large amounts of underwater
acoustic recordings. Setup is designed to run through a simple button interface
with a display. No PC is needed to setup and deploy the LS1/LS2.
•HTI-96-min hydrophone
•Adjustable sample rate
•1 TB microSD formatted as exFat
Software
LS1/LS2 store data directly as audio wav files.
Any audio analysis software (Adobe Audition, Cornell Raven, MATLAB, R,
Python) will work with these files.

LS1/LS2 Manual 3
Setting up LS1/LS2 for Deployment
See the online video for a tutorial on setting up the LS1/LS2
Step 1.Prepare microSD card. The microSD card should be formatted as
exFAT (for version 2 of the LS1/LS2).
Step 2. O-rings. Clean and grease o-rings with silicone grease and insert into the
groove on the ring. The fatter radial o-ring is 5 mm wide x 90 mm inner diameter
(McMaster Part number 9262K395). The o-ring that seals with the top of the tube
is -155 (McMaster Part number 9452K176).
Step 3. Turn on power switch.
The microSD card will be scanned for free memory. Only the card in slot 1 is
used in version 2 of the LS1/LS2.
Use buttons to change settings
UP/DN: Used to move through menu settings and make changes.
Enter: Used to change values.
Display Setting
Description
Start
Press Enter to Start
Record
Record duration in seconds
Sleep
Sleep duration in seconds. This is the time from the END of one
recording to the START of the next recording.
Continuous Recording: Sleep = 0 seconds.
For continuous recording the minimum Record duration (i.e. file size) is
600 s.
Rate
Sample rate
Note for 250 kHz and 300 kHz you may need to increase the gain to
achieve lower noise recordings.
Gain
Gain of the audio codec. The gain setting ranges from 0 to 15 and the
corresponding dB of gain will be shown in the display.
Time
It is highly recommended to use UTC time.
Year:
Year
Month:
Month
Day:
Day of month
Hour:
Hour (24 hour time)
Minute:
Minute

LS1/LS2 Manual 4
Second:
Second
Battery
Number of battery packs you will fill. There are 3 D-cells per battery
pack.
Mode
Switch between Norm(al) and Diel recording. In Diel recording mode
the Start HH:MM and End HH:MM are specified to limit recording to
certain parts of the day (e.g. record only in the morning). In Normal
recording mode, recordings are made throughout the day.
Step 5. Start Recording. Press Enter when the display shows START to start
recording. If this is not done, the recorder will automatically start after 10
minutes.
Step 6. Close lid. The radial o-ring is the main sealing o-ring, so there is no need
to make the lid more than hand tight.
Stopping Recording
If a recording is in process after recovery, you can press the UP + DN buttons at
the same time to close the file.
File Names
Example: 20210319T163400_2614231252441225_2.0dB_3.8V_ver2.00.wav
File names contain the following separated by underscores:
Date and time of the start of the file
Serial number of board (not the hydrophone serial number)
Gain of the board
Voltage of the batteries
Version of the firmware

LS1/LS2 Manual 5
setup.txt Commands
All commands are optional. Default column lists values if no setting in setup.txt
file. Record duration and record interval can be set through the button interface.
Command
Function
Default
Example
Setup.txt example
RD
Record duration (s)
Last used
Record 600
second files
RD 600
RI
Record interval (s)
Last used
Sleep 240
seconds between
files
RI 240
SG
Hydrophone system
gain. See table for dB
gains associated with
different settings.
4
Set gain to
setting ‘10’,
which
corresponds to
11.1 dB gain
SG 10
ND
Remove DC from
audio. Turning on
increases electrical
noise
Off
Turn on feature
to remove DC
from audio
ND

LS1/LS2 Manual 6
Power
The LS1/LS2 has battery holders for 4 sets of D-cell batteries (12 batteries total).
The LS1X/LS2X has battery holders for 8 sets of D-cell batteries (24 batteries
total).
Always use new batteries of the same brand and tape them into place.
The display will provide estimated run time based on the number of battery packs
that are filled (LS1: 1-4 battery packs: LS1X: 1-8 battery packs) and the memory
available in the microSD card.

LS1/LS2 Manual 7
HTI Hydrophone and Recording Gain
The LS1/LS2 uses a hydrophone manufactured by High-Tech Inc. The sensitivity
of the hydrophone will be on a specification sheet included with the shipment
(typically -170 dBV/uPa or -180 dBV/uPa).
The hydrophone has a red LED in the end to indicate when it is getting power.
This will only be turned on during startup and recording. The hydrophone red
LED will be off when sleeping.
The A/D converter gain can be changed through the setup.txt file. The default is
setting 4. The setting can be changed with SG command in setup.txt. The actual
setting that was used is stored to the log.txt file.
Setting
Clip Level (peak-peak)
Clip Level (peak)
Gain (dB)
0
3.12
1.56
-3.9
1
2.63
1.315
-2.4
2
2.22
1.11
-0.9
3
1.87
0.935
0.6
4
1.58
0.79
2.0
5
1.33
0.665
3.5
6
1.11
0.555
5.1
7
0.94
0.47
6.6
8
0.79
0.395
8.1
9
0.67
0.335
9.5
10
0.56
0.28
11.1
11
0.48
0.24
12.4
12
0.4
0.2
14.0
13
0.34
0.17
15.4
14
0.29
0.145
16.8
15
0.24
0.12
18.4

LS1/LS2 Manual 8
Vent Plug
This plug is only to be used if there is a leak in the housing.
A leak in the housing can be dangerous because the housing will pressurize
internally to the same pressure as the depth of deployment.
If there is a leak, it is critical to relieve the pressure before removing the lid,
otherwise the lid could fly off.
The vent plug can be used to relieve the pressure, by turning it slowly until you
start hearing air come out. Once air starts coming out, stop unscrewing and wait
until air stops coming out. The vent plug is designed to stay in the endcap and
safely vent air through holes machined in the plug.
Once the internal pressure has equalized, you may remove the top lid with the
hydrophone. There is no need to fully remove the vent plug. Then gently
retighten the vent plug. On PVC housings be very careful not to overtighten the
plug, otherwise the threads in the bottom endcap may strip.
This manual suits for next models
1
Other Loggerhead Measuring Instrument manuals
Popular Measuring Instrument manuals by other brands

AW
AW CP400Xl CP500Xl NI 5191 manual

YOKOGAWA
YOKOGAWA ROTAMASS Total Insight user manual

DH Instruments
DH Instruments RPM3 - VERSION 2002 Operation and maintenance manual

PRECISION DIGITAL
PRECISION DIGITAL PD603 instruction manual

eSolutions
eSolutions PowerMeter Installation and user manual

Woodley
Woodley InSight V-IA PLUS user manual