Logiflex ELEVATION PLUS User manual

ELEVATION PLUS
User’s Guide
Guide de l’utilisateur

22February 19, 2021 LOGIFLEX | ELEVATION PLUS - USER’S GUIDE
Precautions
1. Ensure there are no obstacles in the desk’s path.
2. If you encounter an obstacle during the height adjustment, stop the table by pressing on the arrows (up or down).
3. If you encounter an obstacle during a programmed height adjustment, stop by pressing any of the buttons.
4. Ensure the table is not in contact with any walls or panels.
5. Ensure all cables are the appropriate length to accommodate the height adjustment.
6. Children must be supervised when using this product.
7. There is a risk of injury and/or electric shock if not properly installed.
8. Keep liquids away from electrical components.
9. Do not sit or stand on the table.
10. Do not sit or stand under the table.
11. Do not place any object taller than 508 mm (20”) under the desk.
12. Do not open any of the electrical components. There is a danger of electric shock.
13. This product is designed with a duty cycle of 10% (2 min. on and 18 min. off).
14. In the event of a power outage or if the power cord is unplugged, a manual reset may be necessary.
Control Pad Instructions
Control Pad Information
1. Use the arrows or to reach the desired height.
2. Press
. The height will flash.
3. Then press on a number ( , or ) to save the height on the selected button.
4. To use the stored height, press the corresponding number.
Reset the Table
1. Press and hold until the table goes down to the lowest.
2. Release when RST disappears and the lowest height is displayed.
Digital
Display Memory
Key Memory
Buttons Arrows
Up or Down

33February 19, 2021 LOGIFLEX | ELEVATION PLUS - USER’S GUIDE
Reset following a power failure
or “RST” error on control pad
Réinitialisation suite à une panne de courant ou
une erreur « RST » sur l’afficheur numérique
1. Press & hold until the table
goes to its lowest level.
2. Release when “RST” disappears
and the lowest height displays.
1. Press & hold until the table
goes to its lowest level.
2. Release when “RST” disappears
and the lowest height displays.
Preset Heights
1. Position the table at
the desired height.
2. Press
3. Press one of the buttons.
Prédéfinir des hauteurs
1. Positionnex la table
à la hauteur désirée.
2. Appuyez.
3. Appuyer sur un des boutons.
Reference label under the table
Troubleshooting
The table does not work
1. Is the table plugged into an outlet in the wall?
2. Is the electric wire correctly inserted in the control box?
3. Is the keyboard plugged into the control box?
4. Has the box been unplugged or has there been a power failure?
5. If the table still does not work, reset the table.
The table sways
1. Make sure all frame screws are tight.
2. Make sure the table top is properly secured to the structure.
The table legs are not at the same height
It is possible that the legs are out of sync and not at the same height. Usually this happens in situations where a leg has struck an
obstacle while going up or down. If this happens, reset the table.
The table stops by itself
Most of the time, this problem occurs when the collision and overweight detector has been triggered. The table protects itself by
stopping until the problem is resolved.
1. Is the table at the right level?
2. Are the legs of the table the same height (see problem #2 (E6)?
3. Is there an obstacle under, around or above the table?
4. Is the top of the table centered on the structure?
5. Does the table top exceed maximum weight or size specifications?
6. Is the weight distributed evenly across the table, or is there something very heavy on one side or the other?
Note that this label is found on the control box which is under the
table, therefore always accessible to the user or the installer. The
explanations there are:
●How to reset after a power failure or an “RST” error on the
digital display
●How to preset heights

44February 19, 2021 LOGIFLEX | ELEVATION PLUS - USER’S GUIDE
Error Codes
No Code Errors Steps Troubleshooting Reasons Error Level
1
E1
E2
E3
Control box
does not receive
signals from
each leg sensor
1•Reduce or recenter the load on the
table.
•Then reset the table.
E1 : The leg connected to the M1 port is supporting too much weight.
E2 : The leg connected to the M2 port is supporting too much weight.
E3 : The leg connected to the M3 port is supporting too much weight.
Low
2•Disconnect and reconnect the wire
connecting the leg to the control box..
•Then reset the table.
E1 : The leg connected the M1 port is not connected properly.
E2 : The leg connected the M2 port is not connected properly.
E3 : The leg connected the M3 port is not connected properly.
Low
3
•Switch the legs extension cords. Put
E1 into E2 or E2 into E3 & E3 into E1.
•If it still does not work, the wire is
damaged. Replace the wire.
•Then reset the table.
E1 : The wire connected to the M1 port is damaged.
E2 : The wire connected to the M2 port is damaged.
E3 : The wire connected to the M3 port is damaged.
Medium
4•Replace the control box. The control box is damaged. High
5•Replace the leg with a new one
OR resolder the circuit board wire.
•Then reset the table.
E1 : The wire connecting the leg’s circuit board to the M1 port is damaged.
E2 : The wire connecting the leg’s circuit board to the M2 port is damaged.
E3 : The wire connecting the leg’s circuit board to the M3 port is damaged.
High
6•Replace the leg with a new one
OR resolder the circuit board wire.
•Then reset the table.
E1 : The circuit board of the leg connected to the M1 port is damaged.
E2 : The circuit board of the leg connected to the M2 port is damaged.
E3 : The circuit board of the leg connected to the M3 port is damaged.
High
2 HOT
The table has
been used for
too long or
continuously
N/A
•Wait 18 minutes. After this rest time,
the table will be ready for use.
• If urgent : Unplug the table for 45
seconds. Plug in and it will return to
normal.
When the desk is used for more than 2 consecutive minutes, the display will
say “HOT” to prevent overheating.. Low
3 E6 Height difference
between
both legs
1•Reduce the load on the table.
•Then reset the table. One of the legs is suppporting more weight than the other which causes a
height difference. Low
2
•Connect the wire properly to fix the
problem..
•The manual reset procedure may
be required.
The wire of one of the legs is not connected, causing a difference in height.. Medium
3•Replace the control box.
•Ensuite, réinitialisez la table. The control box is damaged causing a difference in height. This can cause a leg
to move faster than the the other during a reset procedure. High
4•Replace the leg with a new one.
•Then reset the table. The wire connected to the circuit board is damaged. High
4 E7 Overload N/A •Reduce the load on the table.
•Then reset the table. There is too much weight on the table. Low
5
Controller
beeps but
does not
turn on
No signal from
the control box N/A •Program the control pad.. The control pad has not been programmed. High
6
The buttons
work but
the control
box does not
respond
Control box
is damaged N/A •Replace the control box with
a new one.
•Then reset the table. The components or circuit board of the control box are damaged.. High
7Burning
odor Short circuit 1•Replace the control box with
a new one.
•Then reset the table. The control box is damaged. High
ATTENTION : AFTER REPAIRING OR REPLACING COMPONENTS,
PERFORM THE MANUAL RESET PROCEDURE.

55February 19, 2021 LOGIFLEX | ELEVATION PLUS - USER’S GUIDE
1235 St-Roch N., Sherbrooke QC J1N 0H2 Canada
T : 1.877.864.9323 | F : 1.800.474.7830 | logiflex.ca
Editable Parameters
Please visit Logiflex.ca to see how to change the following settings:
• Display in imperial or metric (inches or centimeters)
• Control pad screen brightness
• Control pad with or without ‘beep’
• Sensitivity of the “sensor” going upwards
• Downward sensitivity of the “sensor”
• Vibration sensitivity
• Adjustable minimum and maximum height and height indicated on the control pad
• Continuous support mode activated or deactivated
• Timer
• Adjusting the ‘rebound’
• Reset the table to the ‘factory’ settings
• “Fatigue Tests” mode (for demos / showrooms)
As our product line is constantly evolving and expanding, we recommend that you visit logiflex.ca for updates.

619 février 2021 LOGIFLEX | ELEVATION PLUS - GUIDE DE L’UTILISATEUR
Avertissements
1. Assurez-vous qu’il n’y a aucun obstacle pendant le mouvement de la table.
2. Si vous anticipez un obstacle pendant le mouvement, cessez d’appuyer sur la flèche (haut ou bas).
3. Si vous anticipez un obstacle pendant le mouvement programmé de la table, appuyez sur la flèche du haut ou du bas pour l’arrêter.
4. Assurez-vous qu’il y a un espace d’un pouce (1”) entre la table et les murs ou les panneaux l’entourant.
5. Assurez-vous que les câbles utilisés aient une longueur adéquate par rapport aux niveaux atteignables de la table.
6. Les enfants doivent être supervisés lorsqu’ils utilisent ce produit.
7. Si le produit n’est pas installé correctement, il peut y avoir un risque de blessures ou de chocs électriques.
8. Éloignez tout liquide des composantes électriques.
9. Ne pas s’asseoir ou se tenir debout sur la table.
10. Ne pas se tenir en dessous de la table.
11. Ne placez aucun objet de plus de 508 mm (20”) de hauteur en dessous de la table.
12. Ne pas ouvrir les composantes électriques de ce produit. Il y a un risque de choc électrique.
13. Ce produit est fabriqué avec un cycle de fonctionnement de 10 % (2 min. de fonctionnement en continu pour 18 min. de repos).
14. En cas de coupure de courant ou si le fil d’alimentation est débranché, une réinitialisation manuelle pourrait être nécessaire.
Fonctionnement du clavier de contrôle
Mémoriser des hauteurs
1. Utilisez les flèches ou pour atteindre la hauteur désirée.
2. Appuyez sur
. La hauteur clignotera.
3. Appuyez ensuite sur un chiffre ( , ou ) pour sauvegarder la hauteur sur le bouton choisi.
4. Pour utiliser la hauteur mémorisée, appuyez sur le chiffre correspondant.
Réinitialiser la table
1. Appuyez et maintenez jusqu’à ce que la table descende au plus bas.
2. Relâchez lorsque RST disparaît et que la hauteur au plus bas s’affiche.
Afficheur
numérique Touche de
mémorisation Boutons
mémoire Flèches
haut et bas

719 février 2021 LOGIFLEX | ELEVATION PLUS - GUIDE DE L’UTILISATEUR
Reset following a power failure
or “RST” error on control pad
Réinitialisation suite à une panne de courant ou
une erreur « RST » sur l’afficheur numérique
1. Press & hold until the table
goes to its lowest level.
2. Release when “RST” disappears
and the lowest height displays.
1. Press & hold until the table
goes to its lowest level.
2. Release when “RST” disappears
and the lowest height displays.
Preset Heights
1. Position the table at
the desired height.
2. Press
3. Press one of the buttons.
Prédéfinir des hauteurs
1. Positionnex la table
à la hauteur désirée.
2. Appuyez.
3. Appuyer sur un des boutons.
Étiquette de référence sous la table
Dépannage
La table ne fonctionne pas
1. La table est-elle branchée dans une prise de courant dans le mur ?
2. Le fil électrique est-il correctement inséré dans la boîte de contrôle ?
3. Est-ce que le clavier est branché sur la boîte de contrôle ?
4. Est-ce que la boîte a été débranchée ou y a-t-il eu une panne de courant ?
5. Si la table ne fonctionne toujours pas, réinitialiser la table.
La table oscille
1. Assurez-vous que toutes les vis de la structure soient bien serrées.
2. Assurez-vous que le dessus de la table soit correctement sécurisé à la structure.
Les pattes de tables ne sont pas à la même hauteur
Il est possible que les pattes soient désynchronisées et pas à la même hauteur. Habituellement, cela arrive dans des situations
où une patte aura heurté un obstacle en montant ou en descendant. Si cela se produit, réinitialisez la table.
La table s’arrête par elle-même
La plupart du temps, ce problème survient quand le détecteur de collision et de surpoids a été déclenché. La table se protège en ar-
rêtant jusqu’à ce que le problème soit résolu.
1. Est-ce que la table est au bon niveau ?
2. Est-ce que les pattes de la table sont de la même hauteur (voir problème no 2 (E6) ?
3. Est-ce qu’il y a un obstacle sous, autour ou au-dessus de la table ?
4. Est-ce que le dessus de la table est bien centré sur la structure ?
5. Le dessus de la table dépasse-t-il le poids maximal ou les spécifications de grandeur ?
6. Est-ce que le poids est réparti uniformément sur la table, ou est-ce qu’il y a quelque chose de très lourd d’un côté ou de l’autre ?
Notez que cette étiquette se retrouve sur la boîte de contrôle
qui est sous la table, donc toujours accessible à l’utilisateur
ou l’installateur. Les explications qui s’y trouvent sont :
●Comment réinitialisation suite à une panne de courant ou
une erreur « RST » sur l’afficheur numérique
●Comment prédéfinir des hauteurs

819 février 2021 LOGIFLEX | ELEVATION PLUS - GUIDE DE L’UTILISATEUR
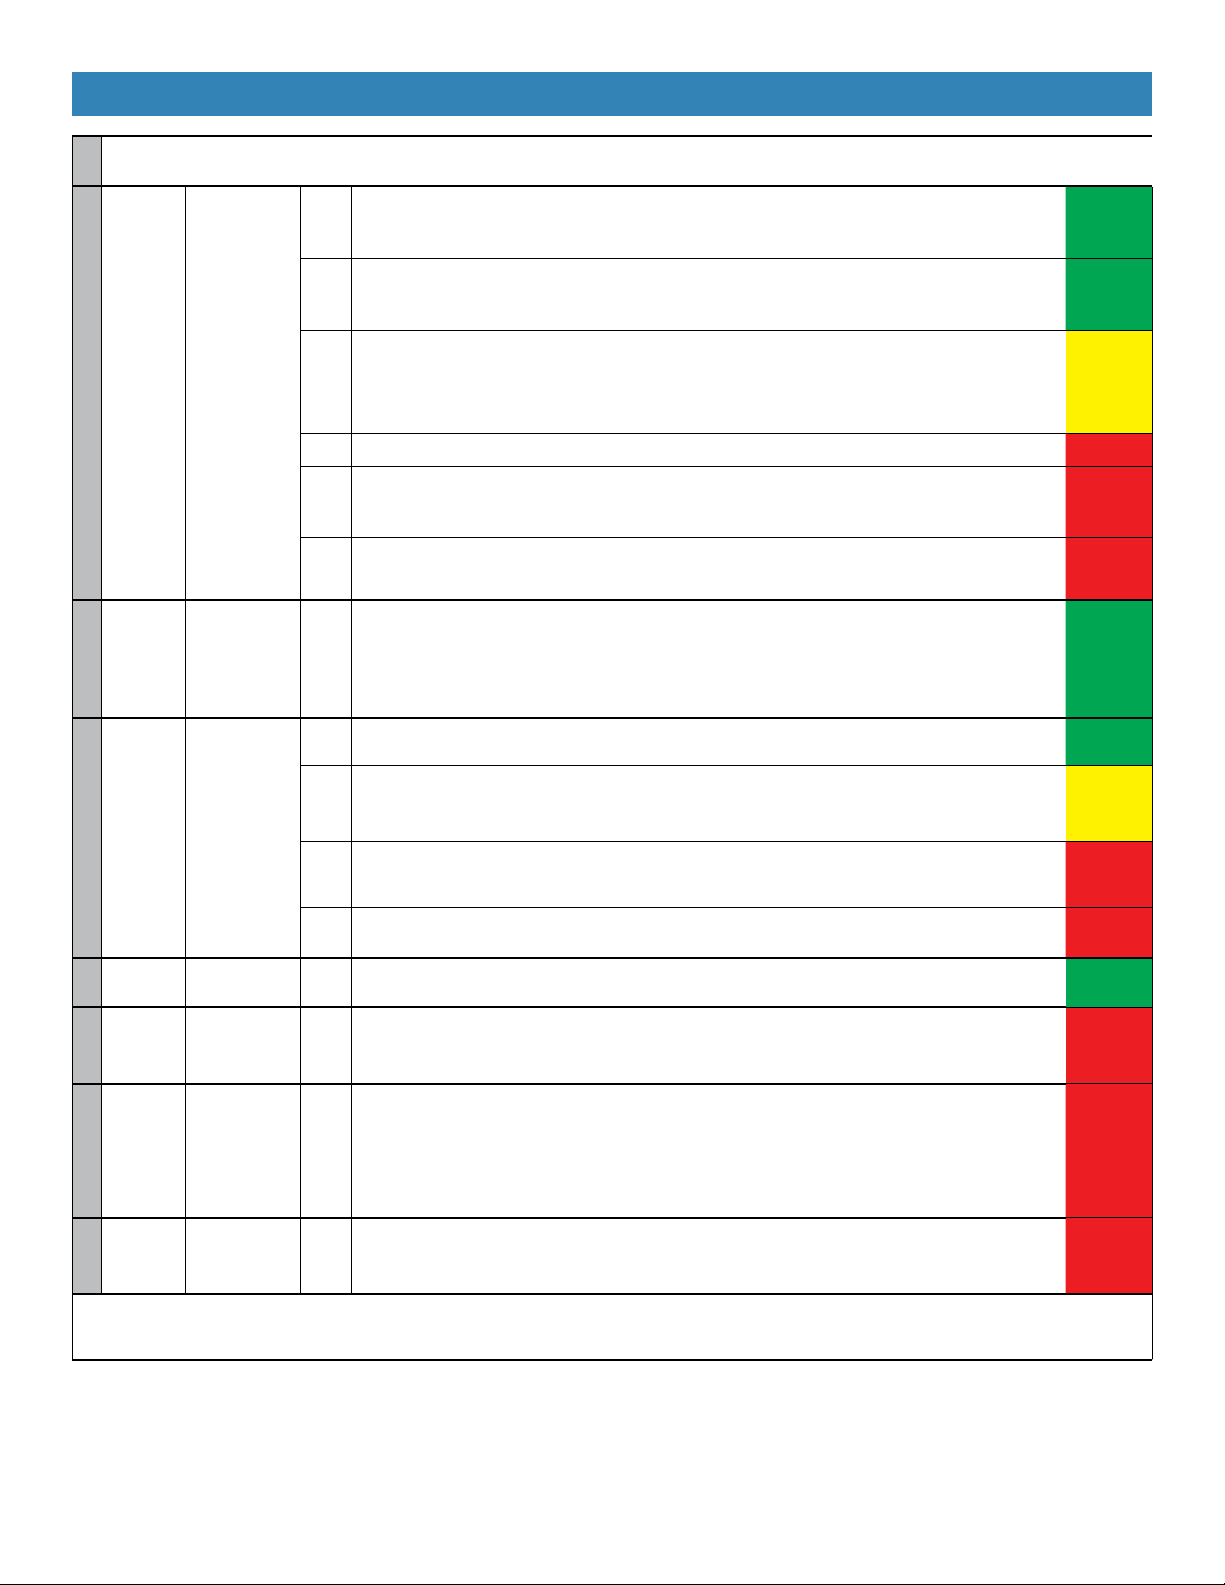
No Code Erreur Étape À faire Raison Ampleur du
problème
1
E1
E2
E3
La boîte de
contrôle ne
reçoit pas un
signal de la part
des capteurs de
chaque patte.
1•Réduisez ou recentrez le poids
sur la table.
•Ensuite, réinitialisez la table.
E1 : La patte branchée dans le port M1 a trop de poids dessus.
E2 : La patte branchée dans le port M2 a trop de poids dessus.
E3 : La patte branchée dans le port M3 a trop de poids dessus.
Mineur
2•Débranchez et rebranchez le fil reliant
la patte à la boîte de contrôle.
•Ensuite, réinitialisez la table.
E1 : La patte branchée dans le port M1 est mal branchée.
E2 : La patte branchée dans le port M2 est mal branchée.
E3 : La patte branchée dans le port M3 est mal branchée.
Mineur
3
•Interchangez les fils des pattes, mettre
E1 dans E2, E2 dans E3 & E3 dans E1.
•Si cela ne règle pas le problème, le fil
est endommagé. Changez le fil.
•Ensuite, réinitialisez la table.
E1 : Le fil branché dans le port M1 est endommagé.
E2 : Le fil branché dans le port M2 est endommagé.
E3 : Le fil branché dans le port M3 est endommagé.
Moyen
4•Changez la boîte de contrôle. La boîte de contrôle est endommagée. Elevé
5• Changez la patte pour une nouvelle
OU ressoudez le fil du circuit imprimé.
• Ensuite, réinitialisez la table.
E1 : Le fil allant au circuit imprimé de la patte branché dans le port M1 est endommagé.
E2 : Le fil allant au circuit imprimé de la patte branché dans le port M2 est endommagé.
E3 : Le fil allant au circuit imprimé de la patte branché dans le port M3 est endommagé.
Elevé
6•Changez la patte pour une nouvelle
OU ressoudez le circuit imprimé.
•Ensuite, réinitialisez la table.
E1 : Le circuit imprimé de la patte branché dans le port M1 est endommagé.
E2 : Le circuit imprimé de la patte branché dans le port M2 est endommagé.
E3 : Le circuit imprimé de la patte branché dans le port M3 est endommagé.
Elevé
2 HOT
La table a été
utilisée trop
longtemps en
continu
N/A
•Attendez 18 minutes. Après ce temps
de repos, la table sera prête pour
utilisation.
• Si urgence : Débranchez la table
pendant 45 secondes. Vous pourrez
ensuite l’utiliser.
Lorsque la table est utilisée plus de 2 minutes consécutives,
l’affichage changera à « HOT » pour prévenir une surchauffe. Mineur
3 E6 Différence de
hauteur entre
les deux pieds
1•Réduisez le poids sur la table.
•Ensuite, réinitialisez la table. Une des pattes supporte un poids beaucoup plus lourd que l’autre,
ce qui cause une différence de hauteur. Mineur
2
•Branchez les fils correctement
pour régler le problème.
•Ensuite, réinitialisez la table
peut être nécessaire.
Le fil d’une des pattes n’est pas connecté, ce qui cause une différence de
hauteur. Moyen
3•Changez la boîte de contrôle.
•Ensuite, réinitialisez la table.
La boîte de contrôle est endommagée, ce qui cause une différence de hauteur.
Lors d’une réinitialisation, cela peut amener une patte à bouger plus rapidement
que l’autre.
Elevé
4•Changez la patte pour une nouvelle.
•Ensuite, réinitialisez la table. Le fil qui va au circuit imprimé est endommagé. Elevé
4 E7 Surcharge
de poids N/A •Réduisez le poids sur la table.
•Ensuite, réinitialisez la table. Il y a trop de poids sur la table. Mineur
5
La manette
ne s’allume
pas, mais
fait « beep »
Pas de retour du
signal de la boîte
de contrôle N/A •Une programmation de la manette
est nécessaire. La manette n’a pas été programmée. Elevé
6
La manette
fonctionne
mais il n’y
a pas de
réaction de
la boîte de
contrôle
La boîte de
contrôle est
endommagée N/A •Changez la boîte de contrôle.
•Ensuite, réinitialisez la table. Les composantes ou le circuit de la boîte de contrôle sont endommagés. Elevé
7Odeur de
brûlé Court-circuit 1•Changez la boîte de contrôle.
•Ensuite, réinitialisez la table. La boîte de contrôle est endommagée. Elevé
ATTENTION : TOUTES LES TABLES RÉPARÉES OU AVEC DES COMPOSANTES
MODIFIÉES DOIVENT ÊTRE RÉINITIALISÉES AVANT D’ÊTRE UTILISÉES.
Codes d’erreurs

919 février 2021 LOGIFLEX | ELEVATION PLUS - GUIDE DE L’UTILISATEUR
1235 St-Roch N., Sherbrooke QC J1N 0H2 Canada
T : 1.877.864.9323 | F : 1.800.474.7830 | logiflex.ca
En raison de l’évolution constante des lignes de produits, Logiflex vous encourage à consulter les mises à jour au logiflex.ca.
Paramètres modifiables
Veuillez consulter le logiflex.ca pour consulter comment modifier les paramètres suivants :
• Affichage en impérial ou en métrique (pouces ou centimètres)
• Luminosité de l’écran de la manette
• Manette avec ou sans ‘beep’
• Sensibilité du ‘sensor’ allant vers le haut
• Sensibilité du ‘sensor’ allant vers le bas
• Sensibilité à la vibration
• Hauteur minimale et maximale ajustables et hauteur indiquée sur la manette
• Mode d’appuiement continu activé ou désactivé
• Minuterie
• Ajustement du ‘rebond’
• Mettre la table aux paramètres ‘factory’
• Mode ‘Fatigue Tests’ (pour démos/salles de montre)
Table of contents
Languages:
Other Logiflex Indoor Furnishing manuals
Popular Indoor Furnishing manuals by other brands

Regency
Regency LWMS3015 Assembly instructions

Furniture of America
Furniture of America CM7751C Assembly instructions

Safavieh Furniture
Safavieh Furniture Estella CNS5731 manual

PLACES OF STYLE
PLACES OF STYLE Ovalfuss Assembly instruction

Trasman
Trasman 1138 Bo1 Assembly manual

Costway
Costway JV10856 manual