Longvast GVP-201 User manual

Granvista Plus Series
H.264 2-Megapixel Network Camera
GVP-201 / GVP-201W
User’s Manual
Version: 1.21
Revised July, 2011

1
Contents
Notices .................................................................................................................................................2
Introduction..........................................................................................................................................3
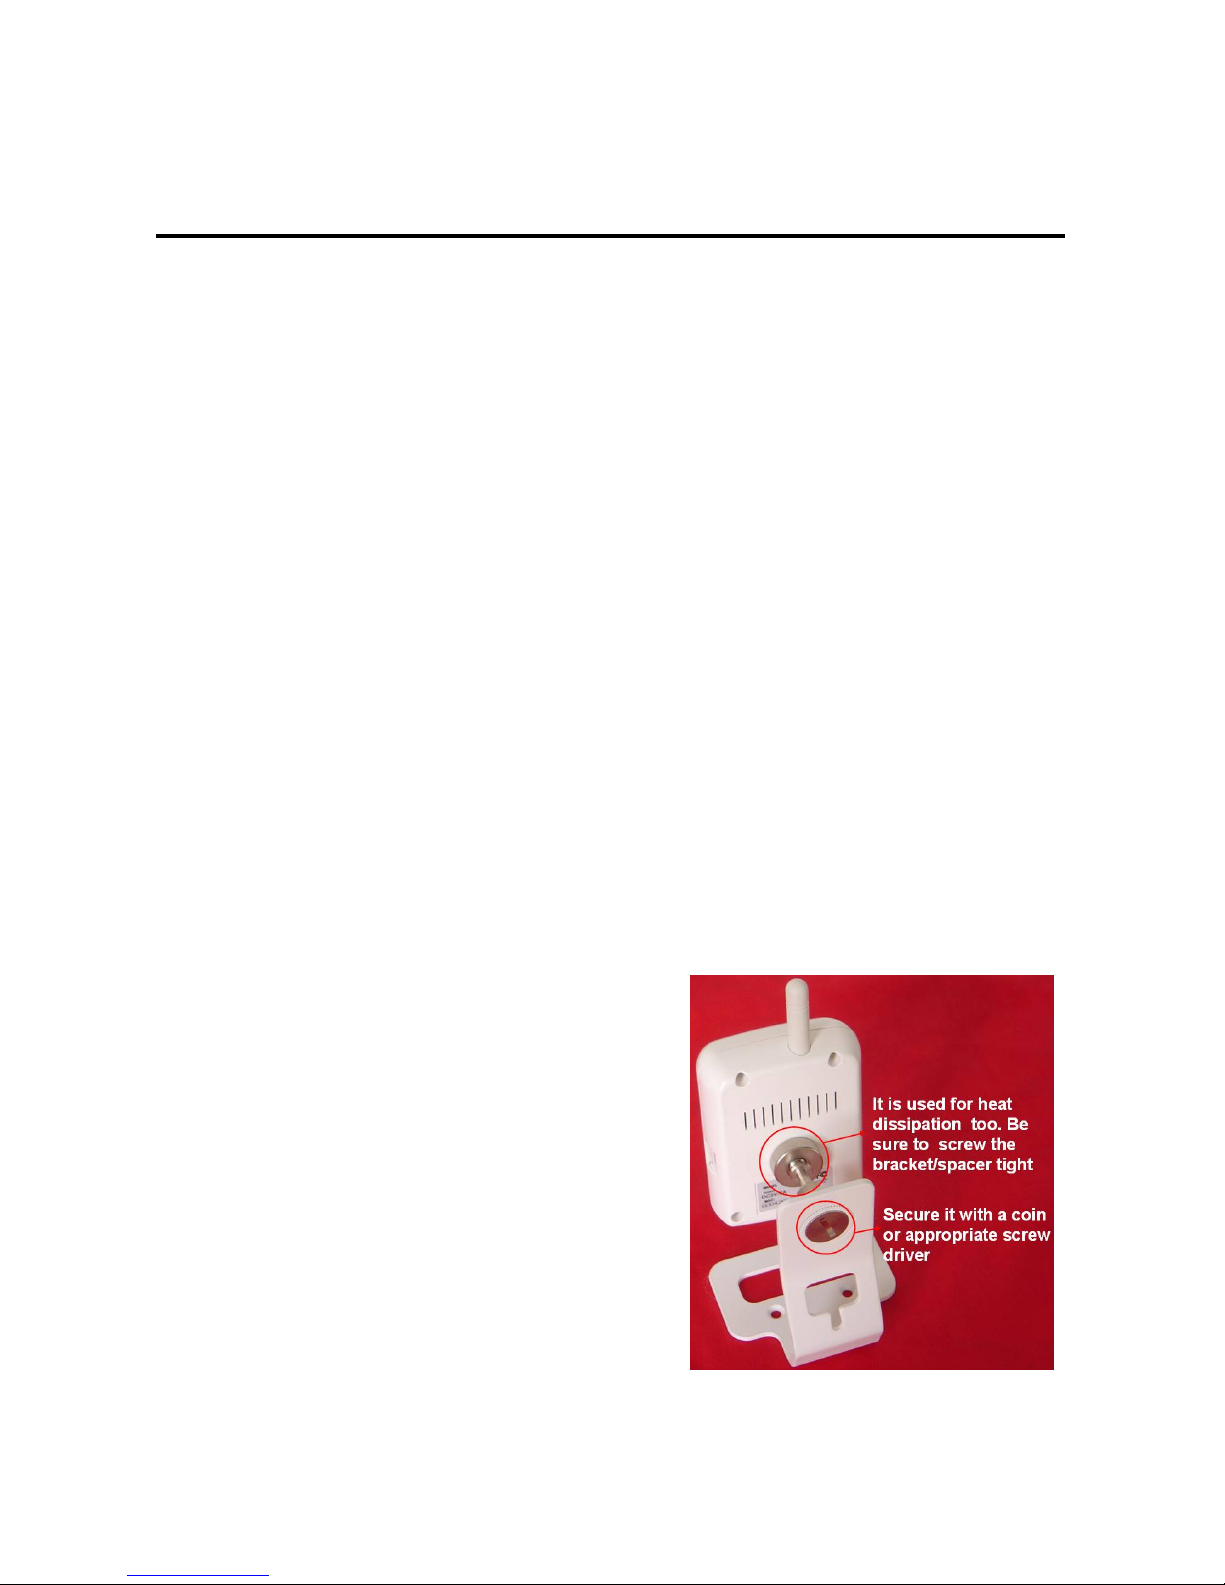
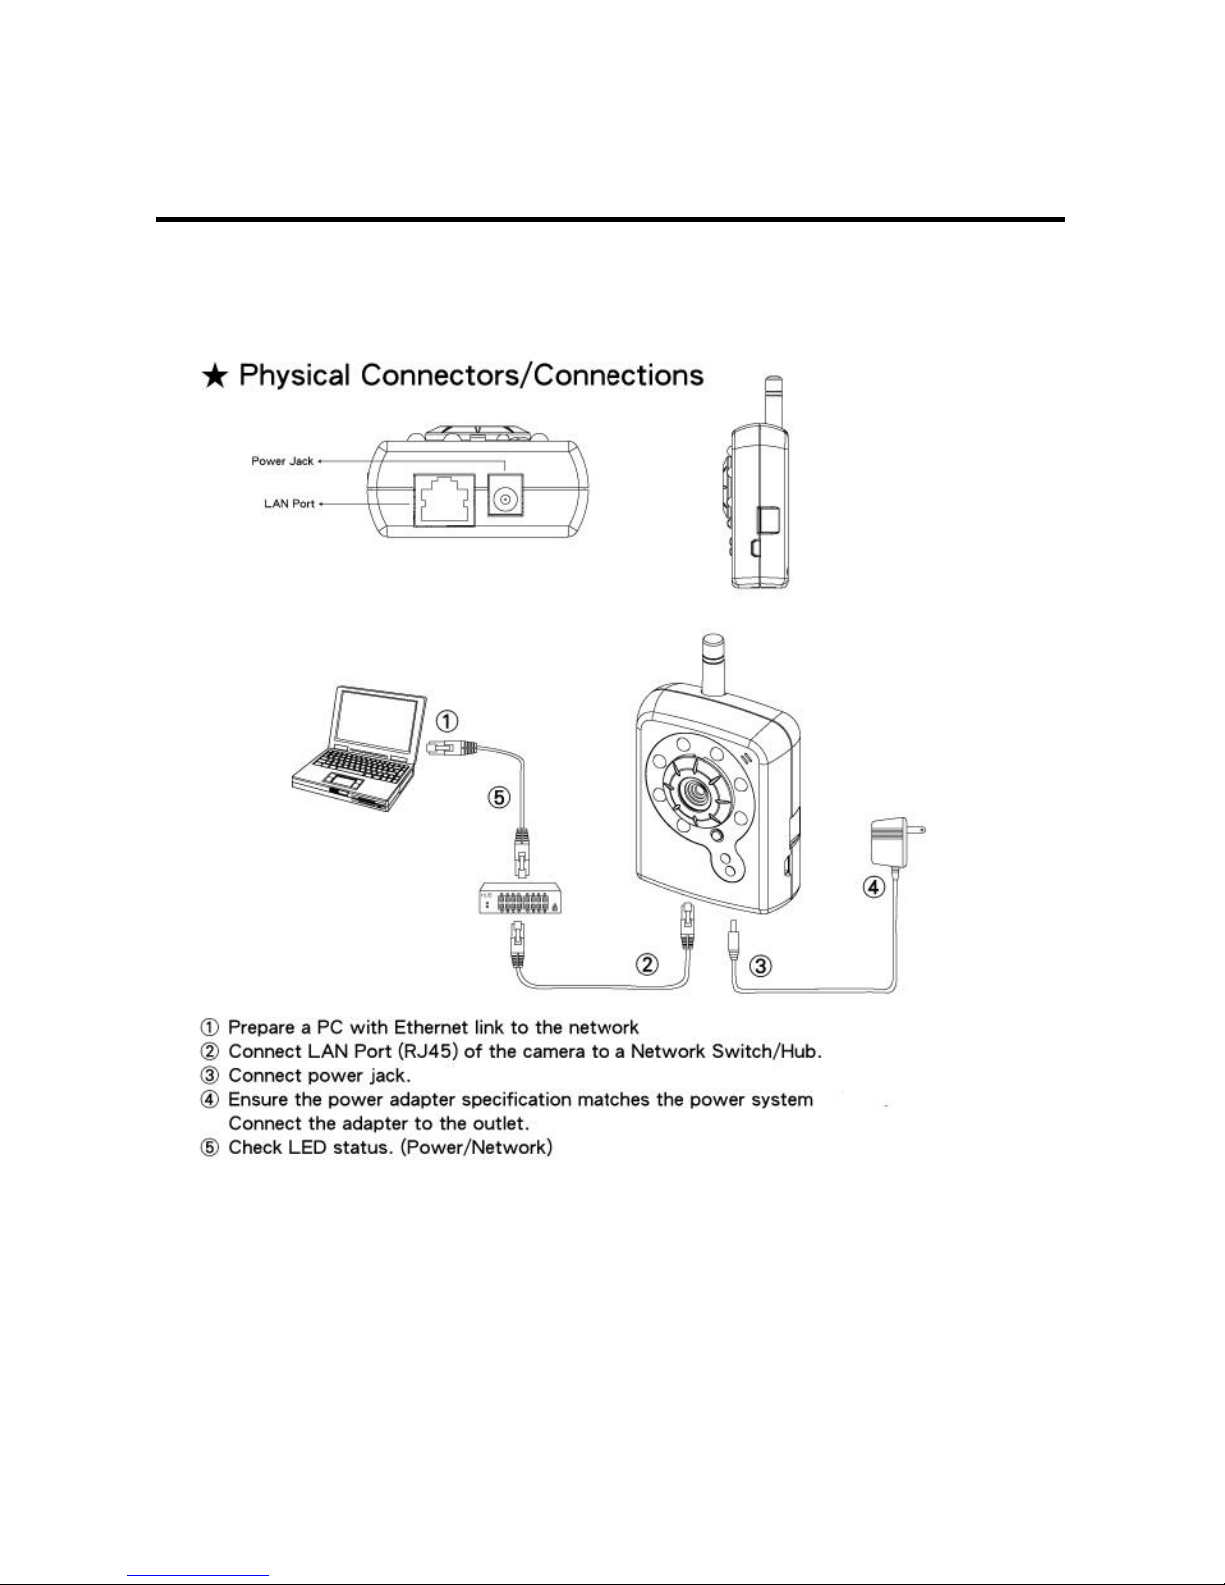
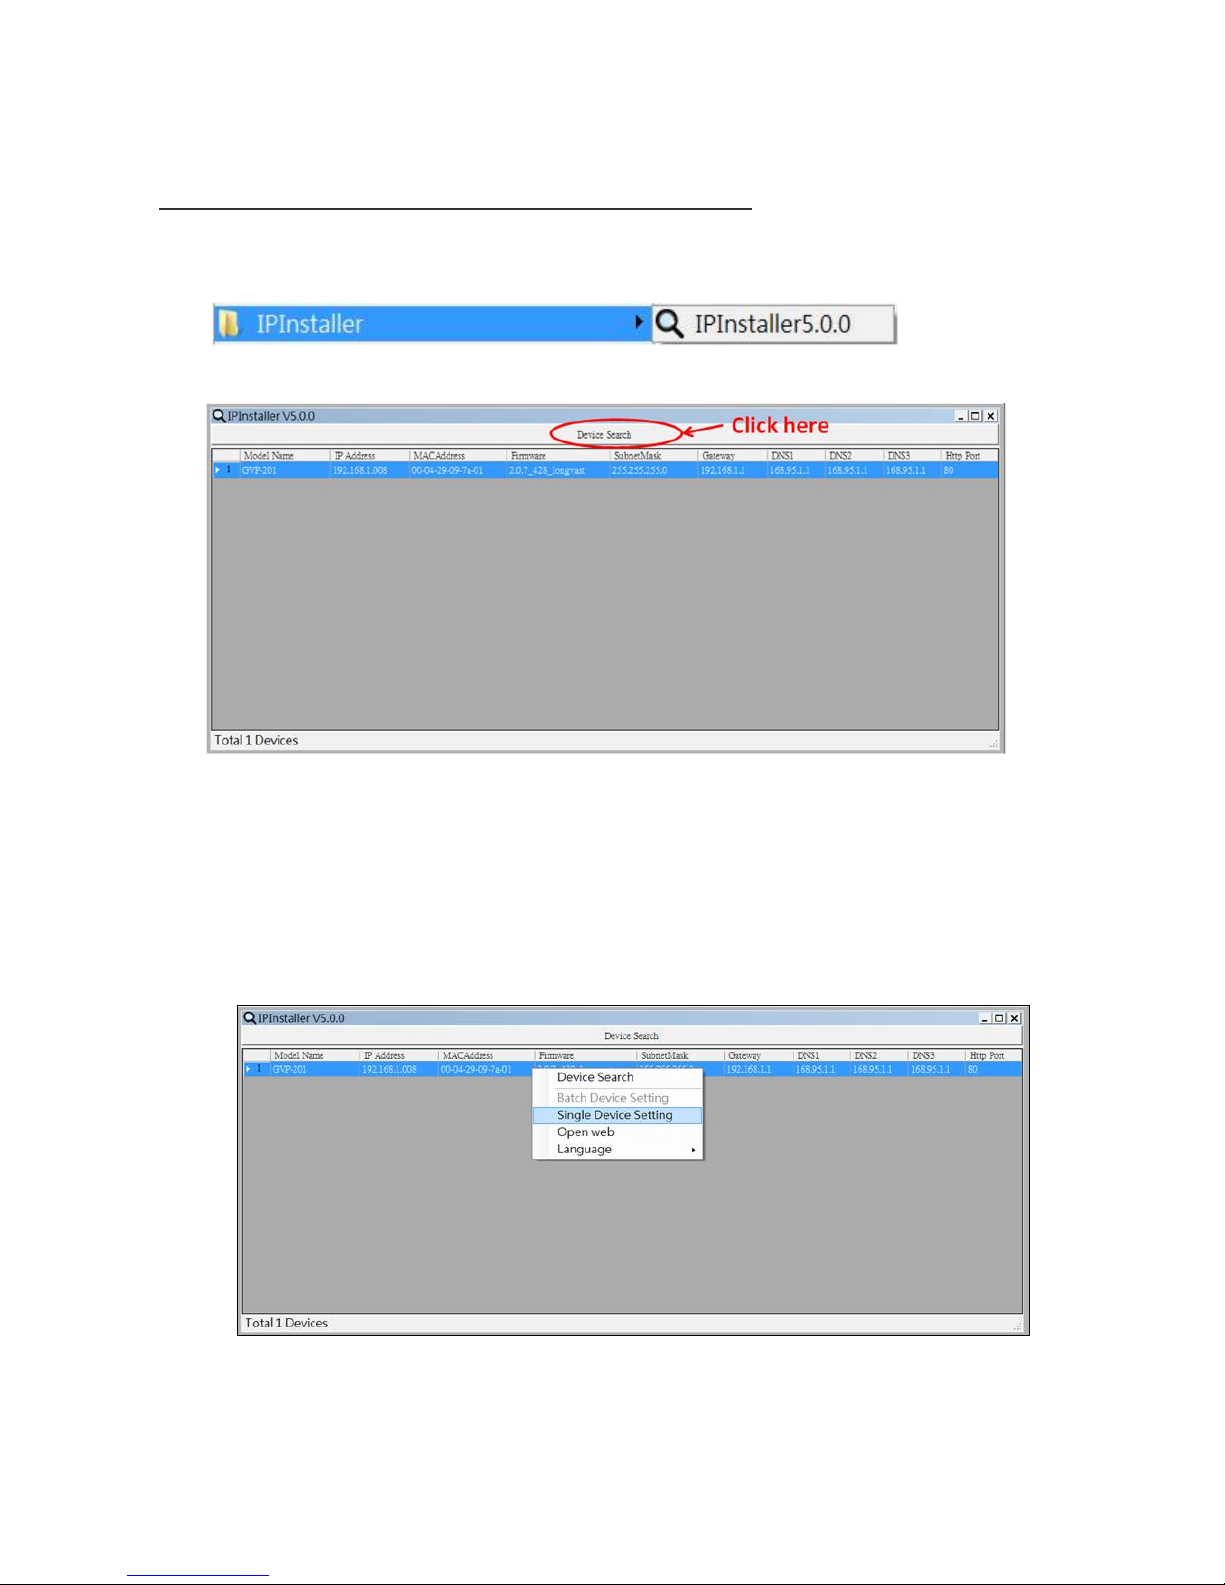
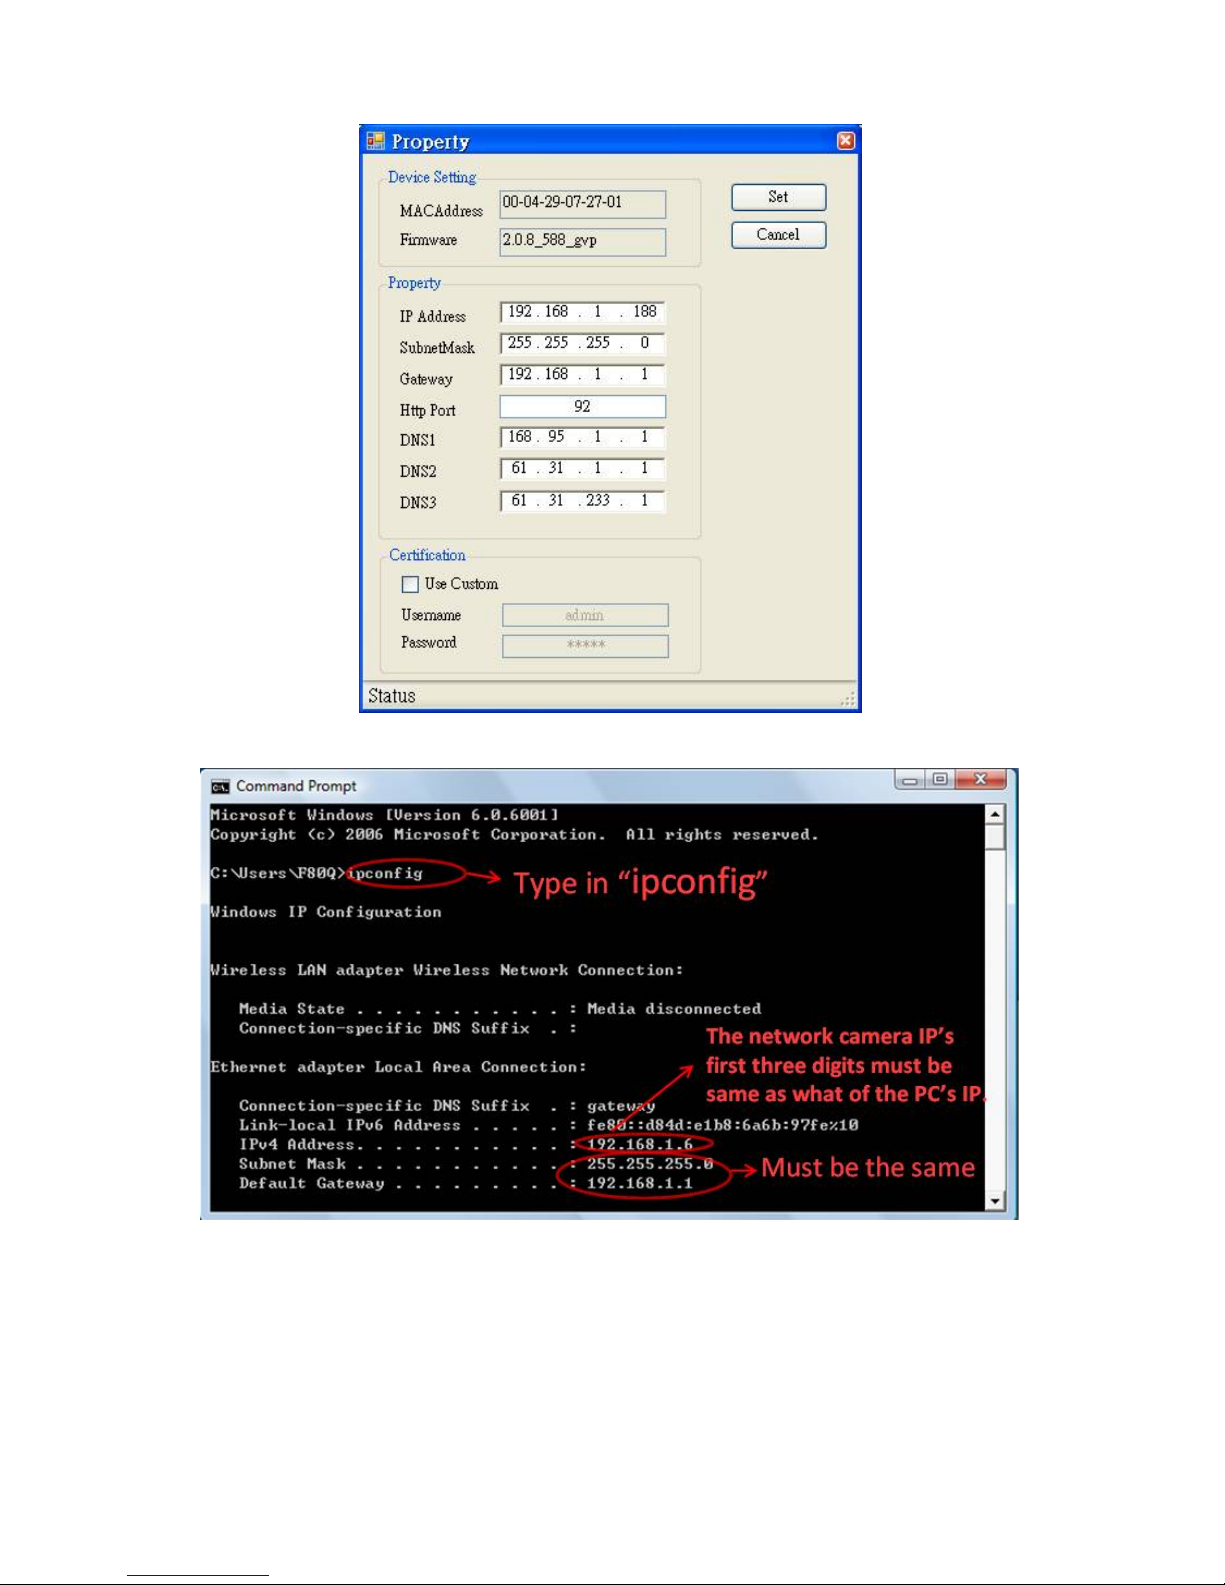
Installation............................................................................................................................................4
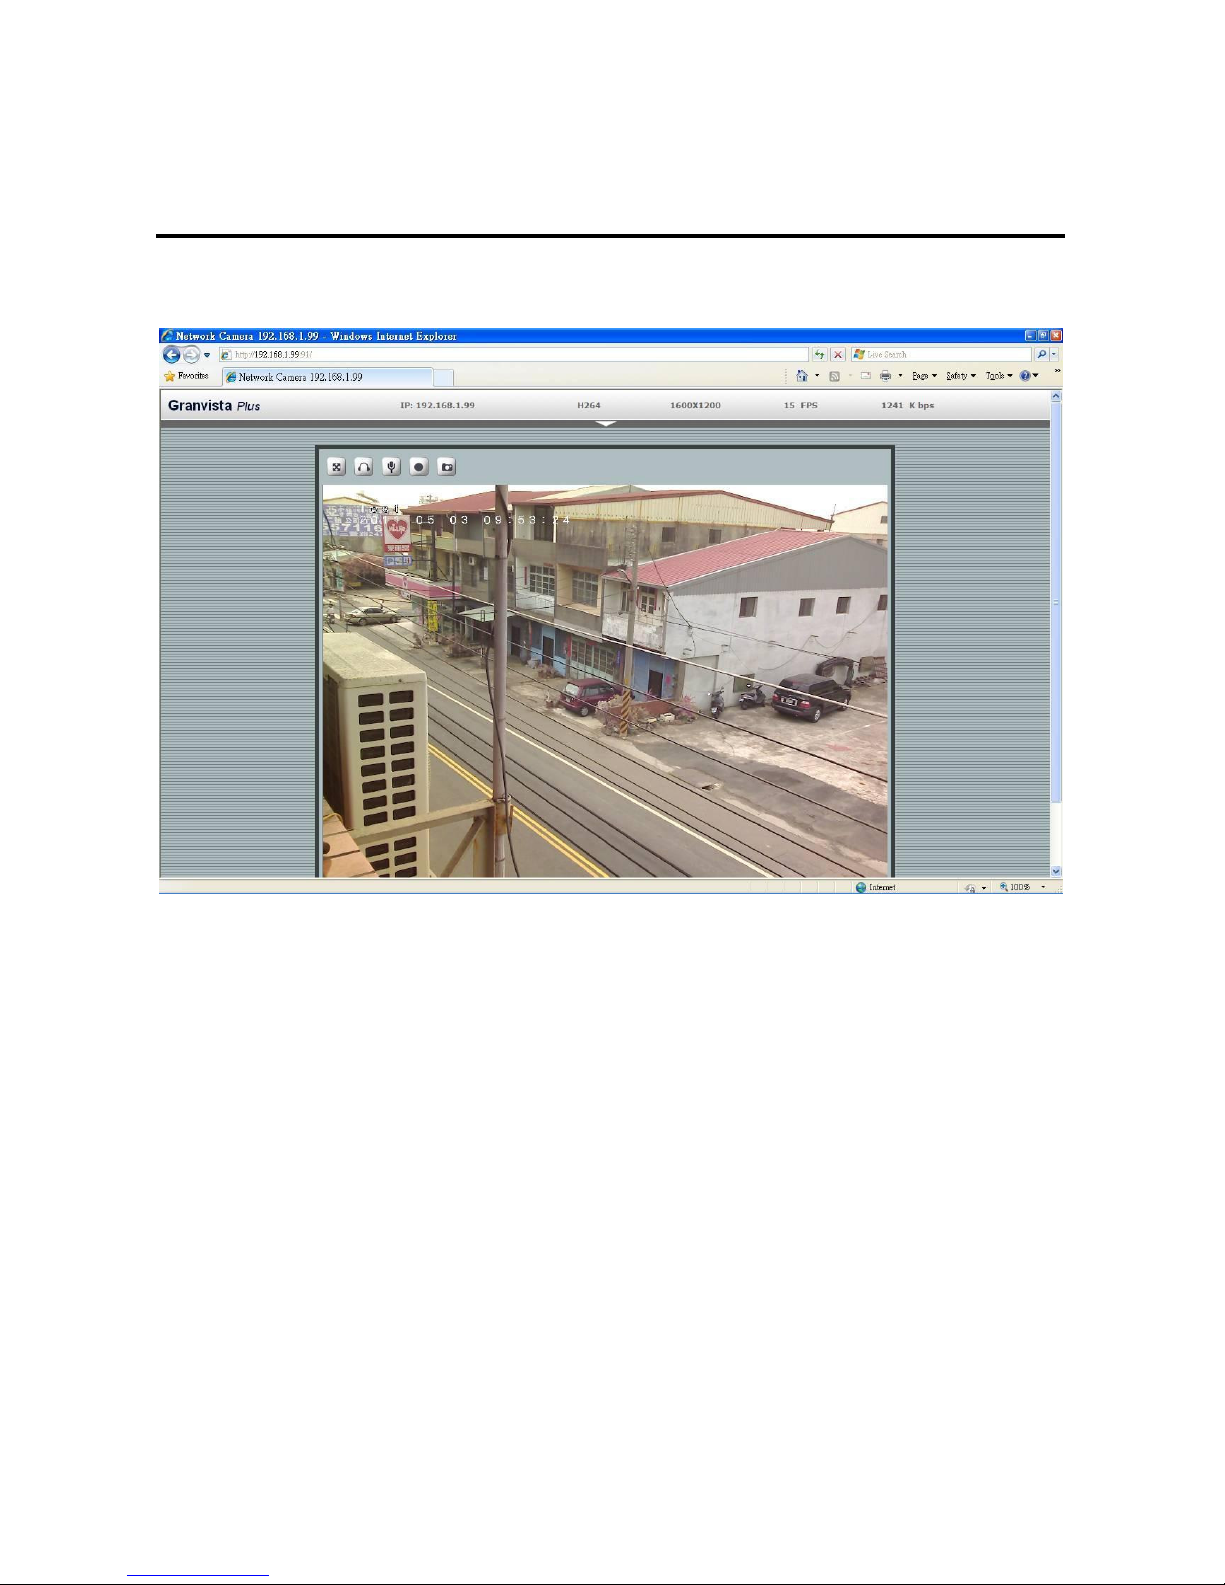
Using the Web UI.................................................................................................................................9
1. Live View............................................................................................................................... 11
2. Video ......................................................................................................................................13
General...............................................................................................................................13
Advanced ...........................................................................................................................14
3. Camera ...................................................................................................................................18
General...............................................................................................................................18
Advanced ...........................................................................................................................20
4. Event ......................................................................................................................................21
Event Server.......................................................................................................................22
Motion Detection ...............................................................................................................24
Event Configuration...........................................................................................................25
5. Schedule.................................................................................................................................29
General...............................................................................................................................29
Storage ...............................................................................................................................29
6. Network..................................................................................................................................34
General...............................................................................................................................34
Advanced ...........................................................................................................................35
SMTP (E-Mail) ..................................................................................................................37
DDNS.................................................................................................................................38
Wireless (GVP-201W) .......................................................................................................43
7. System....................................................................................................................................45
Information.........................................................................................................................45
User ....................................................................................................................................46
Date & Time.......................................................................................................................47
Server Maintenance............................................................................................................47
Log Service ........................................................................................................................49
8. Customize ..............................................................................................................................49
9. FAQ........................................................................................................................................51
Appendix I: An example of how to set up users’ own FTP servers ...........................................56
Appendix II: How to install the VLC program..........................................................................65
Appendix III: How to replay the recorded video clips with VLC program...............................67

2
Notices
This user manual is intended for administrators and users of the GVP-201/GVP-201W Network Camera,
including instructions for using and managing the camera on your network. The use of surveillance devices
may be prohibited by law in your country. It is the user’s responsibility to ensure that the operation of such
devices is legal before installing this unit for its intended use.
Before the Network Camera is installed, all the safety and operating instructions should be carefully read and
followed to avoid damage due to faulty assembly and installation. This also ensures the product is used
properly as intended.
Heed all warnings
¾Do not drop or strike this equipment
Sensitive electronics inside the camera are vulnerable to excessive strike.
¾Do not install the equipment near any flames or heat sources
Excessive heat could damage this equipment.
¾Do not cover cloth or to install this equipment in poorly ventilated places.
Overheating could damage this equipment.
¾Do not expose this equipment to rain or moisture. Do not touch the power connection with
wet hands
Risk of short circuit, electric shock or fire
¾Do not damage the power cord or leave it under pressure
Risk of fire or shock circuit
¾To reduce the risk of electric shock, do not remove the Cover (or Back).
No user-serviceable parts inside. Misusage, improper, and negligence could damage this
equipment. Need to refer servicing to qualified
service personnel.
¾Do not continue to operate if it appears to be
faulted.
If the unit ceases functioning, contact qualified
service personnel for help.
¾Any works related to detailed service or repair of
this product should be made by qualified
personnel only.
¾We strongly recommend to use the metal
mounting stand, and to screw the
bracket/spacer tight for optimal heat
dissipation.

3
Introduction
Both GVP-201 and GVP-201W are of compact and high resolution (1600x1200) Network Cameras
featured with superior H.264-AVC performance and multiple functions. They are perfect for indoor
applications such as factories, retailer stores, residence, restaurants, hotels, schools and pre-schools,
caring centers, etc.
GVP-201’s H.264-AVC video compression has significantly lowered down the requirements for bandwidth
and storage size without compromising image quality. Motion JPEG and multiple independent video
streaming are also supported for even better flexibility.
The camera offers wired Ethernet connection to the network and optional wireless connectivity
(IEEE802.11b/g) for flexible installations. It includes 7 IR LEDs for illuminating the scene automatically or
when requested by the user. Further functions include two-way audio with integrated high-sensitivity
microphone and audio output, Micro SD card support and digital PTZ (4X) to focus any location you would
like to highlight in the image.

4
Installation
1. Hardware Connection

5
2. Software Installation
The following software is necessary for the proper display and use of the camera from the Web site. The
software will be taken from the Software Package CD.
IP Installer
The IP Installer is used to locate and configure Network Cameras and video servers on the LAN. This
utility is useful for conveniently configuring the network settings of the device, or for finding a device
once the network settings have been modified.
To install the IP Installer, from the Software Package CD UI, select IPInstaller, and then follow the on
screen instructions.
VLC
Though not necessary, this can be used for viewing the streaming without a Web browser. Besides, the
VLC may be helpful in reviewing the recorded video files in the Micro SD card. Please refer to the
appendix II & III for more details on how to install and use the VLC program.
Network Configuration
IPInstaller is a utility that provides an easier, more efficient way to configure the IP address and network
settings of the devices. It even provides a convenient way to set the network settings for multiple
devices simultaneously using the batch setting function. Moreover, IP Installer can save the network
settings for all devices as a backup and restore them when necessary. IPInstaller is able to help
non-professional users to quickly setup their network cameras to work in a professional manner.
Preparation before IP Assignment
1. Always consult your network administrator before assigning an IP address to your server in order to
avoid using a previously assigned IP address.
2. Ensure the device is powered on and correctly connected to the network. This network can be simply a
hub, PC and the network camera; and the network camera may directly connect to the PC too.
3. MAC Address: Each device has a unique Ethernet address (MAC address) shown on the label of the
device as the serial number (S/N) with 12 digits (e.g. 000429-XXXXXX).
4. Although the IPInstaller is able to find and configure any Network Cameras in the LAN except those that
are behind a router, it is a good idea to set the host PC to the same subnet. In order to connect to the
Web-based user interface of the camera, the host PC must be in the same subnet. For more information
*0004290000
B
1

6
about subnets, please consult your network administrator.
Using IPInstaller to Assign an IP Address to GVP-201 / GVP-201W
1. Once IP Installer has been successfully installed on the PC, double click the IPInstaller icon on the
desktop, or select it from Start > Programs > IP Installer > Launch IP Installer.
2. Click the “Device Search” tool bar and search the device in the LAN.
Please note that he firewalls of your Windows or Anti-virus software might block IPInstaller from
searching the cameras. In this case you would need to unblock IPInstaller software from the firewalls, or
to manually make this IPInstaller software an exception to the firewalls.
3. From the list, select the device with the MAC Address that corresponds to the device which is to be
configured. The MAC Address is identical to the unit’s S/N (Serial Number).
4. Select the “Single Device Setting” item to open the Property Page for the selected device.
5. After filling in the properties, click [Set] button to complete the configuration settings in the remote
device.

7
Example about how to know the user’s PC and network information from command prompt. Simply type in
“ipconfig” in the Command Prompt screen, press Enter, and you will see the related information which
shows you the PC’s IP, Subnet Mask, Default Gateway, etc.
The first three digits of the network camera’s IP must be same as the first three digits of the PC’s IP
address. In the above example the PC’s IP address is 192.168.1.6., and we have set the camera’s IP to be
192.168.1.188..

8
Open the Web-based UI of the Selected camera
1. To access the Web-based user interface of the selected unit by selecting “Open web” from the slide-bar.
2. If the device has been configured correctly, the default Web browser, the Internet Explorer, will open to
the home page of the selected device.
3. If you find your browser is opened and automatically connected to the camera Home Page, it means
you’ve assigned an IP Address to the unit successfully. Now you can close the IP Installer and start to
use your camera.
4. Usually the users no longer need to run the IPInstaller software again after configuring the cameras
correctly.
Verify and Complete the Installation from Your Browser
If not able to get the ActiveX downloaded properly, user must temporarily lower the security settings to
perform a one-time-only installation of the ActiveX component onto the workstation, as described below:
- From the Tools menu, select [Internet Options] -> [Security] -> [Custom Level]
- Set the security level to Low and click [OK].
- Depends on different versions of browser software used, the users may have to set the individual ActiveX
settings from “Disable” to “Prompt” or “Enable” if necessary for completing the ActiveX program
downloads.
- Restore the security level after the ActiveX installation.

9
Using the Web UI
Start your Web browser and enter the URL or IP address in the Address field. The Home page of the
camera is now displayed.

10
How to make the Mozilla Firefox properly work with the cameras?
Please note that in addition to Microsoft Internet Explorer, Mozilla Firefox browser is also compatible for
viewing the screens from Granvista Plus network cameras.
Similar to Internet Explorer which needs to download the needed ActiveX programs, the Firefox browser will
guide the users to download and install the VLC program for the needed plug-in the first time when it
connects to the network cameras, so that it can work properly.
In the process of installing the VLC program, please be sure to check the “Mozilla plugin” option, so that
Firefox may work properly with the network cameras.
The VLC program is a very handy shareware that the users will find it helpful when they want to replay the
“.mp4” video clips recorded by the cameras. Actually the users may use its streaming function for viewing the
camera’s rea-ltime screen directly too. Please refer to the “Video/Advanced” introduction for more details.

11
1. Live View
Button Description
Click for more general/advanced camera settings
Select languages among English, traditional Chinese and simplified
Chinese
Check actual size to view the actual size (resolution) of the image
Image Setting: To adjust the brightness, hue and saturation
Choose among the 3 streams for viewing. Due to bandwidth
constraints the users may want to choose its 2nd or 3rd video
streams which are 640x480 and 320x240 respectively. The 2nd
stream supports digital PTZ function which users should find it
helpful.

12
Button Description
Full screen
Listen the audio input from site
Talk function. An external speaker need to connect to its audio jack for audio
output
Record instant live video
Snapshot the image
Further configurations and options; a prominent button in between is used to expand the further operations.
Click on the indicated prominent, and more operational options shows up.

13
2. Video
General
Video General Setting: Check each box to enable needed streams (max 3) for live viewing
Note: Digital PTZ is only available with stream 2. Please select the required video streams only, so that the
system can be running at best performance.
OSD Setting: Enable OSD (Over-Screen-Display) to display camera name or date/time on the image, the
camera name must be a continual string, for instance “LivingRoom”. This OSD setting may be set from the
NVR too if any Granvista Plus series NVR has linked to this network camera.

14
Advanced

15
RTSP Path -
The RTSP(Real Time Streaming Protocol)Path is the stream ID used for RTSP client’s streaming connection,
such as VLC player. The default values are v00, v01 and v02 for the three streams respectively. The string
can be any combination of number or capital/small letters. It can not be empty however.
Following is a setting example of RTSP steaming by using VLC program. (The users may access this setup
screen from VLC program’s Media/Streaming…/Network).
Note: the “port number” of 556 in the example is its RSTP port number which the user has defined for this
camera (default value is 554). This port number must be routed in the network router properly if the user
likes to receive the video streaming from the web. In other words, if the user likes to use the external web
address of rtsp://219.86.240.234:556/v00 in stead of the LAN address of rtsp://192.168.1.99:556/v00.
The above is a setup screen example of an Internet broadband router. In this example the port 90 is for
WWW, and the port 556 is for RTSP. These two port numbers must be same as what configured in the
camera’s Network/Advanced settings.

16
Note: the users may right-click and choose VLC program’s “Full Screen” mode too.
Resolution -
The resolution here describes an image size counted by width and height, e.g. 640x480, referring to pixel
resolution. The 1st stream can be set from more options of resolution; 1600x1200 (2 megapixels),
1280x720(HD), 800x600(SVGA), 640x480(VGA), 320x240(QVGA). While Stream2 has the options of VGA
and QVGA, stream3 is in a fixed resolution, the QVGA. The users need to decide which resolution and frame
rate options to be selected according to the requirements and practical constraints from the bandwidth and
storage available.
Video Mode -
This option allows the selection of two bit-rate modes, the Constant Bit Rate (CBR) or Variable Bit Rate (VBR).
CBR refers to the setting of a fixed Target Bit Rate (configuration in the range of 64Kbps to 6Mbps) that
would apply in the case of limited bandwidth or/and storage requirement. While CBR concerns a fixed data
rate transmitting, the video quality setting is of high priority for VBR mode selected. VBR therefore is
configured with the Quality Level (Standard, Good, Best). In general, CBR predicts the provided condition; if
image activity requires higher bit rates than configured, the frame rate and quality would be affected as not
likely to increase bandwidth (bit rate). In spite of the required recording storage estimation, VBR is by way of
compensation that adjustable bit rate fits the actual image activity.
Image Format -
H.264 and MJPEG are available for image format selection. The term, “image format”, is referring to
compression / encoding technique. The selection of image format decides the performance of bandwidth and

17
storage requirement. In the request of same video quality, H.264 contributes to less bandwidth and storage
requirement, which is much more efficient than MJPEG. Therefore it is usually a better selection to select
H.264 format if there is no particular reason for MJPEG.
GOP -
In MPEG4/H.264 video coding, GOP (group of pictures) describes how the different types of frames are
arranged. The frame types implemented here are I-frame (full image information) and P-frame
(motion-compensated difference information). This setting configures the GOP length which is the number of
frames before next I-frame appears. Having more I-frames usually increases the stream size, and therefore
more bandwidth and storage are required.
Frame Rates -
The Frame Rates defines the number of frames that will be displayed per second. The frame rate setting can
affect the target bit rate (bandwidth requirement) and storage requirement.
Note:
While multiple streaming is possible, each stream has its limitation and dependency to other stream. See
“Video Stream Specification”.

18
3. Camera
General

19
Camera General Setting:
Brightness: the luminance of image view
Hue: refer to pure a pure color, or described by its name, such as red, green or blue.
Saturation: intensity of a specific color
The 3 correlates are referring image appearance in terms of color/vision. These are adjustable from this
page.
Rotation 180 degree: rotate the image, so it looks up-side down. This can be applied when camera unit must
be mounted up-side down.
Image Mirror Horizontal: to select for horizontally flipped image if necessary.
Audio Setting:
Enable this option, so the video stream will be transferring together with the audio data. There are two types
of formats of AAC and G711. AAC takes less bandwidth, while its quality is fairly good already, but the users
may still want to choose G711 if they want even better audio quality, and if there is no bandwidth and storage
size concern.
AAC format must be selected if the users want audio to be recorded together with the video in Schedule or
snapped web recording.
In case there is a Granvista Plus series NVR (network video recorder) available in the network for recording,
the NVR will set G711 as its audio default.
Web Record/Snapshot Setting:
Web Record / Snapshot: define the locations where snapshot images and video clips will be stored. The file
name is referring to the prefix of the file name of each snapshot image or video clip generated. These two
settings’ are saved in the Web Browser such as Internet Explorer, thus the settings will be reset if you reset
the Web Browser software. Users may find it an easy cure to set it up in Windows’s Safe Mode when they
encounter problem with Vista platform which is stricter and more complicated in security settings than other
platforms.
As to the “Web Recording Setting”, if you have chosen D:\TEMP as the path and “video” as the file name
prefix then the generated files will be saved into the D:\TEMP directory, and their file names will be in the
format of “video” plus time tags, such as “video_20110102_121313_770”. The “Web Snapshot Image Setting”
is configured in the same way.
Default:
Set [camera general setting] and [audio setting] back to default
Note: As mentioned above, this Default command will not change the configuration of [Web Record Setting]
and [web Snapshot Image Setting]
Save:
Save the changes which have been made
This manual suits for next models
1
Table of contents
Other Longvast Security Camera manuals