Lorentz pump PS600 BADU Top12 Instruction manual

page 1 | v100630BERNT LORENTZ GmbH & Co. KG | Kroegerskoppel 7, 24558 Henstedt-Ulzburg, Germany, Tel. +49 (0) 4193 7548 - 0, Fax - 29, www.lorentz.de
Errors excepted and possible alterations without prior notice.
Sun. Water. Life.
WARNING
disregard might lead to injury or damage the
installation
CAUTION
recommended to avoid disfunction or
premature ageing of the pump etc.
PS600 BADU Top12
Solar Water Pump Systems
Manual for Installation, Operation, Maintenance
Thank you for purchasing a LORENTZ PUMP.
Before you begin Check the model numbers of all the
components of your system, and verify that they are the
items that you ordered. Also check against the PUMP speci-
fications and performance charts (end of this manual) to be
sure the system is appropriate for your application.
Please fill in the SYSTEM REPORT This will be essen-
tial information if any problems occur.
Read the manuals of pump end, charger (optionally) and
other components used in your system
1 Installation
1.1 Pump Controller PS600
Controlling and monitoring of the motor
Integrated MPP-Tracking
LVD protection (low voltage disconnect) for 48V bat-
teries
Check and display the operating states
Two control inputs for float- or pressure switches, re-
mote control, etc.
92% max. efficiency (motor + controller)
Adjustable maximum RPM setting
1.2 Technical Data
PV max. open circuit (Voc).. .. .. .. .. 150VDC
4– 6 pc of 12VDC nominal solar panels
Input voltage battery. .. .. .. .. .. .. 48VDC
Input current / Power, max... .. .. .. .unlimited
controller regulates max. power
Battery low voltage disconnect.. .. .. .. 44VDC
Restart voltage.. .. .. .. .. .. .. .. 52 V DC
Output.. .. .. .. .. 13– 45VEC PWM 3-phase
Type of enclosure.. .. .. .. .. .. .. ..IP54
Ambient temperature. .. .. .. .–20 °C to +50 °C
Weight.. .. .. .. .. .. .. .. .. .. 4.8kg
Dimensions.. .. .. .. .. ..425 × 175× 150 mm
1.3 Mechanical Installation
Position If it is outdoors, mount the controller in a verti-
cal position to assure that rain will not enter the box.
Battery system Place the controller near the batteries
but safely isolated from the battery terminals and from cor-
rosive gases. (Batteries must be in a cool location for best
longevity and enclosed for cleanliness and safety.) Con-
nect the battery directly with the + and – Terminal of the
controller. Do not use the load terminals of the charge con-
troller as they maybe not strong enough to allow the start
current to flow. The PS600 Controller has a low voltage
function to protect the batteries from deep discharge. The
charger ( additional) is only needed for charging the bat-
teries.
1.4 Controller Input Wiring
WARNING TEST THE VOLTAGE before
connecting power to the controller.
Voltage (open circuit) must not exceed
150V for PS600 Controller. (Even in
cloudy weather, the open circuit voltage will be
near maximumW.)
WARNING Do not apply a direct
connection or an amp meter between +
and – when the controller is connected.
A short circuit here will cause a strong
discharge.
WARNING SOLAR-DIRECT systems only
— Do not connect any electrical load to
the solar array if it is not part of the
LORENTZ Pump system. Connection of a
battery charger, active solar tracker controller,
electric fence charger, or other load simultaneously
with LORENTZ PS systems may “confuse” the
controller and prevent proper operation.

page 2 | v100630BERNT LORENTZ GmbH & Co. KG | Kroegerskoppel 7, 24558 Henstedt-Ulzburg, Germany, Tel. +49 (0) 4193 7548 - 0, Fax - 29, www.lorentz.de
Errors excepted and possible alterations without prior notice.
Sun. Water. Life.
Terminals inside the PS controller
”Max. RPM setting” is at right. To reduce RPM
turn counter-clockwise
1.5 Electrical Installation – Terminals
Power IN For PV-direct systems, a two-pole disconnect
switch may be installed between the solar array and the
controller. Switch it off to prevent shock and arc burn haz-
ard during installation and maintenance, or if the system
will be shut down for the season. For Battery systems: Con-
nect the controller directly to the plus and minus termi-
nals of the Battery. Do not connect to the load terminals of
the charger as they may be not strong enough to provide
the starting current. A 20 Amp slow blow fuse must be in-
stalled between. The controller and the battery.
Ground Connect the ground wire to the ground connec-
tion in the controller. Grounding helps to prevent shock
hazard if there is a fault in the motor.
L1 – L2 – L3 ECDRIVE® requires four-conductor (four-
wire) cable between the controller and the motor. The
three wires L1, L2 and L3 carry power. The fourth wire car-
ries ground. To reverse direction of rotation reverse any
two wires.
No. 1 and 2 In order to protect the pump from being
damaged by dry running connect one well probe cable to
each terminal. If dry run protection is not needed, short cut
these two terminals.
No. 3, 4 and 5 Connect any kind of external switch (NO
or NC type) for remote control of the controller. In case no
switch is used the terminals No. 4 and 5 have to be con-
nected with a short cable (factory setting). In case a NO-
switch is used (connected to the terminals No. 3 and 4) the
short cable (connecting the terminals No. 4 and 5) must re-
main installed.
No. 6 and 7 Connect these two terminals to switch the
controller to battery mode. The motor will be switched OFF
by the controller if the input voltage is below 44V DC in or-
der to protect the battery. If the battery voltage increases
to 52 V the motor will be switched ON automatically. 1.6
1.6 Battery-Based Systems
PS600 pump systems can be operated from bat-
teries.
Short circuit protection Install a fuse or circuit breaker
near the power source. For either 48V , use a 20 amp cir-
cuit breaker or a time-delay (slow blow) fuse. The purpose
of this protection is for safety in case of a wiring fault, and
to provide a means of disconnect when installing or main-
taining the system. PS600 controllers have electronic over-
current protection against motor overload.
Low-voltage disconnect function Lead-acid batteries
can be permanently damaged by over-discharge when the
voltage falls below a critical point. To prevent this, the PS
battery-system controller will turn off at low voltage, and
turn back on only after the battery has recovered signifi-
cantly. The set points are:
48V SYSTEM: OFF at 44VDC ON at 52V DC
A controller in disconnect mode can be reset manually by
turning off/on, but it will quickly disconnect again if the
battery is not gaining a substantial recharge.
1.7 Wire Sizing
Wire Sizing for the DC circuit Wire must be sized for
no more than 5% voltage drop at 20 amps (starting).
Refer to a wire sizing chart for 48V DC, or follow these ex-
amples:
Solar Direct Systems
AWG #10 wire to maximum distance of 30 ft
Metric: 4mm2to max. 20 m
Battery Systems
AWG #10 wire to maximum distance of 30 ft
Metric: 4mm2to max. 15 m
GREATER LENGTHS For each increase by 50%, use next
larger wire size

page 3 | v100630BERNT LORENTZ GmbH & Co. KG | Kroegerskoppel 7, 24558 Henstedt-Ulzburg, Germany, Tel. +49 (0) 4193 7548 - 0, Fax - 29, www.lorentz.de
Errors excepted and possible alterations without prior notice.
Sun. Water. Life.
2 Operating the Pump
This explains the function of the switch and the indicator
lights on the pump controller.
SWITCH: POWER ON/OFF
When switched off/on during operation, it resets all sys-
tem logic.
INDICATOR LIGHTS
SYSTEM (green)
The controller is switched on and the power source is
present. In low-power conditions, the light may show even
if there is not enough power to run the pump.
PUMP ON (green)
Motor is turning. Sequence of flashing indicates pump
speed. See below sequence
PUMP OVERLOAD (green changes to red)
SOURCE LOW (red)
The water source dropped below the level of the low-water
probe. After the water level recovers, the pump will restart,
but this light will slowly flash until the sun goes down,
power is interrupted, or the POWER switch is reset. This in-
dicates that the water source ran low at least once since
the previous off/on cycle.
TANK FULL (red)
Pump is turned off by action of the remote float switch (or
pressure switch or manual switch, whichever is wired to the
“remote float switch” terminals.
BATTERY LOW (tank light flashes)
Battery systems only – battery voltage fell to 44V, and
has not yet recovered to 48V.
RPM indication Pump speed can be read off by the
flashing sequence of the Pump ON LED.
Indication RPM
LED ON > 900
one flash > 1,200
two flashes > 1,600
three flashes > 2,000
four flashes > 2,400
five flashes > 2,800
Starting the pump Be sure there is not a closed valve or
other obstruction in the water line.
Fill the pump with clean water until the water level reach-
es the inlet connection. Coat the O-Ring seal with Vase-
line, close the lid by hand and make sure that it is well in
the housing groove. Otherwise the pump will prime insuffi-
ciently or not at all.
NEVER LET THE PUMP RUN DRY, NOT
EVEN FOR THE PURPOSE OF CHECKING
THE DIRECTION OF ROTATION!
Switch on the array disconnect switch, and toggle the pow-
er switch on the controller. It is normal to leave the switch-
es on at all times, unless you desire to have the system off.
A solar-direct pump should start under the following con-
ditions
clear sunshine at an angle of about 20° or more1.
from the surface of the solar array
cloudy conditions, if the sunshine is bright enough to2.
cast some shadow
low-water probe submersed in the water source (or3.
bypassed in the controller) – Water-Low light OFF
full-tank float switch is not responding to a full tank4.
– Tank-Full light OFF
battery system only – voltage is higher than the low-5.
voltage disconnect point of 44V.
When sunshine is insufficient When sunshine on the
array is present, but too weak for the pump to run, it will
attempt to start about every 120 seconds. During each at-
tempt, you will see the PUMP ON light come on.
When pump runs slowly (PUMP ON) under weak sun con-
ditions the pump may spin without lifting water all the way
to the outlet. This is normal.
When pump stops from a sudden shadow on the
solar array If a shadow suddenly passes over the array,
like if you walk in front if it, the controller will lose track of
the input voltage. This does NOT indicate a problem. The
pump will attempt to restart after the normal delay.
Time delays
After pump stops due to insufficient sunshine – 1201.
seconds
After full-tank float switch resets – 2 to 3 seconds2.
After low-water probe regains contact with water3.
in the source – 20 minutes but the indicator light
will slowly falsh for the rest of the solar day, or until
power is disrupted or the controller is turned off/on.
Battery systems – after low voltage disconnect point4.
is reached, delay to stop pump – a few SECONDS.
After voltage recovers, delay to re-connect – a few
SECONDS
To force a quick start To test or observe the system,
you can bypass the normal time delays. Switch the POWER
switch off then on again. The pump should start immedi-
ately if sufficient power is present.

page 4 | v100630BERNT LORENTZ GmbH & Co. KG | Kroegerskoppel 7, 24558 Henstedt-Ulzburg, Germany, Tel. +49 (0) 4193 7548 - 0, Fax - 29, www.lorentz.de
Errors excepted and possible alterations without prior notice.
Sun. Water. Life.
3 Automatic Control For Full-Tank Shutoff
We recommend the use of a float switch or other means
to prevent overflow of your tank. This will stop the pump
when the tank is full, then reset when the level drops. This
conserves ground water, prevents overflow, and eliminates
unnecessary pump wear. PS controllers allow the use of
small signal cable to a remote float switch, even if the tank
is a long distance away.
Float switch requirements
A switch must be used, not wet electrodes.1.
The preferred system requires a float switch to MAKE2.
contact on rise to turn the pump OFF. This is called
“normally open” (N.O.). It may be commercially la-
beled as a “pump down” switch, but here it works in
reverse, to allow pumping up.
sealed
cable clamp
cable
weight
pump off
pump on
pumping
range
Wiring to the controller The controller offers two op-
tions for connection of a remote switch. These allow the
use of either a “normally open” (N.O.) or a “normally
closed” (N.C.) switch. “Normal” refers to the status of the
contacts when the switch is DOWN and calling for water.
Wiring a “normally closed/reverse action switch”
Connect the switch to termins 4 and 5. Closing (connect-
ing) the switch turns the pump ON
Wiring a “normally open switch” Connect the switch
to terminals 3 and 4 (NO and common) and connect termi-
nals 4 and 5 together, as illustrated.
Closing (connecting) the switch circuit turns the pump OFF
Float switch cable requirements
Two wires are needed.1.
Minimum wire size #18 AWG (1mm²). This is good2.
for a distance as far as 2000 feet (600 m).
The cable must be suitable for its environment.3.
If it must run a long distance, use twisted-pair shield-4.
ed cable to reduce the chance of damage from light-
ning-induced surge.
Grounding shielded float switch cable If you use
shielded cable, connect the shield to ground AT THE CON-
TROLLER ONLY. DO NOT ground the shield at the float
switch. This will reduce surges induced by nearby lightning.
4 Maintenance
Controller amd pump The controllers electronic has no
moving or wearing parts. It requires no maintenance. There
are rubber plugs to seal at the bottom, unused conduit
holes. Inspect them to insure that the controller is sealed
from moisture, insects, etc. Check that mounting and con-
duit hardware is tight.
Motor The motor requires no maintenance. It has no
brushes or other frequently wearing parts.
Pump end The pump mechanism (pump end) is lubricat-
ed only by water and requires no maintenance. It may wear
after some years, especially if there are abrasive solids in
the water. If sand accumulates in the storage tank or pipes
as a result of normal pumping, it is best to take period-
ic measurement of the pump’s performance. A worn pump
end can be replaced in the field.

page 5 | v100630BERNT LORENTZ GmbH & Co. KG | Kroegerskoppel 7, 24558 Henstedt-Ulzburg, Germany, Tel. +49 (0) 4193 7548 - 0, Fax - 29, www.lorentz.de
Errors excepted and possible alterations without prior notice.
Sun. Water. Life.
5 Trouble Shooting
Please read this section before calling for help.
If you call for help, please refer to the model and seri-
al numbers.
If The Pump Does Not Run
Most problems are caused by wrong connections (in a new
installation) or failed connections, especially where a wire
is not secure and falls out of a terminal. The System ON
light will indicate that system is switched on and connected
to the controller. It indicates that VOLTAGE is present but
(in a solar-direct system) there may not be sufficient pow-
er to start the pump. It should attempt to start at intervals
of 120 seconds.
Pump attempts to start every 120 seconds but
doesn’t run
The controller makes a slight noise as it tries to start the
pump. The pump will start to turn or just vibrate a little.
There may be insufficient power reaching the control-1.
ler. A solar-direct (non-battery) system should start if
there is enough sun to cast a slight shadow. A bat-
tery system should start if the supply voltage is great-
er than 44V.
If the pump was recently connected (or reconnected)2.
to the controller, it may be running in reverse direc-
tion due to wiring error.
If the motor shaft only vibrates and will not turn, it3.
may be getting power on only two of the three motor
wires. This will happen if there is a broken connec-
tion or if you accidentally exchanged one of the pow-
er wires with the ground wire.
The pump or pipe may be packed with mud, clay,4.
sand or debris.
PUMP OVERLOAD (PUMP ON light shows red in-
stead of green) The system has shut off due to an over-
load. This can happen if the motor or pump is blocked or
very difficult to turn and is drawing excessive current (hard
to turn). Overload detection requires at least 250 Watt out-
put of the solar array. This can be caused by a high con-
centration of solids in the pump.The controller will make
3 start attempts before shutting down the system. The
System ON LED will be OFF and the red OVERLOAD LED
ON. The system will not reset until the ON / OFF switch is
turned OFF and ON again.
Inspect the solar array
Is it facing the sun?1.
Is there a partial shadow on the array? If only 10%2.
of the array is shadowed, it can stop the pump!
Inspect all wires and connections
Look carefully for improper wiring (especially in a1.
new installation).
Make a visual inspection of the condition of the wires2.
and connections. Wires are often chewed by animals
if they are not enclosed in conduit (pipe).
Pull wires with your hands to check for failed con-3.
nections.
Inspect the controller
Remove the screws from the bottom plate of the1.
controller. Move the plate downward (or the control-
ler upward) to reveal the terminal block where the
wires connect.
First, check for a burnt smell. This will indicate a fail-2.
ure of the electronics. Look for burnt wires, bits of
black debris, and any other signs of lightning dam-
age.
Inspect the grounding wires and connections! Most3.
controller failures are caused by an induced surge
from nearby lightning where the system is NOT effec-
tively grounded. Ground connections must be proper-
ly made and free of corrosion.
Check the low-water probe system
If the controller indicates “SOURCE LOW” when the pump
is in the water, inspect the low-water probe system.The
probe is mounted on, or near the pump. If inspection is not
feasible, you can bypass the probe or test it electrically.
Check the full-tank float switch
If the controller indicates “TANK FULL” when the storage
tank is not full, inspect the float switch system. If your sys-
tem has a float switch, it will be mounted in the tank. If in-
spection is not feasible, you can bypass the switch or test
it electrically.
Force a quick start
If you restore a connection or bypass the probe or float
switch, there is no need to wait for the normal time delay.
Switch the on/off switch (or the power source) off then on
again. The pump should start immediately if sufficient pow-
er is present.
If the pump responds to the bypass tests above but not to
the float switch, the wires may be shorted (touching each
other) or open (broken), or the switch may be stuck with
debris, or out of its correct position.
Is the solar array receiving shadow-free light? (It only1.
takes a small shadow to stop it.) Is it oriented prop-
erly toward the south, and tilted at the proper angle?
Be sure you have the right pump for the total lift that2.
is required.
Be sure all wire and pipe runs are sized adequate-3.
ly for the distance. Refer to wire sizing in the pump
sizing table.
Inspect and test the solar array circuit and the con-4.
troller output, as above. Write down your measure-
ments.
There may be a leak in the pipe from the pump.5.
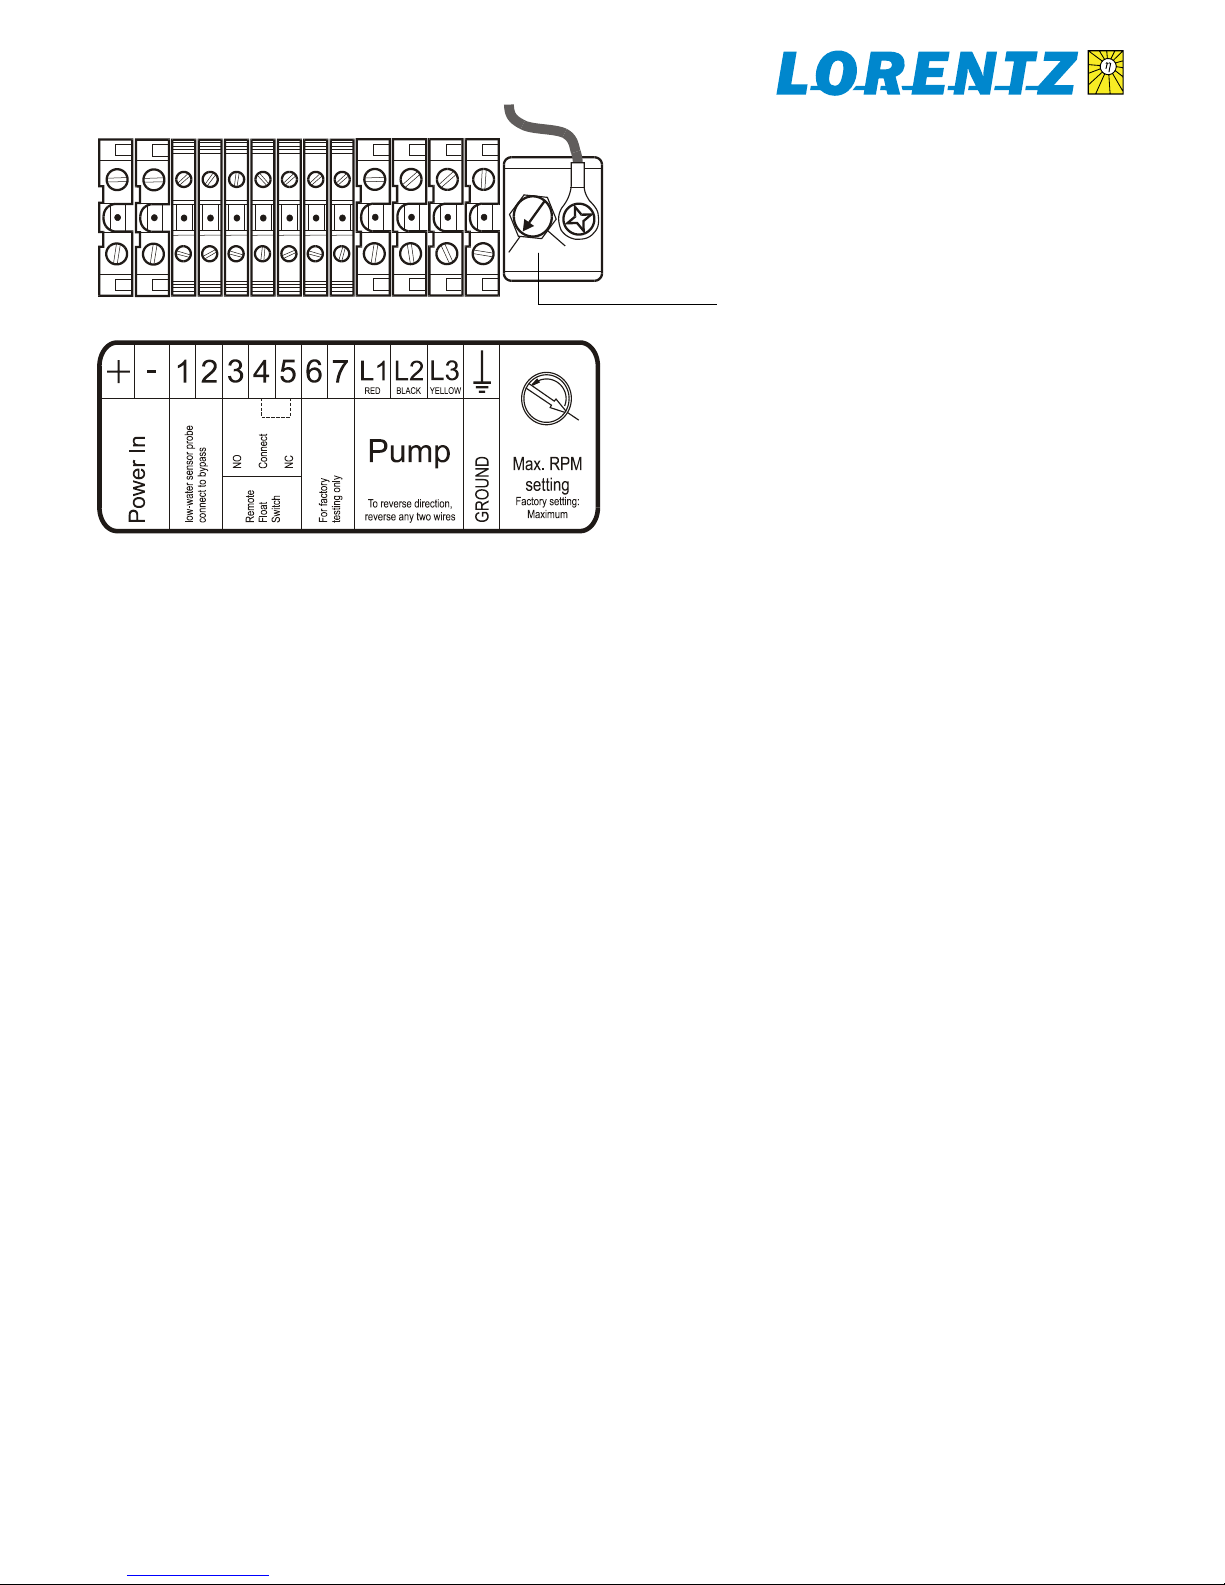
There is a “max. RPM” adjustment in the control-6.
ler. It may have been set to reduce the flow as low
as 30%.

page 6 | v100630BERNT LORENTZ GmbH & Co. KG | Kroegerskoppel 7, 24558 Henstedt-Ulzburg, Germany, Tel. +49 (0) 4193 7548 - 0, Fax - 29, www.lorentz.de
Errors excepted and possible alterations without prior notice.
Sun. Water. Life.
This is an example, using 4 ×12V-nominal PV modules. Your system may vary in the number, voltage, and configuration of PV mod-
ules. If the diagram for YOUR system is not attached here, ask your pump supplier. The system here below is typical for a PS600
system (4 to 6 modules in series).
6 System Wiring Diagram for Solar-direct (non-battery) Systems
PV Modules
Before connecting the array to the controller
measure the open-circuit voltage. It must be
within a range of 75–135V DC
To any ground
terminal at con-
troller
Earth
Ground
Pump Motor
Low Water Probe
Float Switch (optional)
Float Switch Kit makes contact on rise to stop pump.
Connect termins 3 (NO) and 4 (COM) and connect terminals 4
and 5 with jumper wire. If you are not using a float switch, in-
stall a jumper wire between terminals 4 and 5
Low Water Probe
If you are not using the low-water probe, install a jumper wire
between terminals 1 and 2

page 7 | v100630BERNT LORENTZ GmbH & Co. KG | Kroegerskoppel 7, 24558 Henstedt-Ulzburg, Germany, Tel. +49 (0) 4193 7548 - 0, Fax - 29, www.lorentz.de
Errors excepted and possible alterations without prior notice.
Sun. Water. Life.
Installation date
Installer
(full contact details)
Well depth m | ft
Pump depth m | ft
Additional vertical lift (to tank) m | ft
Static water level m | ft
Drawdown level m | ft
Drop pipe (vertical from the pump)
Size mm2| in
Type
Length m | ft
Additional pipe (to tank)
Size mm2| in
Type
Length m | ft
Pump cable
Wire size mm2| AWG
Length (Controller to pump) m | ft
Max. RPM control
Factory setting is max. yes no
If this setting was reduced,
enter setting here:
Date of purchase
Dealer
(full contact details)
System voltage V
Battery system yes no
Quantity of PV modules
PV module brand
Module model #
Controller model PS600
Controller serial #
Pump end model #
Pump end serial #
Motor model #
Motor serial #
System Report
System and Components Installation
Table of contents
Popular Water Pump manuals by other brands

Grundfos
Grundfos CR Installation and operating instructions

Espa
Espa PISCIS Series instruction manual

Goulds Pumps
Goulds Pumps IC i-FRAME on, and Maintenance Manual

Hayward
Hayward MaxFlo VS 2300 Series owner's manual

Flowserve
Flowserve PVML 25.04.04 User instructions

vacuubrand
vacuubrand ME 4R Instructions for use

EINHELL
EINHELL GE-DW 1155 N-A Original operating instructions

MAC TOOLS
MAC TOOLS BK229 Operating instructions & parts manual

STA-RITE
STA-RITE 10DOM05221 owner's manual

Sotera
Sotera SP100-10 Series Installation and operation manual

Pentair
Pentair IntelliFlo VF Installation and user guide

Pentair Pool Products
Pentair Pool Products IntelliFlo Pump Demo Kiosk Operation and Set Up Instructions