Loupedeck LOUPEDECK CT User manual

USER GUIDE FOR
LOUPEDECK CT &
ADOBE LIGHTROOM
CLASSIC V.3.2

TABLE OF
CONTENTS
INTRODUCTION TO LOUPEDECK CT DEVICE 3
Robust design 3
Internal Storage 3
Bluetooth 3
Detachable USB cable 3
Loupedeck CT Console 3
General Elements 4
ROUND & SQUARE BUTTONS 5
SETTING UP LOUPEDECK CT 10
Overview of the Loupedeck Setup Software 10
Settings 15
Guide 15
USER ACTIONS 16
USER ADJUSTMENTS 19
CUSTOM PROFILES 22
USING LOUPEDECK CT 25
Home View and Home Button 25
Round and Square Buttons 26
Keyboard Modifiers mode 26
Number Pad mode 27
Popular actions 27
Function (Fn) Buttons 28
Wheel Screen Lock 28
Dials 29
Touch Screen and Touch Buttons 29
Wheel 30
TASKBAR OPTIONS 32
UPDATING LOUPEDECK 33
QUESTIONS & ANSWERS 33
Copyright (c) 2017 Loupedeck Ltd. All rights reserved. 2

INTRODUCTION TO LOUPEDECK
CT DEVICE
Loupedeck CT is a versatile console designed to support your creative processes. It has an internal storage,
Bluetooth connection (available in later software update), two touchscreens that handles up to 12 press
functions (for an infinite number of pages), 7 rotary controllers (out of which 6 also have press functionality),
and 20 buttons.
ROBUST DESIGN
Loupedeck CT has an anodized black aluminum front plate and dial caps. Backplate is made of industrial
plastic.
Square buttons have robust gaming switches underneath them, and round buttons use heavy usage dome
switches. All buttons are illuminated with RGB lights.
Both LCD displays are protected by long-lasting plastic covers (touchscreen including a touch grid).
INTERNAL STORAGE
Loupedeck CT has been equipped with a convenient internal 8 GB memory unit. You can transfer your
projects or other important files between editing locations such as your home and studio. You can also store
your personal profiles into the device to use them wherever you go.
BLUETOOTH
Loupedeck CT is equipped with Bluetooth capability. It will be made available via a later software update.
DETACHABLE USB CABLE
Loupedeck CT is equipped with:
• 1m detachable USB cable.
LOUPEDECK CT CONSOLE
Loupedeck CT’s control elements are: Six rotatable Dials (with a press function), Touch Screen (with
Touch Buttons), eight Round Buttons, twelve Square Buttons and a rotatable Wheel (paired with a touch-
sensitive Wheel Screen). These five elements have been divided into two groups.
Group 1: General elements
Group 2: Workspace elements
Copyright (c) 2017 Loupedeck Ltd. All rights reserved. 3

GENERAL ELEMENTS
The second group, general elements, contains
functions that are needed throughout your creative
process (e.g., Save and Navigation arrows). These
buttons do not change when workspace is changed.
a. Round buttons
b. Square buttons
WORKSPACE ELEMENTS
This group is controlled by workspaces. Every
workspace has an individual set of controls (e.g.,
dials in rating workspace are different from dials in
color adjustment workspace).
a. Dials
b. Touch buttons
c. Wheel (incl. touch screen)
General Elements
Round Buttons when using Lightroom Classic, are dedicated to navigating between workspaces. Round
buttons have a number from 1 to 8, and they change their color according to the assigned action type (e.g.,
green indicates workspace).
NOTE! If workspace links were assigned under touch buttons, for example, they could not be reached when
workspace is changed, as the content of touch buttons would change.
Square buttons, are dedicated to the most used actions that are needed from time to time regardless of
the activated workspace or Lightroom module (e.g., Library, Develop).
Square buttons, unlike round buttons, are prelabeled to indicate a set of actions that are, in fact,
Copyright (c) 2017 Loupedeck Ltd. All rights reserved. 4

common amongst almost every editing software (e.g., save, enter, navigation arrows).
Like round buttons, square buttons are illuminated with RGB color LEDs and they change color according to the
assigned action type (e.g., purple indicates an action).
Workspace Elements
Dials are prioritized for the most used adjustments (e.g., Exposure in Basic Adjustments workspace). Dials also
have a press function that is, in most cases, bind for resetting adjustment value (e.g., pressing contrast dial will
reset contrast back to zero).
TIP! If you don’t need resetting a value, you can assign a different press function to dials. E.g., setting
auto tone action as press function for exposure dial, and Auto White Balance as press functions for
temperature and/or tint dial(s), will speed up your editing process!
Touch Buttons (on touch screen) contain most used actions within every workspace (e.g., Rate 3 Stars in
Rating workspace). Some workspaces have several pages of different actions. These pages are linked to the
workspace’s first touch page for easy and quick access without the need to swipe the screen horizontally.
In some workspaces first touch page also contains page links for dials or the wheel. Usually these links are for
tool sets that are not commonly used (e.g., camera calibration wheel in Color Adjustments workspace).
Wheel contains both rotation capability (wheel ring) and touch capability (wheel screen). In almost every
workspace the wheel has a selector, a menu, for different sets of tools. E.g., Basic Adjustment workspace has a
wheel selector for: Tone Curve, Noise Reduction, Sharpening and Vignetting tools. Pressing one of these links will
open a set of tools that are used with the wheel.
Some workspaces have a smaller set of adjustments or actions dedicated to the wheel. In those cases, actions
and adjustments are assigned to the wheel without a selector menu (e.g., Rating Workspace has Grid View,
Loupe View and Rate 3 stars).
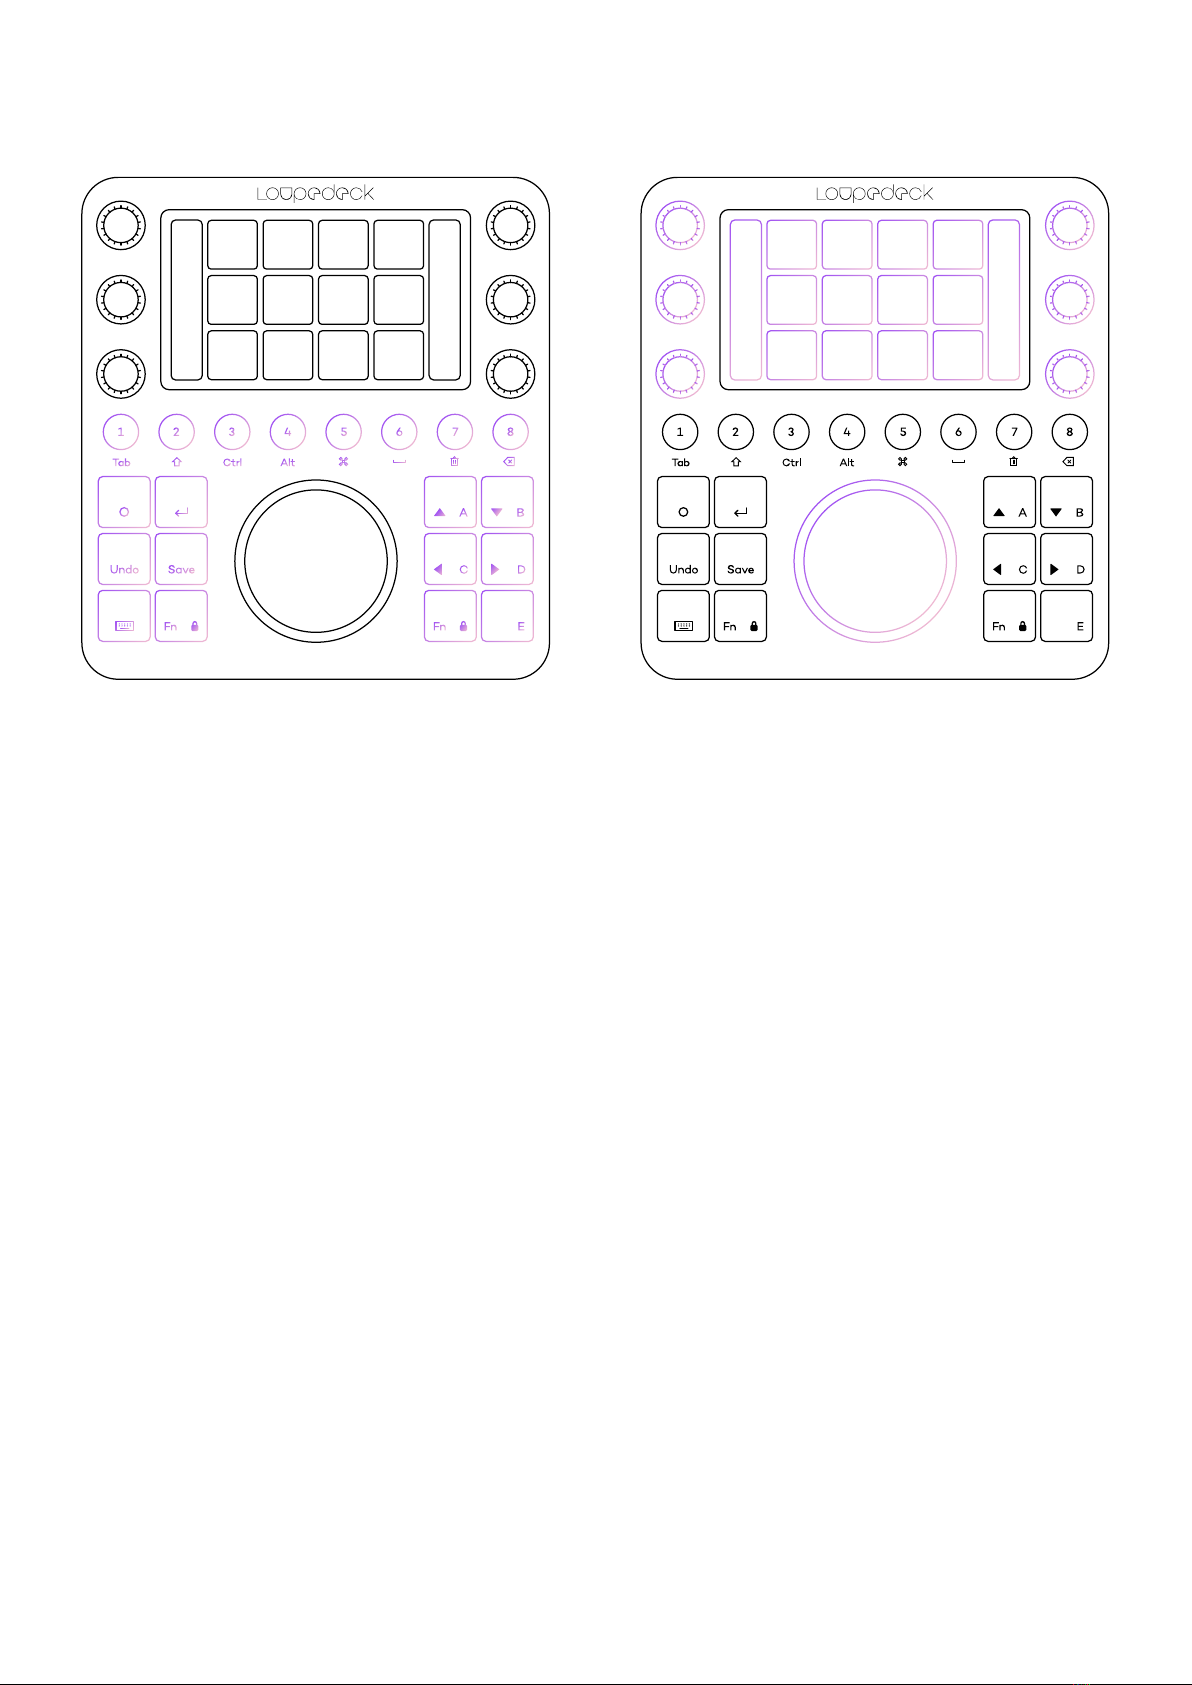
ROUND & SQUARE
BUTTONS
Although Loupedeck CT’s default profile for Lightroom utilizes
square buttons for common actions (e.g., enter) and round
buttons for navigating between workspaces, in addition to that,
there are some common actions also assigned to round buttons
– those actions are needed every now and then, regardless of
the activated workspace (e.g., before / after).
In this chapter we go through all the actions that are assigned
to both square and round buttons, not forgetting useful tips on
how to boost your own workflow!
Copyright (c) 2017 Loupedeck Ltd. All rights reserved. 5

OPTION NAME ITEM WHAT CAN YOU DO WITH IT?
Square Buttons
(generally) General information
Square buttons are prioritized for most common functions
needed from time to time in your editing process.
Square buttons are mainly pre-labeled, including buttons
that are customizable, because in every supported software
these buttons function very similarly if not exactly the same
way. E.g., Save button contains saving or exporting functions
regardless of the supported software.
Square
Buttons
(fixed)
Home ( O )
FN + Home
Home button has multiple functions when using Lightroom.
Pressing home button will work in four stages depending on
what is currently active.
Press Home ( O ) to:
- Show first pages within a Local Tool (e.g., Crop Tool)
- Apply and exit Local Tool(s)
- Show first pages of current workspace
- Jump to Home View
Special function for Home button:
Press FN + Home to activate System plugin for controlling
OS-specific functions – e.g., screen brightness (laptops),
media and desktop controls. When working with System
plugin: Press Home again to activate previously used editing
software, in this case: Lightroom.
TIP! You can use Home View as your workspace “browser”,
an easy access point to any of your workspaces, and assign
more commonly used actions to round buttons (e.g., Full
Screen), instead of using them for navigating between
workspaces!
Press Enter ( )
to apply “OK” for
opened dialogs.
Press FN + Enter (
) to apply ESC for
cancelling dialogs.
Click Keyboard Mode to set Keyboard Modifiers mode ON or
OFF.
Works only for Loupedeck+.
Copyright (c) 2017 Loupedeck Ltd. All rights reserved. 6

OPTION NAME ITEM WHAT CAN YOU DO WITH IT?
Keyboard ( ),
FN + Keyboard
Press Keyboard button ( ) to change round buttons as
keyboard modifiers (indicated below the buttons – e.g., Tab,
Shift, Ctrl etc.). Press Keyboard button again to exit keyboard
modifiers and set round buttons back to how they are
assigned.
TIP! You can also use keyboard modifiers by keeping
Keyboard button pressed down (e.g., Press keyboard + 7 for
deleting a single image). This method does not activate
keyboard modifiers for all round buttons.
Press FN+Keyboard button to activate Number Pad mode.
Press FN+Keyboard button again to exit Number Pad mode.
FN,
FN + FN
Press FN + Round buttons to access second level of actions
and links.
Press FN + Square buttons to access second level of actions.
Press FN + Rotate the wheel to navigate lists or action cakes.
Press FN + FN to lock wheel screen swipe to prevent
accidental navigation to previous or next wheel page. Press
FN + FN again to release the lock.
Press FN + Swipe wheel screen for navigating to previous or
next Wheel page(s).
Square Buttons
(customiz-able) Undo
FN + Undo
Buttons in this set are fully customizable, and you can
reassign them to better fit your requirements. Some buttons
have a paired function accessible by pressing FN (e.g., Undo
-> Redo).
Press Undo to jump to the previous state of Lightroom history.
Press FN + Undo to Redo previous undone history state.
NOTE! Every adjustment has a 1-second delay before the
change is written into Lightroom history. If you press Undo
before state change is visible in the history, the changes will
not take effect and the previous visible state in history will be
also undone.
Save,
FN + Save
Press Save to open Export Dialog.
Press FN + Save to activate “Full Resolution” export preset.
TIP! Instead of using Exporting Workspace for your most used
single image export presets, customize those export presets
to Save and FN + Save buttons. That way you can export
individual images on-the-go much faster!
Copyright (c) 2017 Loupedeck Ltd. All rights reserved. 7

OPTION NAME ITEM WHAT CAN YOU DO WITH IT?
A ( ),
B ( ),
C ( ),
D ( ),
E
FN + A ( ),
FN + B ( ),
FN + C ( ),
FN + D ( ),
FN + E
Square Buttons from A to E are used for most common
actions needed in Lightroom.
Press A ( ) to navigate upwards.
Press B ( ) to navigate downwards.
Press C ( ) to navigate left.
Press D ( ) to navigate right.
Press E to toggle zooming image in/out.
Press FN + A ( ) to select all images.
Press FN + B ( ) to unselect all images.
Press FN + C ( ) to select image on the left.
Press FN + D ( ) to select image on the right.
Press FN + E to show image’s info as overlay.
Round Buttons are prioritized for navigating between
workspaces in addition to some very useful general functions
(e.g., using ALT + arrows for navigating within zoomed
image).
TIP 1! After navigating between pages, press workspace
button to set first pages to every workspace element. This
works the same way as pressing Home button.
TIP 2! If you use workspaces based on your workflow - assign
them to round buttons in your process order. Then just go
forward by pressing 1-2-3-4!
TIP 3! If you use workspaces based on Lightrooms panels, pair
your workspaces to round buttons intuitively using second
level with FN button. This way it is easy to remember that for
example adjustments for controlling Tone are under the same
button:
- Basic Panel <-> Tone Panel
- HSL Panel <-> Split Toning Panel
- Details Panel <-> Effects Panel
- Lens Correct. <-> Camera Calibr
1: Rating
FN + 1: Rating
Advanced
Press 1 to access Rating Simplified (Library) workspace. This
workspace utilizes Lightroom’s Library module and contains
only the most necessary rating actions.
Press FN + 1 to access Rating Advanced (Library) workspace.
This workspace utilizes Lightroom’s Library module and
contains an almost full set of actions for culling, rating, color
tagging, flagging and making collections.
Copyright (c) 2017 Loupedeck Ltd. All rights reserved. 8

OPTION NAME ITEM WHAT CAN YOU DO WITH IT?
2: Basic
adjustments
Press 2 to access Basic Adjustments Workspace. This
workspace is dedicated to tone and other non-color-
related adjustments – e.g., sharpening, noise reduction and
vignetting.
3: Color Adjustment
(2)
Press 3 to access Color Adj. 2 workspace. This workspace is
prioritized for users needing precise color adjustments using
Hue/Saturation/Luminance functions.
Making B&W or color toned images is also done by using this
workspace.
Wheel has additional tools that are sometimes needed while
working with colors in Lightroom.
TIP! If precise HSL work is not needed, but color toning is a
priority – assign “Color Adjustm.” workspace to round button
3 instead of “Color Adj. 2”.
4: Keyboard
Modifier: ALT
When image is zoomed in: Keep round button 4 pressed and
use navigation arrows to navigate within the image area.
When Crop Tool is activated: Keep round button 4 pressed
and use navigation arrows to fine adjust crop area position.
Note! Pressing ALT and rotating adjustment dials will not
activate threshold view or Lightroom’s alternative adjustment
functions for Loupedeck.
LT keyboard modifier operates only if adjustments are used
via Lightroom’s Graphical User Interface with mouse - when
pressing ALT, panel information changes in GUI (e.g., Basic
Panel: Tone -> Reset Tone).
Copyright (c) 2017 Loupedeck Ltd. All rights reserved. 9

SETTING UP LOUPEDECK CT
Managing Loupedeck CT’s Workspaces, Pages and Actions is done by using the Loupedeck setup
application.
Launching Loupedeck Setup ( ):
• Windows:
• Task Bar:
• Right click taskbar menu arrow
• Double-click Loupedeck icon, or
• Right-click Loupedeck Icon and select “Loupedeck Setup..”
• Start menu
• Locate and click on “Loupedeck Setup”
• From some editing softwares
• See software specific manuals for more information
• MacOS:
• Menu Bar
• Click on Loupedeck Icon
• Select “Open Setup..”
• Application Folder
• Locate and click on “Loupedeck”
OVERVIEW OF THE LOUPEDECK SETUP SOFTWARE
Loupedeck Setup has been divided into three main areas:
A. Left section contains all the content you can assign to the device
B. Middle section contains the device and its elements that you configure
C. Right section contains all the pages of the currently selected element (e.g., touch buttons in this
picture)
Copyright (c) 2017 Loupedeck Ltd. All rights reserved. 10

1. Loupedeck Settings ( ) and Quick Guide
(Guide)
2. Search for the content you wish to assign (drag
and drop on the Loupedeck CT)
3. Groups containing assignable Workspaces,
Actions, Tools and Pages
4. Select the workspace or general element to be
configured (e.g., dials)
5. Notification bar
6. Loupedeck CT console
7. Select your Loupedeck device that you want to
configure
8. Select the application you want to configure
9. Select the page you want to configure
10. Device status
1 3 4 6 7 8 9 102 5
Copyright (c) 2017 Loupedeck Ltd. All rights reserved. 11

WORKING WITH WORKSPACES
A Workspace can be considered as a collection of
tools, for example (e.g. Brush Workspace), or part of
your workflow (e.g. Colour Grading Workspace).
A Workspace controls three workspace elements:
Dials, touch buttons, and the wheel. When you
change from workspace to another, the content of
those three elements change.
Create your own Workspace
• Open the Workspace main group
• Click on the + sign (cyan circle ) to create a
workspace
• New workspace is created and added to the
bottom of the list
• You can arrange workspaces within the
workspace list by dragging them upwards or
downwards.
Assigning Workspaces to Loupedeck CT
• Select the element tab or click the element
on the device to which you want to assign a
Workspace:
• Touch Buttons
• Round Buttons
• Square Buttons
• Open Workspace main group
• Drag and drop workspace from the group to the
button you want to assign it to.
Configure your workspace
• Select a workspace from Workspace group, or
• Select an assigned workspace from the device
• Drag and drop actions from the left column to
the device, or remove actions by dragging them
out of the device (see next chapter: Assigning
Action to Loupedeck CT)
• Rename your Workspace by clicking on the pen
image ( )
• Remove your Workspace by clicking on the trash
can image ( )
Configure your Home View (workspace)
• Select Home from the top of workspace list
• Open other workspace groups (if any) within the
workspace list (under Home), and/or
• Drag and drop workspaces on top of the touch
screen
Copyright (c) 2017 Loupedeck Ltd. All rights reserved. 12

ASSIGNING AND REMOVING
ACTIONS
Actions activate different tools and functions within
the editing software (e.g., activate a brush tool,
add a marker etc.). You can add and remove these
activations (actions) to and from the Loupedeck CT
device to best match your own workflow.
Assign an action to the device
• Select workspace or general element you want to
configure
• Click either the element on the Loupedeck CT
image or the element tab
• Drag and drop action from the left column
• Search for a desired action using search bar
on top of the action group list.
• Find the desired action manually by opening a
corresponding group:
• Workspaces, Actions, General Actions, Tools or
Pages
Remove an action from the device
• Select the workspace or general element you
want to configure
• Select the page (if there are more than one page,
see the next chapter: Working with Pages).
• Drag and drop assigned functions out of the
device to an empty area around the Loupedeck
CT image (red circle)
WORKING WITH PAGES
As you drag Actions to the Loupedeck CT, you are
adding them to a page. Every element has at least
one page (e.g. Dial Page, Touch Page, Wheel Page).
When one page is full of assigned actions, you can
create a new page for more actions. The number of
available pages has not been limited.
Selecting a page
• Select the element (e.g. Touch Buttons)
• Click on the desired page on the right-side
section
Copyright (c) 2017 Loupedeck Ltd. All rights reserved. 13

Creating a new page
• Select the element (e.g. Touch Buttons)
• Scroll down on the Page List (if there
are several pages)
• Click on the + sign to create a new
page.
Tip! Rename pages to describe the content
of the page, but also the element type, e.g.,
Tool Parameter Dials, Color Tools Page or
Navigation Wheel.
This helps if you use Page Links on Touch
Buttons – Page link will include your page’s
name.
Assigning Page Links
When a page is created, its Page Link can be
found under a relevant Pages group.
Content within the Pages group is
Workspace-specific: it only contains the
pages of the selected workspace.
You can use Page Links on the device (e.g.,
Touch Buttons) to quickly access certain
pages without swiping the screen.
Copying a Page from a Workspace to another
is not possible.
Copyright (c) 2017 Loupedeck Ltd. All rights reserved. 14

SETTINGS
Loupedeck CT settings can be accessed from Loupedeck Setup’s bottom left corner clicking a wheel
symbol ( ).
SETTING GROUP NAME SETTING WHAT CAN YOU DO WITH IT?
Profiles
Profile
Import/Export
Profile contains all workspaces, assigned adjustments and
actions. Every supported software has a profile.
Press Export to save or backup your editing software’s profiles.
Profiles can be shared and loaded to another computer to be
used in Loupedeck software.
Press Import to load profile to your Loupedeck system. Loaded
profile is immediately ready to be used
TIP! Remember to back-up your personal profiles before
importing!
Reset Plugins
Press Reset Plugins to open a dialog for selecting which profiles
you want to reset.v
Reset profile contains factory default workspaces and actions.
Note! Factory Default profile might be different in newer
software versions.
Device Configuration
Connected
Device(s)
Serial Number
Display Name
Flash Drive
Vibration
Bluetooth
Select which connected device you want to set up.
Device is identified via serial number.
What Loupedeck Model is in use.
Set switch to OFF if you do not want to have “hard drive
connected” notification when connecting Loupedeck CT to a
USB port.
Set switch to OFF if you do not want to have haptic feedback
when using touch screens.
Bluetooth will be available with a later software update.
Currently Bluetooth is set to OFF and Loupedeck CT cannot be
found by other Bluetooth devices.
Bluetooth Settings Currently there are not Bluetooth options.
GUIDE
Loupedeck CT has an integrated Quick Guide for presenting key points how to use the Loupedeck setup
software and Loupedeck CT console.
Quick Guide can be accessed by pressing Guide link at the bottom left corner of the Loupedeck Setup
software. Quick Guide is closed when Guide -link is pressed again.
Copyright (c) 2017 Loupedeck Ltd. All rights reserved. 15

USER ACTIONS
With Loupedeck Setup Software you can make
pressable User Actions to match your
requirements. User Actions are able to run multiple
commands which makes it a powerful tool for
making automations or even small processes.
WHAT IS AN USER ACTION?
• User Action can be a single command or a set
of multiple commands binded as one action.
• User Actions are recorded by the user and can
be assigned to a button, touch button or dial
press like any other action.
WORKING WITH USER ACTIONS &
USER ACTION GROUPS
• First select an element with press action. If you
select wheel or dial element, select “press”
instead of “rotation” from the top of the action
category list (magenta circle ).
• Locate “User Actions” category from the
bottom of left side’s action category list.
• All User Actions are divided into groups within
the user action category (green markers ).
Note! Not all application profiles have added
User Actions by default.
CREATING & EDITING GROUPS
• Press “+” (cyan circle ) to create a new
group (e.g. New Group, see image). User Action
creation window appears. Saving a User
Action will automatically add “New Group”
including the new User Action.
• Press “Pen”-icon ( ) to rename a group
(orange circle ).
Copyright (c) 2017 Loupedeck Ltd. All rights reserved. 16

• Move user action from a group to another by
dragging and dropping (orange arrow).
• To merge two User Action Groups: Press “pen”-
icon ( ) to rename the source group with the
same name as the target group.
• To delete a group and all groups content: Press
“Trash can” -icon ( ) (magenta circle ).
CREATING USER ACTIONS
• Press “+” (cyan circle ) to create a new
User Action inside an existing group (e.g. New
Group). After pressing “+” User Action creation
window appears.
• Give User Action a short and self explanatory
title by typing it into the title box (green
marker ). User Action title is shown on the
screens (green circle).
Tip! Using “\n” command within the text acts
as “enter” forcing text to multiple rows on the
touch screen: “My\nAction\n1”
• User Action creation window automatically
contains first (1) User Action command line
(orange circle ).
• By default User Action’s command line type is
set as “Shortcut” (purple circle ).
• Start recording a shortcut by clicking the first
command line or,
• Drag an existing action from one of the left
side’s group (purple arrow) on top of the
command line. Action can be dragged from
any of the action category groups (outcluding
User Actions).
Tip! Dragging an action over (any type of)
command line will automatically change
command line’s type to “Action”.
Copyright (c) 2017 Loupedeck Ltd. All rights reserved. 17

• You can add a new command line by pressing
“+” -bar at the bottom of the action creation
window (purple circle ).
Tip! Create a new action command line by
dragging action from left side’s action list over
the “+” -bar (magenta arrows).
• If a command line has been left open, “OK”-
icon (yellow circle ) has not been pressed,
pressing “Save” on the User Action creation
window will discard all open command lines.
EDITING USER ACTIONS
• Press “Wheel”-icon ( ) to start editing an
existing user action (magenta circle ).
• Rename user action by clicking the title
(orange marker ).
• Record a new shortcut by double clicking a
command line (cyan marker ) or press
“pen”-icon ( ) (cyan circle).
• Change the command order within the
user action by dragging and dropping any
command line over another (magenta arrows).
• Press trash can (green circle ) to delete
current row within the User Action.
Copyright (c) 2017 Loupedeck Ltd. All rights reserved. 18

USER
ADJUSTMENTS
Rotetable User Adjustment is a powerful addition
to User Actions. With User Adjustments you can
easily control adjustments that have changing
values, e.g. sliders. User Adjustments can be build
from existing actions or of individually recorded
shortcuts to left- and right rotations.
WHAT IS AN USER ADJUSTMENT?
• User Adjustment is an action for rotation
elements such as dials and the wheel.
• User Adjustments are recorded by the user and
can be assigned to rotation elements like any
other existing adjustment.
WORKING WITH USER ADJUSTMENTS &
USER ADJUSTMENT GROUPS
• First select dial or wheel element and select
“rotation” instead of “press” from the top of
the action category list (magenta marker ).
• Locate “User Adjustments” category from the
bottom of left side’s adjustment category list.
• All User Adjustments are divided into groups
within the user action category
(green markers ).
Note! Not all application profiles have added
User Adjustments by default.
CREATING & EDITING GROUPS
• Press “+” (cyan circle ) to create a new
group (e.g. New Group, see image). User
Adjustment creation window appears. Pressing
“save” will automatically add “New Group”
including the new User Adjustment
• Press “Pen”-icon ( ) to rename a group
(orange circle ).
Copyright (c) 2017 Loupedeck Ltd. All rights reserved. 19

• Move user action from a group to another by
dragging and dropping (orange arrow).
• To merge two User Action Groups: Press “pen”-
icon ( ) to rename the source group with the
same name as the target group.
• To delete a group and all groups content: Press
“Trash can” -icon ( ) (magenta circle ).
CREATING USER ADJUSTMENTS
• Press “+” (cyan circle ) to create a new
User Adjustment inside an existing group (e.g.
New Group 2, see image).
• User Adjustment creation window appears.
• Activate shortcut recording by clicking the first
Adjustment Action command line (orange
marker ) or,
• Drag an existing action from left side’s action
list (purple arrow) on top of the command line.
Note! By default User Adjustment’s command
lines types are set as “Shortcut”
(purple circle ).
Tip! Dragging an action over a “shortcut”-
type command line will automatically change
the command line type to “Action” and
simultaneously assign dragged action.
• Give User Adjustment a name by typing it
to the title box (green marker ). As dial
display is quite narrow, use “\n” between every
word to force text into multiple rows
(e.g. My\nDial\n6)
• User Adjustment creation windowd has an
optional “Action Before Rotation” command
line (yellow marker ).
Note! If the adjustment is located in specific
panel (within the target software), this
command line can be used to open that panel
when rotation adjustment is used.
Copyright (c) 2017 Loupedeck Ltd. All rights reserved. 20
Other manuals for LOUPEDECK CT
1
Table of contents
Other Loupedeck Dj Equipment manuals