Loyalty-Secu LY-MPS-N01 User manual

Shenzhen Loyalty-Secu Technology Co., LTD
Network Print Server
User Manual
(2021-03 Version)

Shenzhen Loyalty-Secu Technology Co., LTD
www.loyalty-secutech.com
Contents
1 Summary.....................................................................................................................2
1.1 Product Main Features .........................................................................................2
1.2 Product Description..............................................................................................3
1.3 Product Series.......................................................................................................3
2 Technical Specifications.............................................................................................3
2.1 Technical Parameters ...........................................................................................3
3 Interfaces Instruction ..................................................................................................4
4 Network Configuration Instructions...........................................................................5
4.1 Configuration Tool Preparation ...........................................................................5
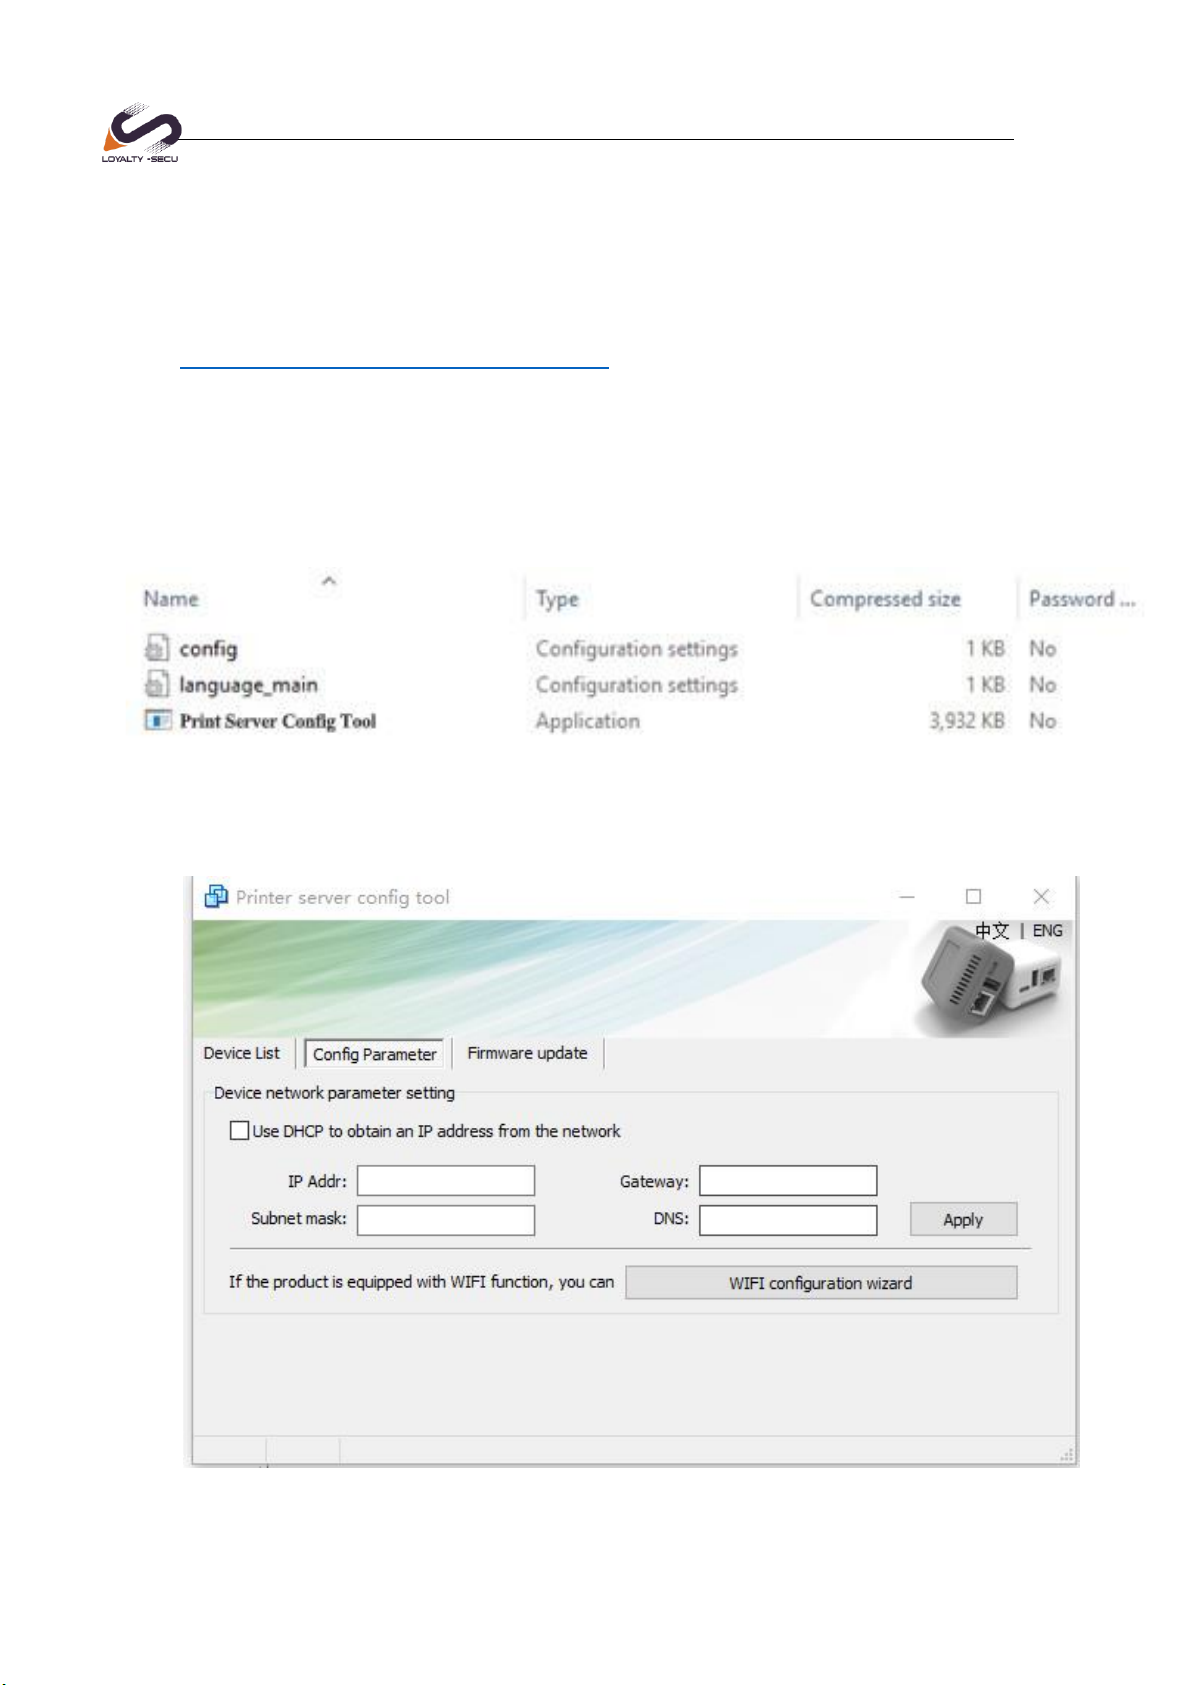
4.2 Configuration Tool File Description....................................................................5
4.3 Preparation Before Using.....................................................................................6
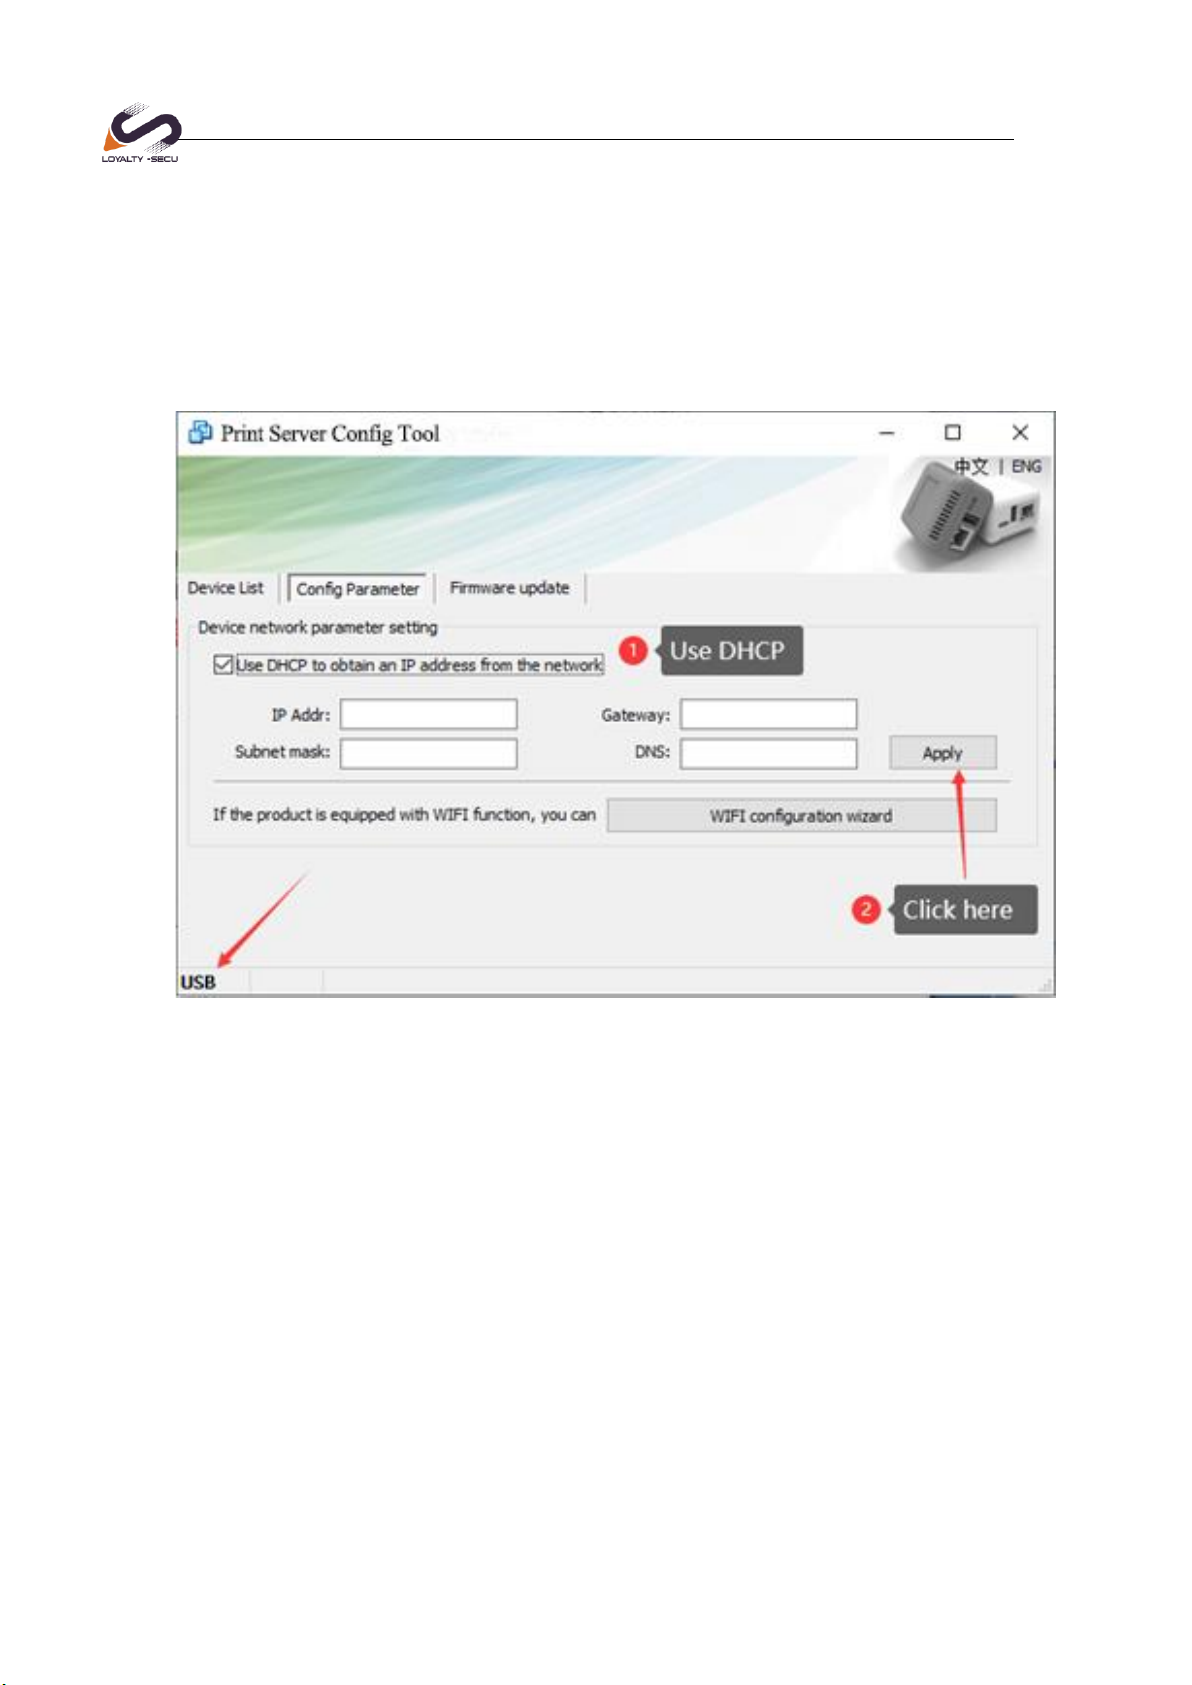
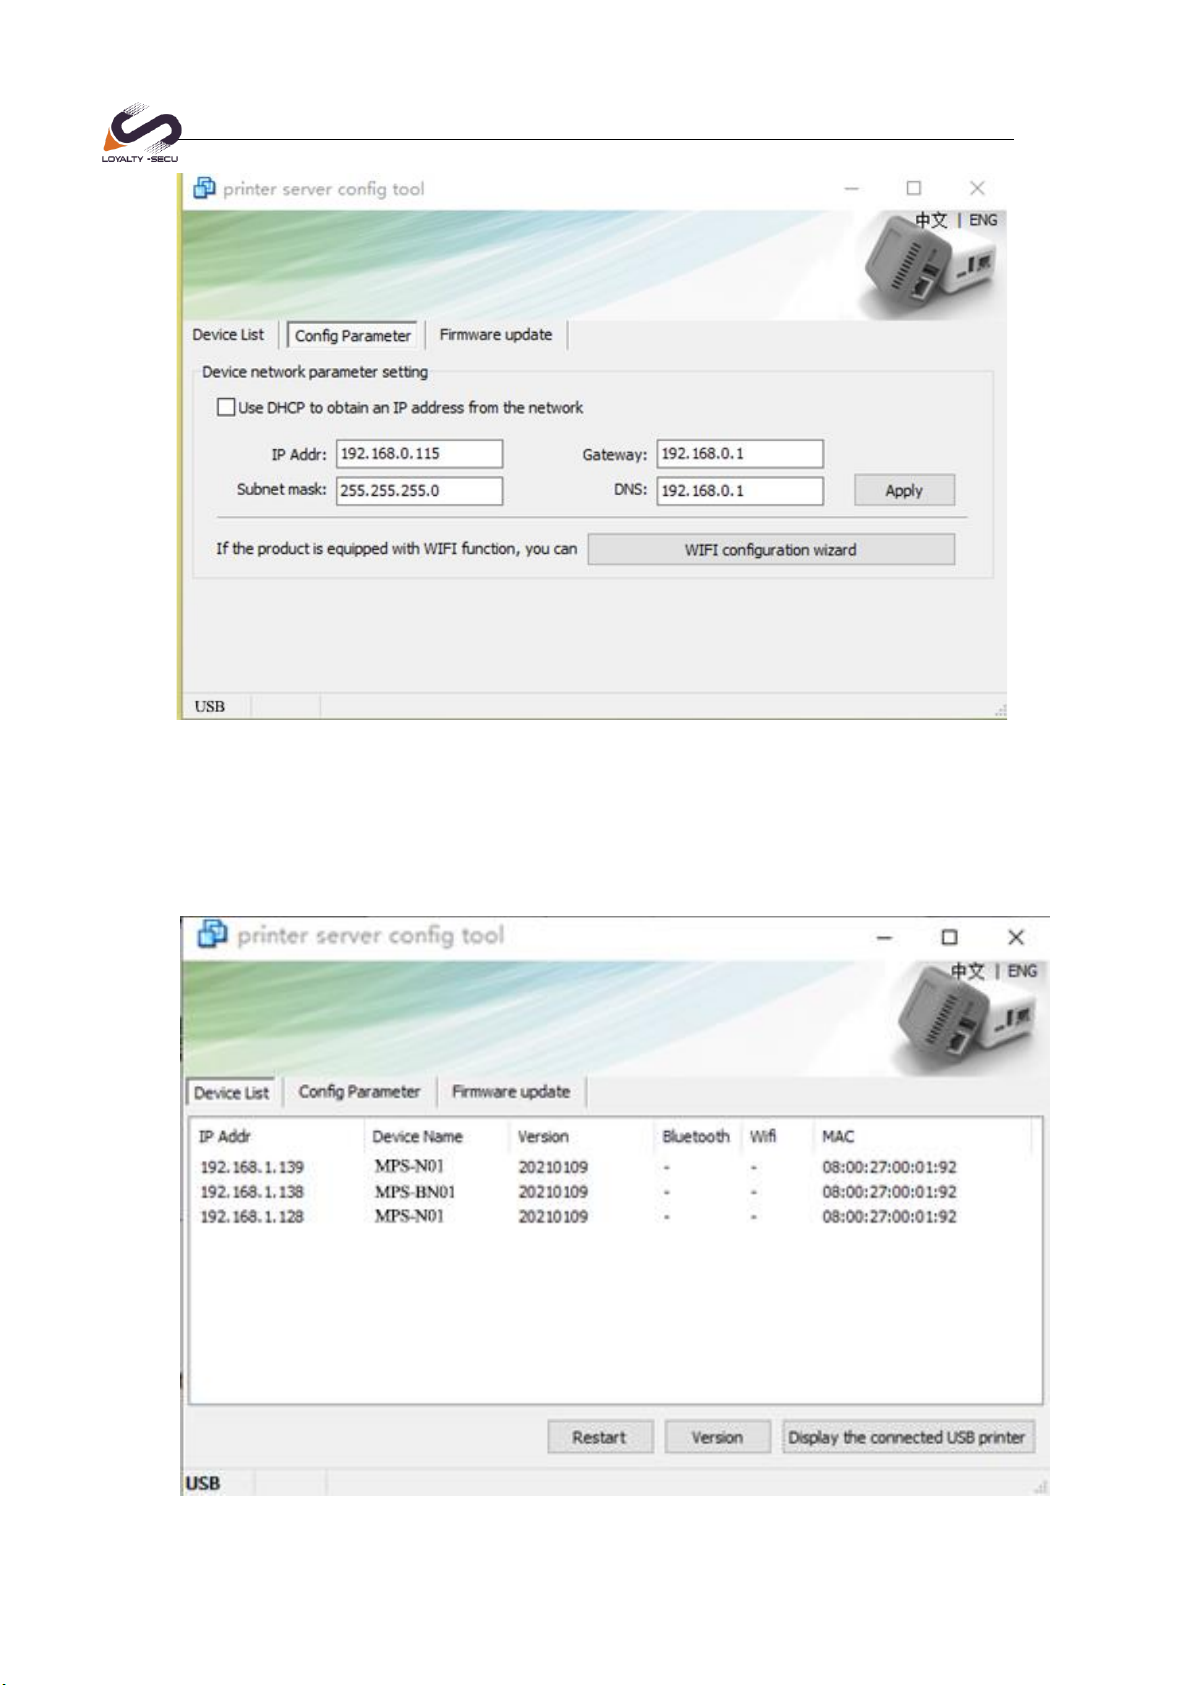
4.4 Set the Ethernet IP Address of the Print Server...................................................7
4.5 Query Current Status..........................................................................................10
4.6 WiFi Parameter Configuration...........................................................................11
4.7 Print Server Port.................................................................................................13
5 WINDOWS Printer Driver Installation Example.....................................................13
5.1 Install the Printer Driver.....................................................................................13
5.2 Configure the Printer Port..................................................................................13
1Summary
1.1 Product Main Features
Standard 100M network interface
Small Size: 53x53x40mm
Default Configuration: RJ-45 LAN Port, WiFi/Bluetooth version is available
Communication Method: USB 2.0 interface.
Support Multi-users sharing one printer of a wireless network simultaneously.

Shenzhen Loyalty-Secu Technology Co., LTD
www.loyalty-secutech.com
Simple and compact design, low power, small footprint, easy to carry.
Can print directly from operating the mobile phone (work with PrinterShare or
Printhand APP), support to print files, photos directly via APP.
1.2 Product Description
LY-MPS-N01 is a Mini USB Print Server, a 10/100Mbps Ethernet to USB 2.0
Network LPR Print Server, after connected to the local area network (LAN) through
the RJ45 network cable, it is an independent network device in LAN, which allows
multiple computers in the local area network to share a USB printer. It’s replacing the
computers which worked as the print server with the high cost, spacy-occupying, high
energy consuming, not easy to manage later disadvantages. Allowing users to use
mobile phones, tablets, computers or other devices to print files.
1.3 Product Series
Loyalty-Secu Network print servers with 3 versions for option:
Model
Communication Method
Remarks
LY-MPS-N01
Ethernet
RJ45 LAN Port
LY-MPS-BN01
Ethernet &Bluetooth4.0
Support Android/IOS(BLE)
RJ45 LAN Port+ Bluetooth
LY-MPS-WN01
Ethernet &WiFi
RJ45 LAN Port+ WiFi
2 Technical Specifications
2.1 Technical Parameters
Product Parameters
CPU
ARM9
RAM
64MB DDR2

Shenzhen Loyalty-Secu Technology Co., LTD
www.loyalty-secutech.com
FLASH
128MB NANDFLASH
USB Printer Interface
USB2.0 HOST
USB Configuration Port
USB2.0 DEVICE
Network Port
10/100M
Bluetooth Interface
Classic Bluetooth +BLE (Bluetooth 4.0) optional
WiFi Interface
802.11BGN optional
Power Supply
DC 5V/1A
Product Dimension
53×53×40mm
Product Weight
25g
Packing Size
13.5×13.5×5CM
Packing Weight
160g
Operating Environment
Temperature -10°C~50°C Humidity 20%~85%
Storage Environment
Temperature -10°C~50°C Humidity 20%~85%
3 Interfaces Instruction

Shenzhen Loyalty-Secu Technology Co., LTD
www.loyalty-secutech.com
4 Network Configuration Instruction
4.1 Configuration Tool Preparation
Please download the configuration tool from Loyalty-Secu official website:
https://www.loyalty-secutech.com/download or contact our customer service to obtain
the configuration tool of the print server.
4.2 Configuration Tool File Description
The compression file package will be shown as below after decompression:
Double-click [Print Server Config Tool.exe] to configure the parameters, it’s no
need any software installation process, the interface will be as Image 1 shows:
Image 1

Shenzhen Loyalty-Secu Technology Co., LTD
www.loyalty-secutech.com
4.3 Preparation Before Using
A. A computer with WINDOWS operating system
B. A USB cable with TYPE C interface (Included in the packing box)
C. Print Server Config Tool (WINDOWS version)
Connect the print server to the computer via the USB cable, as the Image 2
shows:
Image 2
After connected to the computer, the print server will automatically power on
and start. The entire startup process takes about 20 seconds, then the print server
config tool will display USB sign in the lower left corner, indicating that the config
tool has been identified the print server as Image 3 shows:

Shenzhen Loyalty-Secu Technology Co., LTD
www.loyalty-secutech.com
Image 3
After configuring the corresponding parameters, remove the USB cable
between the print server and the computer. Starts the connection between several
devices as Image 4 shows:
Image 4
4.4 Set the Ethernet IP Address of the Print Server
Two ways for the print server to obtain the IP Address:
Method 1: Use DHCP to obtain an IP address from the network
Method 2: Obtain an fixed IP Address
The advantage of the method 1 is very simple and time saving, however, the
disadvantage is that it is easy to forget the IP address and may assign a different IP
address for the print server, brings the IP Address conflict problem.
For method 2, can assign a fixed IP address to the print server according to the
current network environment, this method is more reliable and stable((highly
recommended)), the users need to know their own network attributes.
※Tips for how to get an fixed IP Address※
Click "Start Menu---Run",or use the WIN+R key combination to call the run
window, enter “cmd” in the run window, click OK (As Image 5 Shows).

Shenzhen Loyalty-Secu Technology Co., LTD
www.loyalty-secutech.com
Image 5
After inputting “ipconfig”,click “Enter” button, then the IP Address, Subnet Mask,
Gateway information will be displayed as Image 6 shows:
Image 6
Network Segment: 192.168.0.xxx
Subnet Mask :255.255.255.0
Default Gateway: 192.168.0.1

Shenzhen Loyalty-Secu Technology Co., LTD
www.loyalty-secutech.com
Open the config tool and select the "Config Parameter" tab
A: If you use DHCP to obtain an IP address
Please check "Use DHCP to obtain an IP address from the network" as
shown in the Image 7:
Image 7
Click the “Apply” button, restart the print server, the print server will work successfully.
B: Assign a fixed address
Uncheck "Use DHCP to obtain an IP address from the network" and enter
fixed network parameters in the config menu. Different network environments will
have different parameters. Please obtain the corresponding information based on
the actual internet situation, as Image 8 shows:

Shenzhen Loyalty-Secu Technology Co., LTD
www.loyalty-secutech.com
Image 8
4.5 Query Current Status
On the "Device List" page, all the print servers will be listed in the current
network, as the Image 9 shows:
Image 9

Shenzhen Loyalty-Secu Technology Co., LTD
www.loyalty-secutech.com
4.6 WiFi Parameter Configuration
Note: Only the print server with WiFi function, can proceed on the WiFi
Wizard process.
In the "Config Parameter" page, click "WIFI configuration wizard" to
continue the WiFi setting as Image 10 shows:
Image 10
Click "Scan" to scan for nearby WiFi hotspots, the result will be displayed in the
drop-down list within 5 seconds, select the right WiFi hotspot you need to connect
to ,then click "Next", as Image 11 shows
Image 11

Shenzhen Loyalty-Secu Technology Co., LTD
www.loyalty-secutech.com
Enter to the WiFi Password Setting Menu, input the WiFi password and click
“Next”, as Image 12 shows:
Image 12
After connected to the WiFi internet, need to configure the WiFi Parameter to
obtain an IP address for the WiFi print server.
There also have two methods for getting an IP address for the print server:
Method 1: Use DHCP to obtain an IP address
Method 2: Obtain an fixed IP Address (the procedure is same as 4.4 above )
After confirming the parameter,please click “Modify network parameters” write
the parameter in to the WiFi module as Image 13 shows:

Shenzhen Loyalty-Secu Technology Co., LTD
www.loyalty-secutech.com
Image 13
After configurating the parameters, please restart the print server.
4.7 Print Server Port
The print server uses a standard RAW interface, the port number is 9100
5 WINDOWS Printer Driver Installation Example
When the network parameter configuration of the print server is completed, please
power on the print server, make sure it works under a stable condition.
5.1 Install the Printer Driver
Installing the printer driver is the same procedure as the normal USB printer
driver (will not explained here)
5.2 Configure the Printer Port
After installing the printer driver, select the newly installed printer in the
control panel, select the printer, and right click printer properties. As shown in the
Image 14/15/16, different operating systems may have some differences.

Shenzhen Loyalty-Secu Technology Co., LTD
www.loyalty-secutech.com
Image 14
Image 15
Image 16

Shenzhen Loyalty-Secu Technology Co., LTD
www.loyalty-secutech.com
Image 17 demonstrates an example of installing the HP 1020 printer for reference:
Image 17
After clicking “Add a printer”, choose and click “ The Printer that I want isn’t
listed” as Image 18 shows.

Shenzhen Loyalty-Secu Technology Co., LTD
www.loyalty-secutech.com
Image 18
Click the “Next ”button
Create a new port, and the type of port is “Standard TCP/IP Port”, Click the”
Next” button.
Then Click the “Next” button.

Shenzhen Loyalty-Secu Technology Co., LTD
www.loyalty-secutech.com
Click the “Next “button, then now start to install the printer driver
Well done.
The next step is to configure the printer properties, as shown in the Image 19

Shenzhen Loyalty-Secu Technology Co., LTD
www.loyalty-secutech.com
Image 19
After installing the printer driver, some printers come with the default IMF data format,
so we need to change it into RAW data format. Please refer to the Image 20:

Shenzhen Loyalty-Secu Technology Co., LTD
www.loyalty-secutech.com
Image 20
Now all settings have been completed, we can start to print a test page.
This manual suits for next models
2
Table of contents